Bur Oak Fairies

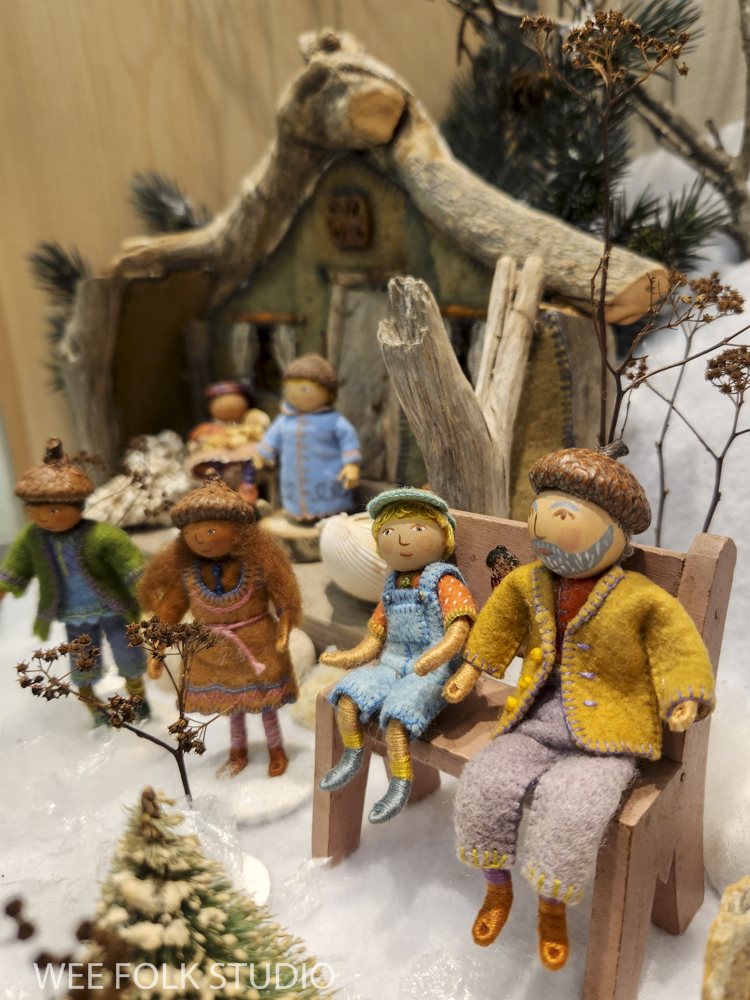
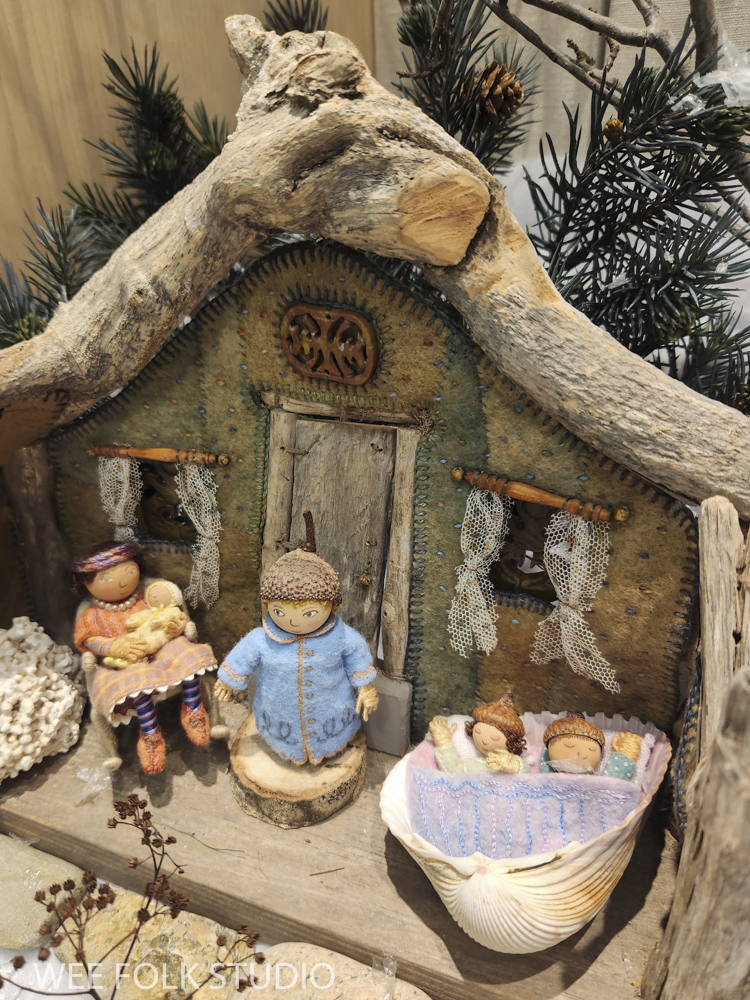
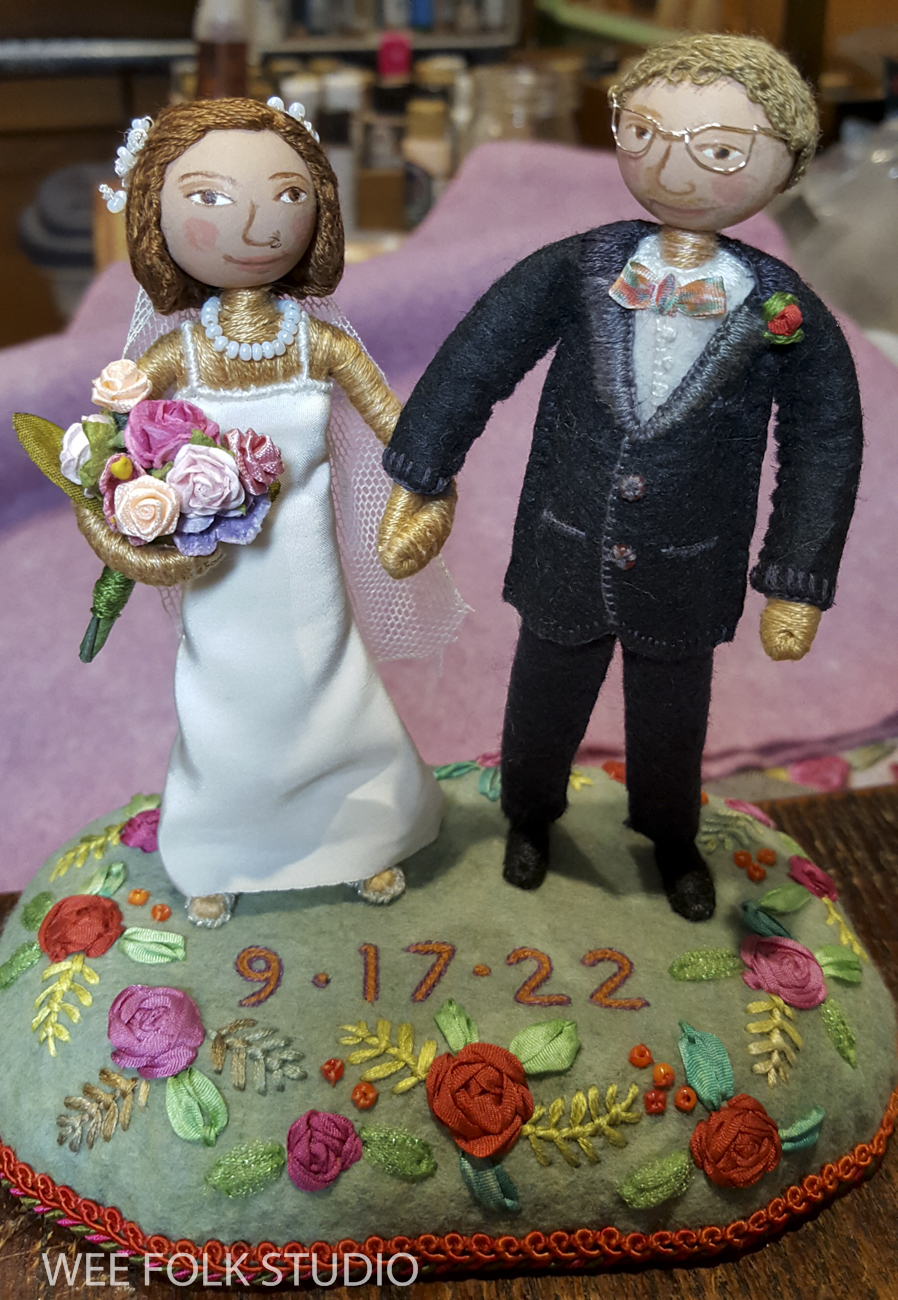
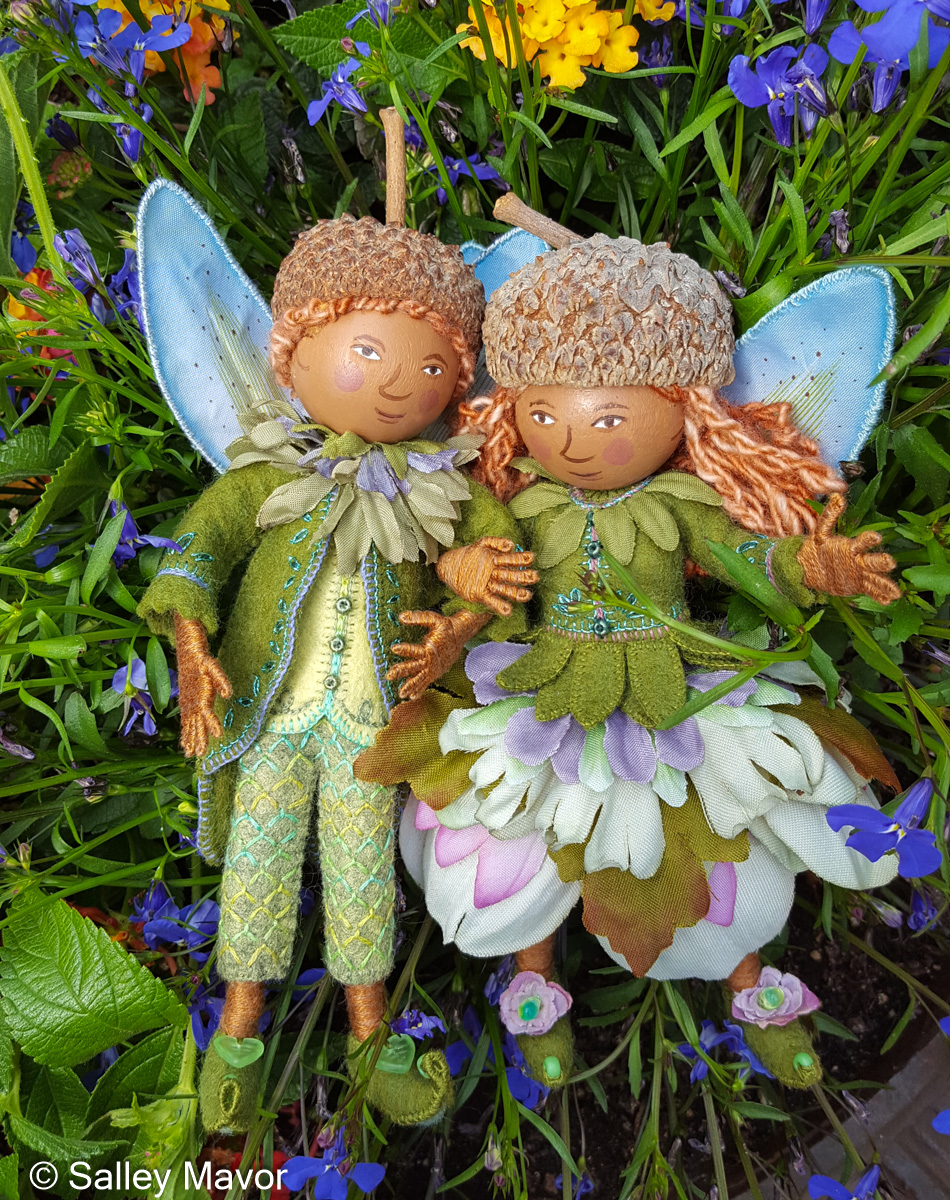
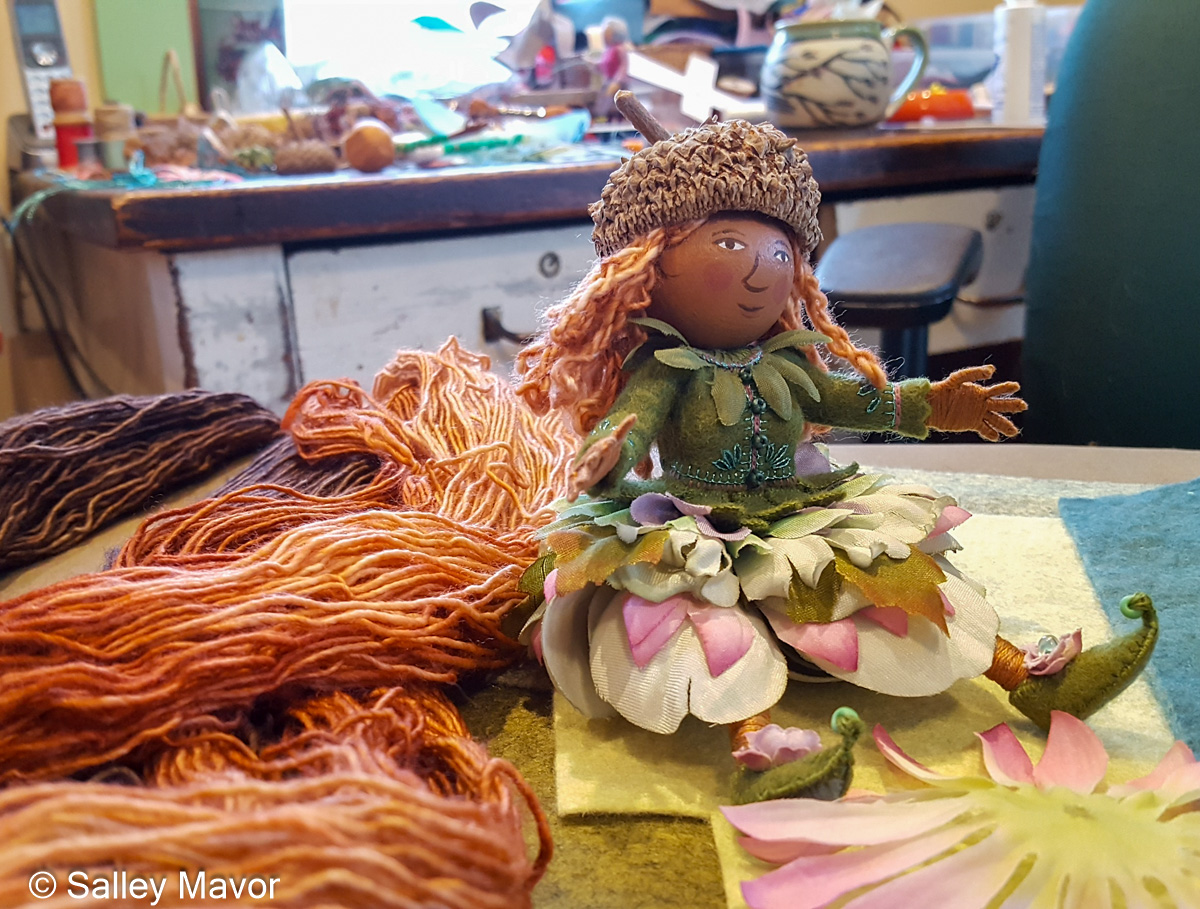
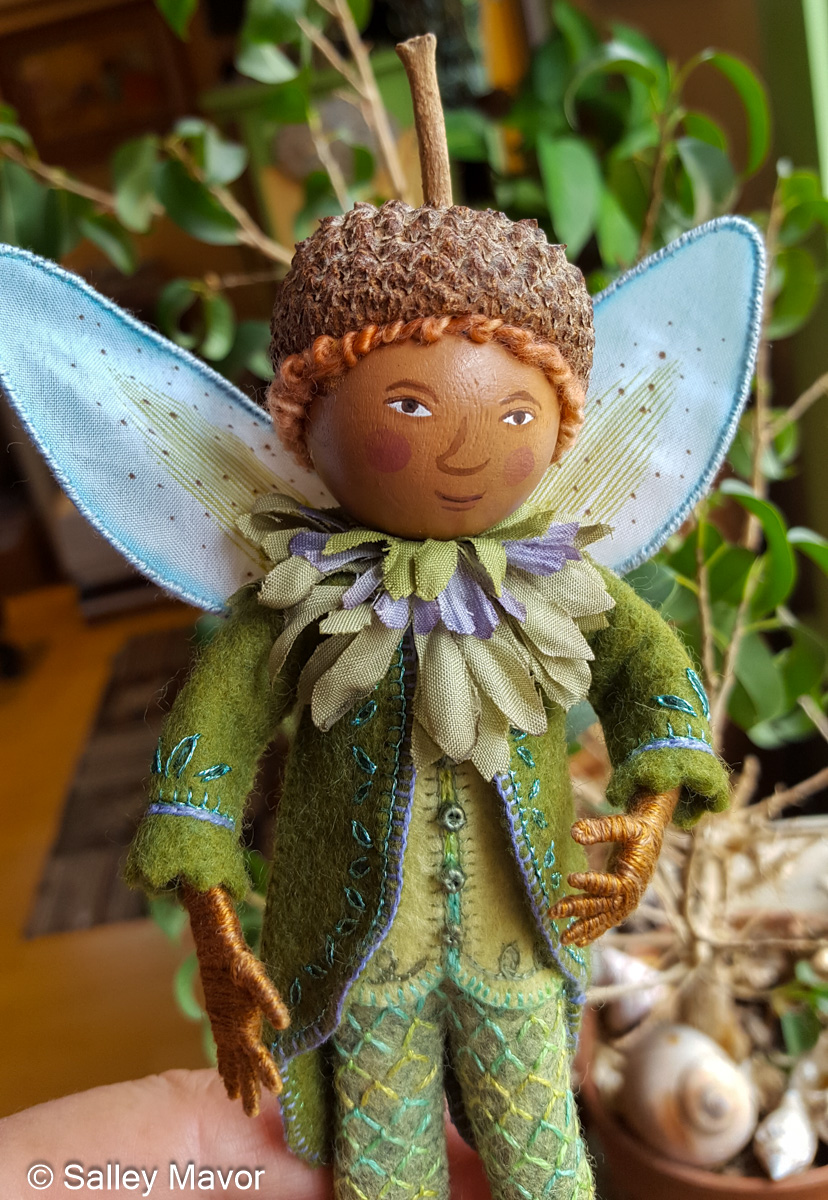
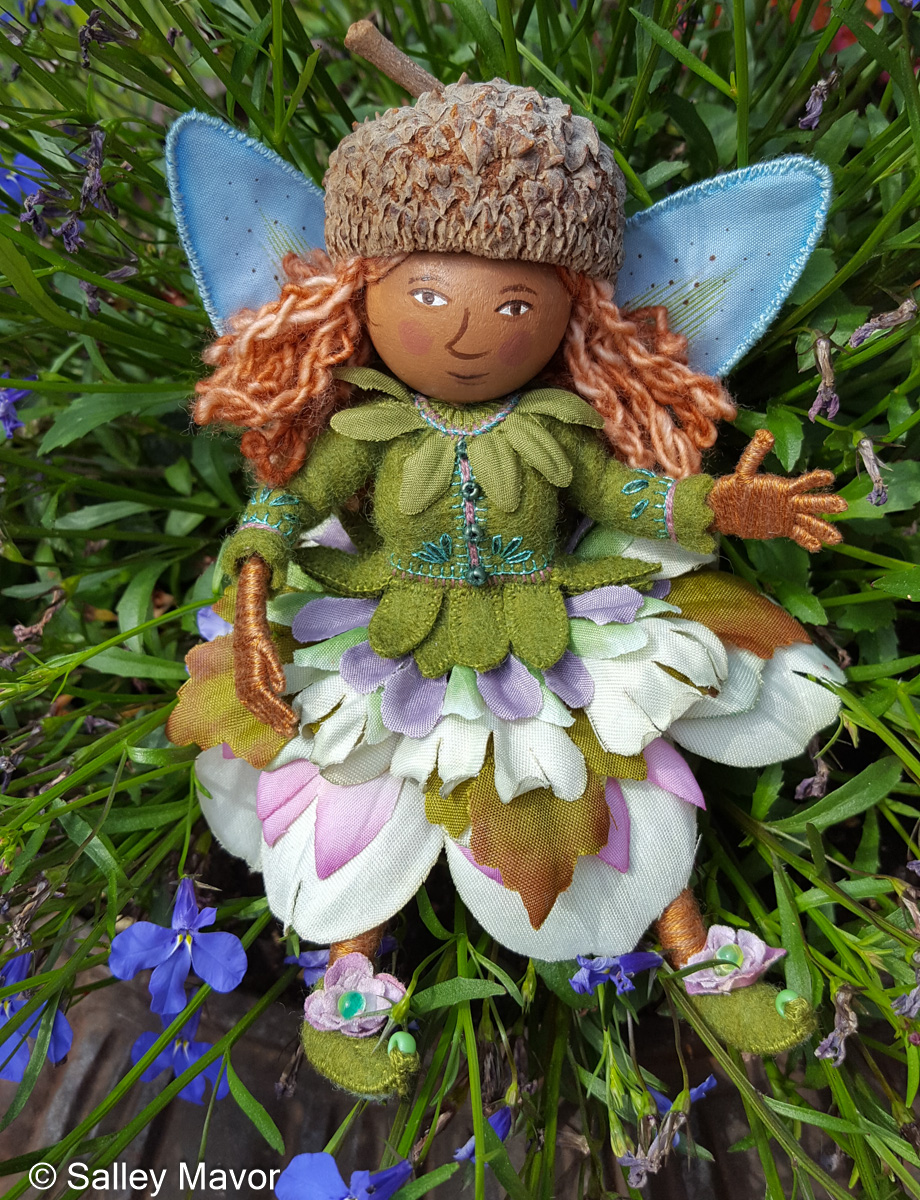
After a 4 year delay, I’m finally sharing photos, videos and commentary about how I made a pair of larger than usual fairies. A while back, a fan from the Midwest kindly sent a boxful of bur oak acorn caps. They are humongous compared to regular run-of-the-mill acorn caps that I used as hats for the 3-inch tall dolls in my how-to book Felt Wee Folk.

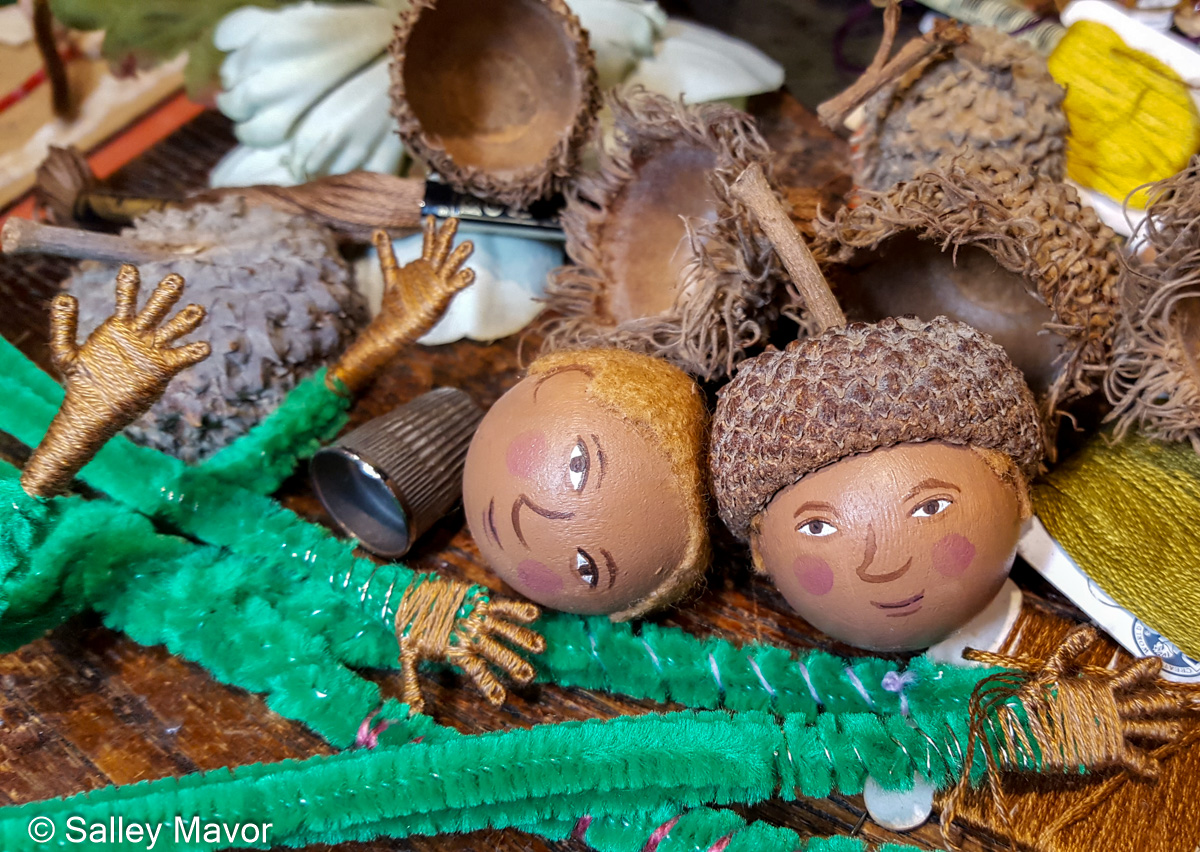
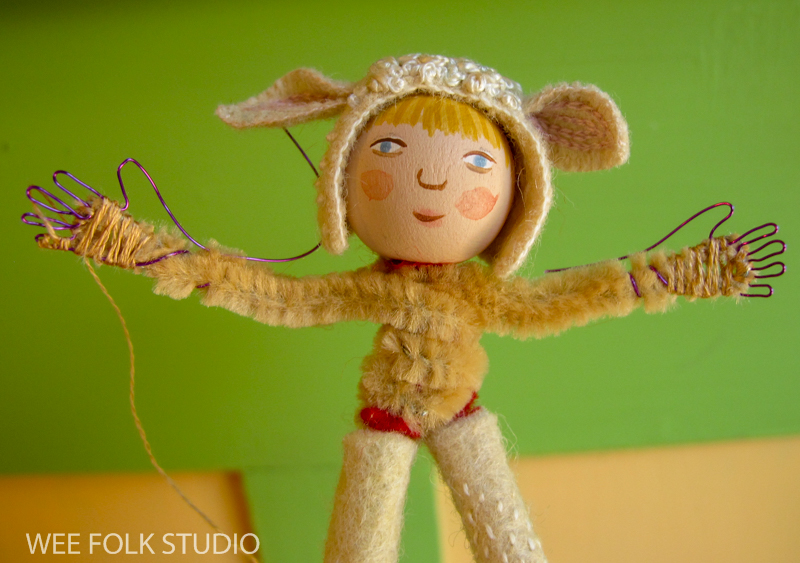
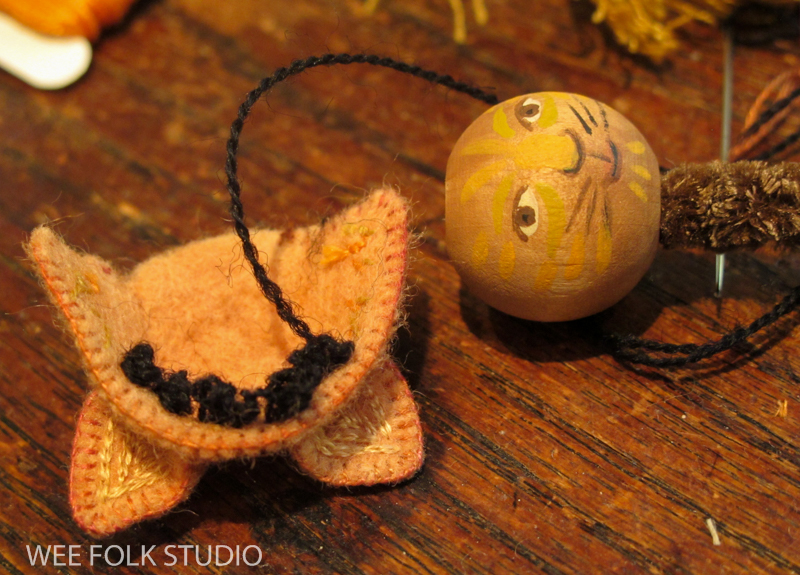
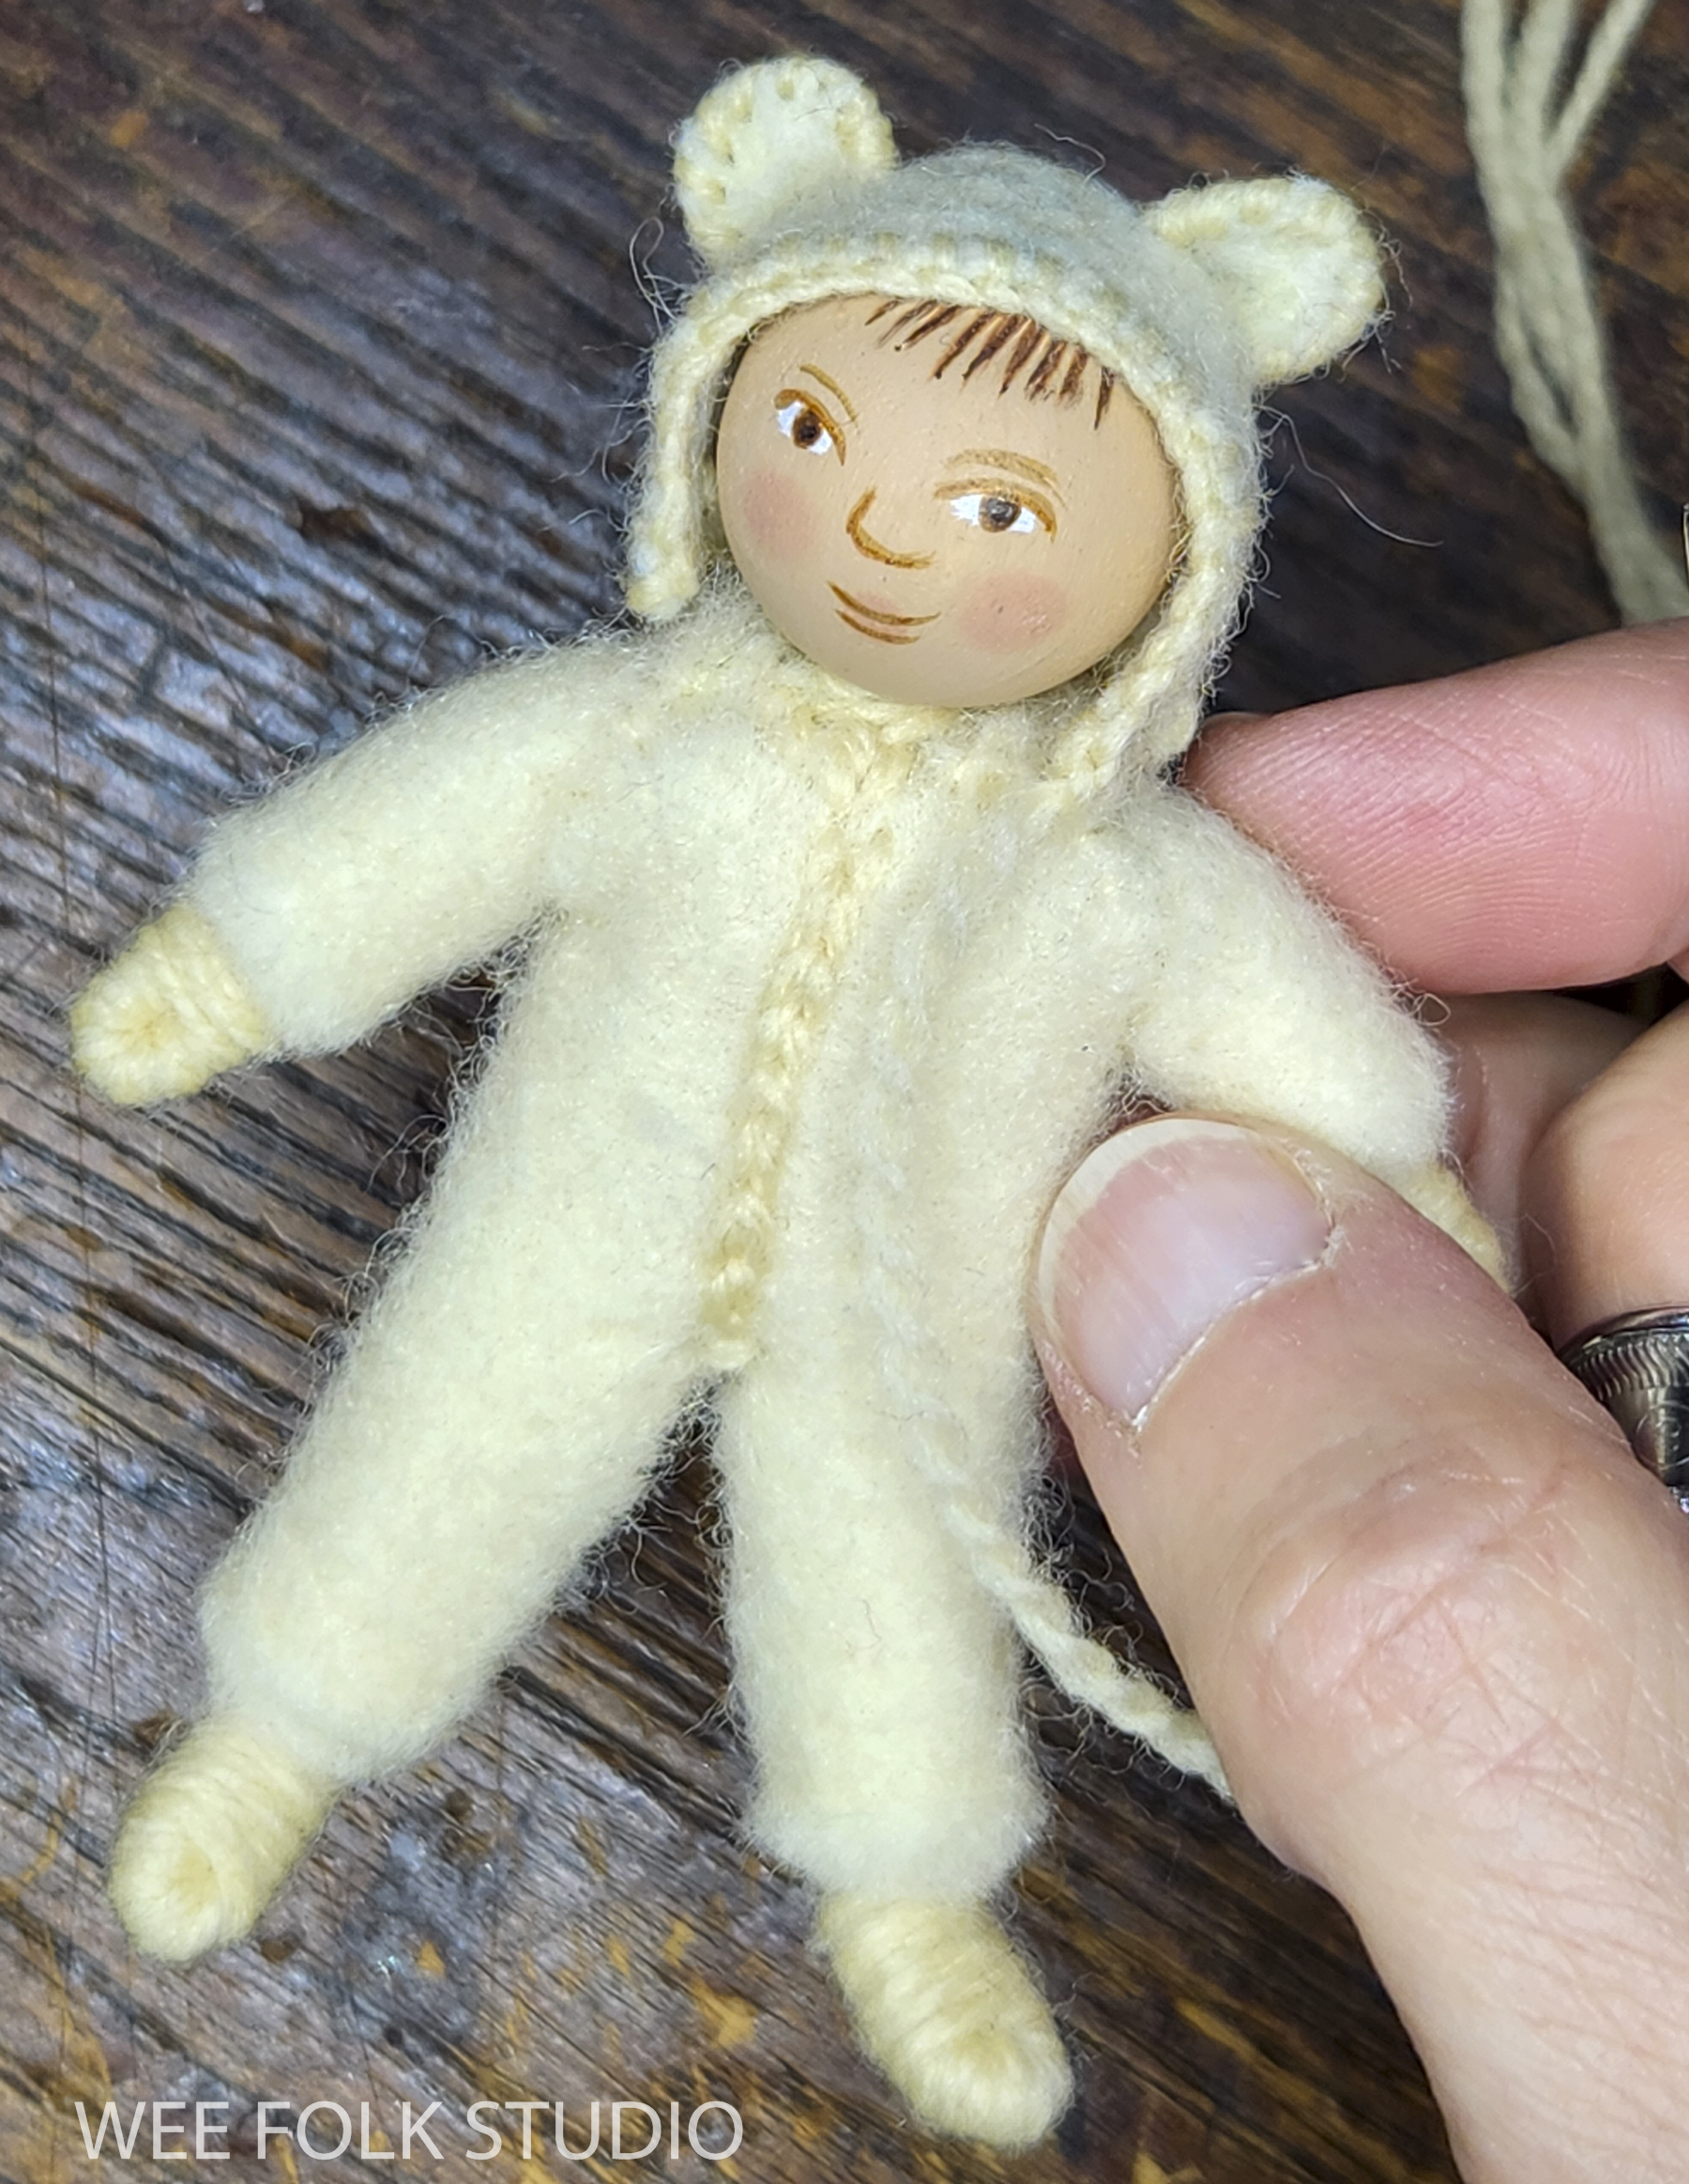
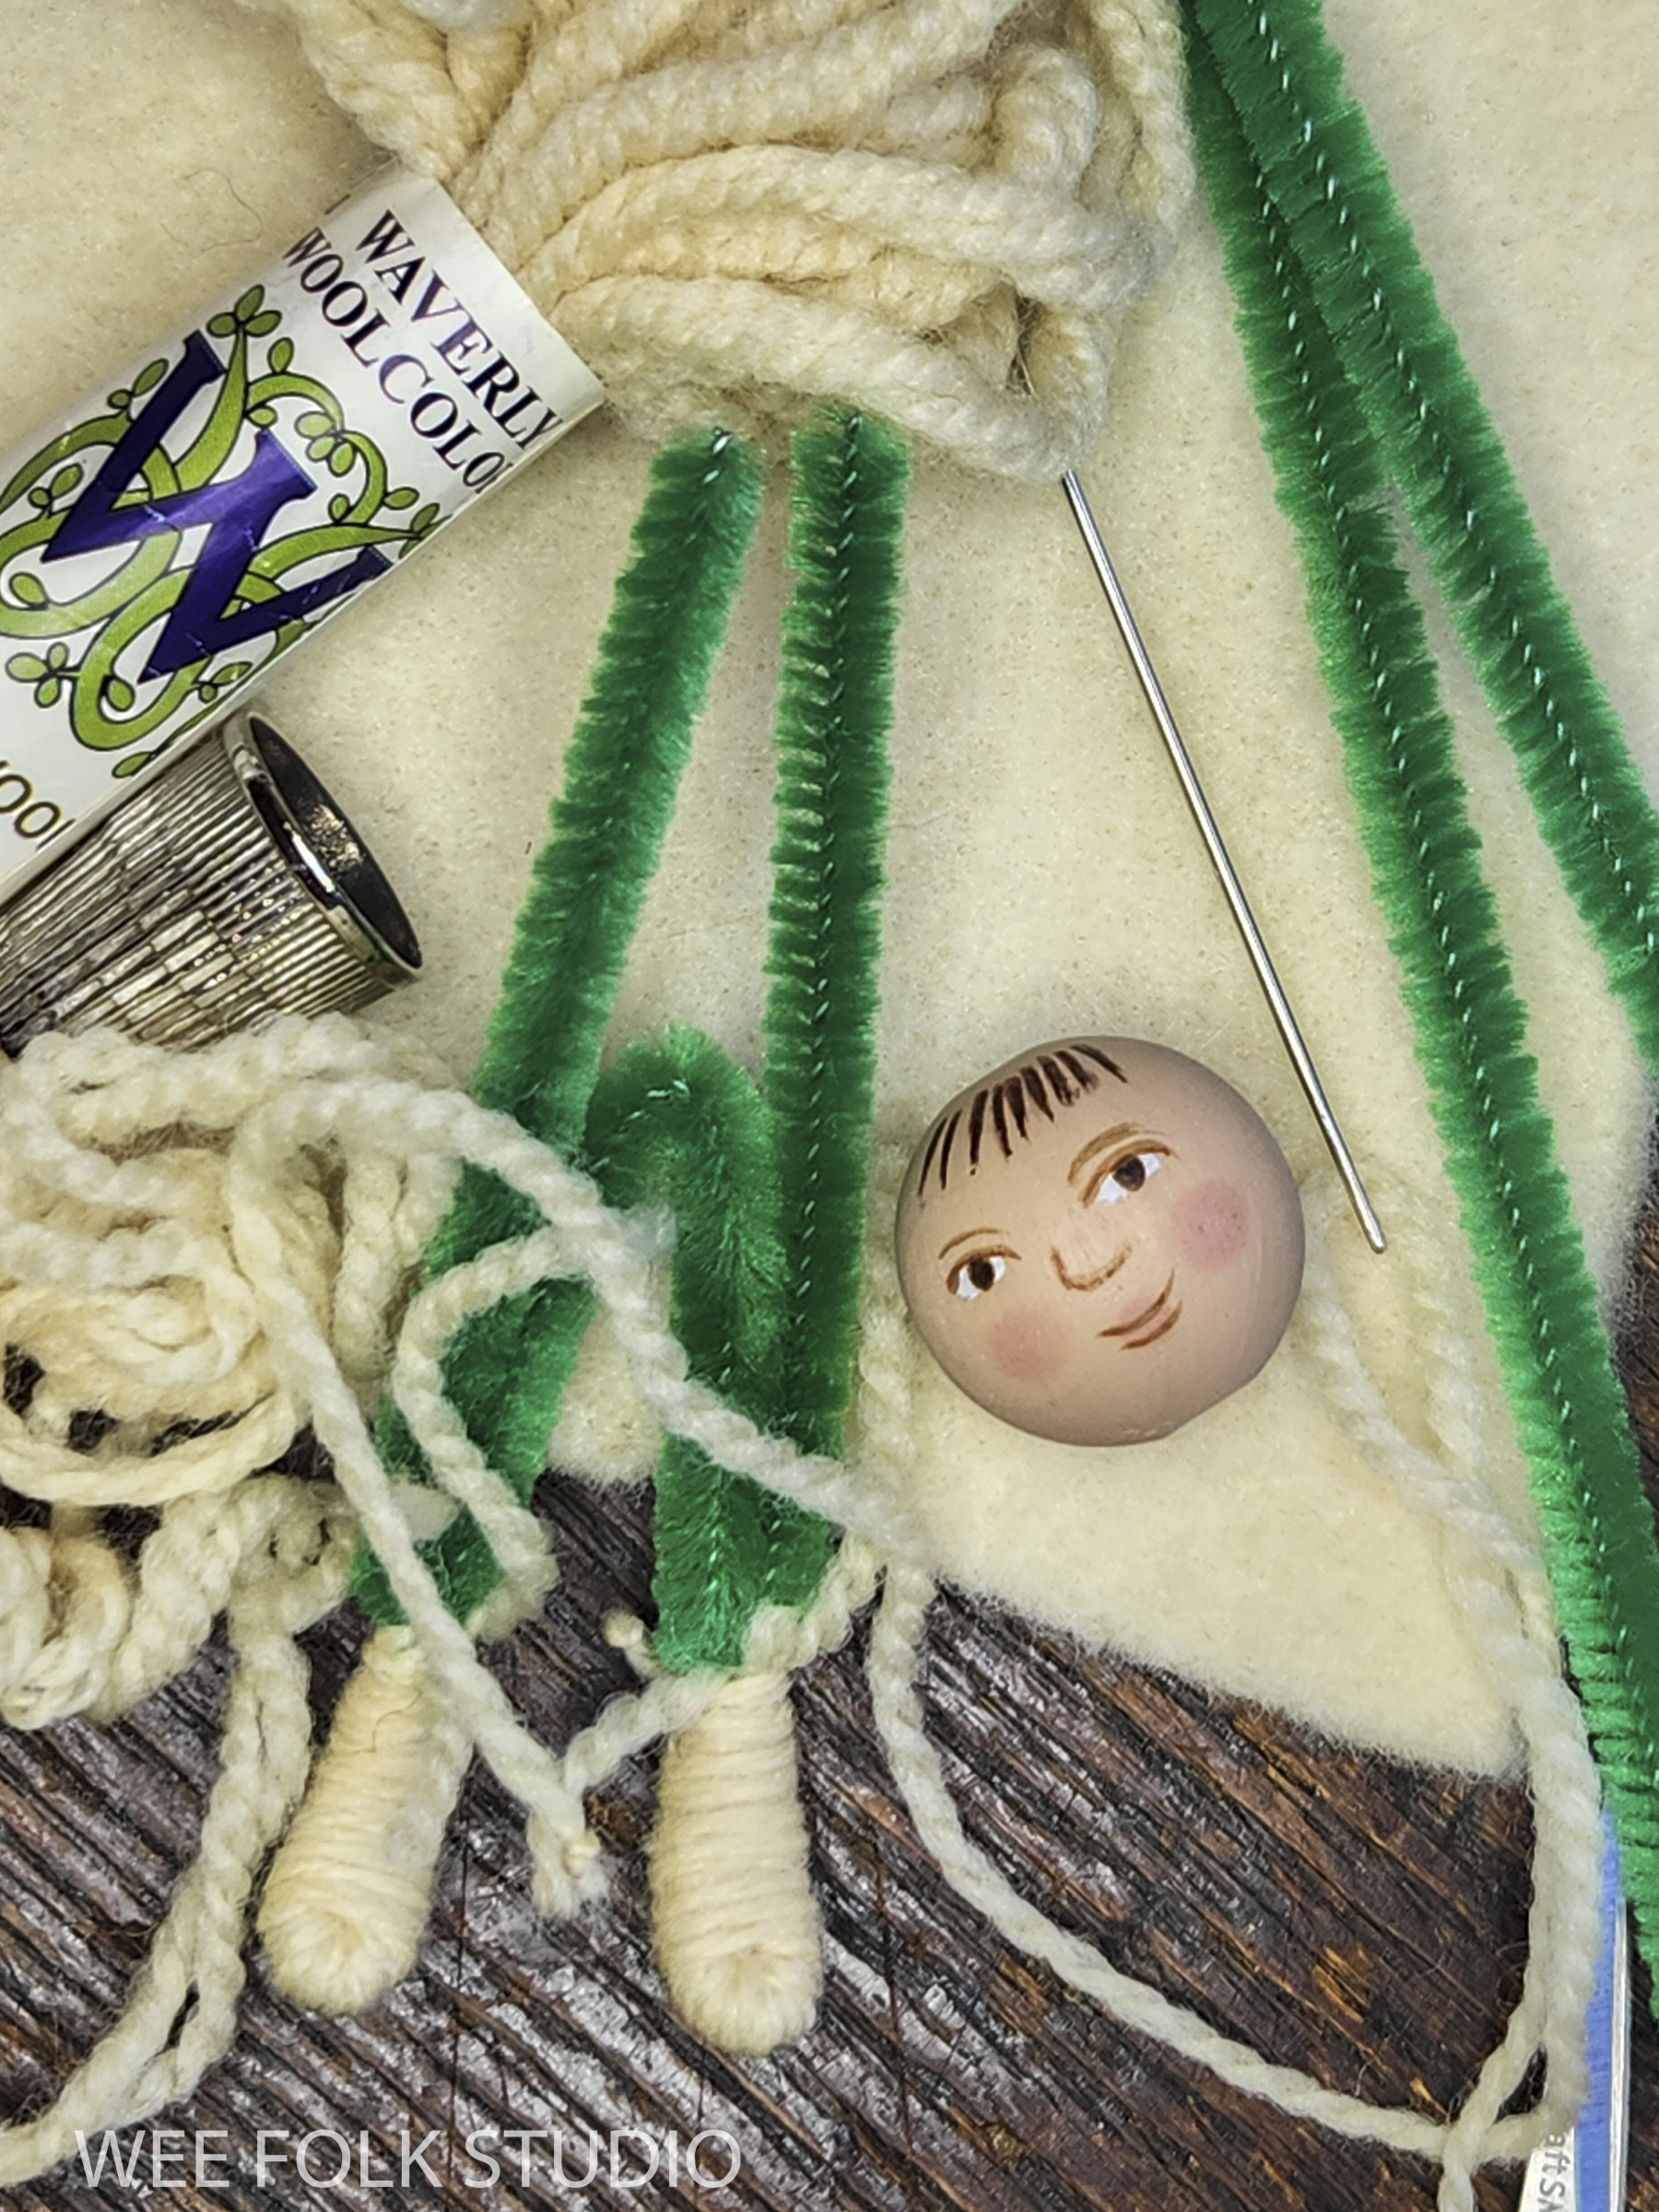
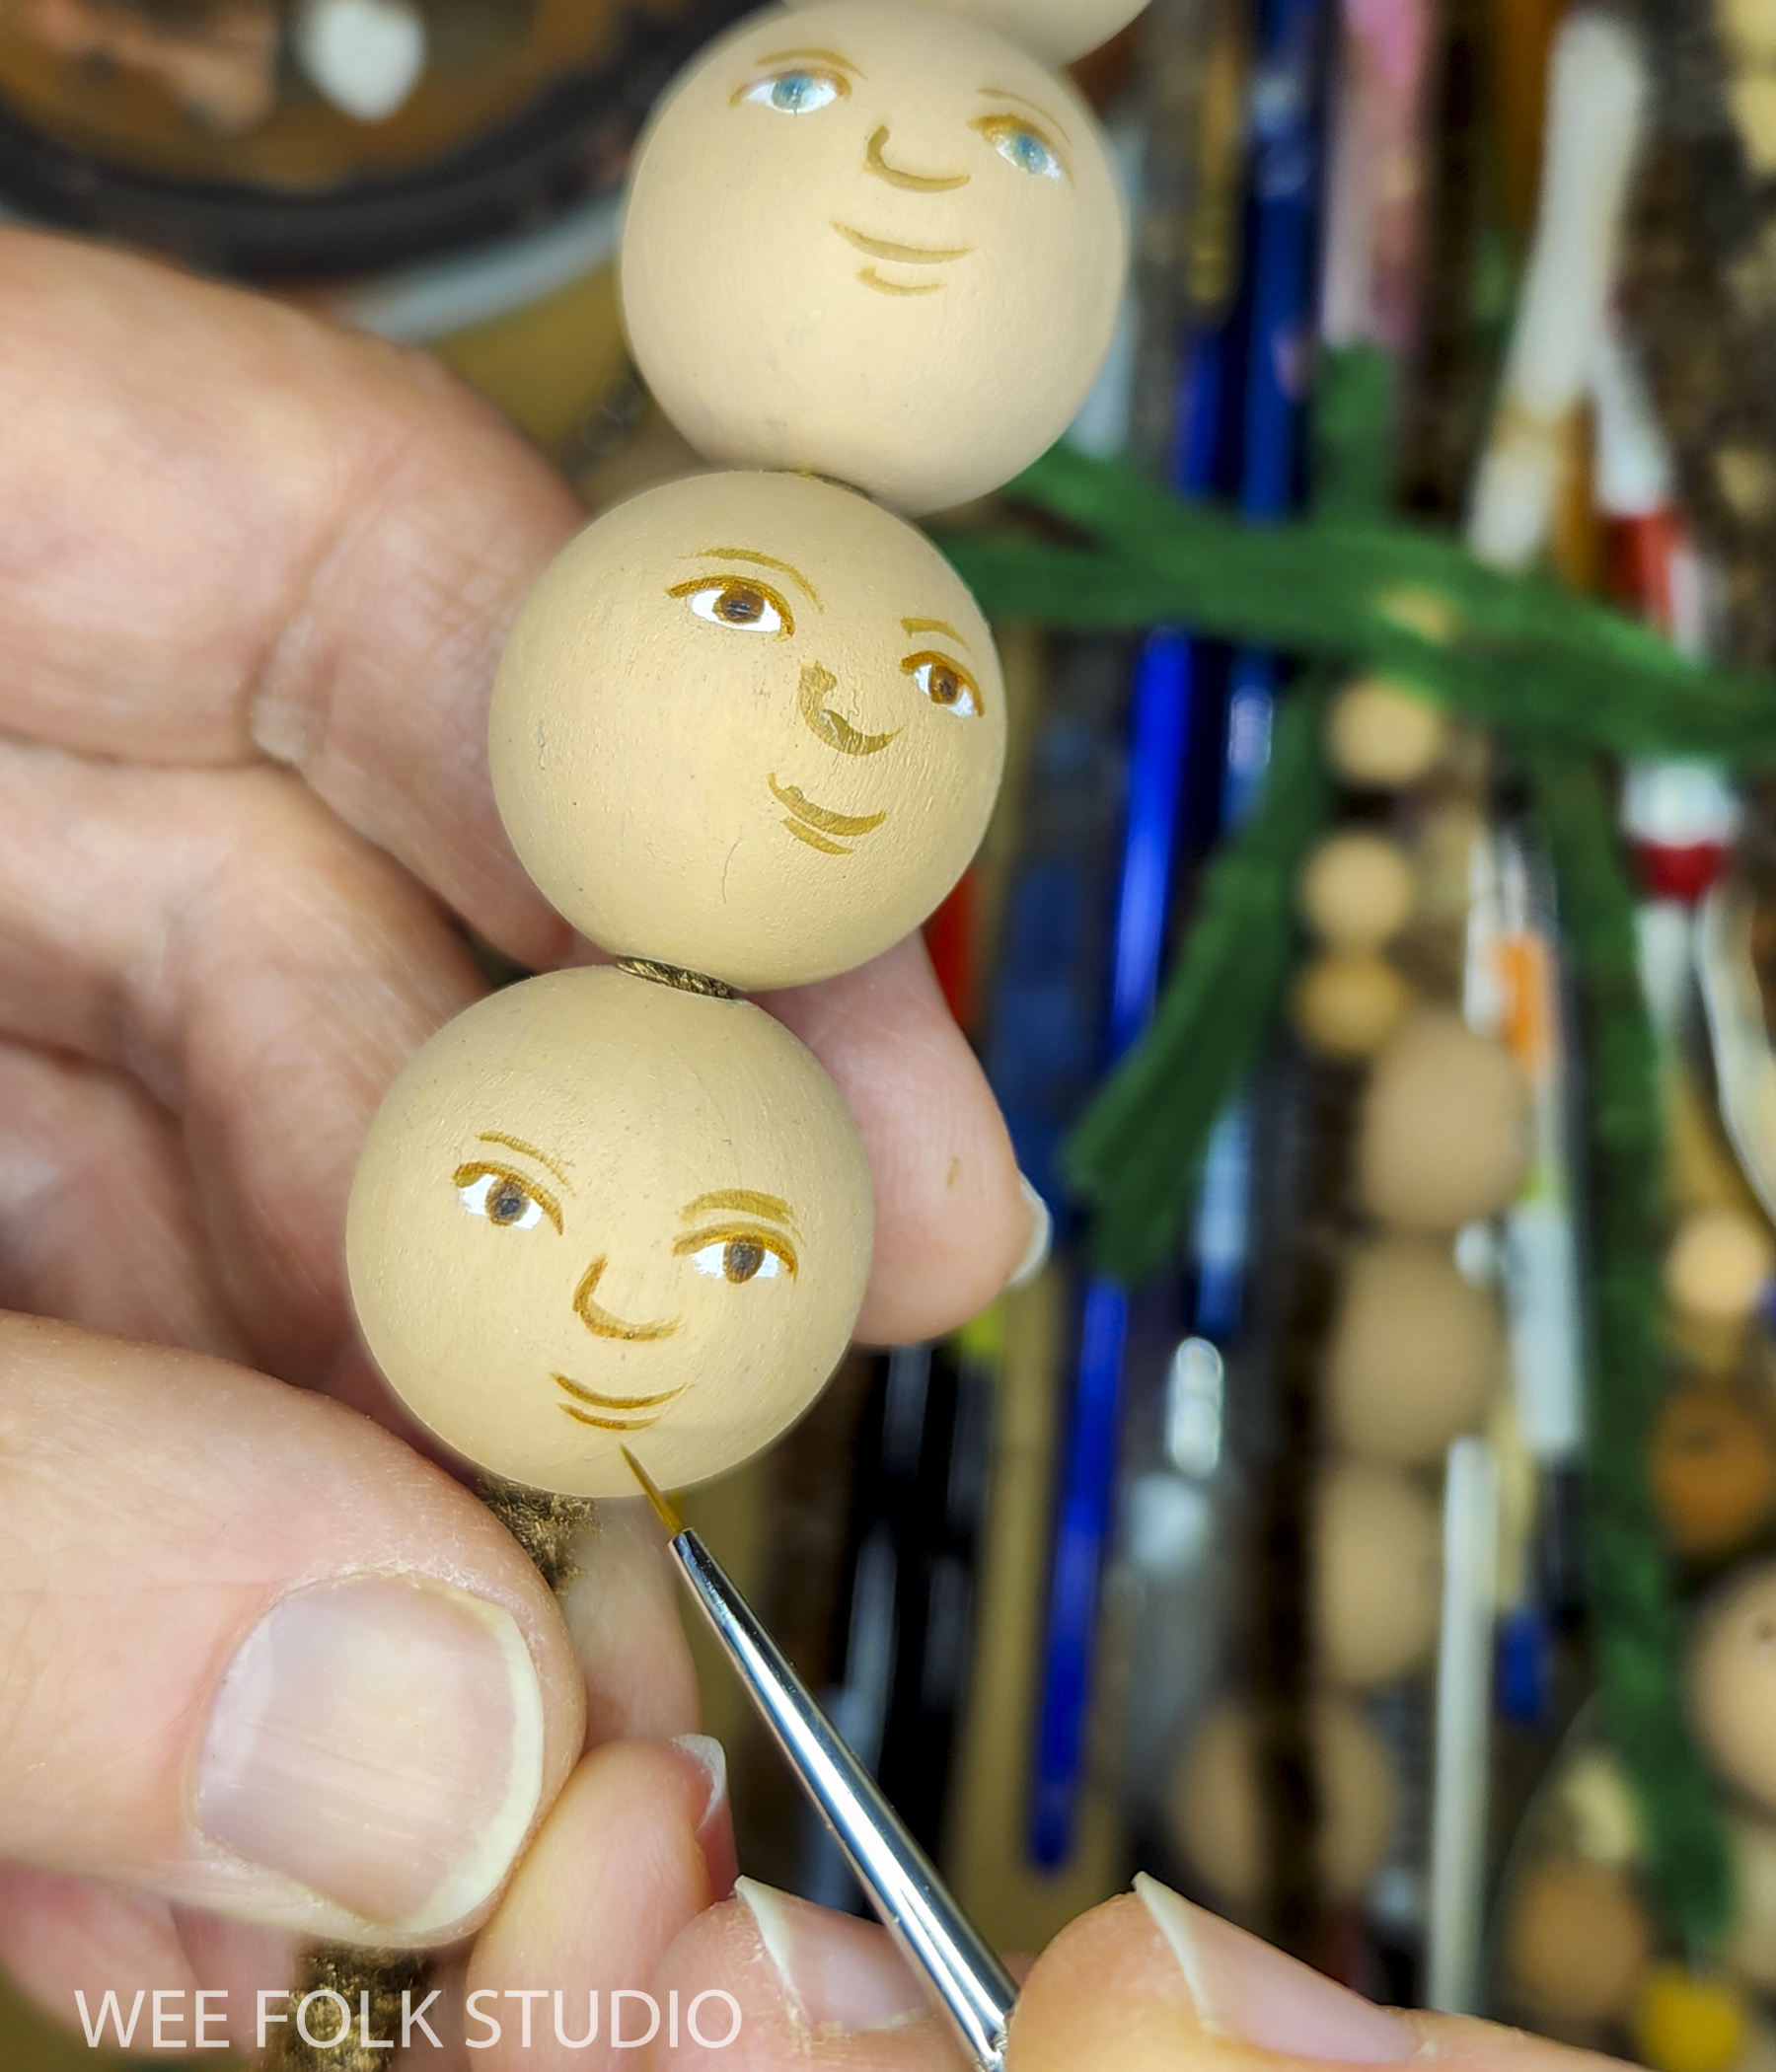
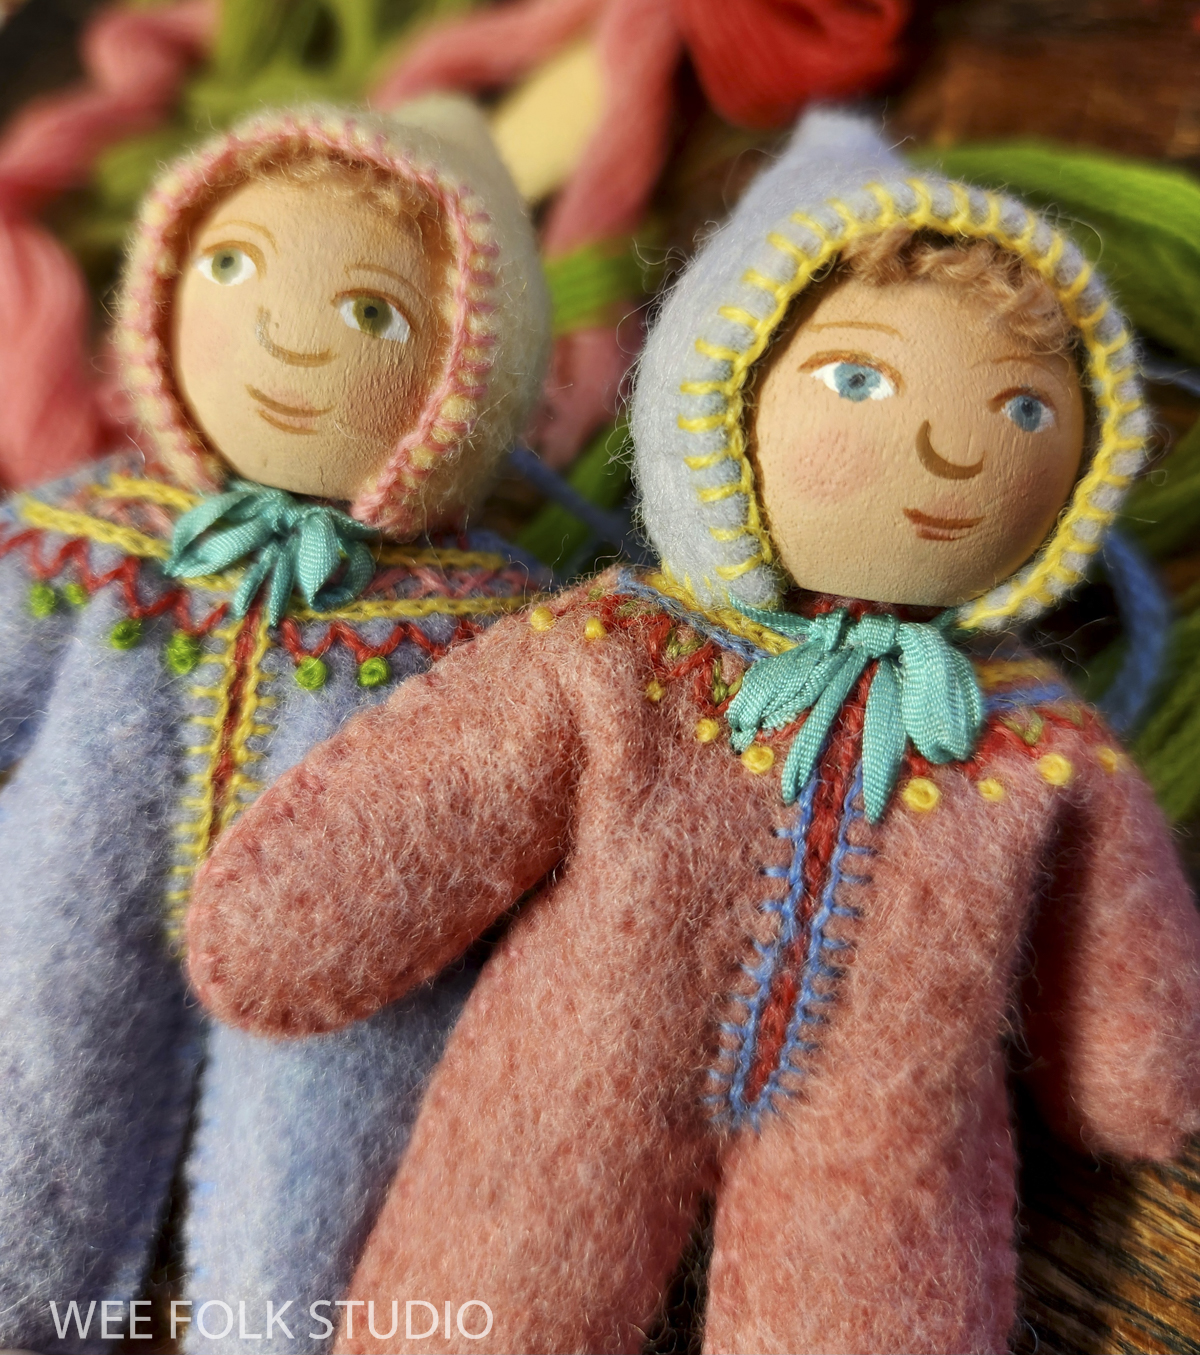
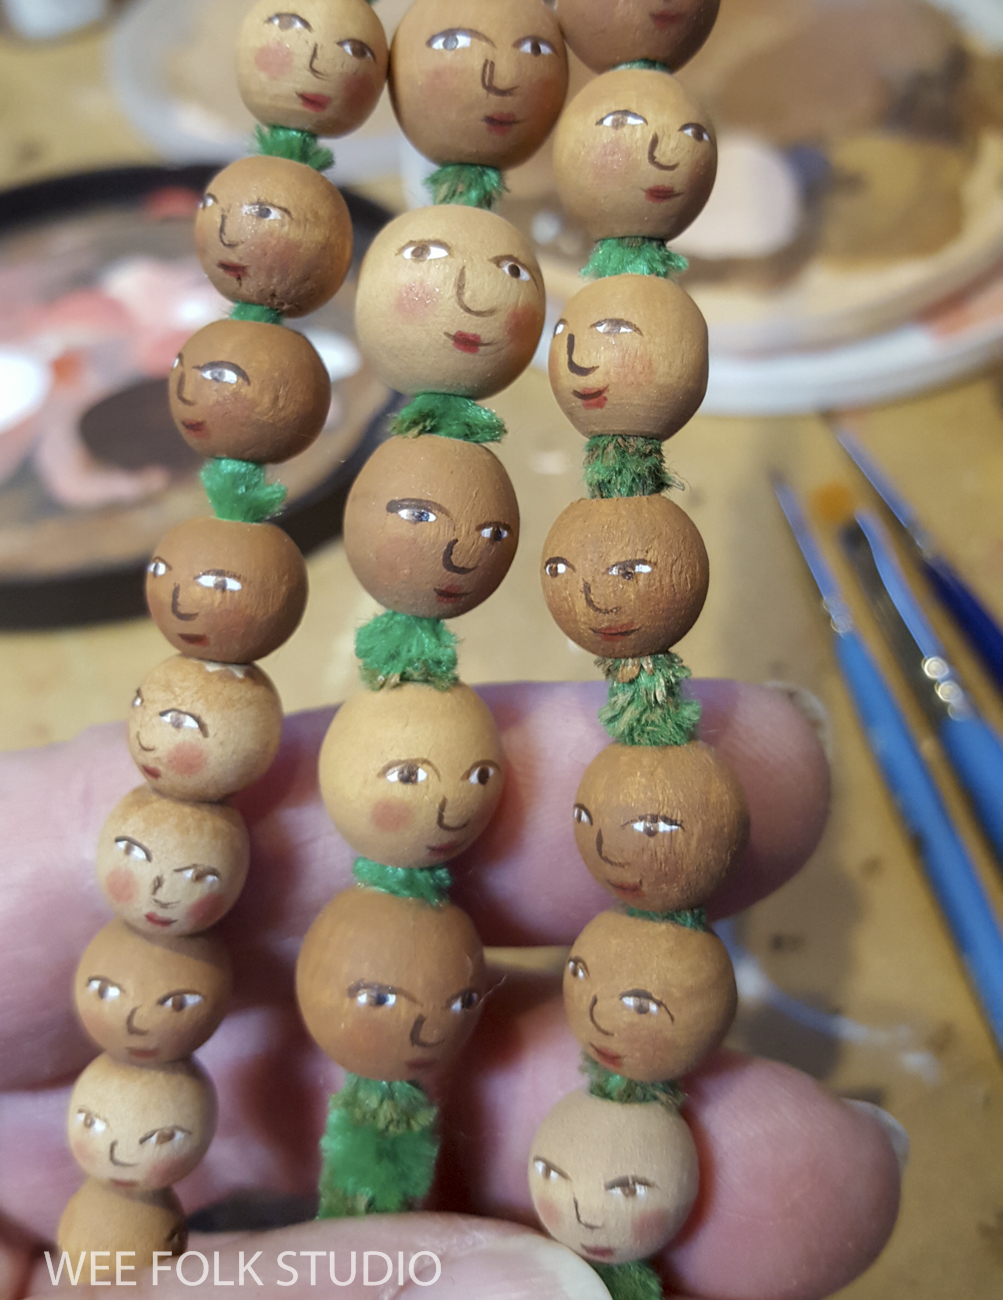
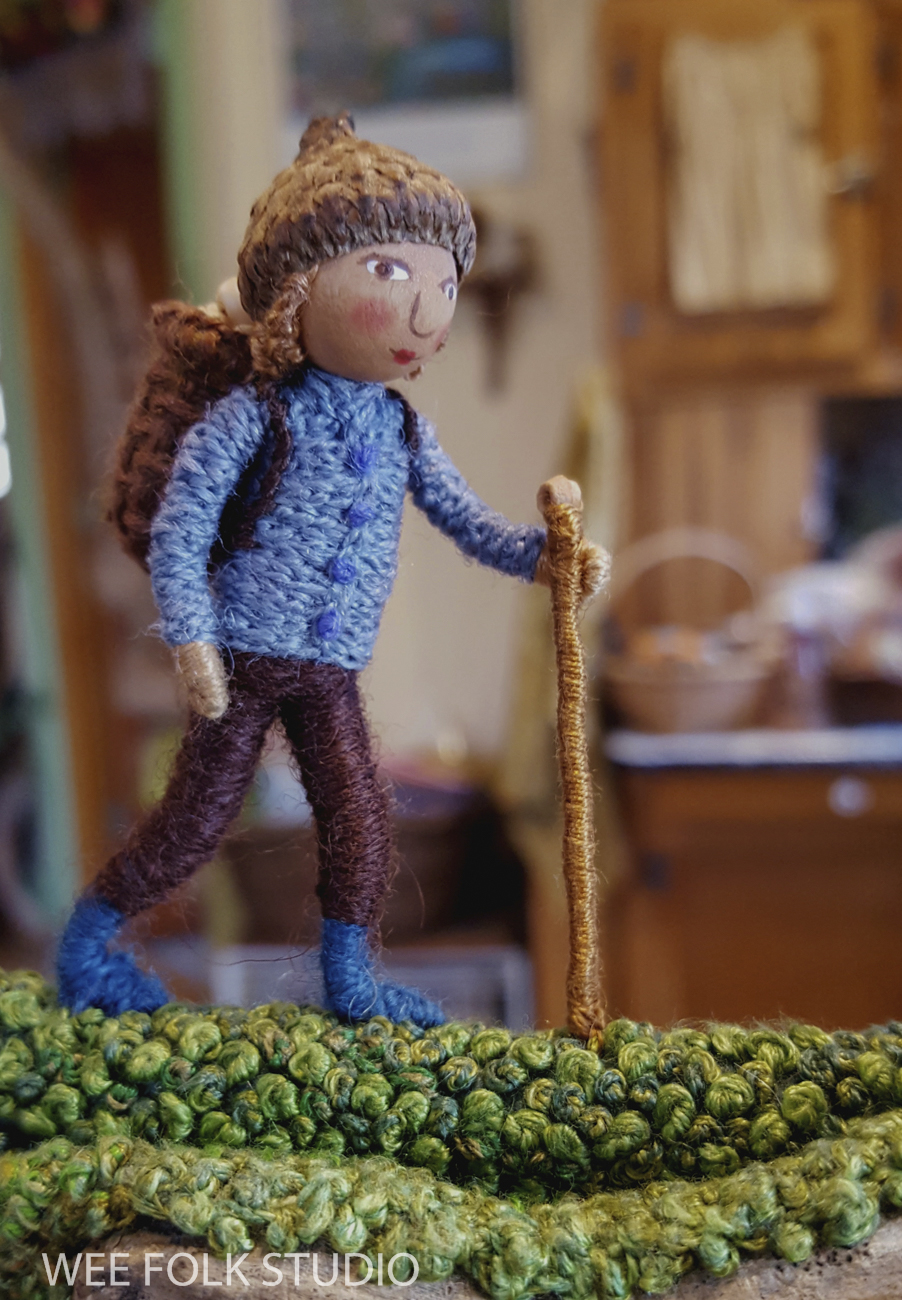
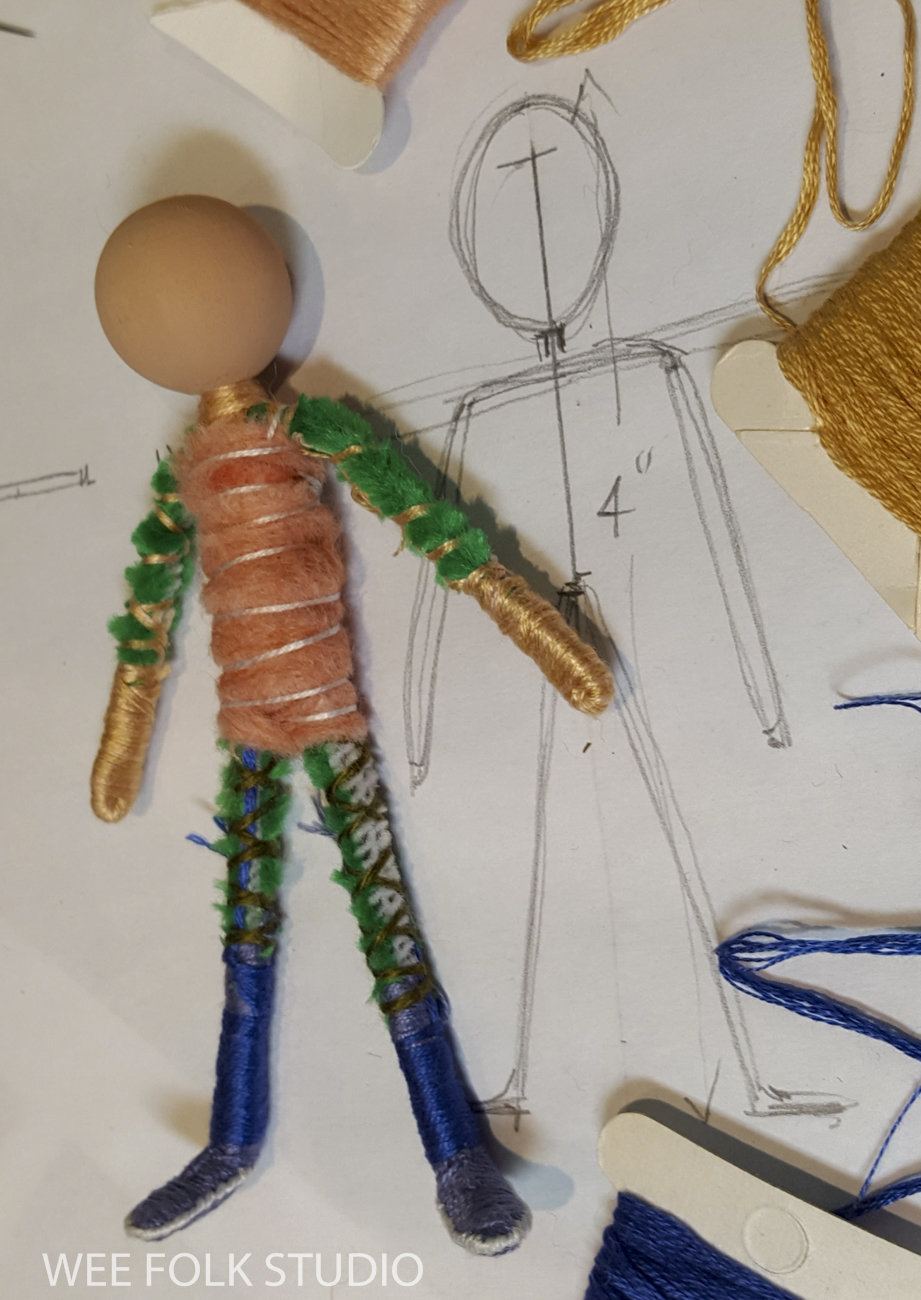
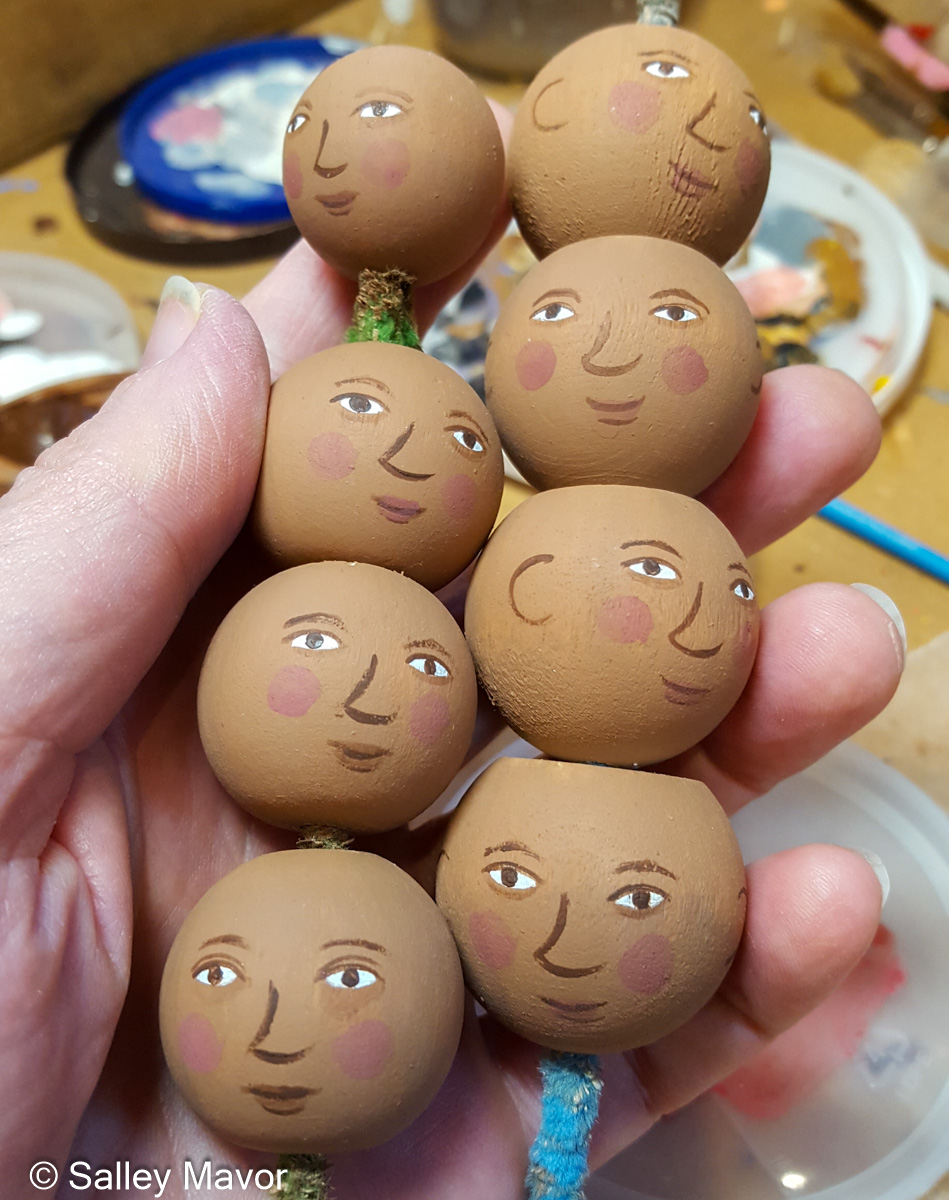
I really liked the hatlike quality of these caps, but to use them, I had to adjust my design to accommodate larger 5 to 6 inch figures with 1 1/4″ heads. To start, I painted faces on a bunch of wooden beads and ball knobs, until I was satisfied with a few impish ones with upturned pointy noses.

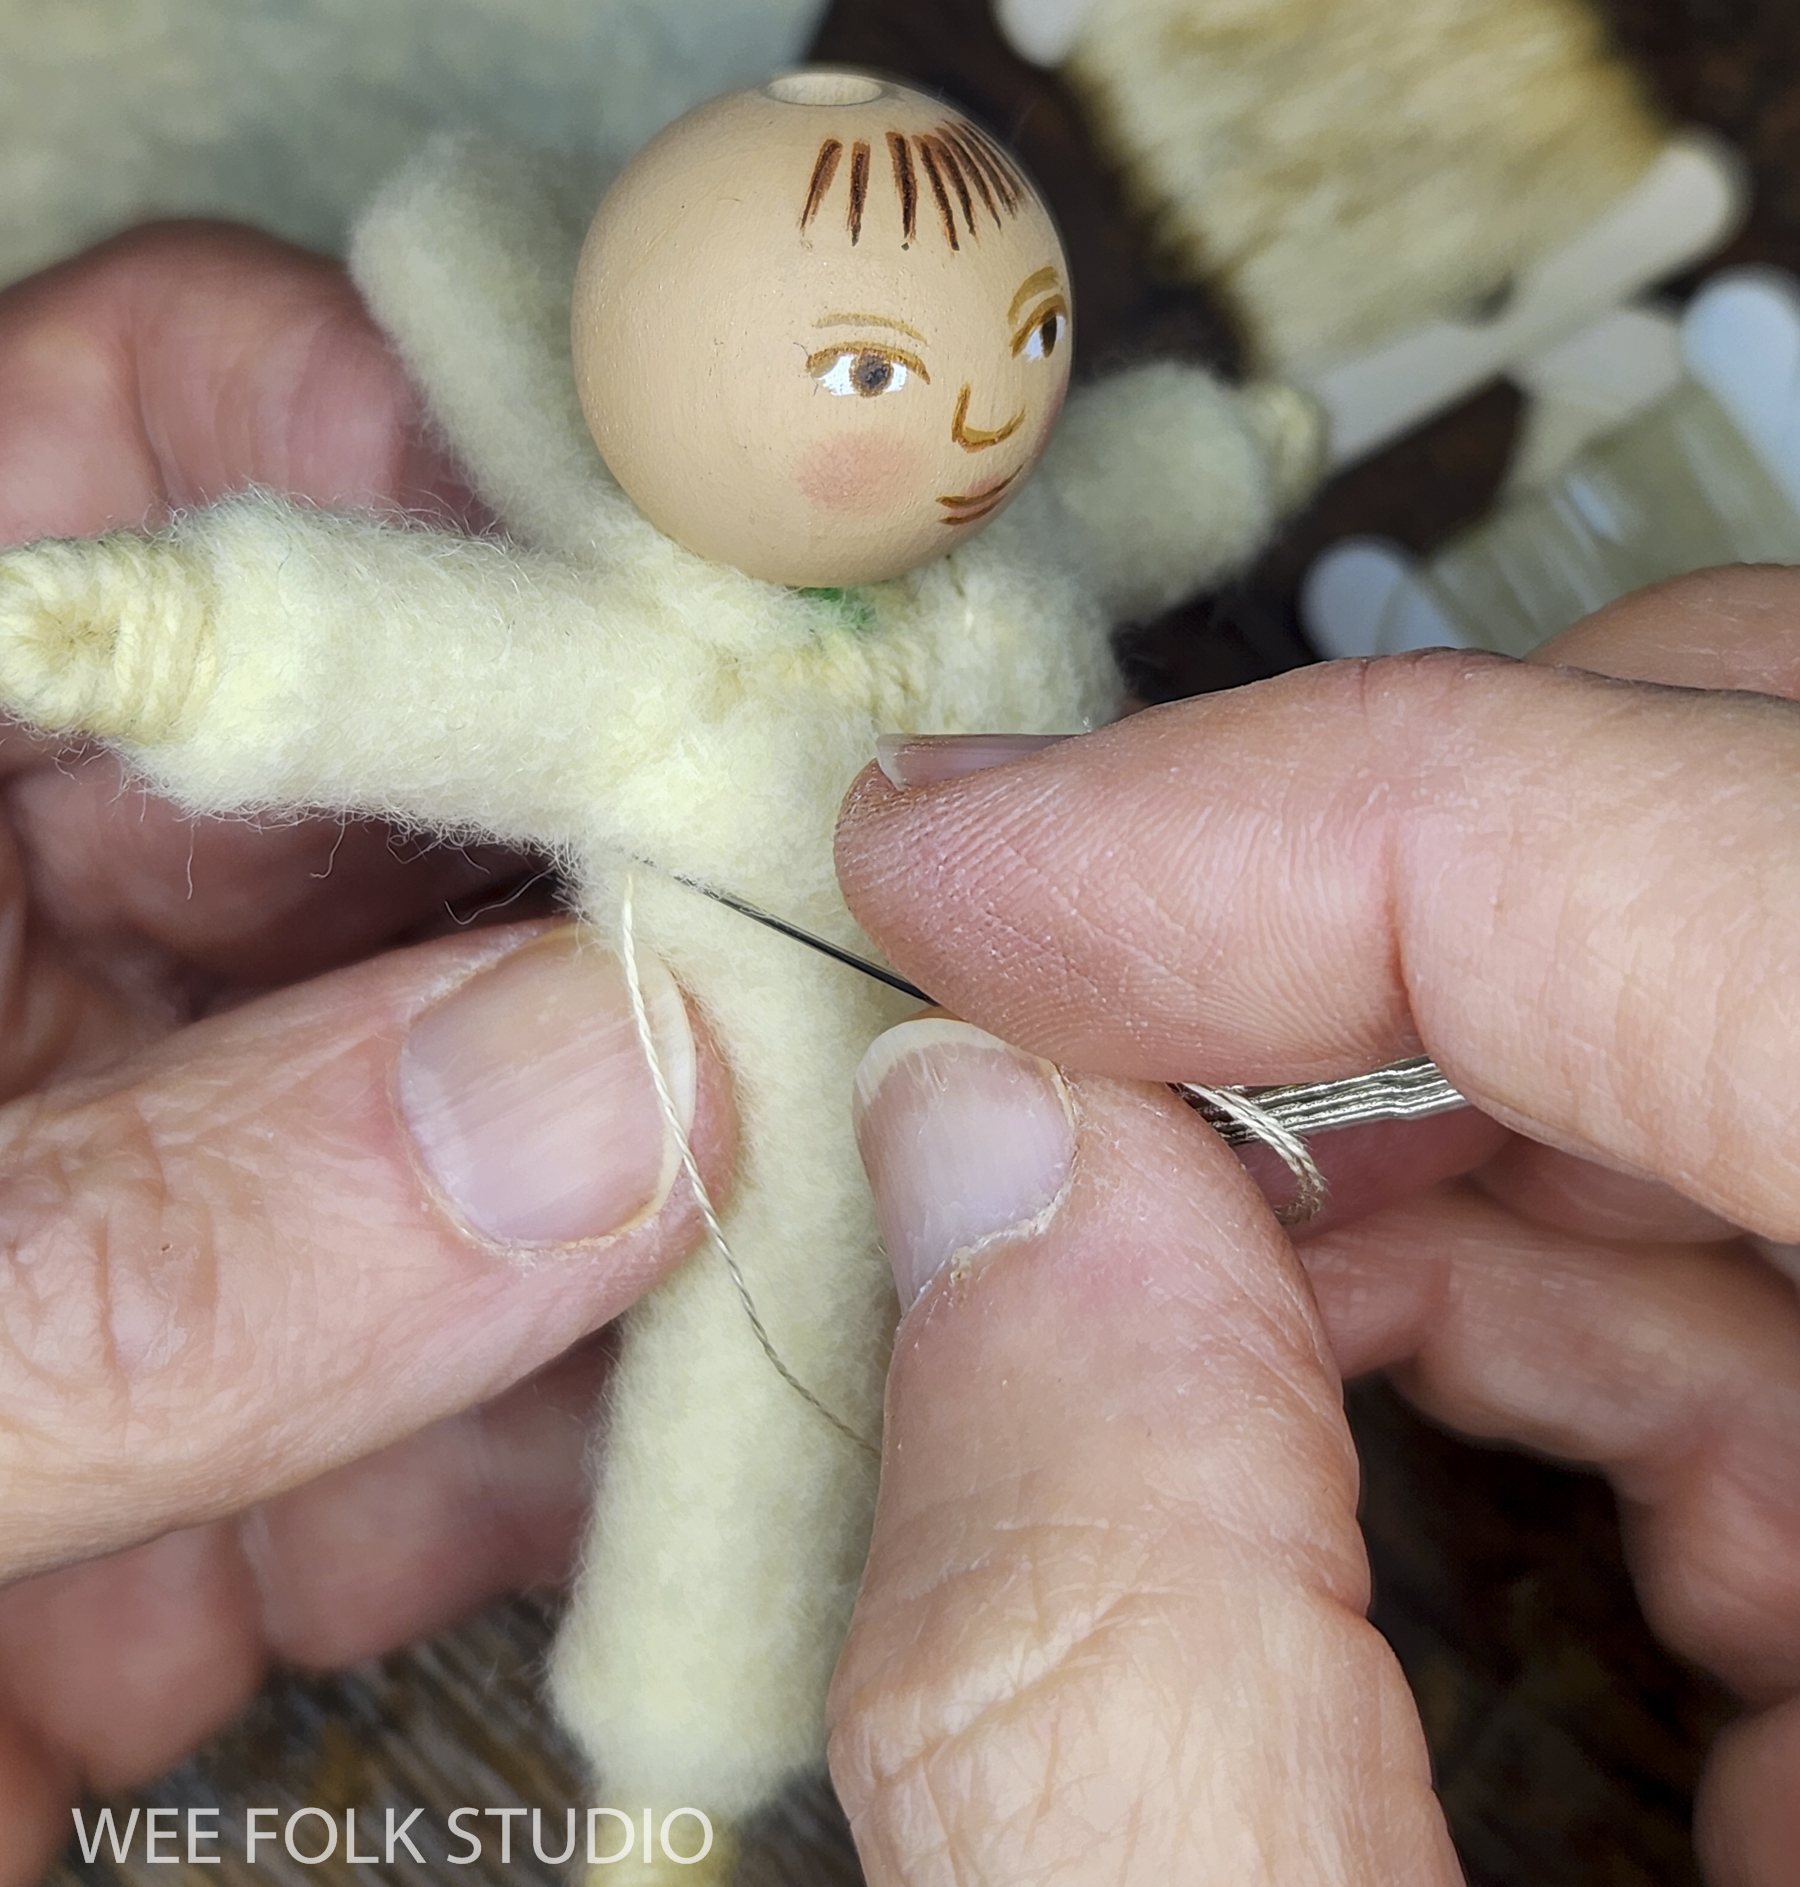
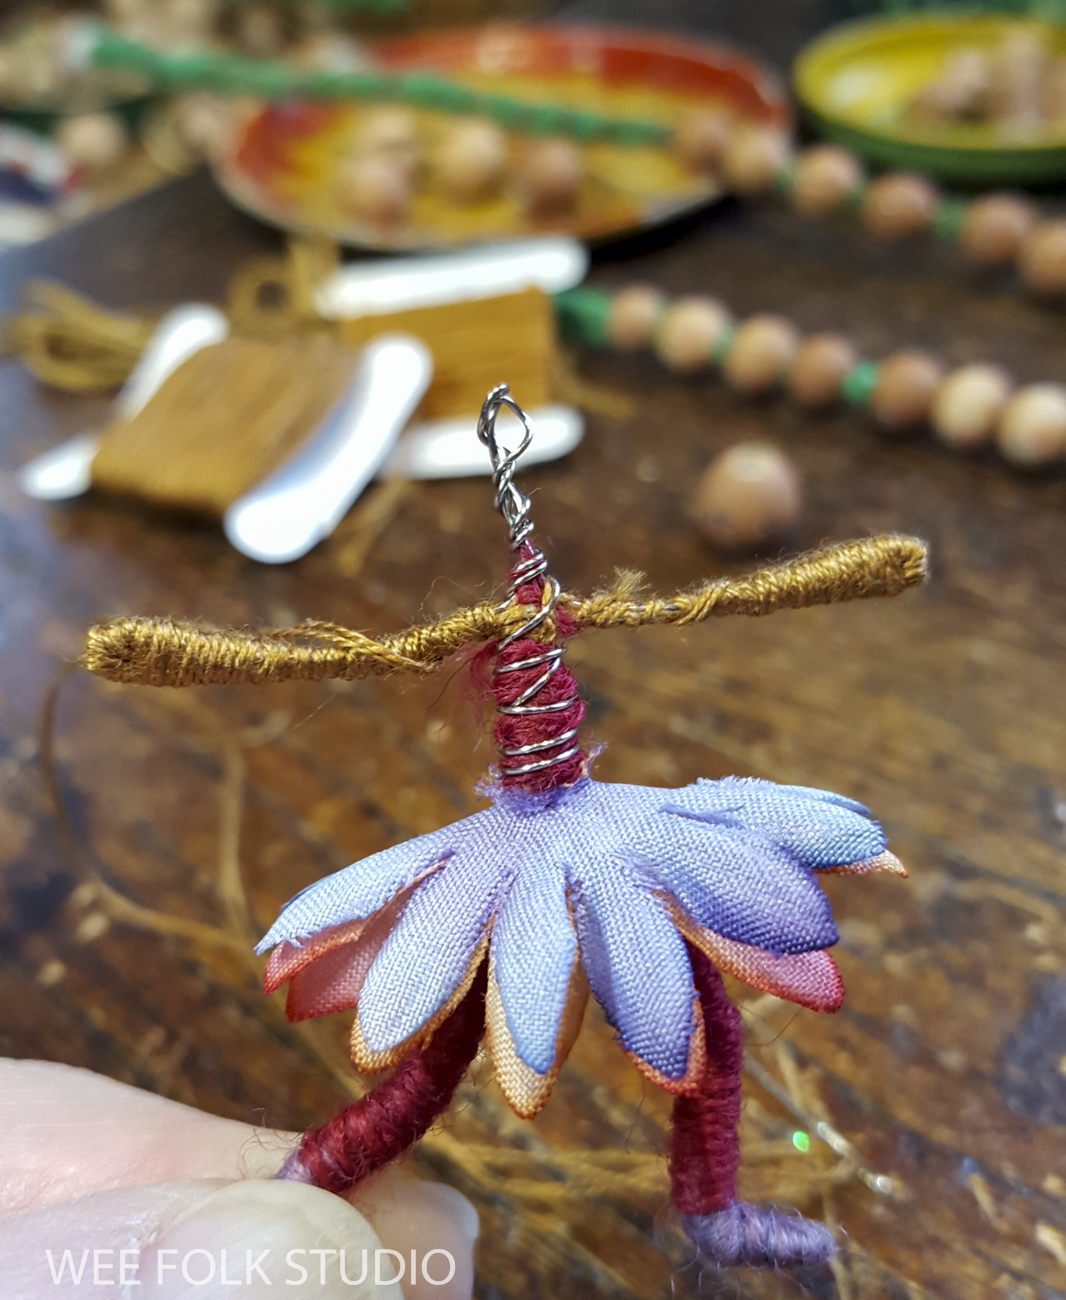
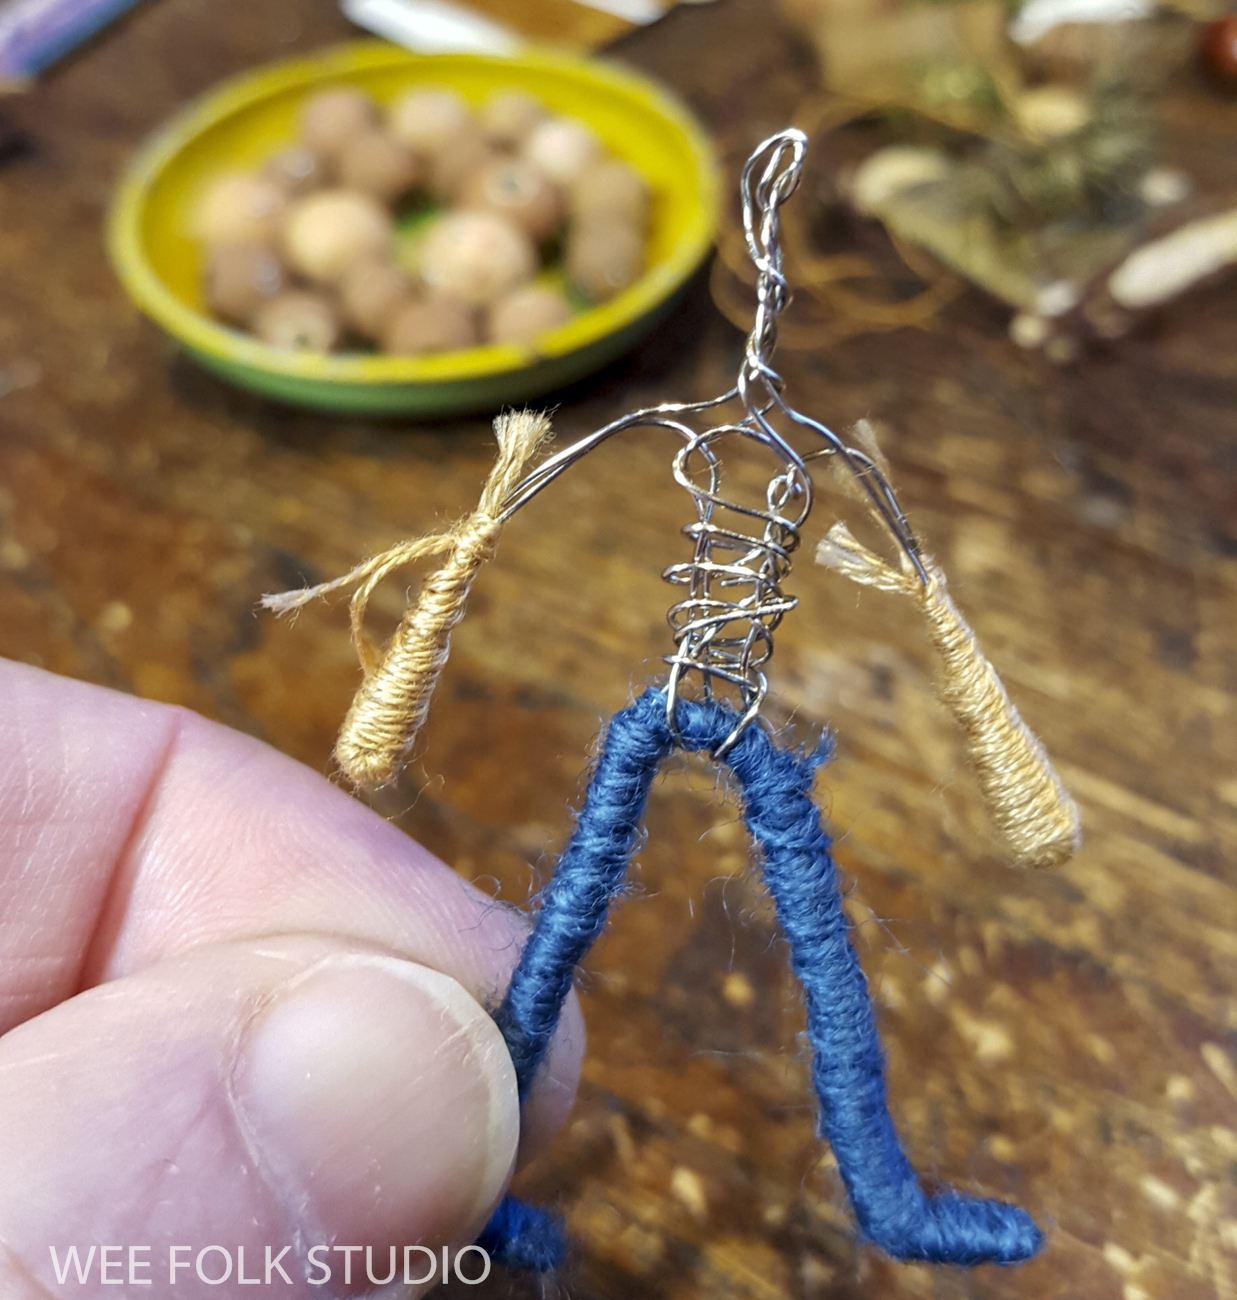
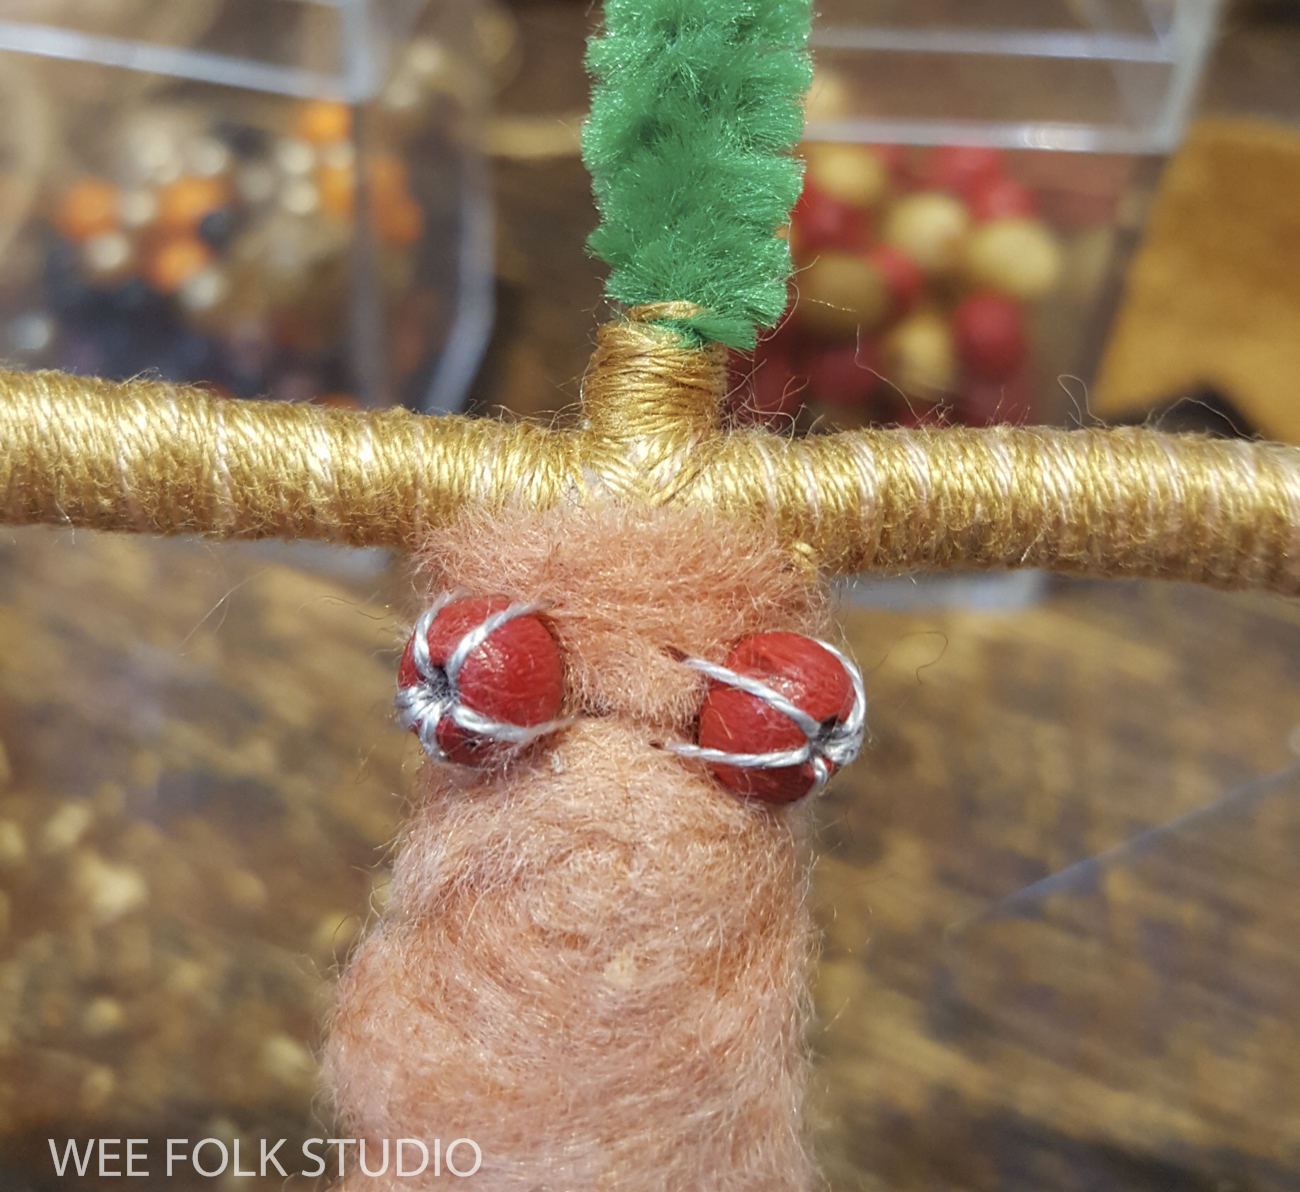
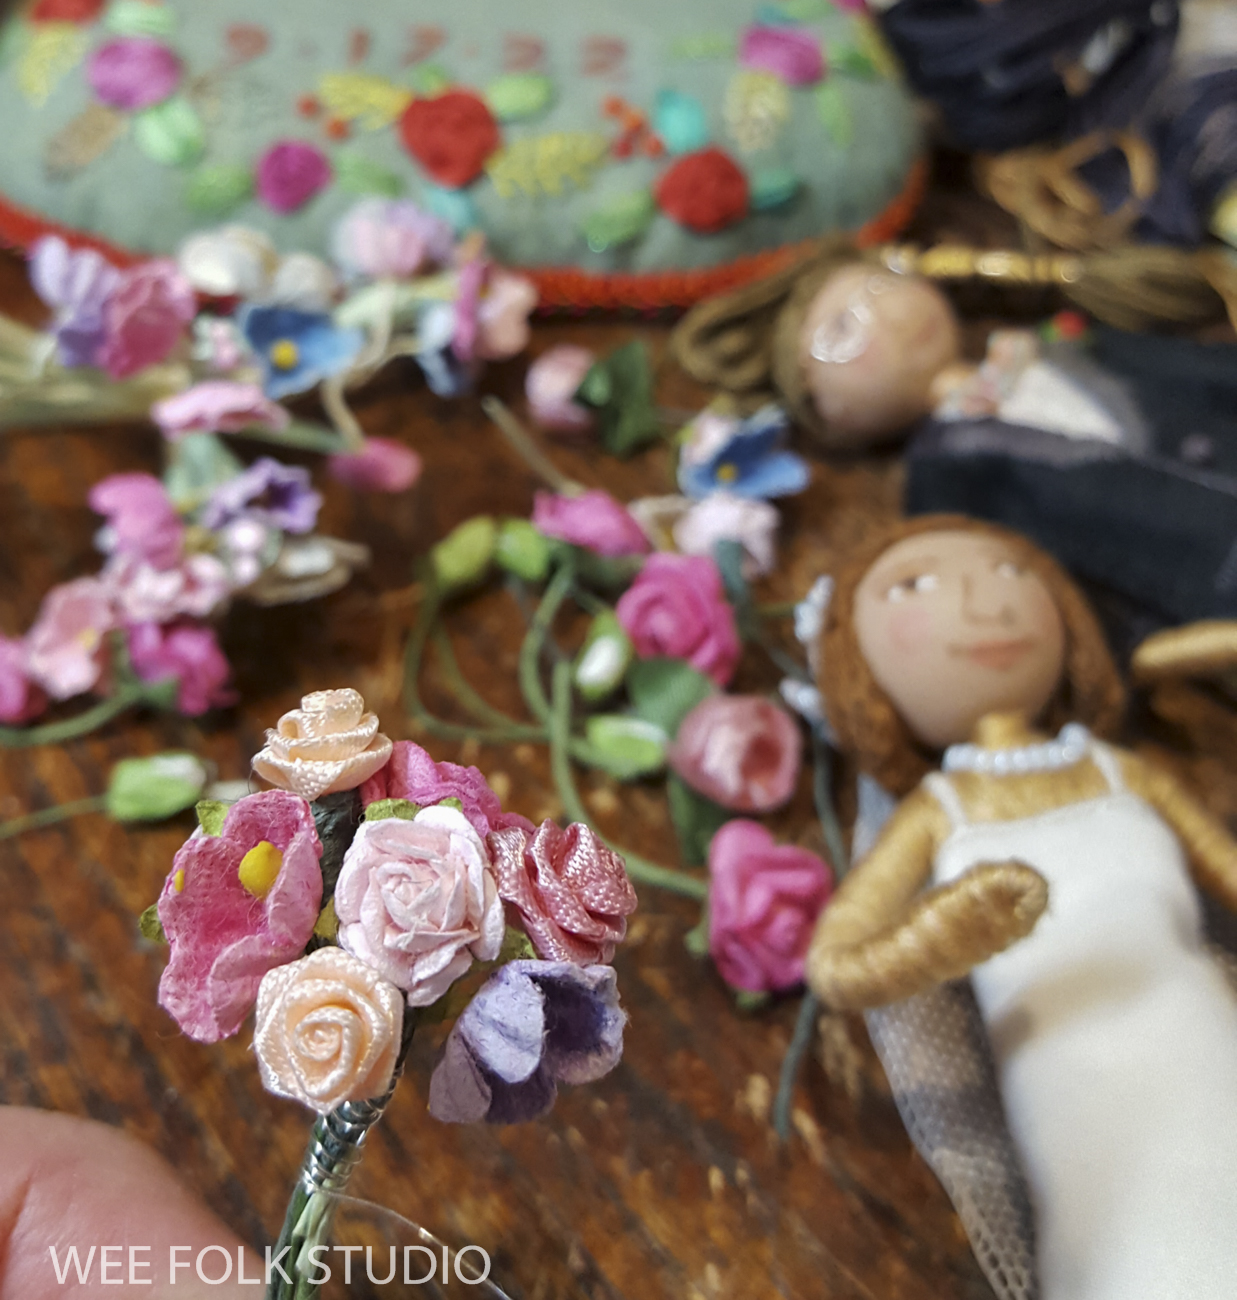
I increased the size of their pipe cleaner bodies and made hands to scale. It was also an opportunity to use larger faux flower petals from my collection for the skirt.

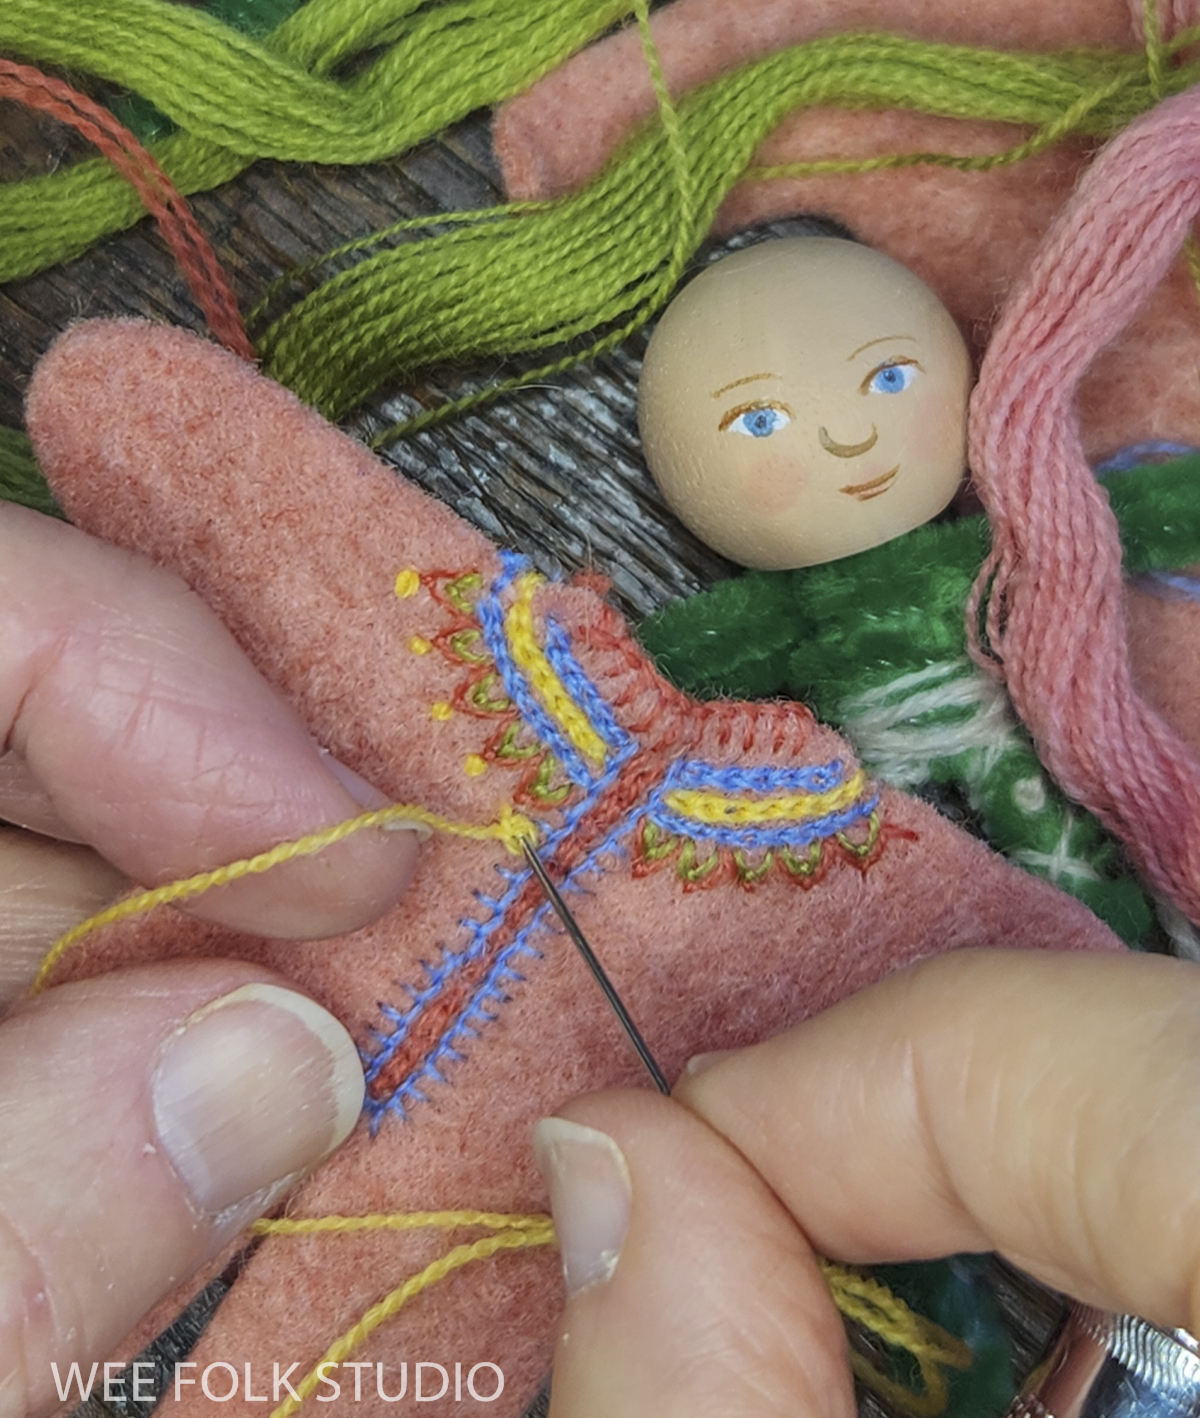
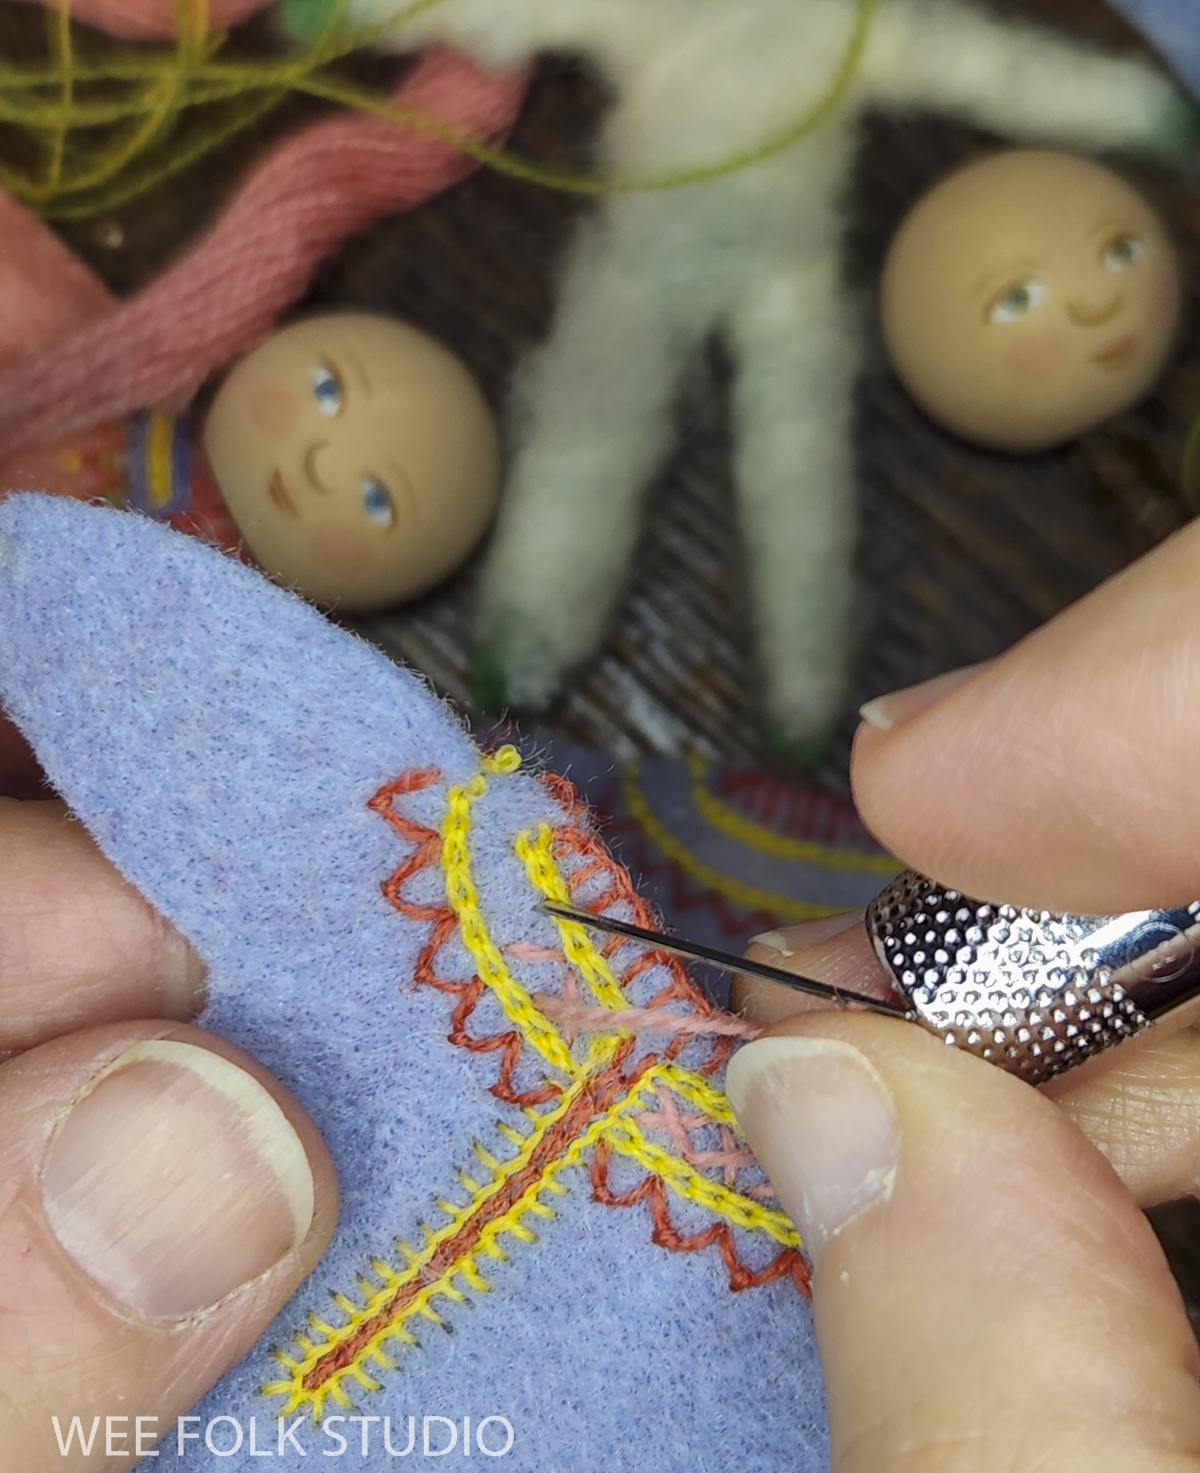
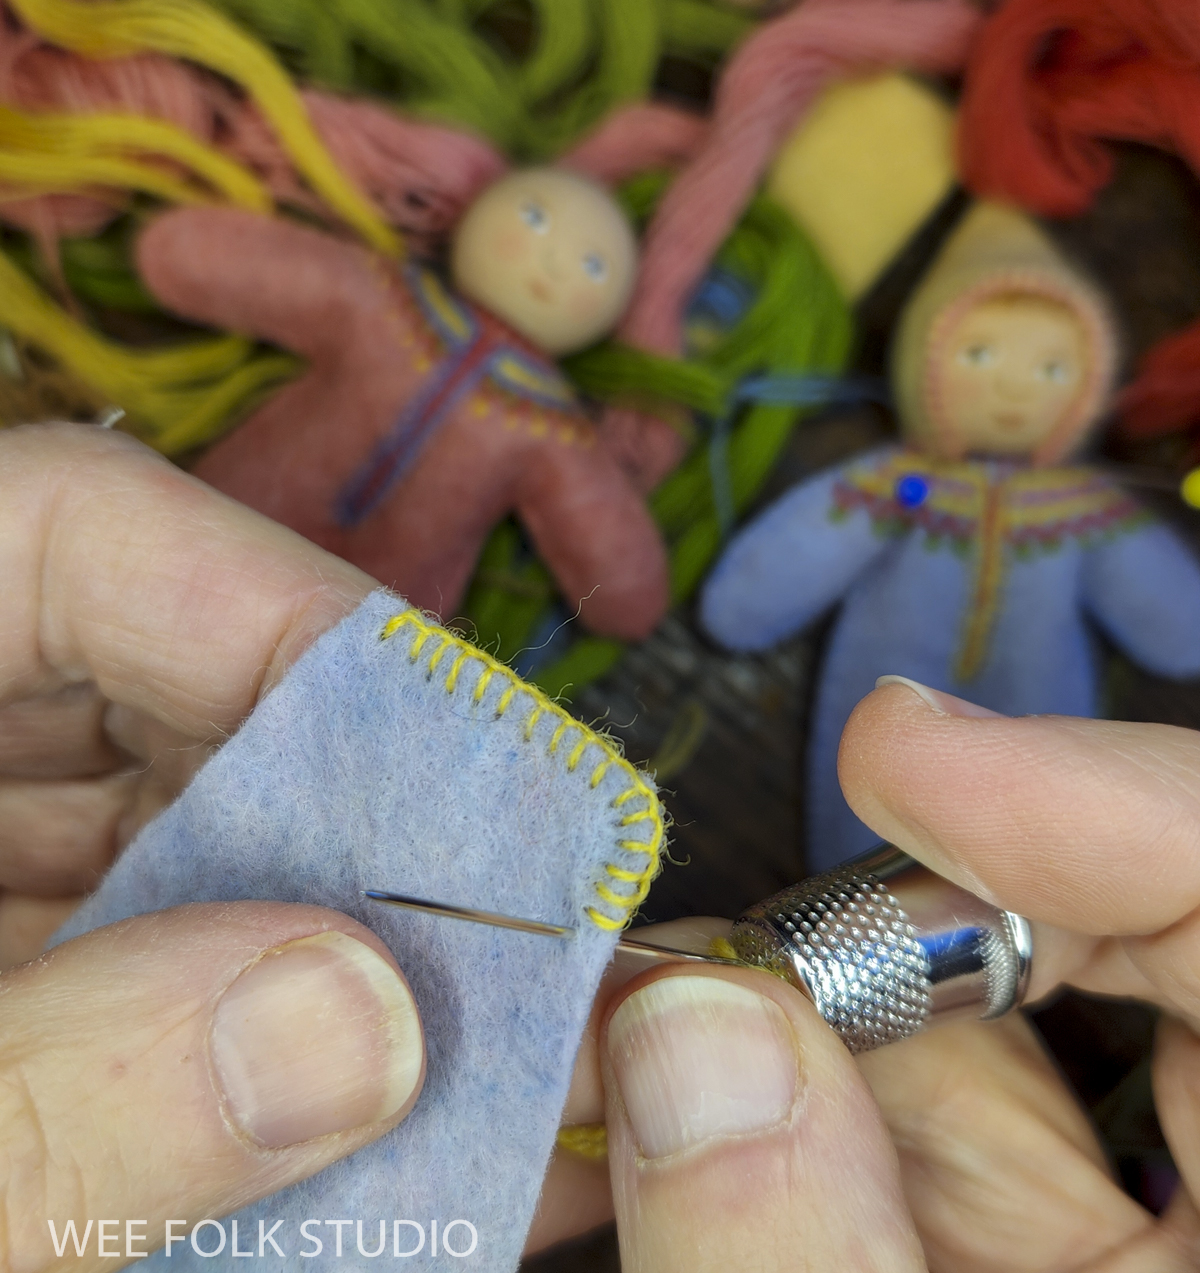
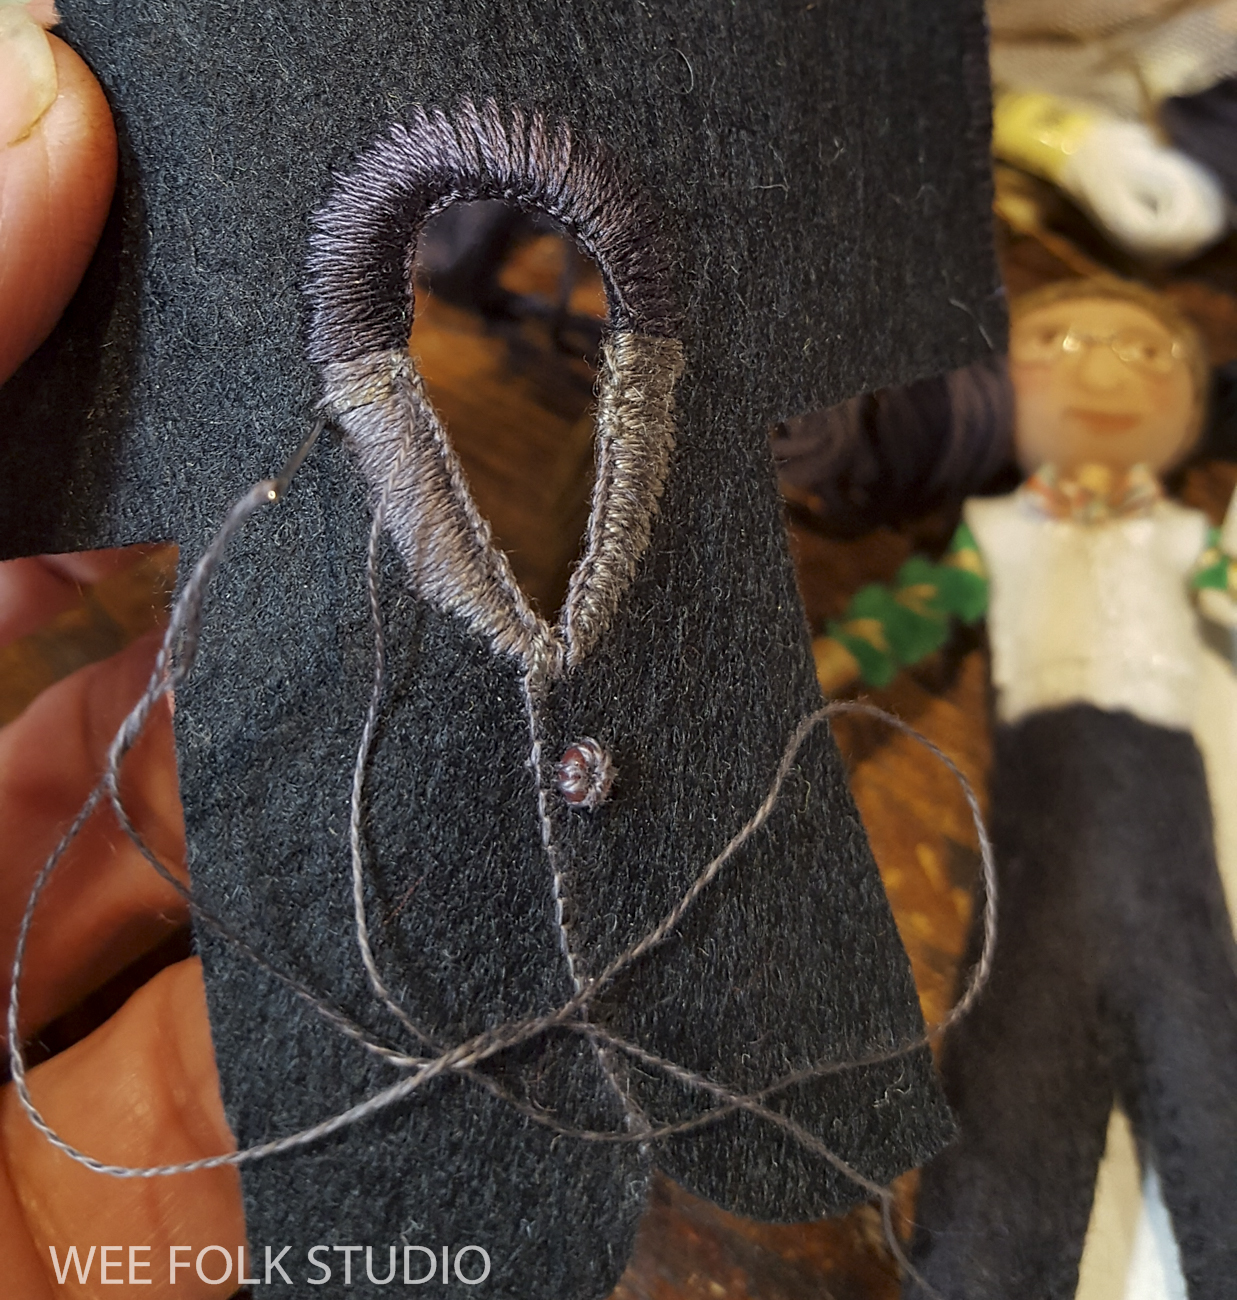
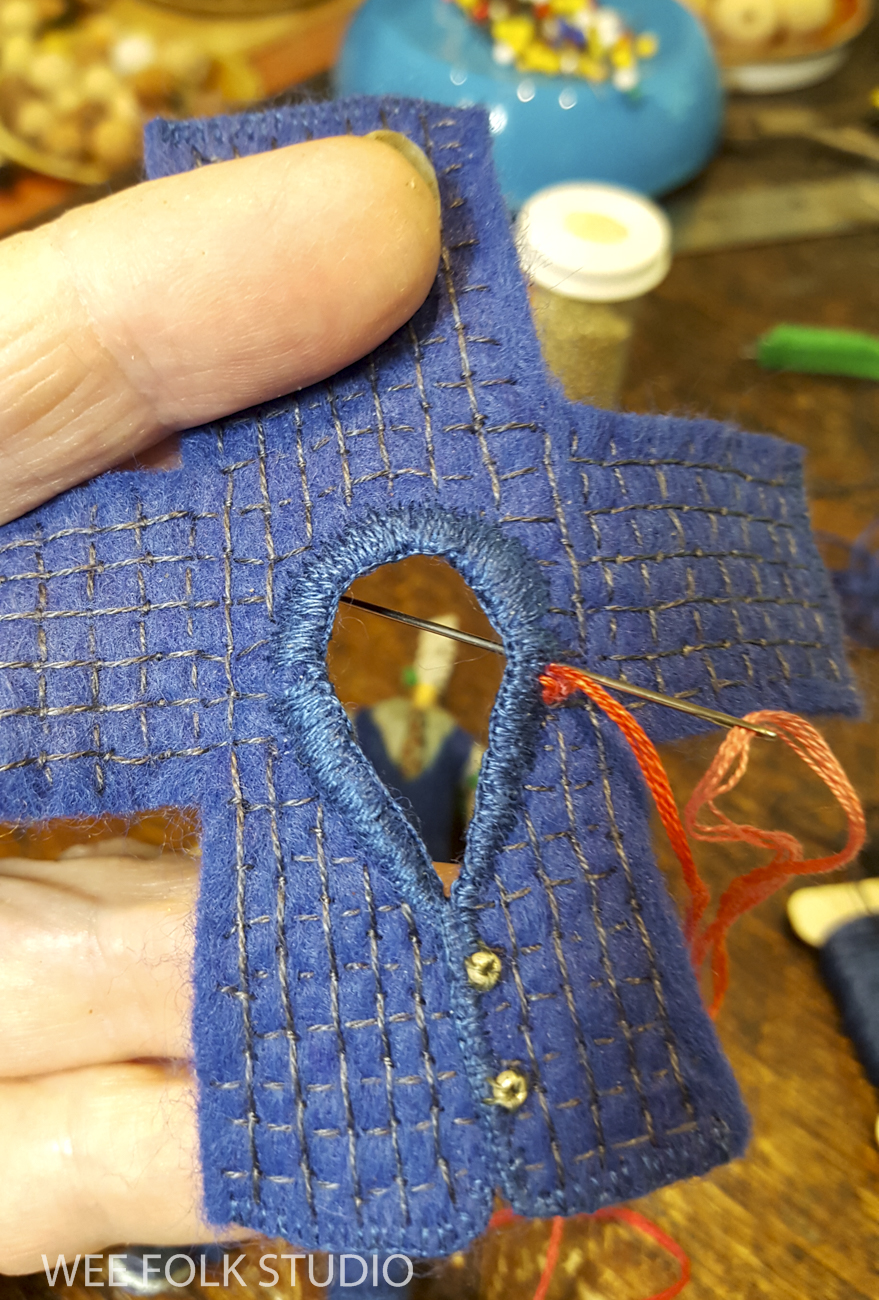
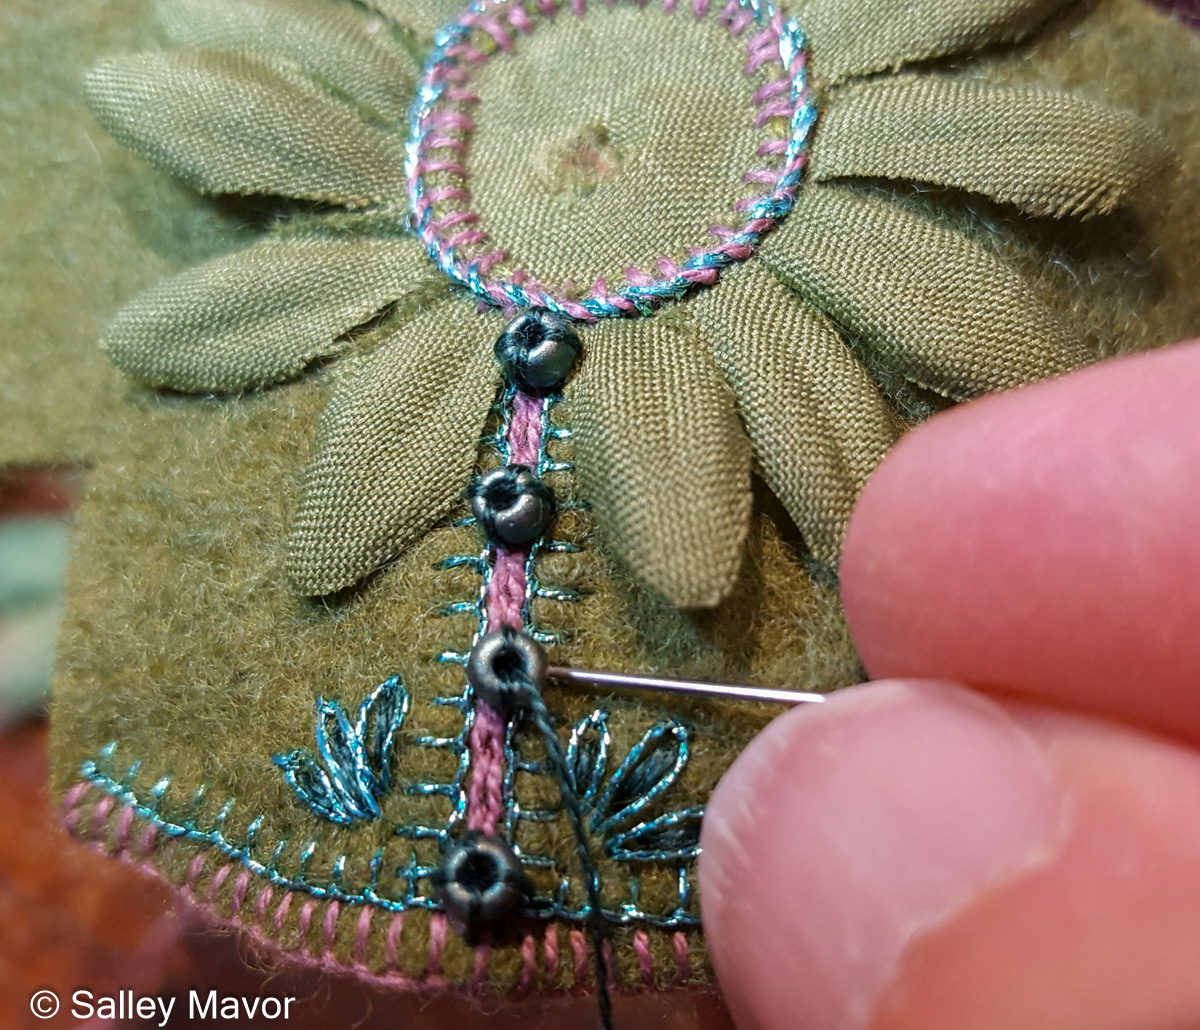
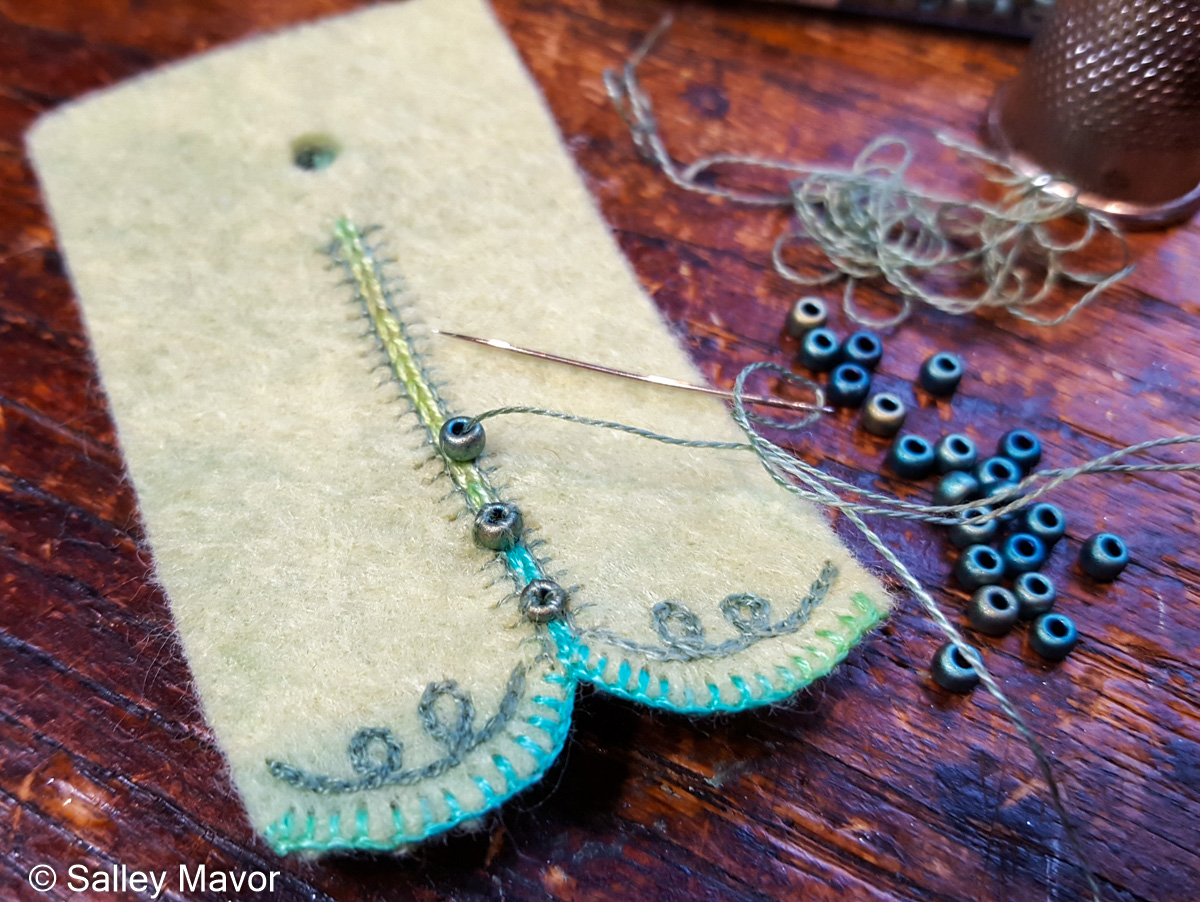
I made a peplum jacket pattern and cut it out of felt, which I embellished with a flower petal collar, beads, embroidery floss, and metallic thread.

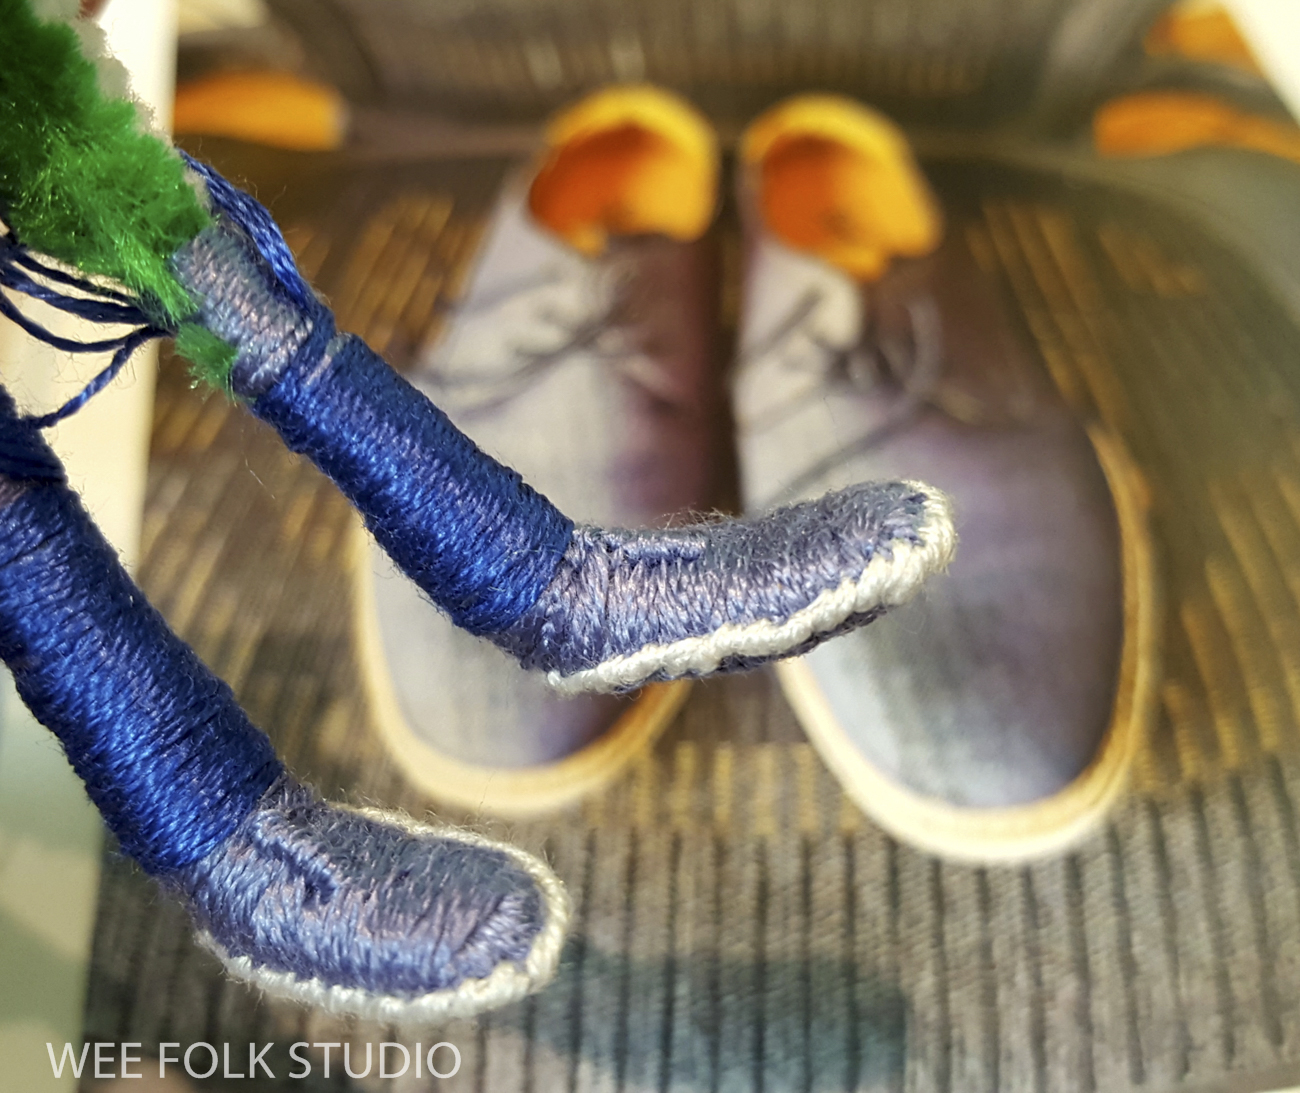
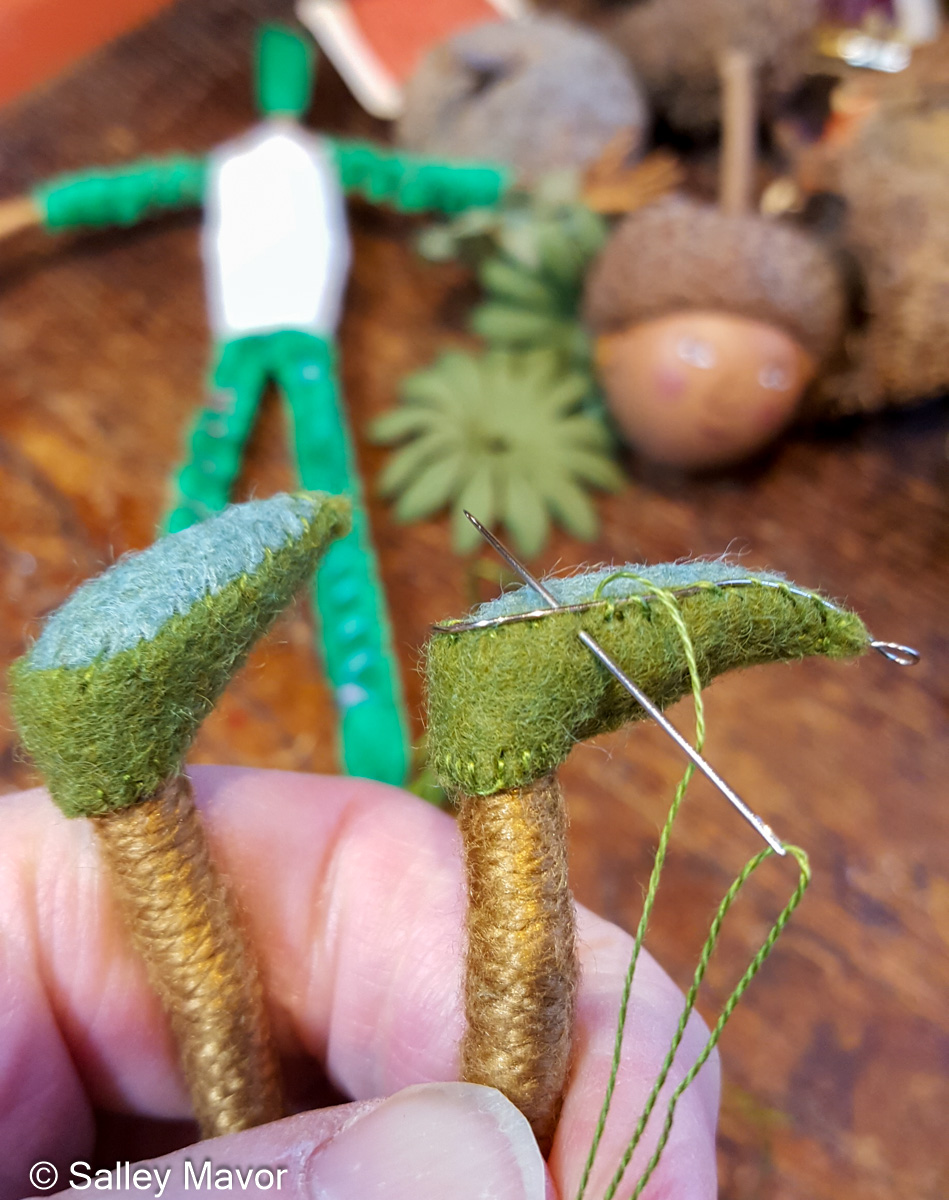
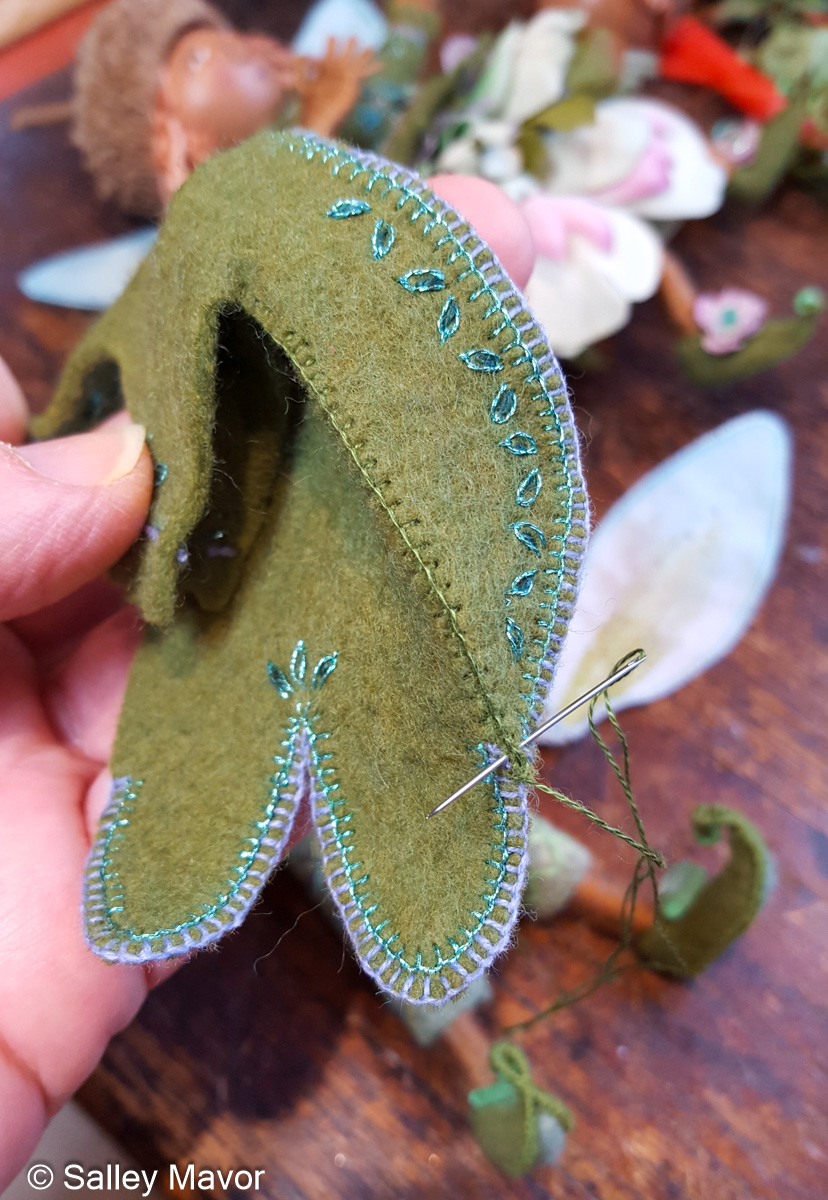
Because these fairies have nice big feet, I could more easily cobble shoes for them. This pair of slippers are made out of felt, with a bit of wire reinforcement to give them a pointy elfin look.

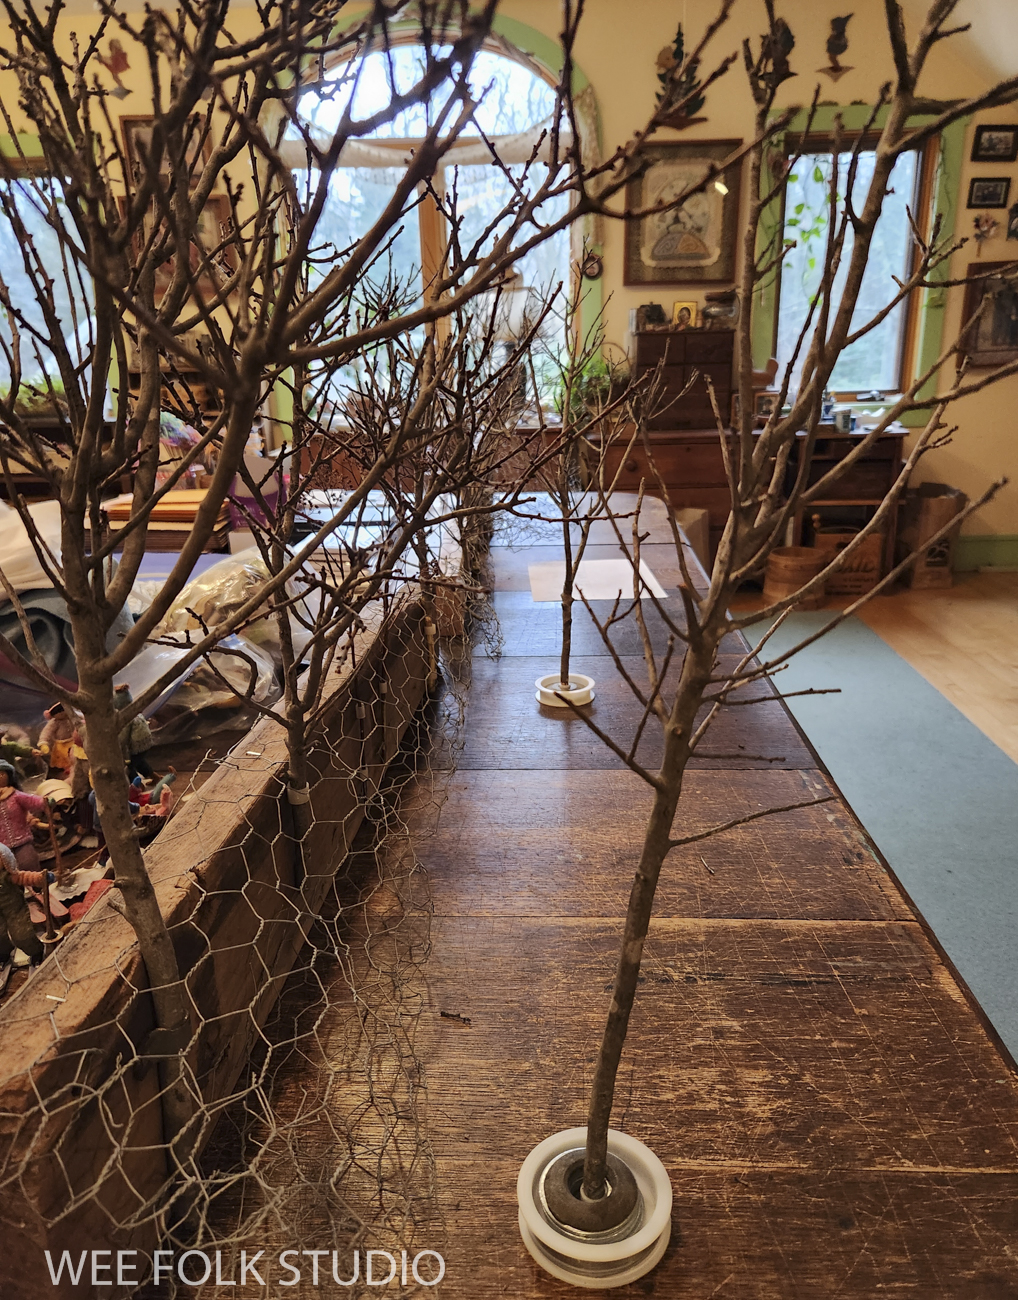
Here’s a video of my work table that I shared on Facebook and Instagram in 2020. The response to the video was mixed. Some people were uncomfortable with the disorderly jumble, while others were relieved to see another creative space that looked as messy as theirs.

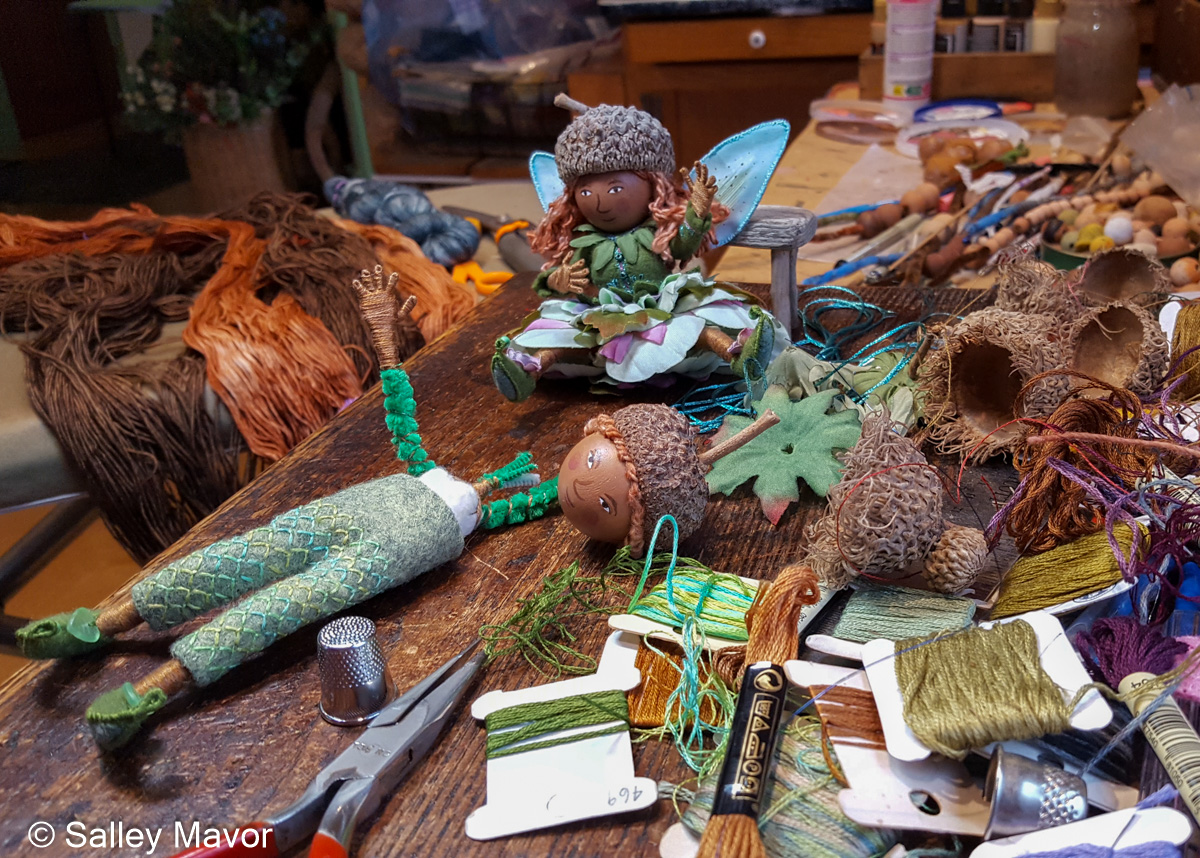
I attached felt wigs to the bead heads using the same techniques that I teach in my how-to book, Felt Wee Folk. This doll’s hair is made with variegated single ply Merino wool from Flying Finn Yarns. I created tangled ringlets by stitching yarn up an down the long tresses.

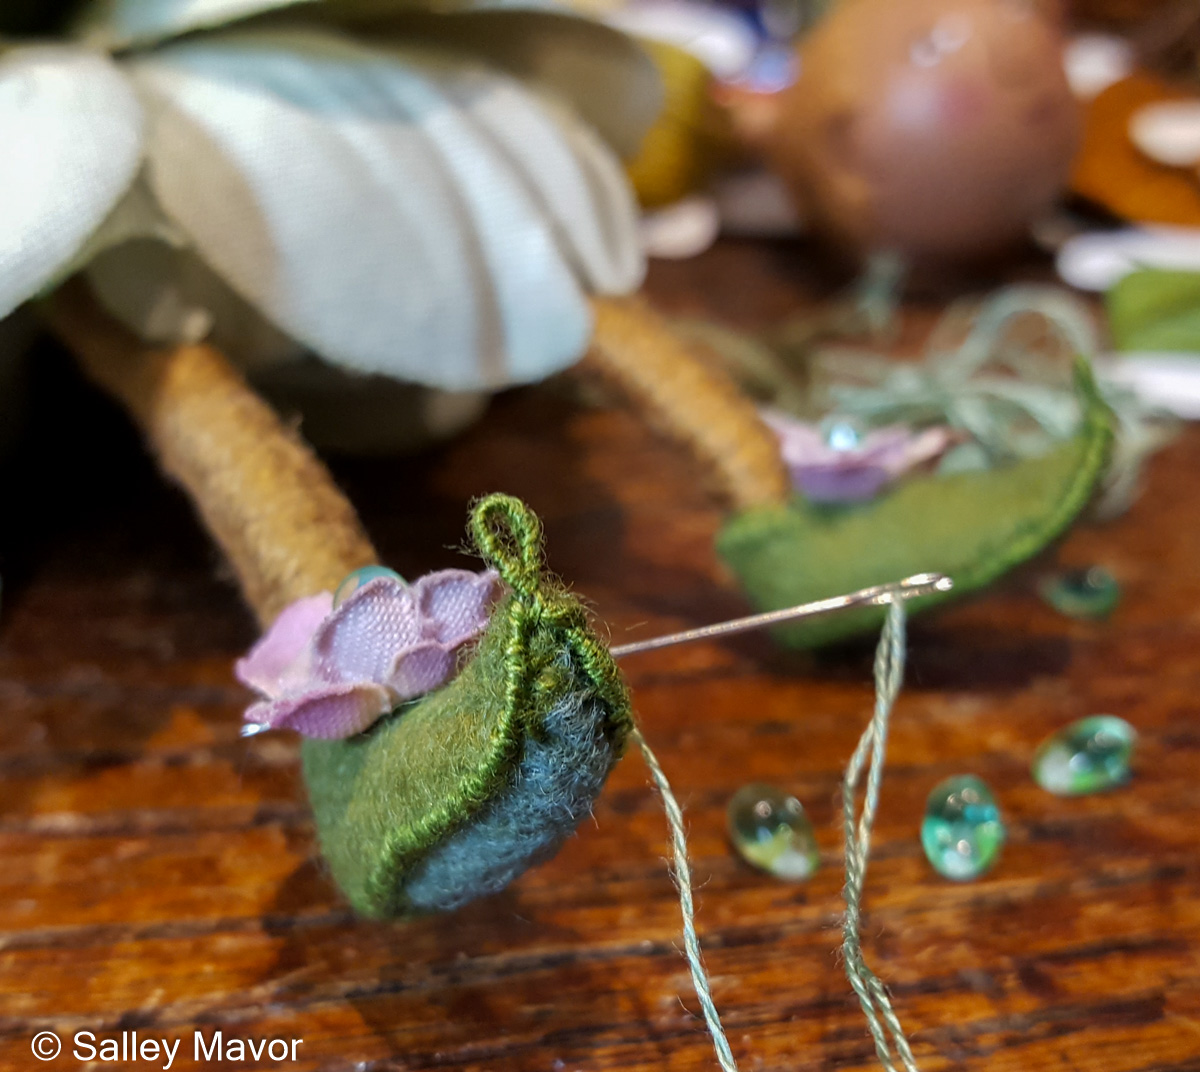
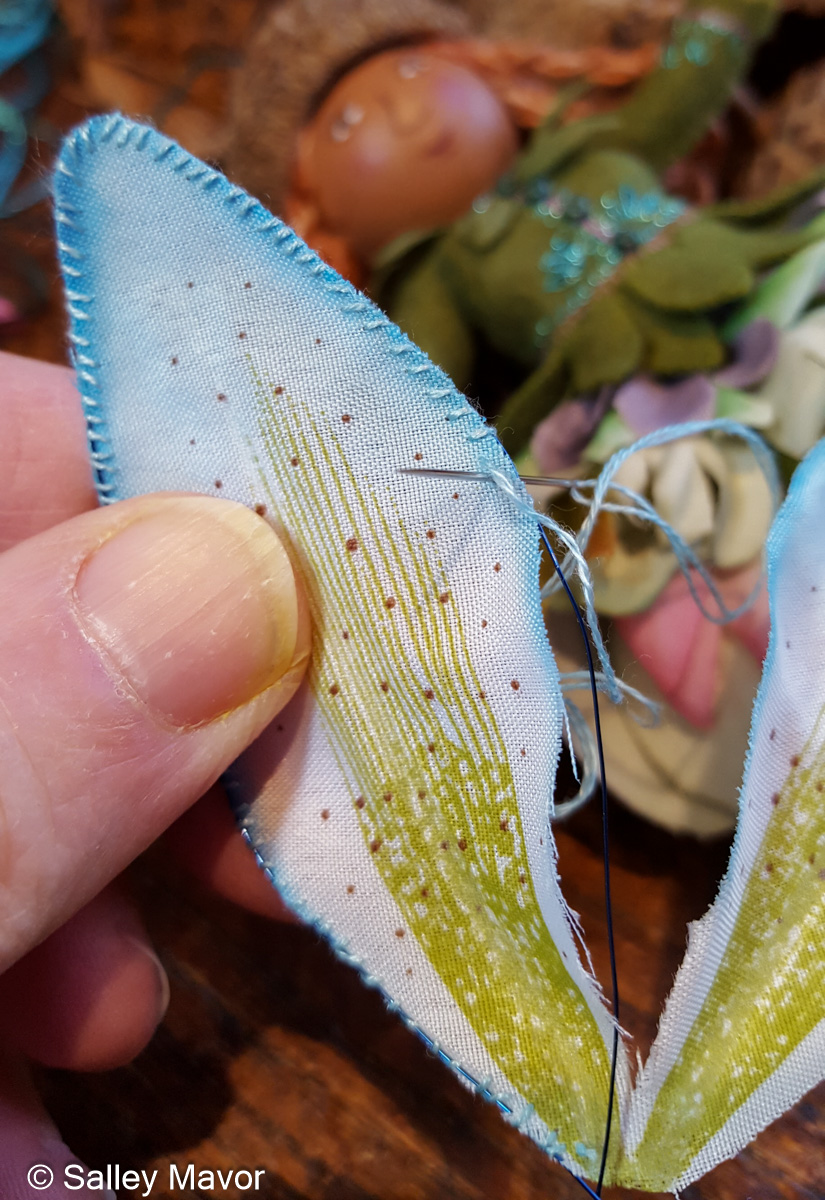
Just as with the smaller fairies, I made wings out of faux flower petals. But because of the increased scale, these wings were too floppy. I gave them extra support by sewing wire along the outside edge, going around a few times until the wire was completely hidden by thread.

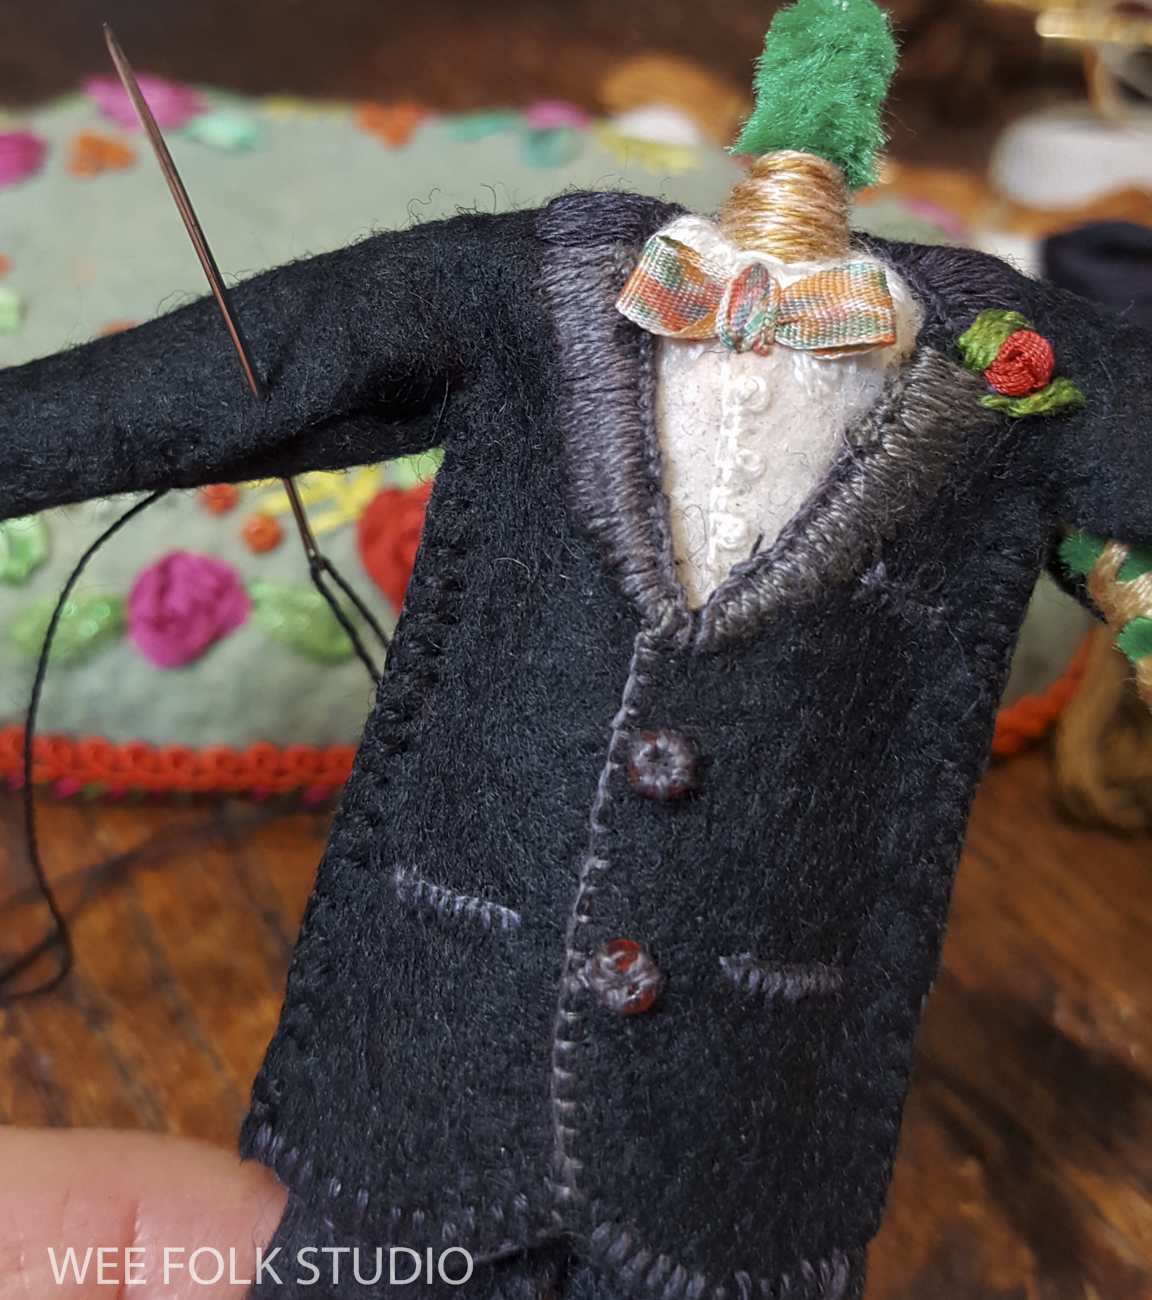
In this video, you can watch over my shoulder while I stitch wire to the outside edge of a wing and embroider a felt tailcoat.

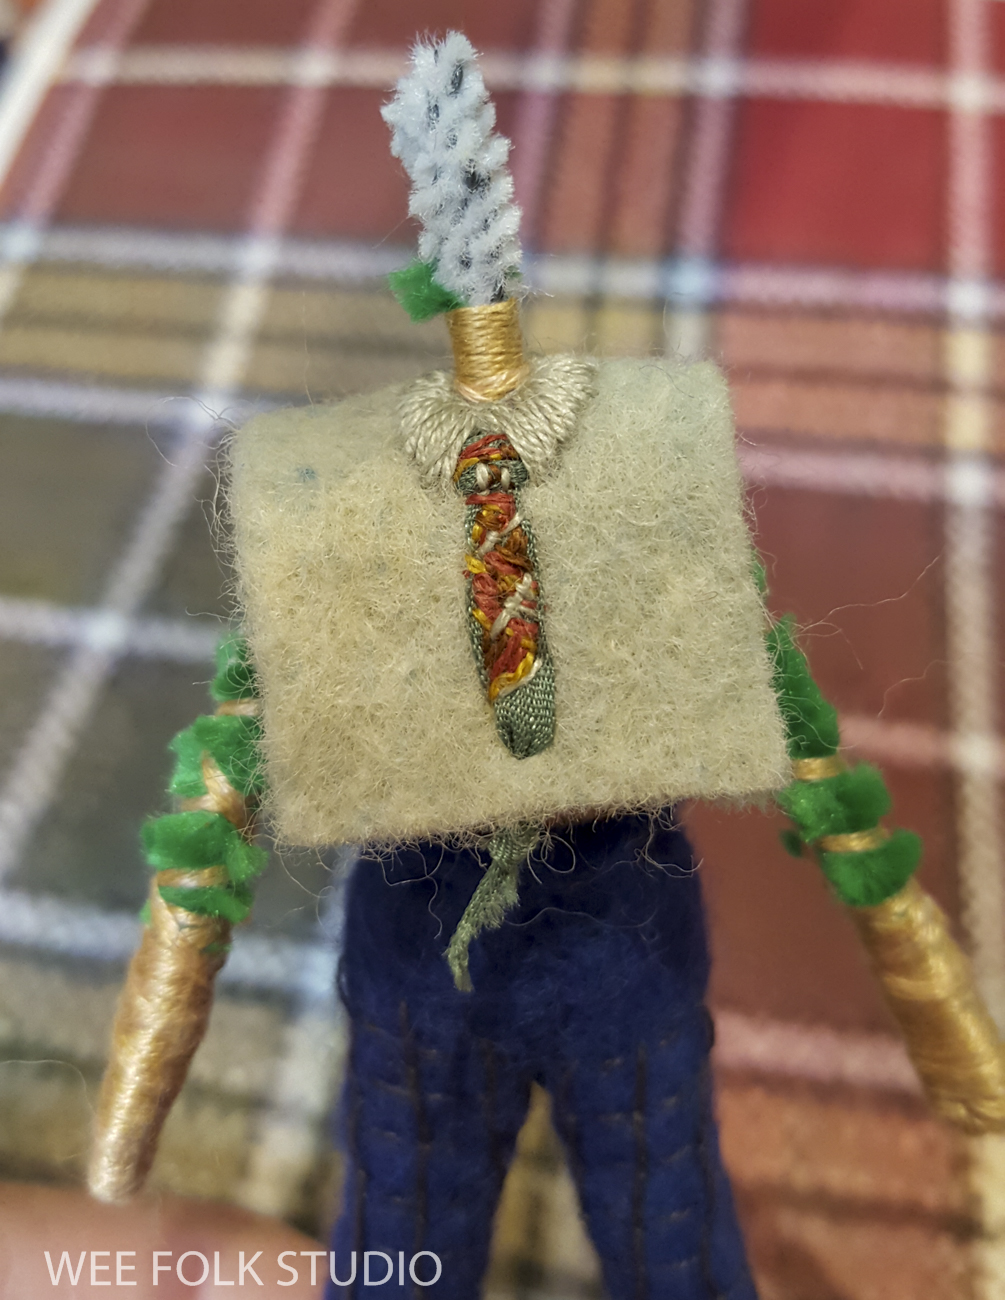
I dressed one of the fairies in an embroidered felt vest and leafy cravat…

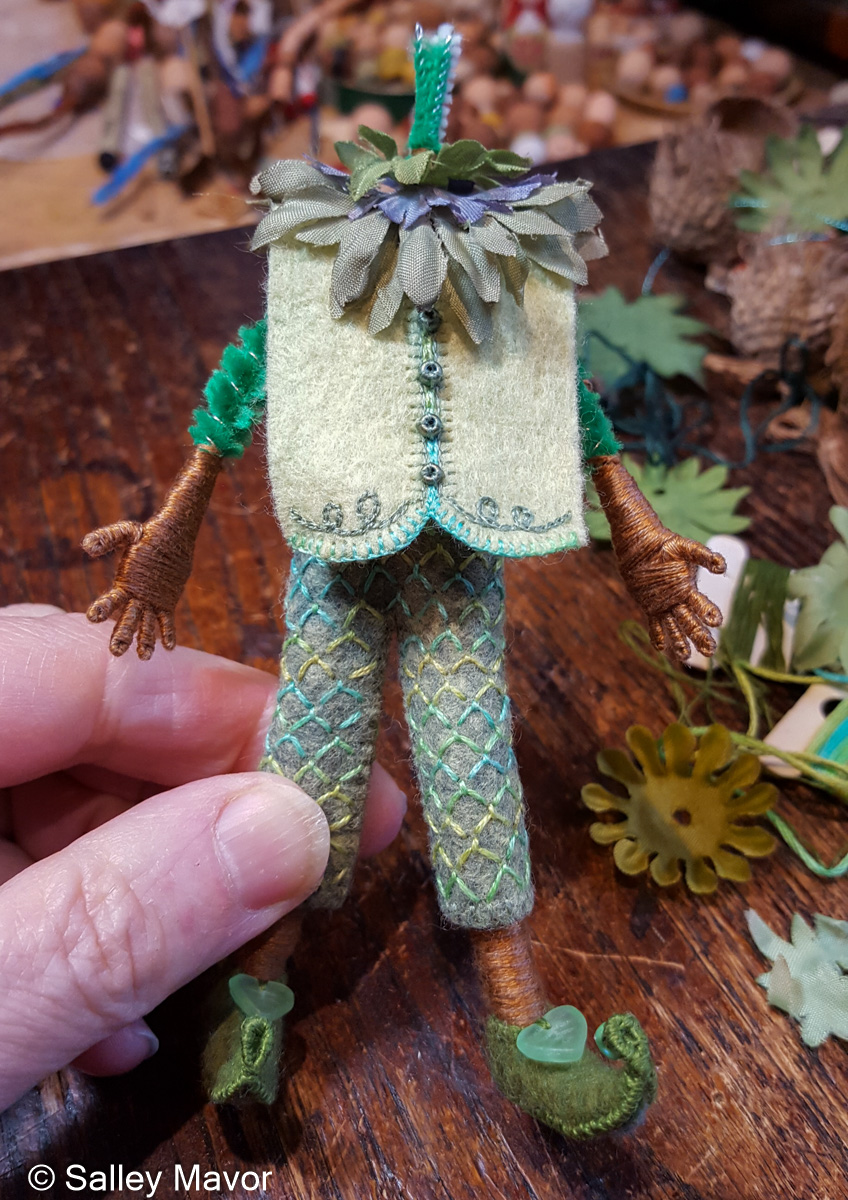
and a green felt tailcoat embellished with metallic thread.

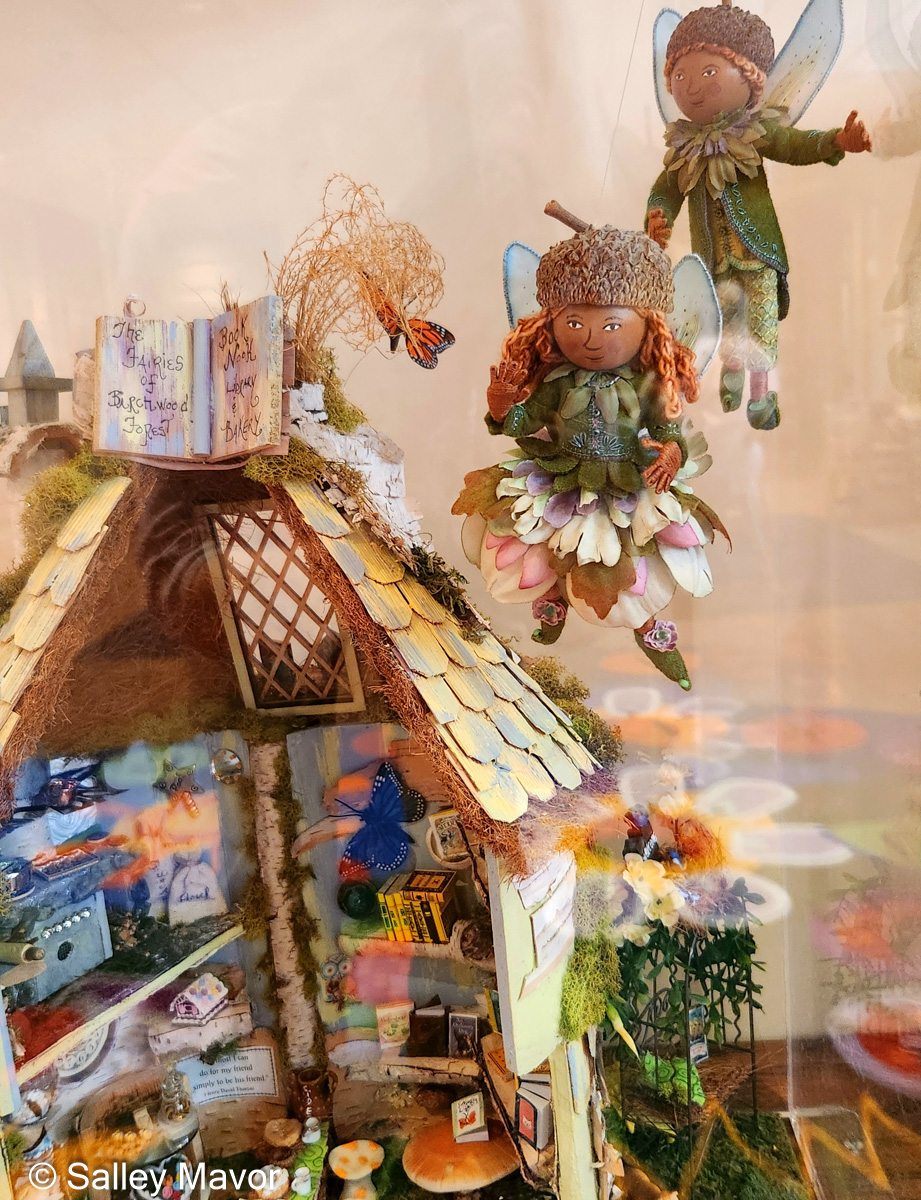
At 5 and 6 inches tall, they are the largest and best dressed fairies I’ve ever seen!

The Bur Oak Fairies’ permanent home is in the West Falmouth Library, downstairs in the Moira Shea children’s room. You can find them hovered over a fairy house made by Andrea Riggillo.

To keep up with new posts, subscribe to this blog. If you’d like to see more frequent photos tracking the projects in my studio, please follow me on Facebook and/or Instagram.

Cover Madness at The Horn Book

UPDATE: I just received word that my 2012 cover was voted the winner of The Horn Book Magazine’s Cover Madness contest in the January/February category! As part of this year’s centennial celebration of the magazine’s founding, this “very-subjective, not-serious event” will continue with more contests to pick covers from previous issues published in March/Aril, May/June, etc. By the end of Cover Madness, 6 different covers will “emerge as winners”.

What a wonderful surprise this is! Even though the children’s book community has always been very supportive, I sometimes feel like an imposter because of my singular vision and nontraditional illustration medium. So, I’m especially honored to have my work recognized this way. Of all the groups my work is lumped into, from embroidery to doll making, the storytelling genre of children’s books is where I feel most at home. I hope that you enjoy this account from 2012 about how I made the cover!


This is an edited and republished version of a post that was first written in 2012.

The Jan/Feb 2012 issue of The Horn Book Magazine is out, with my illustration on the cover. This issue has many wonderful articles and book reviews, including the 2011 Boston Globe-Horn Book Award speeches, which were delivered at the colloquium on Sept. 30th, 2011.

In this post, I share the process of making The Horn Book cover illustration, which I worked on for about 6 weeks this past summer. The original size of the scene is about 12″ wide and 18″ high. The original piece was purchased by an art collector who is connected to the children’s book world.

As the Horn Book Award recipient for Pocketful of Posies in 2011, I had the honor of illustrating a cover for the magazine. You can find out more about my award here. Signed copies of the book are available in my Etsy Shop.


THE TREE
I first found a twisted vine to use as the central tree and made a sketch with the Horn Book logo and child characters. I then drilled holes on the vine where wire branches would go.  

To form the branches, I covered wire with felt and embroidered them to match the real vine/tree trunk. This coiled branch has thread-wrapped wire thorns attached.

The Horn Book logo was rendered in wire branches and found objects. For one of the O’s, I sawed the back of a walnut-shell, so that it would lay flat and not stick out too much.  The O in the word Horn is a nest-like acorn cap from an oak tree in Iowa and the B’s spiky acorn caps are from northern California.

THE FELT BACKGROUND
I thought that a solid color background would looked too plain, so I stitched together scraps of naturally dyed wool felt to make a more interesting field for the action.

I made a little fairy to fit in the walnut-shell.

THE CHILDREN
I didn’t want the characters to be animals, but children dressed in animal costumes. So, I made every effort to make them look like children by giving them bangs, ponytails, hands and shoes. These figures are made with similar techniques found in my how-to book, Felt Wee Folk.

During the process, I changed some of the characters in the original sketch and substituted a boy in a dinosaur costume pulling an acorn cap wheeled wagon full of books.

I printed out the words on acetate, so that I’d be sure to leave enough room at the bottom edge. I then embroidered plants and leaves to the felt background.

This little child/mouse is getting red shoes.

The Horn Book staff suggested I include a reading child, so I made a felt book for the face-painted mouse.

All of the parts piled up as I worked. It’s a miracle nothing got lost!

It was really fun thinking up costumes to make for these kids. I wanted to create a scene of children immersed in imaginary play and story.

I added a sun to the upper left corner and embroidered a wavy chain-stitched border. Then, I sewed the felt background to a sheet of foam core board, pulling it flat and straight.

Then, I stitched the tree, characters and other props in place, right through the foam core board. After everything was in place, I took it to the photographer, so he could take its picture. After that, I removed it from the foam core board and remounted the felt background and all of the parts on a cloth-covered stretcher. It is now framed behind glass and was recently bought by a collector. It was a joy to work on this project with Lolly Robinson at the Horn Book Magazine! Having my illustration on the cover will be a great opportunity for many people to discover my work for the first time.

Here I am with Roger Sutton, editor in chief of The Horn Book.

To keep up with new posts, please subscribe to this blog. Your contact info will not be sold or shared. If you’d like to see more frequent photos tracking the projects in my studio, please follow me on Facebook and/or Instagram.

Inuit Doll remake

In 1985, I made a velveteen Inuit doll with a seal appliqued on its parka for my son, Peter. When you make something for a toddler, or anyone for that matter, you never know how it will be received. Will they actually play with it or leave it in the corner? I needn’t have worried, because Peter loved this doll to the point where its arms and legs had to be sewn back on several times. All these years later, I have 2 really good reasons to make dolls for a new generation, because a few weeks ago Peter became a father! So, it seemed right that little Eddie and his 1 yr. old cousin, Elias would each have their own Inuit doll to love.

Little Eddie and his father Peter

I found the original sketches and patterns for Peter’s doll in my files and unearthed pieces of cotton velveteen left over from my doll-making days. The only material I needed to buy was some sherpa fabric for the fur trim. This post includes photos and videos that show the process of making the 2 new dolls for my grandsons, one decorated with a snowy owl and the other with a fish.

Back in the 80s, when practically every checkout line at the supermarket had a rack full of homey women’s magazines, I designed sewing projects for Better Homes and Gardens. Sewing projects are conspicuously absent from today’s version of the magazine, which is limited to home decor ideas, gardening, and recipes. 

I mostly designed cloth dolls, including one with a prairie bonnet that they styled on the cover of their December 1982 issue. You can also see a crèche that Better Homes and Gardens published in 1981 here. When I submitted a photo of Peter’s Inuit doll to the magazine’s crafts editor, they asked me to design 3 dolls, which were included in the December 1986 issue.

During this early phase of my career, I enjoyed coming up with project ideas and making prototypes, even though the pay was dismal and I signed away my design rights (I was young and inexperienced). By the end of the 1980s, I was ready to move on to children’s book illustration, which came with its own suite of challenges.

When I was designing projects for the magazine, writing out step-by-step instructions was my least favorite part of the job. Describing what I’d done in words felt overly analytical and thoroughly anal! It took years to learn to show and tell how to make something in a way that intuitive and visual learners like me could understand. Then, I was ready to write my how-to book, Felt Wee Folk, which combines visual diagrams and step-by-step instructions for making little dolls. To find out more about my philosophy of sharing knowledge, please read this post.

Nowadays, I’m relieved to not have to explain in detail how I make something. Demonstrating my process through photos and videos is much more natural than describing every step in words.

I hope that you enjoy the following photos and videos that show how I embroidered the doll’s face, stitched and appliquéd the snowy owl, and sewed on the arm.

To keep up with new posts, subscribe to this blog. Your contact info will not be shared. If you’d like to see more frequent photos tracking the projects in my studio, please follow me on Facebook and/or Instagram.

Baby Polar Bear Suit

Last December, I made some small gifts, including a little version of my grandson Elias in his polar bear snow suit. I’m looking forward to making more mementos like this and hope it becomes a yearly tradition! These days, it seems that practically every children’s hat and hooded outfit comes with a pair of animal ears on top. That’s fine with me – the more playful, the better!

I also made new Inuit dolls, which I’ll write about in a future post. They are a redo of a project I originally made for my kids and designed for Better Homes and Gardens magazine in 1986.

Baby Polar Bear Doll
The 4″ doll is based on the figures in my how-to book, Felt Wee Folk, only I used wool needlepoint yarn (regular knitting yarn is too bulky) instead of embroidery floss to wrap the hands and feet on the pipe cleaner armature.

As usual, I painted multiple faces on wooden beads and picked out the one I like best. Even after painting thousands of faces, I still mess up sometimes.

The suit is made with some really thick wool felt that I was given years ago. It is probably manufactured for industrial purposes rather than little polar bear suits. The video below shows how I wrapped the feet and hands and sewed on the suit.

In the past year or so, I’ve used a hands-free phone/light stand made by Canvas that makes documenting my process a lot easier. I used to have to bug Rob to stop whatever he was doing and come film different steps with his camera. Now, I can take photos or videos whenever I want to. The downside is that I can’t get into the flow because I’m always thinking about recording some aspect of how I work. And there are times when I’m so engrossed that I skip entire sections of the process. That’s why my demonstration videos aren’t really tutorials. They’re more like peeking over my shoulder while I work. You might not see every detail, but you can get the gist of it.

After sewing on the suit, I made the hood – ears and all. The hood is made from a lighter weight wool felt.

The following video shows how I glued on the head and constructed the hood.

After the doll was finished, I got the idea of chain stitching Elias’s name and the year on the back. Yes, this will definitely be a yearly tradition!

To keep up with new posts, please subscribe to this blog Your contact info will not be sold or shared. If you’d like to see more frequent photos tracking the projects in my studio, please follow me on Facebook and/or Instagram.

Baby Bunting Twins

January is reserved for playing and puttering in my studio. I really look forward to this time of hibernation, without outside distractions. 31 days doesn’t seem long enough to make all of the things I’ve been dreaming about! So far, I’ve worked on simple projects that might take a few days, instead of months or seasons. I’ve already made several gifts, including a pair of Baby Buntings for twin 3 year-old girls. This post includes photos and 3 videos that show the process of making them.

The dolls are simpler than the figures with floss-wrapped arms and legs in my how-to book, Felt Wee Folk – New Adventures. The baby’s pipe cleaner body is padded and hidden inside a felt suit. Since the dolls would be played with by real children, I doubled up the pipe cleaners to make them extra sturdy. In the following video, you’ll see me forming the armature and covering it with wool batting.

The suits are made with naturally dyed wool felt and embroidered with fine wool tapestry yarn from my old stash. I’m sad to say that DMC discontinued selling the yarn years ago.

The following video shows me stitching the bunting yoke. To give an honest impression, I left in some clips that reveal snags, instead of editing them out. Maybe someday I’ll string all of the bloopers together!

I was was so engrossed with painting their faces that I forgot to take photos or videos. Their heads are made with 1′ wooden knobs (not beads), which are available here. Beads could be used as well. I just liked the size and flat bottom of the knobs.

The following video demonstrates how I attached the head, stitched the pointed hat, and formed the silk ribbon tie, which is a process I can’t describe in words.

These little dolls were so fun to make! They are now happily living with 3 year-old twins in Vermont. Stay tuned for future stories about more gifts I’ve made this month.

To keep up with new posts, please subscribe to this blog Your contact info will not be sold or shared. If you’d like to see more frequent photos tracking the projects in my studio, please follow me on Facebook and/or Instagram.

Harvest Time – Part 7 (wee folk)

In Part 7 in the continuing series about making Harvest Time, I share photos and commentary about the wee folk characters who populate the landscape. In the coming weeks, I will post more stories that focus on different aspects of making the fall scene, including the miniature storage containers and the embroidered trees. So far, I’ve written the following posts:
The overview introduces the Harvest Time piece.
Part 1 features moss making.
Part 2 is about making the turkey tail mushroom.
Part 3 shows the construction of felt leaves.
Part 4 gives a peek at embroidering the plants.
Part 5 is about making the toadstool mushroom.
Part 6 covers the underground tunnels, roots and stones.

Harvest Time is the fall scene in a series of seasonal landscapes that capture the wonder and magic of the natural world, both real and imagined. Note cards and jigsaw puzzles of the this and other scenes in the series (Frosty Morning and Mossy Glen) are available in my Etsy Shop.

Everything I make includes some sort of living being with eyes, be they animal or human. I can’t imagine spending months working on a piece that is purely decorative, abstract or simply a landscape, without a storytelling element. The interplay between characters and their surroundings is what drives me to create. As I paint their faces, form their little bodies and stitch their clothes, I grow to care about them. This emotional connection is what motivates me to spend copious amounts of time creating an imaginary world that is worthy of their existence.

For this scene, I painted more faces than I needed, in different sizes and shades. That way, I could select a cast of characters later. I’m never sure how many figures I’ll need or exactly where they’ll end up. They are like actors in an improvisational skit or a group posed in a tableau.

The little people range in size between 1″ to 2″ tall. They were made the same way as the wee folk dolls in my how-to book, Felt Wee Folk, with slight variations. For instance, I used wire instead of pipe cleaners for their tiny armatures.

In keeping with the harvesting theme, all of the people are bringing produce to the mossy stump, where it will be stored in the cellar.

I’m often asked, “How do you knit their tiny outfits?” There might be someone out there who can knit or crochet a tiny sweater for a 2″ doll, but I challenge them to stuff their arms through the sleeves! Remember, this is make believe. The wee folk never have to bathe or change their clothes. Why knit, when you can embroider a piece of clothing directly onto a body? Rows of chain stitching are pretty convincing, don’t you think? I call it faux knitting.

Please stay tuned for more stories about making Harvest Time, including the storage containers and embroidered trees.
The overview introduces the Harvest Time piece.
Part 1 features moss making.
Part 2 is about making the turkey tail mushroom.
Part 3 shows the construction of felt leaves.
Part 4 gives a peek at embroidering the plants.
Part 5 is about making the toadstool mushroom
Part 6 covers the underground tunnels, roots and stones.

To keep up with new posts, please subscribe to this blog. Your contact info will not be sold or shared. If you’d like to see more frequent photos tracking the projects in my studio, please follow me on Facebook and/or Instagram.

Adaptive Sled for the snow scene

This father and child pair is included in my winter themed display that is currently on view at Boston Children’s Hospital. The exhibit, which I wrote about in a previous post, is in the Mini-Museum in the Hale lobby, not far from the main entrance to the hospital at 300 Longwood Ave., Boston, Massachusetts through March 15th.

The hospital’s art program manager requested that I make a little adaptive sled for riders with disabilities to include in the snow scene. For reference, she sent a link to this futuristic looking contraption. At first I balked at the idea because of such short notice during the holidays. But, I decided to give it a try, as long as she understood that it would be a naturalistic wee folk version.

I knew it would take at least a couple of days to make, so I pushed aside other impending deadlines and focused entirely on the sled. I picked out a father and child from the collection of sample dolls I’d made for the Winter Play chapter of my how-to book, Felt Wee Folk.

I studied the photo of the adaptive sled and and made sketches of its basic structure. I measured the figures and bent wire to form the seat, back frame and handle bars.

I wrapped embroidery floss around the wire frame, making several passes until the shiny metal was thoroughly covered and the thread looked smooth and even. Wrapping is the most time-consuming part! You can’t really rush the process, otherwise it comes out lumpy and crude looking.

I formed the lower frame and runners out of wire and bound it to the seat frame with thread. At this stage the wrapping was quite fussy, with lots of maneuvering in and around joints.

I added arms to the seat with a finer gauge wire.

Up until this point, I hadn’t chosen exactly how to finish the seat – felt or floss or a combination. Since the sled was looking more and more like an old fashioned caned chair, I decided to go all out and weave the seat. I’m not sure how warp and weft apply here, but I basically set up a loom.

In this video, you can see the weaving process from the top and the bottom.

Here’s a video of the installation in Boston Children’s Hospital.

I’ve already been contacted by several people who saw the display while going to a doctor’s appointment with their child or grandchild. Hearing their reactions warms my heart and makes it feel like the effort was worth it! If you’re in the area, please stop by the Boston Children’s Hospital’s Mini Museum.

Boston Children’s Hospital Installation

I’m excited to announce that a winter themed display full of my wee folk characters is on view until March 15th at Boston Children’s Hospital, which has been named the country’s #1 pediatric hospital for 9 years in a row.
UPDATE: Good news! The show has been extended until March 27th.

The 8 ft. long case is located in the Mini-Museum in the Hale lobby, not far from the main entrance to the hospital at 300 Longwood Ave., Boston, Massachusetts. The exhibit, which is sponsored by the Art Program at Boston Children’s Hospital is for patients and their families, staff, and visitors to enjoy.

I’m thrilled to be given the opportunity to show my work in the hospital and hope that it provides a bit of comfort and joy to the children and their families who pass by on their way to appointments and treatments.

The snow scene is populated with sample dolls from the Winter Play chapter of my how-to book, Felt Wee Folk: New Adventures. The book includes instructions for making the dolls and stands like the ones I used in this scene.

After being invited to show my work and consulting with the hospital’s art program manager, I drew up this sketch that showed how I envisioned the display case. We agreed that placing the 3-dimensional snow scene at child height on the bottom shelf was important.

I constructed wood and chicken wire supports for the snow bank and trees, which I tested out on the big oak table in my studio. Bayberry branches, with their densely packed branches are the perfect scale for a scene like this.

For the free-standing trees, I made weighted stands from plastic wire spools and a stack of metal washers, which I padded with stuffing and covered with white felt.

This video shows the practice set-up of the winter scene in my studio.

Snow scene practice set-up in studio

I packed everything up and drove to Boston to set up the scene. Some of the figures aren’t really dressed for cold weather, but they wanted to come along anyway!

Also in the case, above the snow scene set up, are printed enlargements of Frosty Morning, Winter Play (from Felt Wee Folk) and Snow. All 3 are available as cards in my shop.

Here’s a video of the installation in Boston Children’s Hospital.

Snow Scene Display at Boston Children’s Hospital

Most of the figures and houses are from other projects, so I was able to reuse them for this display. I did make something new, though – an adaptive sled for riders with disabilities. I took lots of photos of the process of creating the sled, which I’ll share in a future post.

I’ve already been contacted by several people who encountered the exhibit while going to a doctor’s appointment with their child or grandchild. Hearing their reactions warms my heart and makes it feel like the effort was worth it! If you’re in the area, please stop by the Boston Children’s Hospital’s Mini Museum.

To keep up with new posts, please subscribe to this blog. Your contact info will not be sold or shared. If you’d like to see more frequent photos tracking the projects in my studio, please follow me on Facebook and/or Instagram.

Sam and Louisa’s wedding dolls

This summer, both my son Ian and Sam, his best friend from childhood, got married. Here they are at age 3 and at Sam’s wedding last weekend. So, I had the pleasure of making personalized cake toppers for 2 wedding couples! You can see the post I wrote about Ian and Liz’s dolls here.

Sam and Louisa hosted a heart-felt and whimsical ceremony and reception, full of do-it-yourself touches, at their home in Falmouth, MA. Sam is a radio announcer and reporter for WCAI, our local NPR station and Louisa teaches ballet and is also the handwork teacher at the Waldorf School of Cape Cod.

A few weeks before the wedding, Sam and Louisa sent photos of their wedding attire and accessories, including their shoes. As I teach in my how-to book, Felt Wee Folk, the figures are constructed from the feet upward.

I also asked them to send head shots, specifically with closed mouths – no toothy grins, which are difficult to paint. When depicting real people, I like to paint their likenesses way in the beginning of the process. That way, I feel attached to them. They aren’t just dolls, but individuals with unique characteristics who are dressing up for a special occasion.

After forming the bride’s limbs with pipe cleaners and wrapping the arms and legs with embroidery floss, I sewed felt around the torso and stitched on boob beads.

Then, I covered the torso and boob beads with a layer of cotton batting and stitched more embroidery floss onto the upper chest area. Dressing bride dolls is a challenge because so often they wear skimpy gowns that show a lot of exposed skin. It’s so much easier to make the groom’s suit out of wool felt!

To make Louisa’s hair, I stitched embroidery floss onto the felt “wig”, which I’d previously glued onto her wooden bead head (see photo above). I should mention that at this point, her head is not yet glued onto the neck. That came at the end, after her clothing was finished. I popped her head on and off throughout the process to check how it looked.

I found some white silk (or silk-like) fabric in my stash to make Louisa’s gown.

I formed Sam’s pipe cleaner body and he lay on my work table in his underwear, while I waited for photos of his suit.

Using photos of Louisa’s family heirlooms, I fashioned her veil and pearl necklace.

With Sam still in his underwear, I pressed forward and made the platform that they would stand on, which is basically a piece of wood covered with felt. I chain stitched their wedding date in orange and outlined the numbers in purple to make them more prominent.

I used a spider web technique to embroider ribbon roses, which I learned on YouTube.

I added more ribbon embroidery and bead embellishments.

I glued a piece of felt to the bottom of the wooden platform and stitched the embellished felt top piece to it around the outside edge. Then I edged the base with twisted memory wire and braid.

As soon as the photo of Sam in his black velvet jacket appeared on my phone, I got to work creating its wee version.

To make Sam’s floral bow-tie, I decorated silk ribbon with markers and stitched it to his shirt.

It didn’t take long to sew his jacket onto the pipe cleaner body, and glue his head on top. Now, he was all ready to get married!

For her bouquet, i weeded through my collection of miniature flowers, guessing what it might look like. In reality, it turned out that she held a bouquet of dahlias in a very similar color scheme.

Before covering the wooden base with felt, I had drilled holes for sewing their feet in place. I had marked the location of the drill holes on the felt, so it was easy to anchor their feet with a few stitches using a long sewing needle.

Here they are, atop their lemon poppy seed wedding cake, which was homemade by the bride’s sister. Congratulations and best wishes to Sam and Louisa!

To keep up with new posts, please subscribe to this blog. Your contact info will not be sold or shared. If you’d like to see more frequent photos tracking the projects in my studio, please follow me on Facebook and/or Instagram.

Ian and Liz’s Wedding Dolls

Before sharing the process of making wedding cake topper dolls for my son Ian and his new bride Liz, I want to remind you to sign up for a ZOOM Talk that I’ll be giving on August 25th at 2:PM (eastern time). “An Afternoon with Salley Mavor” will be hosted by the Brick Store Museum, where my retrospective exhibition is currently on view until Sept. 11. The Talk will be recorded so that those registrants unable to attend the live chat will receive the recorded version the next business day. I look forward to seeing your smiling faces, as I share the story of my life’s work, touching on where it came from, how it has evolved and why I do it. Have your questions ready! Please register HERE.

My first major retrospective exhibition, “WHAT A RELIEF: The Art of Salley Mavor” is currently
at the Brick Store Museum in Kennebunk, Maine until Sept. 11, 2022

Now back to Ian and Liz, who are as adorable in real life as they are in doll form. Their wedding, which took place on July 23rd in New Haven, CT on what could have been the hottest day of the year, was a wonderful and joyous event. Rob and I are thrilled to welcome Liz into our family!

Ever since they announced their engagement a year ago, I’ve looked forward to making Ian and Liz a personalized set of wedding cake toppers. Over the years, I’ve made wedding dolls for close friends (see them HERE) and samples for a chapter in my how-to book, Felt Wee Folk, but this is the first time in several decades that someone in our family has had a wedding to make them for!

I had a short window of time to work on them in late June and early July, after my exhibition in Maine was underway and when Ian and Liz could provide reference photos of their clothing, hair styles and other details. If you’ve made figures using the instructions in Felt Wee Folk, you’ll know that you start with the feet, so I couldn’t begin until I had photos of their shoes.

Ian chose a tartan tie (Buchanan from my mother’s side) that we bought for him on our last trip to Scotland. We have Scottish ancestors through many branches of the family, so there are a few different tartans to choose from, but those are never available in souvenir shops.

I matched the window pane weave of Ian’s suit with a stitched grid of embroidery floss and added a French knot boutonniere to the button hole stitched collar.

It’s been a while since I’ve made glasses, so I referred to my Cover Up poster to see how I twisted wire to form their shape.

Before painting his face, I asked Ian if he would be clean shaven or sport a beard on his wedding day. He carefully planned for a 3 day old scruff look, a favorite with millennials.

The bridal gown was so much fun to replicate in miniature. To get a womanly shape, I sewed a pair of boob beads onto the armature and then created the bodice with a combination of felt, embroidery floss and metallic thread.

The metallic thread was a pain to work with, but it did the job!

Liz sent photos of her hair in a low bun, which I copied.

To make the curly tendrils in front, I smeared glue on a few strands of floss and wound it around a piece of insulated wire until it dried.

When the dolls were finished, I moved onto their platform, which was an oval shaped piece of wood I found at Michael’s.

Planning ahead for when I would sew them in place, I drilled 4 holes (one for each foot) through the wood.

I cut out a piece of wool felt and chained stitched their wedding date in the space that would be in front of their feet. In the photo, the dolls aren’t sewn in place yet, just balanced there while I gauged the spacing.

I used a spider web technique to embroider ribbon roses, which I learned on YouTube.

It was a chance to use some of my collection of silk ribbon, which usually just sits in a basket looking pretty.

The dolls relaxed while I decorated their stand.

I glued a piece of felt to the bottom of the wooden platform and stitched the embellished felt top piece to it around the outside edge.

For a finishing touch and to add some visual weight, I sewed rows of braid and twisted red and green memory wire to the bottom edge of the stand. I had marked the location of the drill holes, so it was easy to anchor their feet with a few stitches using a long sewing needle.

In anticipation of the fact that the wedding couple would be placed on top of a frosted cake (it was carrot cake with cream cheese frosting), I stitched a layer of wax paper to the bottom to protect the felt. It was a good thing, because afterward the wax paper was a bit sticky when I ripped it off.

To keep up with new posts, please subscribe to this blog Your contact info will not be sold or shared. If you’d like to see more frequent photos tracking the projects in my studio, please follow me on Facebook and/or Instagram.