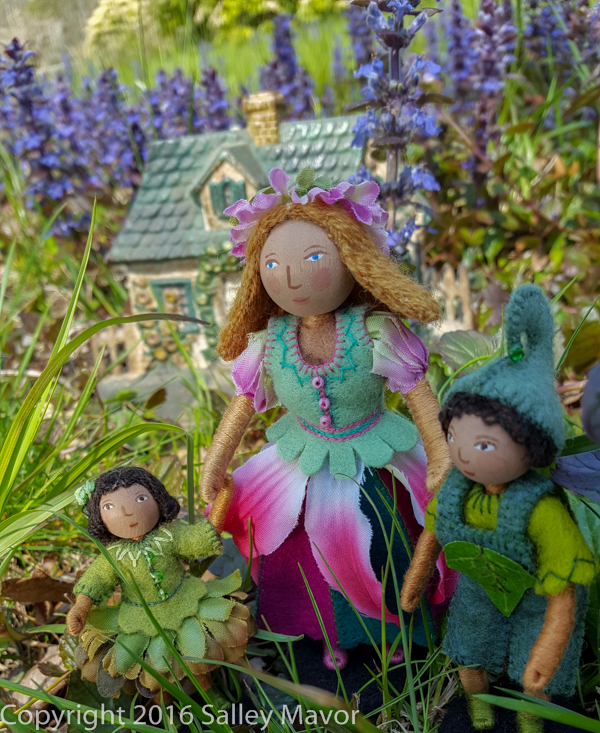
The fairy making habit is hard to break. Time and time again, the urge to make these little dolls gets the better of me, even though I swore off making multiple copies years ago. Fifteen years ago, when the sale of the “last” set of limited edition fairies was announced, my intentions were good.
Looking back, banning mass-production in my studio was an important and necessary step to take, so that I could move forward and grow as an artist. But ultimately the desire to keep my hands busy during long stretches of travel time won out, resulting in new groups of fairies showing up in my shop every few years.
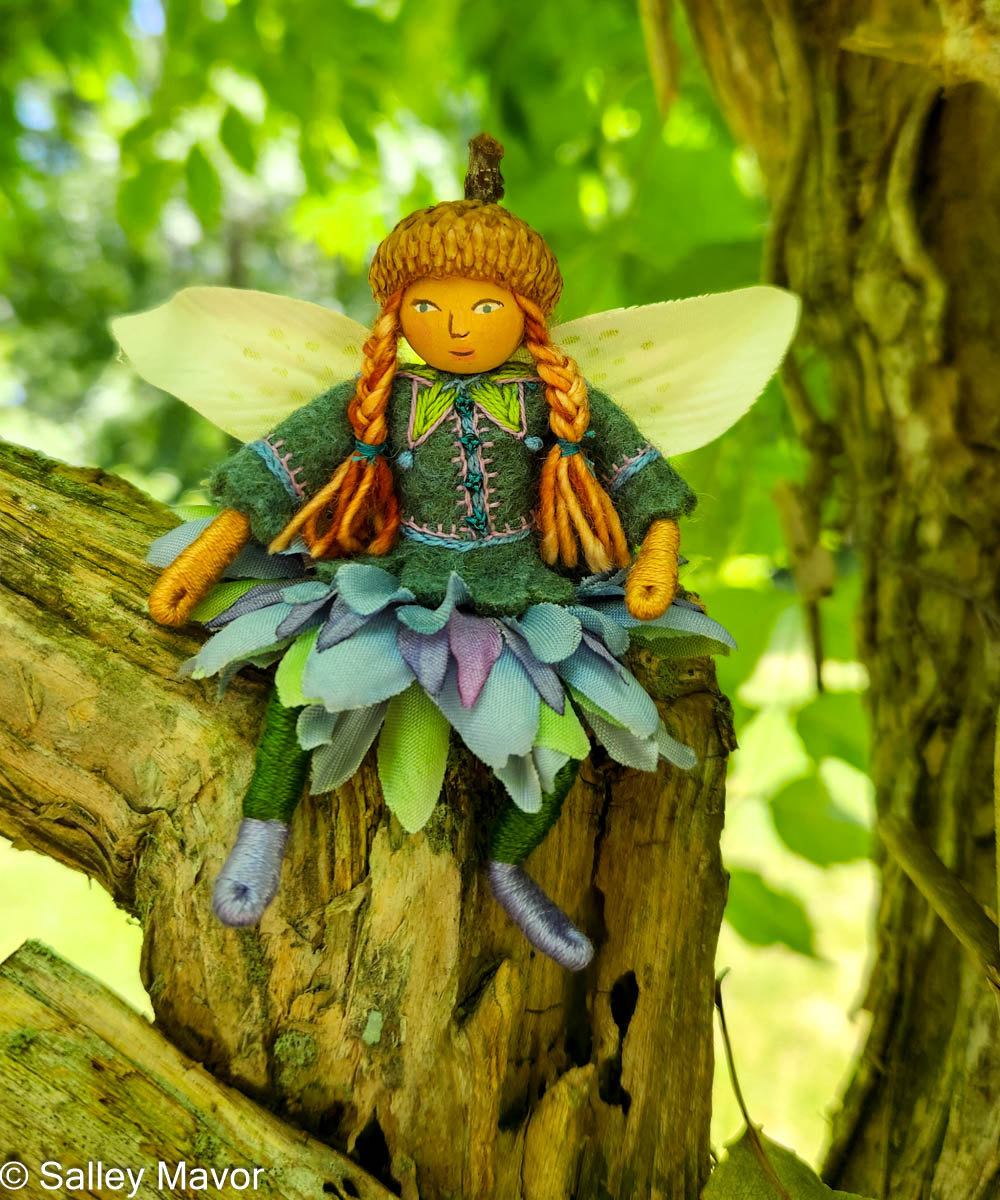
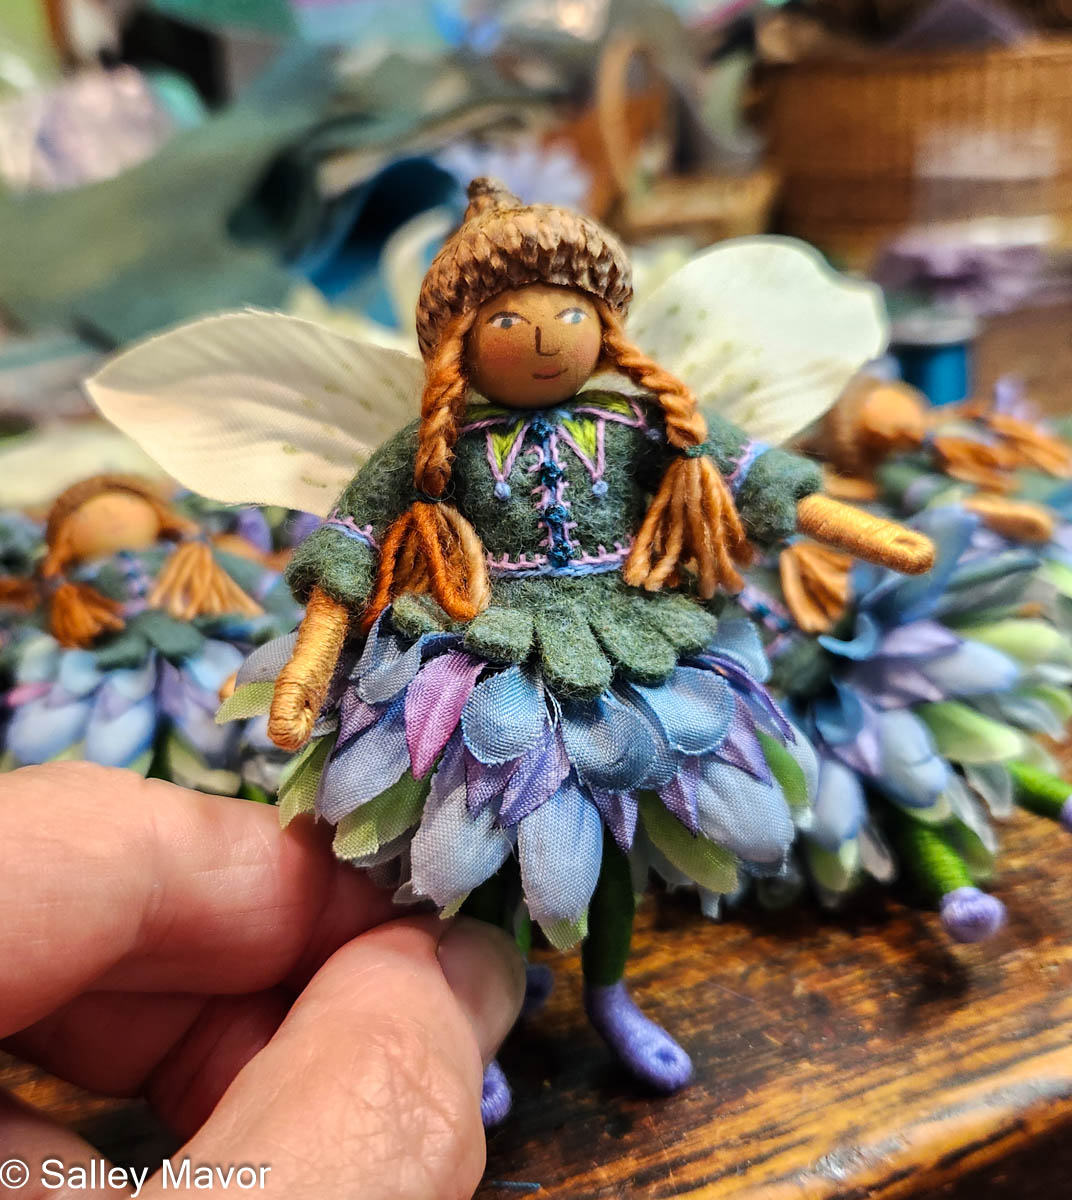
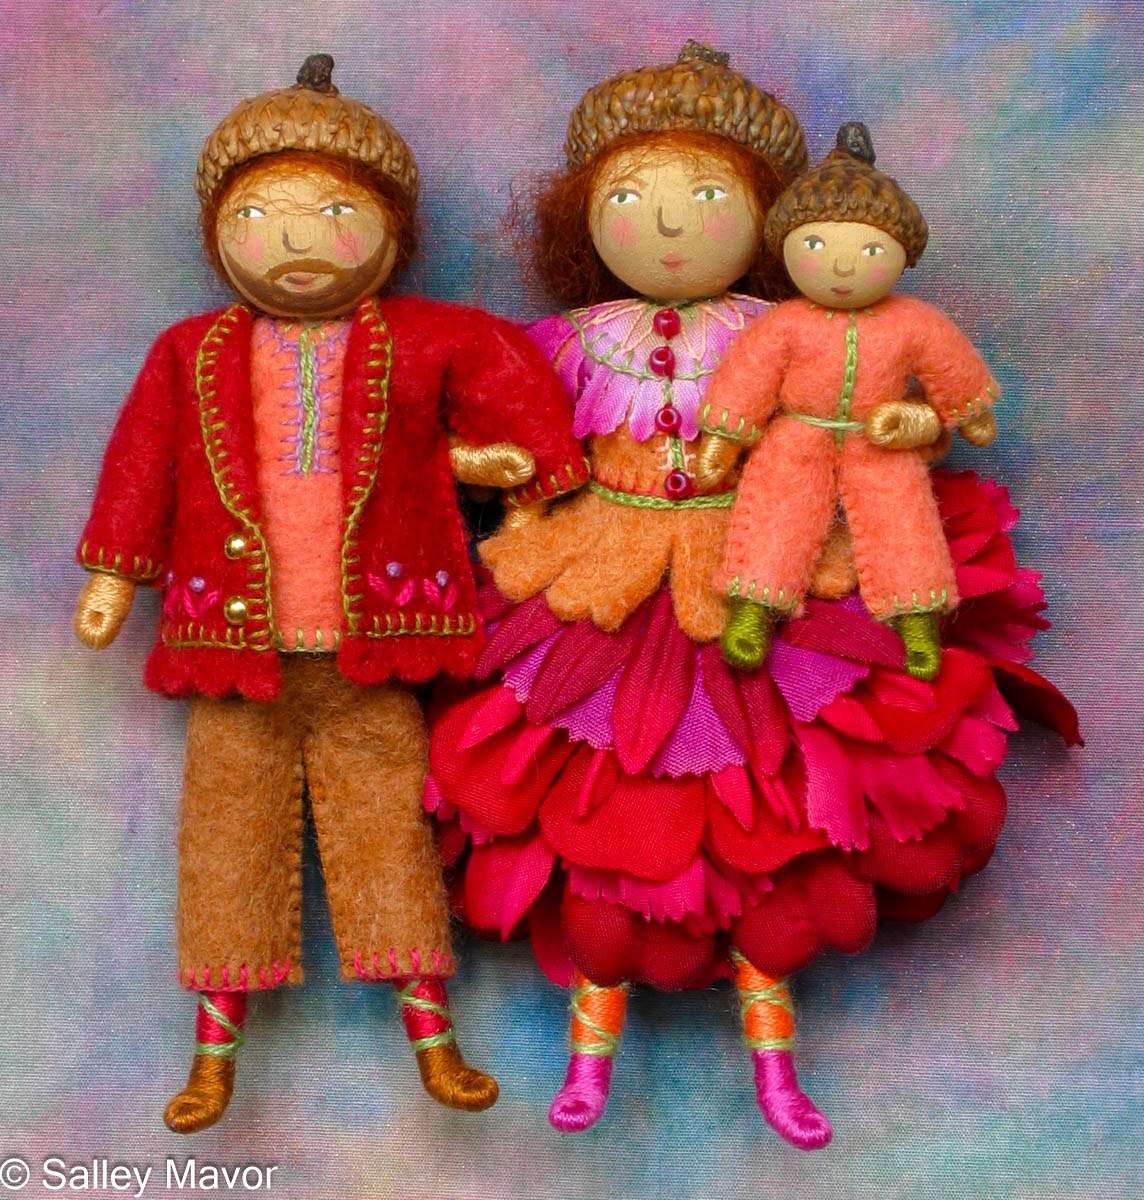
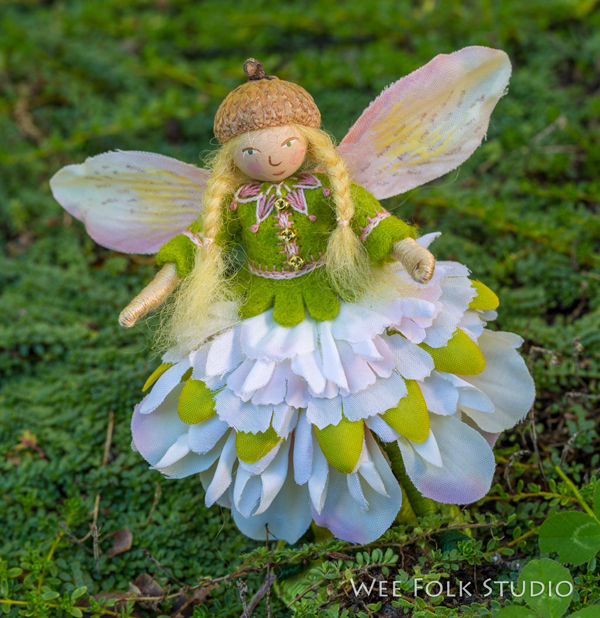
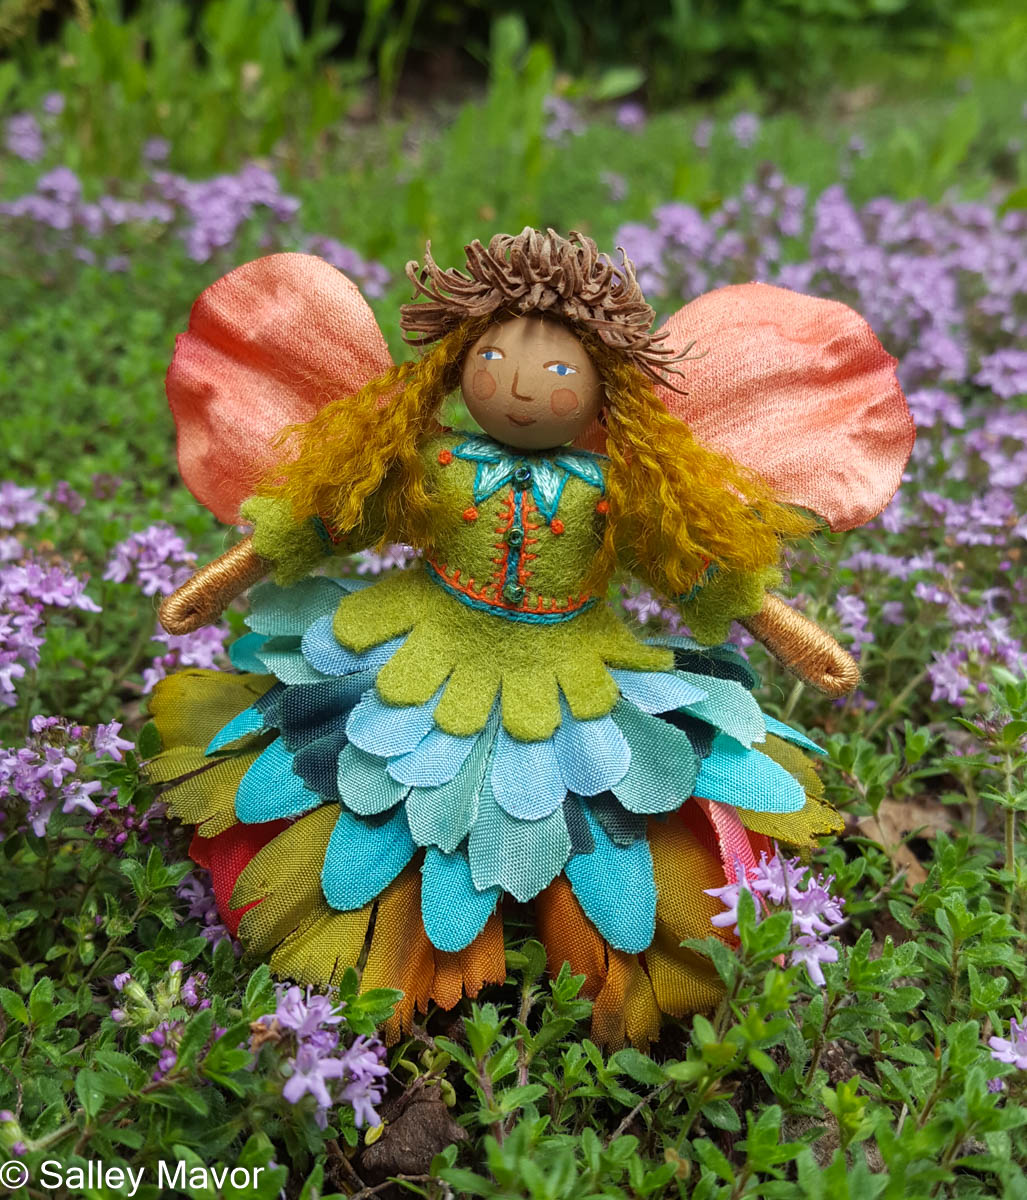
UPDATE: Thank you ~ the fairies sold out immediately! I’m happy to introduce SAPPHIRE, the newest fairy! A Limited Edition of 24 Sapphire Fairies will be added to my Etsy Shop on Sat., July 18th at 10 AM (Eastern US time). The dolls will sell for $125 each, on a first come, first served basis, so please act quickly if you really want one! Sorry, no pre-orders ahead of time. Also, since the cost of shipping overseas has become prohibitive, my shop is only processing sales from the US and Canada.
Despite the decision to move on, I haven’t weaned myself entirely from making sets of lookalike fairies. I’ve had to put limits on myself at home or else I would make them all the time, instead of pushing myself to do new work. It’s such a nice relaxing, portable activity when traveling.
On a recent trip to Oregon to visit family, I brought along fairy making parts to work on in airports and during cross country flights. This arrangement allowed me to have a stitching “fix” while away from home, without it becoming a form of procrastination back in the studio.
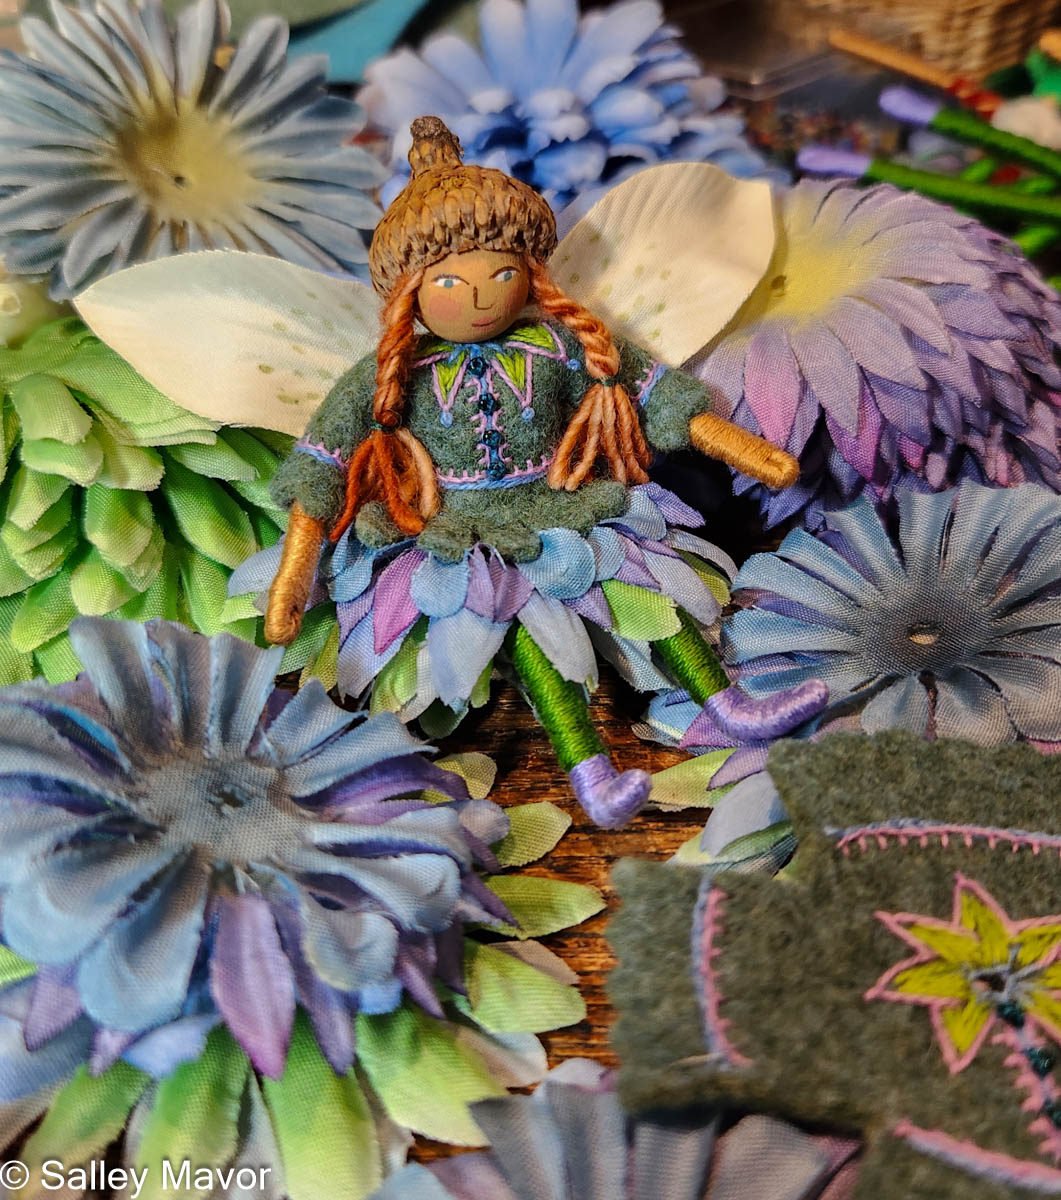
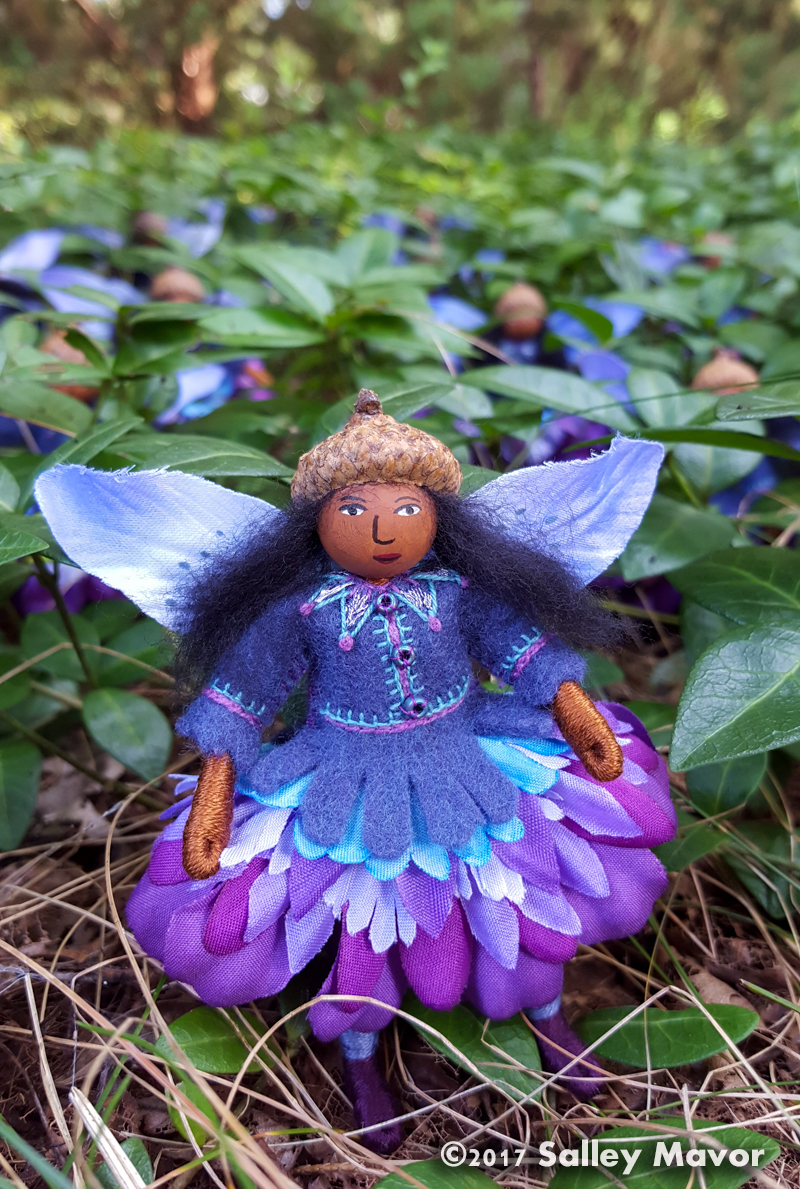
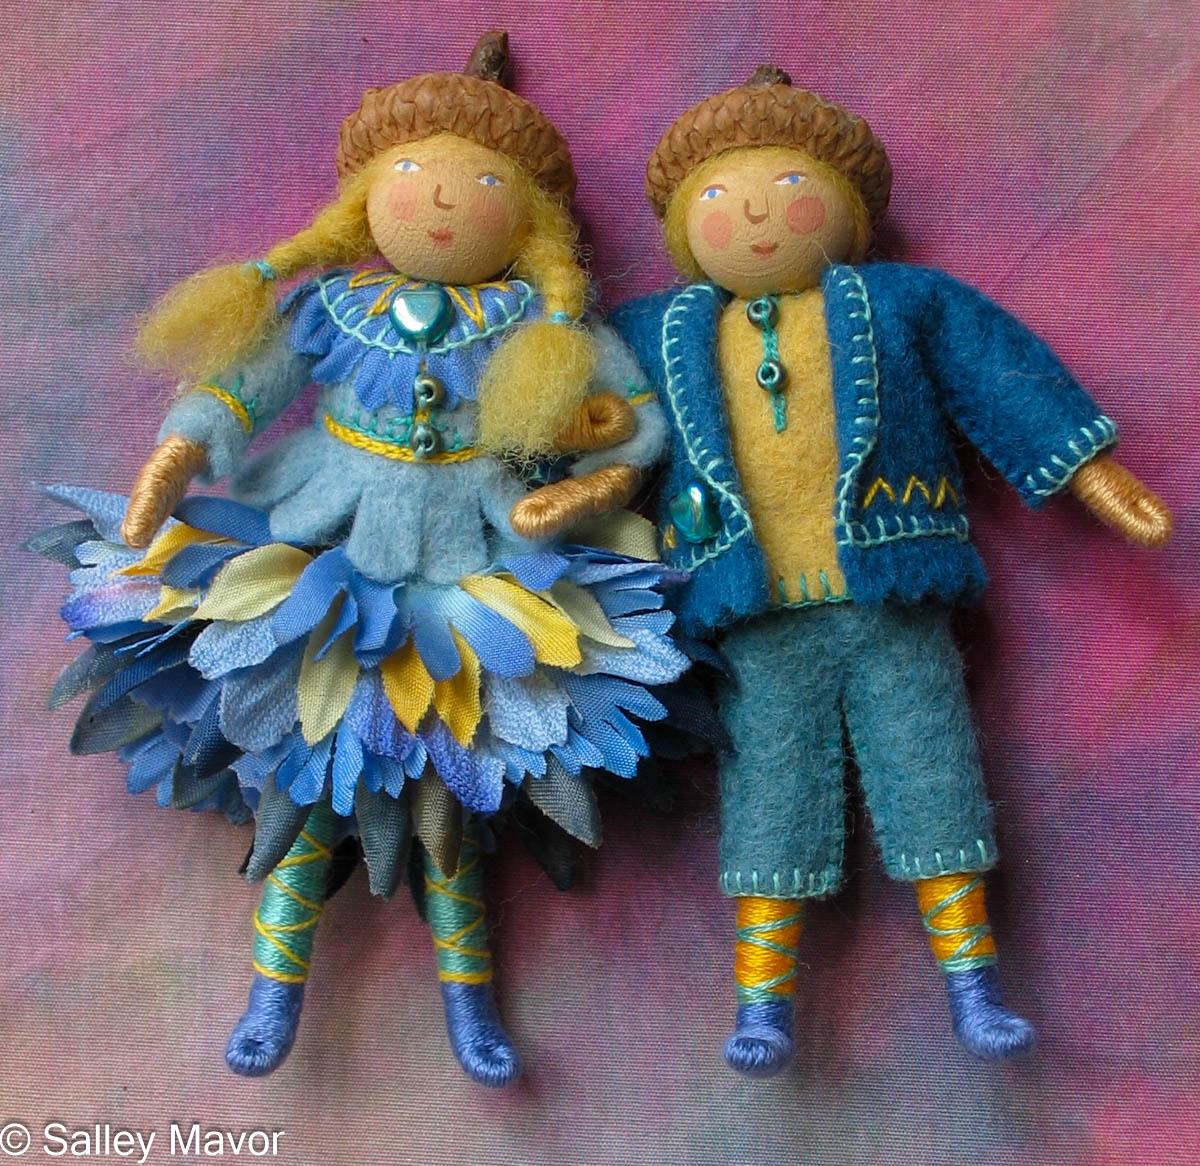
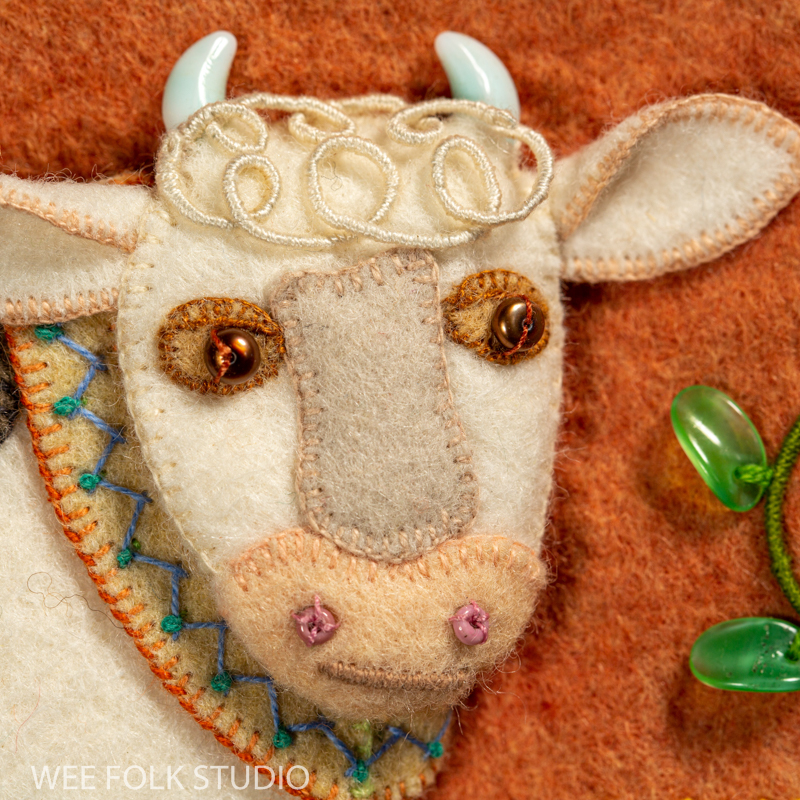
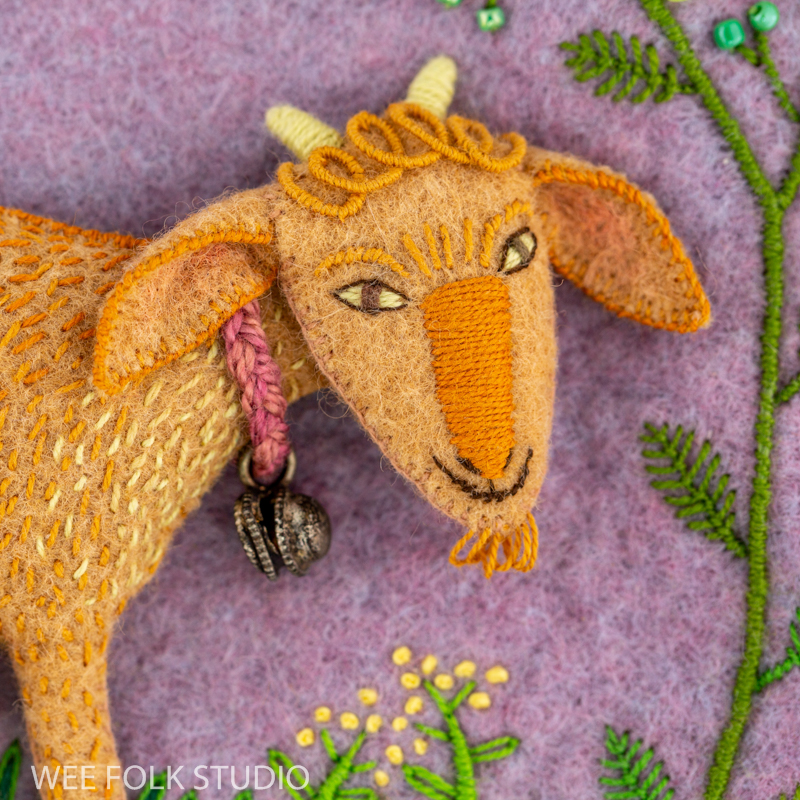
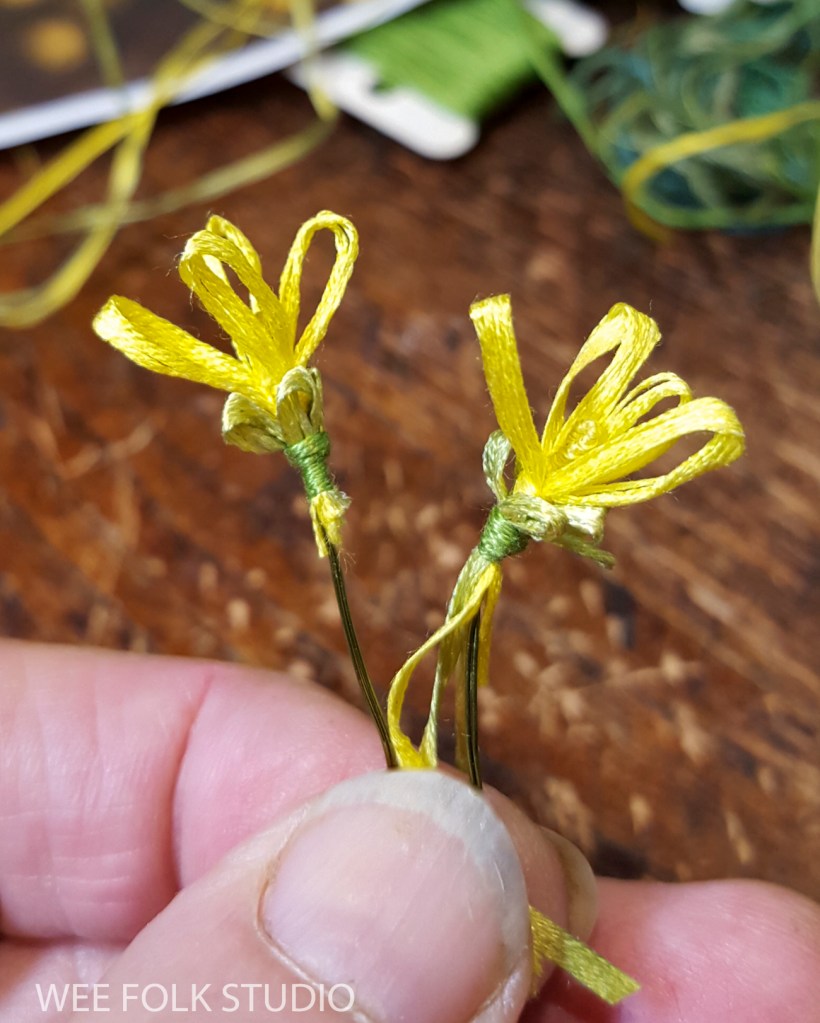
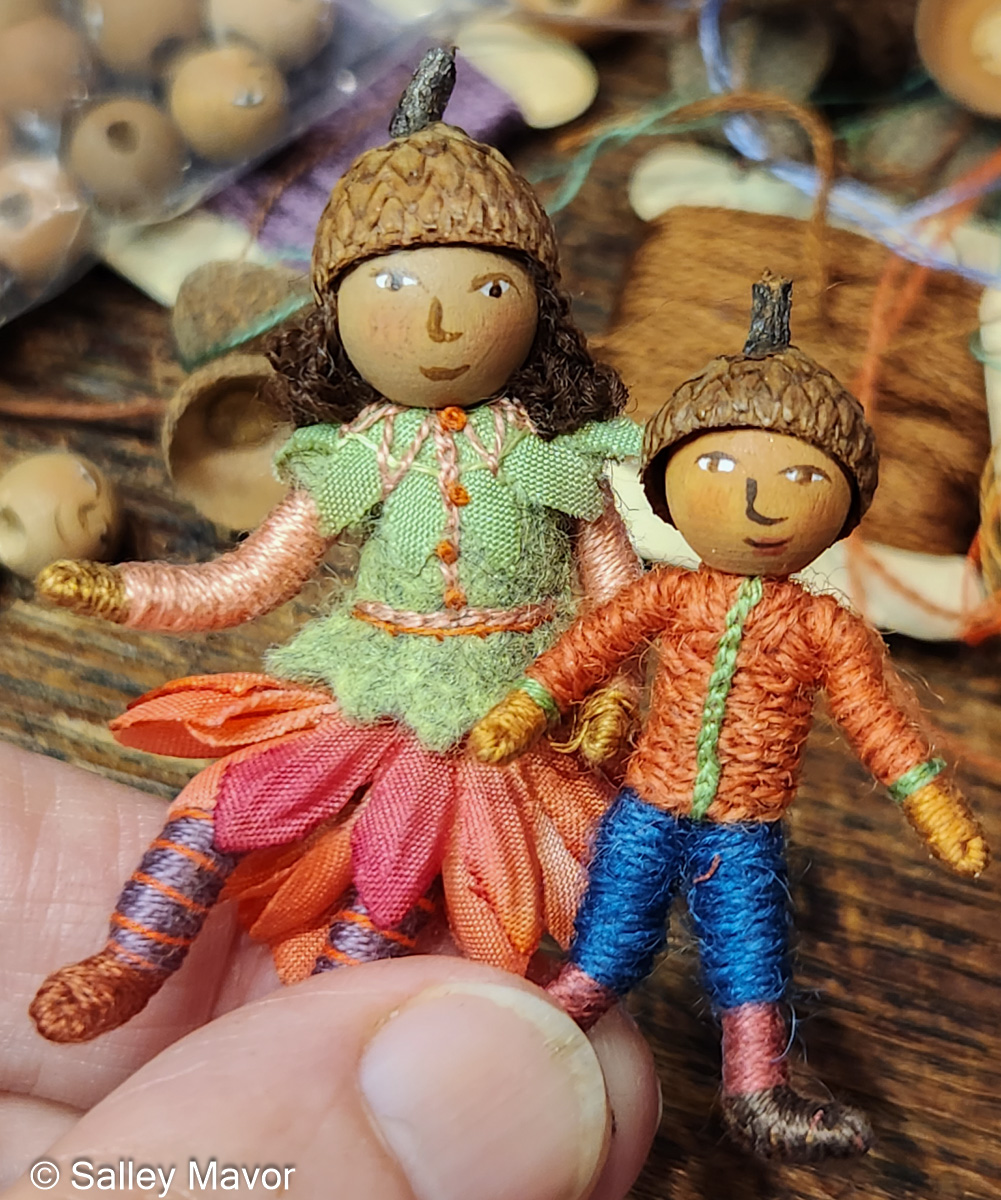
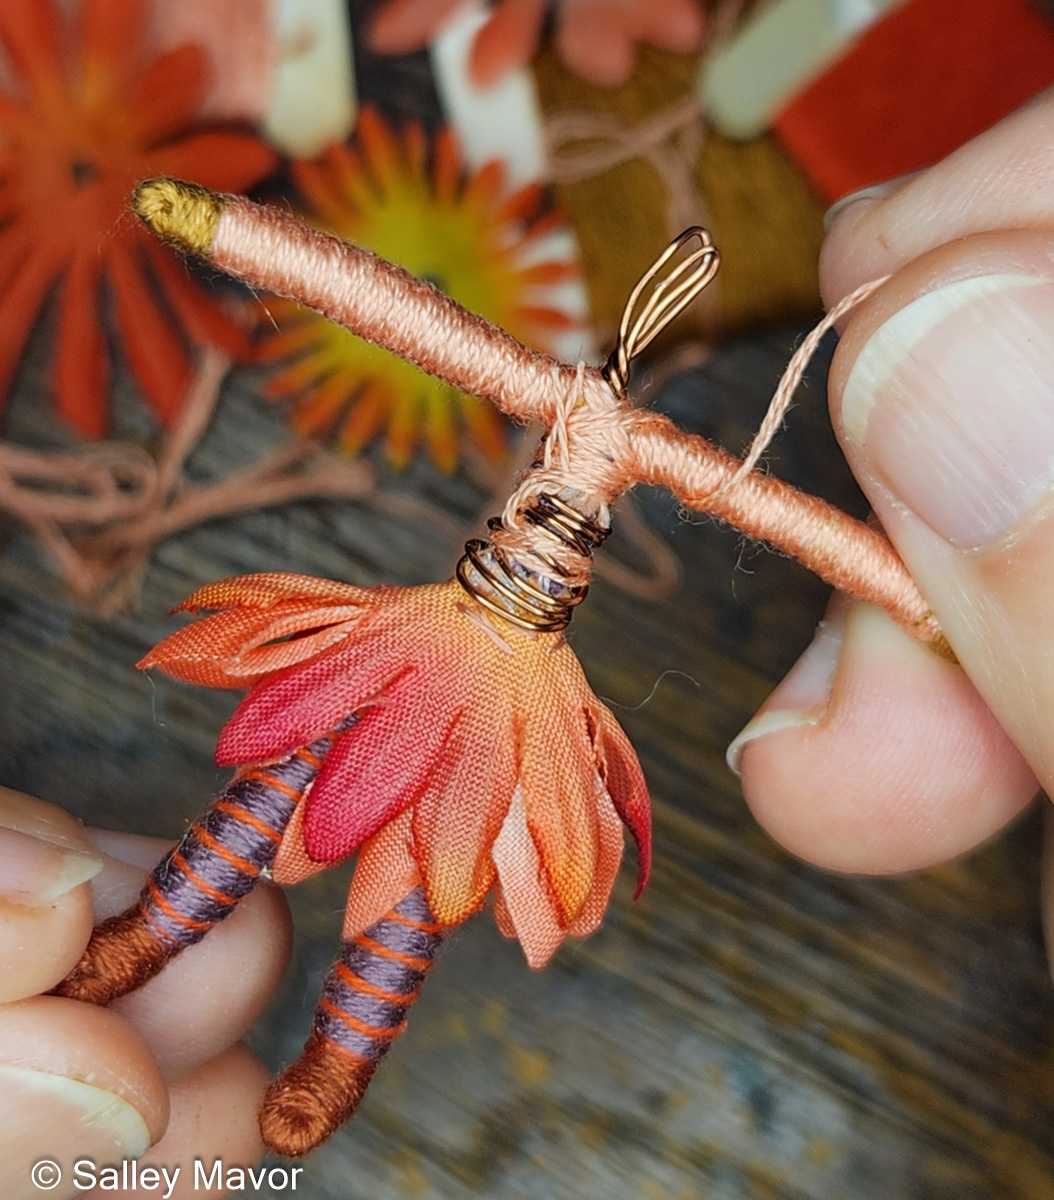
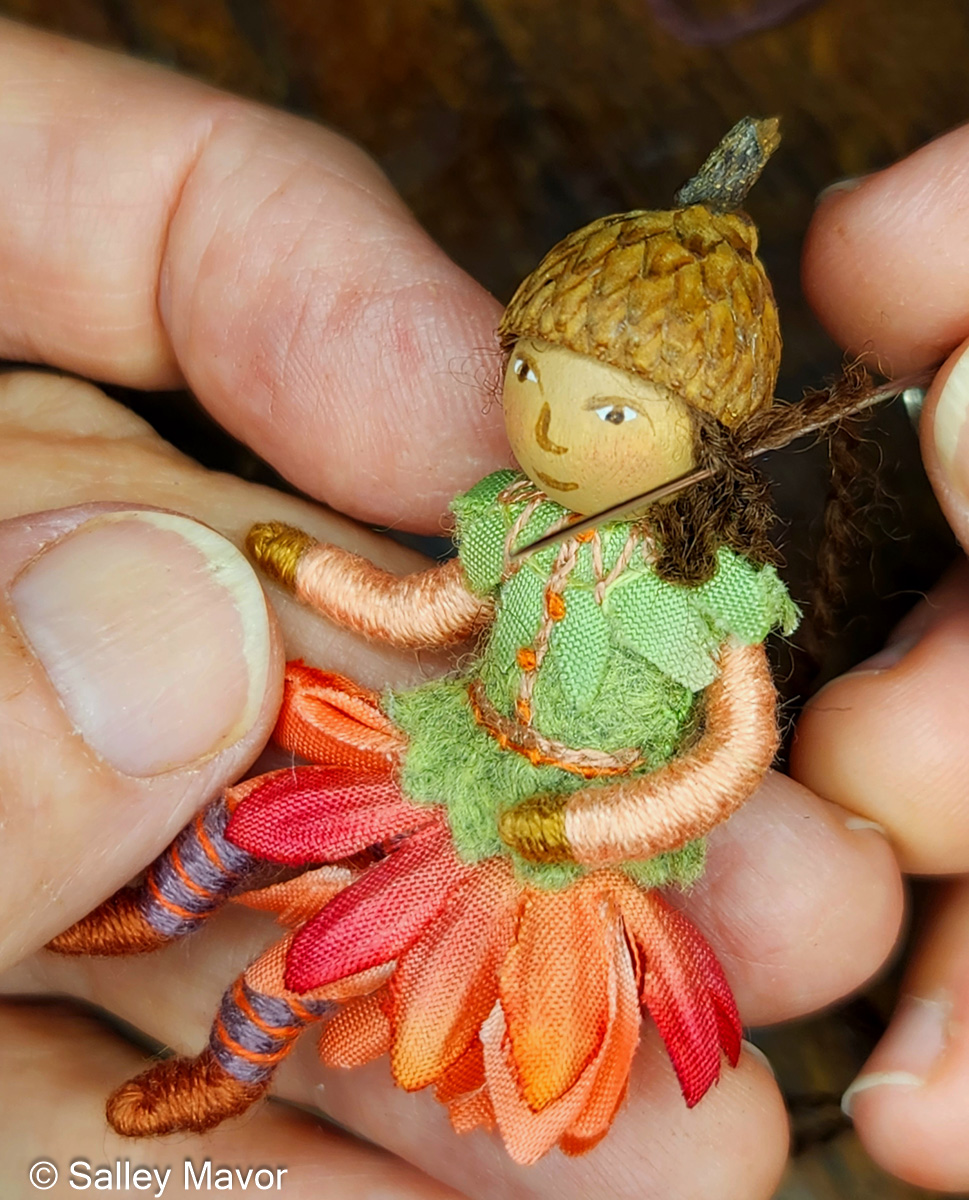
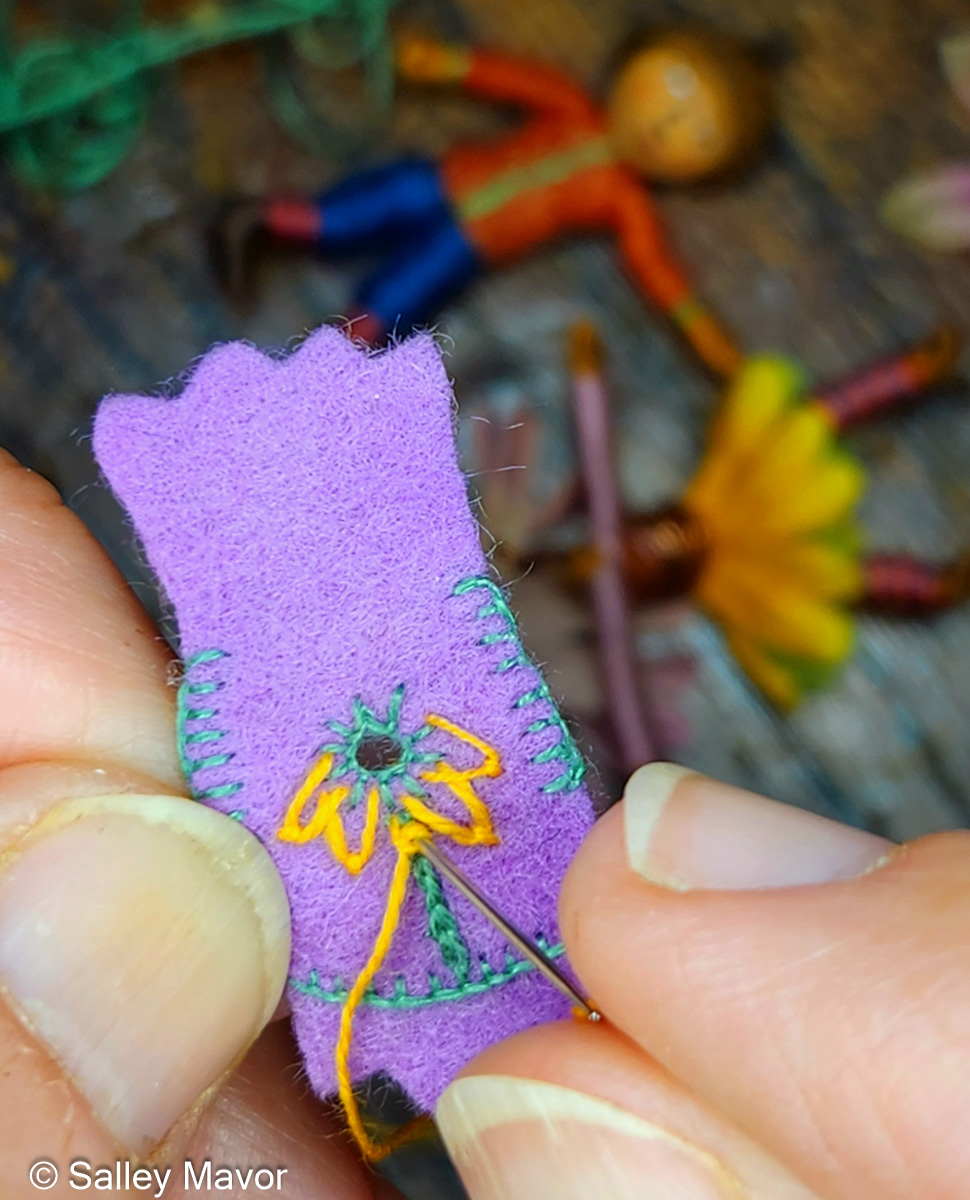
For those of you who are new to my work, these fairies are similar to the designs found in my how-to book, Felt Wee Folk. Sapphire’s hair is different, though. Instead of wool fleece, I used single ply, fingering weight Merino yarn, which is easy to braid. Unfortunately, Flying Finn Yarns, the small cottage industry I bought it from, is not currently in business.
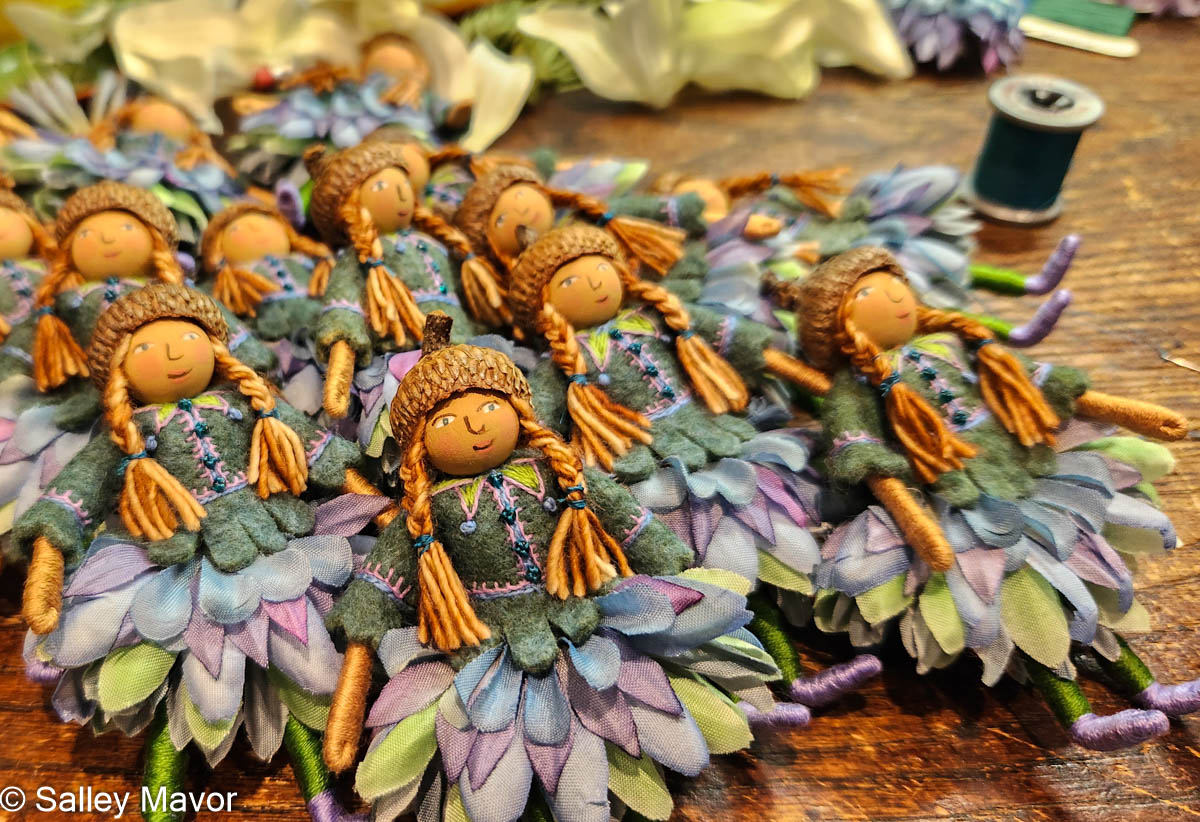
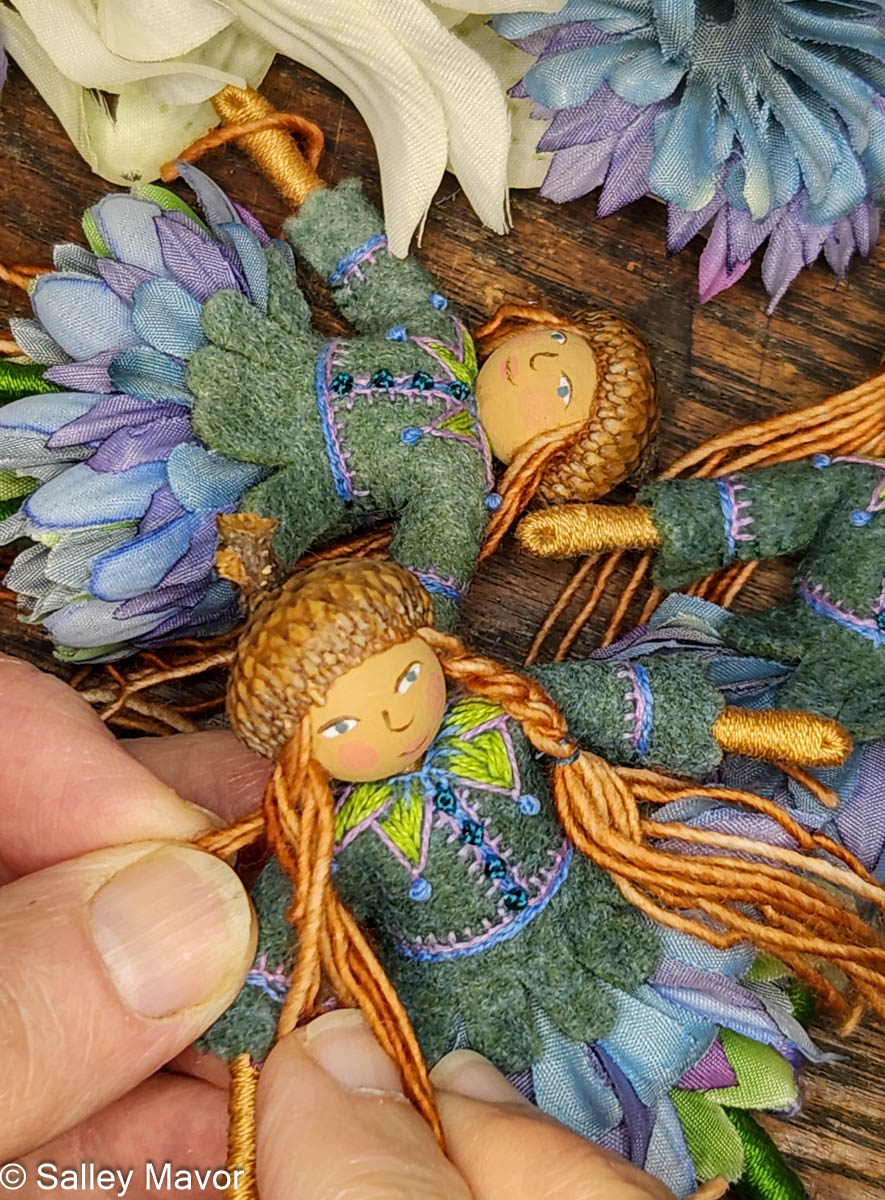
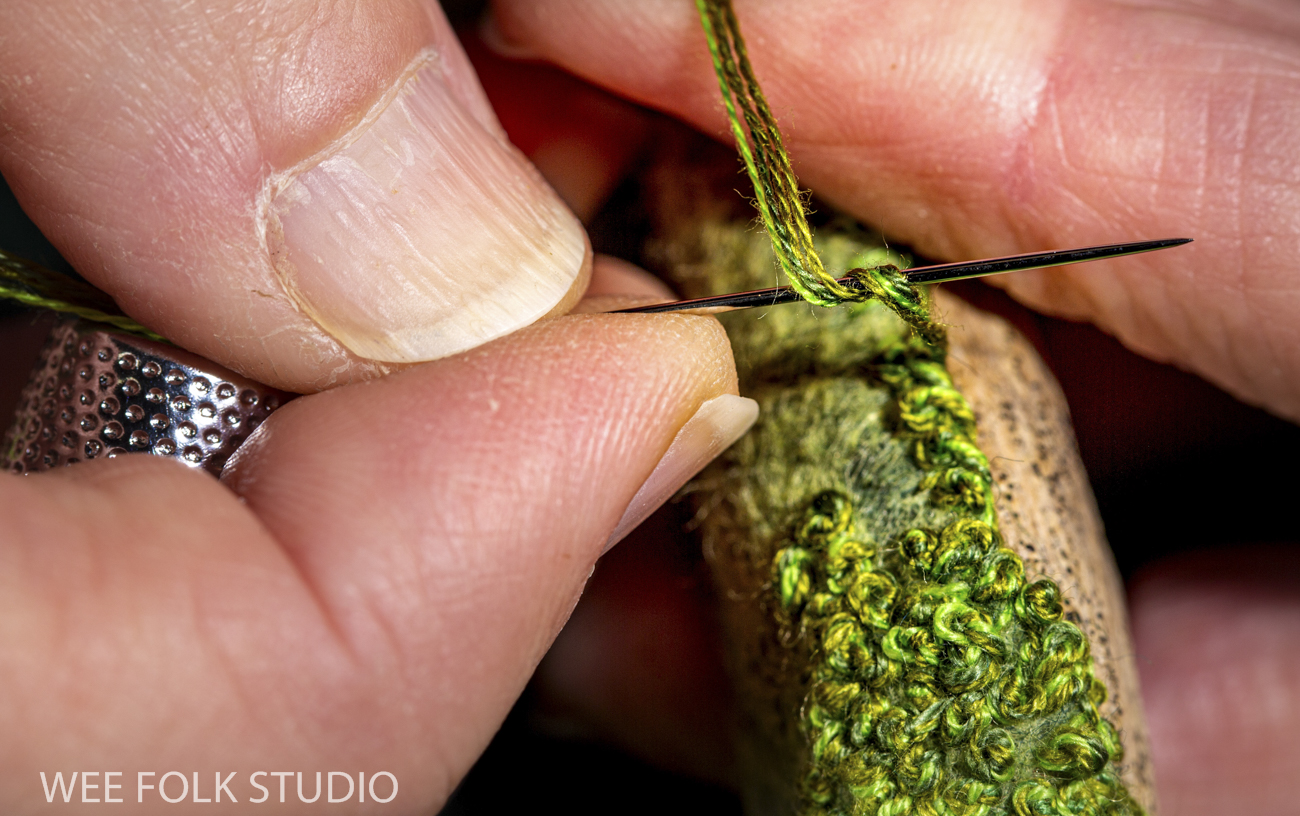
I was able to complete many of the labor intensive steps while traveling, like wrapping the pipe cleaner bodies and stitching the little peplum jackets. But there were plenty of finishing touches to take care of after I returned. This video shows how I finished the fairies back in my studio.
It was fun revisiting the fairies after a two year gap, although the repetitive process did remind me why I rarely mass-produce products anymore. Now, I’ve got to switch gears and continue working on some new pieces for an exhibition in the fall of 2027 (dates TBD) at the Cahoon Museum in Cotuit MA. This may sound odd, but I look forward to the coming winter, when I can focus, without the distractions of warm weather!
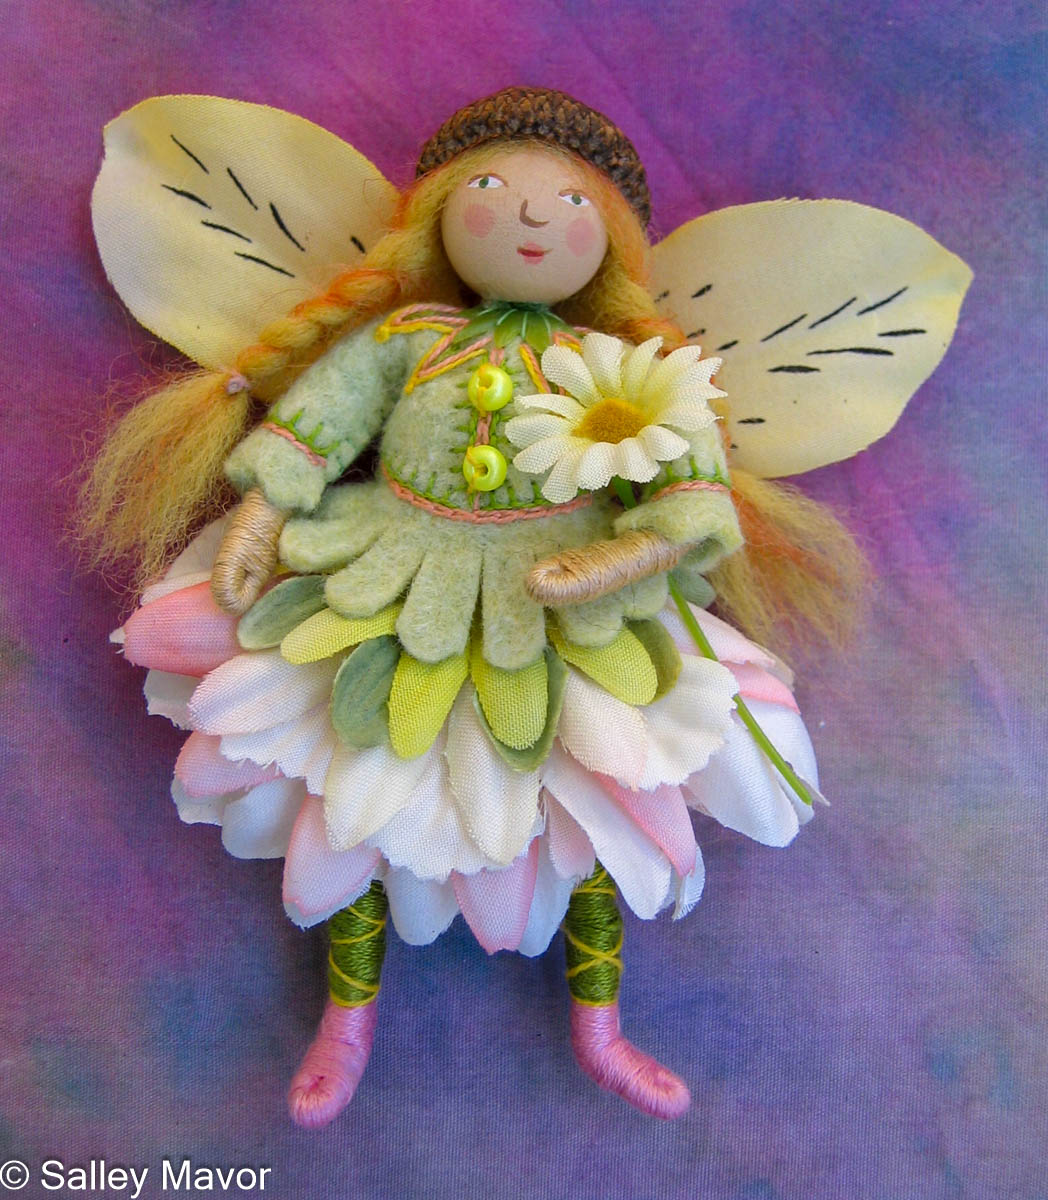
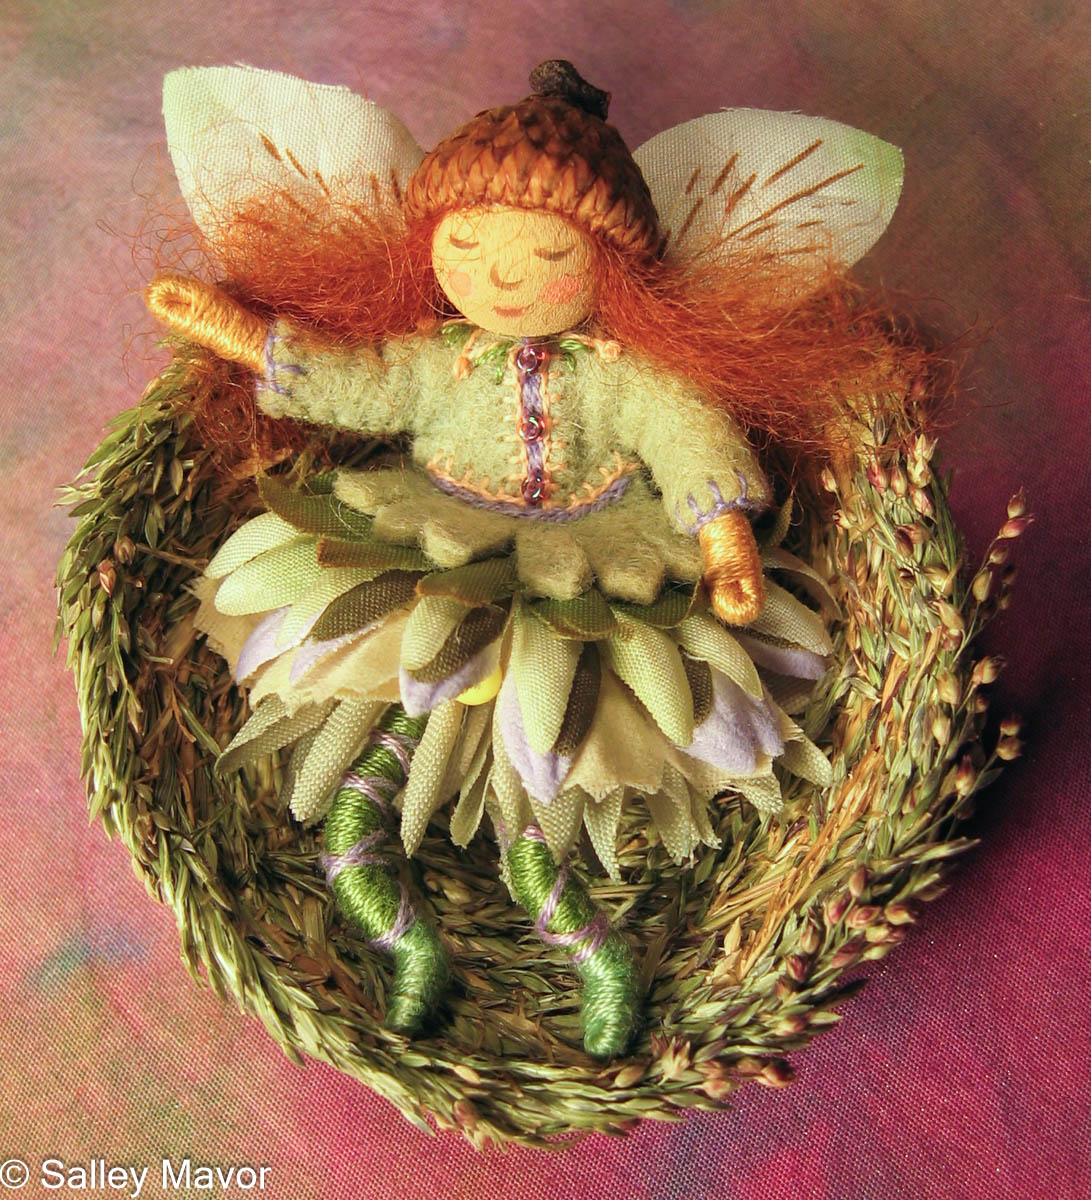
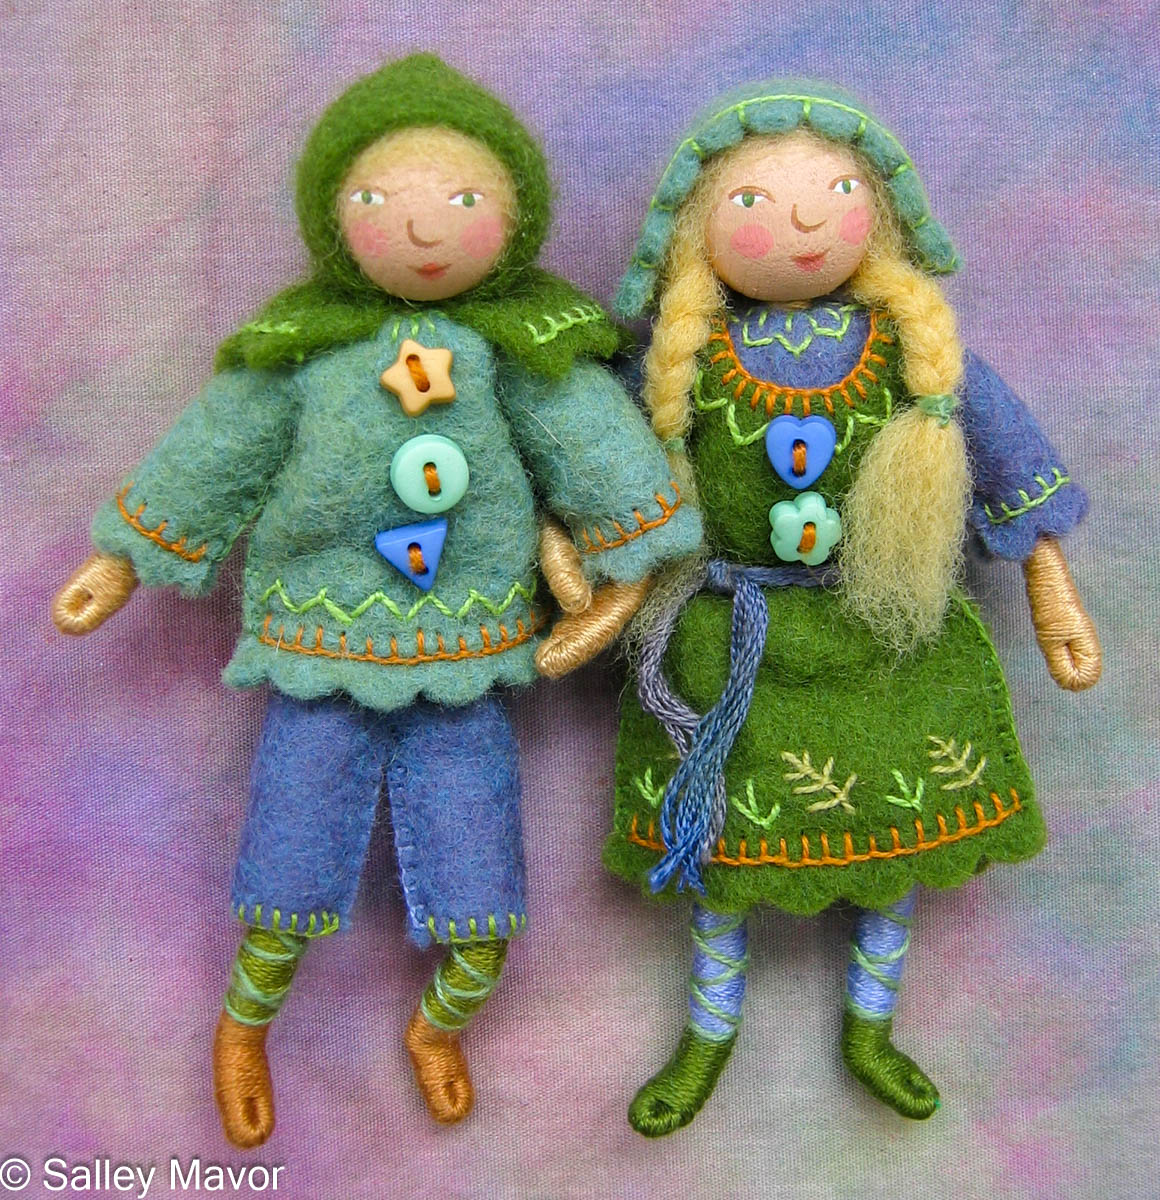
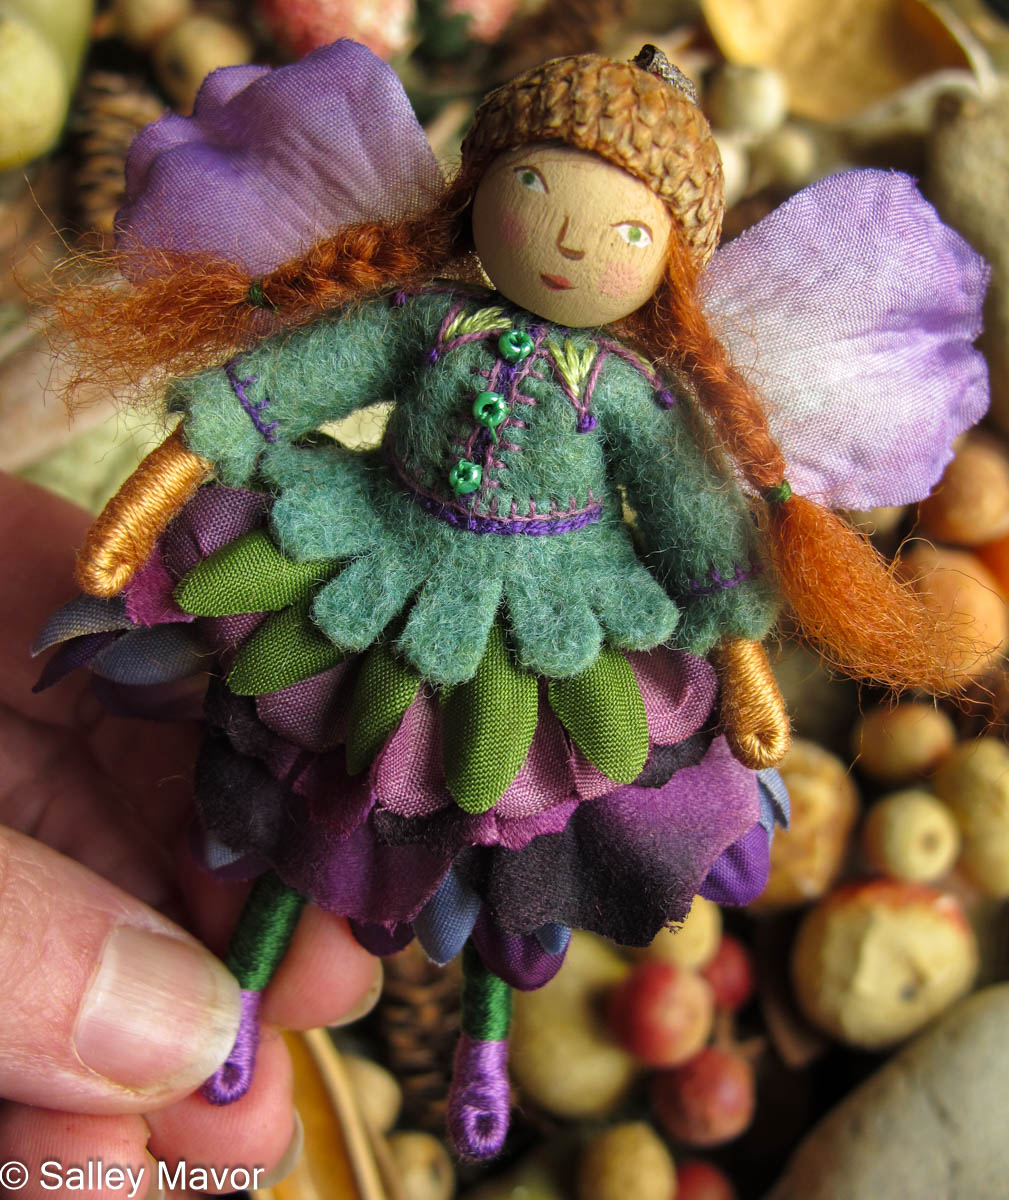
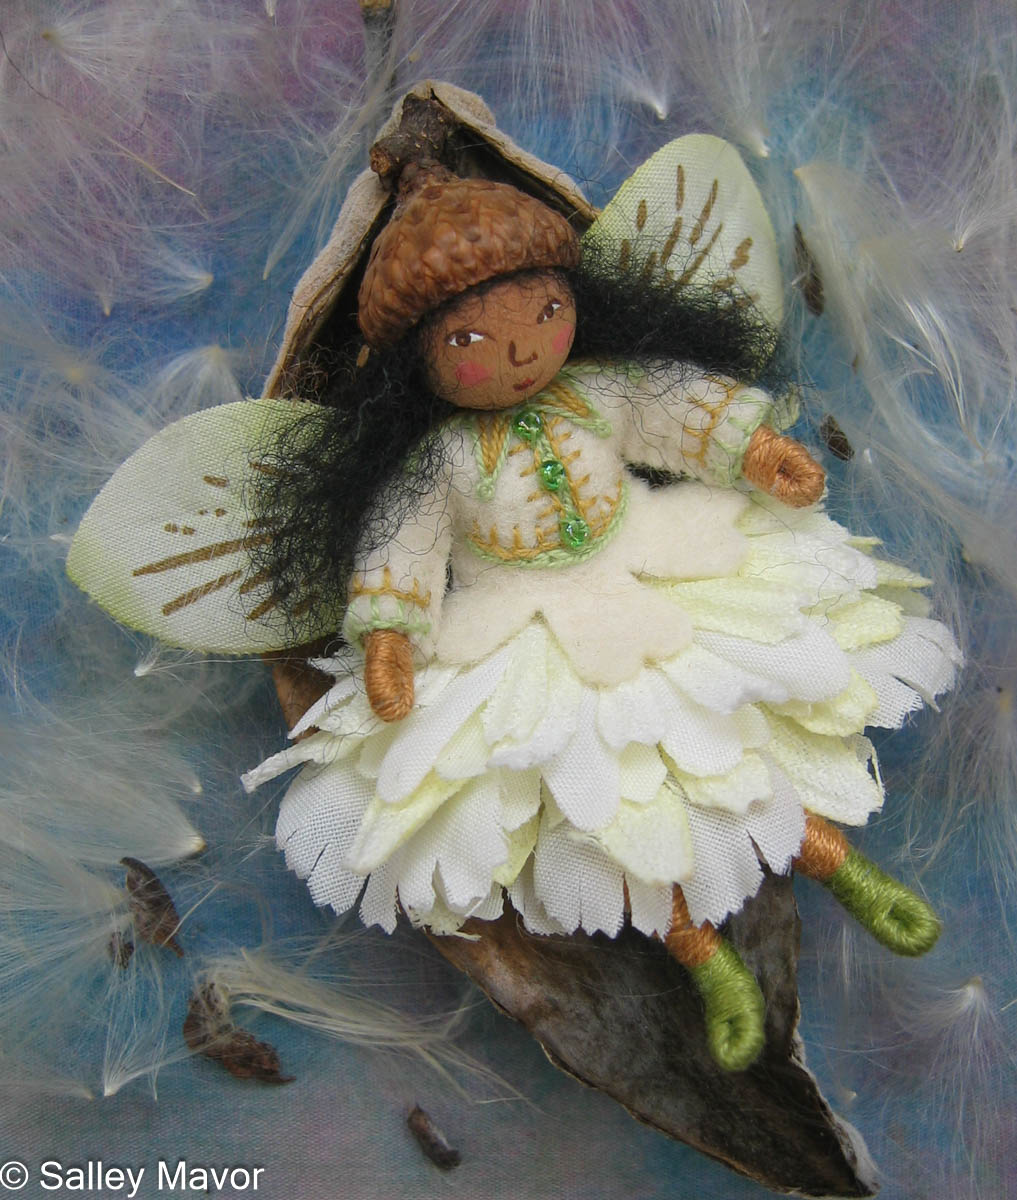
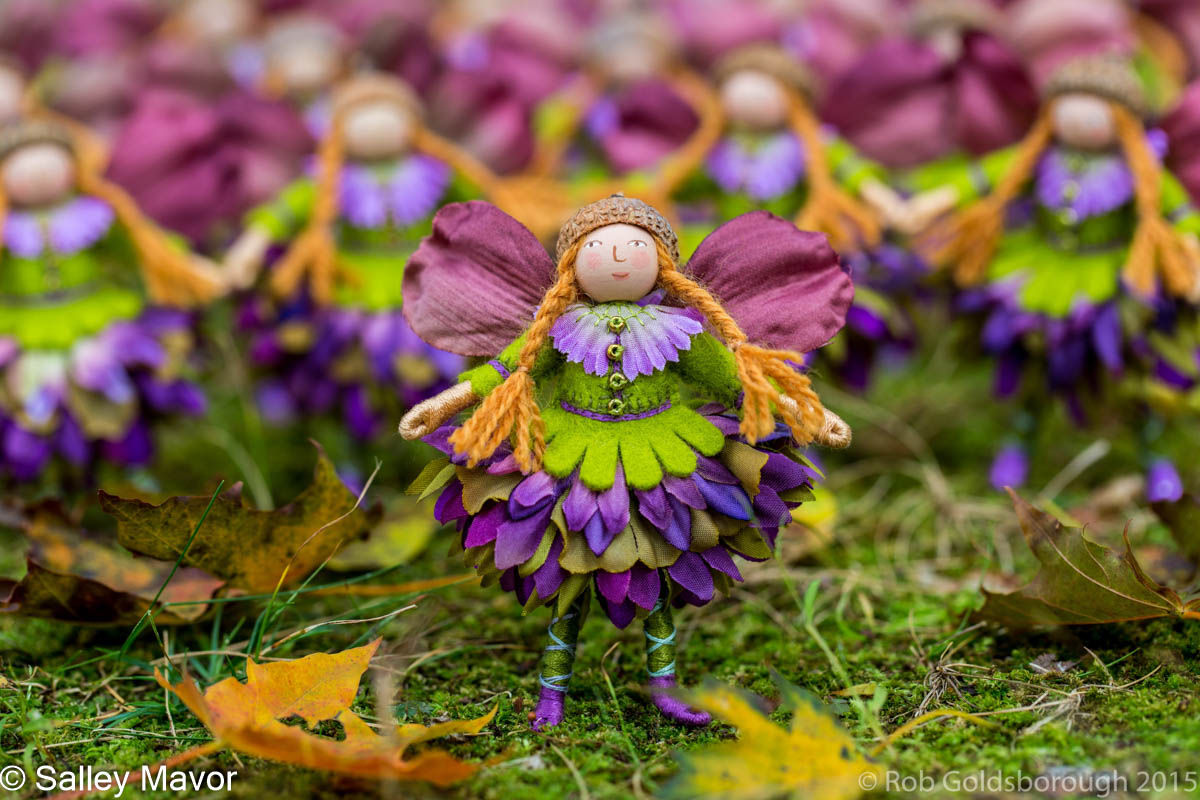
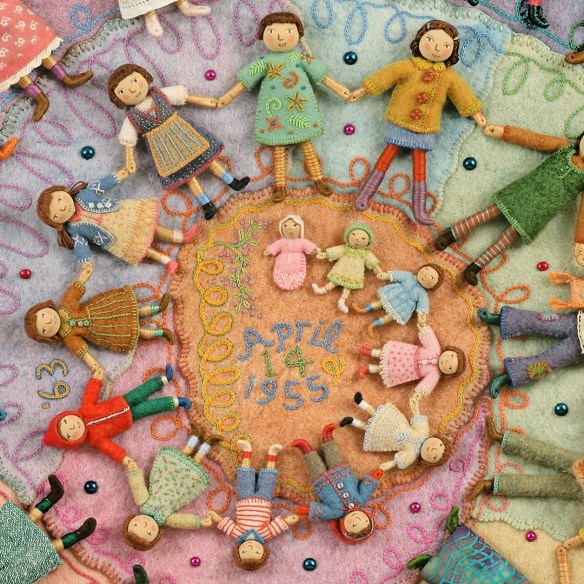
Below are some of the fifty different limited edition fairies and wee folk dolls I’ve made since 2003. When all added up, that’s 1,250 wrapped pipe cleaner bodies, embroidered felt outfits, and painted wooden bead faces!
HonestyCamilliaNastyDaisyDawnAmythystThe Berry FamilyHeidi & HansAzaleaEuphoriaLily of the ValleyWoody & FernVioletDownyHoneydewFiona
To keep up with new posts, please subscribe to this blog. Your contact info will not be sold or shared. If you’d like to see more frequent photos tracking the projects in my studio, please follow me on Facebook, Instagram and BlueSky.
This post is a revised version of a story I first published more than a decade ago. I am sharing it again in response to requests from individuals and groups who have asked for classes, tutorials, patterns, and guidance on my methods. I welcome that interest, and I am glad that people are eager to explore new ways of working.
At the same time, these inquiries remind me how much I operate outside of the mainstream—within a different needle-and-thread universe, shaped by my own experiences and artistic values. In this reflection on my background, I explore both my approach to making art and the personal philosophy that guides how I share what I have learned.
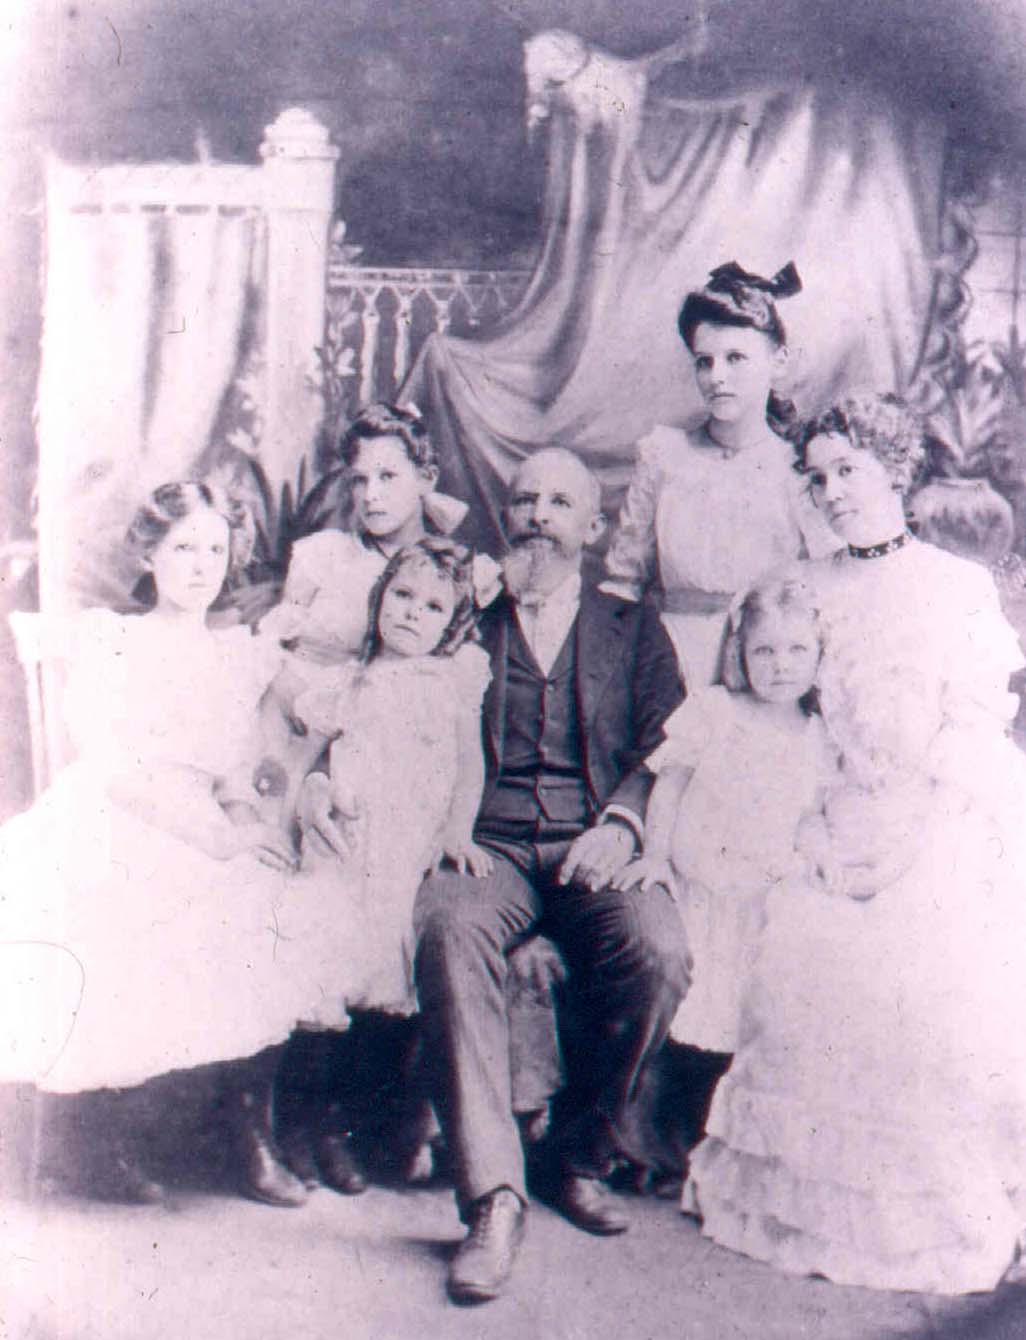
The Salley family of Orangeburg, SC – all the women were accomplished needleworkers, including Salley Mavor’s grandmother (2nd from the left)
TEACHING BY EXAMPLE Needlework has long been rooted in a tradition of learning through imitation. Historically, women played a central role in passing down their expertise within families, ensuring that these skills continued from one generation to the next. Today, a vast needle-craft network is centered around a technique-driven culture that emphasizes following patterns and copying pre-existing designs.
detail from Self Portrait: A Personal History of Fashion
Finding my place within this tradition has not been easy because my path into needlework has been quite different. Creating a space that embraces innovation while honoring needlework’s rich heritage therefore demands determination, as well as the willingness to forge my own way.
My introduction to sewing and embroidery began at home, where my mother and grandmother taught me practical basics such as threading a needle, using a thimble, and making simple stitches. Later, I followed diagrams for basic stitches that were printed in a simple, well-worn embroidery booklet. Although this early guidance provided the groundwork, most of my skills were developed on my own. Through experimentation and repeated practice, I gradually taught myself the techniques that now form the basis of my work. In time, a needle and thread became for me what a brush and paint are to another artist: tools of self-expression.
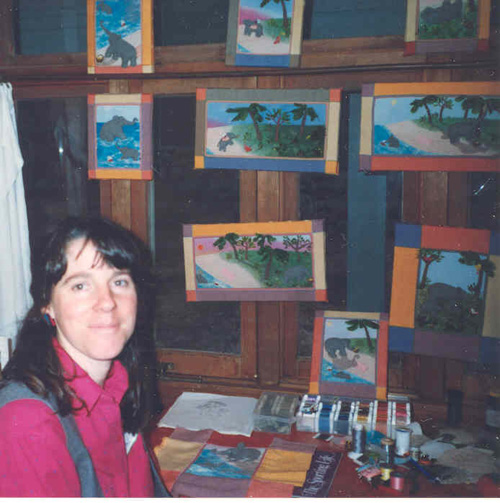
In the 1970s. when I began studying illustration at the Rhode Island School of Design, I believed that being taken seriously meant focusing on fine art and setting aside my interest in crafts, especially needlework. Mercifully, I was enlightened by a perceptive teacher, Judy Sue Goodwin-Sturges, who noticed that I often brought handwork projects to occupy myself during the long and tedious critique sessions. Recognizing my passion for sewing, she urged me to incorporate those skills into my class assignments.
With Judy-Sue’s encouragement, I tapped into my crafty and playful side, which led to a complete shift in my artistic approach. No longer confined to traditional art mediums, I discovered that working with stitching and soft sculpture allowed my imagination to come alive in new and exciting ways. Every class project became more than just an assignment, it was a chance to experiment, to try out new ideas and ways of making art, whether working by hand or with a sewing machine.
Salley and Judy Sue in 2020, 45 years after first meeting at RISD
Salley working on her first picture book, The Way Home in 1989
Years later, in the 1990s, after establishing a career in children’s books, I organized group stitching activities for other parents in my children’s Waldorf school. For me, this was the ideal situation, as these communal gatherings provided a relaxed supportive environment where we could learn from each other. When I later taught doll-making classes in more structured settings, primarily for embroidery and quilt groups, I quickly became aware of the challenges posed by my introverted nature. While I was able to assist my students, maintaining the role of teacher for an extended period proved to be draining. I also noticed an unexpected feeling of envy toward the class as they became absorbed in their projects. More than anything, I wished to join them, immerse myself in stitching, and share in the creative process rather than direct it.
Illustration from Mary Had a Little Lamb 1995
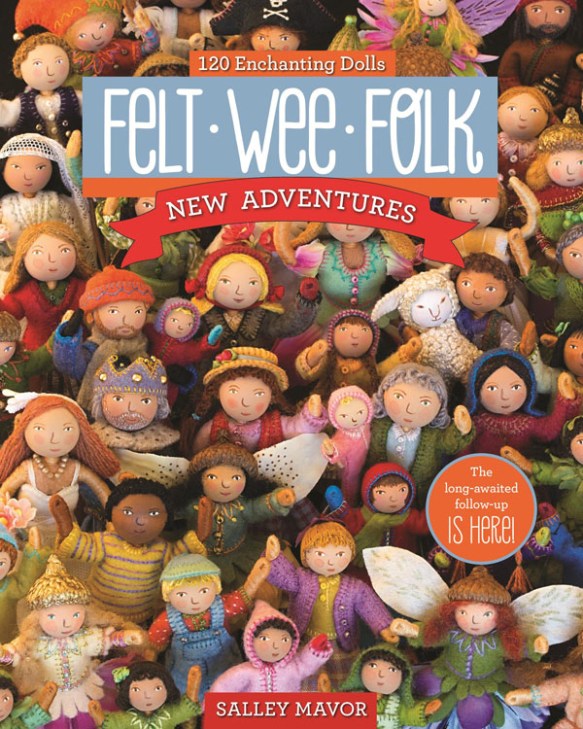
Although my own creative life has been self-directed, I understand that many people appreciate having a clear starting point. For some, the process of being led step-by-step is not only helpful but also deeply satisfying. Recognizing this, I designed and produced a line of fairy kits for ten years and wrote Felt Wee Folk, a comprehensive how-to guide focused on making small dolls.
My objective with the book was to introduce basic techniques and provide a flexible framework to build upon. By offering a range of characters and variations, I aimed to encourage readers to move beyond copying and gain the confidence to add more personal touches. In sharing my methods, I hoped to open a door for others to experiment, play, and ultimately create something that was uniquely their own.
Ever since the first edition of Felt Wee Folkwas released in 2003, I have grappled with an existential crisis stemming from the increased interest in my work. As the doll-making book gained popularity, many people sought further information and instructions about the techniques behind my more elaborate and intricate pieces. I became increasingly aware of the differences in expectations between those who view needlework primarily as a craft, centered on sharing methods and replicating patterns, and those who approach it as a form of artistic expression, emphasizing originality and personal vision.
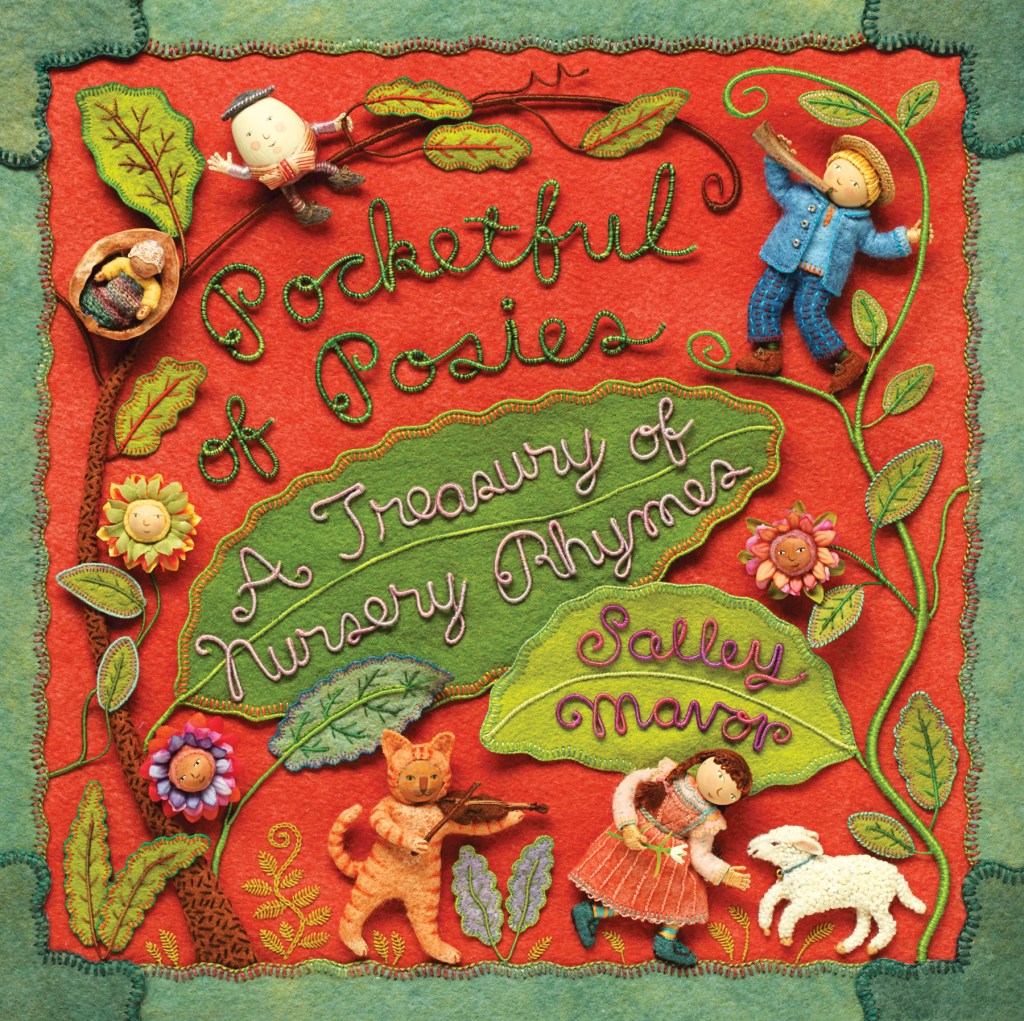
Pocketful of Posies 2010
This realization led me to establish a clear differentiation between the projects featured in my how-to book, Felt Wee Folk, and my fabric-relief work, which is much more technically challenging and personally meaningful.
The distinction between art and craft is a subject that is likely to be discussed and debated long after I’ve threaded my last needle. For myself, this ongoing conundrum raises questions about when to share my methods and when to refrain. Except for a few processes I consider proprietary, like making dolls’ hands, I am unconcerned about others copying my methods. Rather, my hesitation lies in the investment of time and energy required to explain my techniques in detail. Describing how I created something, especially after having lived and struggled with a piece for months, feels like I am retracing my steps and becoming mired in the past, which prevents me from moving forward artistically.
I have come to realize that when the act of creating is overly analyzed and dissected, much of its inherent magic is lost. The joy I find in making art lies in allowing inspiration and intuition to guide my choices, rather than feeling compelled to constantly think in terms of explaining the process to someone else.
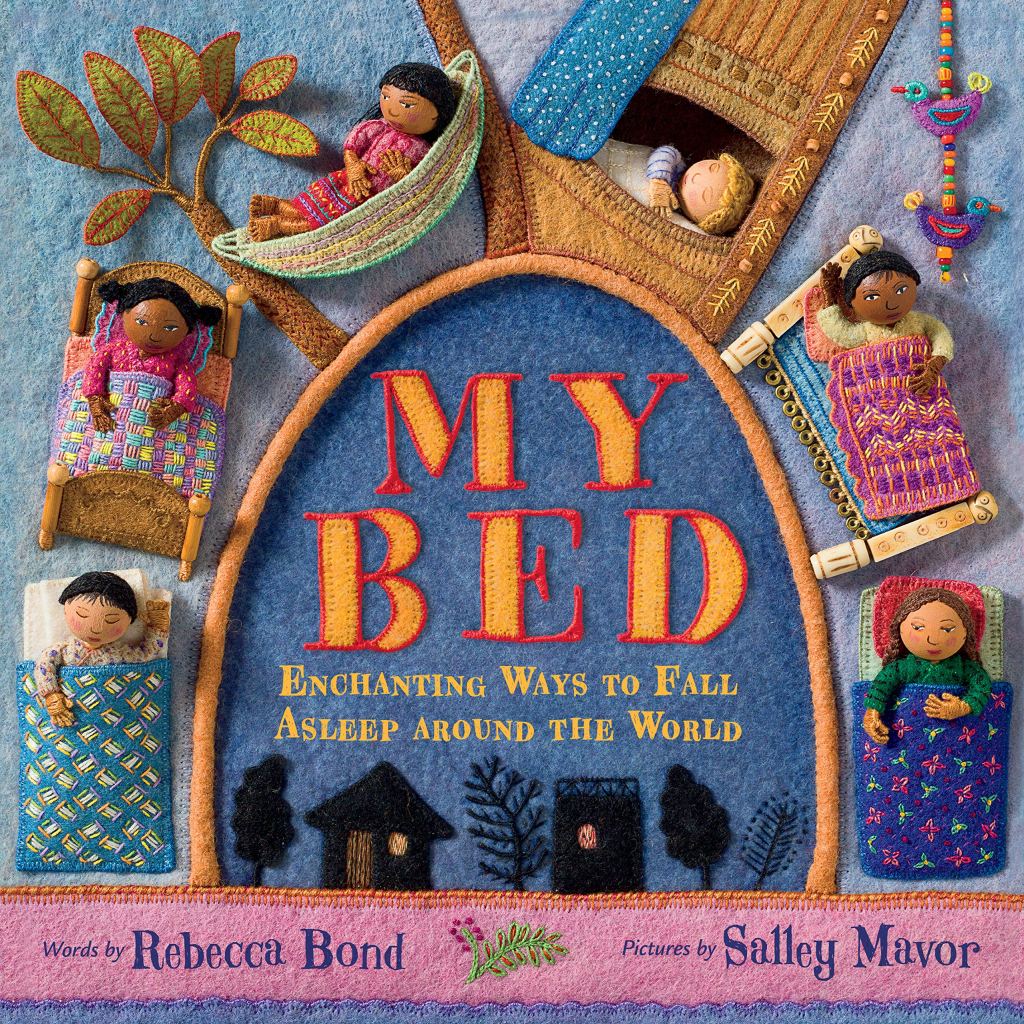
Page spread from MY BED: Enchanting Way to Fall Asleep around the World 2020
The intentions and priorities of artists who create original work with needle and thread often do not mesh with the pervasive imitation model held within today’s needle-craft industry. In my experience, exploring new concepts and ways of working necessitates actively educating the public and clarifying the nature of my creative process, as misconceptions frequently arise.
For example, it is not uncommon for people to ask if I have patterns for pieces like Birds of Beebe Woods. Others seek instructions for recreating the illustrations in my picture books. The expectation that I would provide patterns for my illustrations and fabric-relief works is perplexing to me. Just as artists in other mediums would likely be surprised if asked to supply patterns and step-by-step instructions for their creations, I find this request at odds with the spirit of artistic originality.
Although the conventional needlework industry does not entirely align with my creative approach, I am connected to it through the publication of my how-to book, which is promoted within this world. Aside from this, my artistic practice functions on its own, outside of the mainstream. This independence is hardly surprising, as my work tends to be an exception to the rule in any category it is lumped into, whether in embroidery, dolls, art quilts, miniatures, or children’s books.
Even within the diverse and evolving field of fiber art, my work cannot easily claim a spot. The illustrative aspects that define my art set it apart from the abstract and conceptual tendencies prevalent in the contemporary fiber art world. Practically speaking, it’s hard to imagine my miniature doll-infused imaginary worlds finding acceptance within an art scene that appears to favor droopy, stringy, blobby large scale installations. As a result, my work exists on the margins of the fiber art world, resisting easy classification and standing out as an anomaly wherever it is placed.
All that being said, I see myself first and foremost as an artist. The essence of art, in my view, is not defined or limited by the choice of medium or materials. In today’s art world, all kinds of creative expressions are recognized, and the internet has opened doors for many to share their work, build careers, and attract followers, regardless of the traditional hierarchies upheld by the art establishment, curators, or critics.
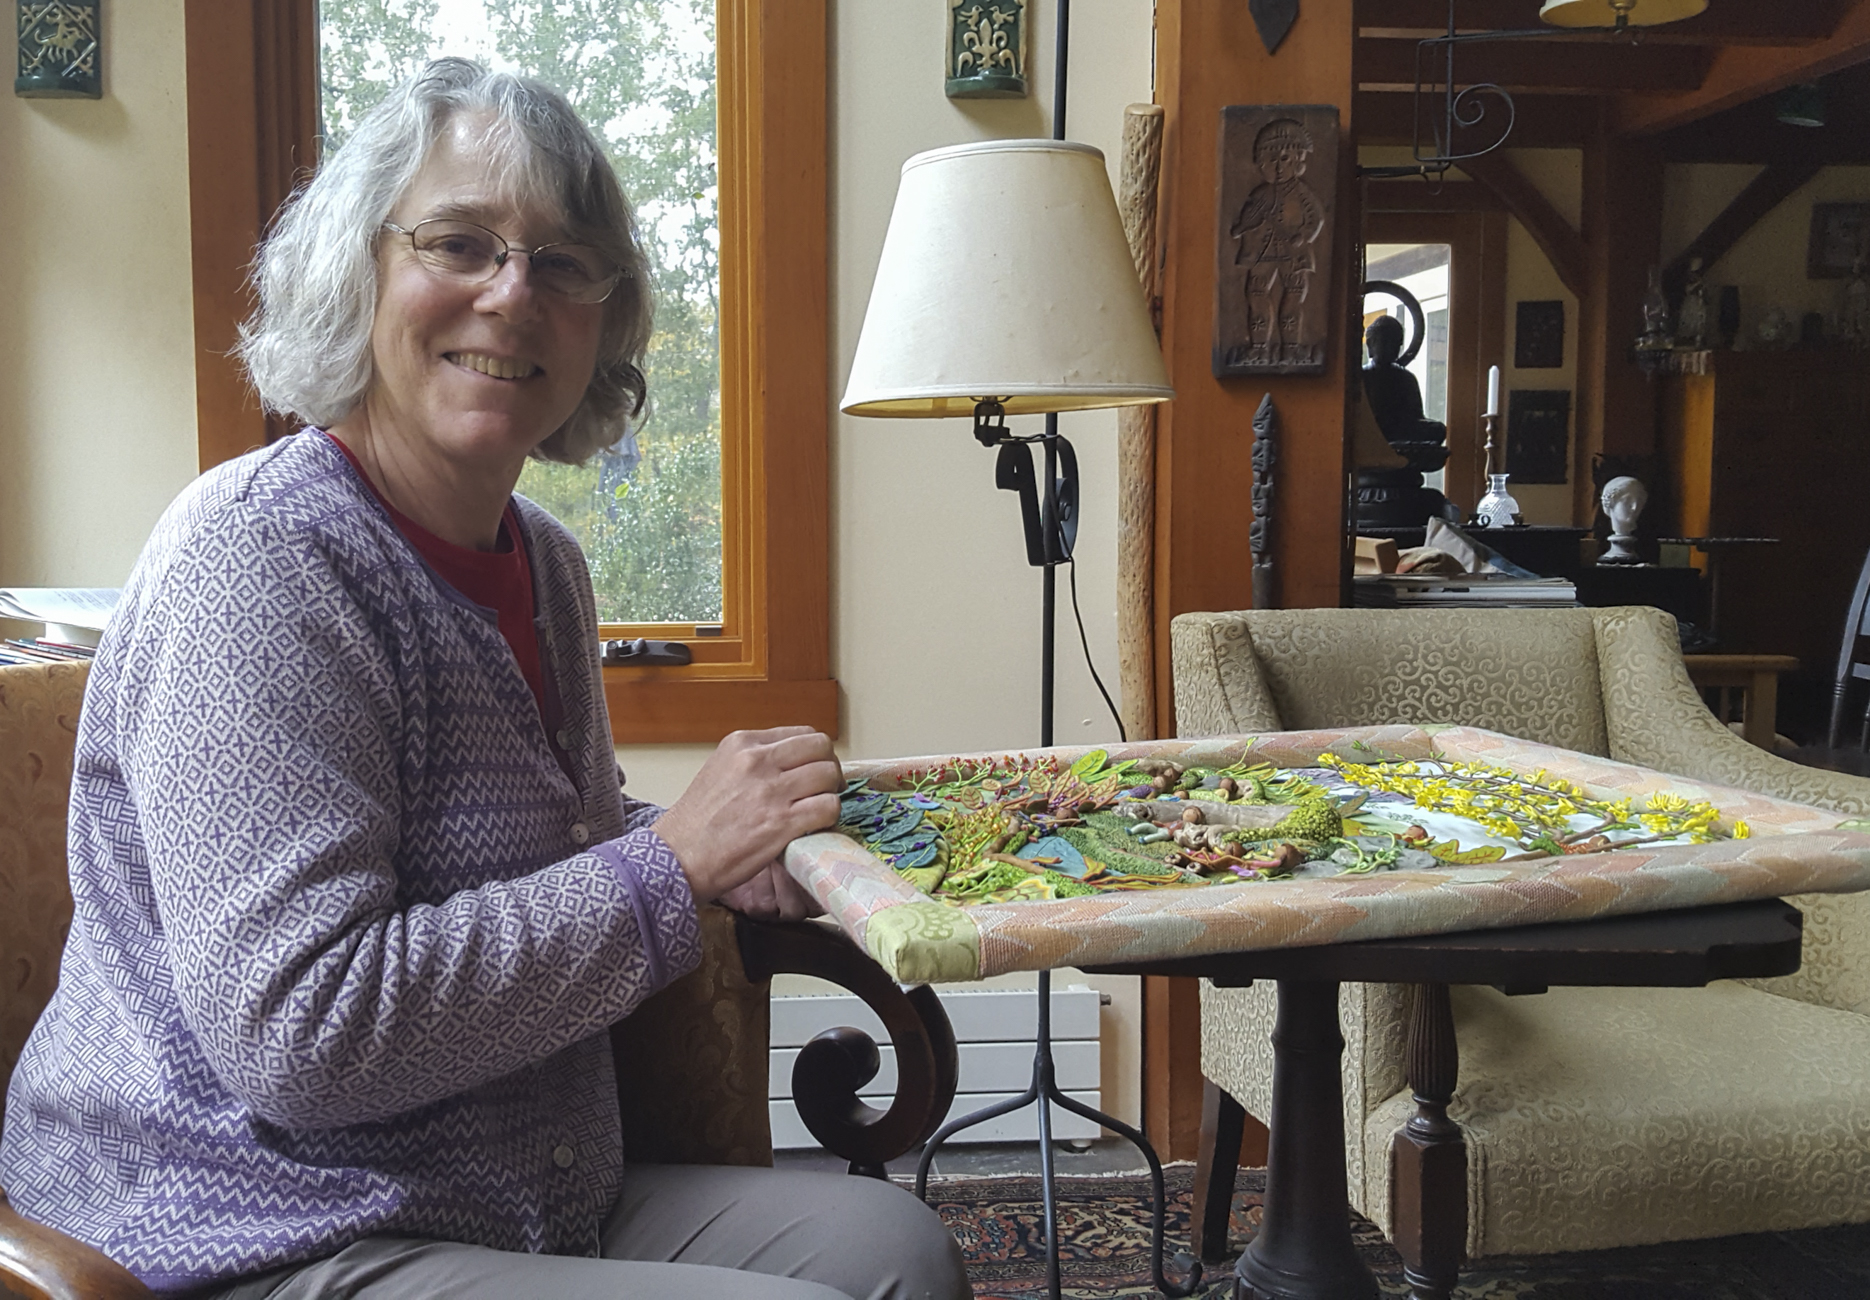
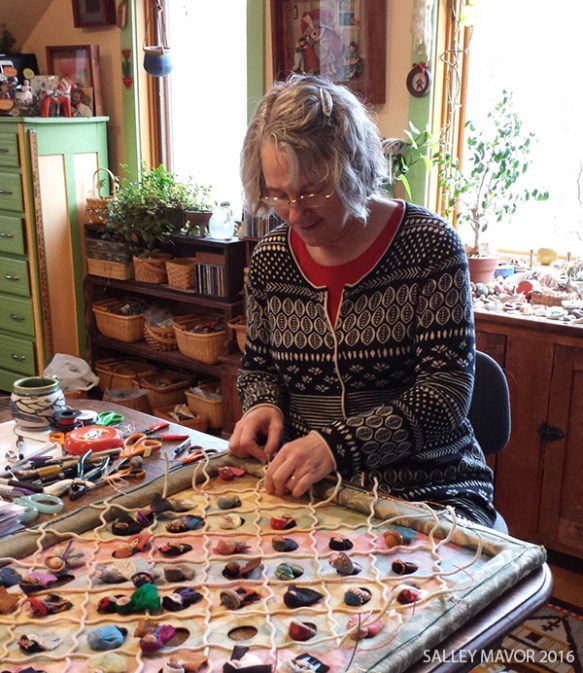
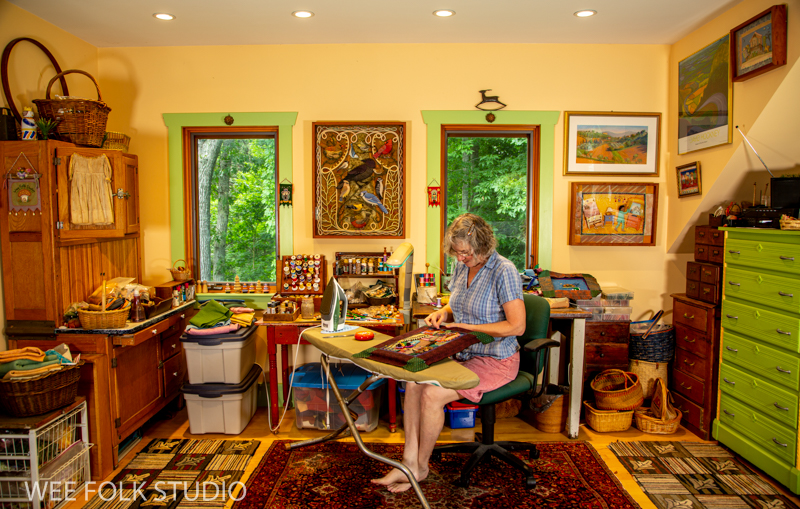
Salley in her studio 2023
I deeply appreciate the unique connection shared among needleworkers, regardless of their backgrounds or approaches. This community is bound by a desire to learn, grow, and refine their skills, and I hold a genuine respect for that pursuit. While I strive to maintain my identity as an artist, I am careful not to separate myself from the world of hobby needlework just to appear more “serious” or to gain validation from the broader art world. There is a profound sense of humanity and strength found in stitched objects that are labored over so lovingly.
In recent years, I have discovered effective ways to share details of my creative process with those interested in observing my stitching firsthand. Thanks to new technical advances, I am now able to easily photograph and record videos that capture the different stages of my process. These tools allow me to document and share my work without significantly interrupting the creative flow.
Photos and videos, paired with commentary about the process of making my recent series of seasonal landscapes can be found in the archives: Mossy Glen, Summertime, Harvest Time, and Frosty Morning
Rather than producing full-scale tutorials, which demand a detailed and systematic approach that I am not willing to undertake, my intention is to provide brief glimpses of my hands at work. By offering these peeks over my shoulder, I can share my techniques without the time commitment required for step-by-step instruction. These concise visual records, paired with written commentary, are regularly made available through my blog and social media platforms, giving a broader audience the chance to experience and appreciate the complexity of my methods.
My hope is to inspire fellow stitching enthusiasts from all backgrounds to push the boundaries of what can be accomplished with a needle and thread. By sharing my methods and showing the artistry that is possible in this medium, I aim to spark curiosity and imagination in others. Regardless of whether one approaches needlework as a hobby or as an art form, I believe that exploring new possibilities leads to growth, innovation, and a deeper appreciation for textile arts. Ultimately, it is my wish that others will feel empowered to experiment, develop their own unique voices, and discover the endless creative opportunities that needlework offers.
To keep up with new posts, subscribe to this blog. Your contact info will not be shared. If you’d like to see more frequent photos tracking the projects in my studio, please follow me on Facebook and/or Instagram.
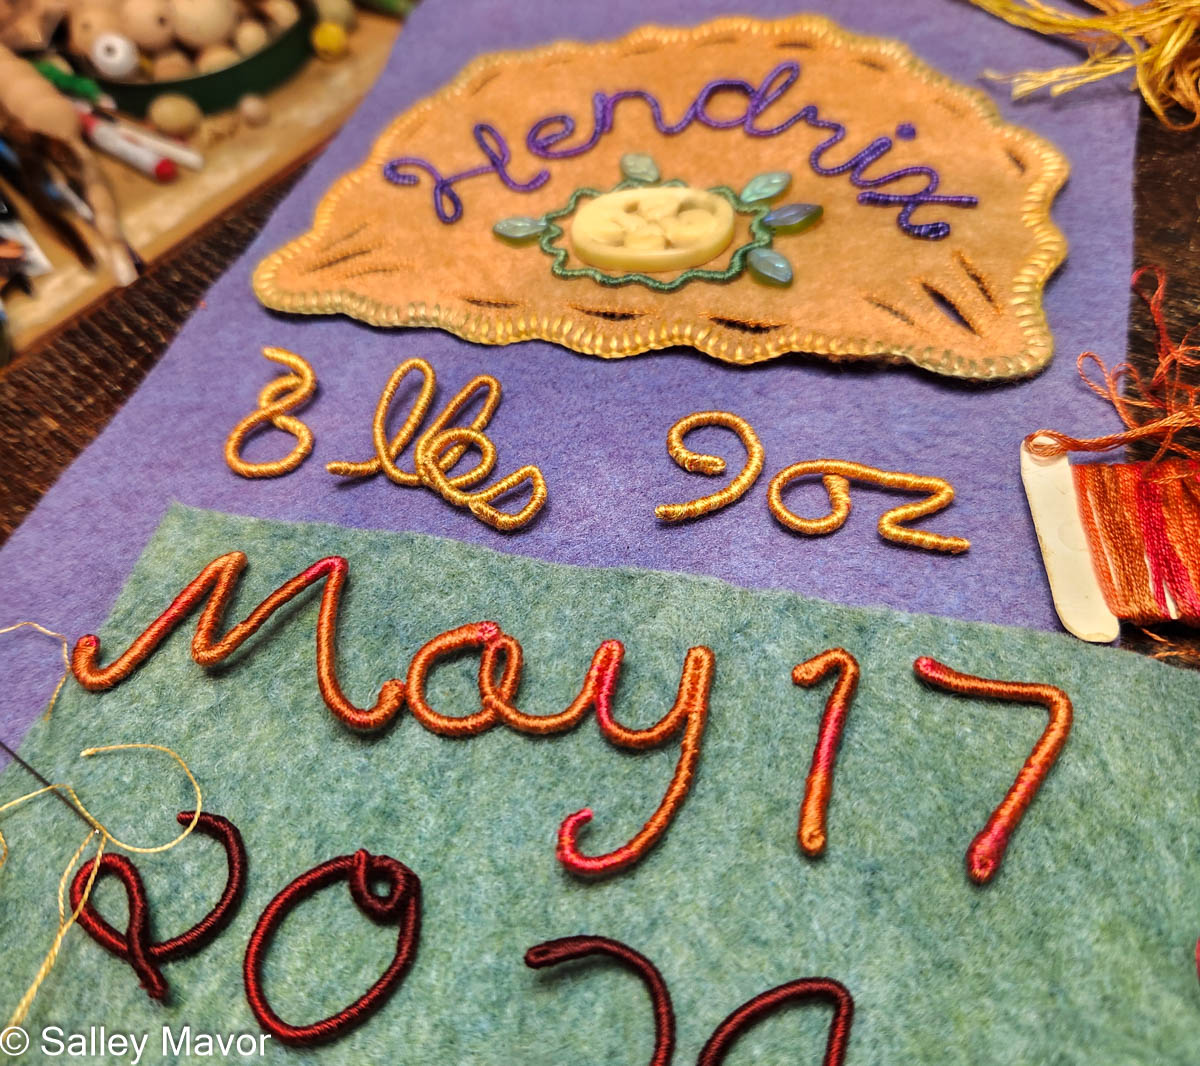
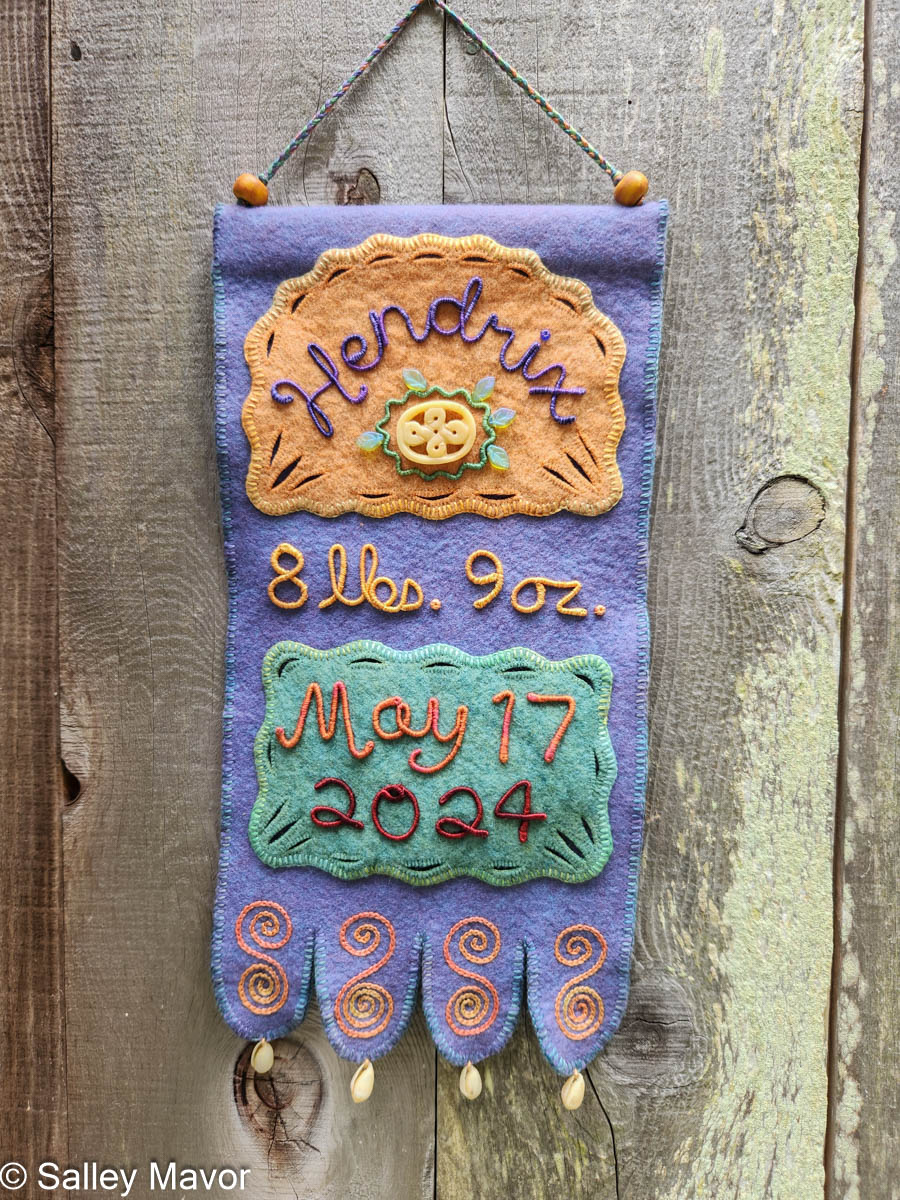
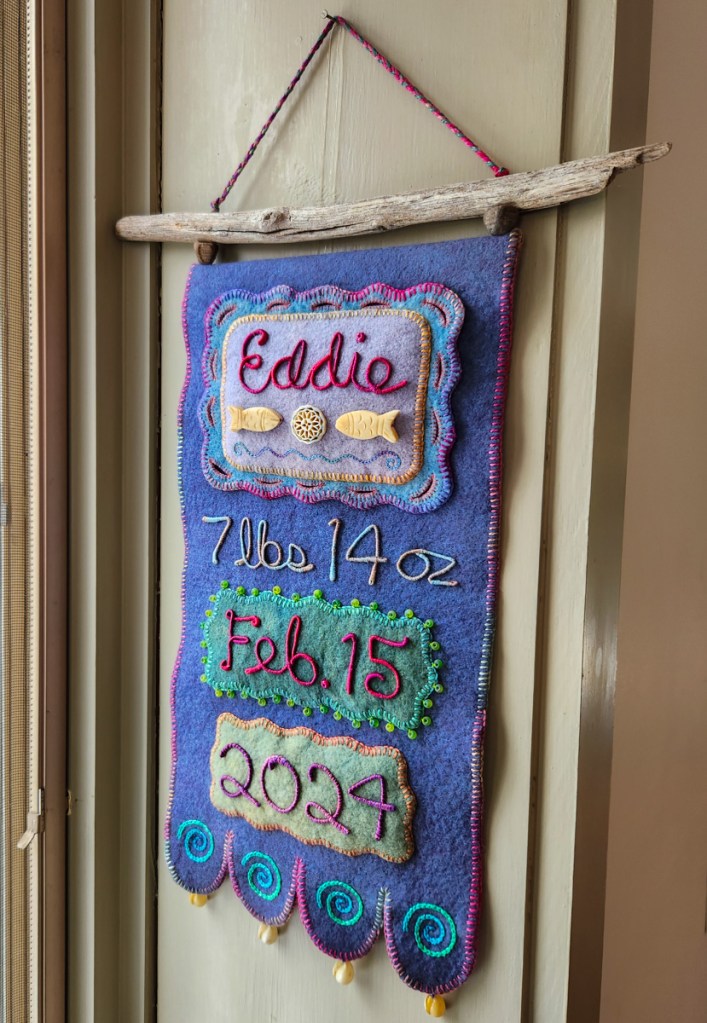
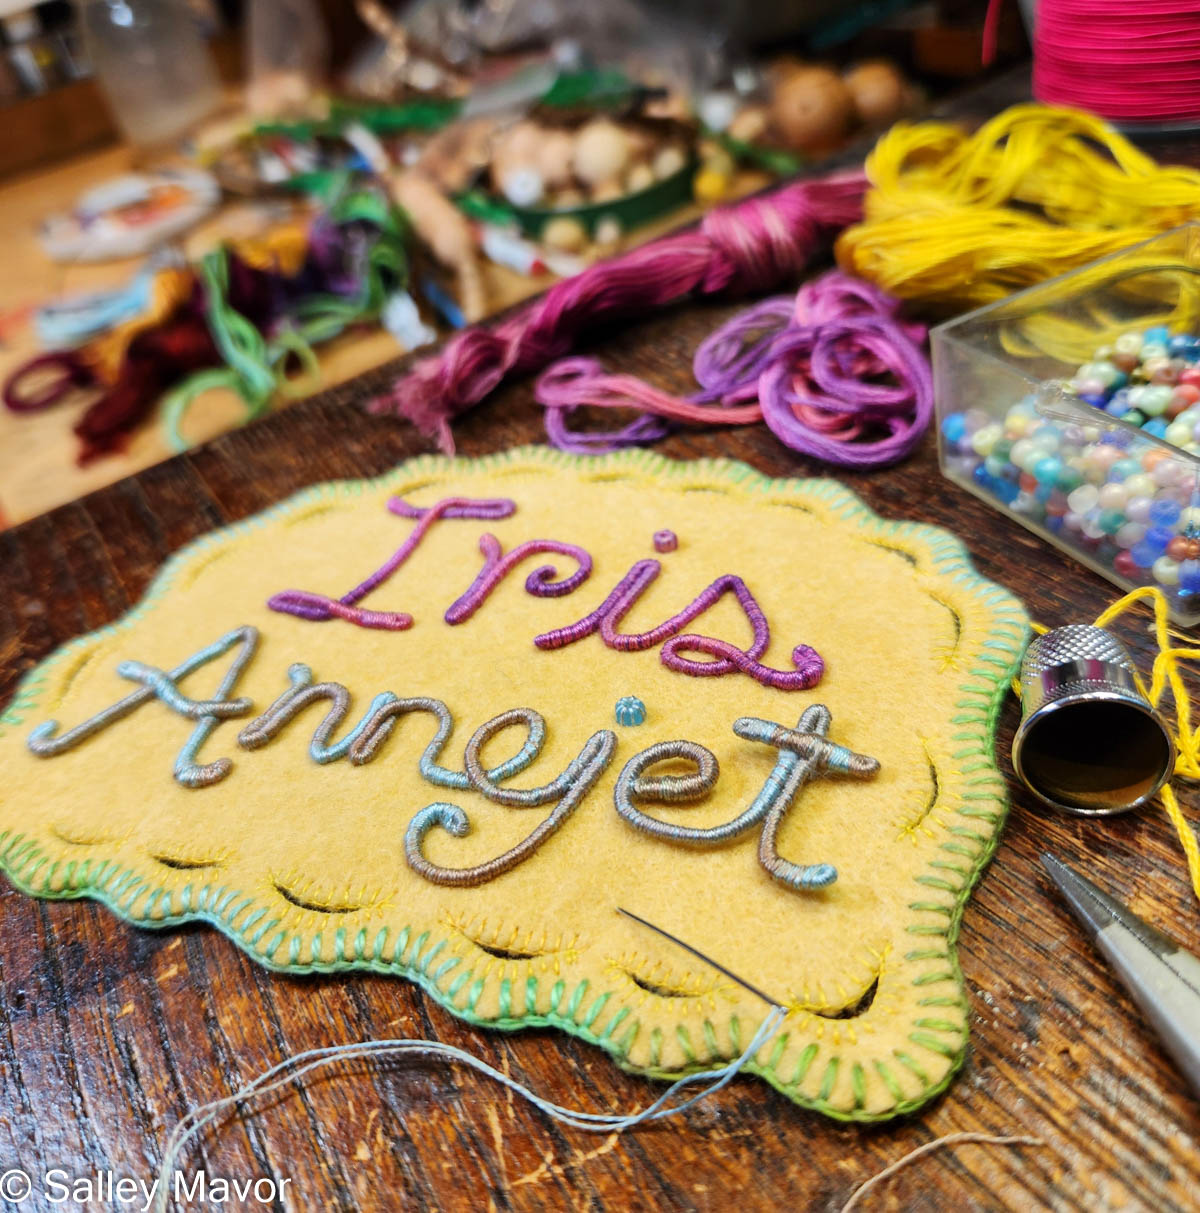
I’m delighted to share the baby banner I made for Hendrix—Henny for short—who is celebrating his second birthday today. If you’ve followed this blog for a while, you may already be familiar with these felt banners, which have become my go-to gifts for friends and family. You can browse posts about this banner and others in the archives here.
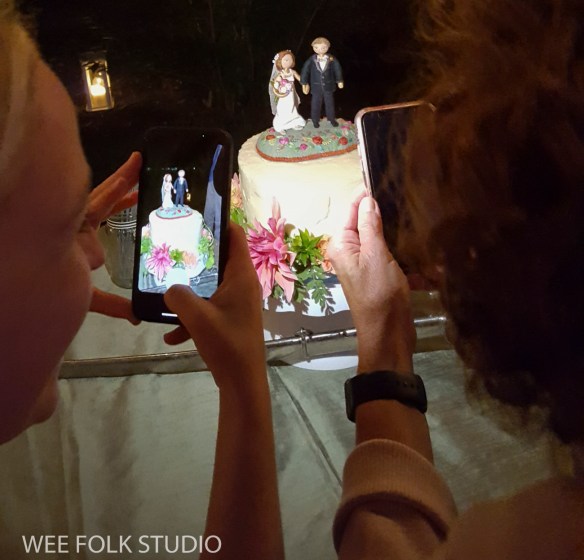
A BANNER FOR HENDRIX In today’s post, I’m sharing a behind-the-scenes look at how this banner came together, with photos, videos, and commentary. I made the banner for Hendrix shortly after he was born in 2024. His parents, Sam and Louisa, are dear friends, and I also had the pleasure of creating their wedding cake topper, which you can see here.
Hendrix’s parents, Sam and Louisa’s wedding cake topper
STITCH MINUTE VIDEO The following video offers a brief overview of the banner-making process, with close-up views of wrapping, stitching, and embellishing. For a closer look at the finer technical details, continue reading for additional videos later in this post that explore some steps in more depth.
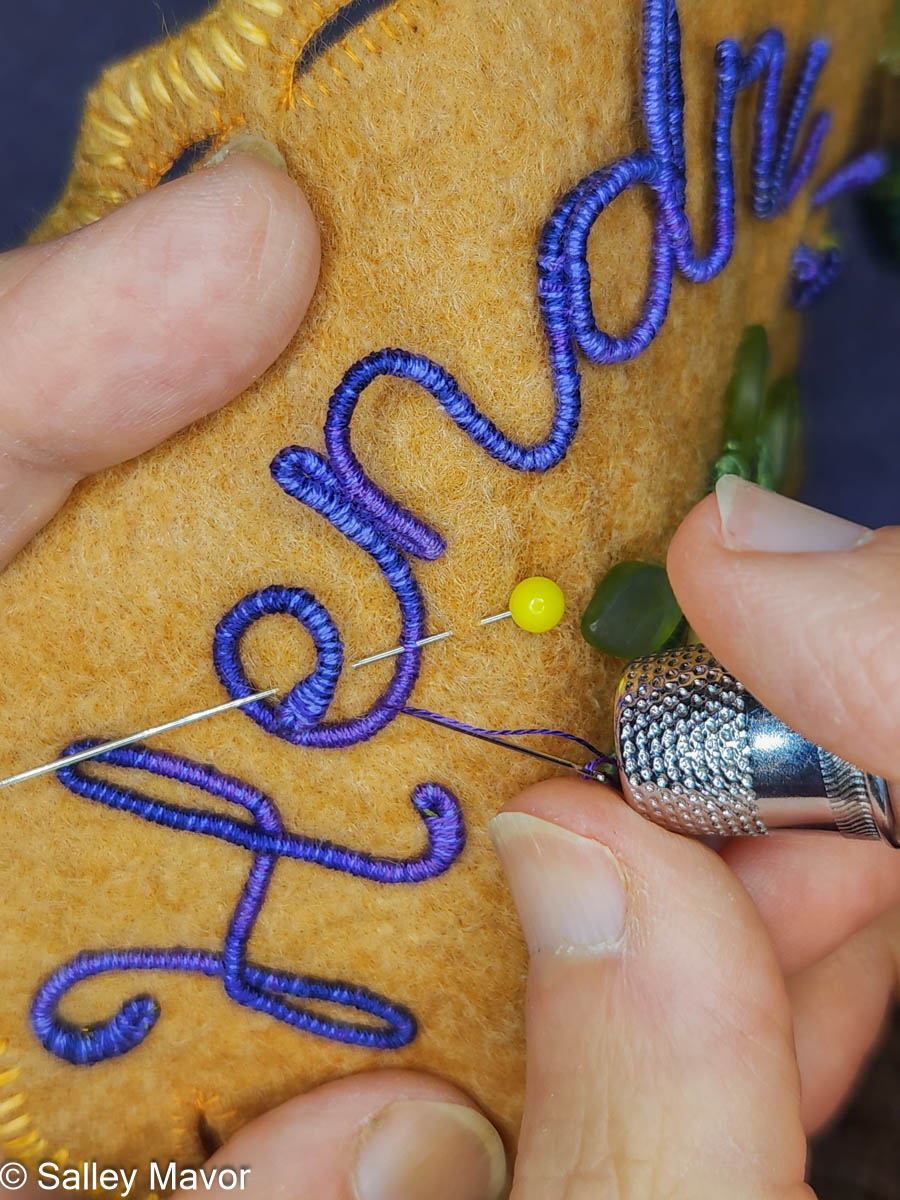
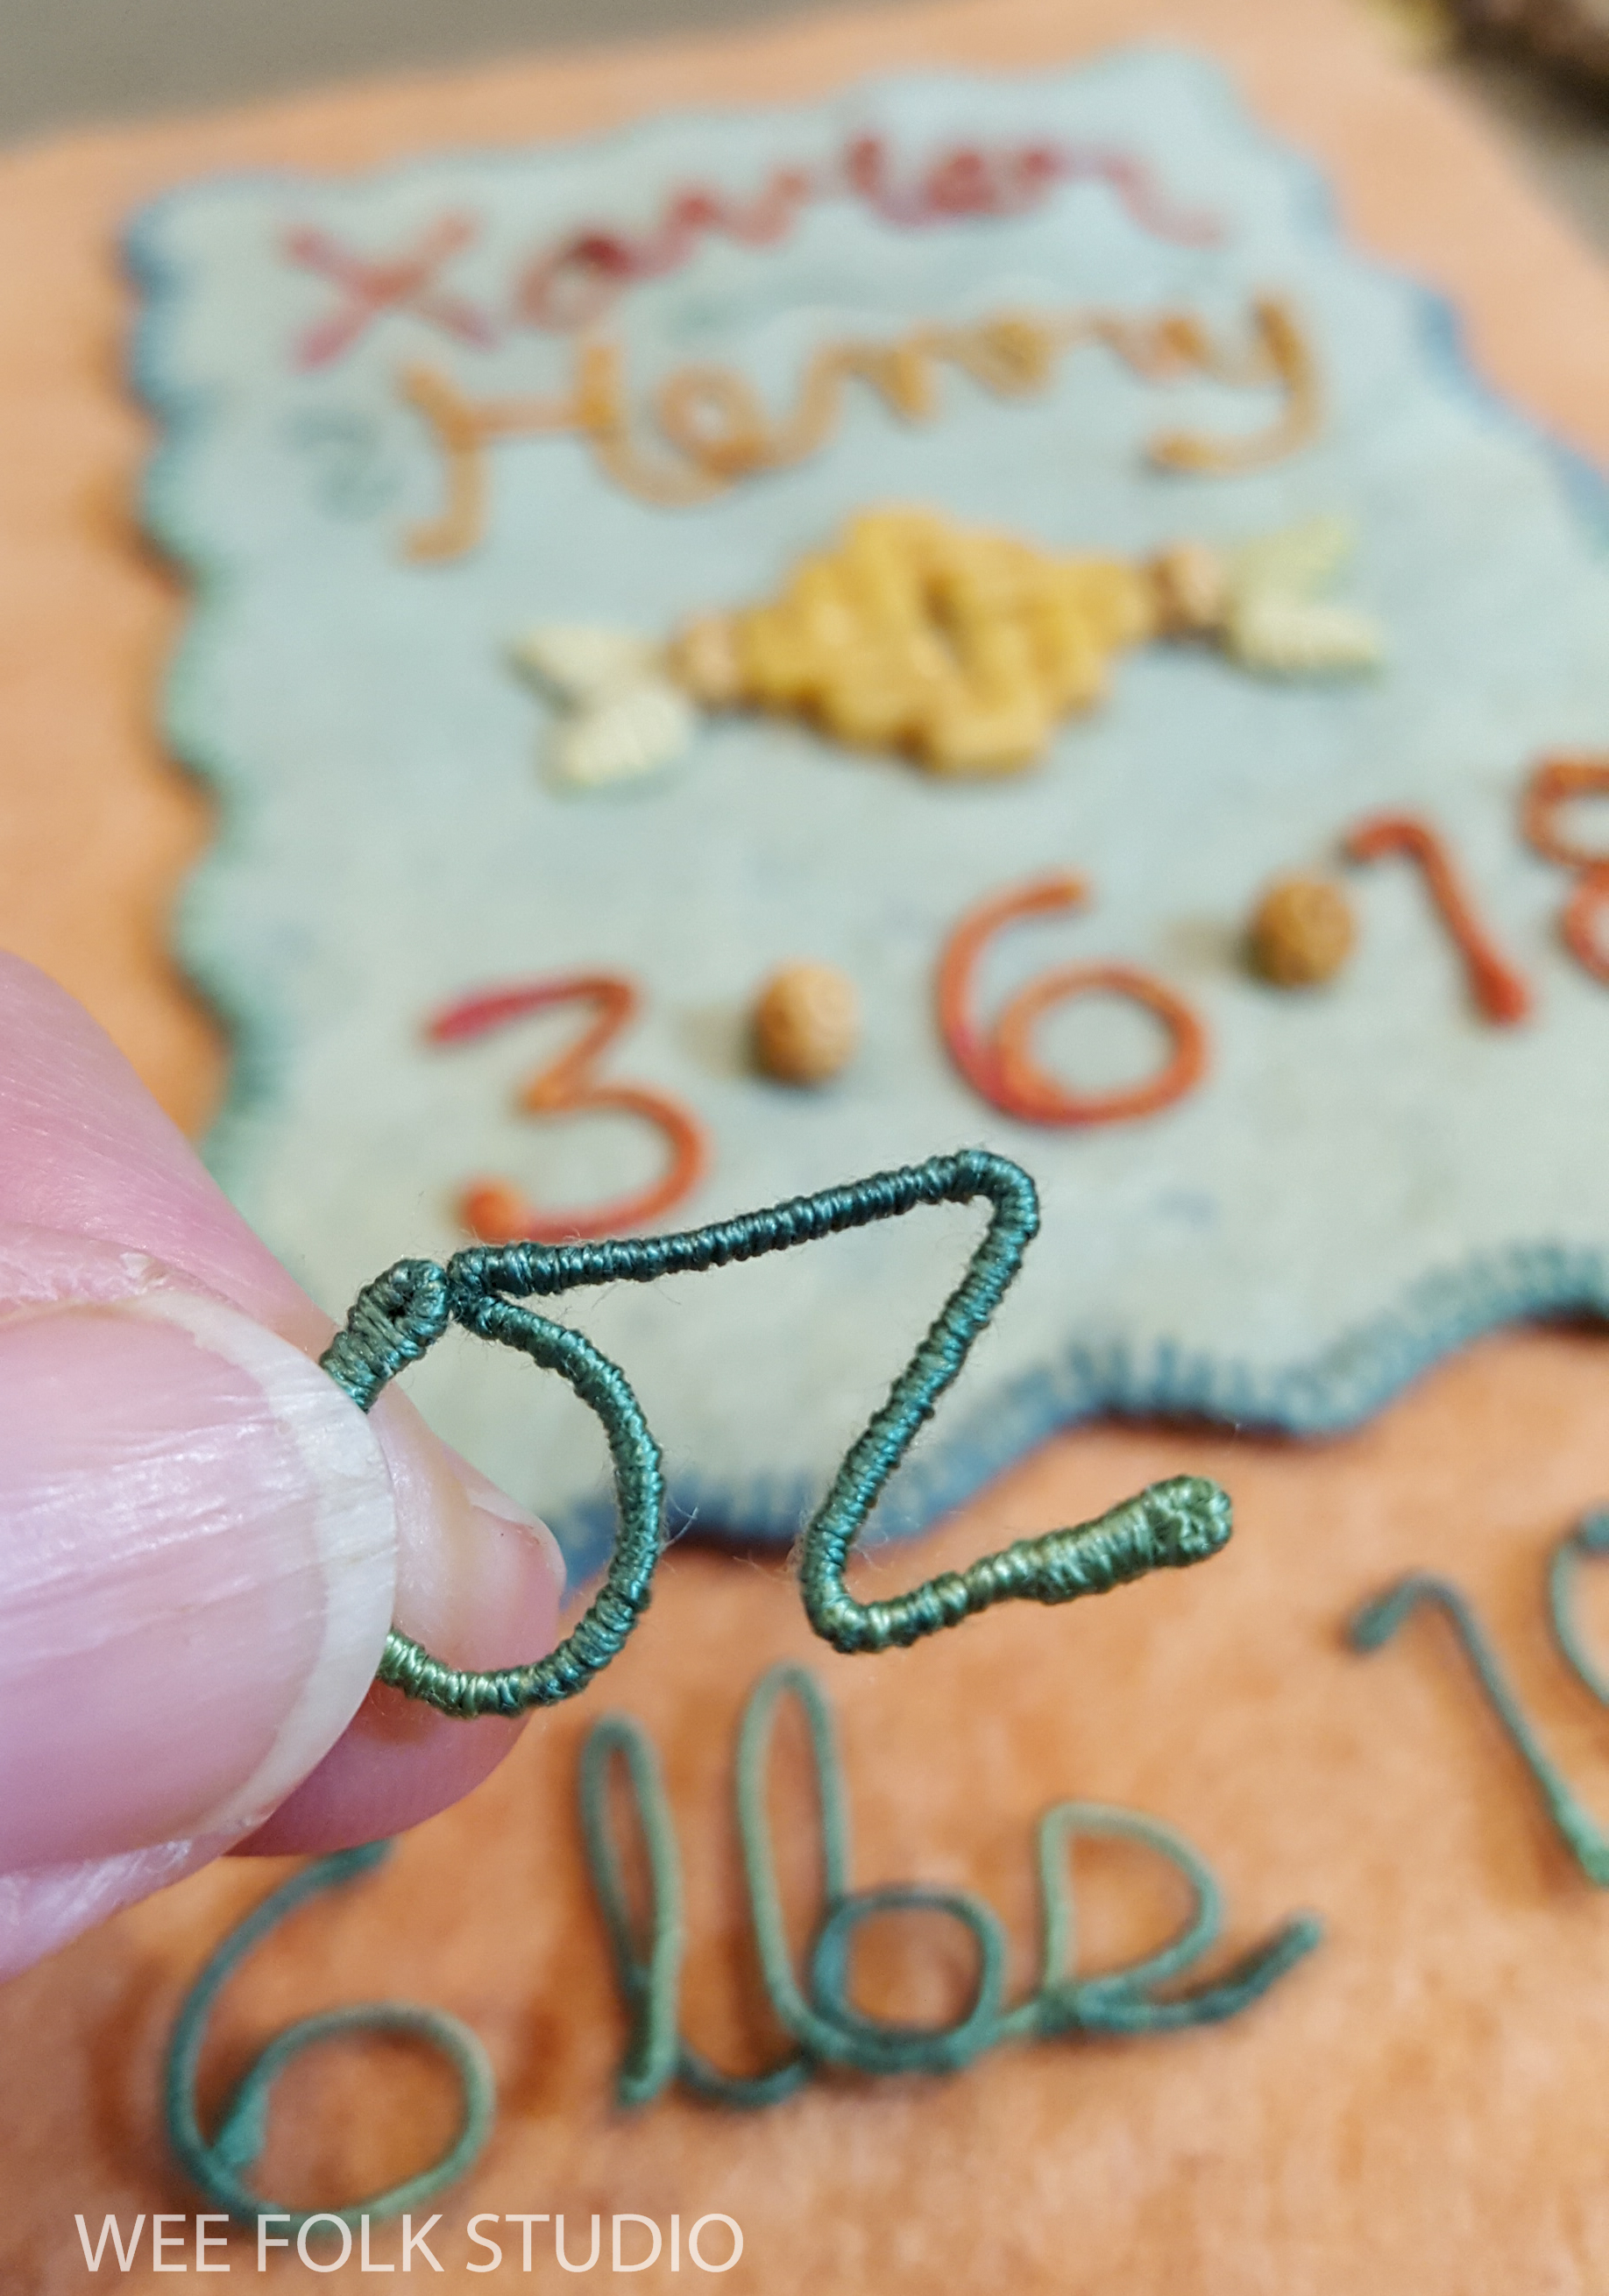
WRAPPING WIRE LETTERS After choosing a color scheme and picking out pieces of felt and thread, I wrote out Hendrix’s name in cursive handwriting with a pencil on paper. I then wrapped the length of DMC memory thread, a flexible wire, with three strands of variegated embroidery floss. Using the sketch as a template, I bent the wire to form his name and stitched the letters together where they touched.
In the following video, I demonstrate how to wrap DMC memory thread with embroidery floss. For these banners, I typically use variegated floss instead of solid colors because the shifting shades give the letters a more lively, natural look. As you’ll see, the process is slow and methodical, and wrapping the wire smoothly and evenly takes practice—so be patient.
The wire ends are bent over and wrapped so that no raw thread ends are left exposed. One advantage of memory thread is that the coating of fibrous material is easier to grip than slippery metal wire. If you’ve learned to wrap pipe cleaner arms and legs for the wee folk dolls in my how-to book, Felt Wee Folk, you already have a helpful head start with this technique.
WRAPPING THE WIRE WREATH I’ve always loved wavy lines and rarely miss a chance to add curves where there might otherwise be a straight edge, so making a zigzag wreath felt like a natural choice. In the following video, I show how I form the wreath into one continuous line with no visible ends. It’s a fussy process, but the finished result is well worth the extra effort.
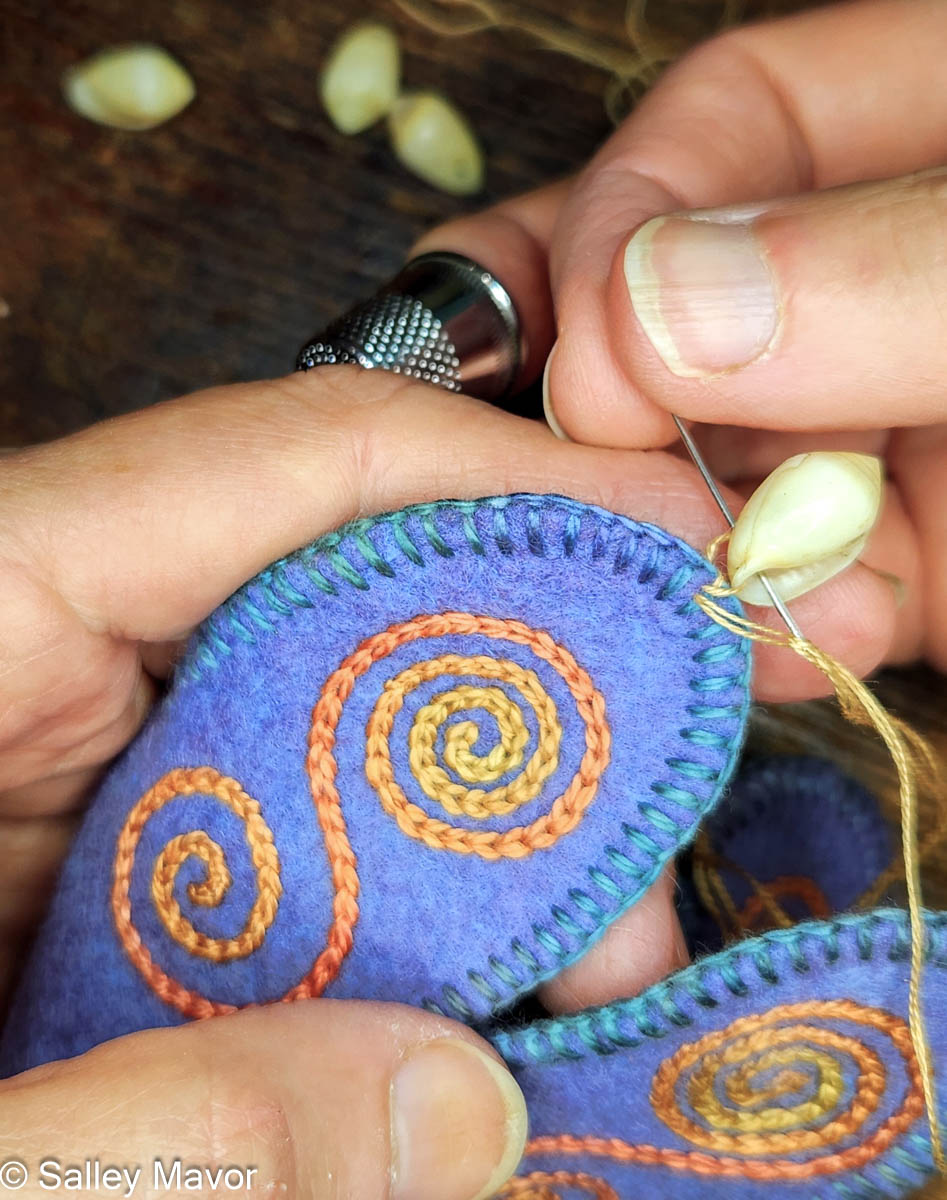
After wrapping all the letters and numbers, I pinned them in place and stitched them to the felt pieces.
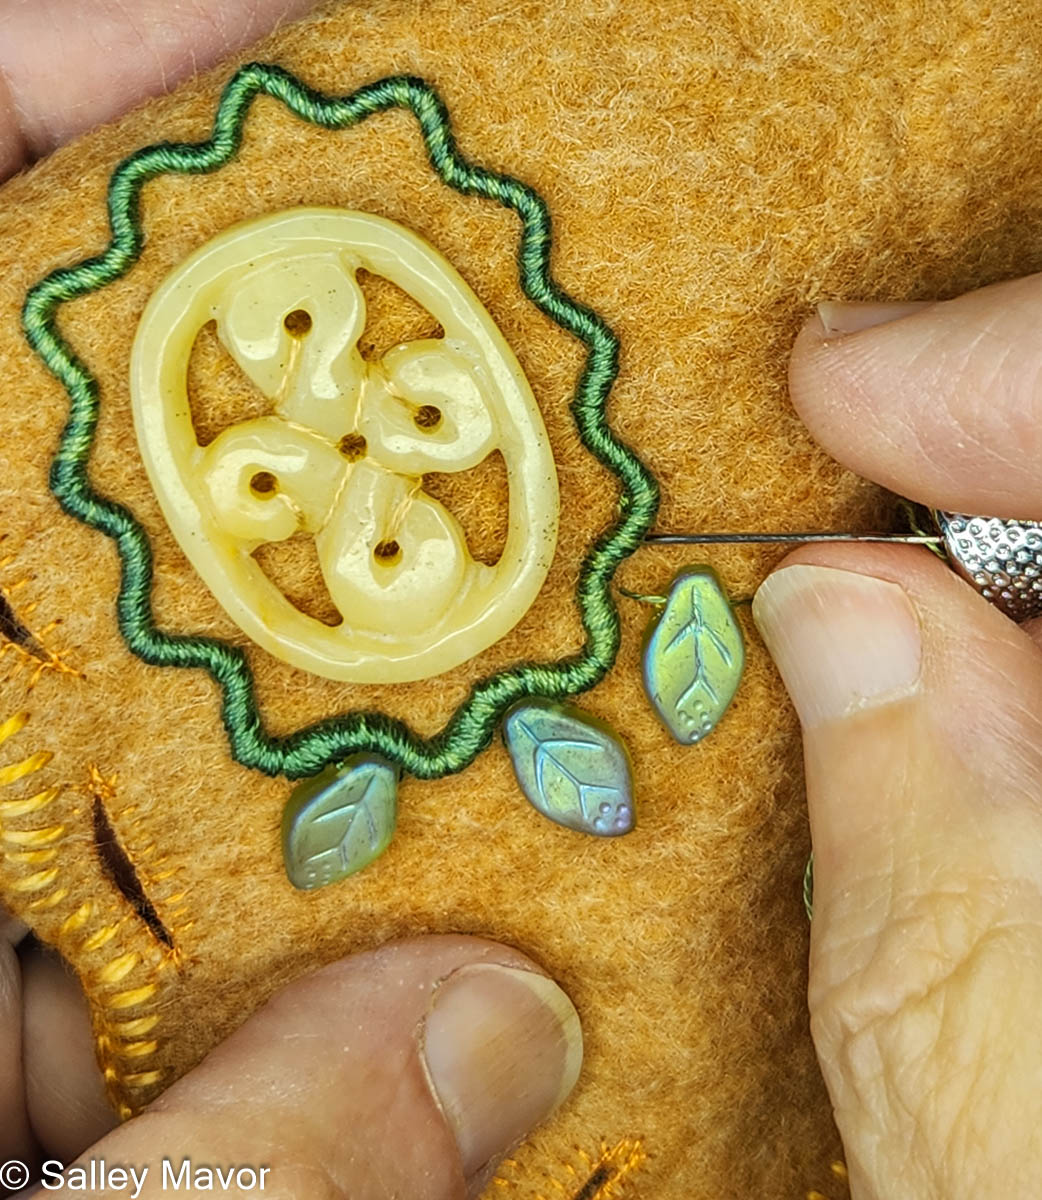
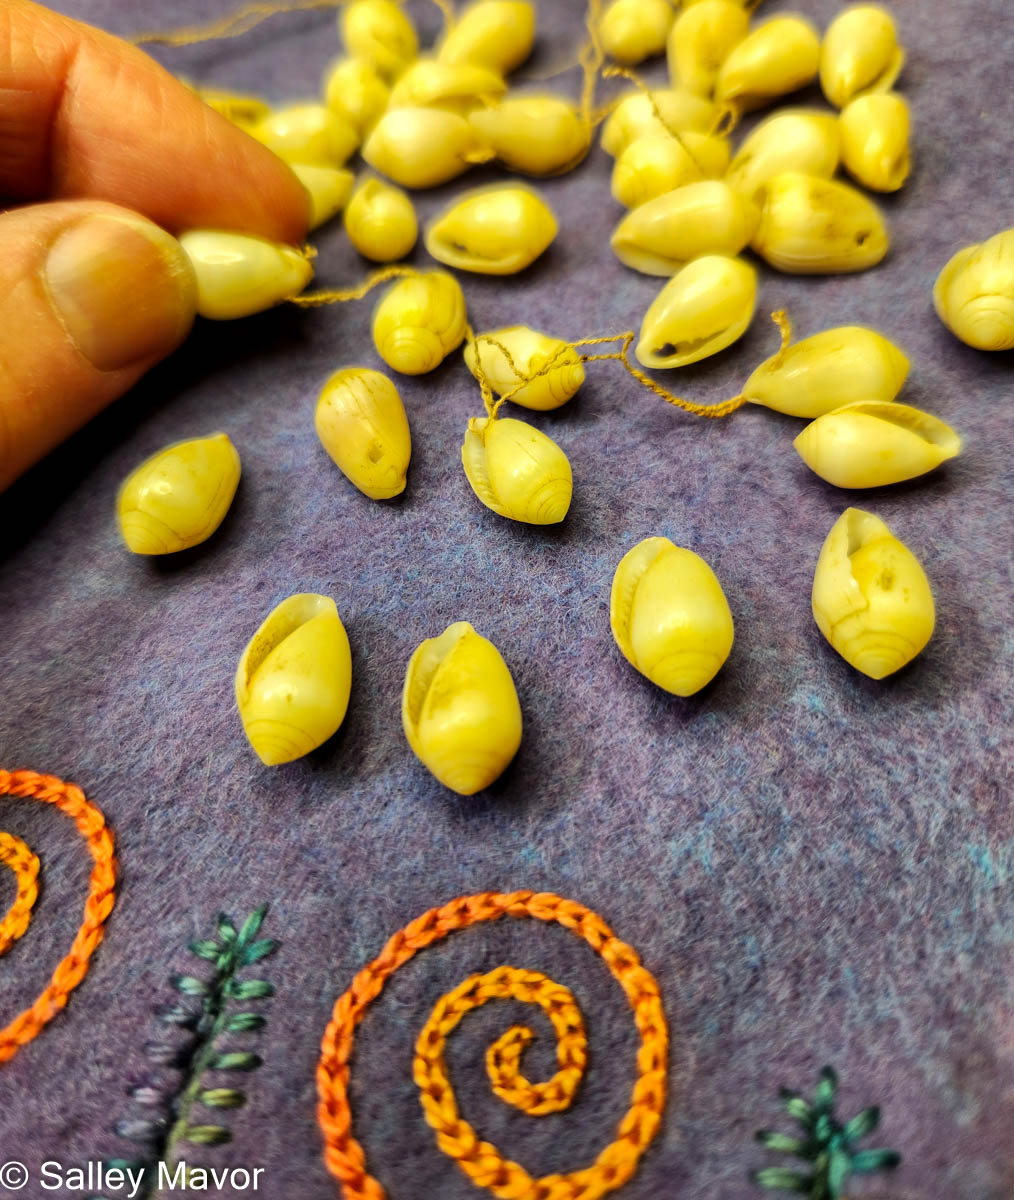
The bottom edge of the banner is finished with four scallop-edged flaps, each embroidered with chain-stitched spirals. At each point, I sewed on a shell that conveniently already had a hole for stitching. They came from a souvenir necklace my grandmother bought many years ago in her travels.
Happy Birthday, Henny!
To keep up with new posts, please subscribe to this blog. Your contact info will not be sold or shared. If you’d like to see more frequent photos tracking the projects in my studio, please follow me on Facebook, Instagram and BlueSky.
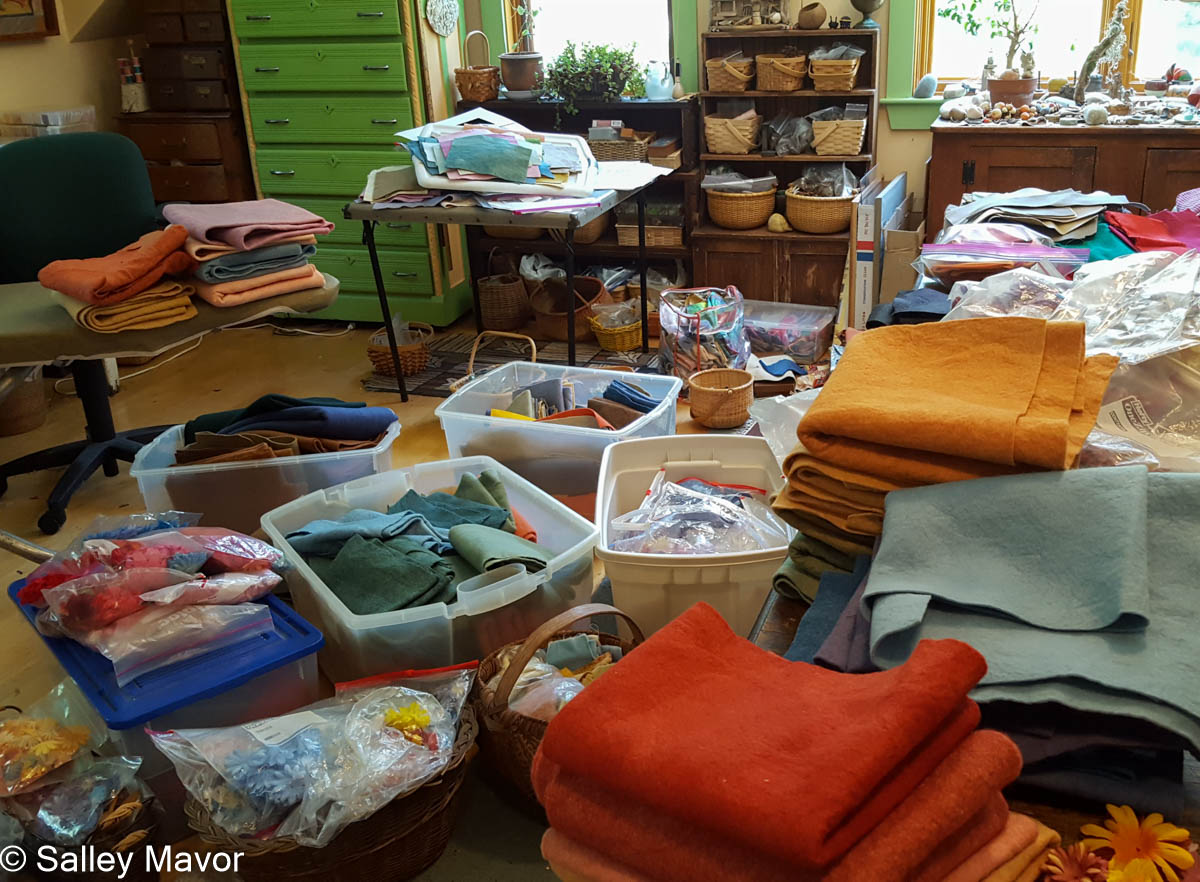
Wool felt is one of my favorite materials to work with—right up there with embroidery thread. I love it for its versatility and stability, and most of all because the cut edges don’t fray. Wool felt is a pleasure to use. It feels better in your hands and offers a level of integrity and durability that synthetic fabrics just can’t match.
Sorting pieces of wool felt in my studio.
Once you’ve worked with wool felt, it’s hard to go back to the inexpensive acrylic sheets commonly found in craft stores—like trading a polyester pantsuit for cotton, wool, or linen. Many online businesses sell wool felt, from garish commercially dyed colors to softer, plant dyed, and “heather” shades. Sources for purchasing wool felt are at the end of this post.
Like many other children born in the 1950s, my first experience with wool felt was through making doll clothes. The moment I mastered sewing snaps onto felt outfits for my Troll dolls, a new world of possibilities opened up. I can still remember wondering which was the “right” way to sew on snaps: make the stitches jump from hole to hole or stitch around the outside of the snap. It’s still a conundrum.
I don’t recall coming into contact with genuine wool felt again until 1988, when my children began attending the Waldorf School of Cape Cod. Handwork was part of the daily curriculum—knitting, woodworking, and sewing with wool felt. At the time, many Waldorf schools around the country were supplied with naturally dyed wool yarn and wool felt from Textile Reproductions, a small family business here in Massachusetts.
I was thrilled to find such thick, luscious wool felt in a pleasing array of colors. For nearly ten years, I regularly ordered felt from Textile Reproductions—until they discontinued dyeing felt in 1997. Luckily, I heard about their plans in time to drive to their house and buy as much felt as I could, including their unevenly dyed “seconds”, which I considered the most desirable. Unfortunately, I still haven’t found a comparable substitute to recommend.
Why the Terms Get Mixed Up Before continuing, I want to clarify something — I use felt (noun) in my pieces. I very rarely do felting (verb). It bothers me when my work is labeled “felting”, because the process of making felt is entirely different than using the finished product to make something else. It’s like the difference between weaving fabric and sewing a dress with fabric.
In short: Felt (noun): a fabric you can cut and stitch. To felt / felting (verb): manipulating and meshing wool fibers with wet or dry methods to form sheets of felt or three-dimensional felted forms.
Felting has a rich history and dates back to ancient times—even before weaving and knitting were widely adopted. Today, needle felting is especially popular, with a unlimited supply videos, kits, and how-to instructions available online. (Needle felting is done by repeatedly stabbing wool fleece with a barbed needle.) With that kind of mainstream familiarity, it’s easy to see how felt (the noun) and felting (the verb) are becoming interchangeable in some people’s minds.
I’ve tried both wet felting and needle felting—but for the most part, I’d rather spend time embroidering with thread. For me, felt (and felting) is a starting point, not a completed piece of art; It’s a base or structure on which to build a world, using a variety of techniques and materials. Many of my picture books, including Pocketful of Posies and My Bed feature illustrations made with wool felt.
Felting definitely has its appeal, but the process—poking and meshing wool fibers—creates an overall, uniform fuzzy texture that tends to blend details together. That’s not usually what I want as the finished look in my work. I’m more interested in using thread and a combination of materials to create contrast, lines, and clearly defined edges.
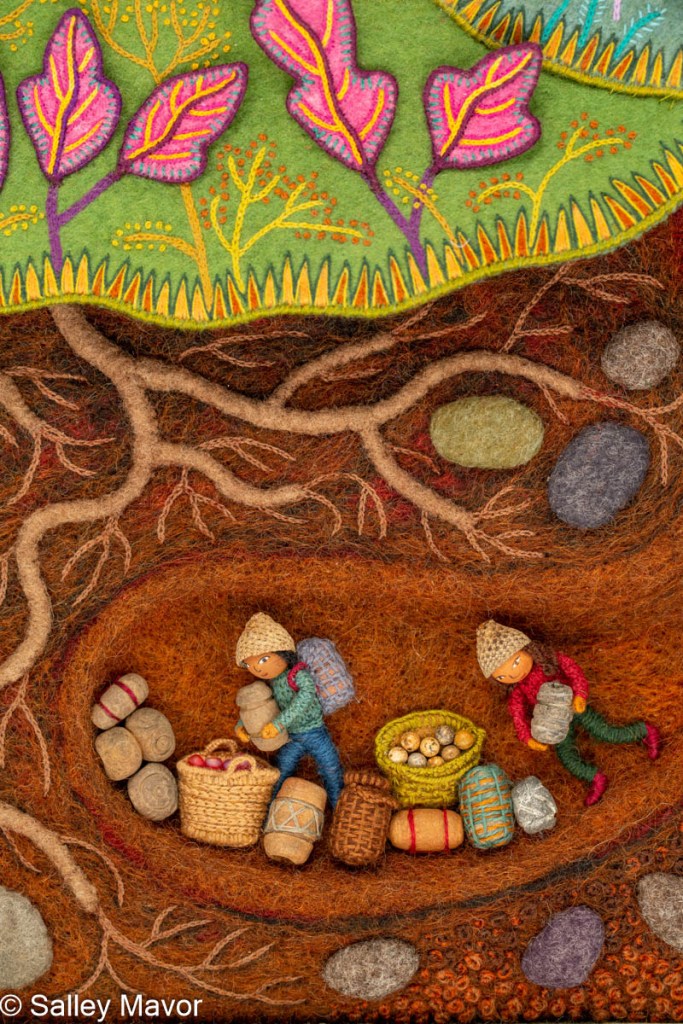
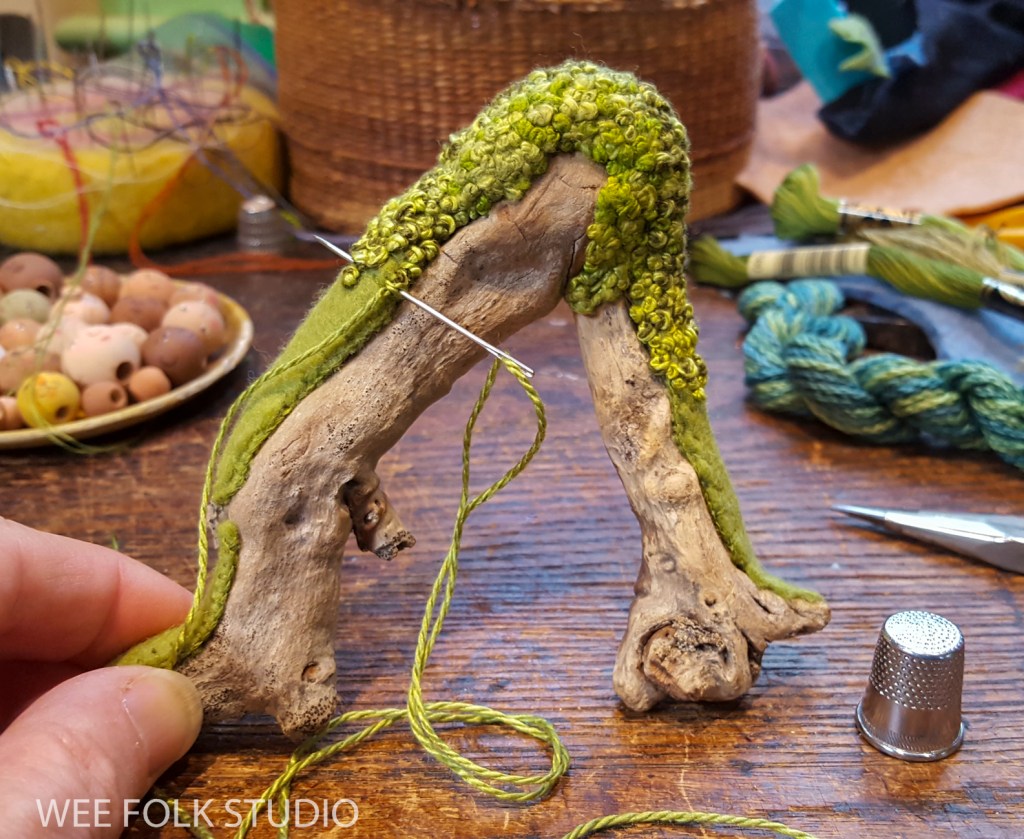
For a recent project (see image below), a soft texture was exactly what was needed to depict soil. I used both wet felting and needle felting techniques to create the tunnels and burrows in the cut-away underground section of Harvest Time, the fall scene in my series of seasonal landscapes. To learn about the process of making Harvest Time, please visit this post.
Where to Buy Wool Felt Online Many online businesses sell wool felt in a wide range of colors, from bold commercially dyed shades to softer plant-dyed and “heather” tones. Here are a few sources to explore: A Child’s Dream: Premium-quality 100% wool felt. Sweet Emma Jean: A more affordable rayon/wool blend. The Olive Sparrow (Toronto, Canada): A wide selection of wool felt.
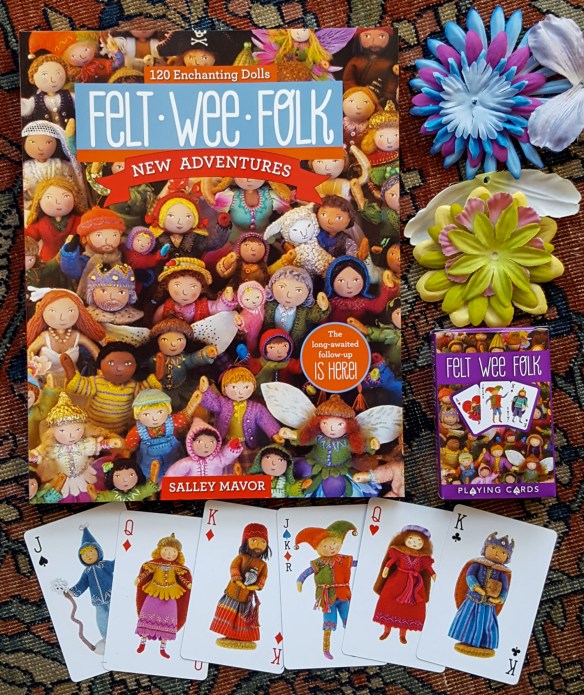
100% wool felt is pricey—but it’s often worth it. The doll-clothes pattern pieces from my how-to book Felt Wee Folk don’t require much material, so a little can go a long way. The book is available worldwide where books are sold. Autographed copies with extra goodies are for sale in my Etsy Shop.
Felt Wee Folk: New Adventures with extra goodies sold in my Etsy Shop
To keep up with new posts, subscribe to this blog. Your contact info will not be sold or shared. If you’d like to see more frequent photos tracking the projects in my studio, please follow me on Facebook and/or Instagram.
Fifty years ago, an encounter with an unusual and historical style of embroidery steered the course of my artistic development, leading the way to a career in children’s books. This is the story of how it happened:
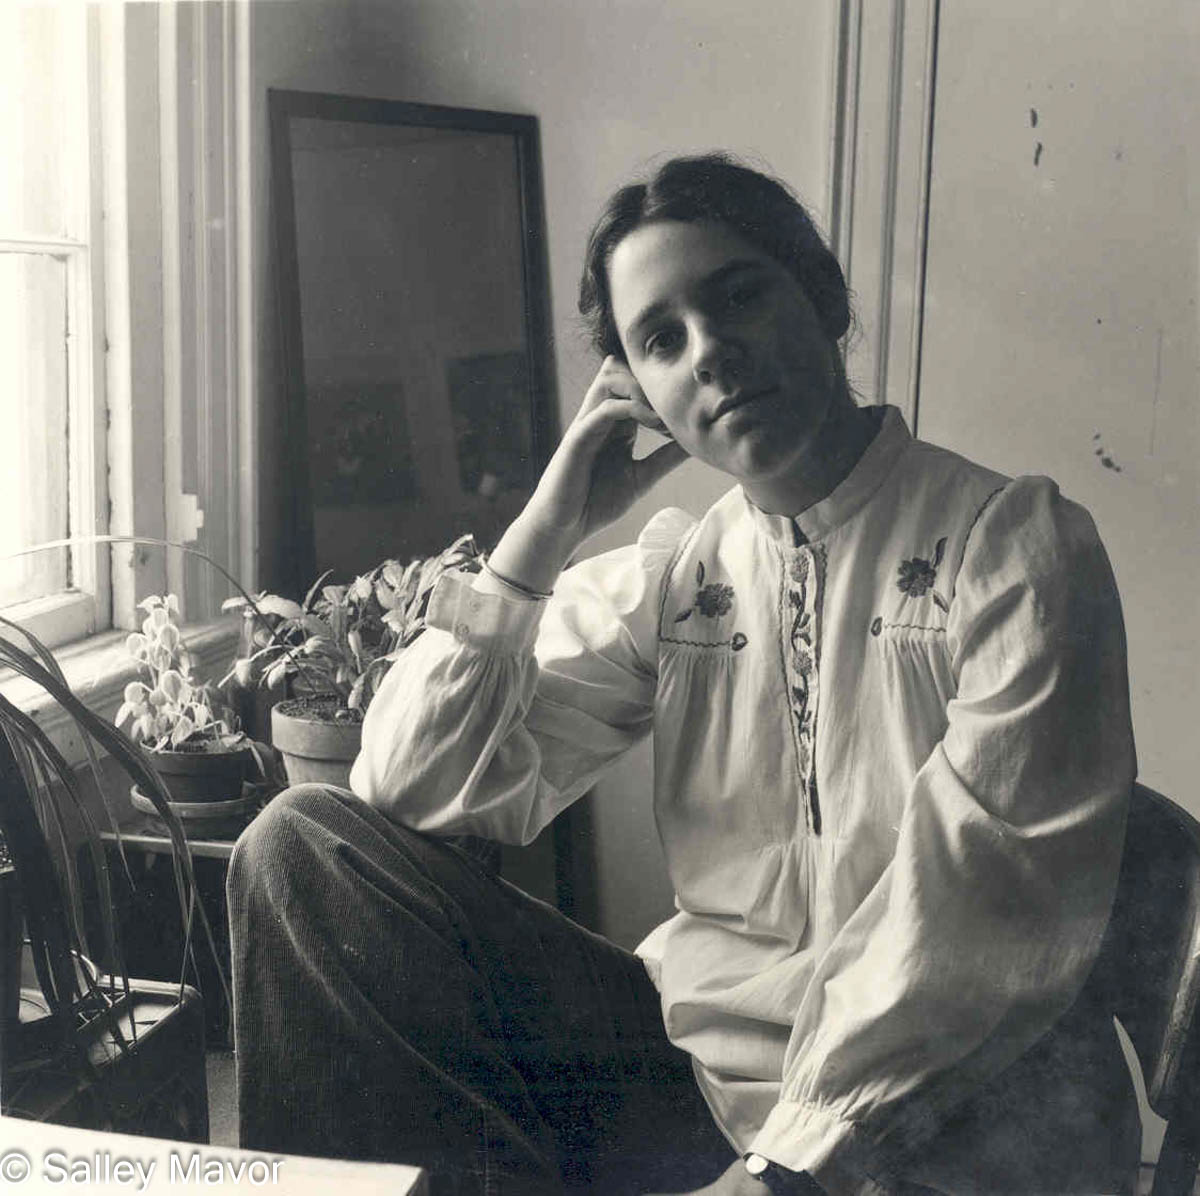
Salley Mavor at the Rhode Island School of Design in 1975
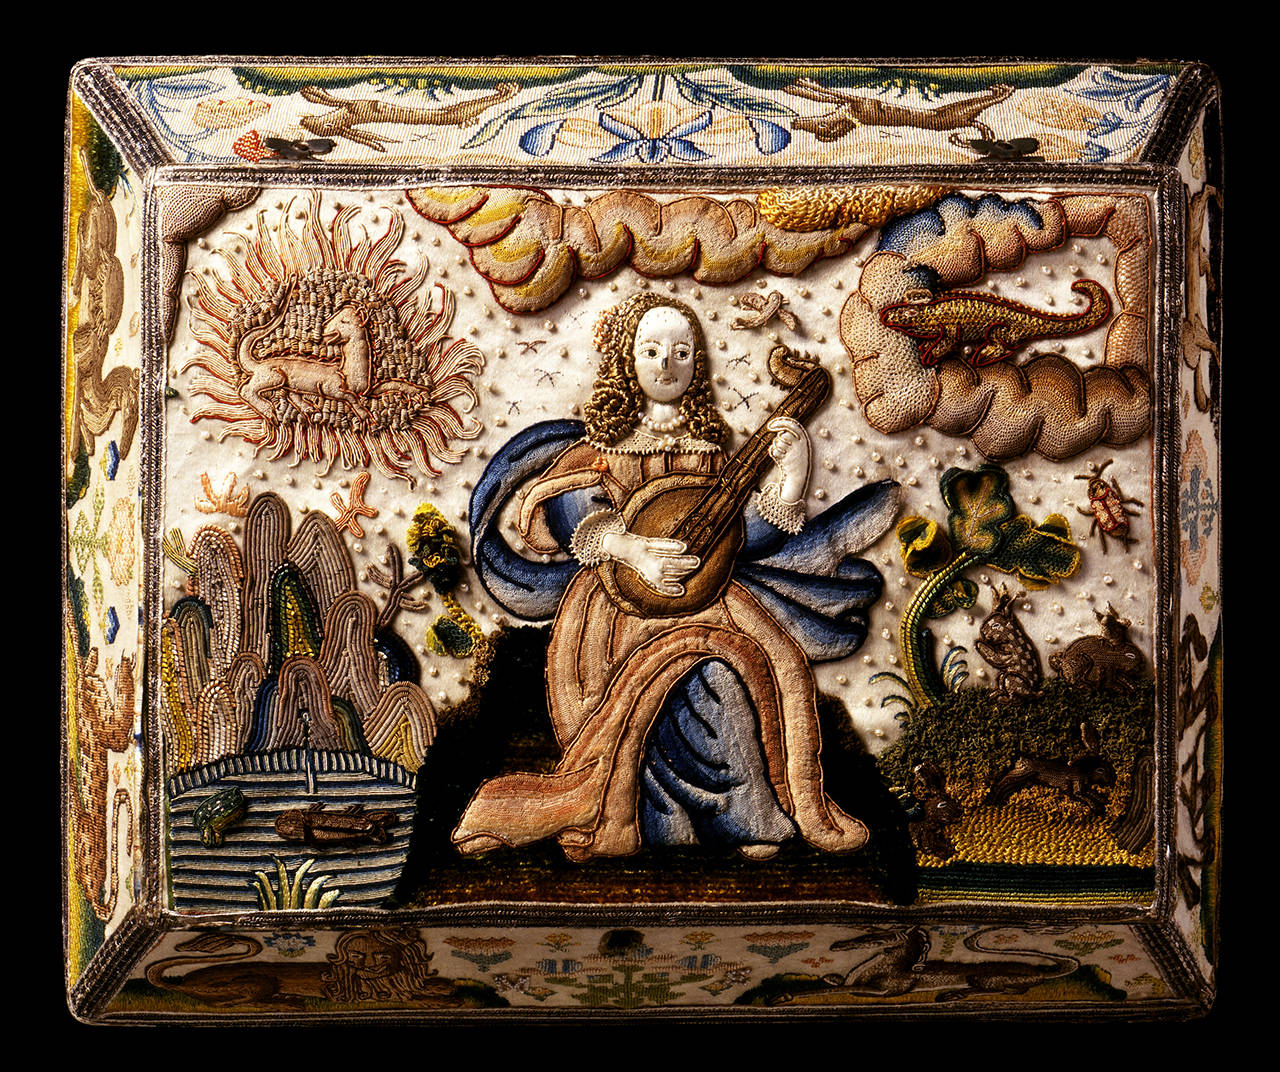
In the mid-1970s, during those early impressionable years in art school when I was searching for inspiration, I came across a distinctive 17th century English raised embroidery technique known as stumpwork. Although I cannot recall the circumstances that led me to discover a book with photographs of this oddly named type of needlework, I clearly remember the impact it had on me.
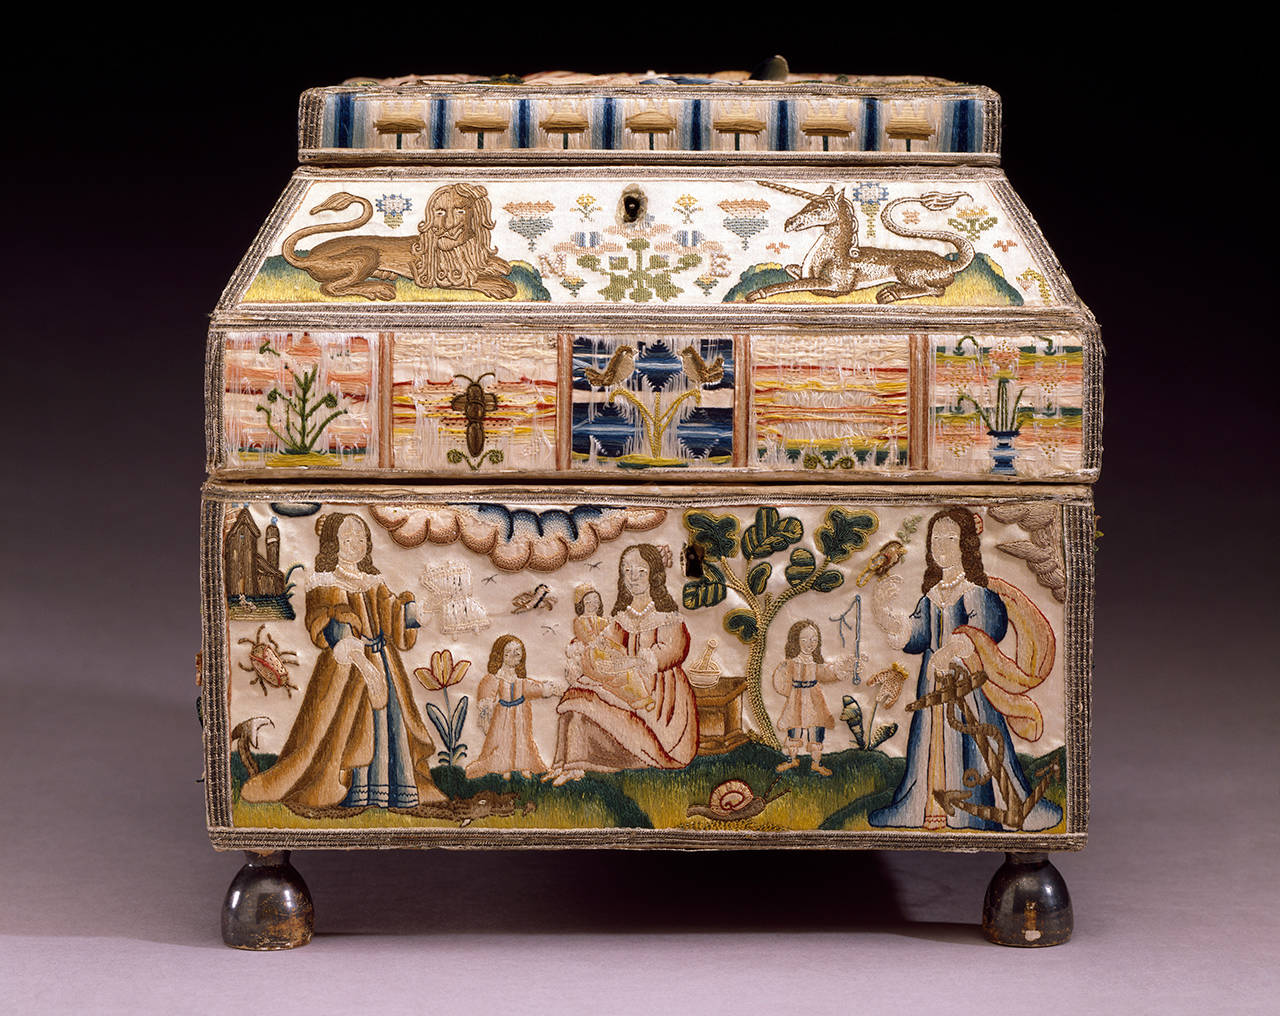
The elaborately embroidered panels and padded keepsake boxes created over three centuries ago piqued my curiosity more than any other form of art I had encountered up to that point. It was not just their remarkable technical skill that drew me in; these pieces contained sculptural and narrative qualities that completely blew me away. This introduction to stumpwork marked a major turning point in my artistic growth, as embroidery would before long turn from a sporadic interest into the full-blown obsession it is today.
This stumpwork casket is in a collection of embroideries at the Victoria and Albert Museum in London. It was made by Martha Eldin in 1671, when she was just 11 years old! The V & A’s website shares this bit of history about Martha’s casket: “Caskets like Martha’s were produced in England between about 1650 and 1695. The decorative needlework panels were worked by young girls as part of their needlework education.”
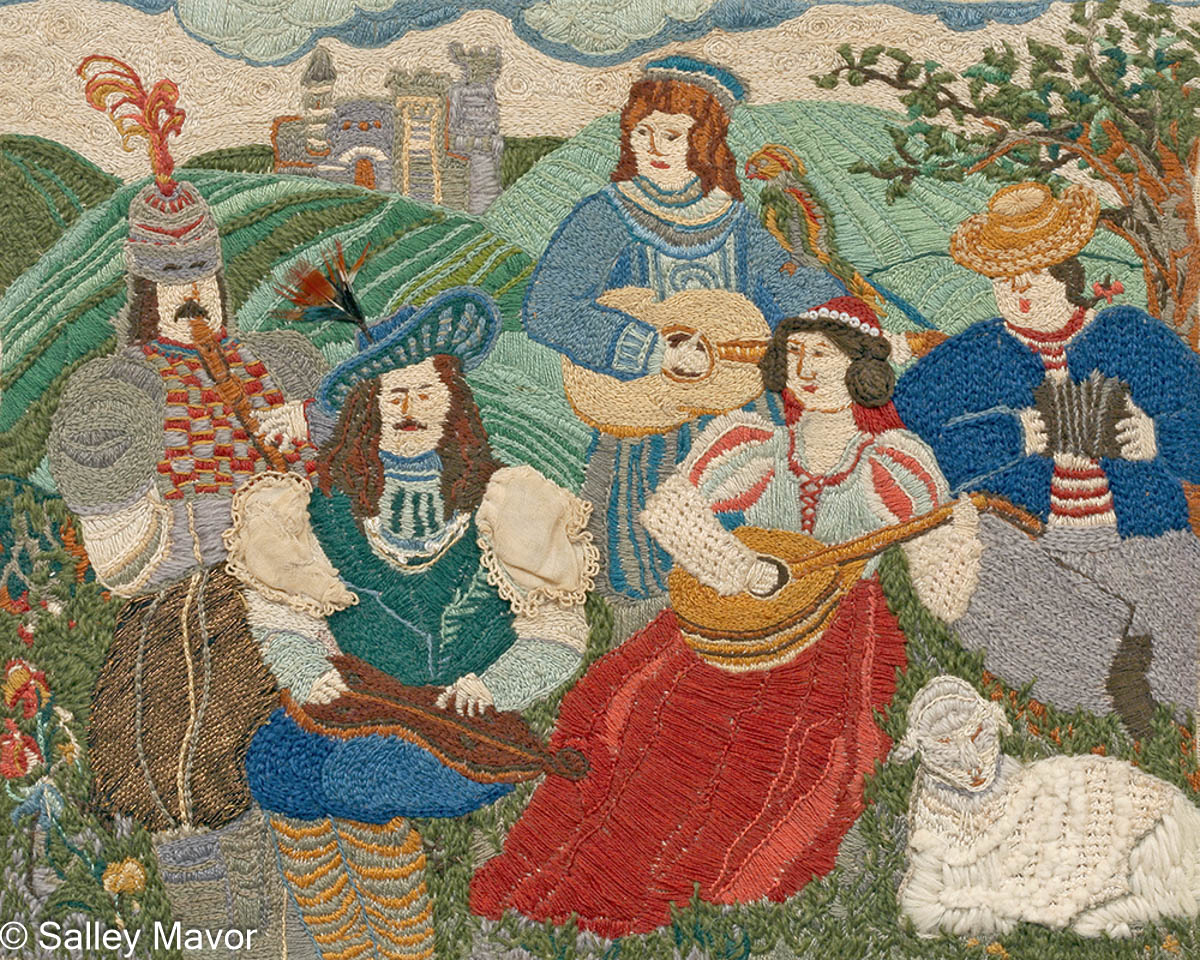
In 1975, just before discovering stumpwork, I embroidered Old World Musicians for an illustration class. At the time, I was already interested in pictorial subjects and enjoyed experimenting with various textural embellishments in my work. However, seeing examples of stumpwork opened my eyes even further to the creative opportunities within needlework.
Old World Musicians, Salley Mavor 1975
What intrigued me most about stumpwork was that it showed how embroidery could literally rise above the surface and add depth to otherwise flat, traditional textiles. By elevating certain components and creating a dramatic interplay of light and shadow, I realized that needlework could become far more engaging than mere decoration. It could be transformed into an immersive visual experience, complete with objects shaped like animals, human figures, and other familiar elements that invite the viewer to take a closer look.
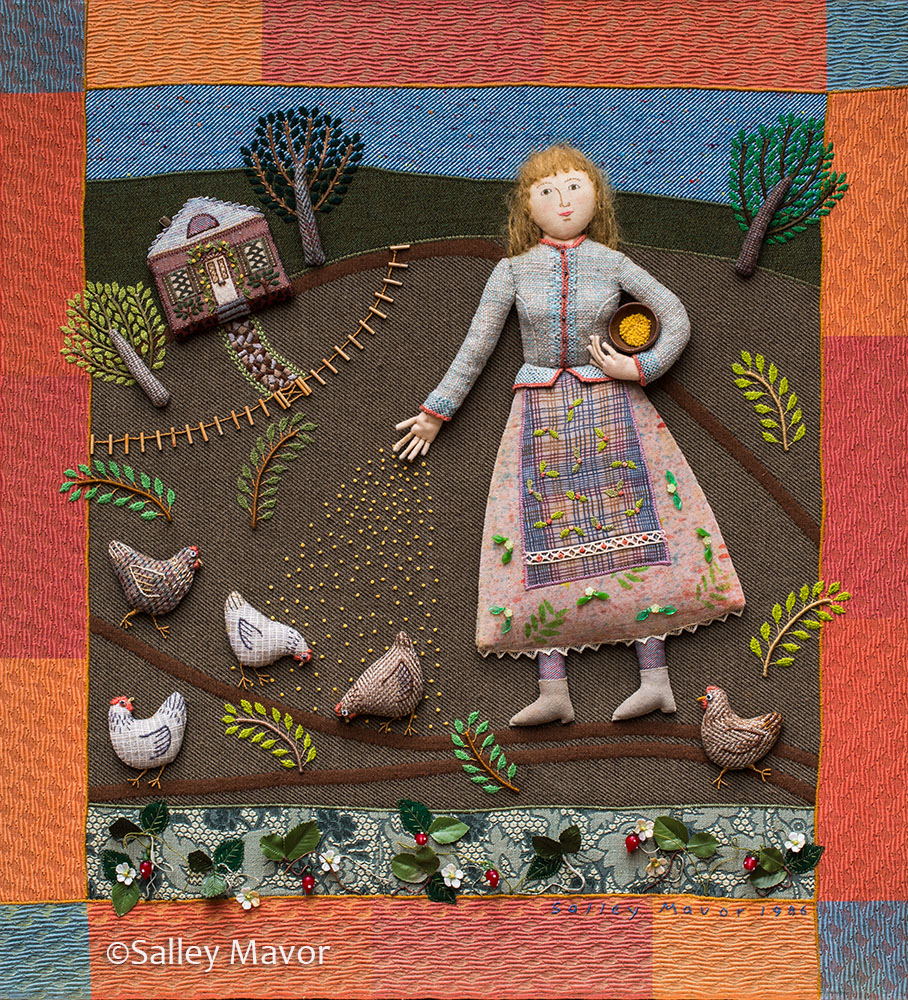
Feeding Chickens 1986, Salley Mavor
Fascinated by the three-dimensional aspect of stumpwork and its storytelling potential, I was eager to adapt the concept in a way that matched my own artistic style and abilities. Unlike other textile processes with pre-planned designs or grids—essentially functioning as color-by-number projects—stumpwork allowed ample wiggle room to make changes as I worked. This freedom to manipulate and rearrange parts midstream made this method especially appealing to me, as I typically began with a simple sketch and refined my work as I progressed.
Illustration from the picture book, Mary Had a Little Lamb, 1995, Salley Mavor.
While my artwork was inspired by stumpwork, my techniques, materials, subject matter, and presentation were entirely different. Even if I could have found instructional materials for learning traditional techniques from the 17th century, I doubt I would have had the tolerance to follow the patterns and directions as prescribed. My creative process has always been more self-guided, involving a lot of experimentation until I discover something that works. When asked what my medium was called, I hesitated to use the term “stumpwork”, concerned that it sounded too homely. I soon labeled my new work ”fabric relief”, a name that I thought more accurately described my art.
The Way Home 1991You and Me 1997Pocketful of Posies 2010
In the fifty years since I first encountered stumpwork, this distinctive form of embroidery has undergone an extraordinary revival. Its renewed popularity has led to numerous books, instructional classes, and online tutorials. For those eager to explore the many facets of stumpwork, I highly recommend Mary Corbet’s Needle ‘n Thread, which offers book reviews and information on various techniques.
In the Heart 2001Pocketful of Posies 2010My Bed 2020
At this early stage of my artistic evolution, I was primarily concerned with finding ways to bring my imagination to life, oblivious to what might be required to take it to the next step professionally. I wasn’t thinking about the realities of photographing and reproducing three-dimensional illustrations. It was only years later, as I began to seriously contemplate illustrating picture books, that I recognized the practical advantages of working in bas-relief rather than sculpture in the round. From both a lighting and focusing perspective, positioning all characters, props, and scenery on a single plane with a shallow depth of field simplifies the composition and makes it much easier to photograph. To see a list of my books, please visit this page.
Come to My Party 1993Hey, Diddle, Diddle 2005Jack and Jill 2006You and Me 1997Pocketful of Posies 2010Mary Had a Little lamb 1995
The summer after graduating from RISD in 1978, I went on a pilgrimage to London to see the Victoria and Albert Museum’s collection of stumpwork in person. Considering the impact that this historical artform has had on the course of my career, I will forever be grateful to the English women and girls of the 1600s who created these unique and charming pieces. Because these works were treasured and safeguarded for more than three hundred years, we are able to be inspired by their beauty and ingenuity today.
Salley Mavor in 2021, finishing Mossy Glen, the spring scene in her series of seasonal landscapes.
To keep up with new posts, please subscribe to this blog. Your contact info will not be sold or shared. If you’d like to see more frequent photos tracking the projects in my studio, please follow me on Facebook, Instagram and BlueSky.
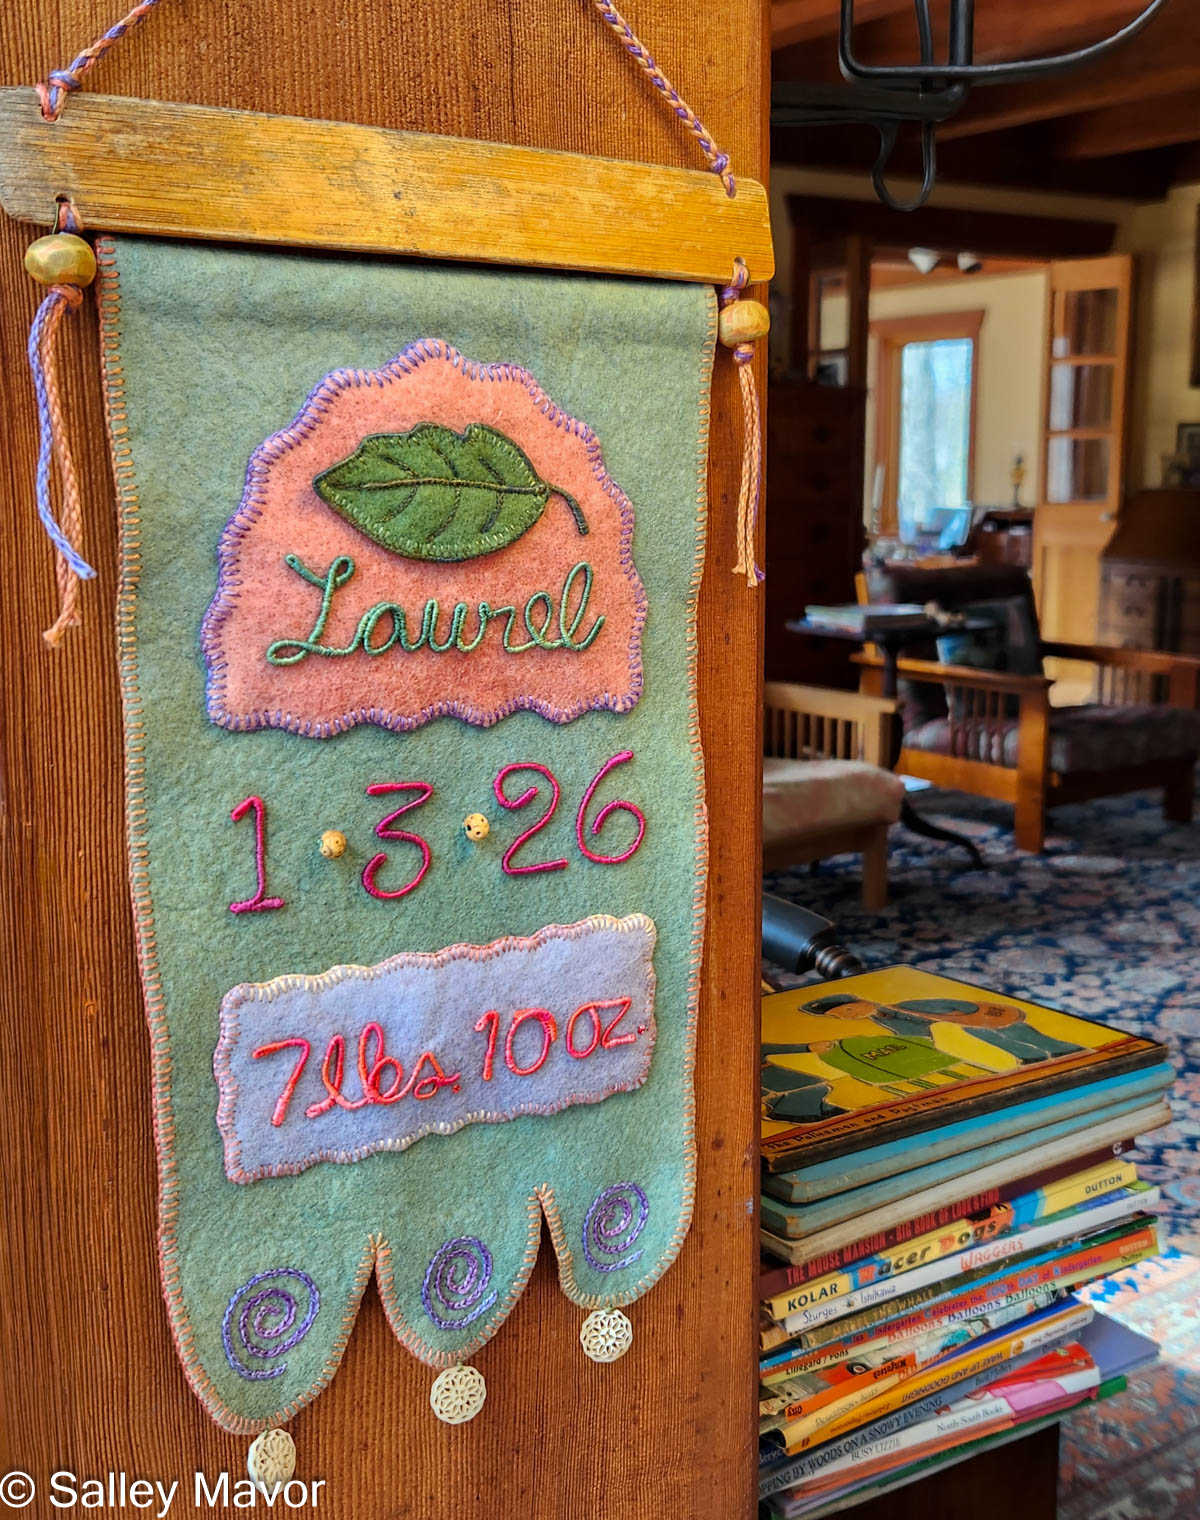
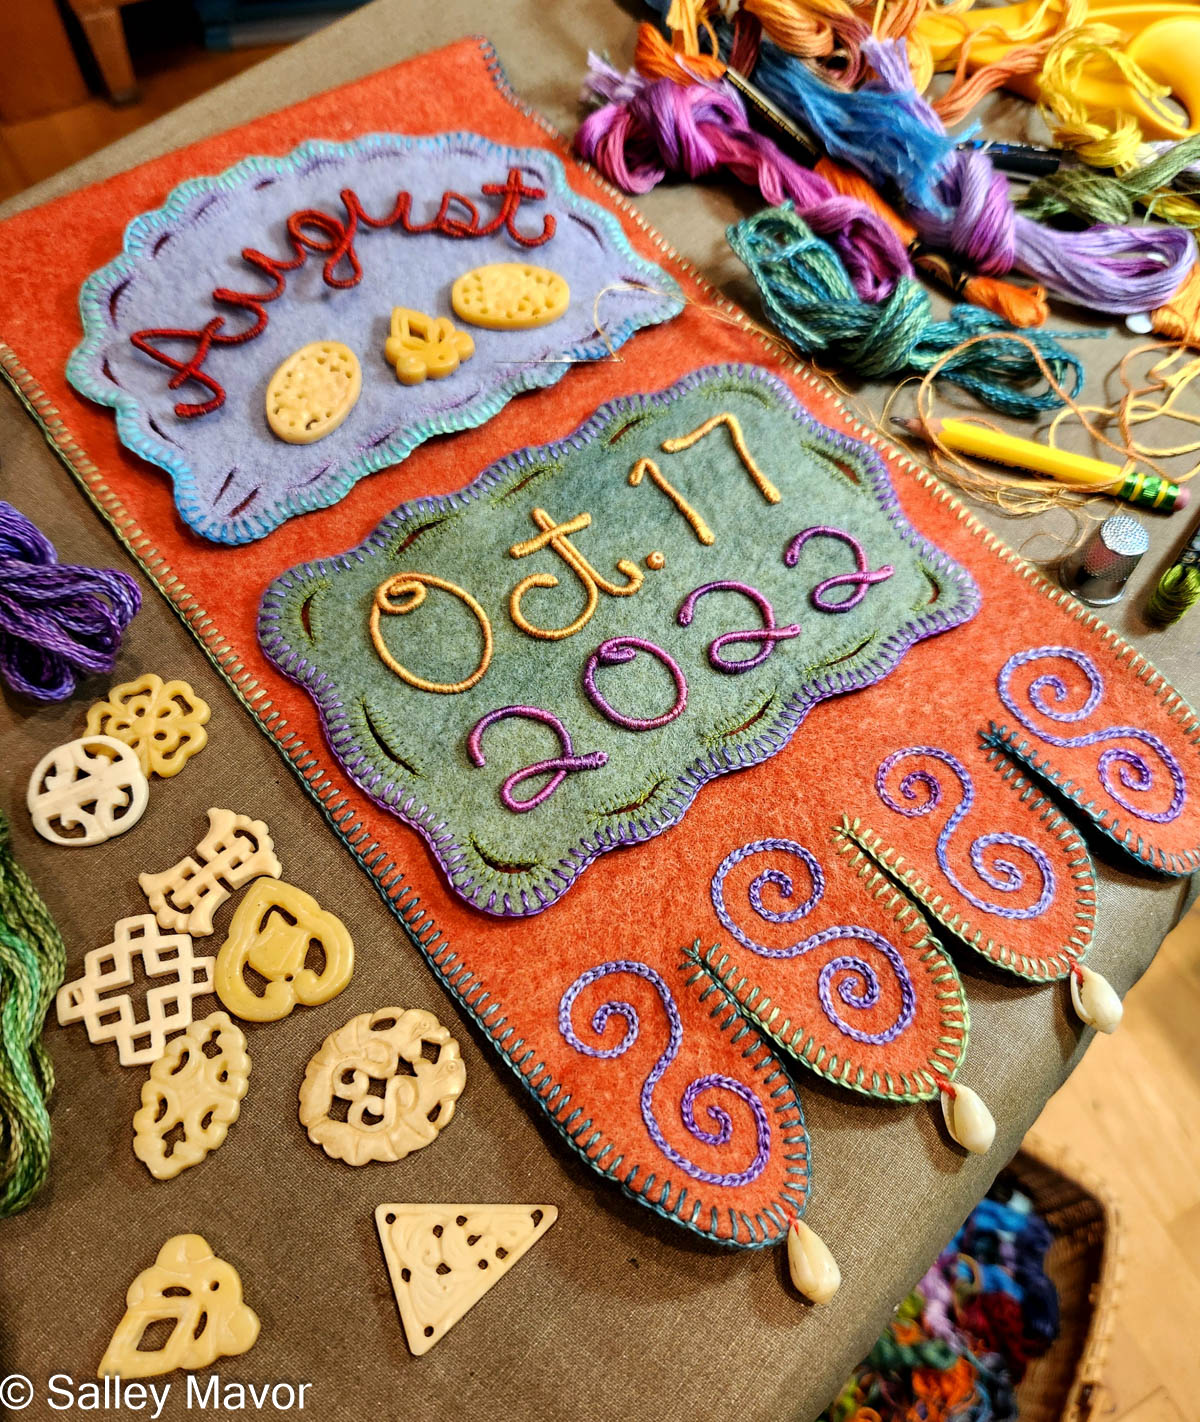
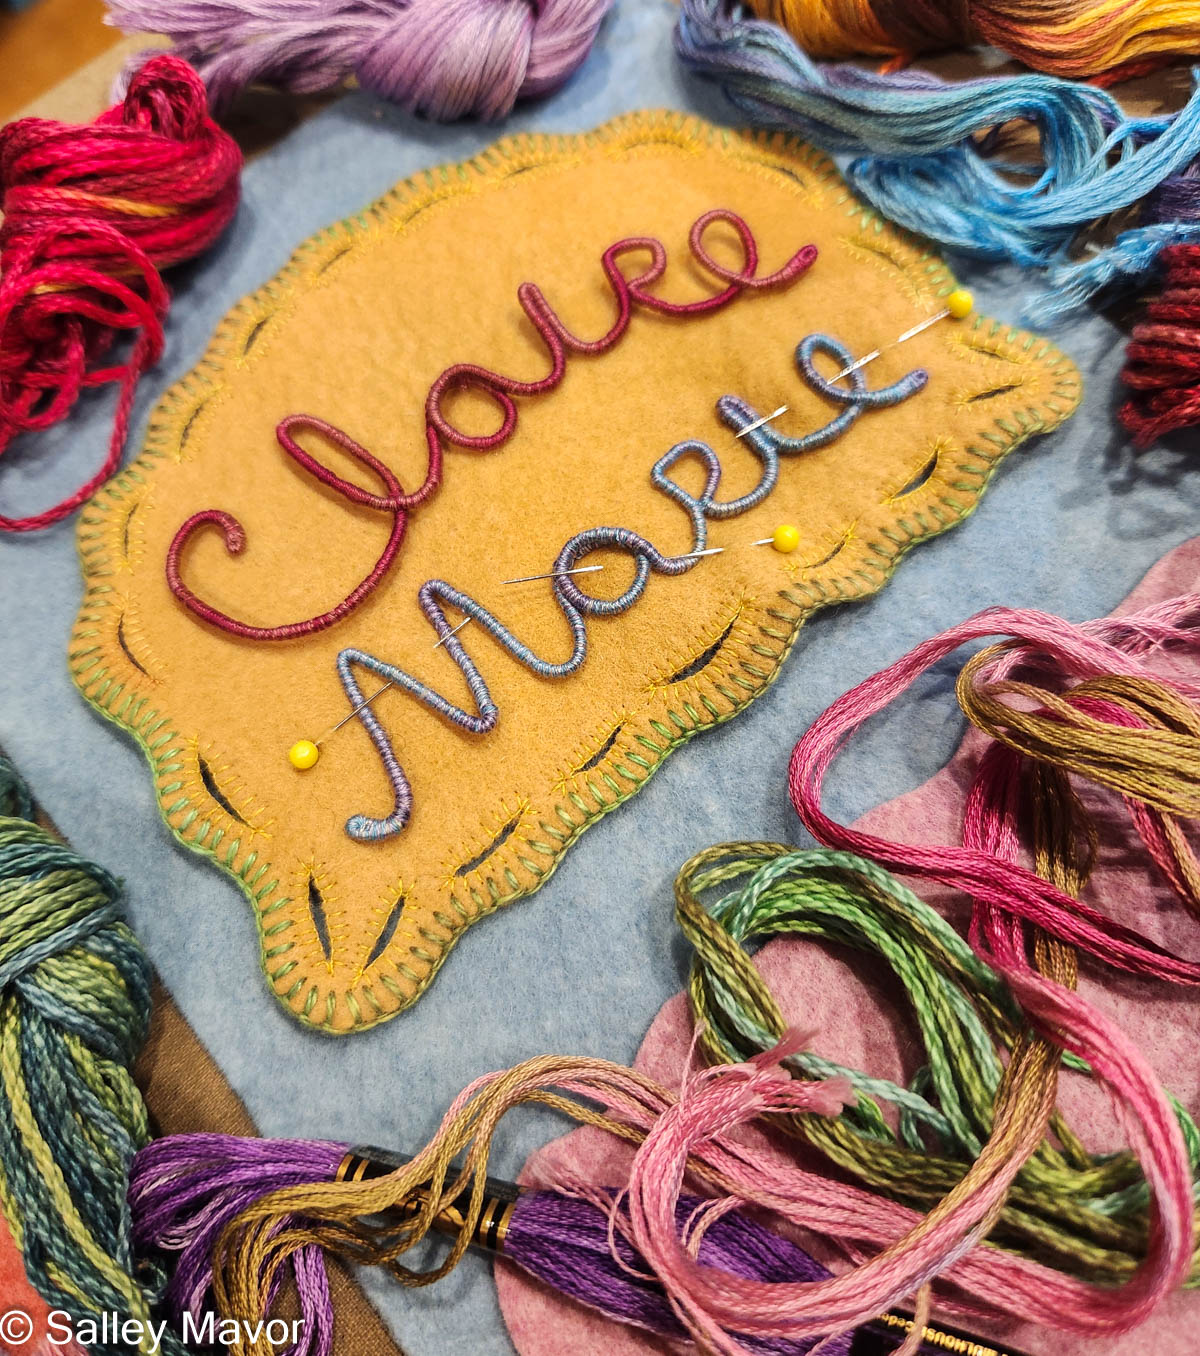
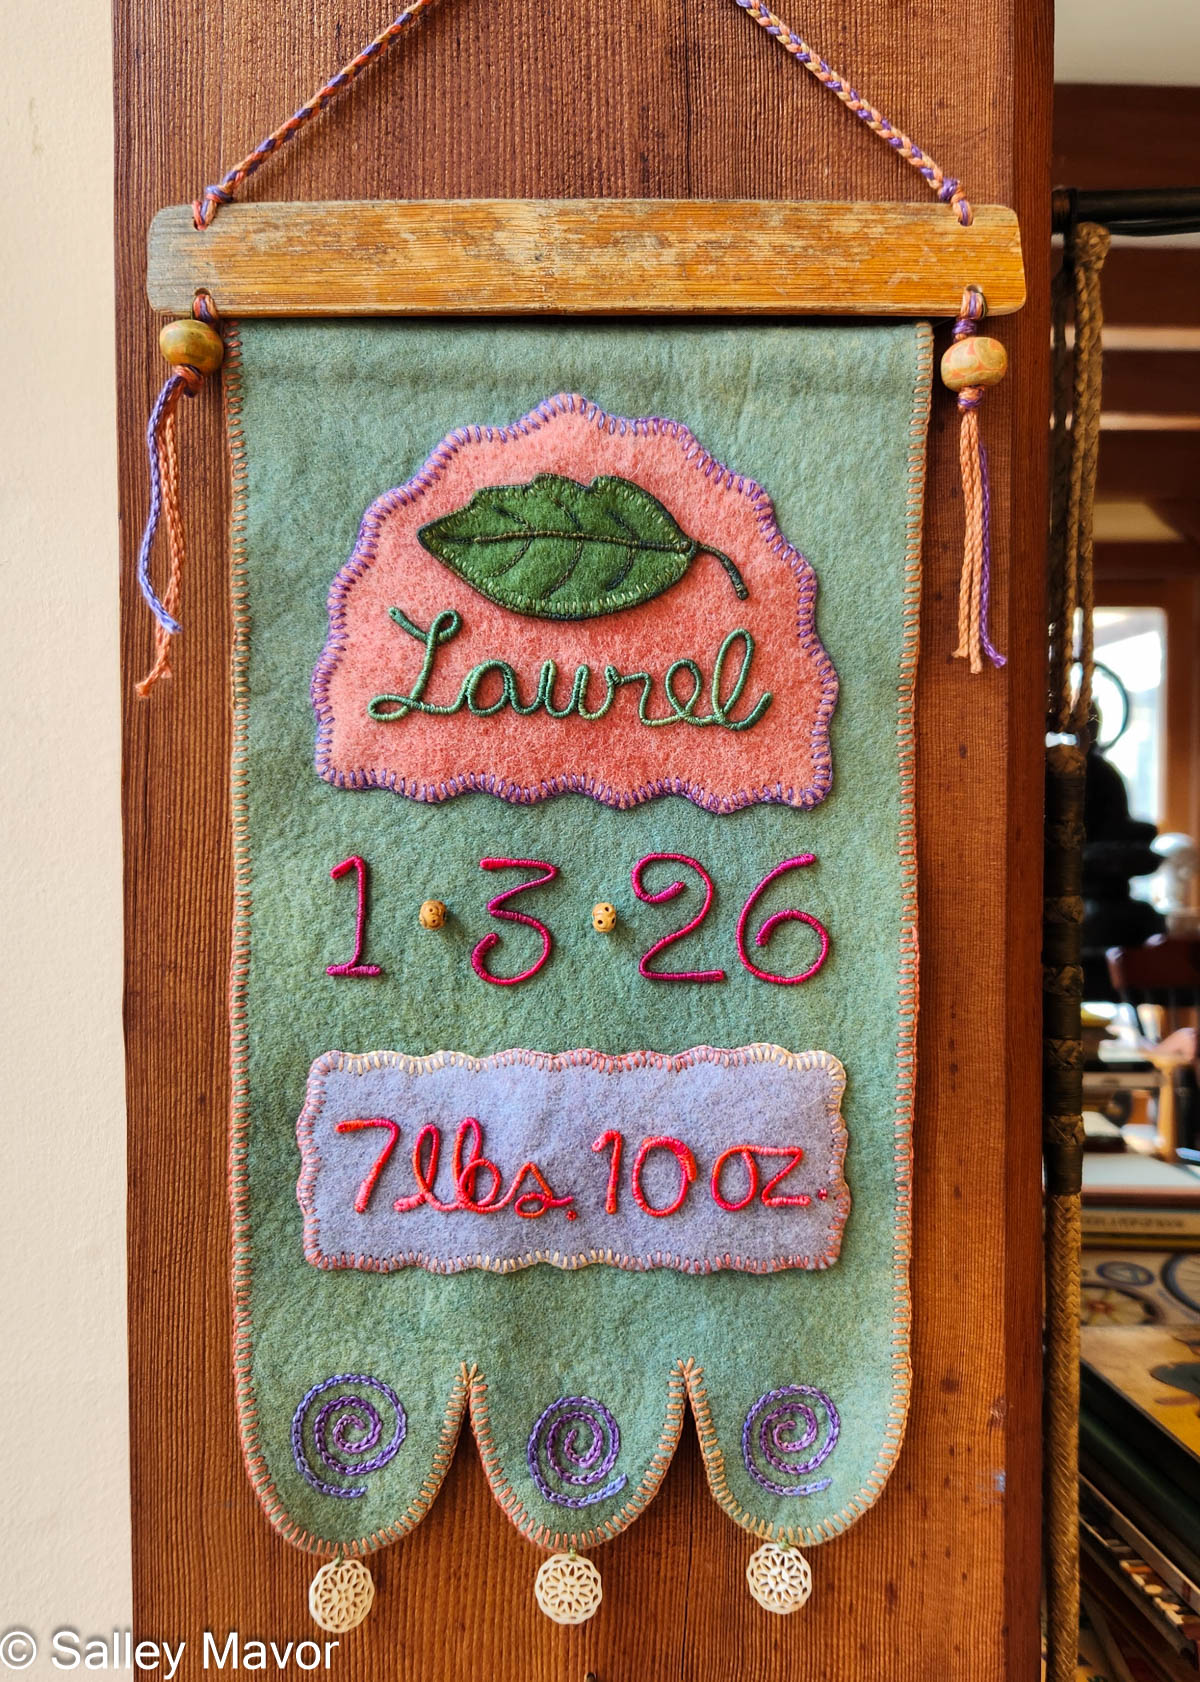
For the past 20 years or so, I’ve made personalized gifts for friends and family to commemorate special events like weddings and births. These gifts take the form of felt banners or cake toppers. The embellished felt banners combine two of my favorite things, hand embroidery and cursive handwriting. In this post, I share a behind the scenes look at the process of making a baby banner for Laurel, who was born earlier this year. You can see posts about this and other banners by scrolling through the archives here. See wedding cake toppers here.
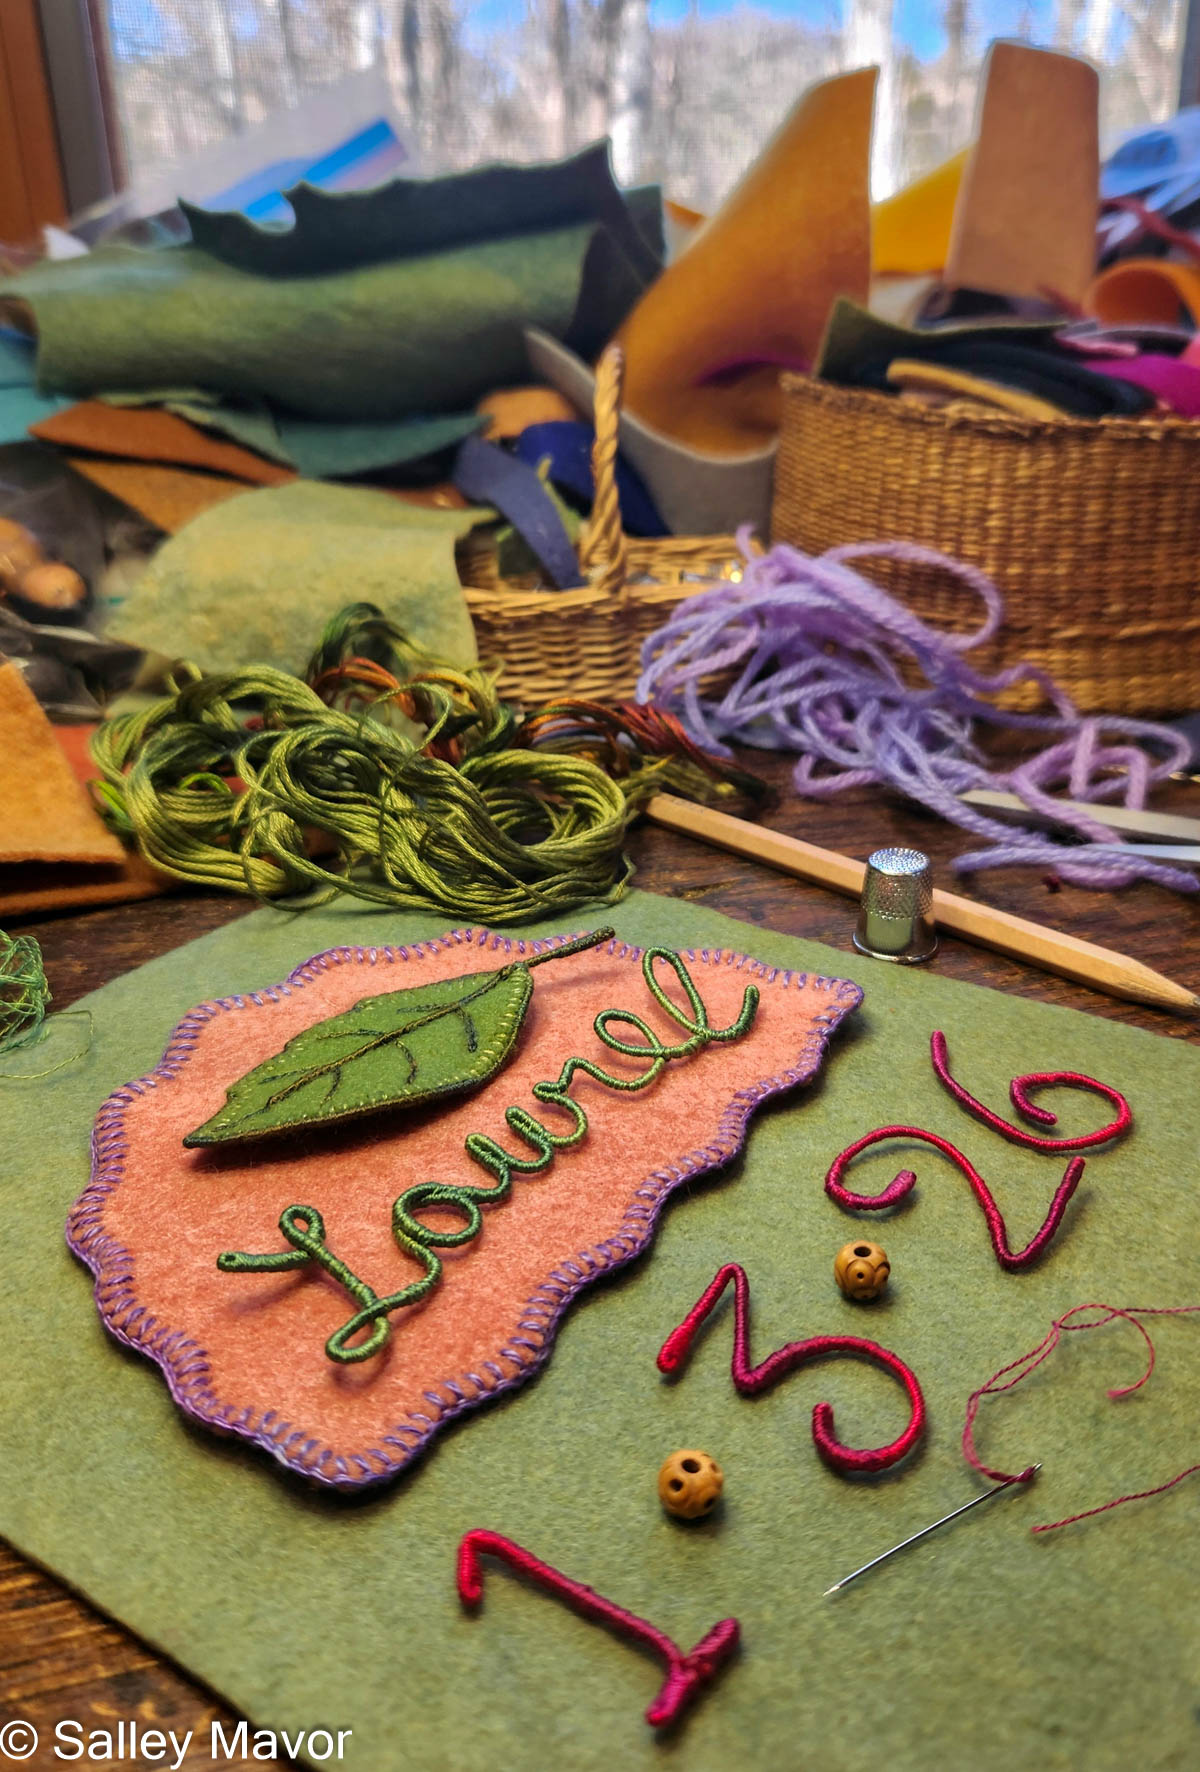
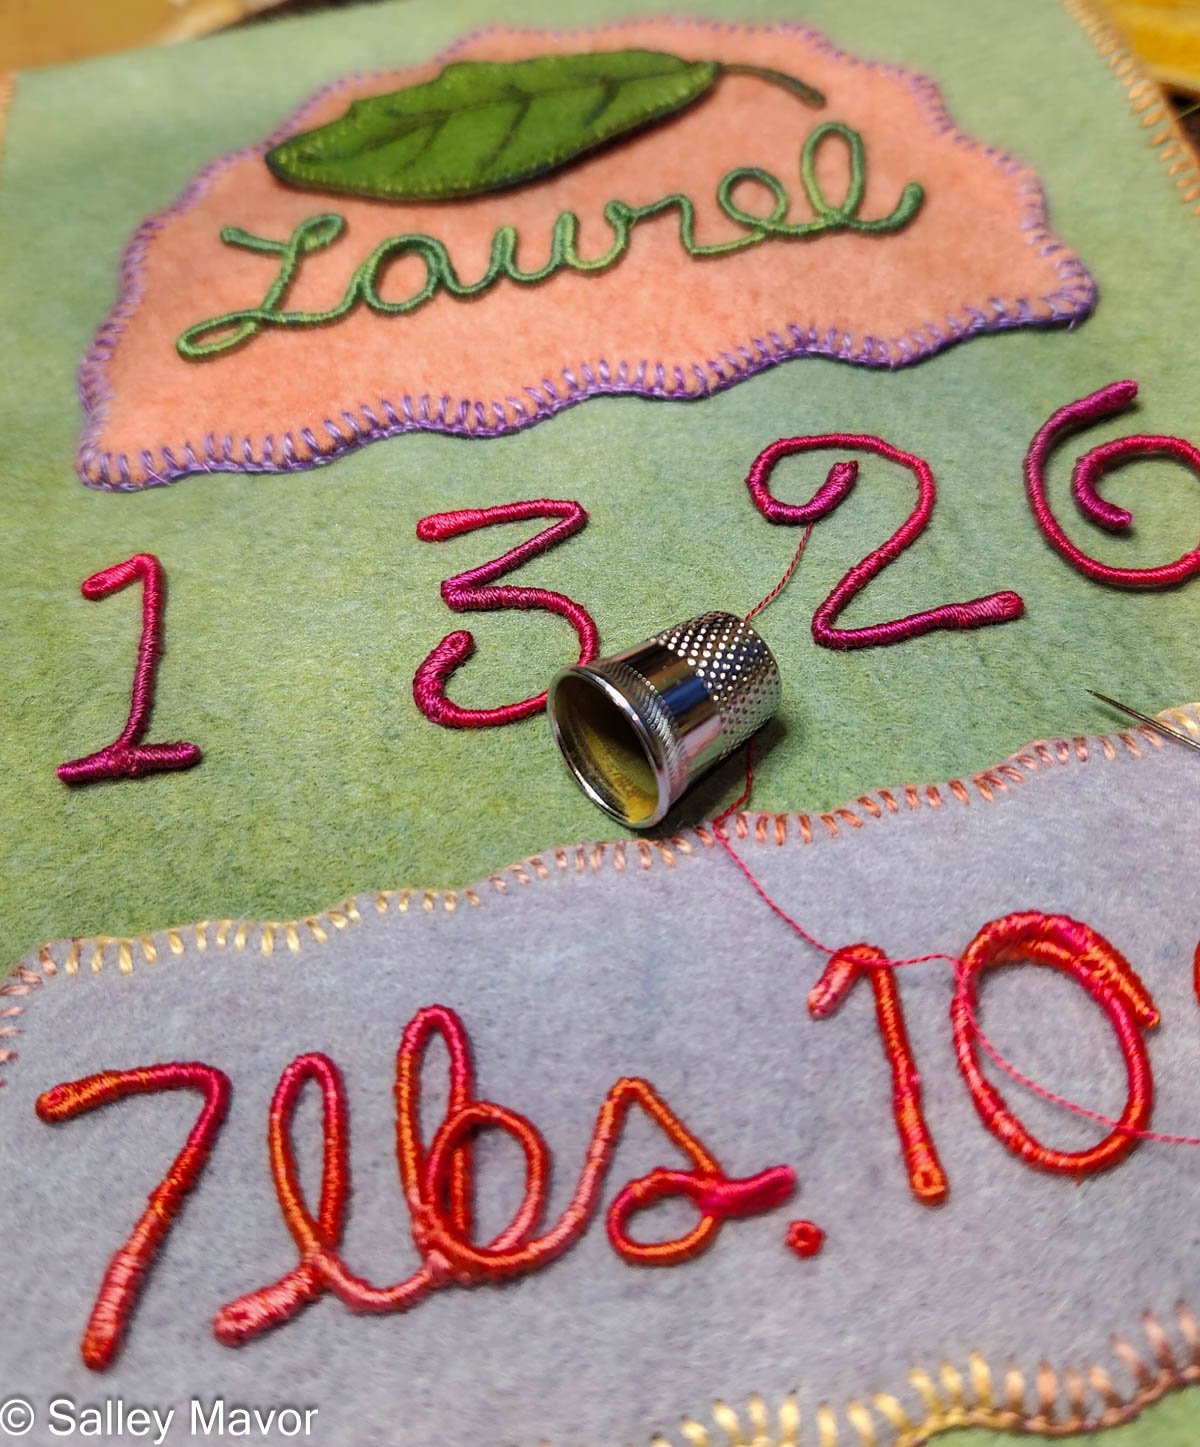
A BANNER FOR LAUREL Three days into the new year, our good friends welcomed a baby girl into the world. I couldn’t wait to make a banner for little Laurel. With a nature inspired name like that, it would have to feature a laurel leaf!
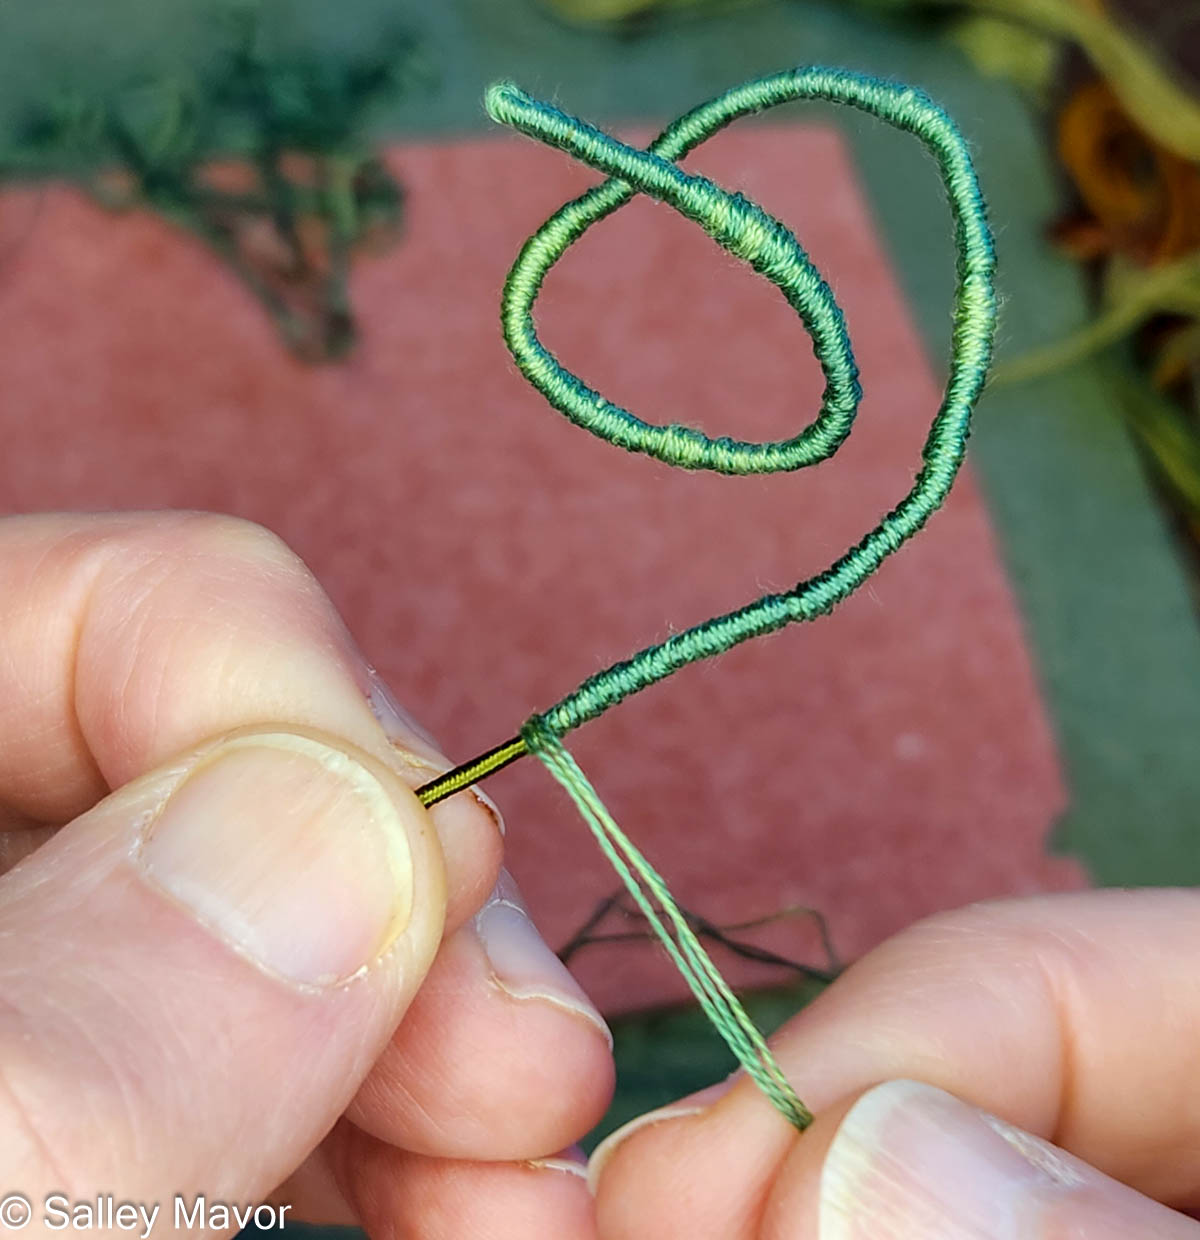
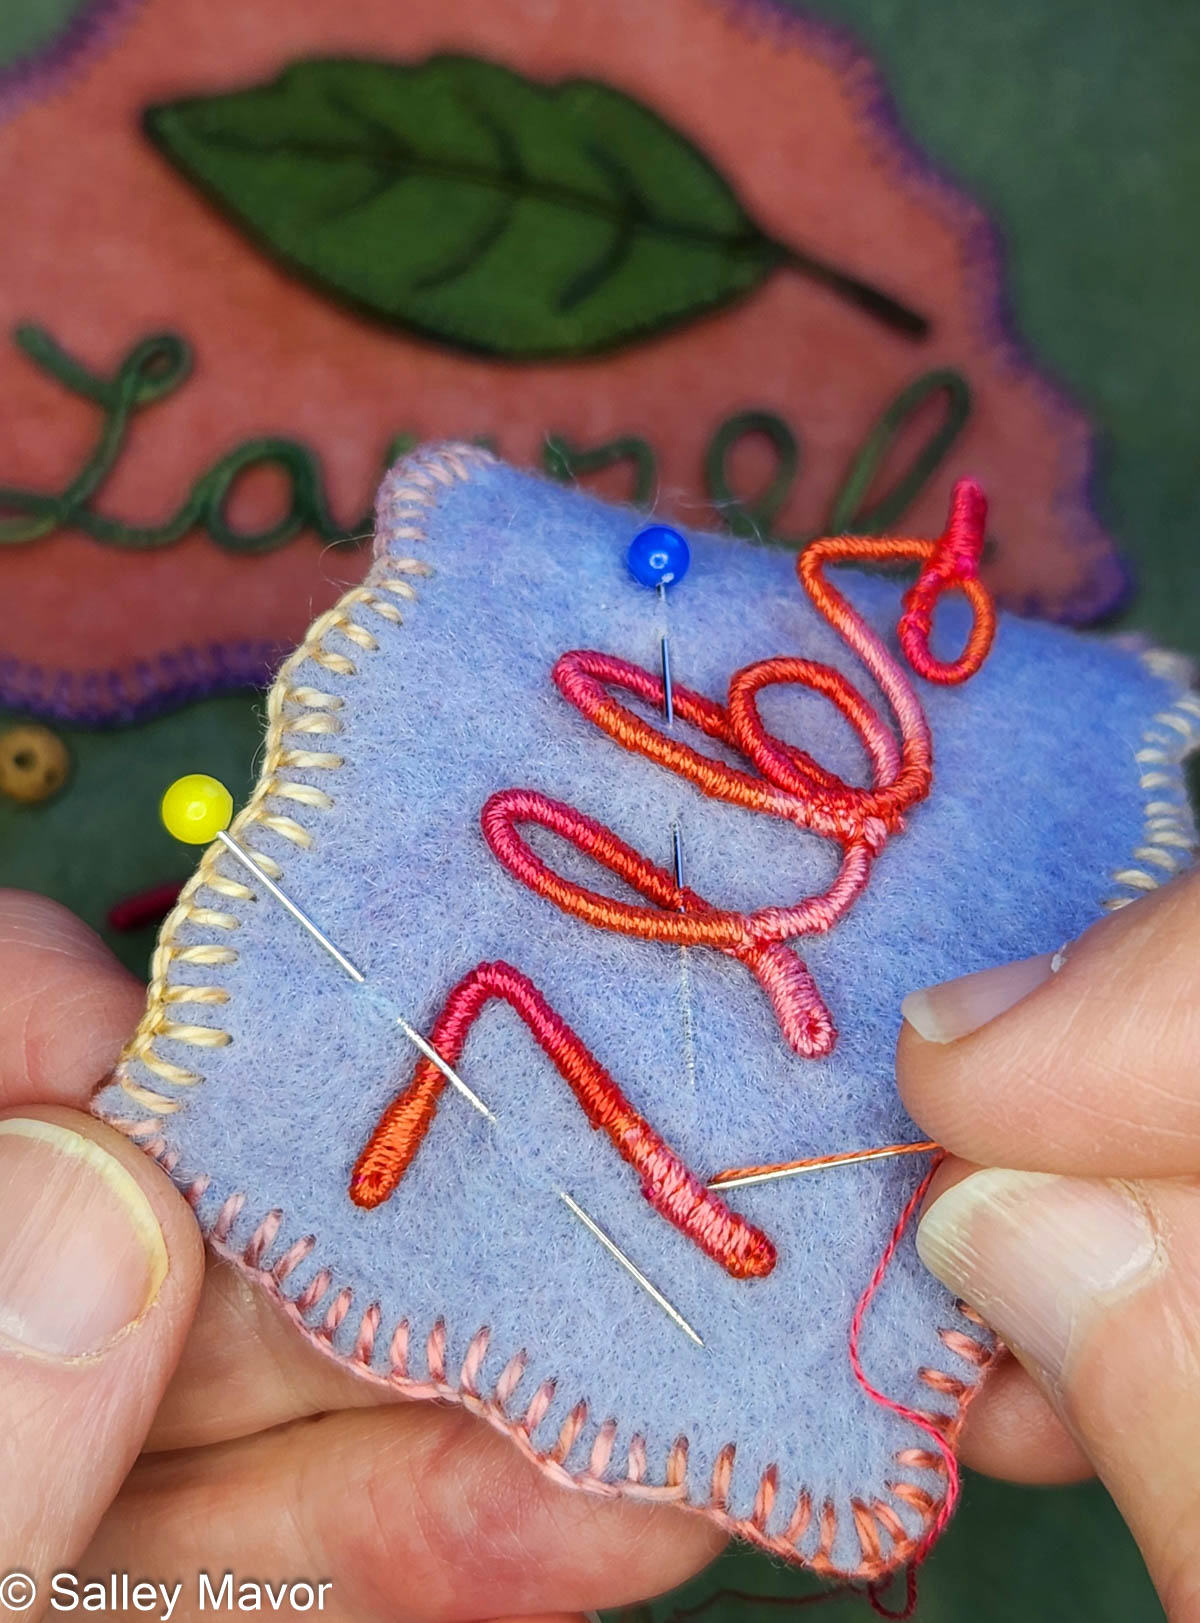
WRAPPING WIRE LETTERS After choosing a color scheme and picking out pieces of felt and thread, I wrote out Laurel’s name in cursive handwriting with a pencil on paper. Fortunately, her name could be written in one continuous line, which doesn’t always happen. I then wrapped a length of DMC memory thread (a kind of wire) with 3 strands of variegated embroidery floss (see video below). Using the drawing as a template, I bent the wire to form her name and stitched the letters together where they touched.
In the following video, I demonstrate wrapping DMC memory thread with 3 strands of embroidery floss to create letters for Laurel’s banner. Memory thread is wire coated with a fibrous material which is easier to grab onto than slippery wire. Wrapping the wire smoothly and evenly takes a lot of practice, so be patient. The wire ends are bent over and wrapped, so that no raw thread ends are hanging out. If you’ve learned to wrap arms and legs for the wee folk dolls in my how-to book, Felt Wee Folk, you’ve got a jump start on mastering this technique.
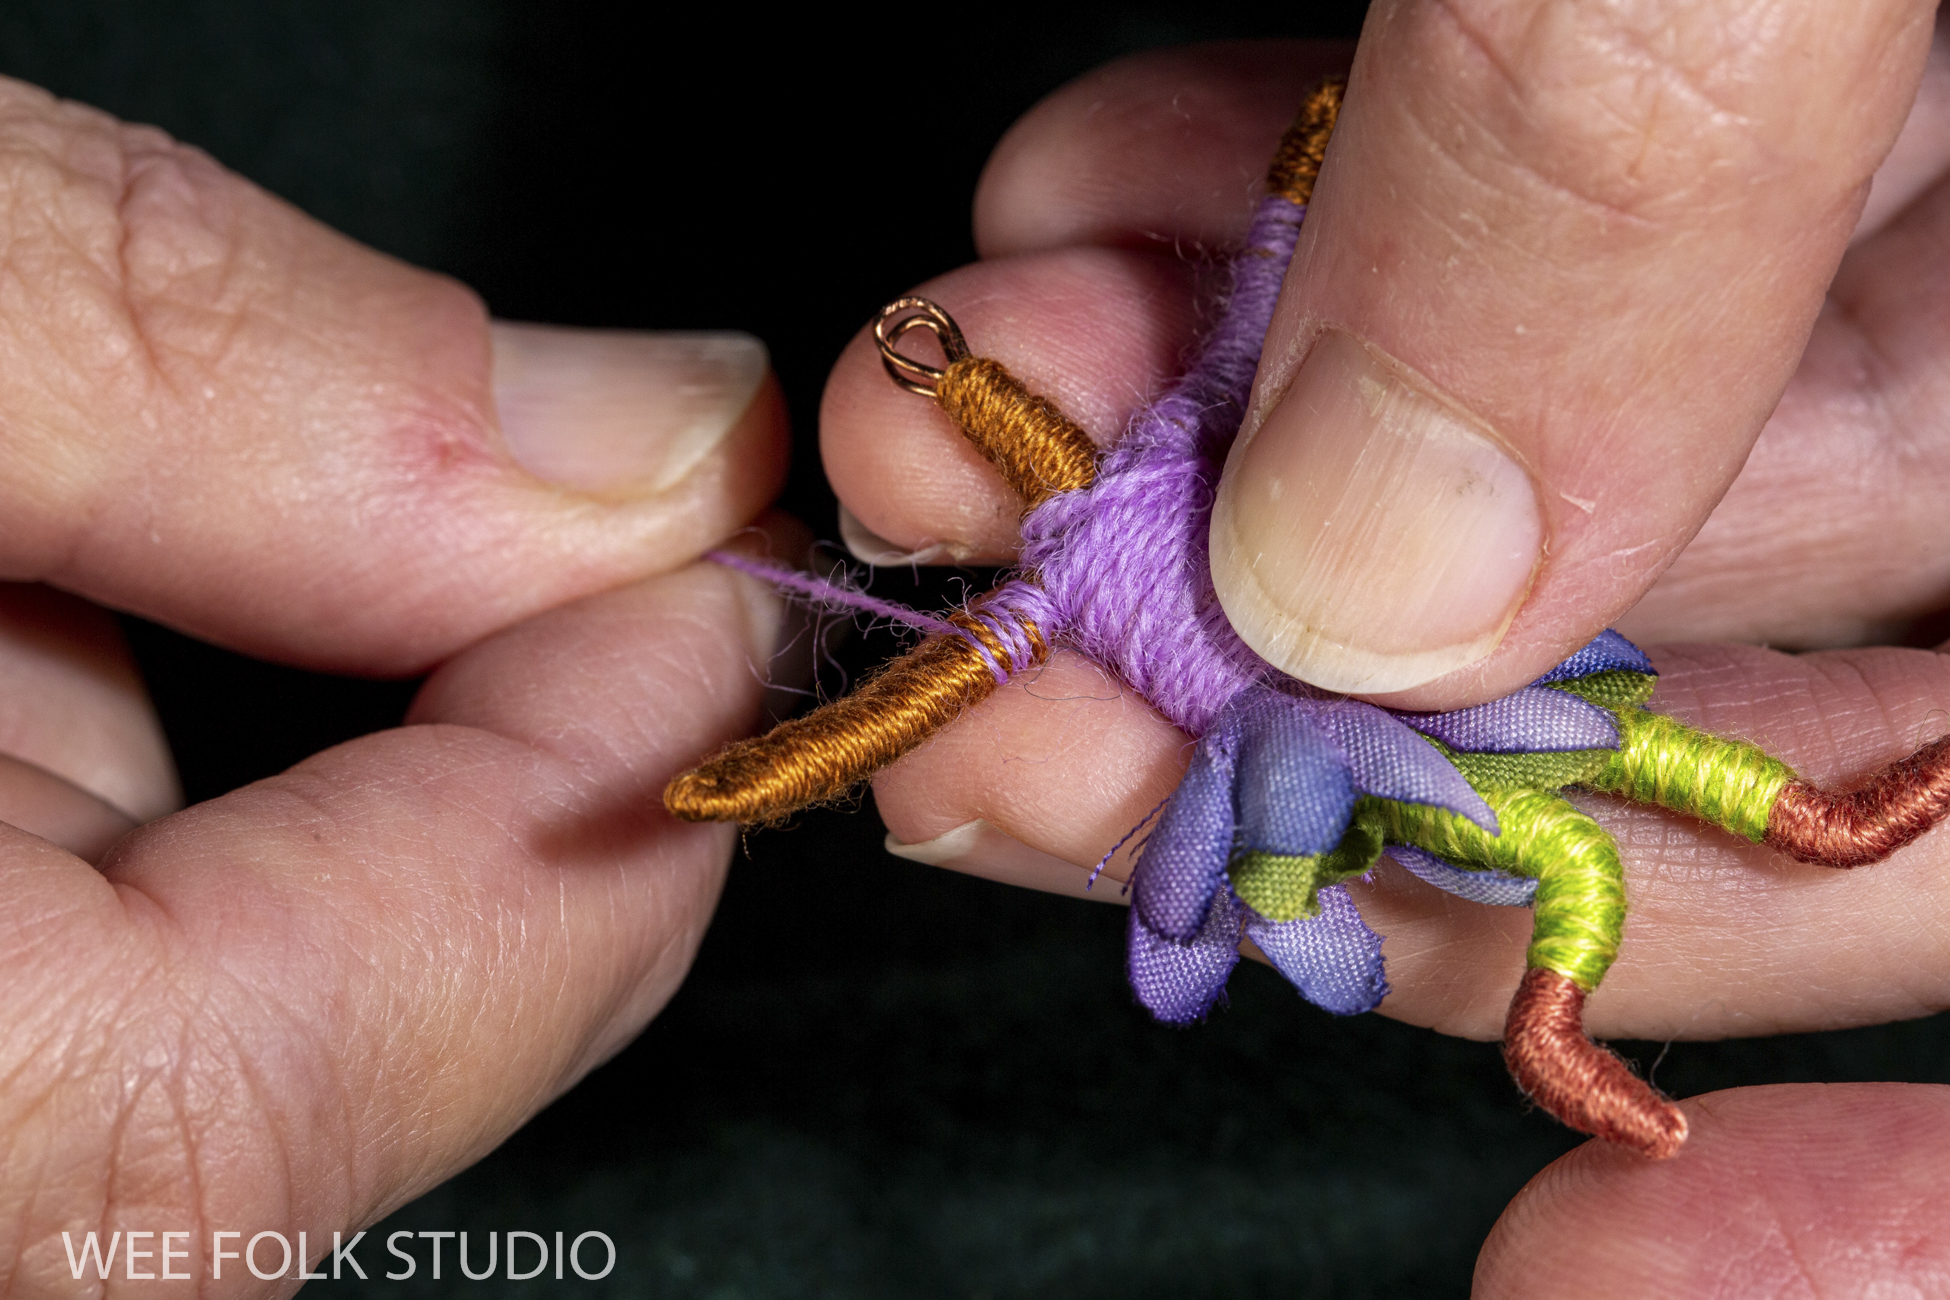
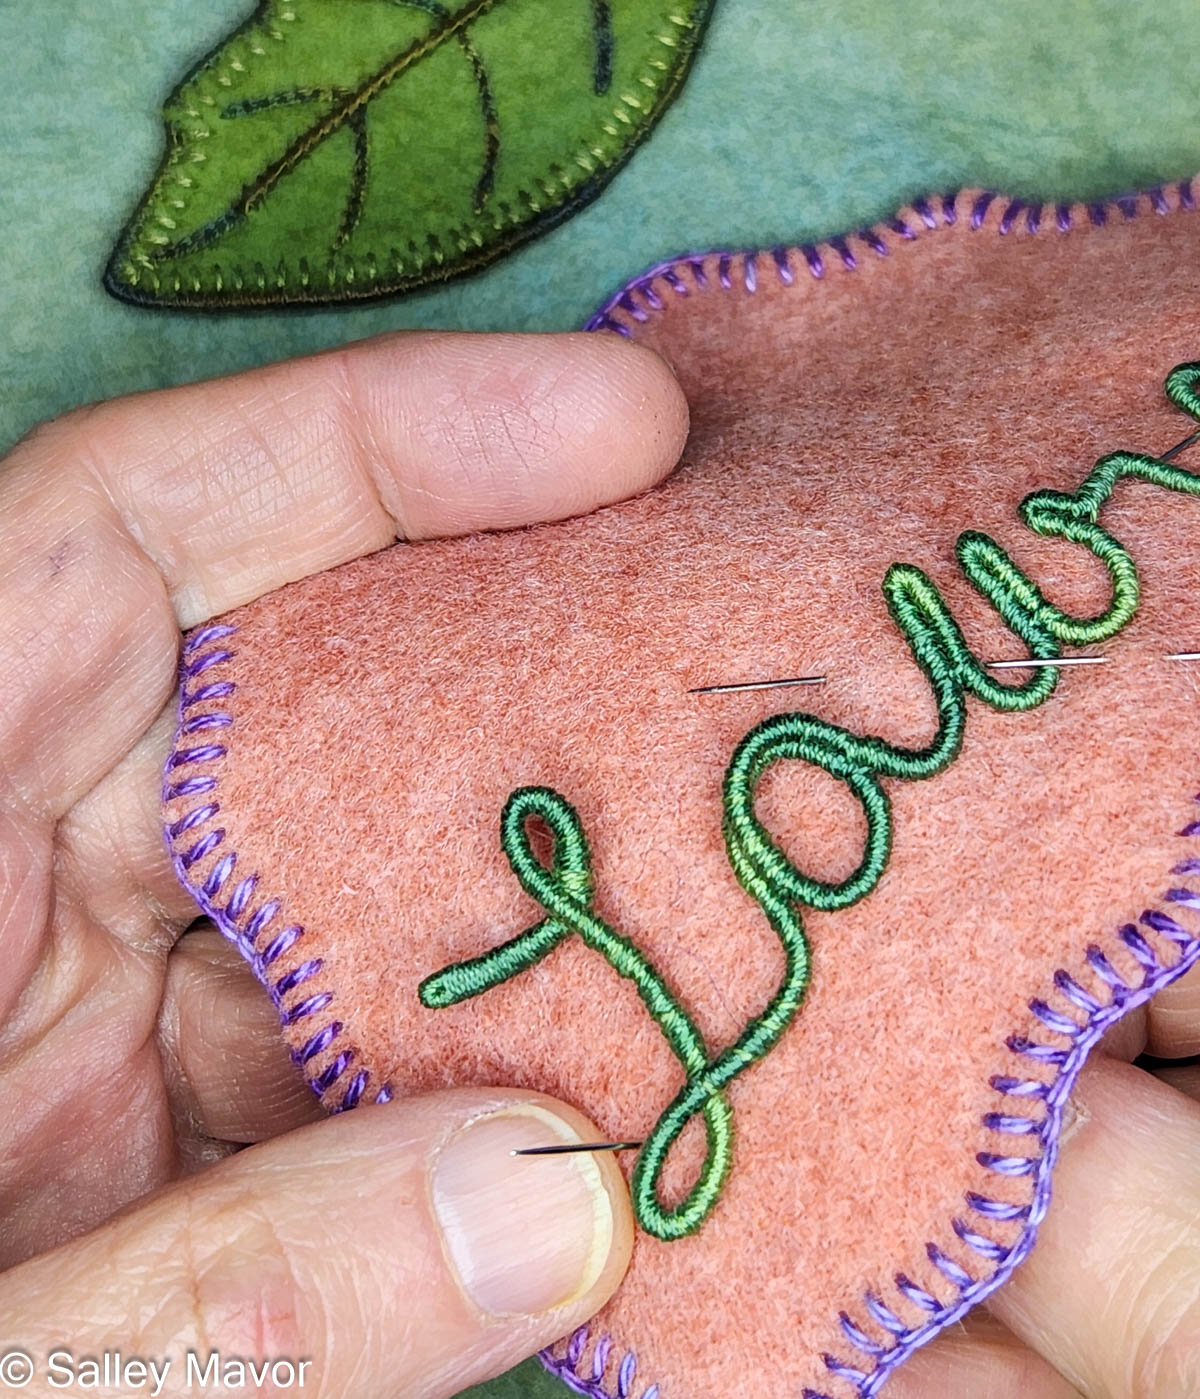
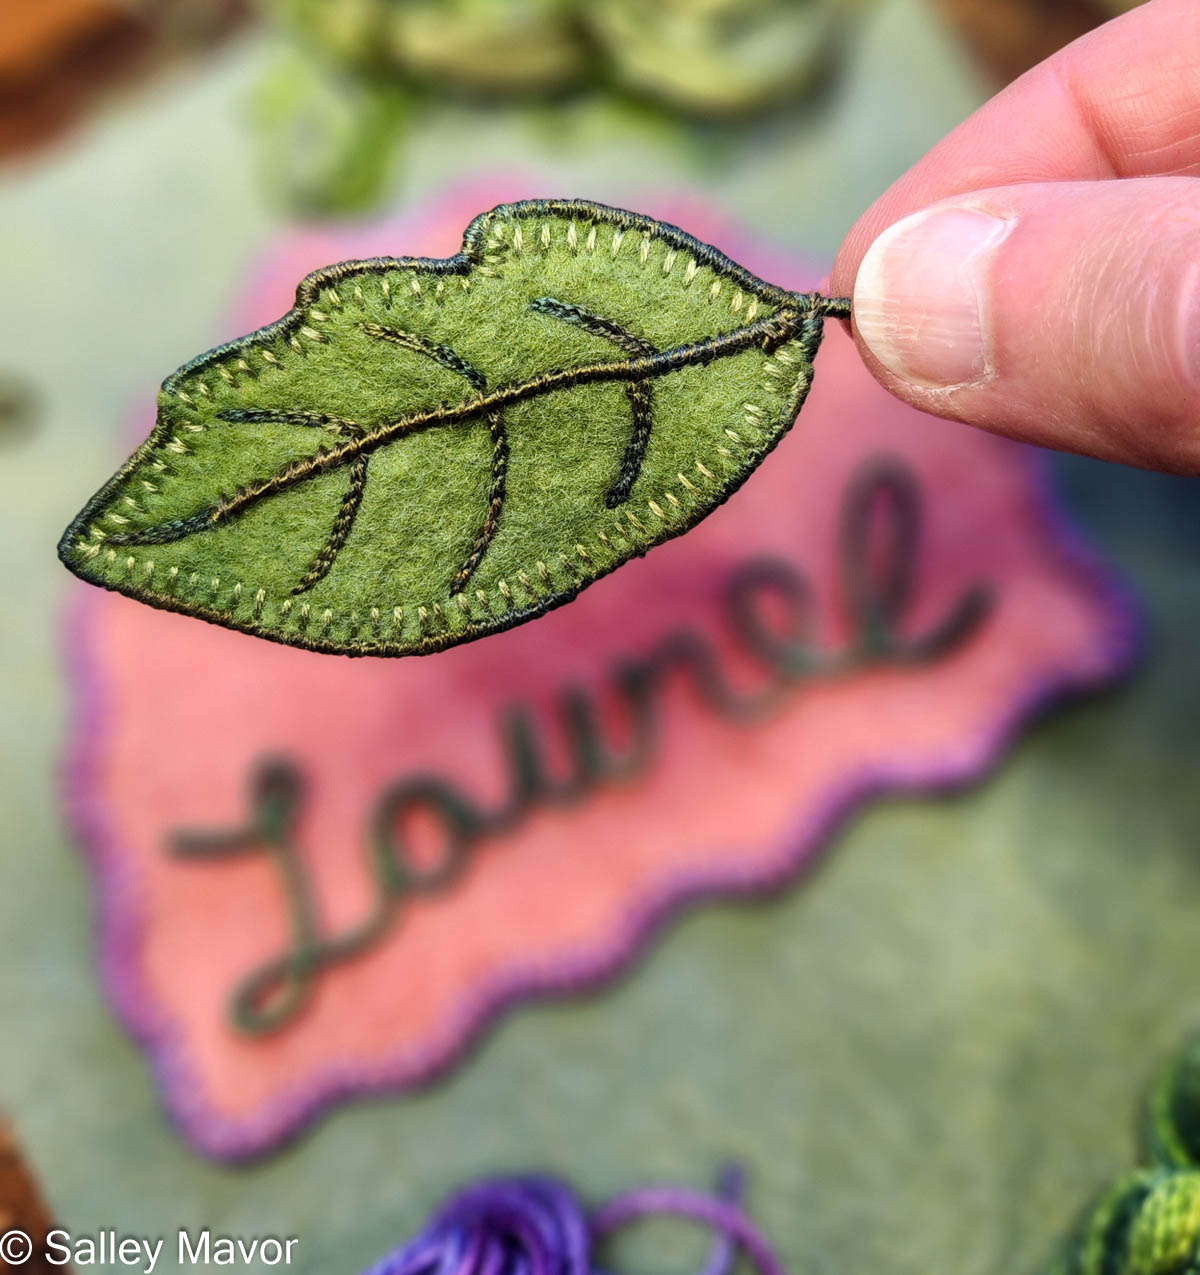
LAUREL LEAF Adding a horticultural element to the banner was fun! I cut a laurel leaf shape out of wool felt and edged it with blanket stitching. Then I stitched wire around the outside edge of the leaf for stability. Jewelry wire works for this purpose, but for this project, I used some memory thread that was readily available on my table.
In the following video, you can see how I stitched memory thread (or wire) around the outside edges of the leaf. Then I created veins with wire and chain stitching.
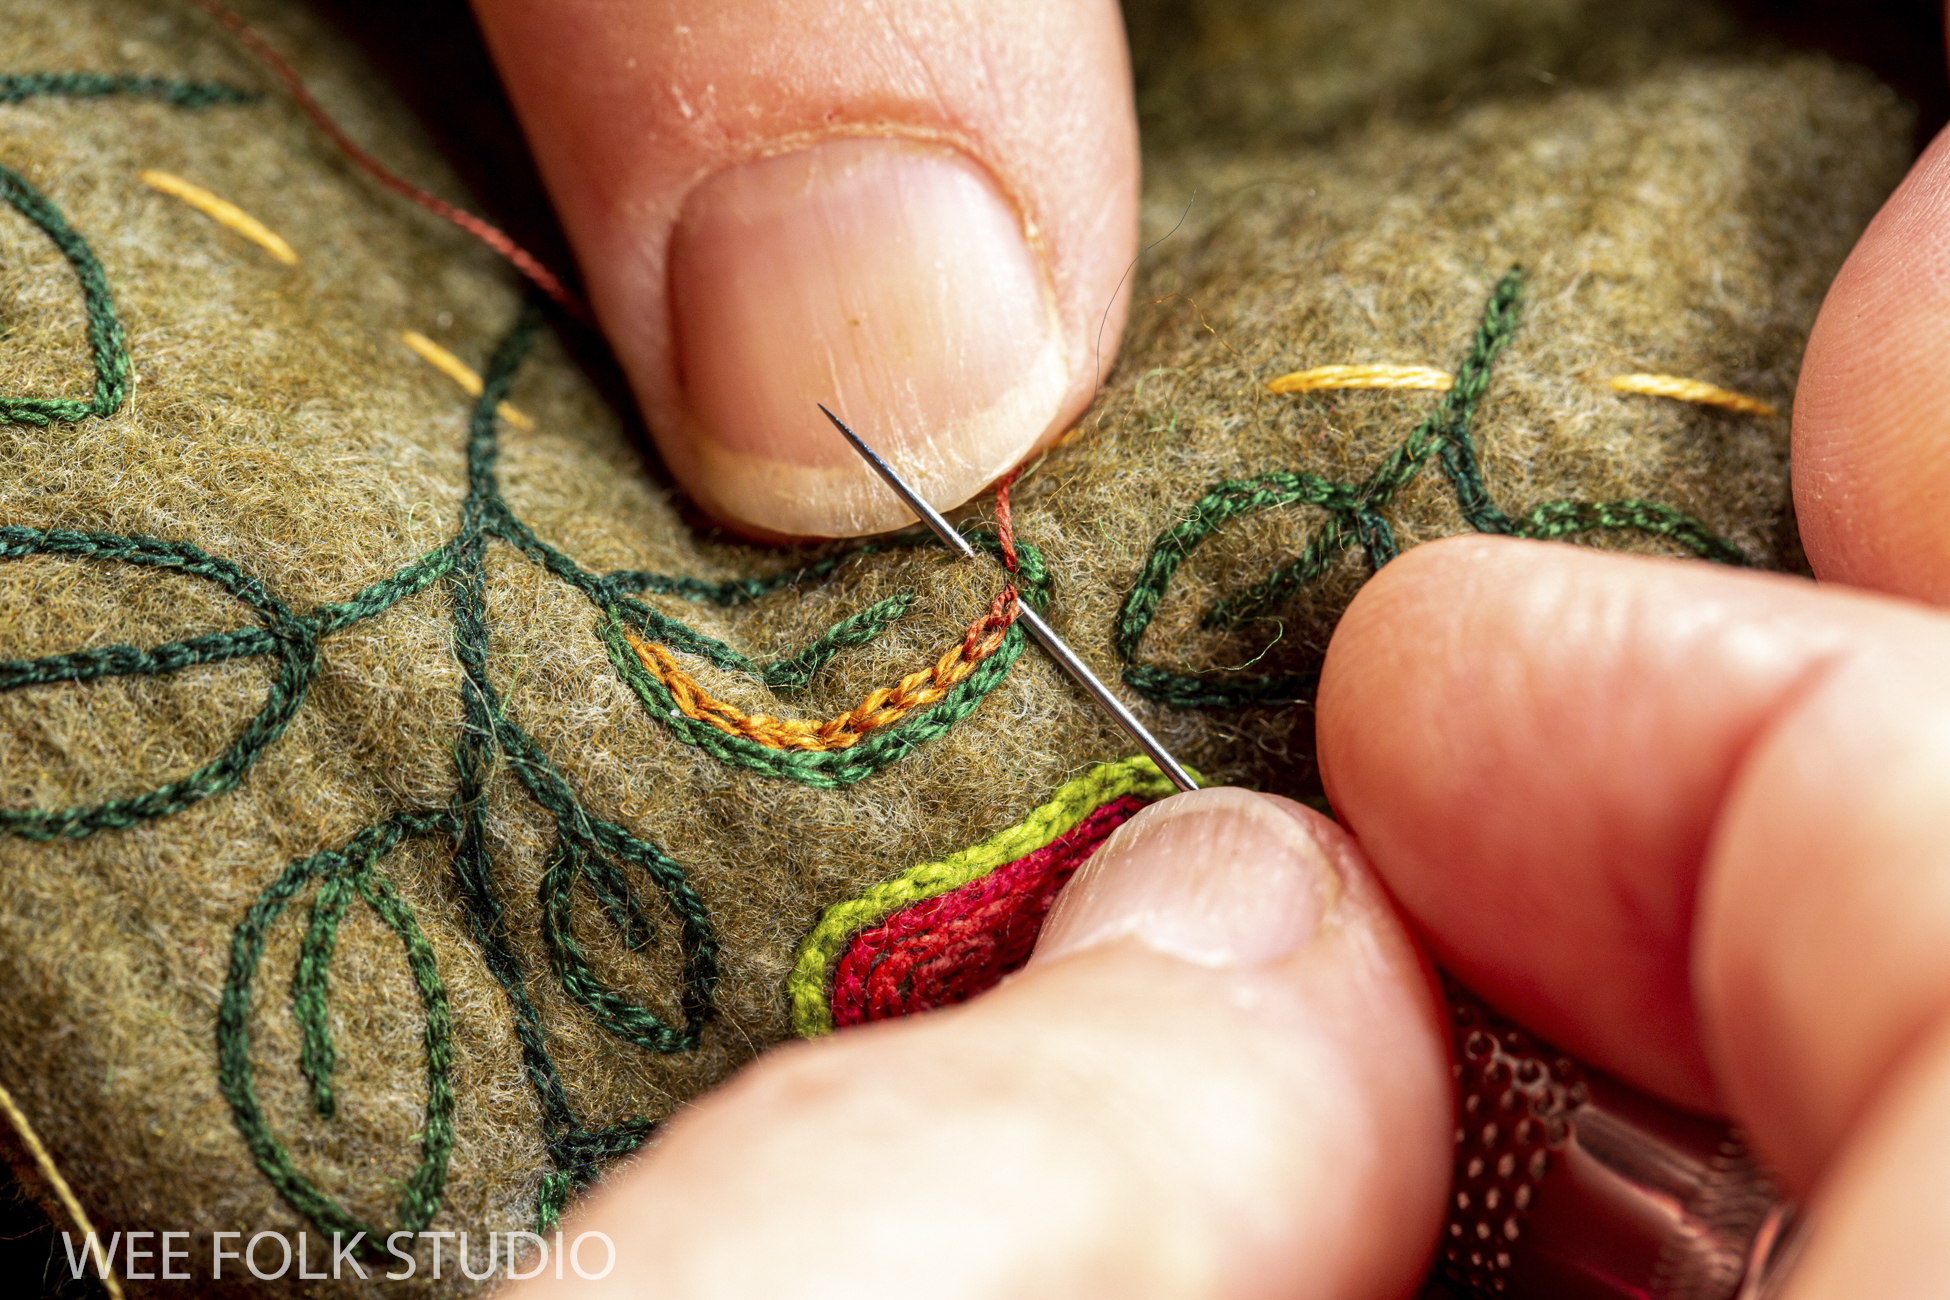
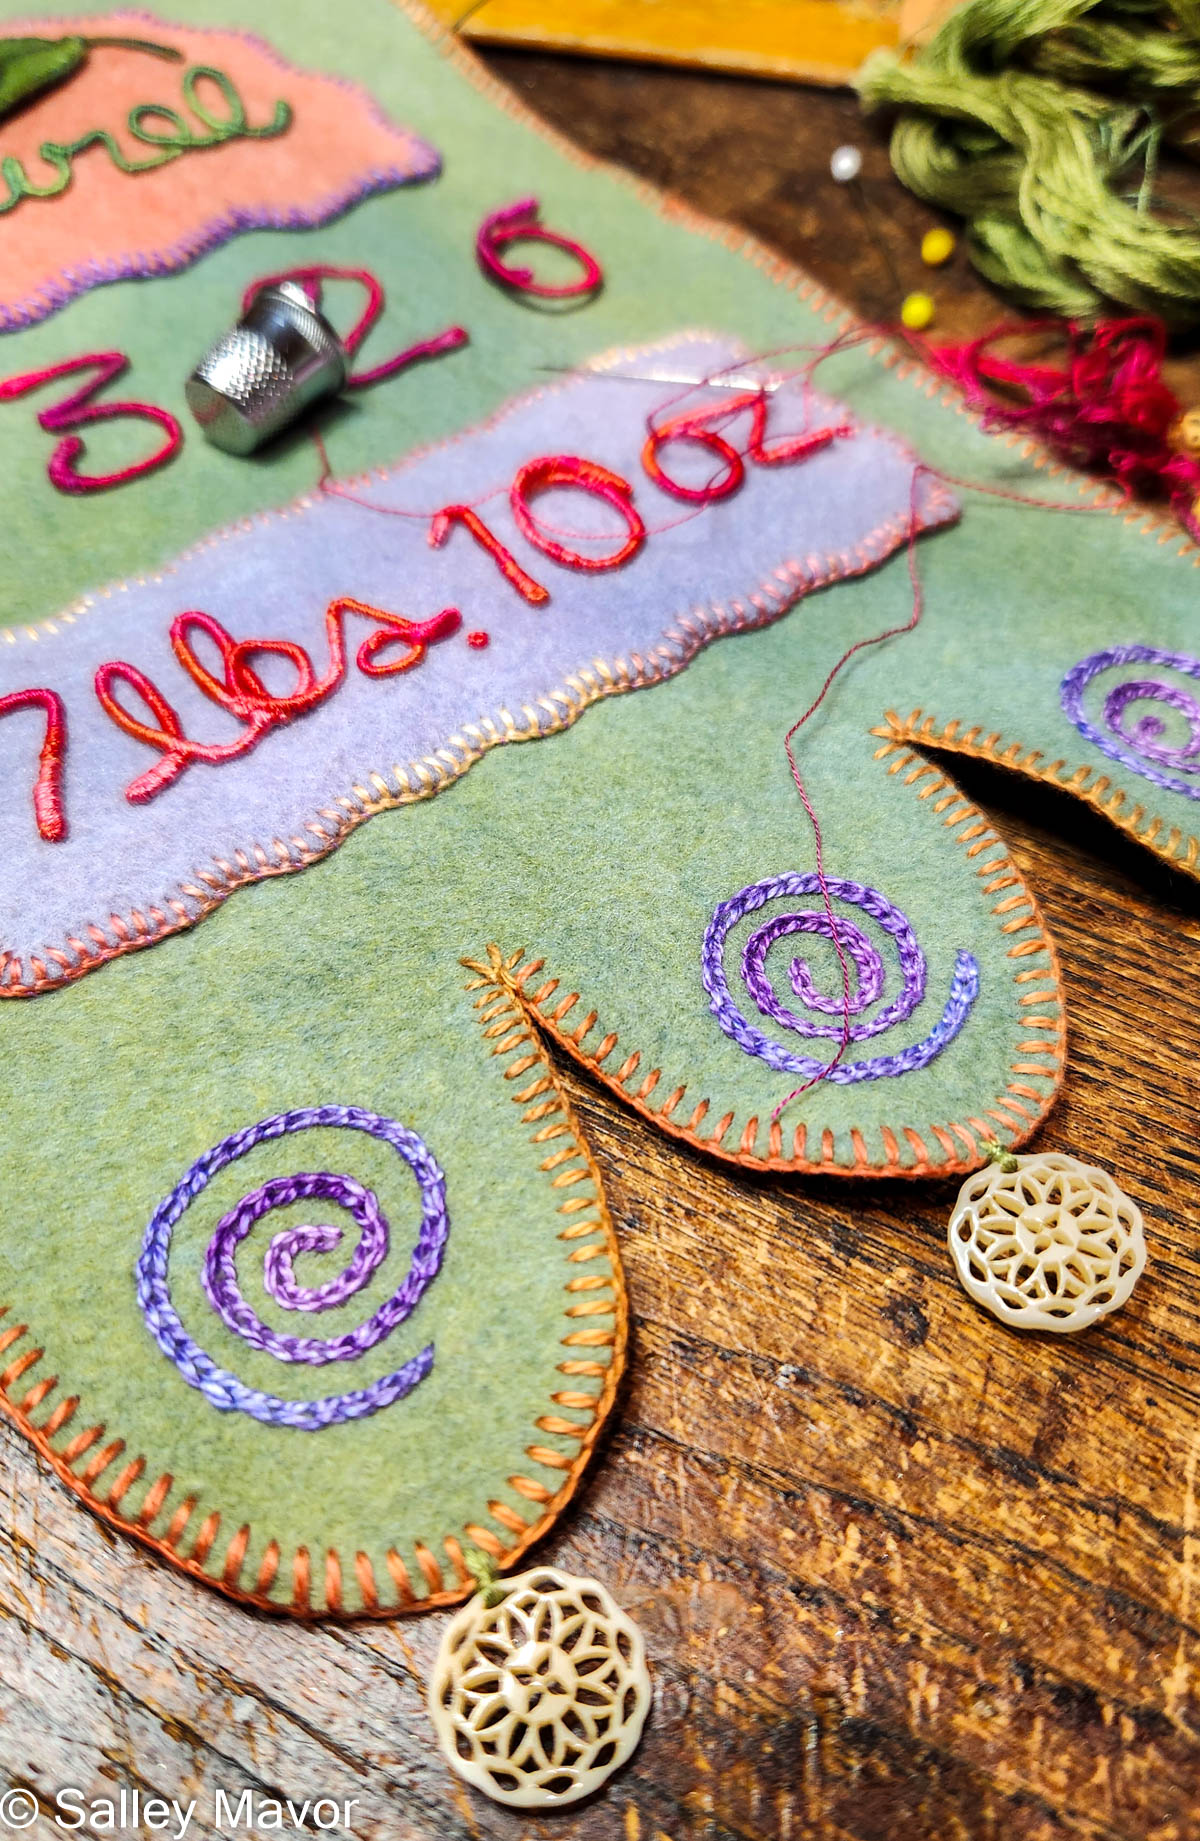
EMBELLISHING FELT BORDERS I love embellishing with blanket stitching, especially with variegated thread. It’s a simple and effective way to create an edge that’s both soft and assertive, while also displaying a handmade quality. For me, it’s important to show that a human being made it, not a machine. For this banner, I created layers of felt pieces, which I blanket stitched with pima cotton (Watercolours by Caron).
For these banners, I’ve routinely used variegated floss to wrap the wire that forms the lettering. I like how the changing shades look lively and naturalistic compared to plain solid colors.
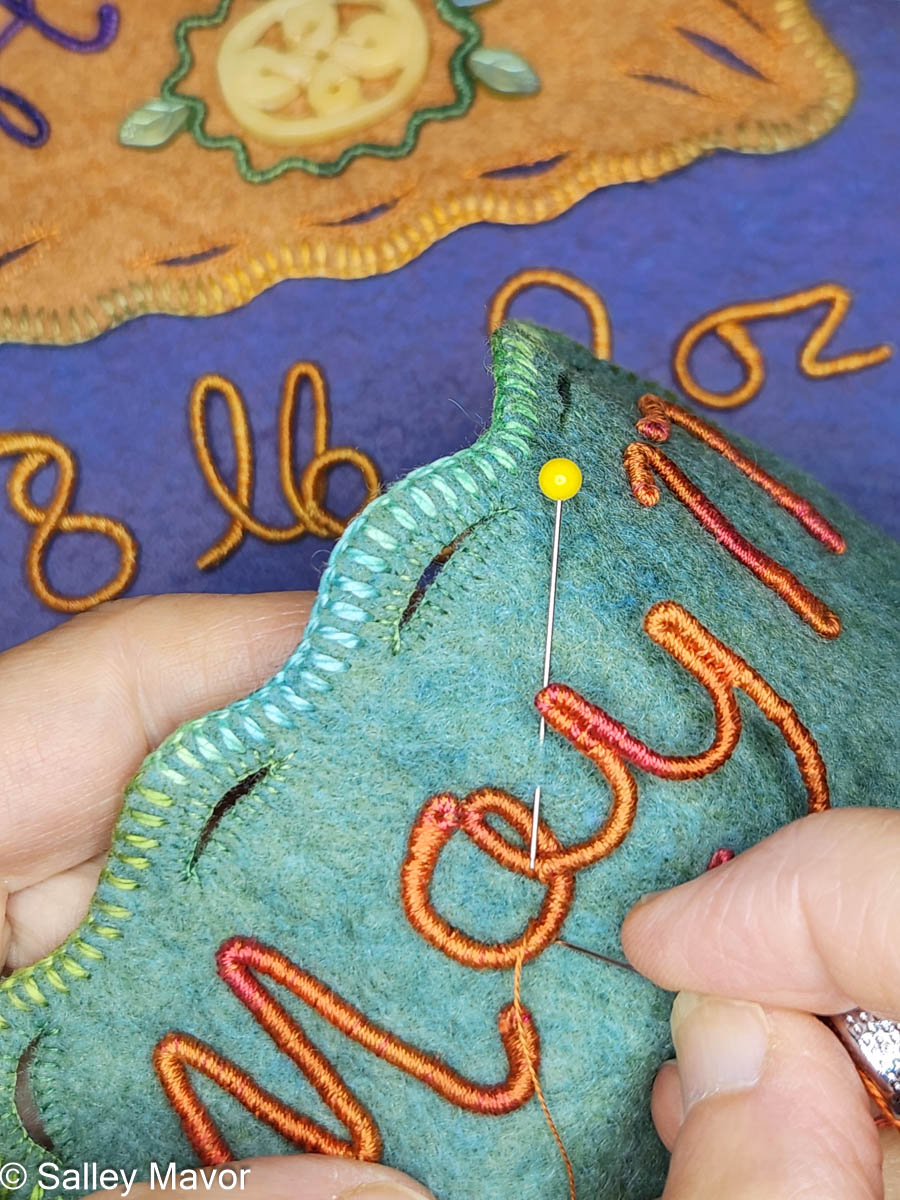
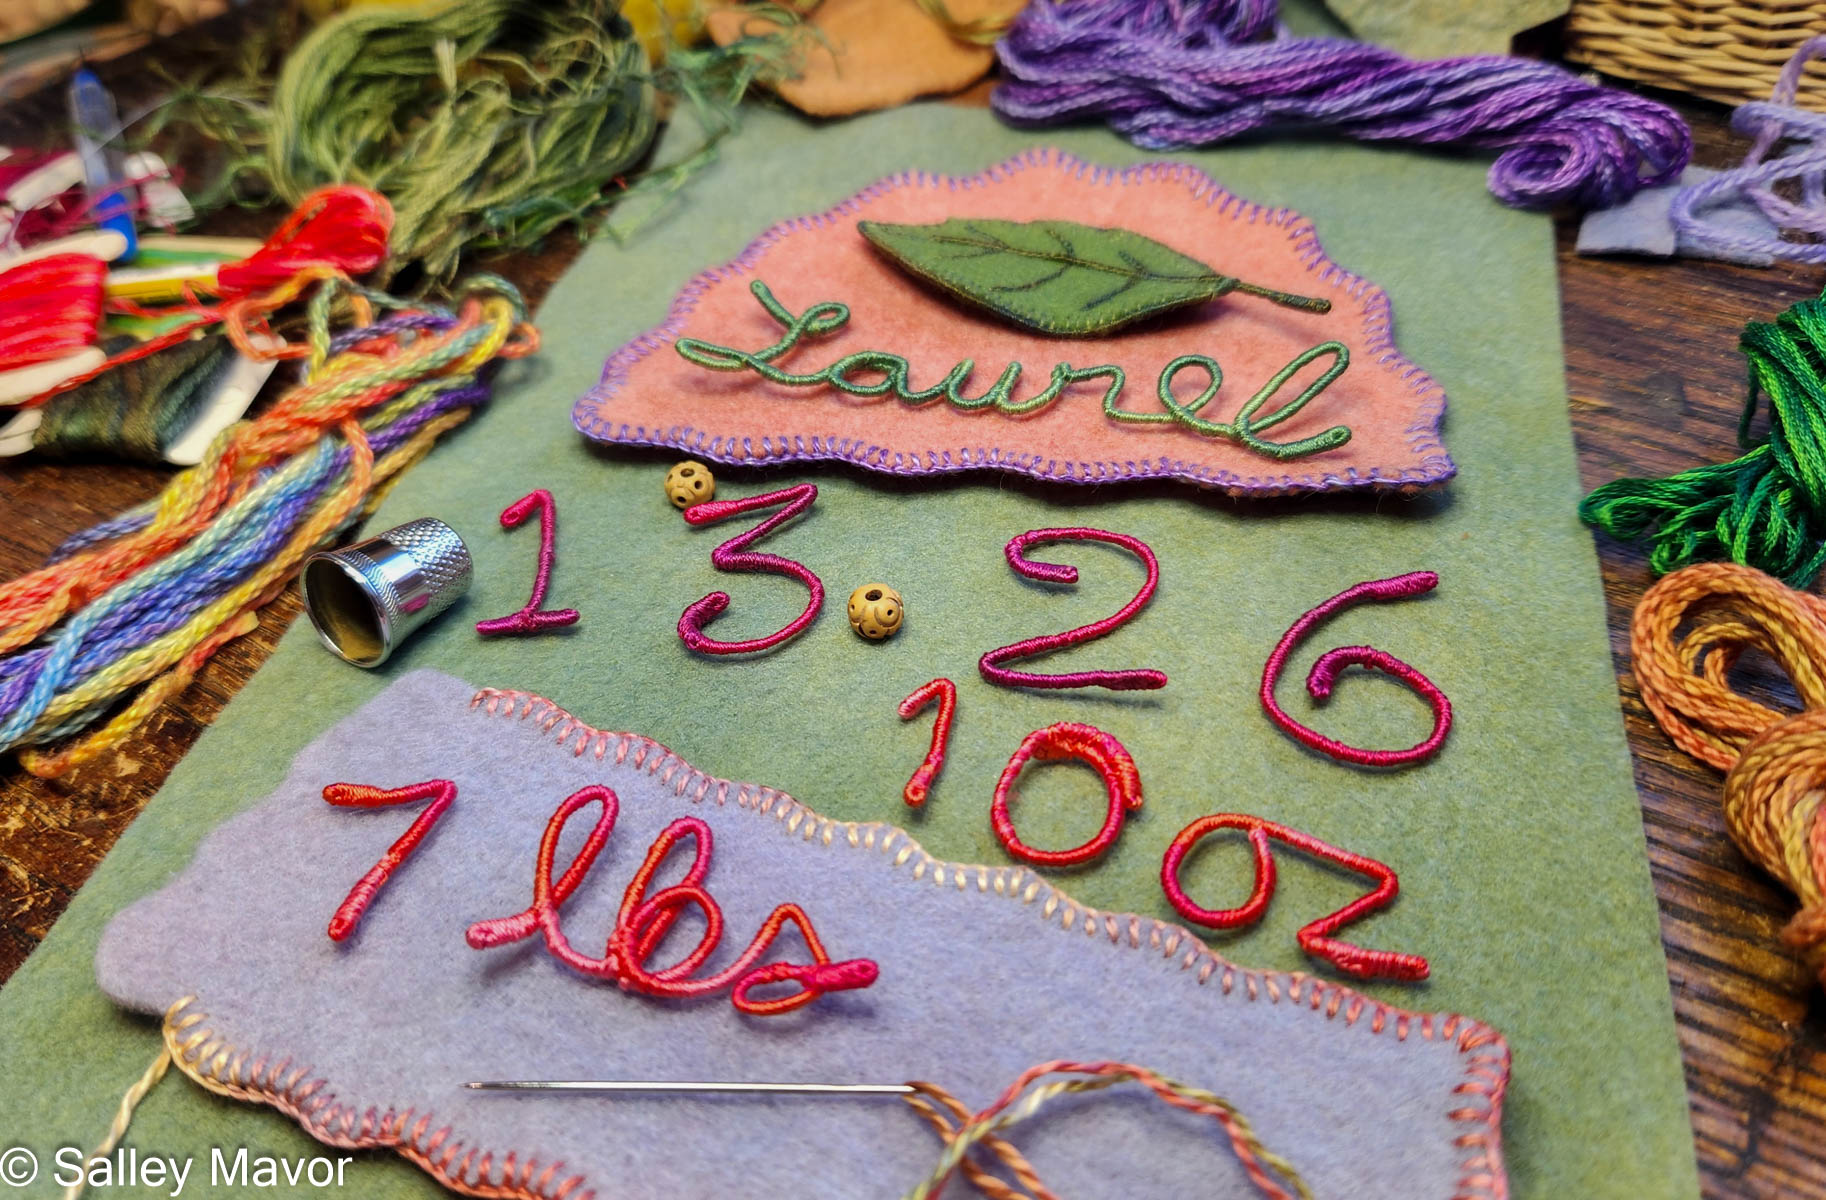
I sewed all of the letters and numbers to the pieces of felt.
The bottom of the banner has three scalloped flaps that I embroidered with chained stitched spirals. At the bottom points, I sewed on some bone buttons that have been waiting a long time for the just the right purpose.
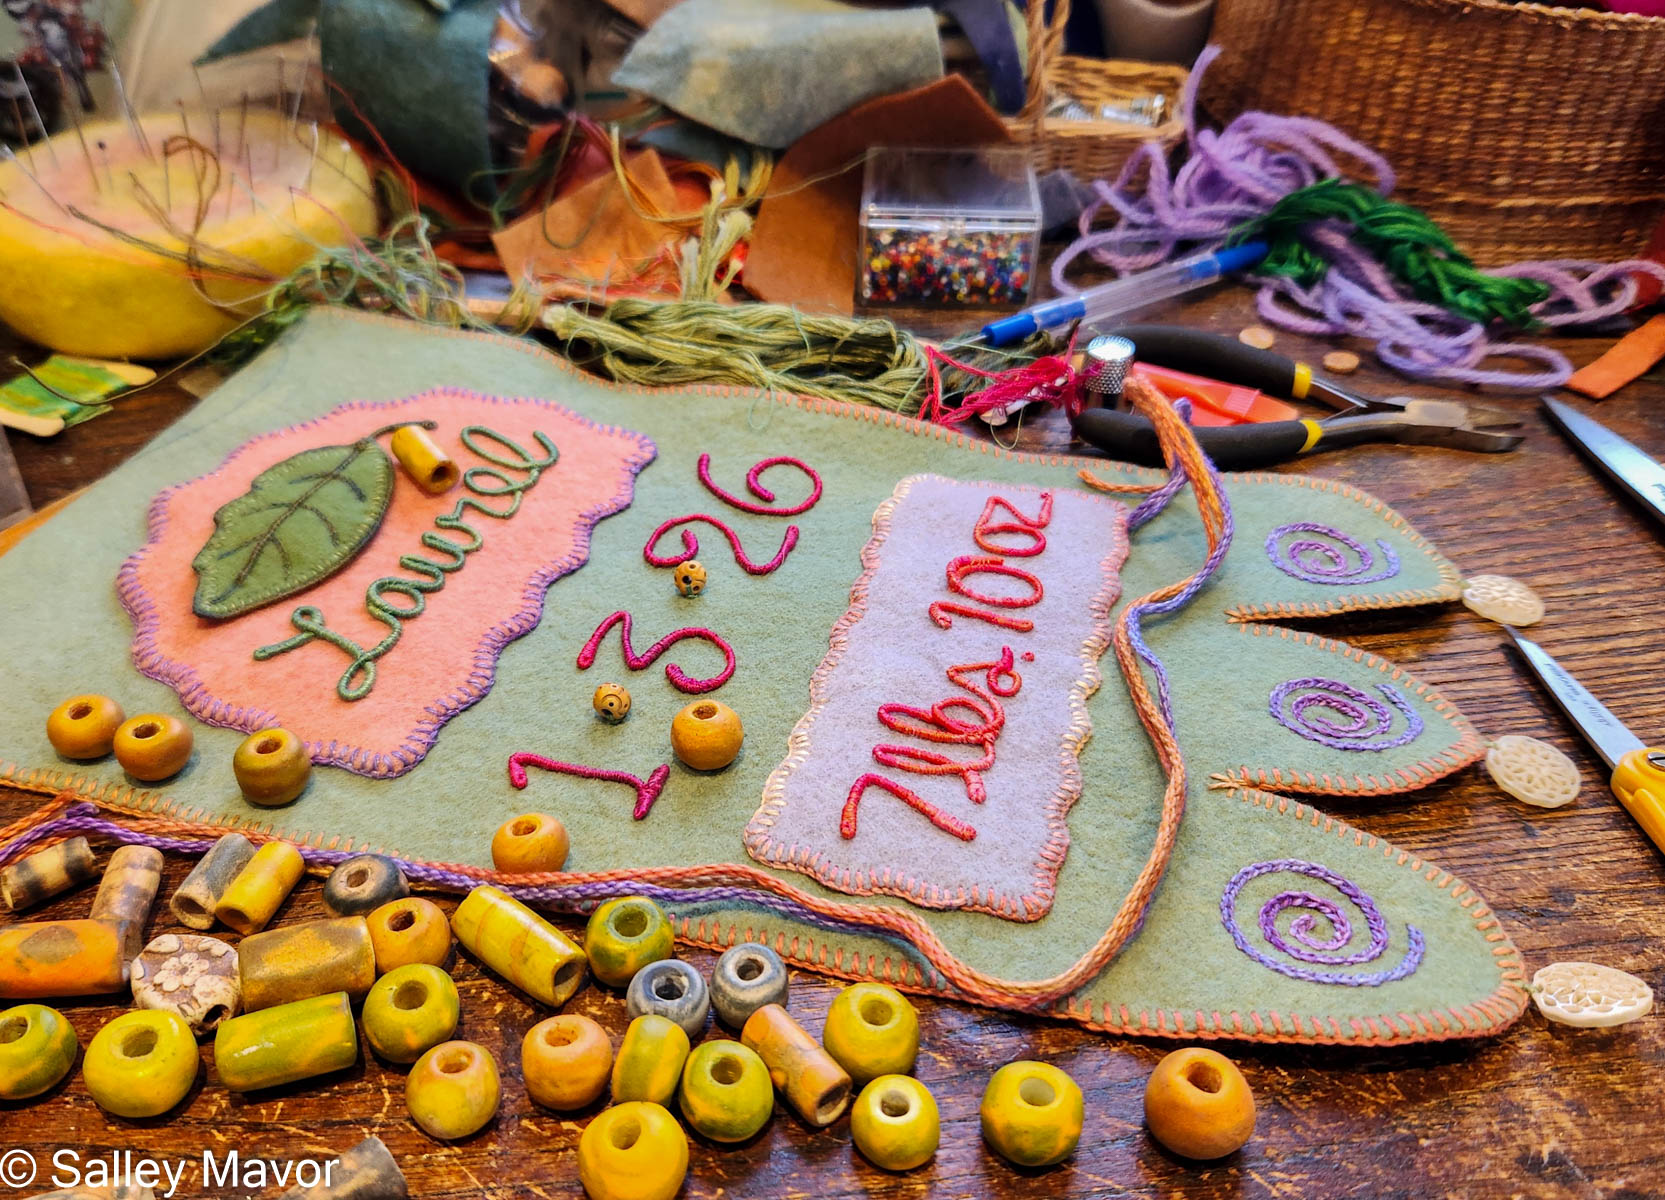
I searched through my stash to find 2 beads to dangle on either side of the hanging bar at the top up the banner.
The wooden hanging bar is actually an old weather-beaten sail batten that I found washed up on a local beach. I braided cord to make a strap and drilled holes in the stick big enough to thread cord through. And voila, the banner is finished and ready to display!
To keep up with new posts, please subscribe to this blog. Your contact info will not be sold or shared. If you’d like to see more frequent photos tracking the projects in my studio, please follow me on Facebook, Instagram and BlueSky.
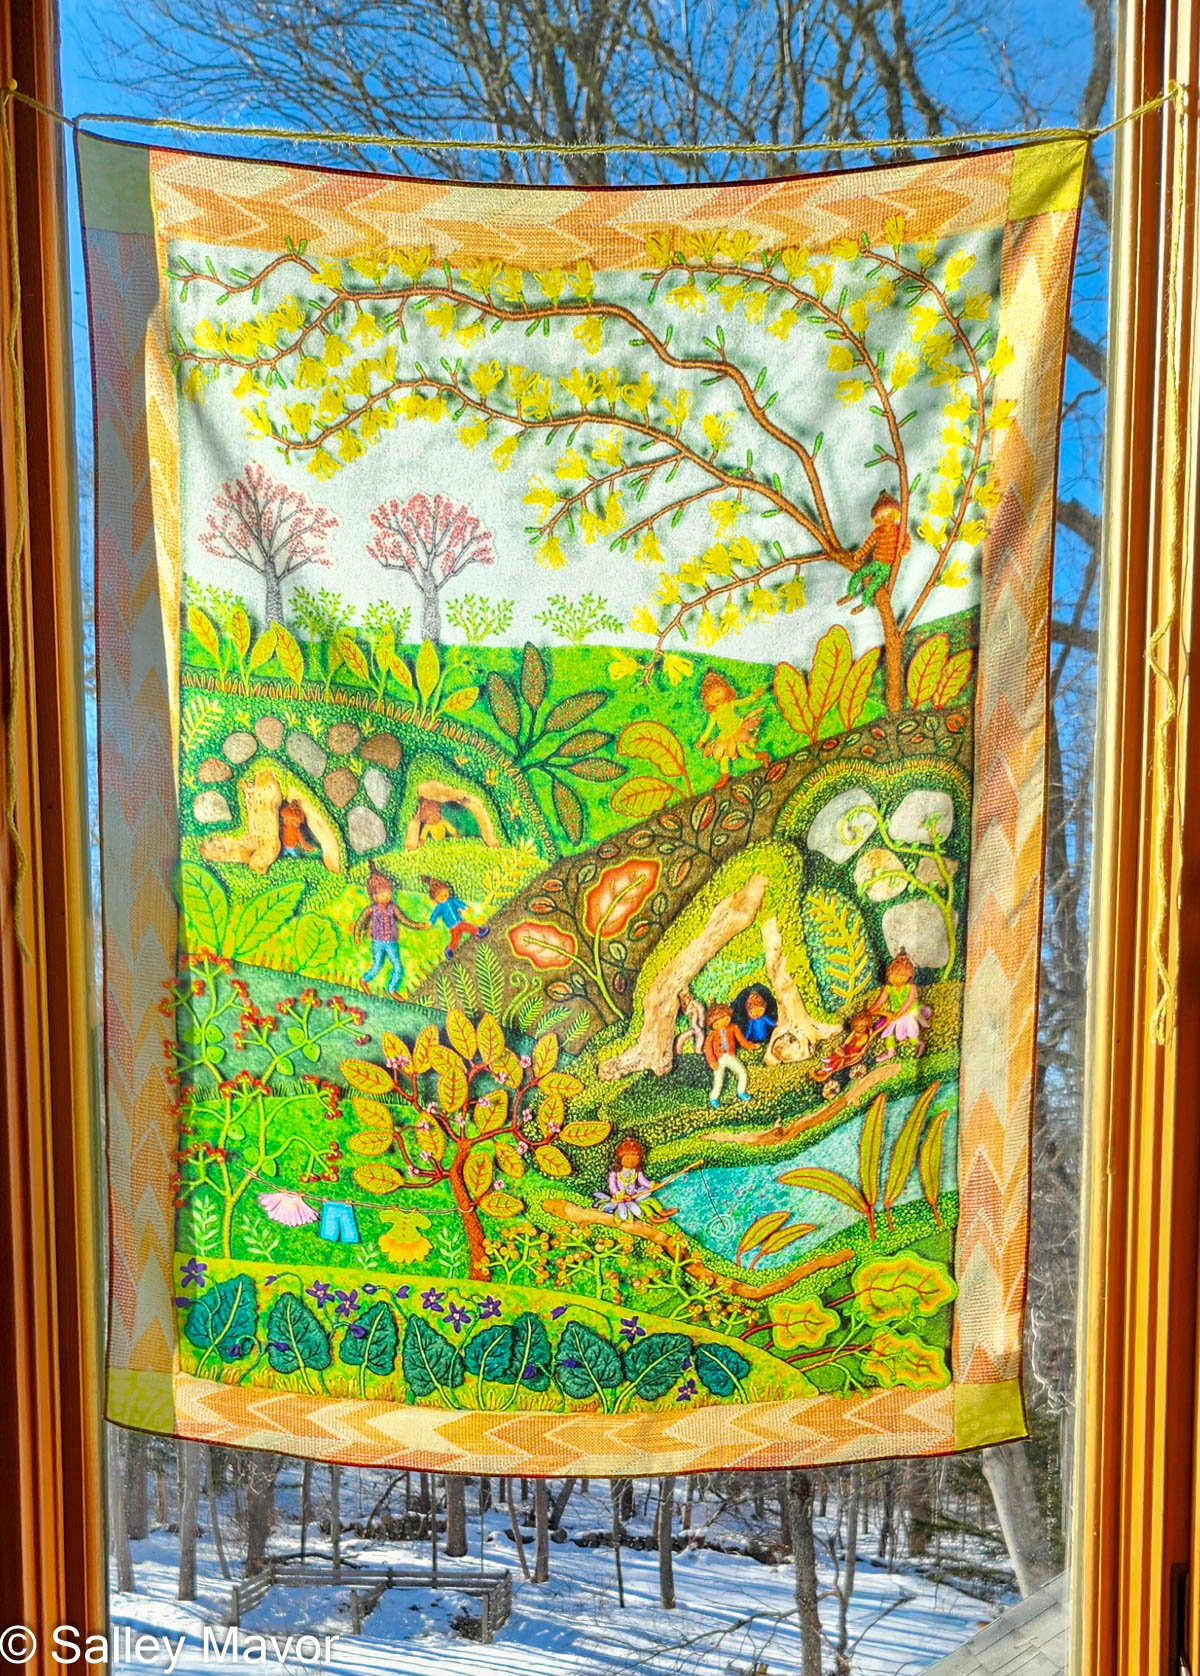
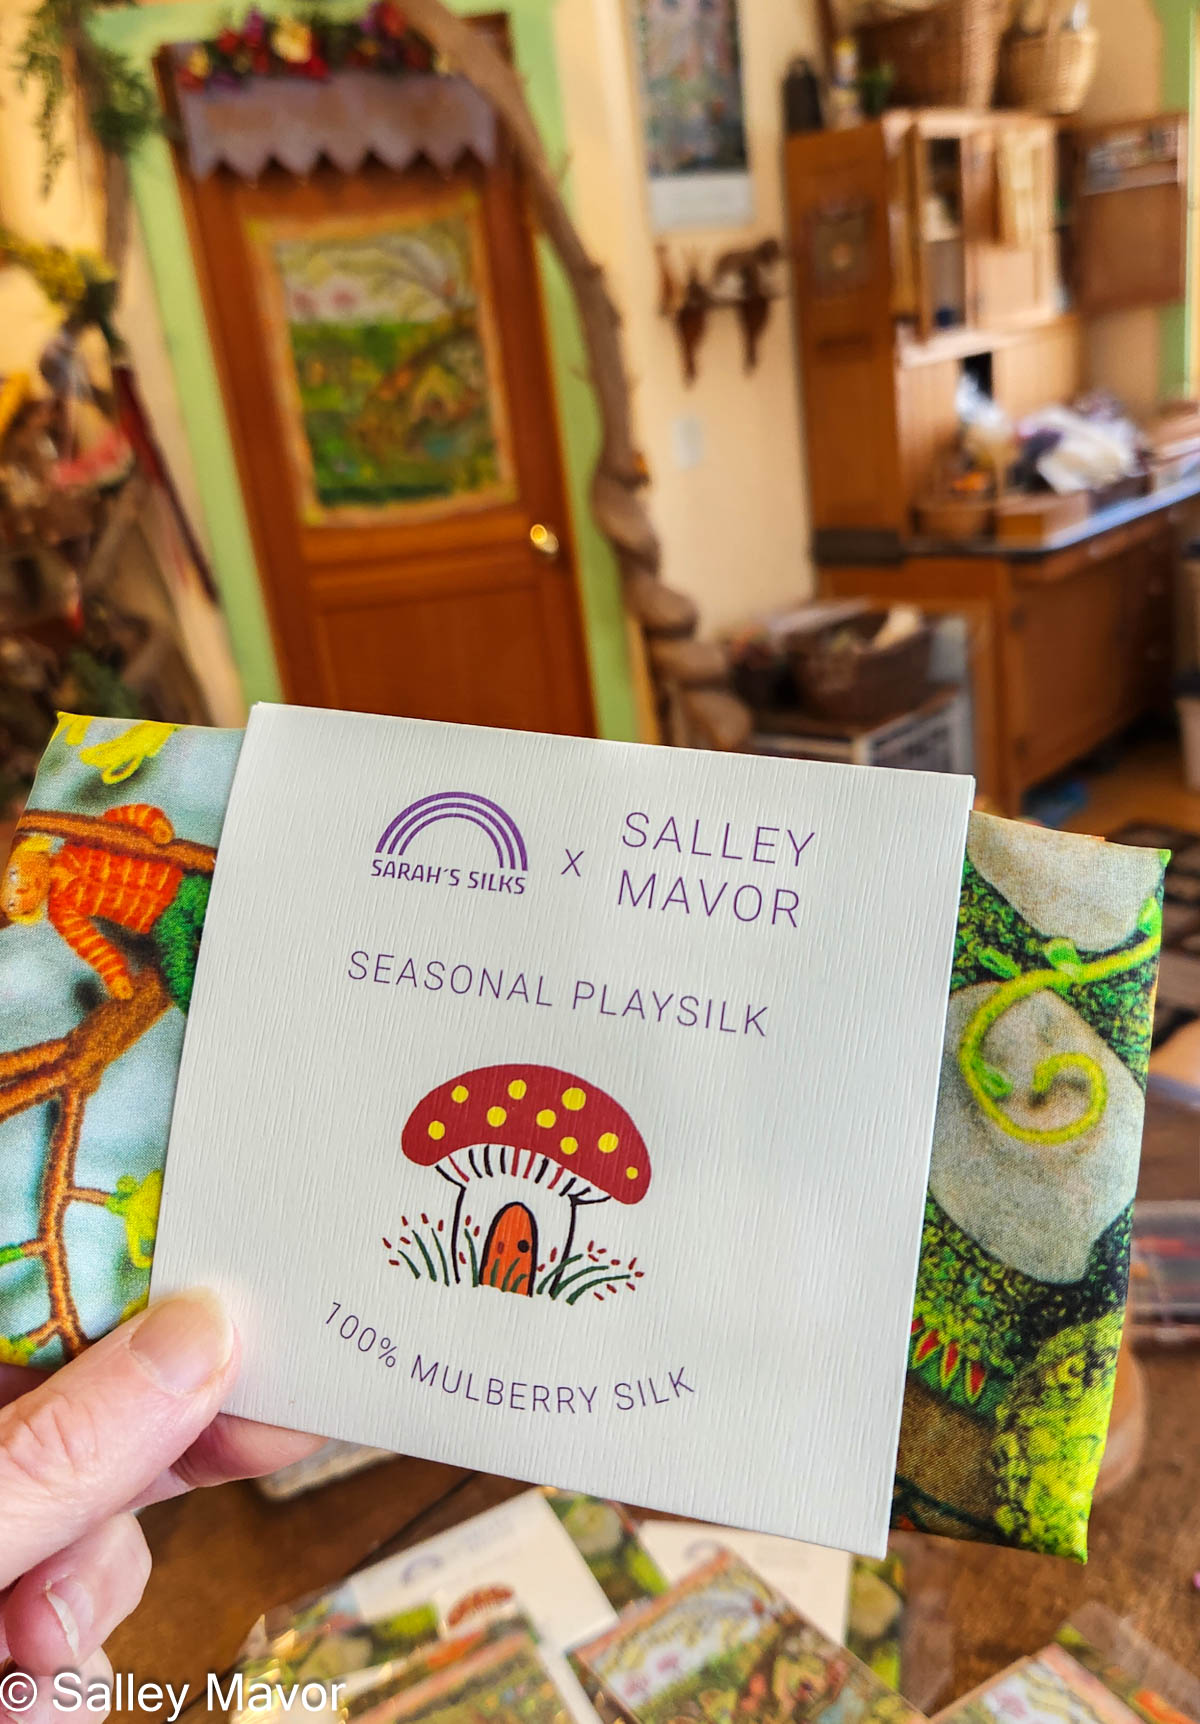
I’m happy to share the news that Sarah’s Silks just released a playsilk featuring my spring scene, Mossy Glen! The sample was a welcome sight, as it arrived just before the second major snow storm we’ve had in a month. Hanging in the window, its green and yellow pallet makes me feel hopeful that the snow outside will eventually melt and the trees will bud.
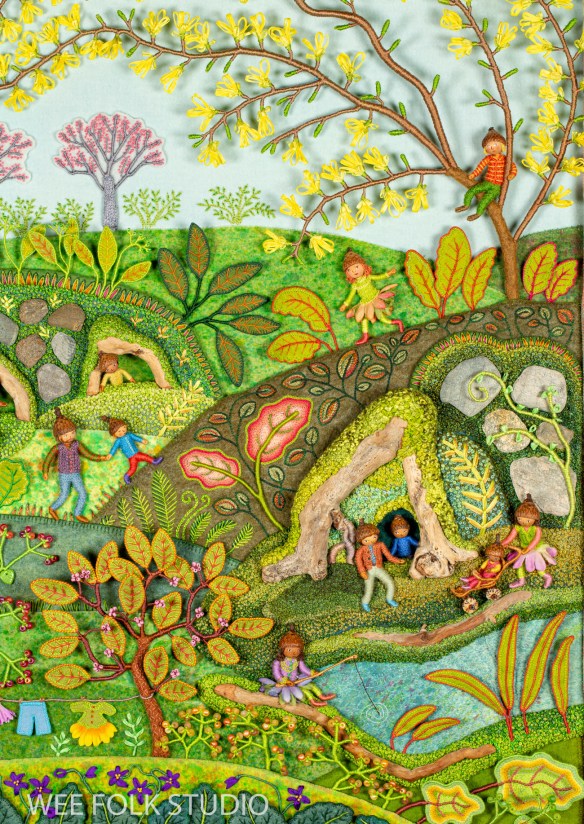
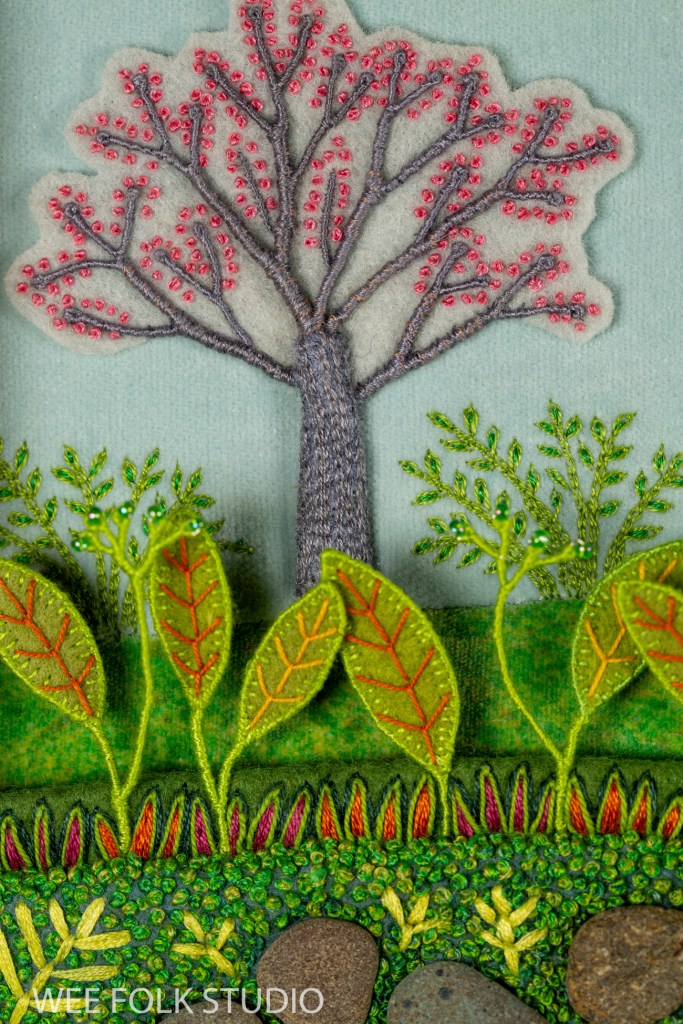
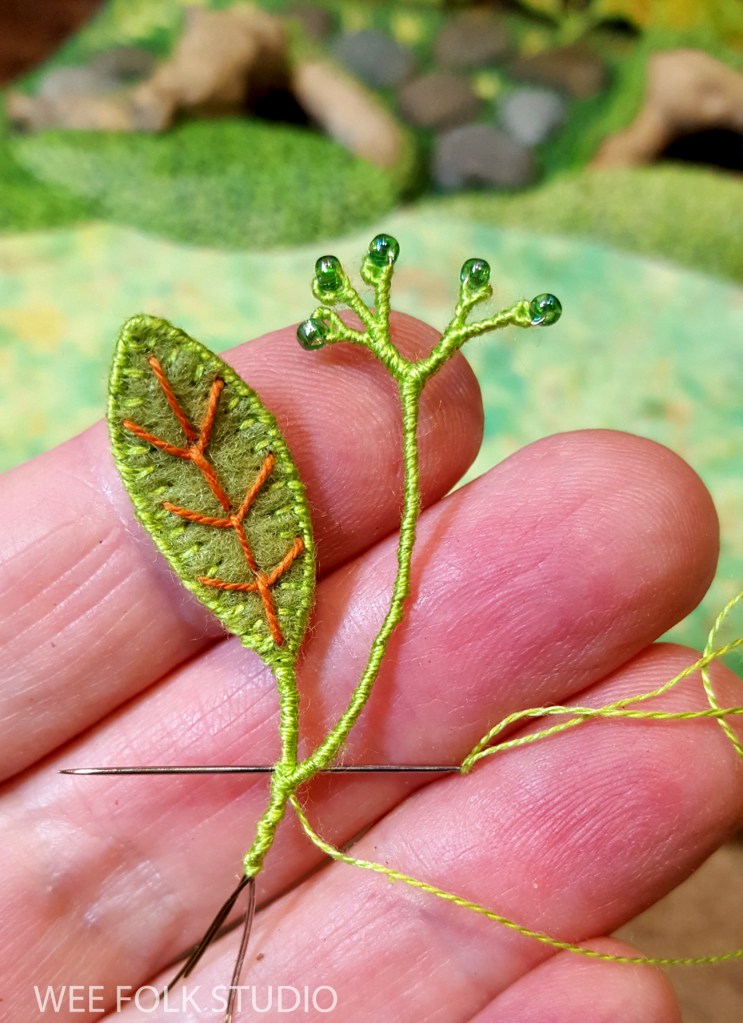
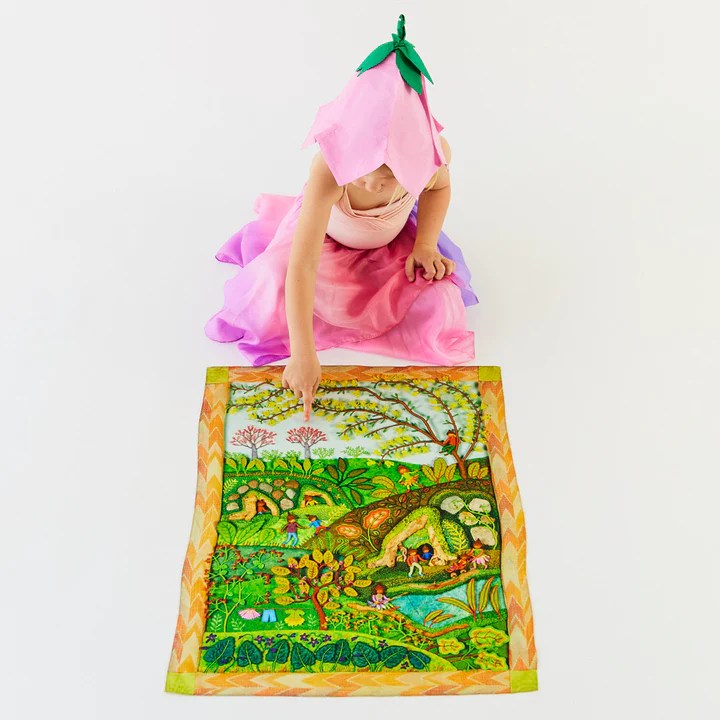
Mossy Glen is the spring scene in a series of seasonal landscapes that capture the wonder and magic of the natural world. During the months-long process of making it, I documented my progress with photos and videos. Click on the photos below to view the 8 part series.
OverviewMossCherry TreesStone WallsForsythiaLeaves and StemsStitched LeavesViolets and BerriesWee Folk
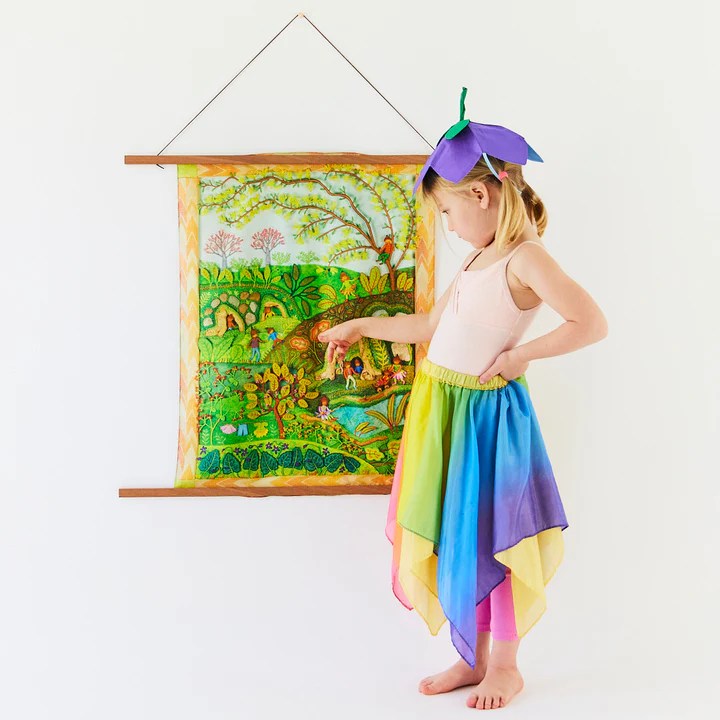
Sarah’s Silks is a wonderful family run company dedicated to providing natural toys that encourage open-ended play. Playsilks have been the main focus of their business for over 30 years, although they’ve branched out to include a beautiful selection of wooden toys. To learn more about playsilks and get ideas for how to use them, visit Sarah’s Silks.
The playsilk measures approximately 21″ x 26″ and is made from heavyweight, 100% pure mulberry silk. Playsilks are perfect for quiet moments of child-directed play – they encourage observation, imagination, and storytelling. They can also be displayed on a wall or in a window. The Springtime in Mossy Glen Playsilk is available from both my Etsy Shop here and Sarah’s Silk’s here. Sarah’s Silk sells Playsilk hangers, too.
I’m excited to be collaborating with Sarah Lee and her company, which has held true to its founding principle of encouraging creative play using simple multi purpose toys. If all goes well with this first springtime release, they will offer playsilks of the other scenes in my seasonal landscape series in the future.
The Springtime in Mossy Glen Playsilk is available from both my Etsy Shop here and Sarah’s Silk’s here. Sarah’s Silk sells wooden Playsilk hangers, too.
To keep up with new posts, please subscribe to this blog. Your contact info will not be sold or shared. If you’d like to see more frequent photos tracking the projects in my studio, please follow me on Facebook, Instagram and BlueSky.
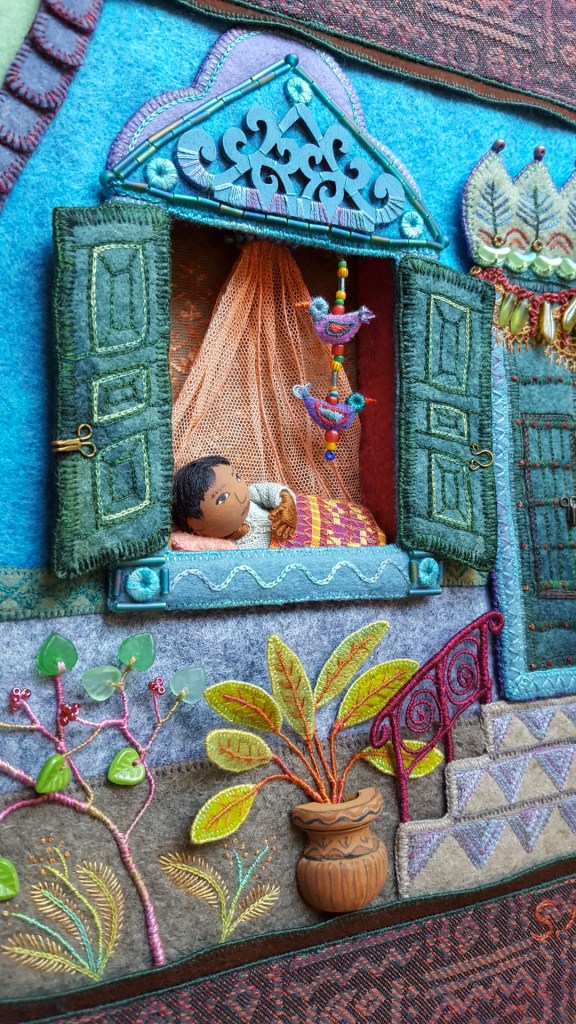
Iranian scene from My Bed: Enchanting Ways to Fall Asleep around the World
Throughout my life, a folky multi-cultural aesthetic has filtered through just about everything I’ve created, beginning in childhood and continuing into my current work. This enduring interest in international folk traditions is deeply rooted in the way I was raised.
Russian scene from My Bed: Enchanting Ways to Fall Asleep around the World
Whether drawing inspiration from traditional motifs and patterns, regional styles, or the details found in costumes from around the world, my art consistently features characters and subjects that celebrate the beauty of diversity while also emphasizing the universal connections that unite us.
In this post, I share three stories about different experiences in my upbringing that have influenced my life and style: Souvenir Doll Collection, Childhood Travels, and Folk Dancing Legacy.
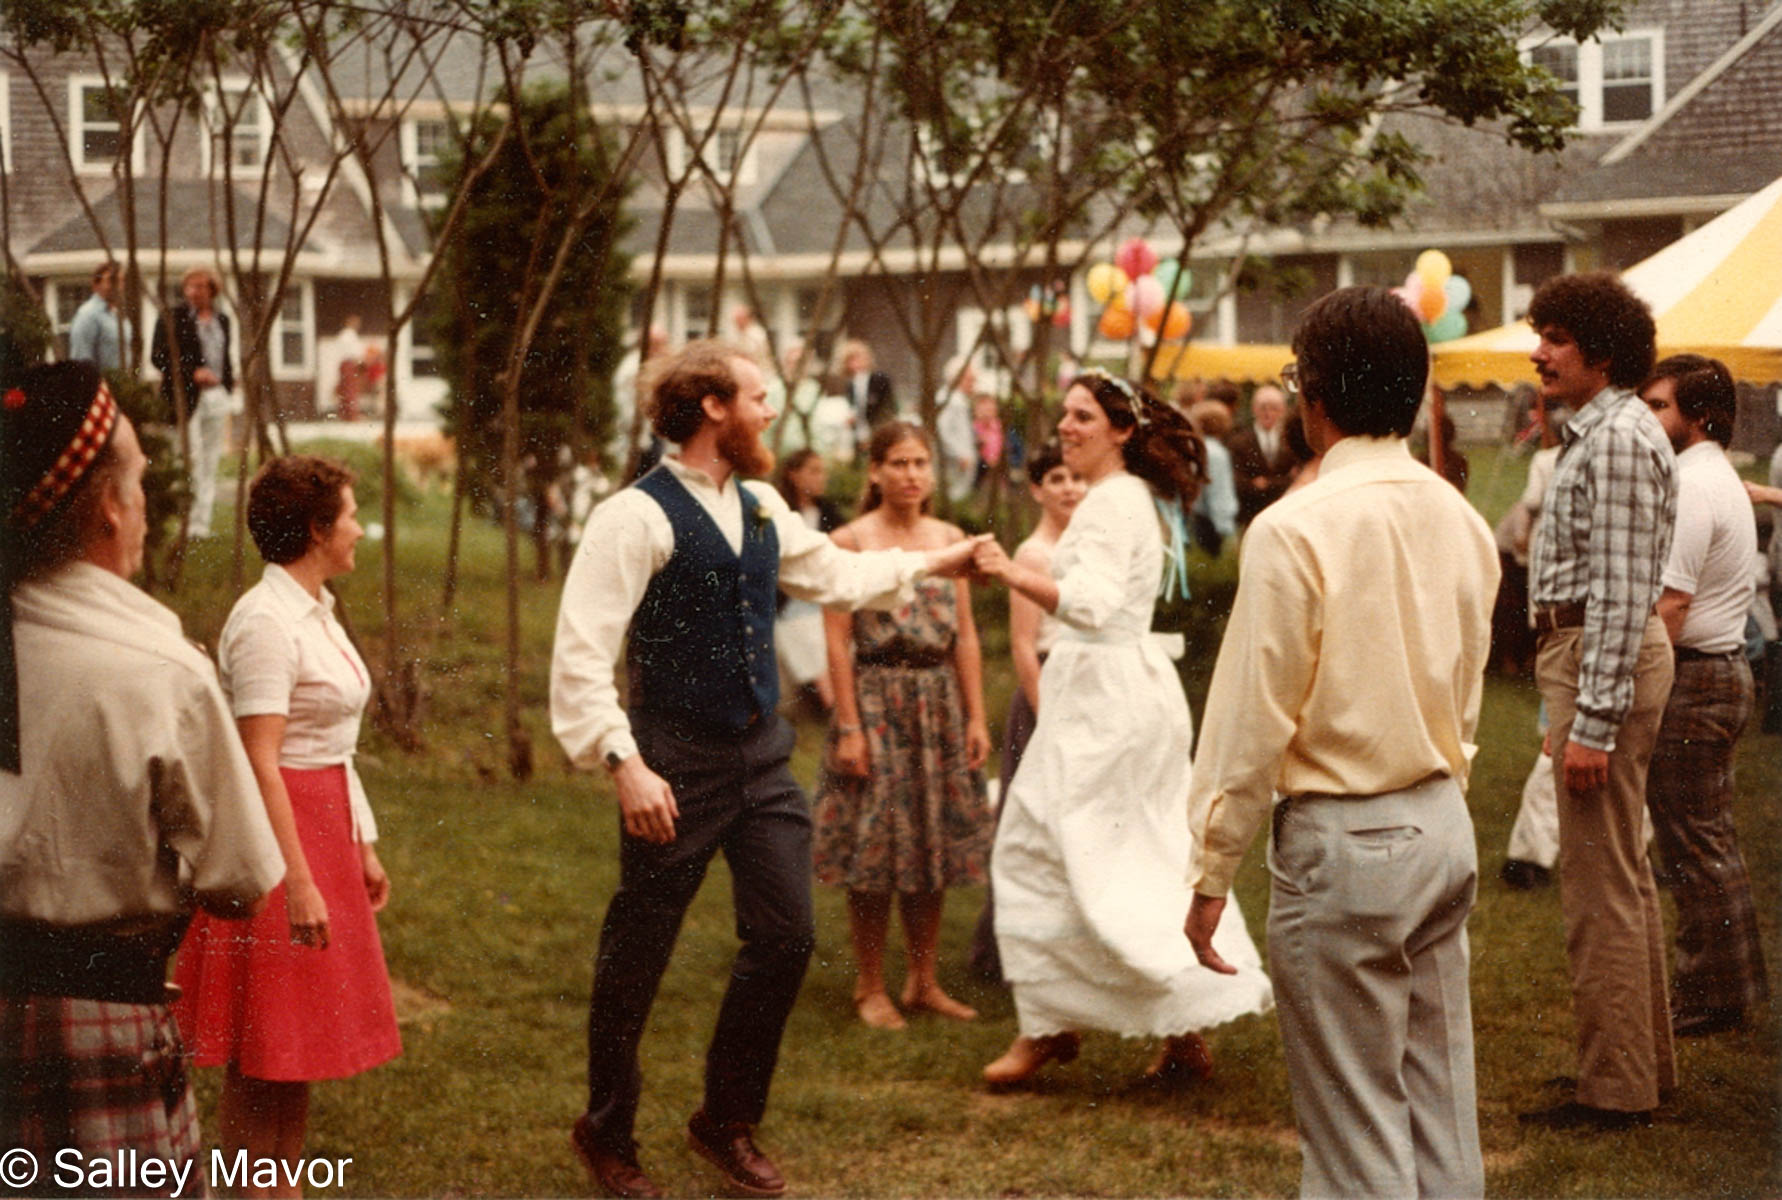
Rob and Salley’s wedding in 1981
Looking back, I feel incredibly grateful to have been brought up in a family who valued creativity in all forms, with an emphasis on world cultures and folk traditions. My parents’ love and appreciation for all things folky—whether it was art, clothing, music, or dance from around the world—was a constant presence throughout my early years. Their passion for celebrating international folk customs not only enriched our daily lives but also served as a meaningful way for our family to engage with and feel connected to our wider community. Growing up in such an environment, it is no wonder that I am continually inspired to explore relationships across cultures and to integrate folk art elements into my work.
Face TimeMy BedCover UpFelt Wee FolkDisplacedWhiskersProjects influenced by a folky multi-cultural aesthetic
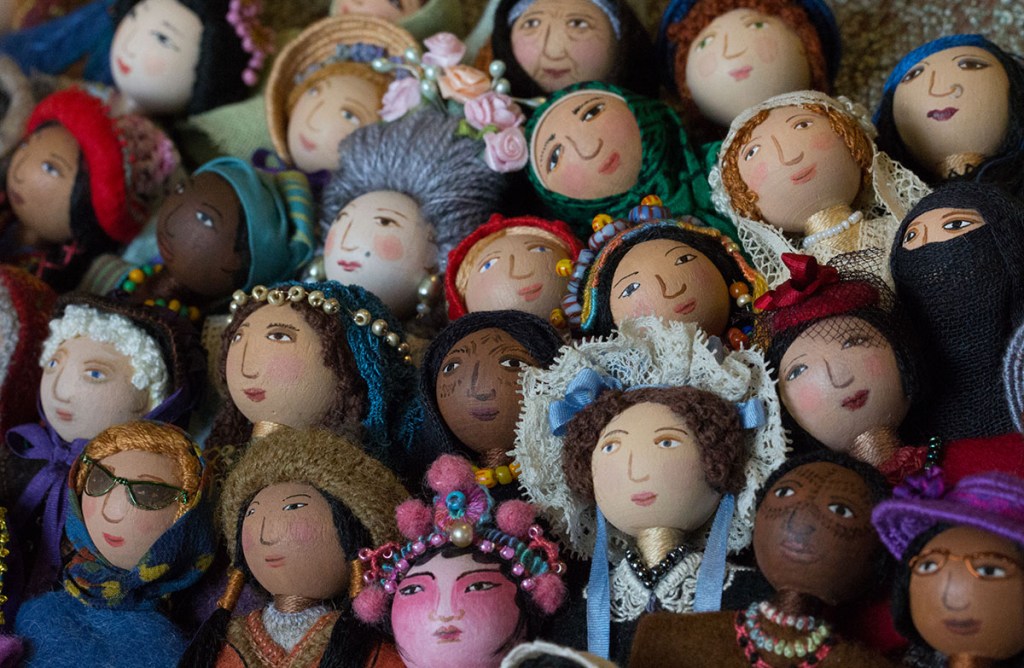
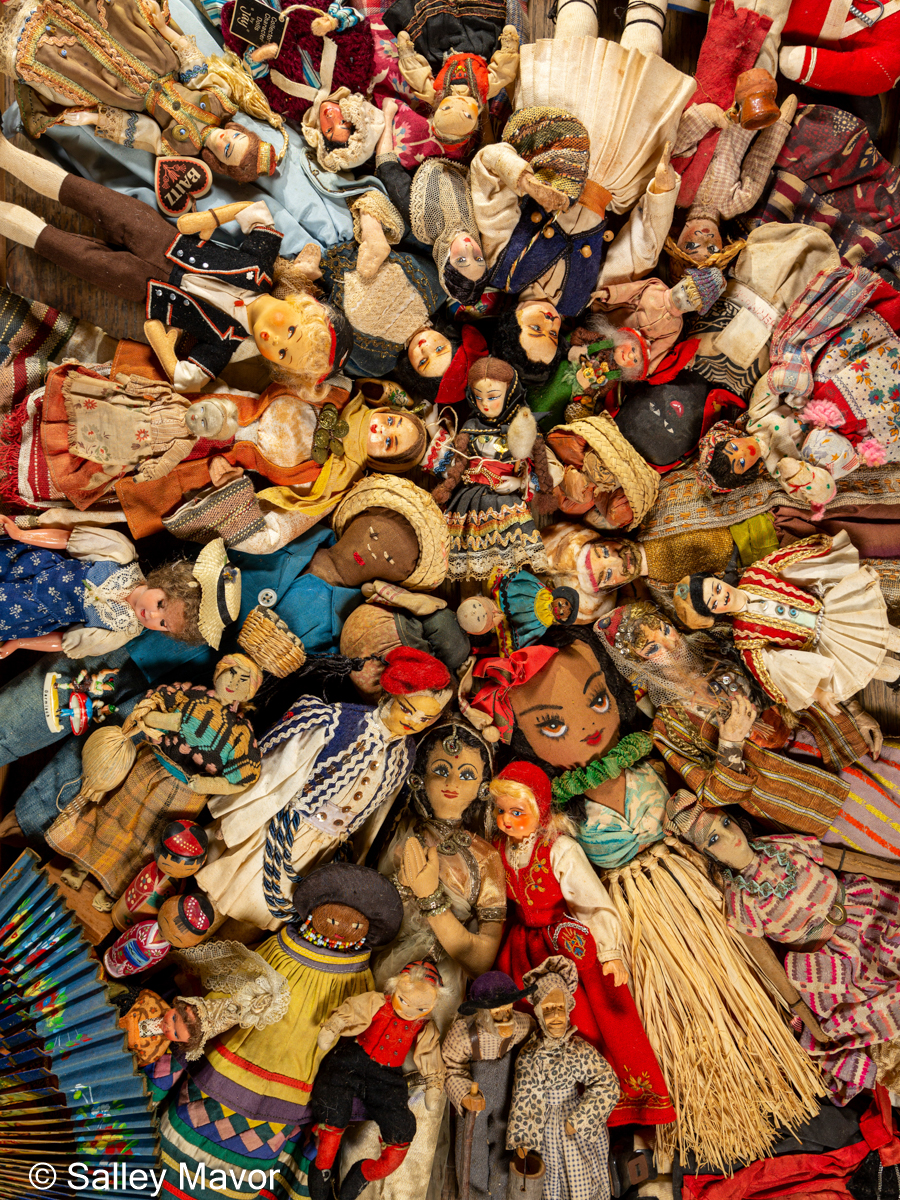
Souvenir Doll Collection My fascination with clothing and costumes stretches back to early childhood. I remember gazing up at my grandmother’s collection of international souvenir dolls, which were displayed high out of reach on her living room shelves. There were dozens of them, each dressed in the traditional clothing of a different country she had traveled to.
My Grandmother’s souvenir doll collection
Over time, I was allowed to touch some of the dolls and get a close look at their intriguing outfits. This early exposure to a variety of cultures in such a child-friendly way sparked a life-long curiosity about how clothing can identify and communicate something about who we are as groups and as individuals.
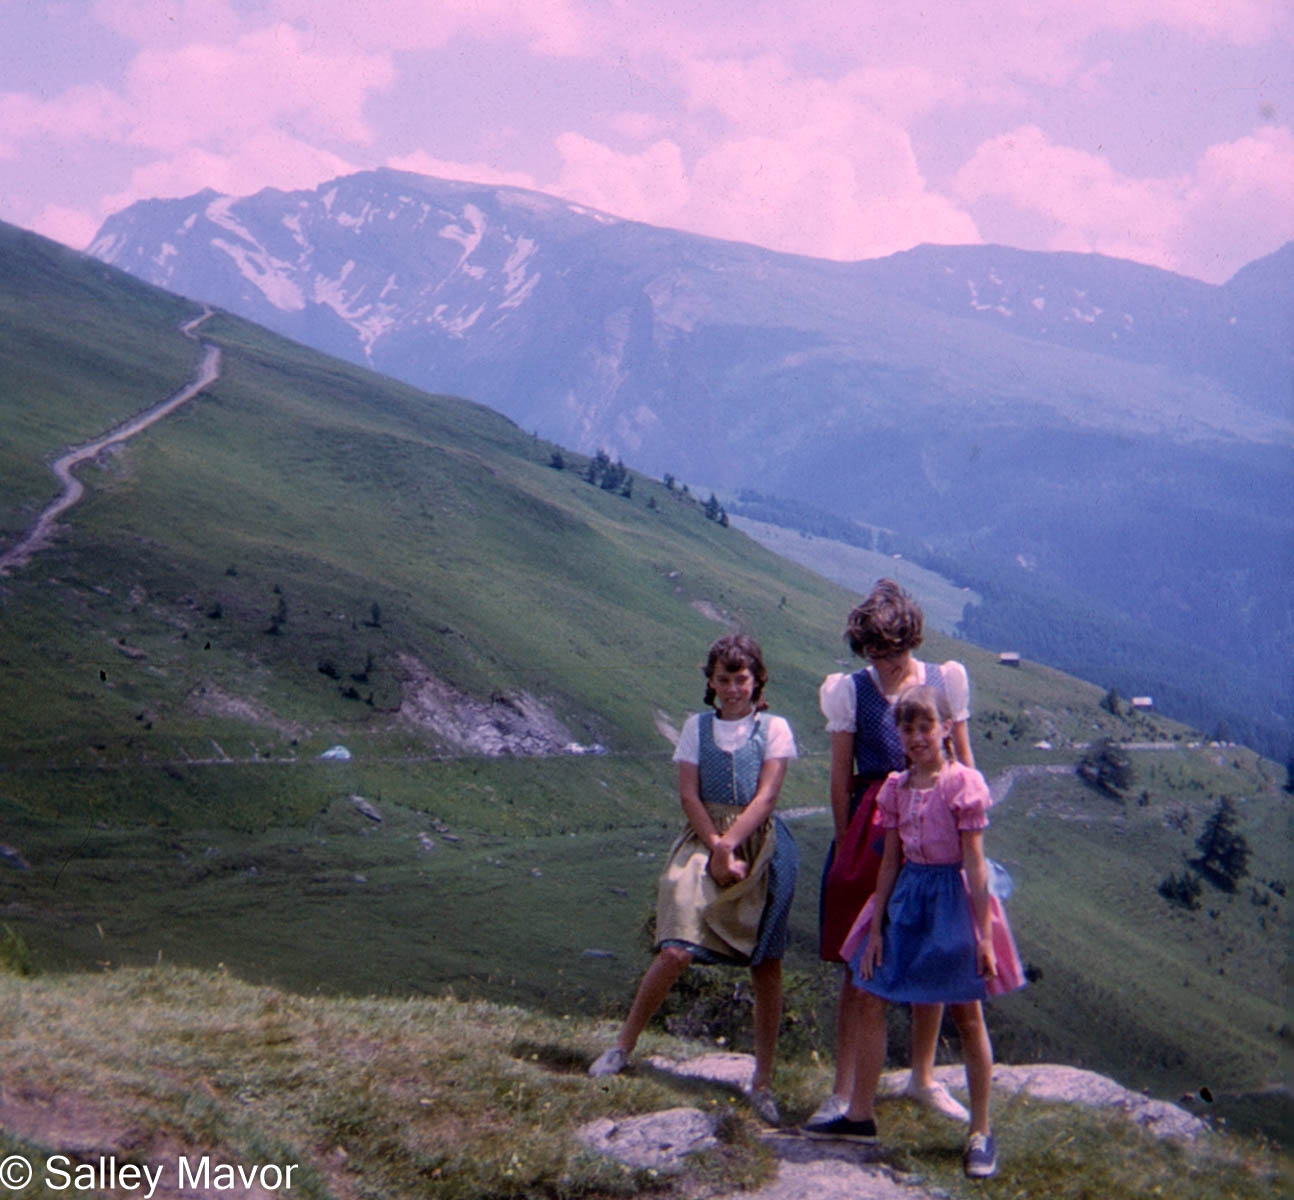
Salley and Anne Mavor and our friend Heidi Stergis (in pink) in Austria, 1965
Childhood Travels In 1965, when I was ten years old, my family went on a trip to Europe that would have a lasting impact on my life. At that age, I was old enough to truly take in and appreciate the wide variety of places and people we encountered. To this day, I remember highlights from our travels: climbing the Eiffel Tower in Paris, riding a donkey up a mountain in Greece, hiking through the Alps, and floating in a gondola along the canals of Venice.
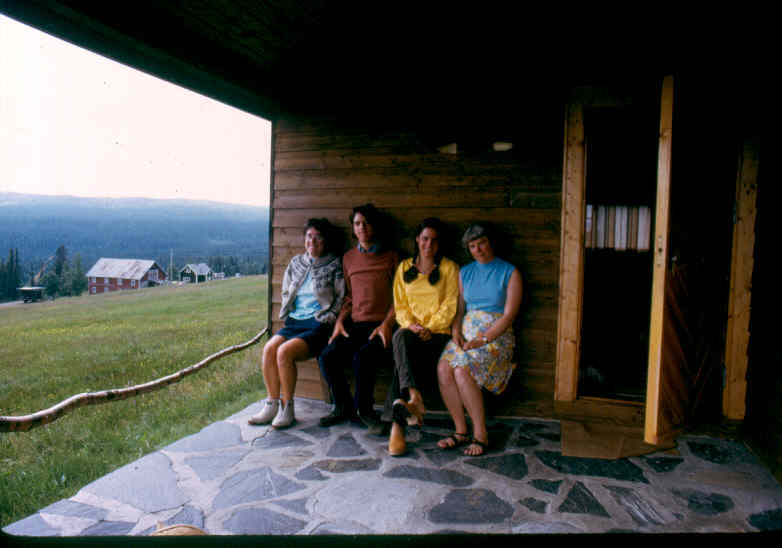
Continuing into my teenage years, our family went on other memorable trips abroad including to Scandinavia in 1973, where we joined my sister Anne, who had just completed a year studying at a Folk School in Sweden.
Anne, Jimmy, Salley and Mary Mavor in Norway in 1973
Each of these travel experiences played a significant role in broadening my understanding of the world. This exposure not only enriched my perspective but also laid the foundation for themes that would become central to my creative work in the years to come.
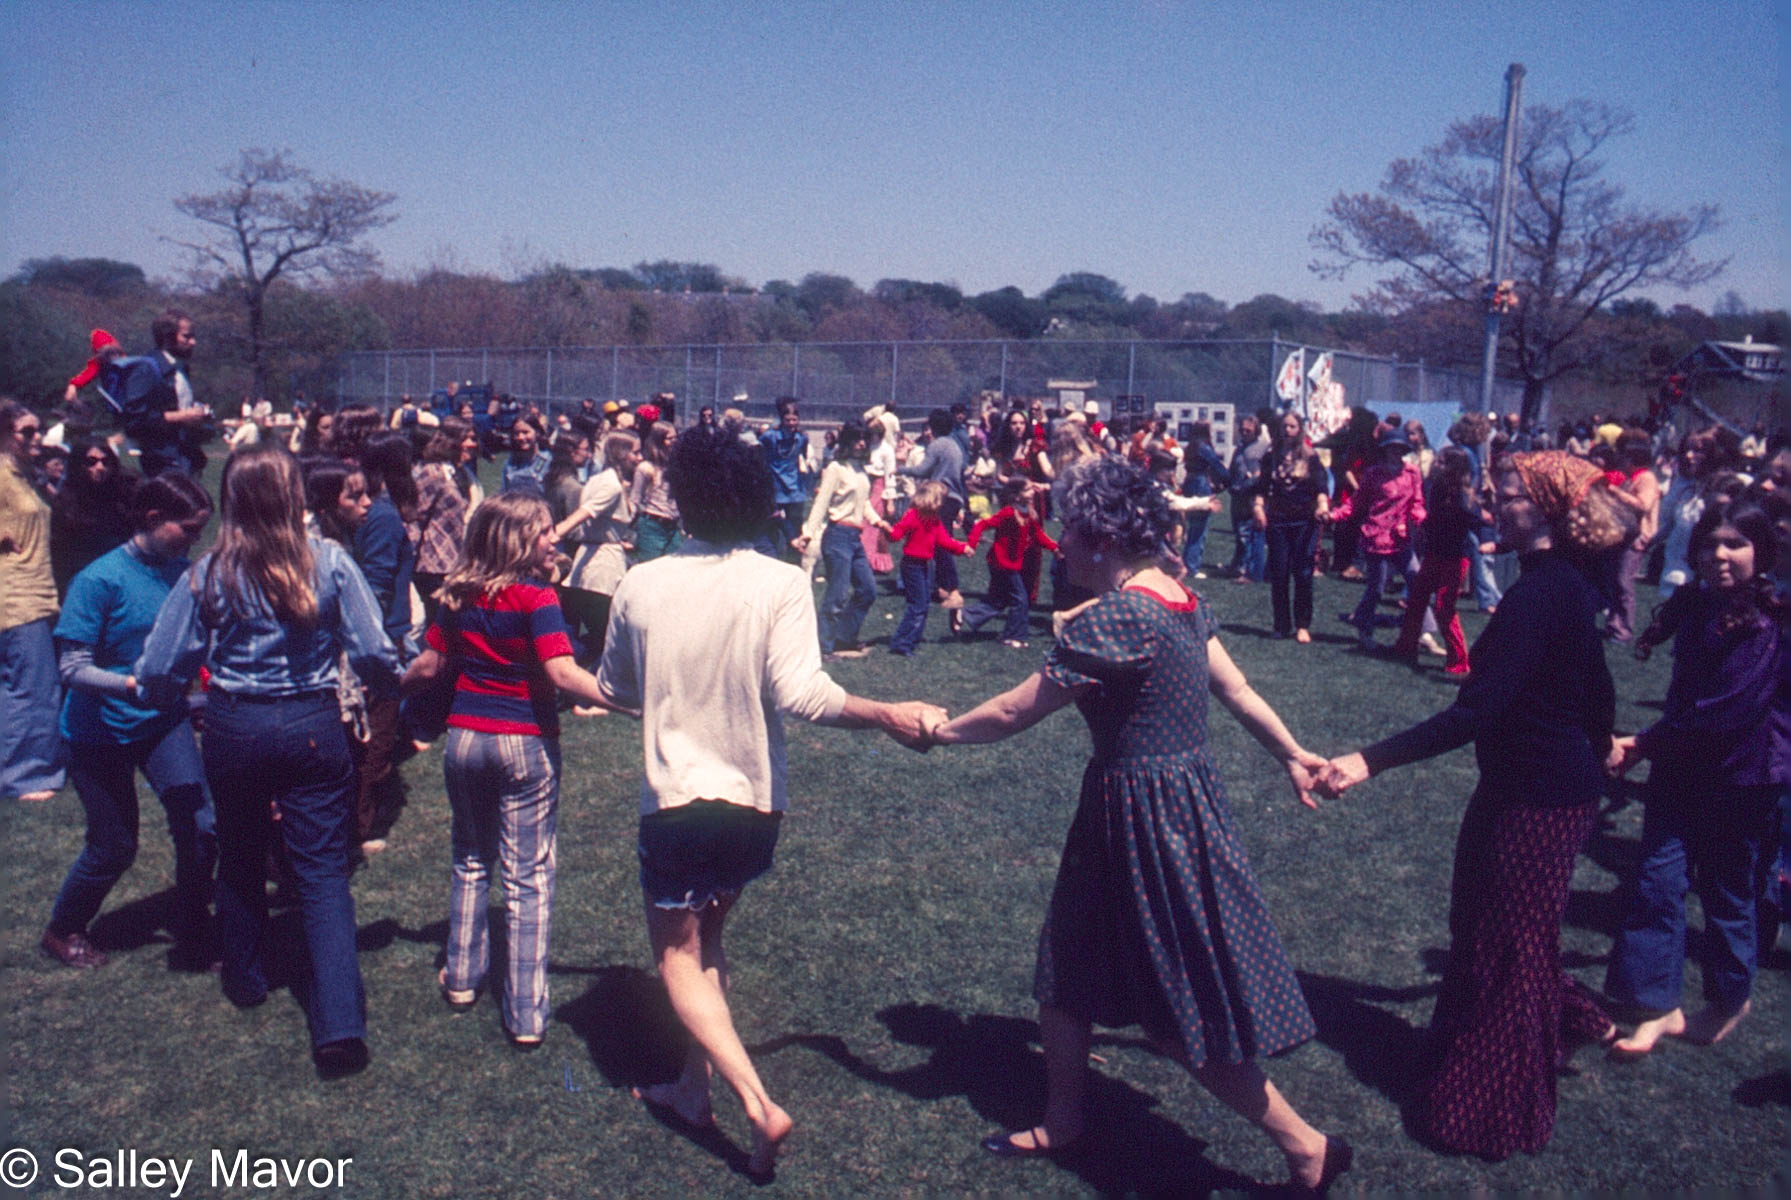
Woods Hole May Festival in the early 1970s, Mary Mavor in green spotted dress
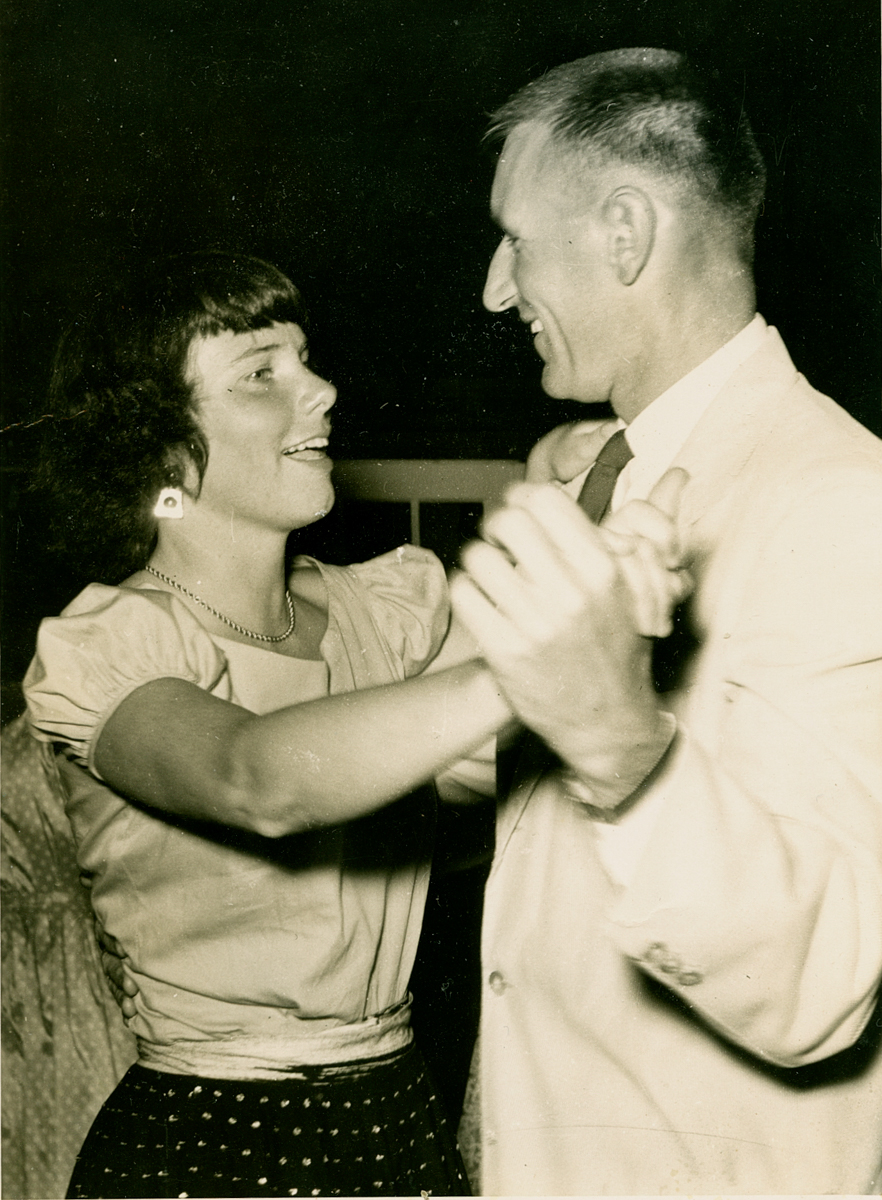
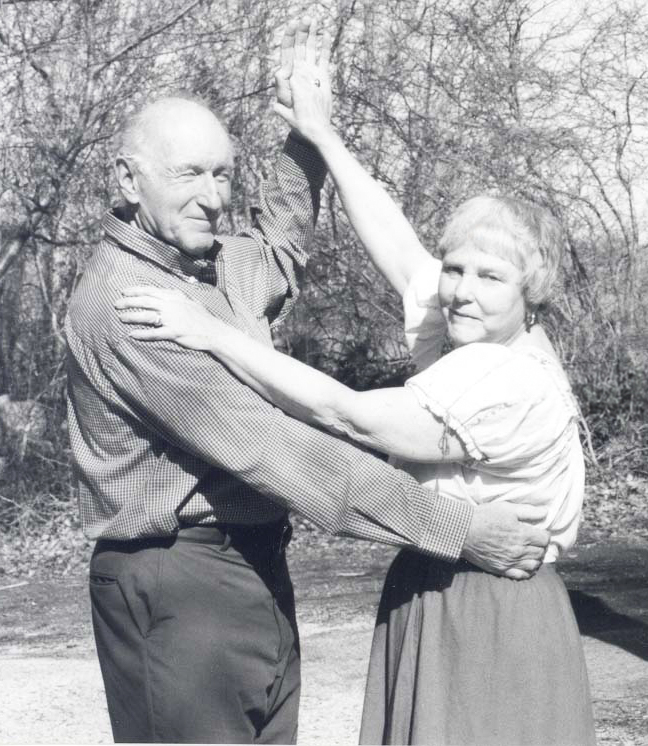
Folk Dancing Legacy Mary and Jim Mavor’s shared passion for folk music and dancing brought them together in the late 1940s. They met and fell in love while attending a variety of folk dance events in the Boston area. During those post-war years and into the 1950s, Boston was a vibrant hub for the emerging folk music and dance scene. They had their choice of dances to go to, including New England Contra dances, square dances or international folk dances, often with live music. My parents’ mutual enthusiasm for folk dancing not only marked the beginning of their courtship but also became a lasting focus throughout their long marriage.
Jim and Mary – 1949Jim and Mary – 2001
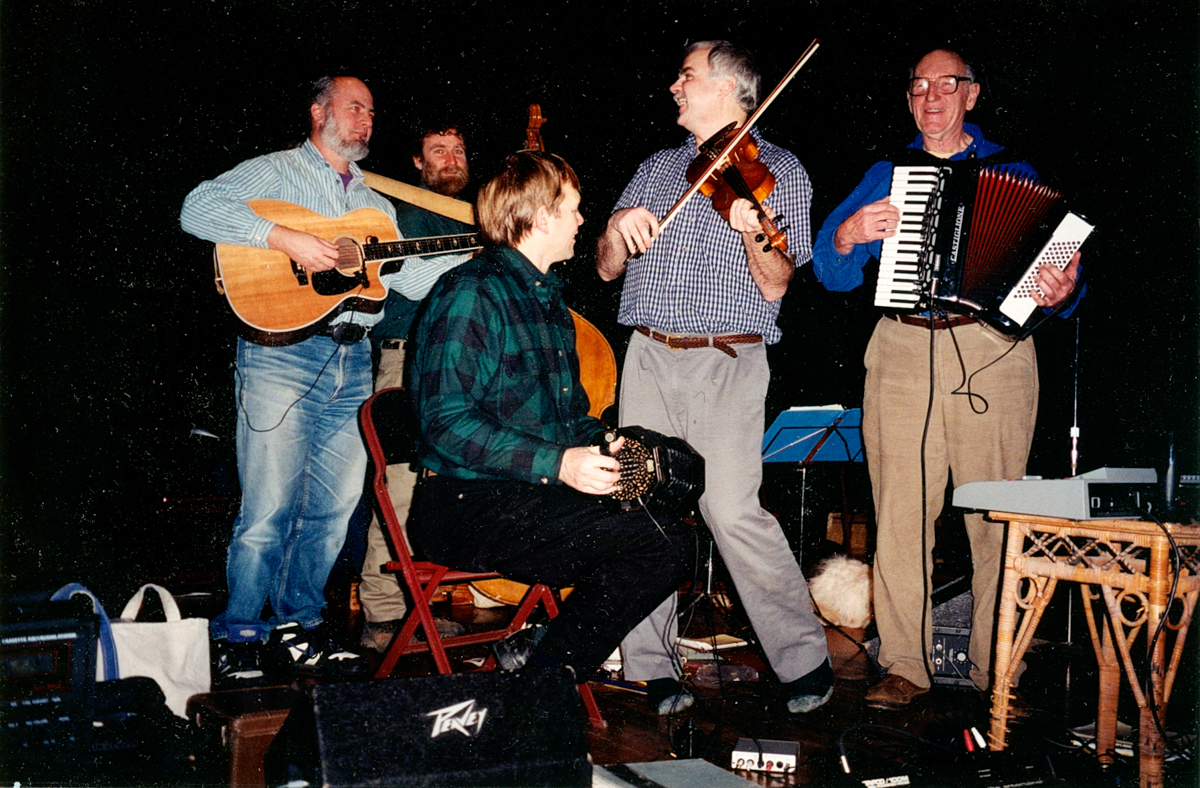
In 1961, when our family switched from being summer people in Woods Hole, MA to living there year-round, Mary and Jim naturally brought their love of folk dancing with them. They began teaching folk dancing at the Woods Hole Community Hall, sharing their knowledge and extensive record collection with people in the village. My father soon formed the Woods Hole Folk Orchestra, which is still going strong. For over fifty years, they made it their mission to hold weekly international folk dances and monthly contra dances.
Woods Hole May Festival – early 1970s
My mother always stressed the social benefits of the dances, including countless match-making successes and the fostering of long-lasting friendships across generations. Through our parents’ example, my sister, brother, and I learned the importance of building community by creating regular opportunities for people to come together—not just physically, but also emotionally and spiritually. Over the years, the seeds they planted helped cultivate a thriving local scene, inspiring the growth of other music, dance, and theater groups rooted in folk traditions.
Woods Hole Folk Orchestra – Jim Mavor on accordion,
Folk dancing continues to be an unbridled source of merriment in Woods Hole even now, decades after our parents’ passing. It remains a defining phenomenon in our community and stands as a testament to their vision and unwavering dedication to celebrating the world’s shared humanity.
International folk dancing at the Woods Hole Community Hall in 2025
To keep up with new posts, please subscribe to this blog. Your contact info will not be sold or shared. If you’d like to see more frequent photos tracking the projects in my studio, please follow me on Facebook, Instagram and BlueSky.
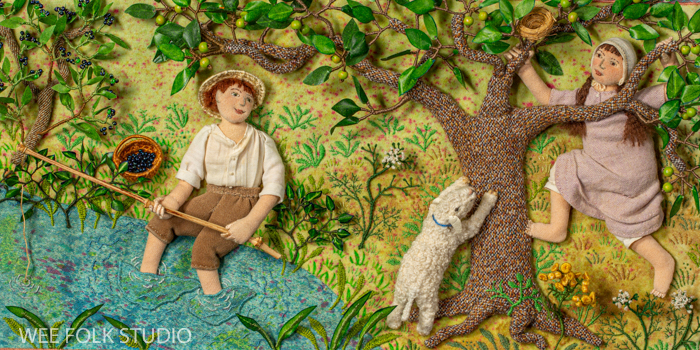
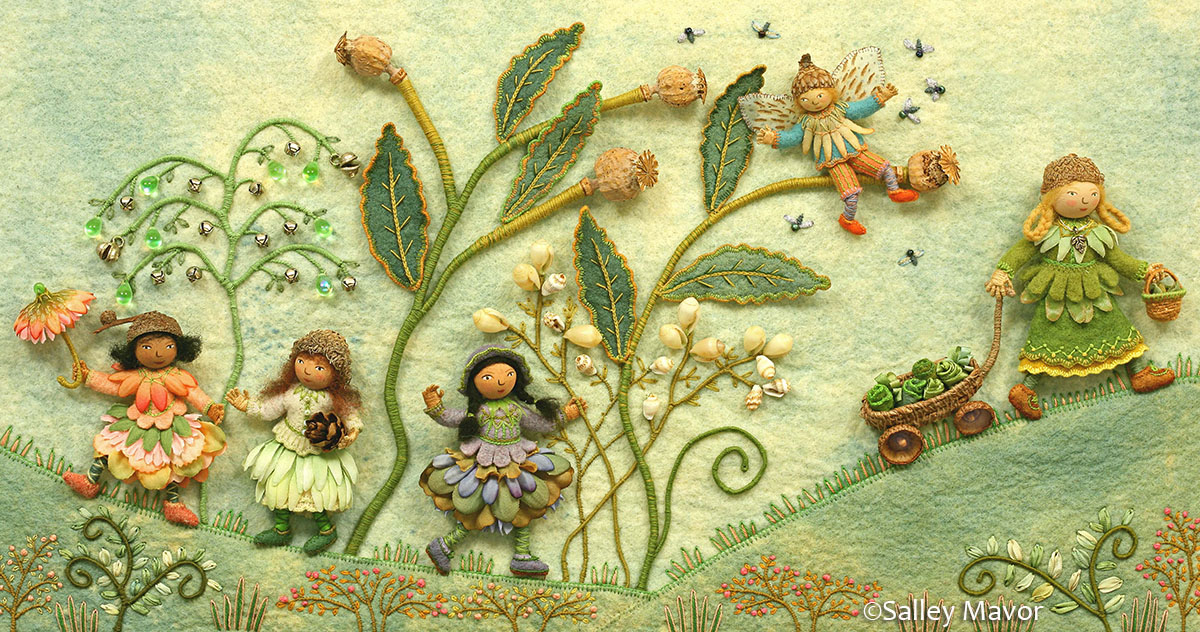
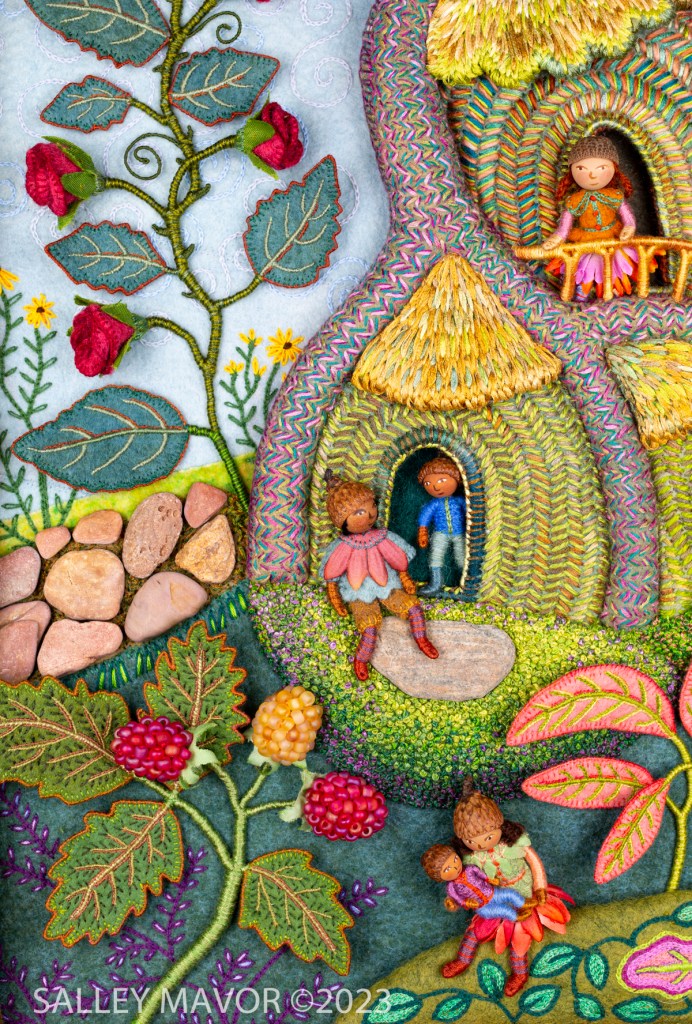
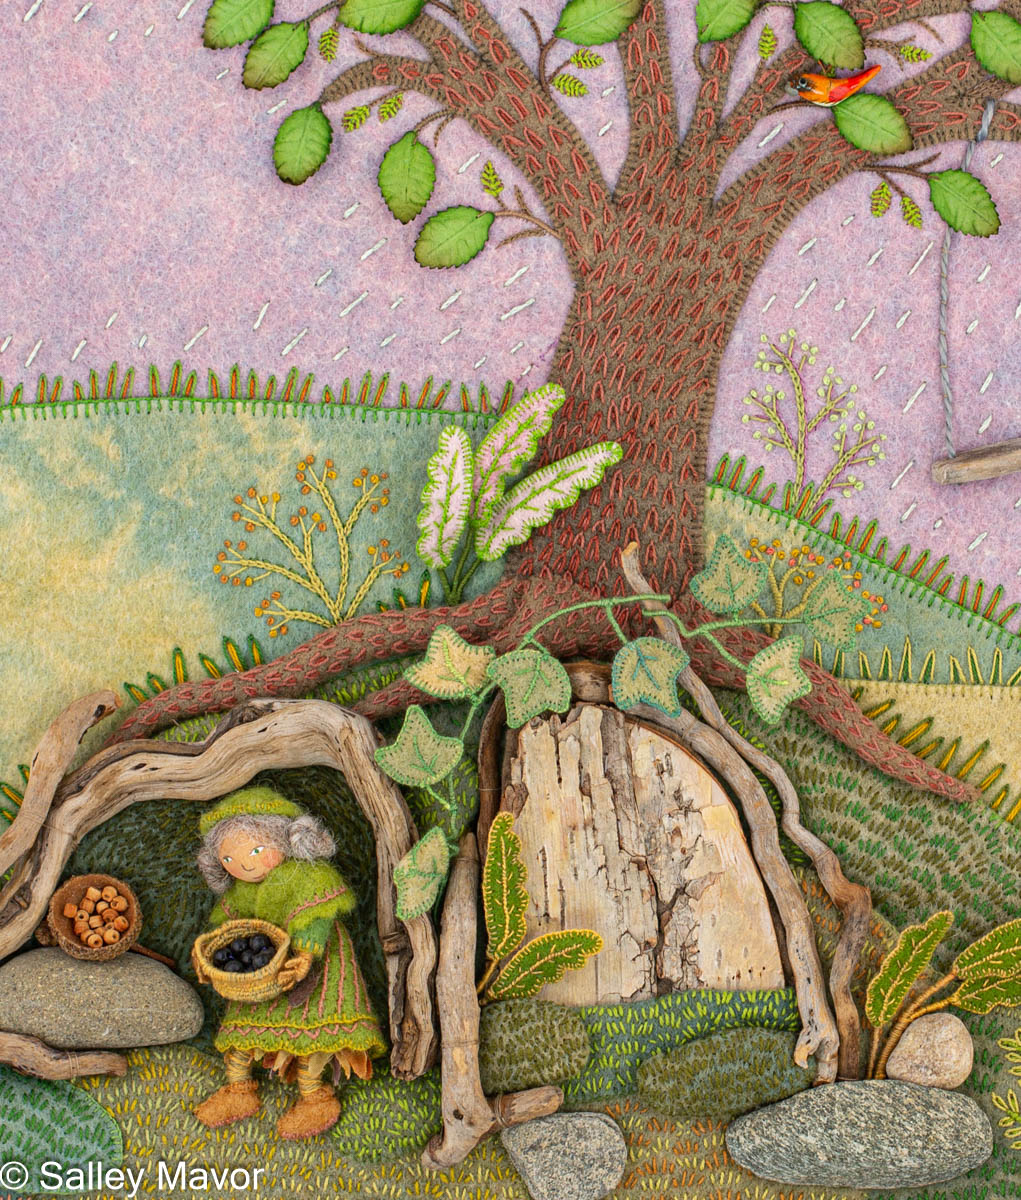
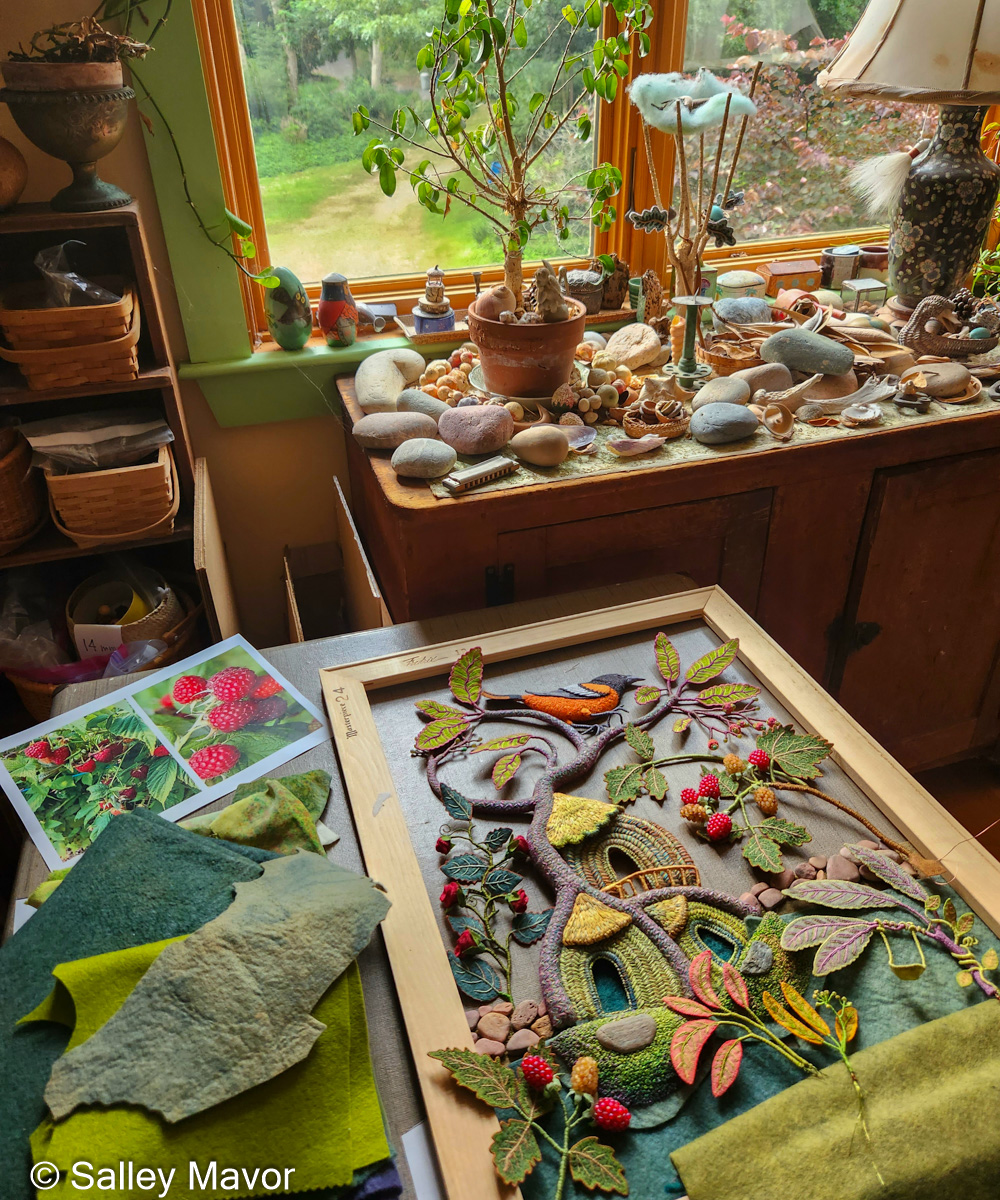
Part 10 concludes the series about making my piece Summertime. This post features photos and videos documenting the process of creating the wee folk characters seen frolicking in the warm summer breeze. A complete list of previous articles about making Summertime is at the end of this post.
Summertime is the summer scene in a series of four seasonal landscapes that capture the wonder and magic of the natural world. Posters, note cards, prints, bookmarks, and jigsaw puzzles of Summertime and the other scenes in the series (Frosty Morning, Mossy Glen and Harvest Time) are available in my Etsy Shop.
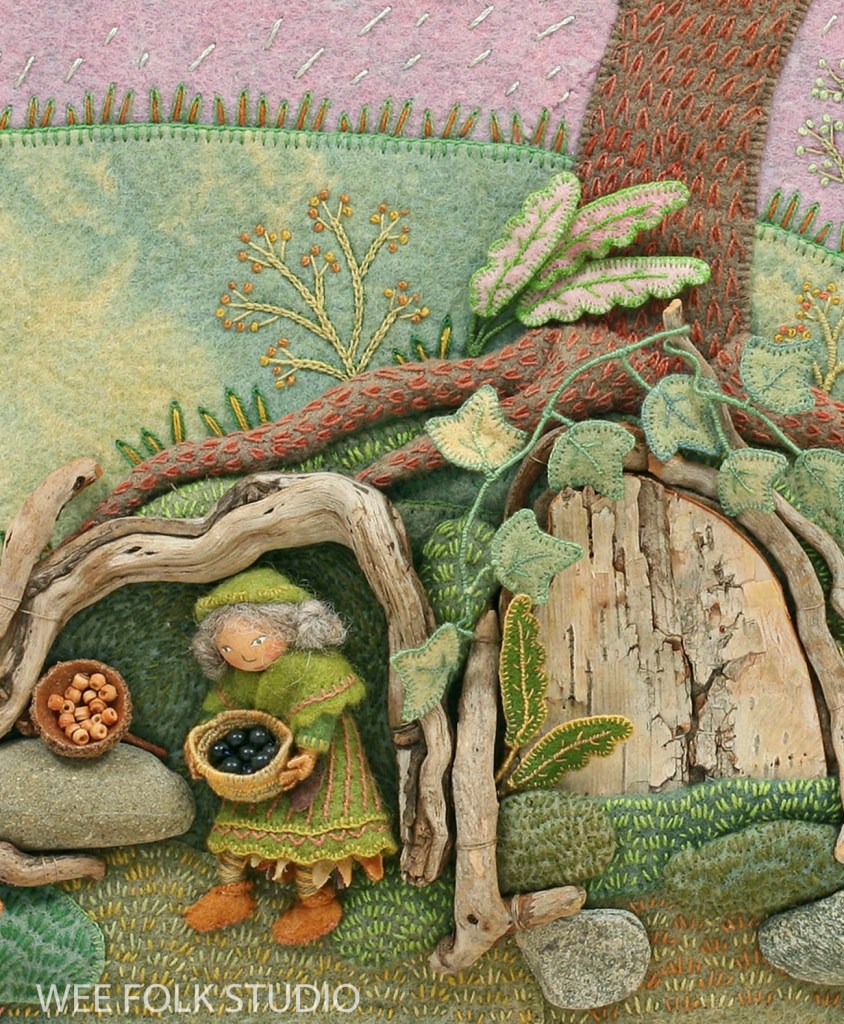
WEE FOLK In the beginning, I’m never sure who is going to appear in these landscapes. The wee folk just show up one by one and claim their spots. After spending many months building places for them to live, it feels satisfying to finally meet the little characters and see them settled into their new homes. You can meet them yourself in the following video.
The figures are similar to the acorn-capped dolls described in my how-to book, Felt Wee Folk, only smaller in scale (1.5″ – 2″ tall).
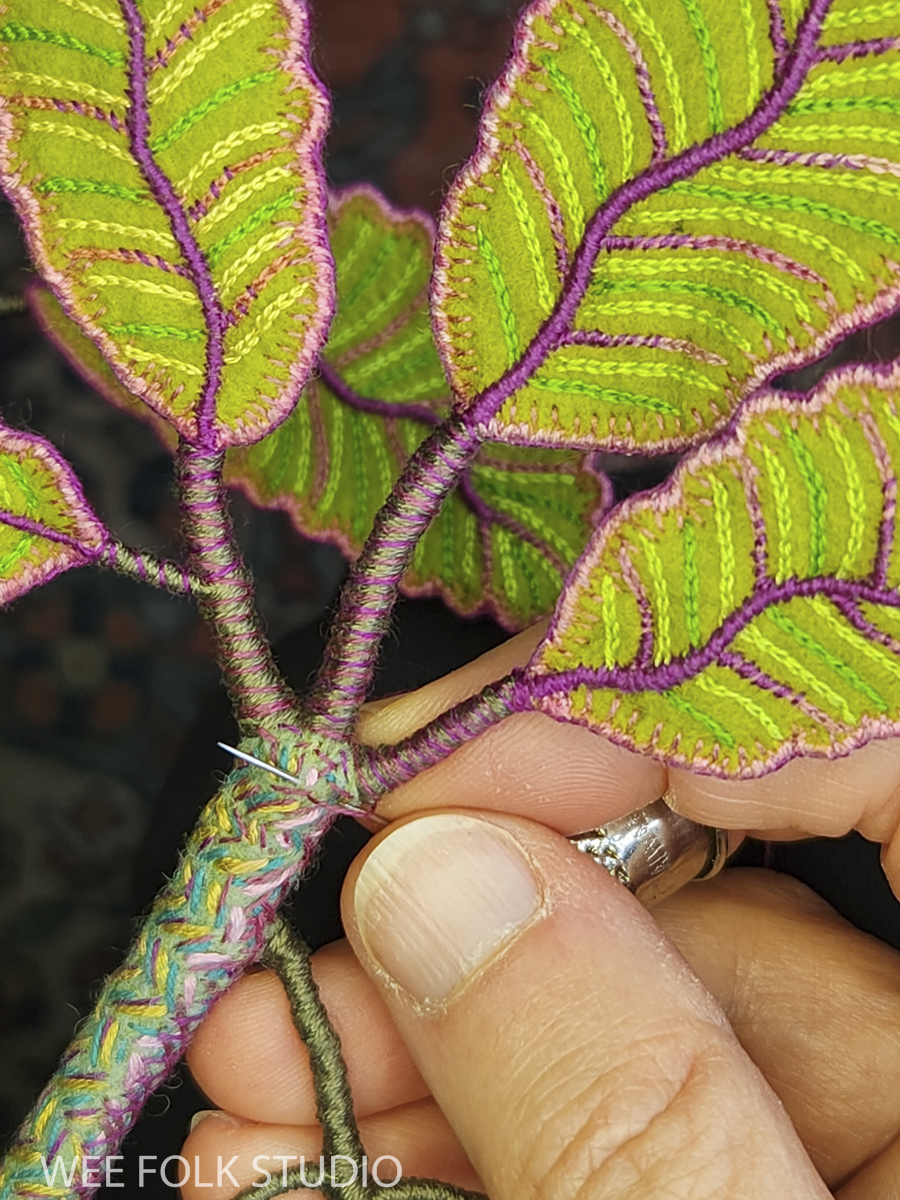
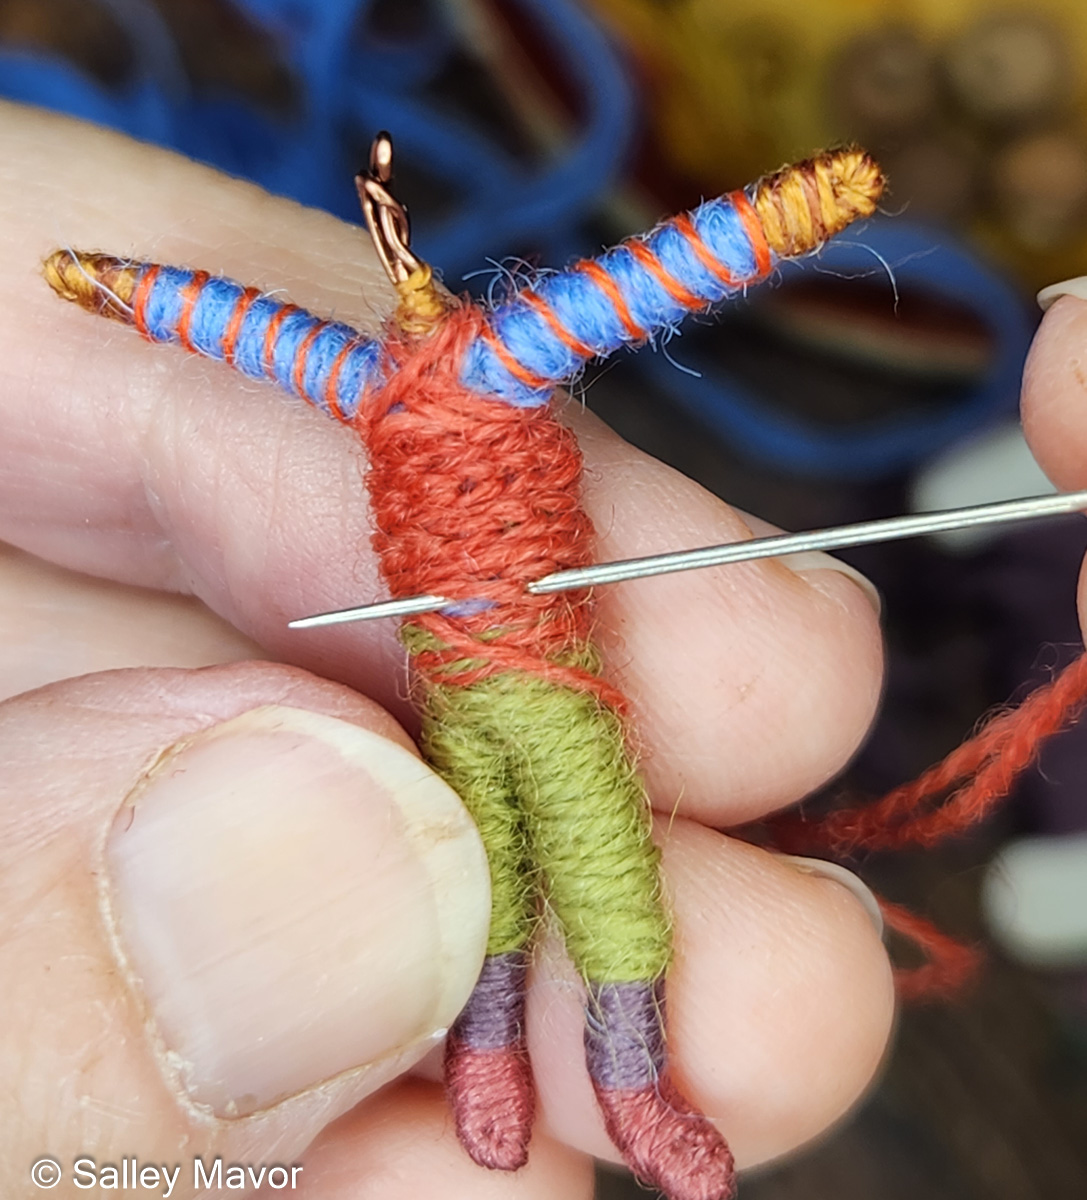
Rather than bending pipe cleaners, I used 24-gauge jewelry wire to form the armatures. With this choice, you have to wind a lot of floss around the wire to beef up the limbs so that they look proportional and not too spindly. One advantage of this method is that it eliminates the hassle of dealing with pipe cleaner fuzz, resulting in smoother and more refined doll bodies.
In the figure below, I used both cotton embroidery floss and tapestry yarn to wrap the wire armature. To give the illusion of a knitted vest, I chain stitched yarn around the torso.
For some of their outfits, I embellished wool felt using cotton embroidery floss.
The following 3 videos demonstrate how I made different figures from start to finish, from winding armatures with thread, to stitching clothing, to fashioning hair.
STITCH MINUTE VIDEOS If you’ve followed me on Instagram and Facebook recently, you’ve probably seen some of my Stitch Minute videos. These short clips offer a glimpse into different aspects of my creative process, like peeking over my shoulder as I work.
While I enjoy sharing these visual moments, I kindly ask that you refrain from seeking in-depth explanations of my techniques beyond what is already shown on my blog or described in Felt Wee Folk. Much of my creative work is guided by intuition, and I feel that examining my process too closely might take away from the magic that makes it special. For those interested in understanding my philosophy on teaching and sharing knowledge, I invite you to read my post to teach or not to teach.
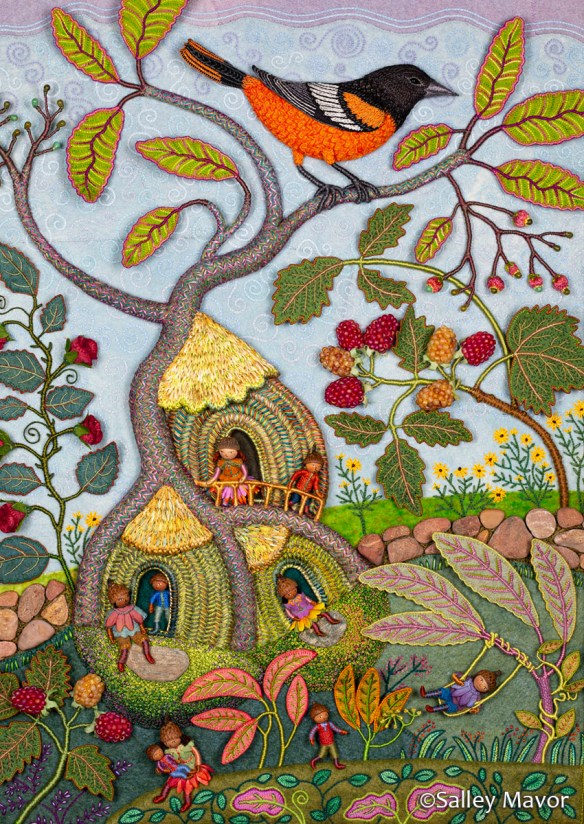
Summertime 2023
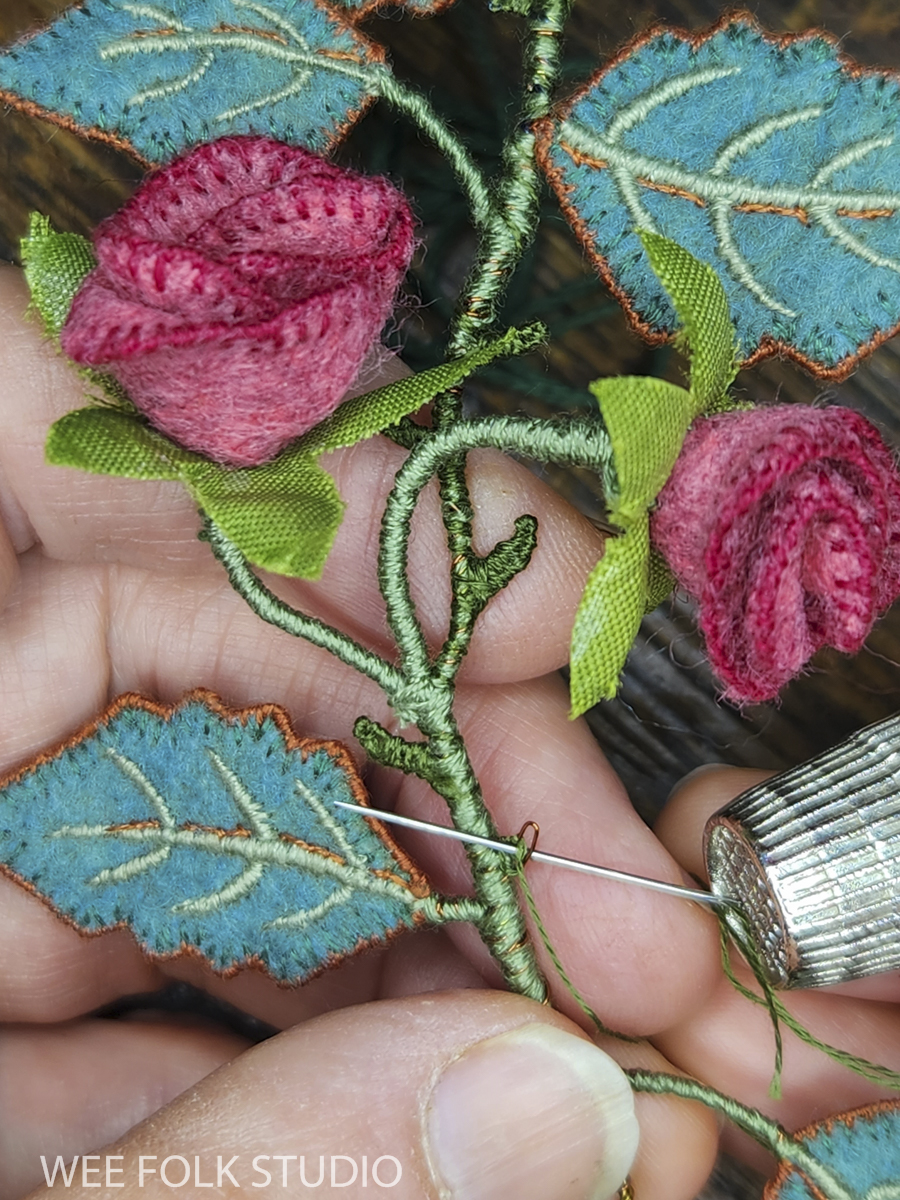
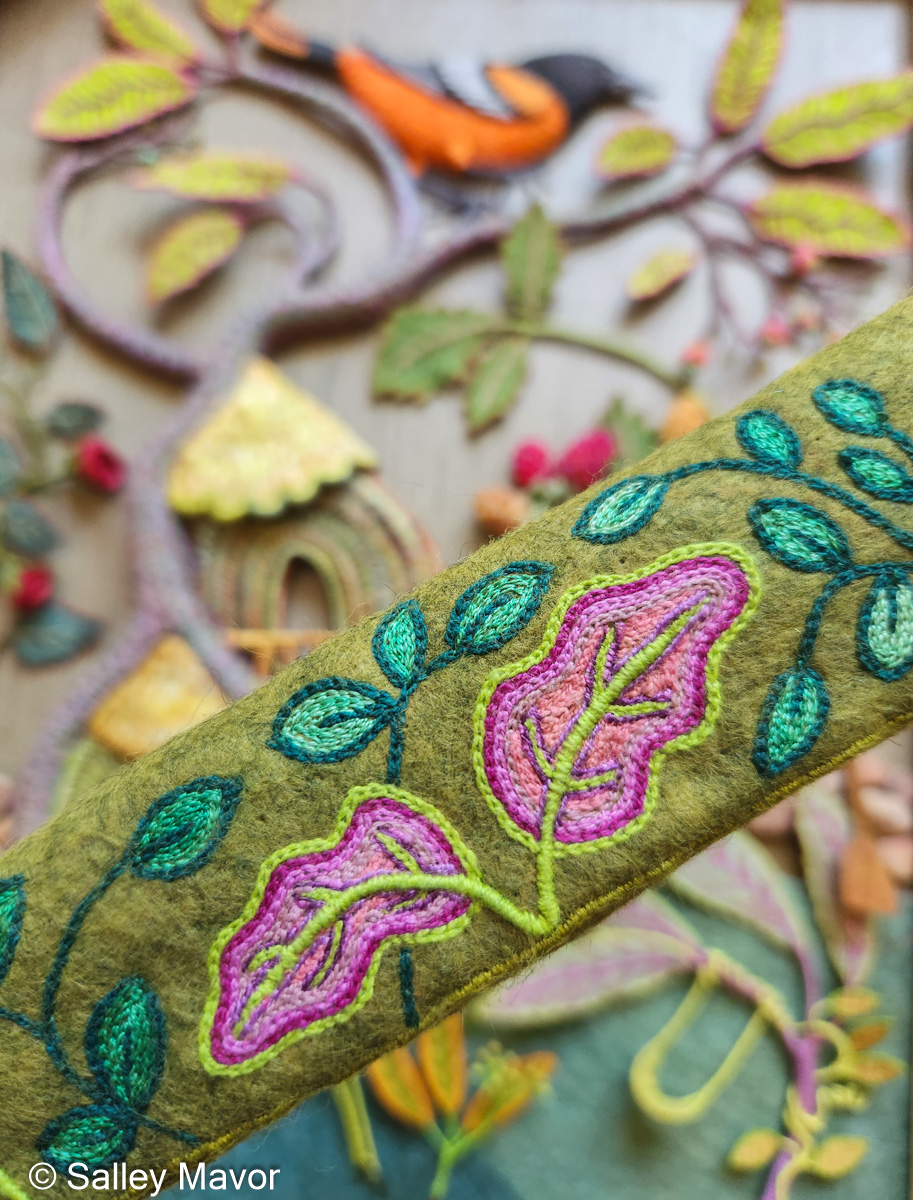
I hope that you’ve enjoyed learning about the making of Summertime. For a more comprehensive understanding of my process, I encourage you to explore previous posts in this series: Overview of the piece, Part 1 – Tree Trunks, Part 2– Tree Houses, Part 3 – leaves, stems and branches, Part 4– Baltimore Oriole (body), Part 5– Baltimore Oriole (head and feet), Part 6 – rose vine, Part 7– raspberry plants, Part 8– stitching flora, and Part 9– moss, sky and stone wall.
To keep up with new posts, please subscribe to this blog. Your contact info will not be sold or shared. If you’d like to see more frequent photos tracking the projects in my studio, please follow me on Facebook, Instagram and BlueSky.
HAPPY NEW YEAR! As time ushers us into 2026, I want to express my appreciation to all of you who follow this blog and take an interest in my work and life as an artist. As we enter its 17th year, I marvel at the constant influx of new subscribers every day! I hope that my words and photos inspire you to create your own artistic life. The blog format may have faded in popularity compared to other social media platforms, but an in-depth and thoughtful approach is more in keeping with my style of working. This is where you’re more likely to find out about what I do and why I do it, not just the little snippets that I post on Instagram and Facebook. So, now that you’re here, please come along as I review the past 12 months and share posts (linked in blue letters) published in 2025.
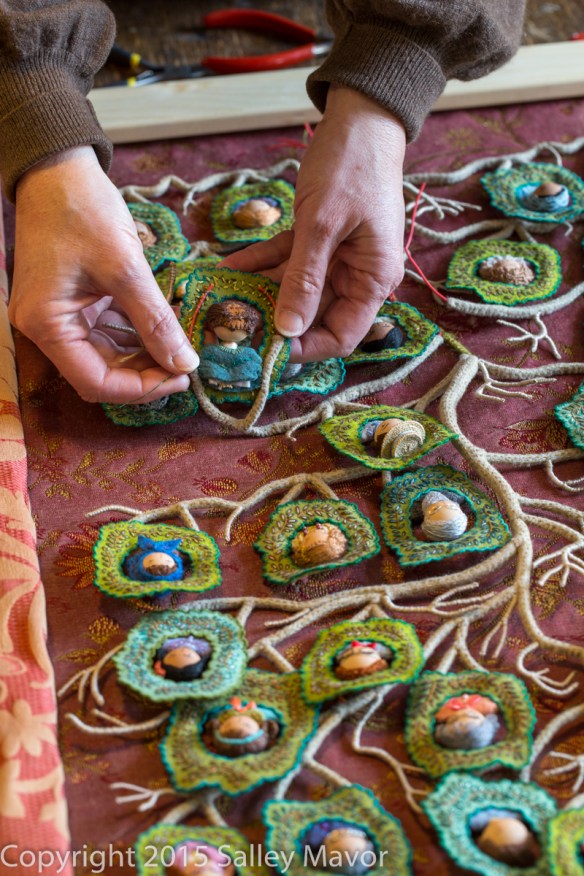
My son Ian holding up one of the felt filigree sculptures.
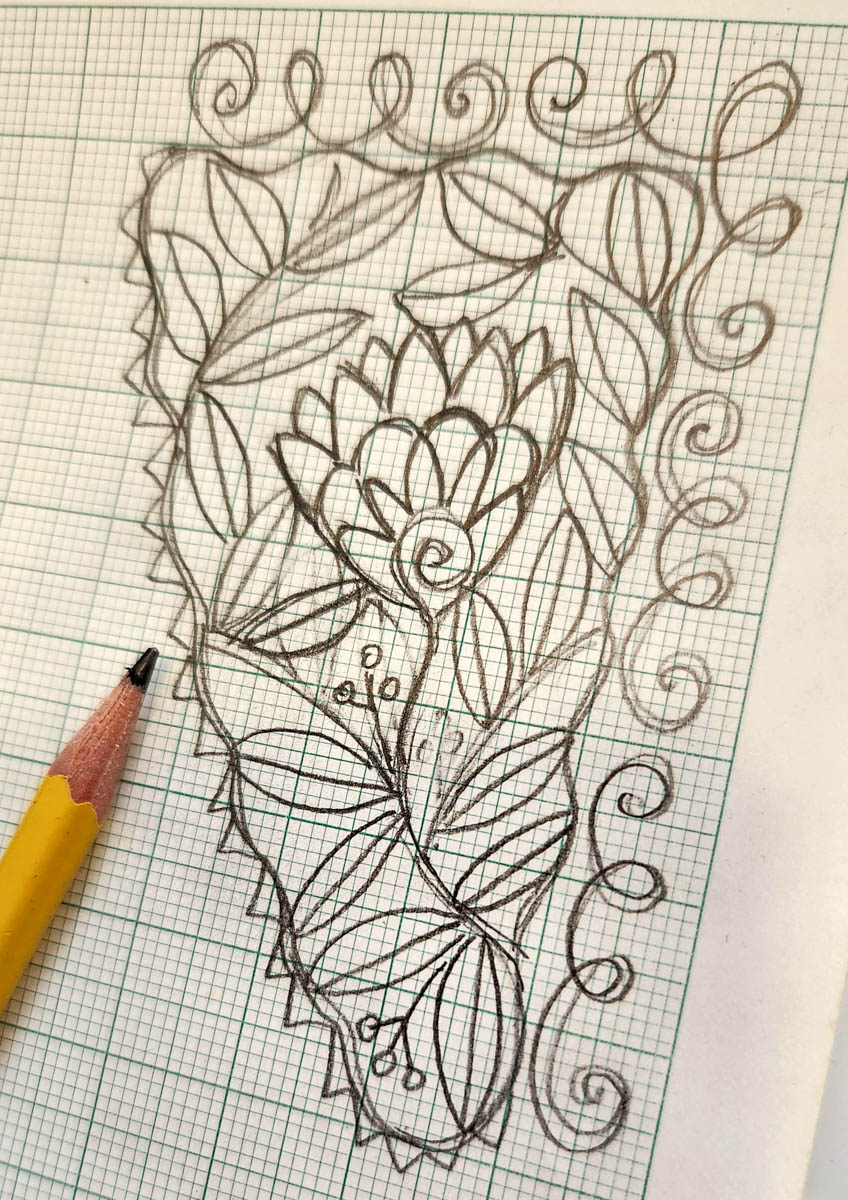
FELT FILIGREE SCULPTURES I shared photos, videos, and commentary about my new “Felt Filigree” sculptures. Felt-covered wire has been a mainstay in my pieces for several years, but this is the first time I’ve created works that are entirely made with covered wire. Post link: Felt Filigree Sculptures
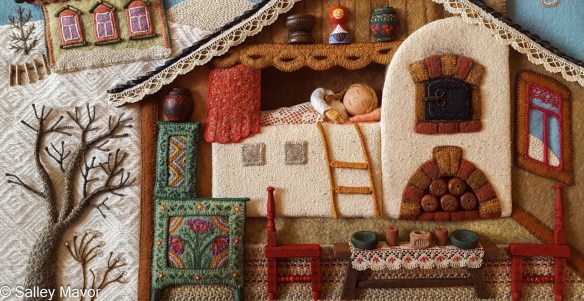
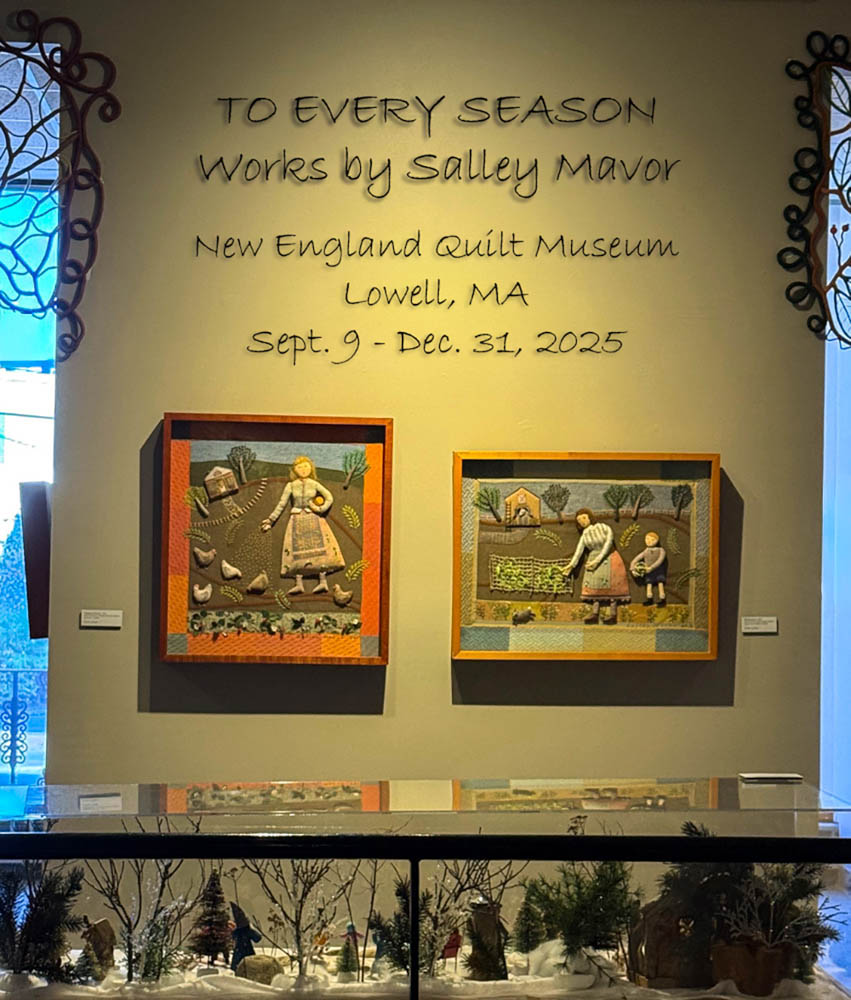
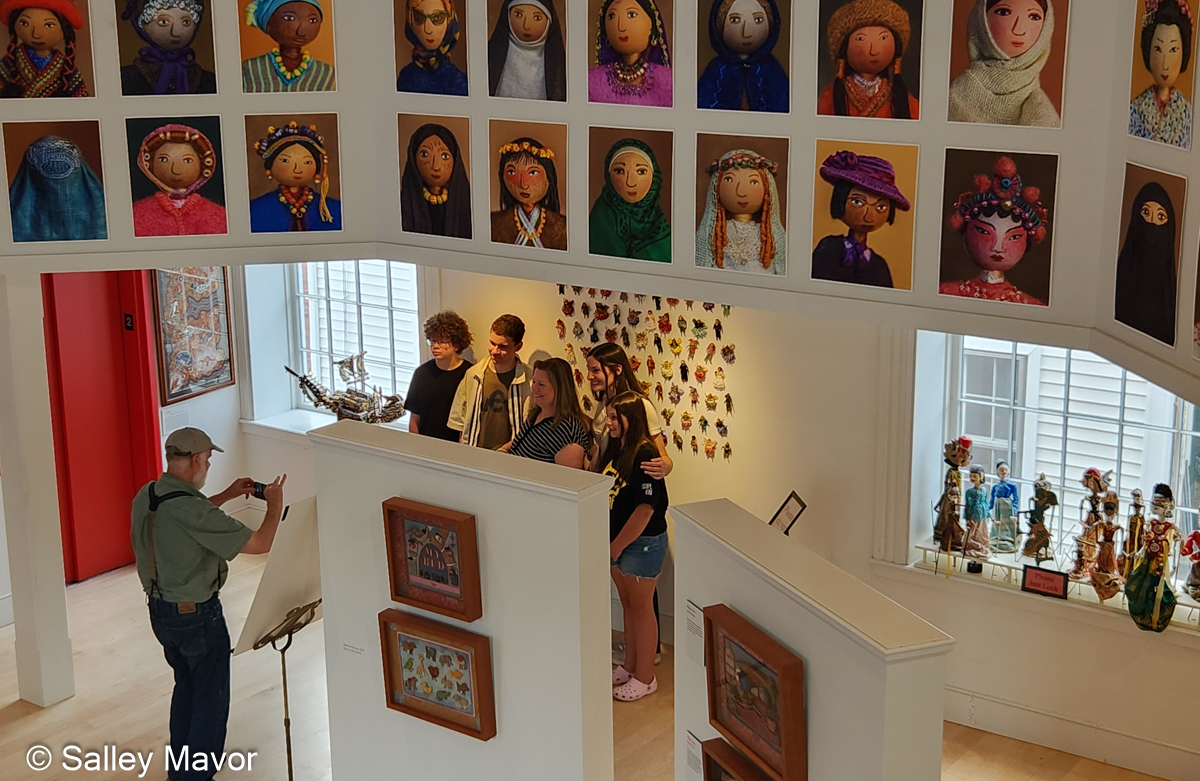
TO EVERY SEASON at the New England Quilt Museum It was an honor to exhibit my work at the New England Quilt Museum in Lowell, MA this past fall. A big thank you to all of you who made your way to Lowell to see my work in person! Visitors saw a wide selection of framed bas-relief embroidered scenes spanning 40 years of my career, spread out in multiple galleries. Soon, I will be returning pieces that were loaned for the exhibition.
There were also four glass cases filled with wee folk characters set up in miniature seasonal environments made with houses, furniture, trees, and foliage saved from other projects. Post links: To Every Season at the new England Quilt Museum Making a Scene
Wee Folk Winter set-up
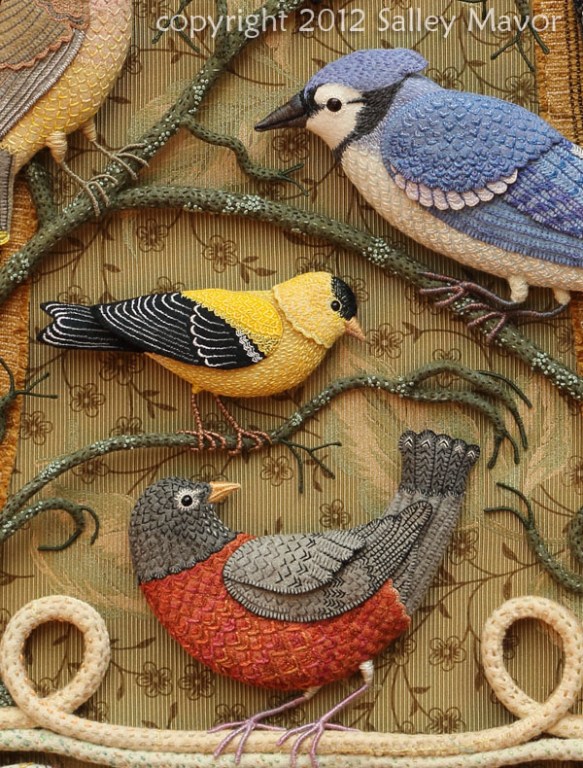
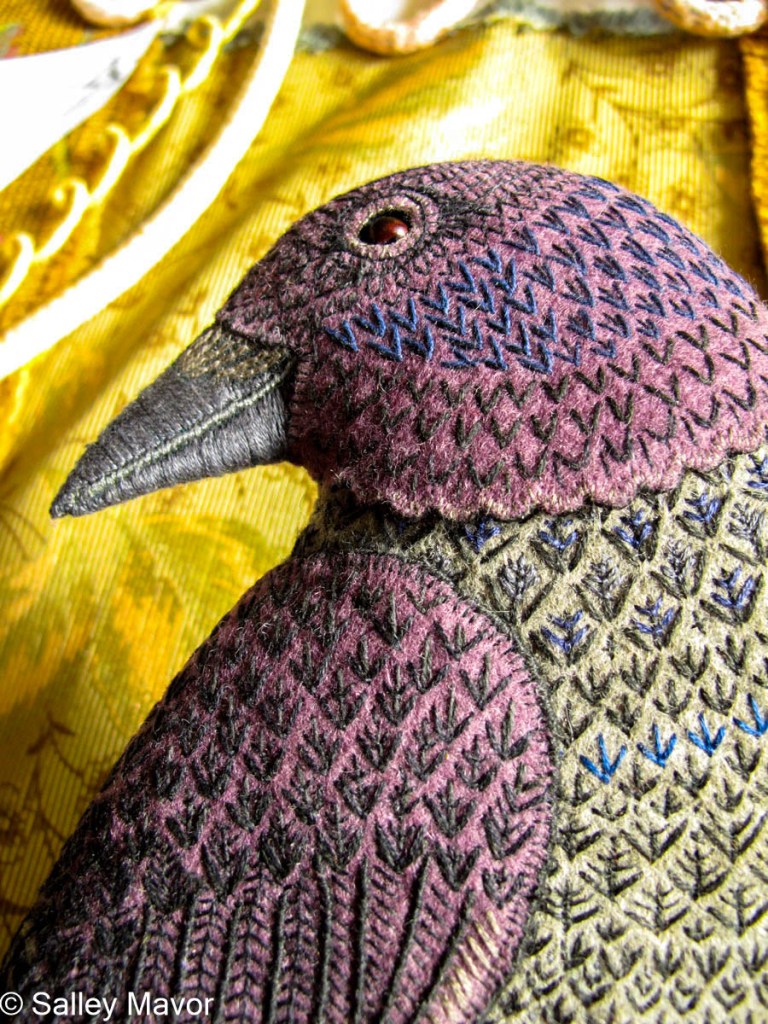
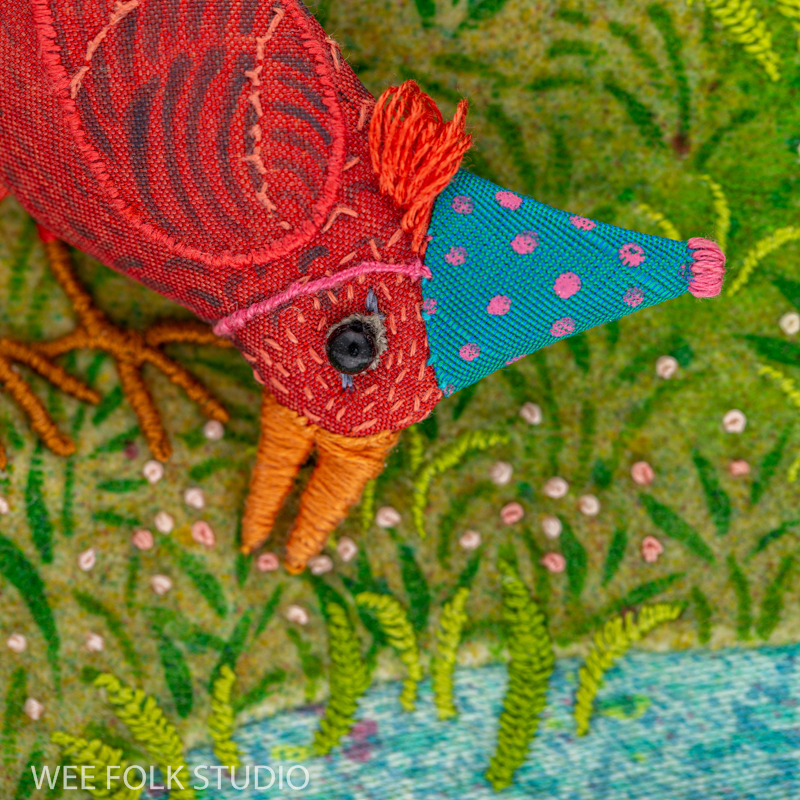
BIRDS OF BEEBE WOODS revisited I shared thoughts about what inspired this collection of hand stitched birds and gave a behind the scenes peek at how I made it 13 years ago. Post link: Birds of Beebe Woods revisited
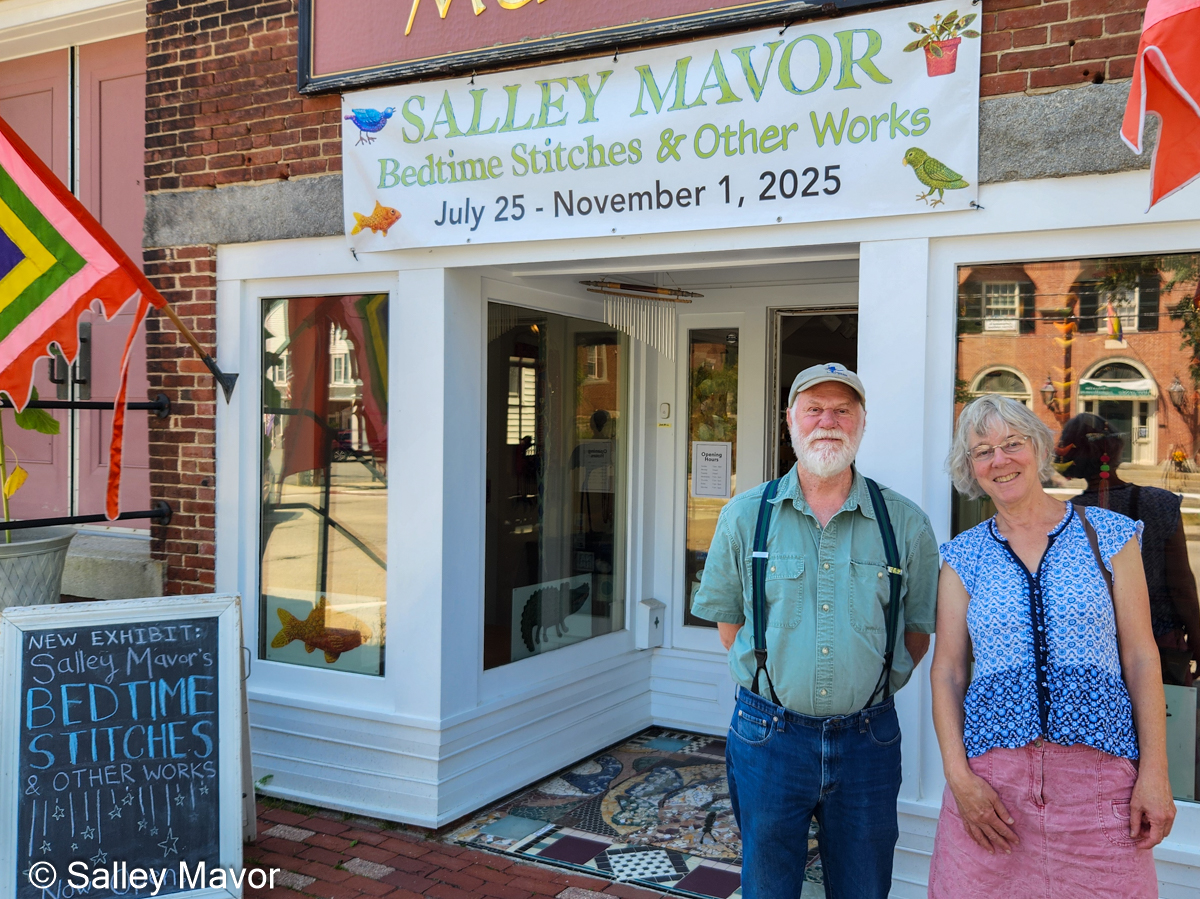
Bedtime Stitches at the Mariposa Museum in Oak Bluffs, Martha’s Vineyard, MA
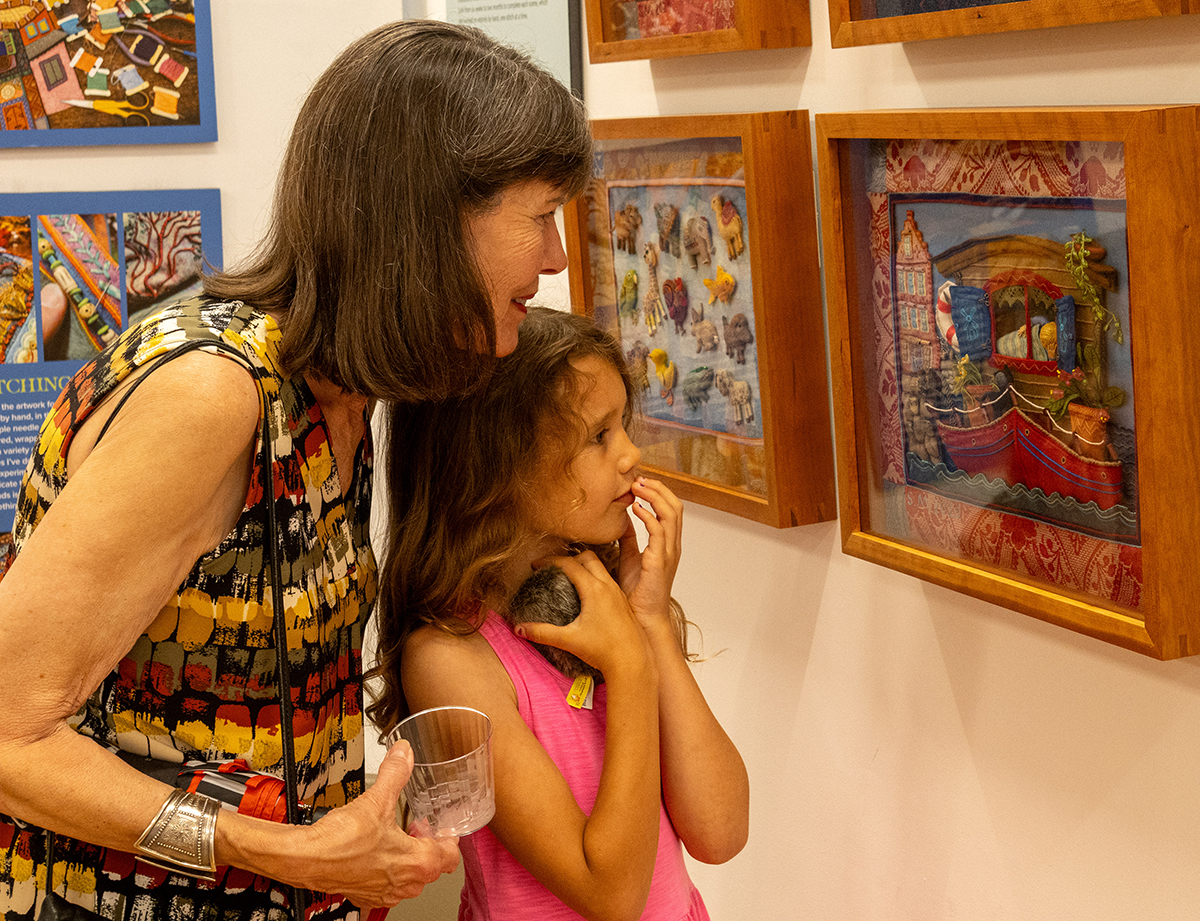
Exhibits at Mariposa Museum It’s been such a pleasure collaborating with the Mariposa Museum & World Culture Center this past year. They hosted 2 exhibitions of my work in both of their locations, on Martha’s Vineyard, MA, and in Peterborough, NH. Bedtime Stitches & Other Works has been extended through Jan. 4, 2026 in Peterborough.
Bedtime Stitches & Other Works at the Mariposa Museum in Peterborough, NH
Bedtime Stitches & Other Works at the Mariposa Museum in Peterborough, NH
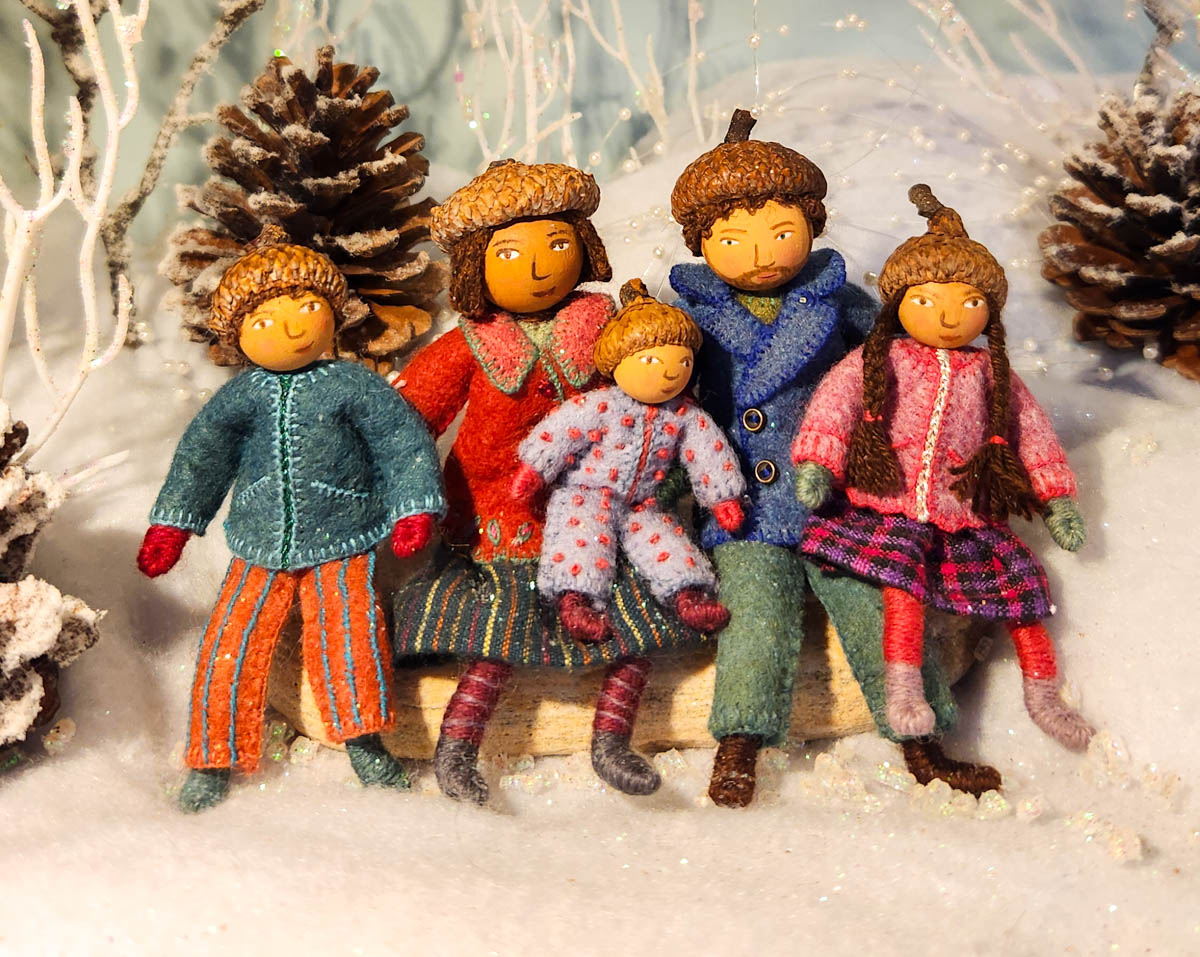
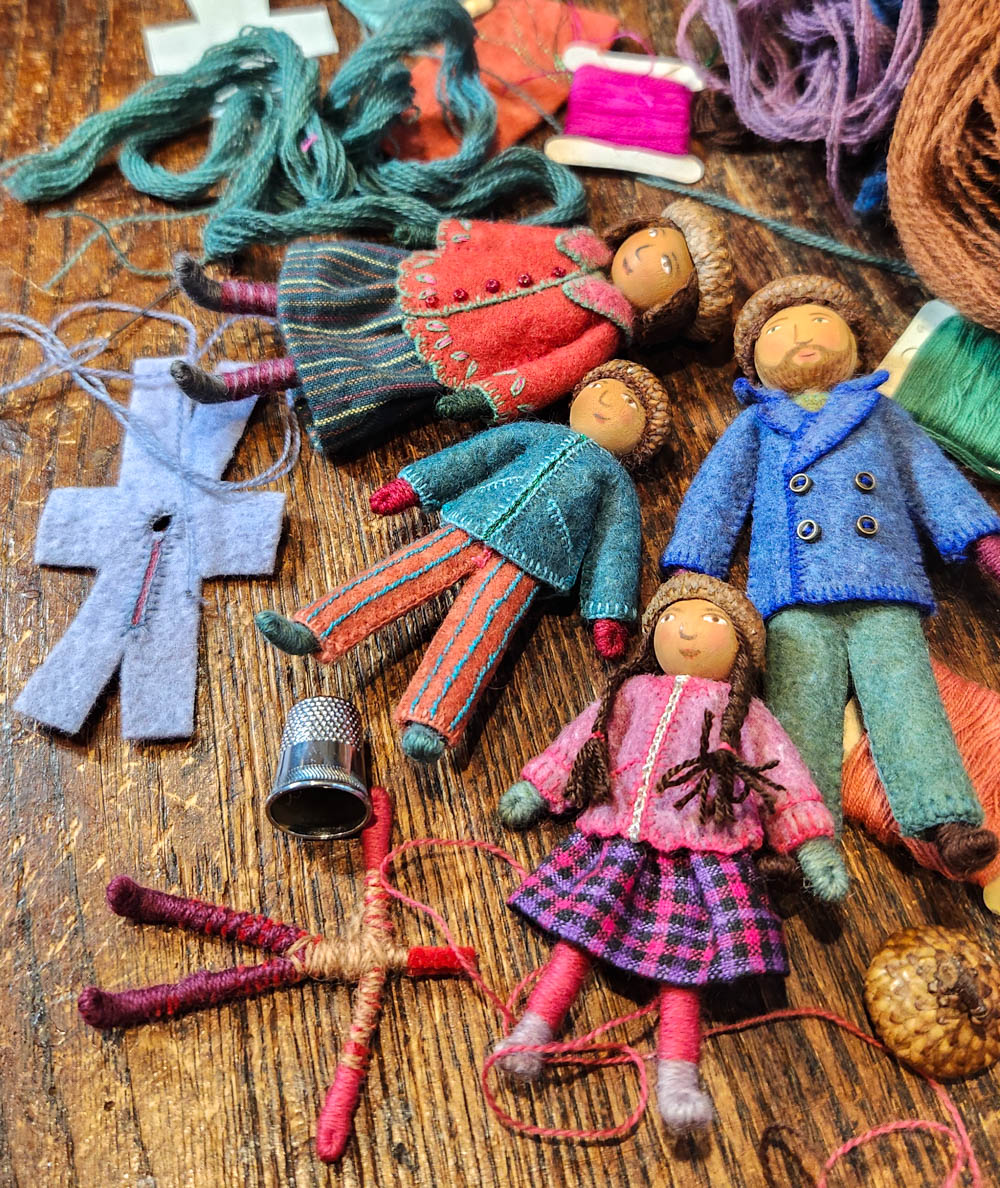
Wee Folk Family RAFFLE I was happy to make a family of 5 dolls for a special fundraiser to benefit the Waldorf School of Cape Cod (my children’s alma mater). A big thank you to all who bought raffle tickets! You helped raise $4150 for the school’s newly renovated kindergarten classroom. That’s a gift that will give for many years to come.
I really enjoyed all aspects of making this little family, from painting their faces, to embellishing their felt outfits, to sewing their wigs. Different parts of the process were documented in photos and videos. Post link: Wee Folk Family RAFFLE
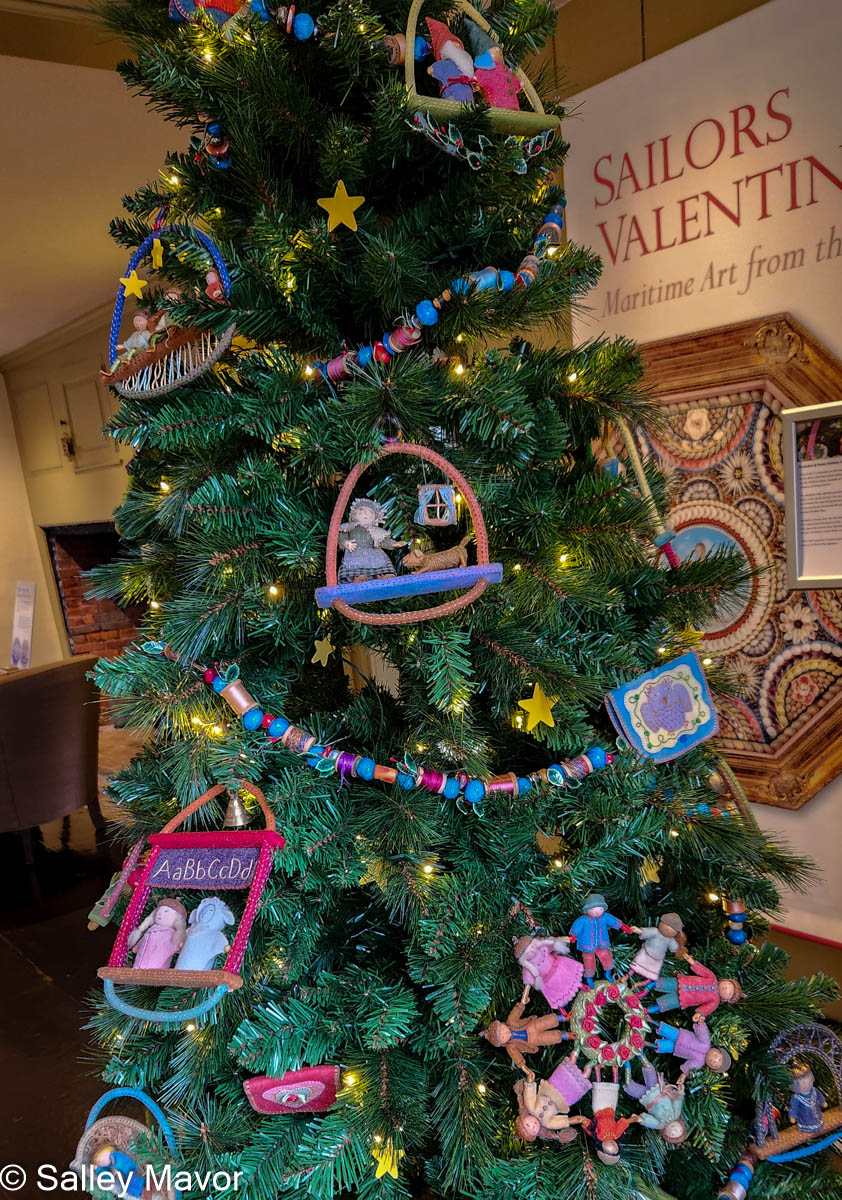
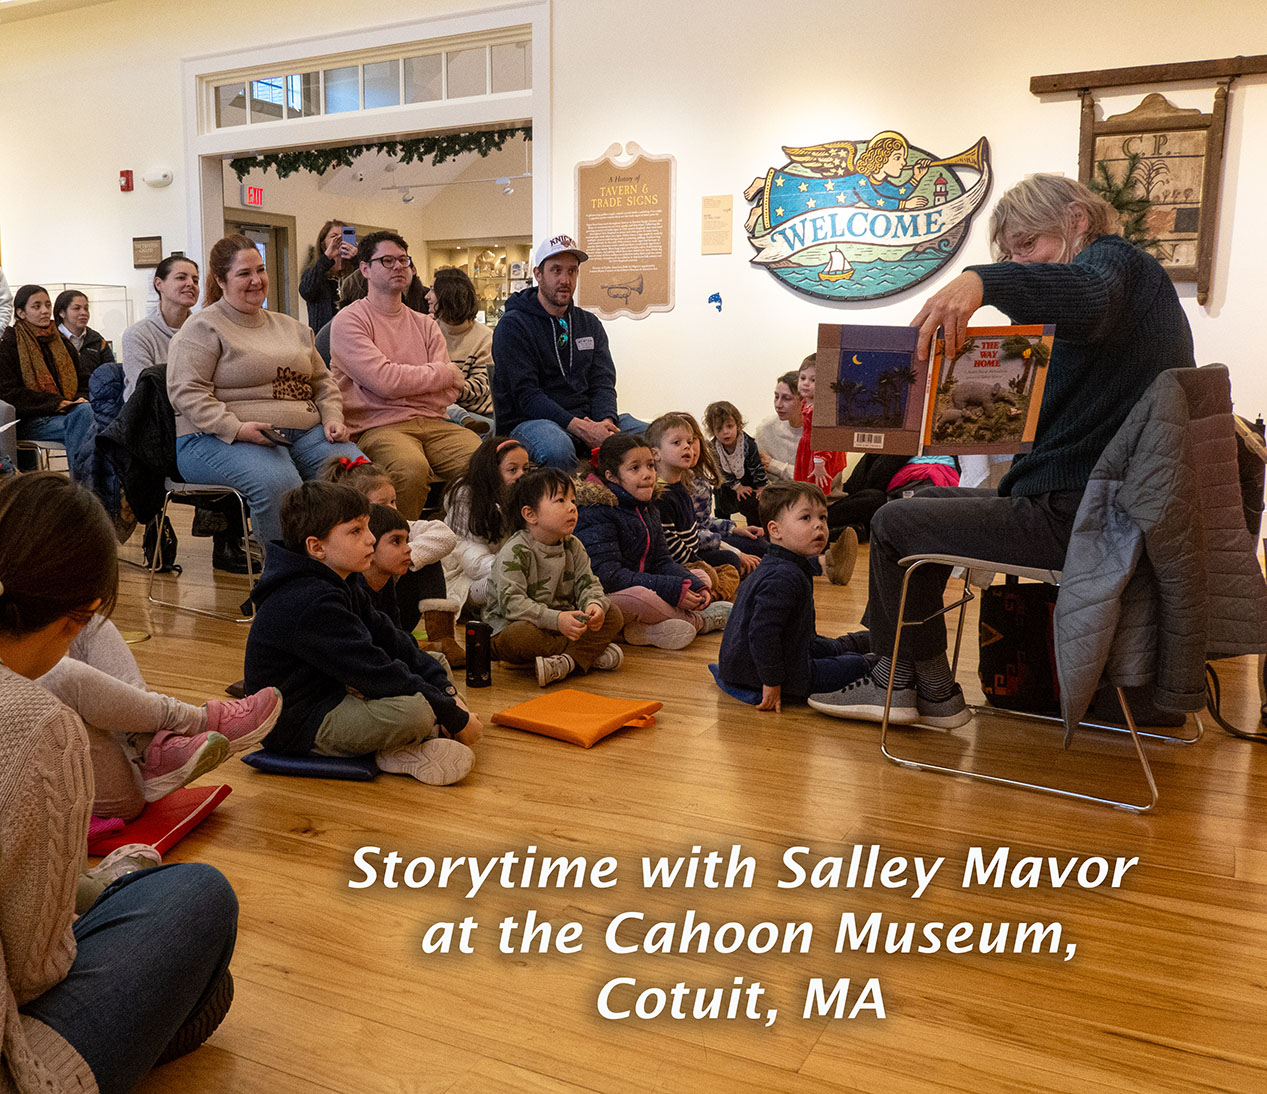
Posies Tree and Storytime at Cahoon Museum My collection of nursery rhyme ornaments were displayed in the Pocketful of Posies Holiday Tree at the Cahoon Museum of American Art in Cotuit, MA. In the post, I explain how the collection of ornaments originated back in 2012.
HAPPY WINTER SOLSTICE! I invited you to watch a one minute video that features a selection of my art that celebrates winter. I also sing the first part of the carol, “In the Bleak Mid-winter.” Post link: Happy Winter Solstice!
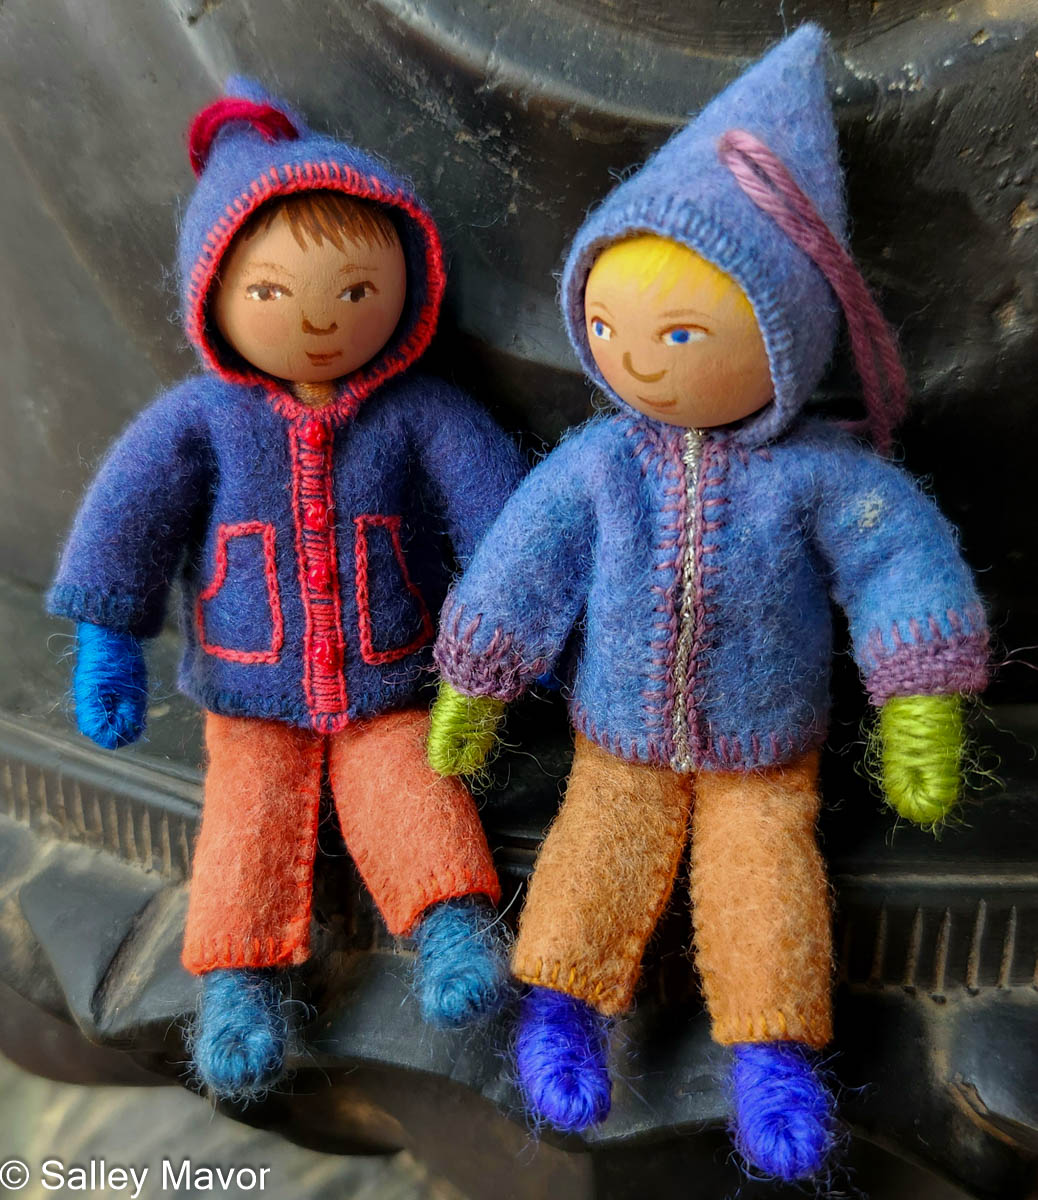
Elias & Eddie 2025 ornaments The yearly tradition of making personalized ornaments of my grandchildren to give to their parents continued. I shared photos, videos and commentary about making wee folk depictions of Elias and Eddie in their winter outfits. Post link: Elias and Eddie 2025 ornaments
Looking ahead to 2026 I’ll soon be in winter hibernation mode. It’s that special time when you can become immersed in projects without the distraction of warm weather! My goal this year is to resist the temptation to push myself to accomplish so much professionally. Don’t worry, I’m not disappearing — I’ll keep sharing glimpses of my process and posting stories on this blog for a while yet. Creating art will always be my source of true contentment, but I also want to savor these moments with my family, especially when my grandchildren are little. The writer, Anne Lamott recently spoke about this subject in a way that felt real to me. We are the same age (70) and she said, “There’s a huge change as you get older. The striving quiets down and the longing for being instead of doing grows stronger.” Wishing you a year of good health, happiness, and unforgettable moments.
If you want to receive email notices when I publish new posts, please subscribe to this blog using the form below.