2023 in review

Here we are again, at the dawn of a new year! As usual, 2023 flew by so fast that it’s hard to comprehend how we could have passed through all four seasons already! For me, it was a year full of blessings and opportunities, both personally and professionally, highlighted by the arrival of a new family member, new artwork, new exhibitions and new products in my shop.

Artwork packed and ready to go to the Southern Vermont Arts Center.

Thank you to all of you who follow this blog and take an interest in my work and life as an artist. As we enter its 15th year, I marvel at the constant influx of new subscribers every day! According to some, the blog format has faded in popularity compared to other fast and flashy social media platforms, but not here. The slow, in-depth, and thoughtful way of writing posts with pictures is more in keeping with my style of working. My Facebook and Instagram pages attract more visitors, but I’m constantly directing people to my blog because this is where you’re more likely to find out about what I do and why I do it, not just a little snippet of the story. So, now that you’re here, please come along as I review the past 12 months and share posts (linked in bold blue letters) published in 2023.

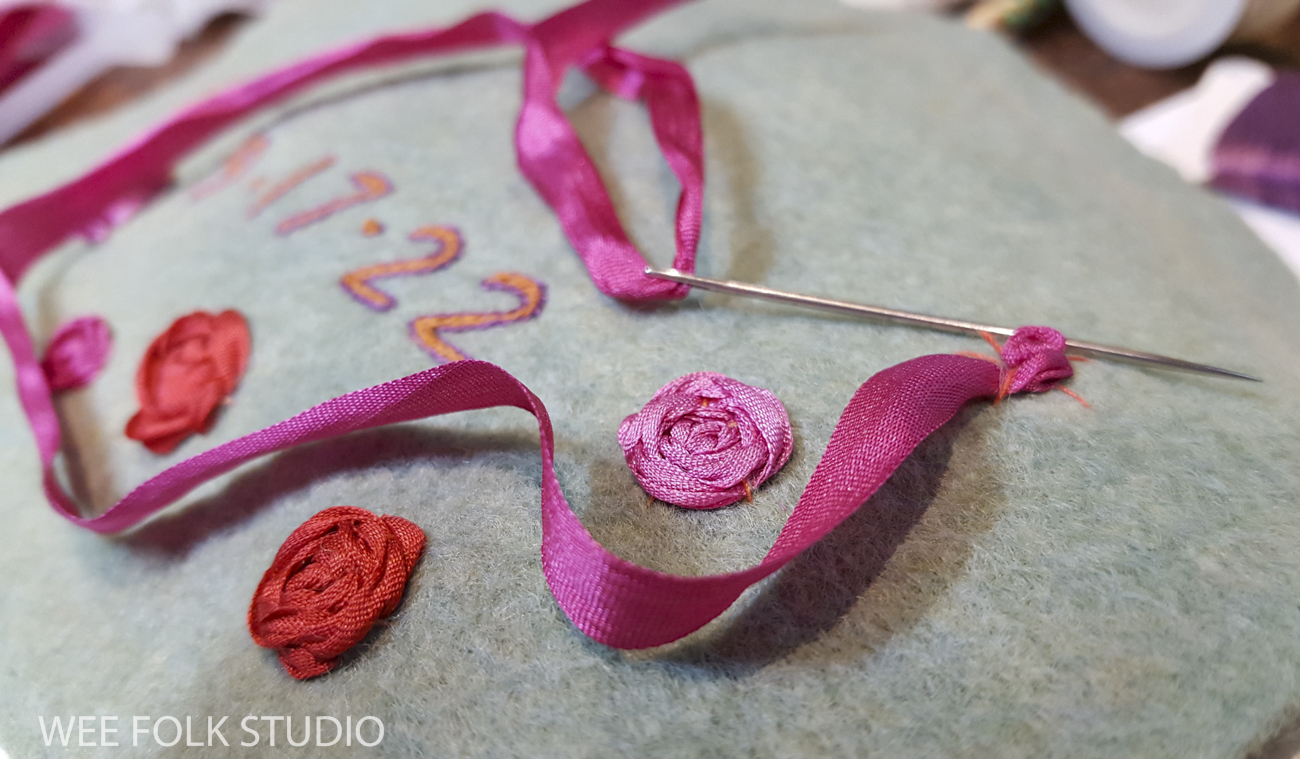
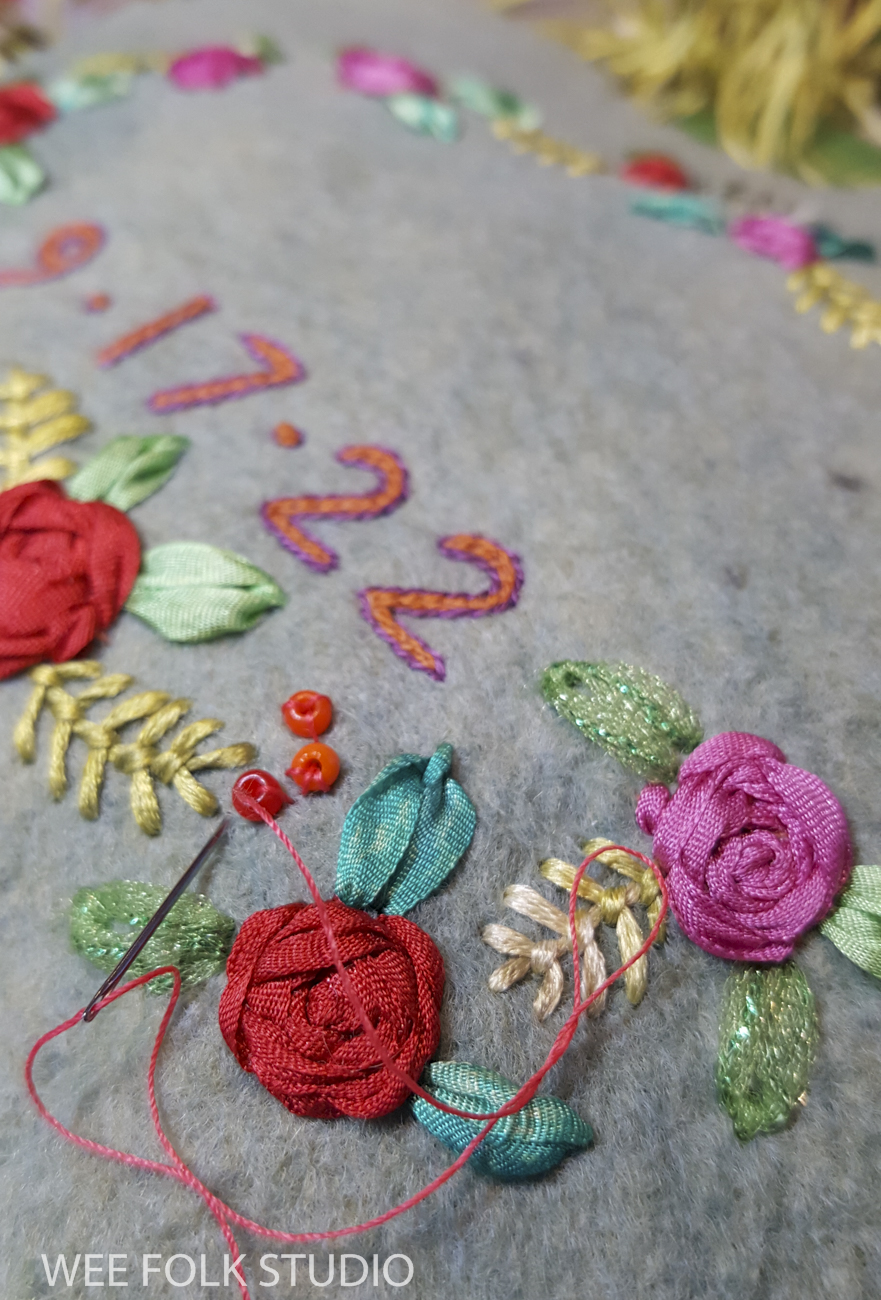
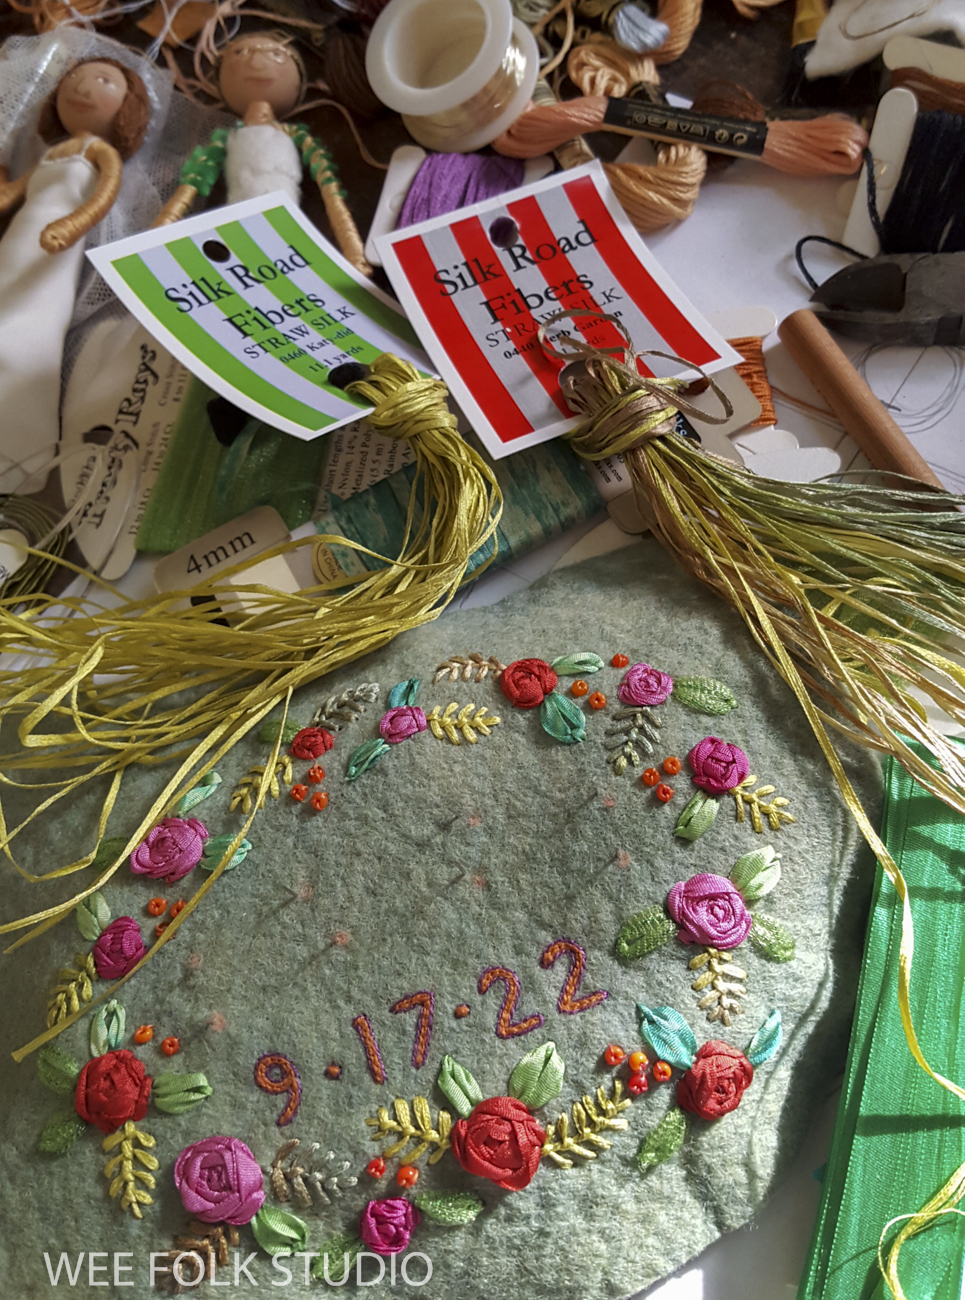
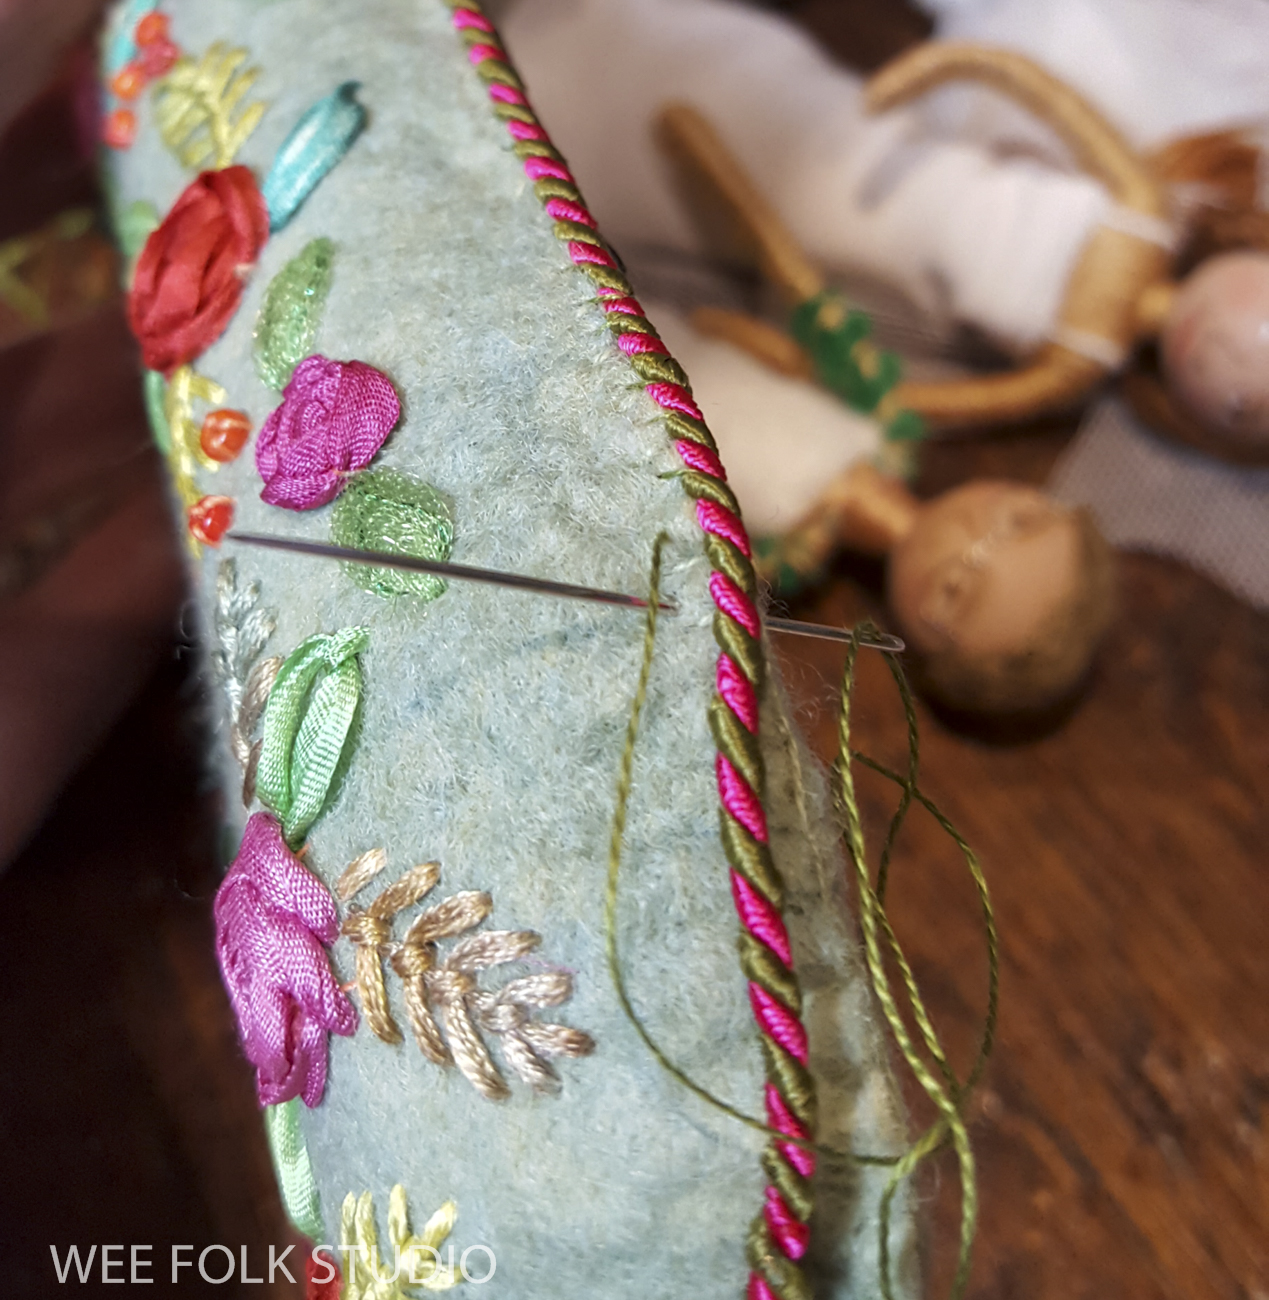
The most significant event in my life this year was the birth of our grandson, Elias in January. During the winter and spring, he and I covered many miles strolling on the bike path behind his house, while I sang every song I could remember. Though, I did manage to get some work done in the studio, including a baby banner with his name, birth date and weight.
Baby Banner for Elias shows how I created the felt banner, including correcting a misspelling.

Baby banner for Elias

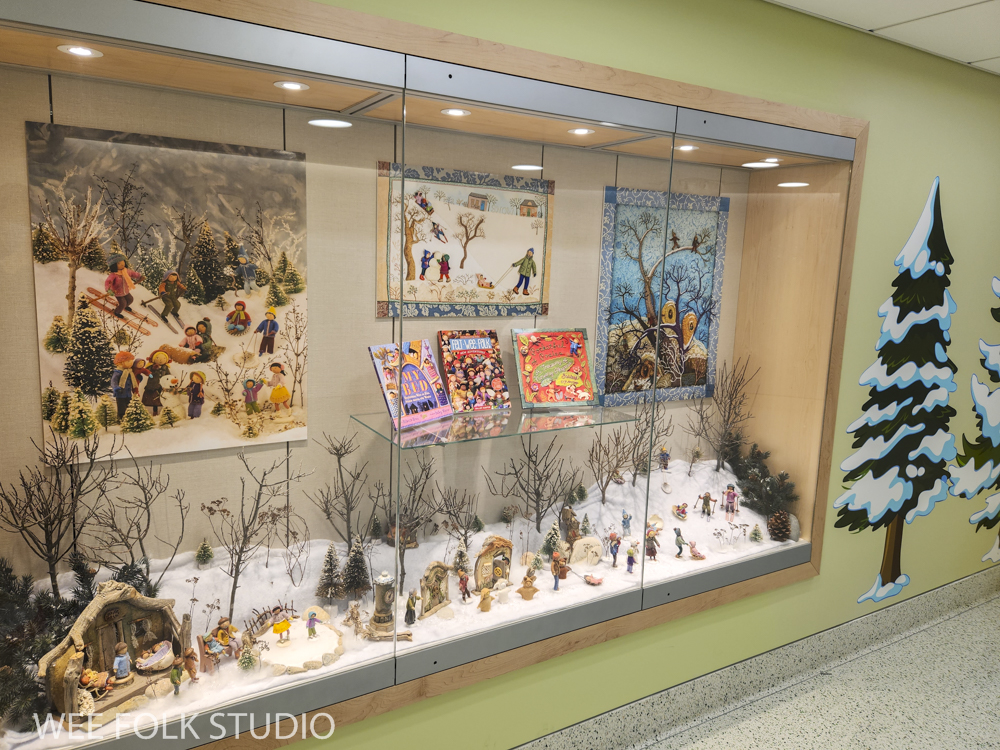
WINTER DISPLAY at BOSTON CHILDREN’S HOSPITAL
I was thrilled to be invited to set up a display at the Boston Children’s Museum last winter. The snow scene was populated with sample dolls from the Winter Play chapter of my how-to book, Felt Wee Folk: New Adventures.
Boston Children’s Hospital Installation shows a practice set-up of the scene in my studio.

Boston Children’s Hospital Installation

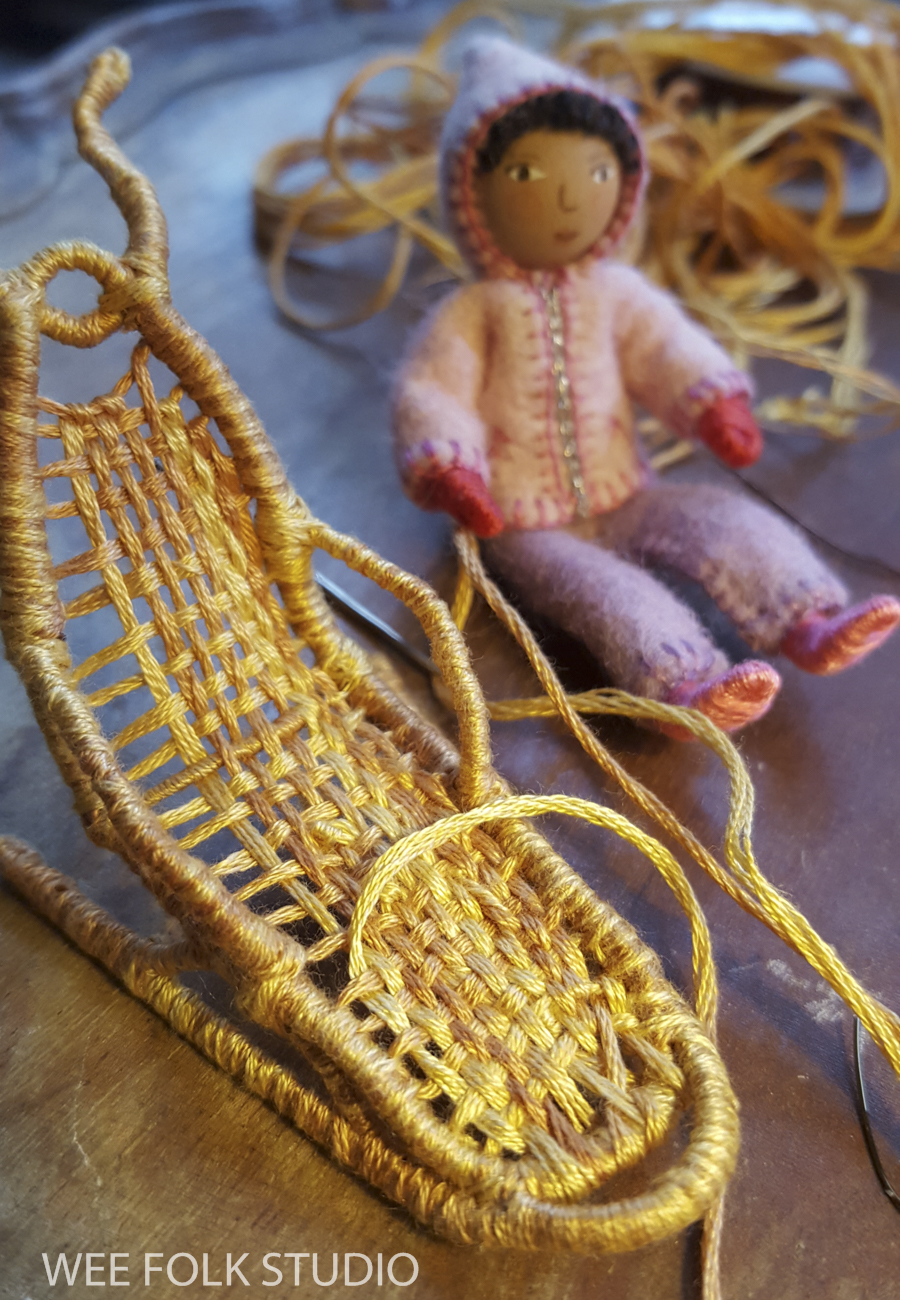
Adaptive Sled for the snow scene gives an inside view in photos and video of how I constructed an adaptive sled for the snow scene.

HARVEST TIME
During 2023, I posted 6 more segments about the fall scene in my series of seasonal landscapes. There’s one more part to go, which will be published in 2024.
Harvest Time – Part 3 (felt leaves)
Harvest Time – Part 4 (embroidered plants)
Harvest Time – Part 5 (toadstool mushroom)
Harvest Time – Part 6 (underground)
Harvest Time – Part 7 (wee folk)
Harvest Time – Part 8 (storage containers)

Harvest Time – Part 5 (toadstool mushroom)
Harvest Time – Part 6 (underground)
Harvest Time – Part 8 (storage containers)

SUMMERTIME
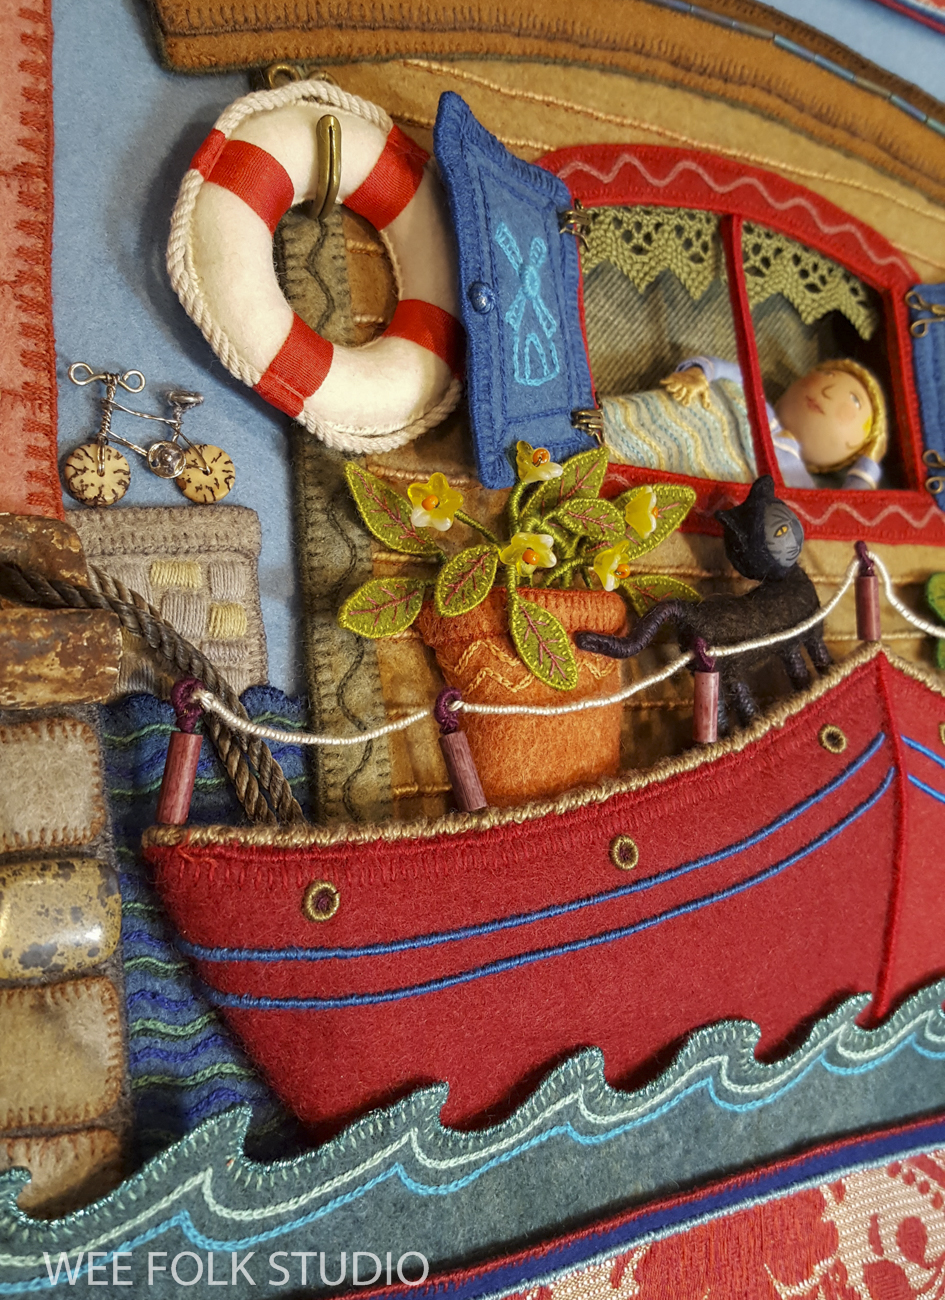
This past year I finally completed Summertime, the fourth piece in my series of seasonal landscapes. In the coming year, I will post photos, videos and commentary about various aspects of the project.

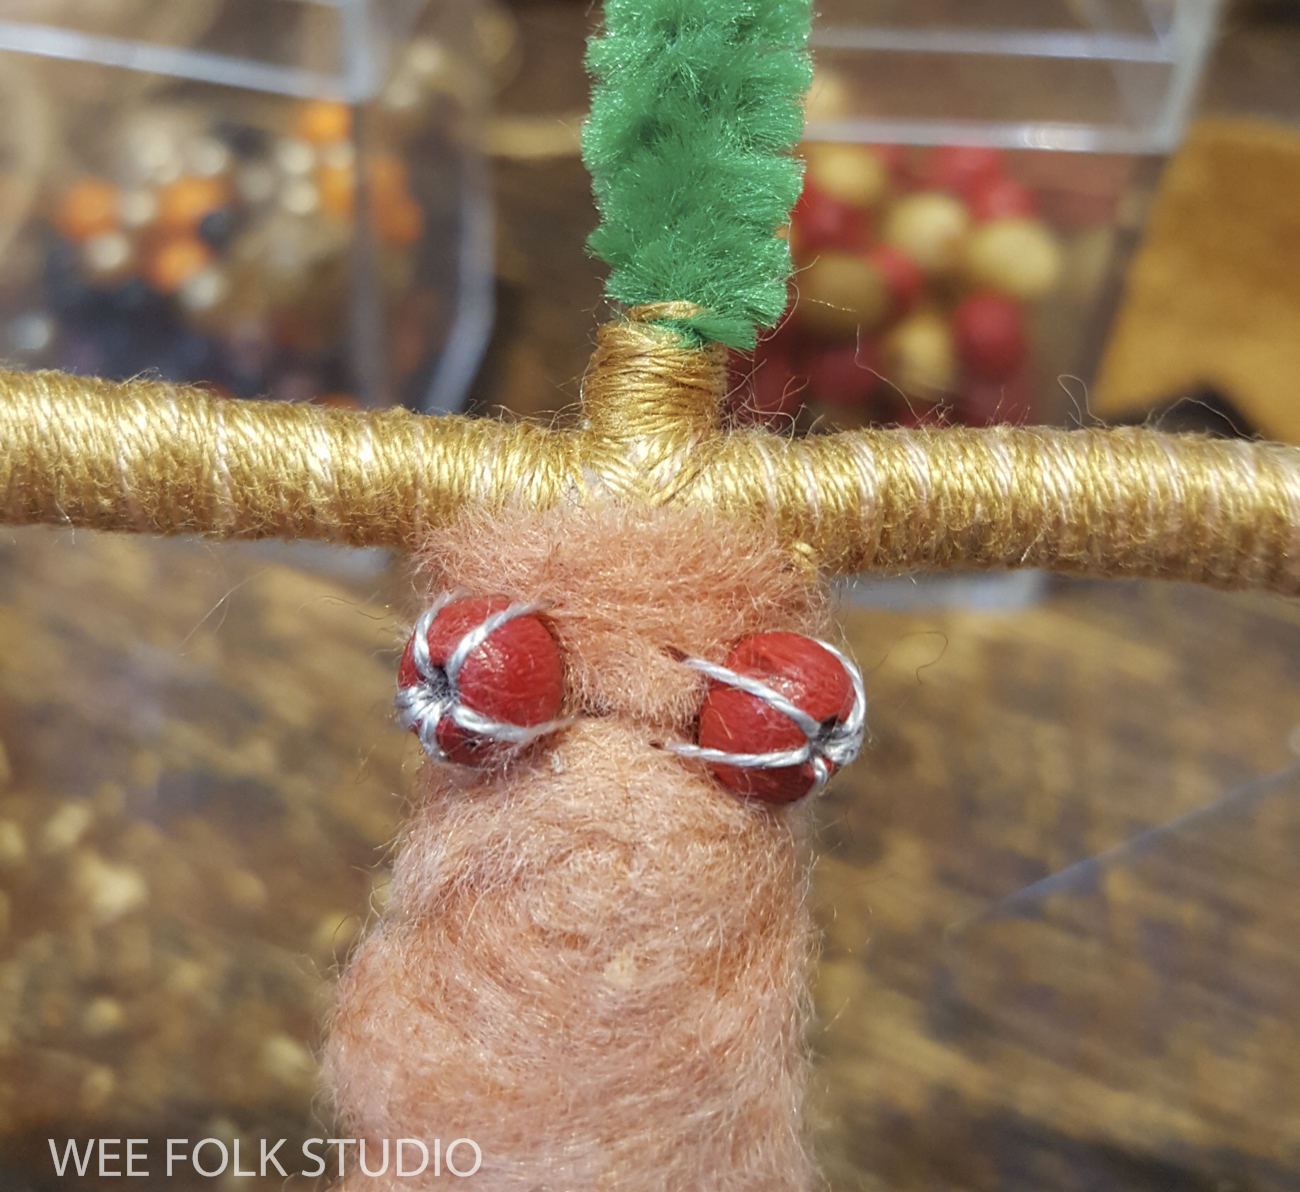
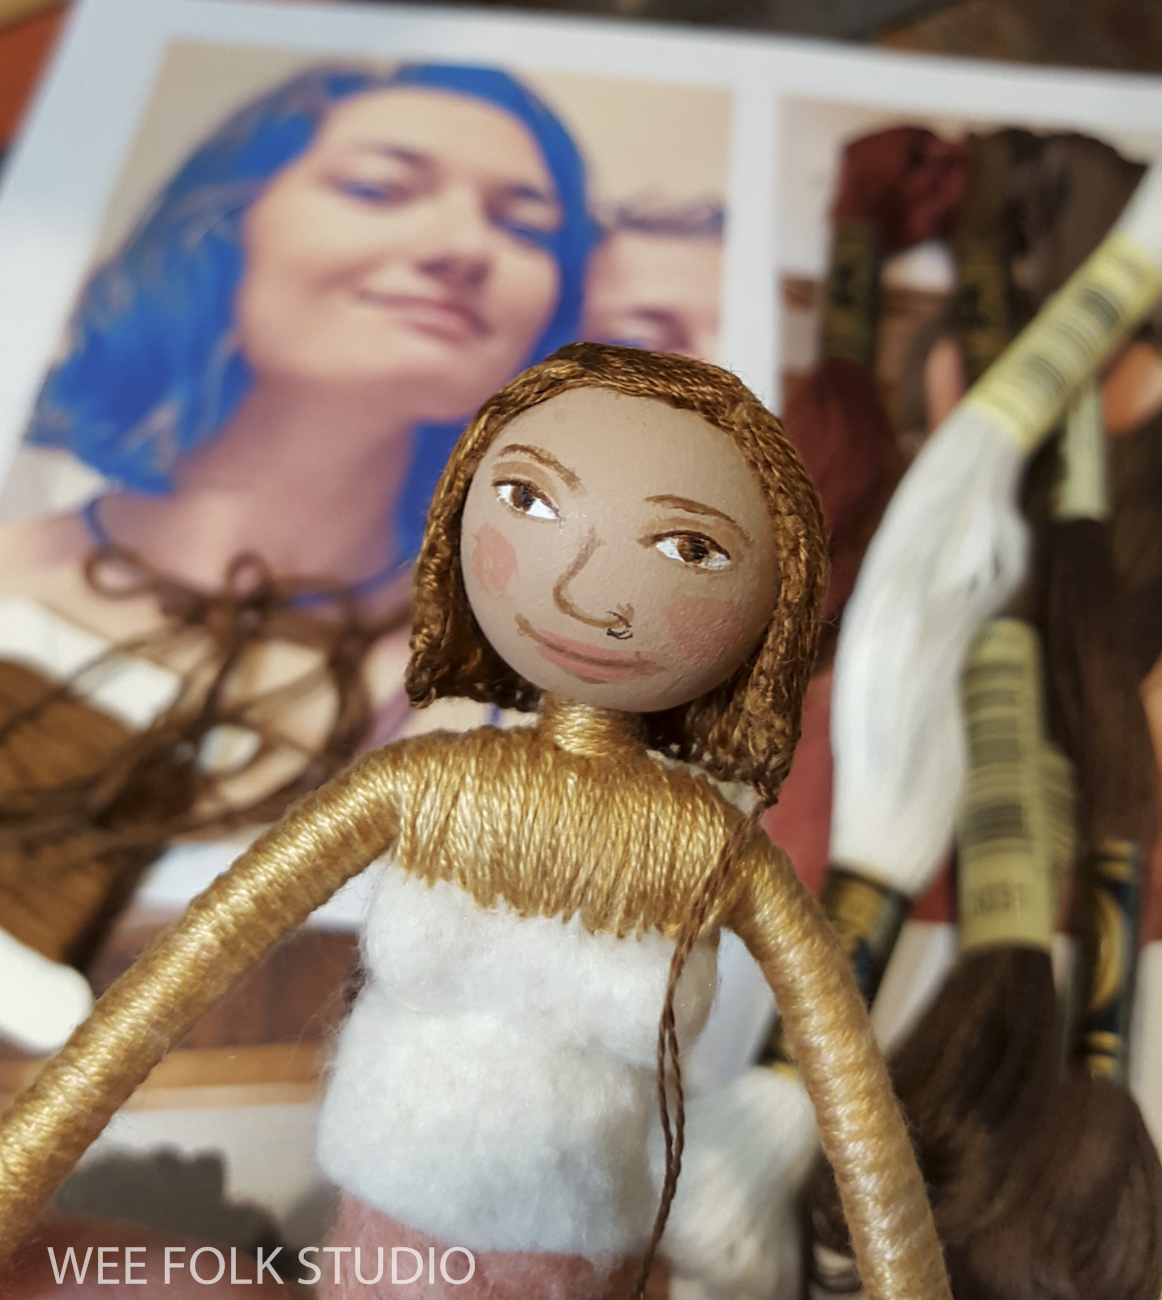
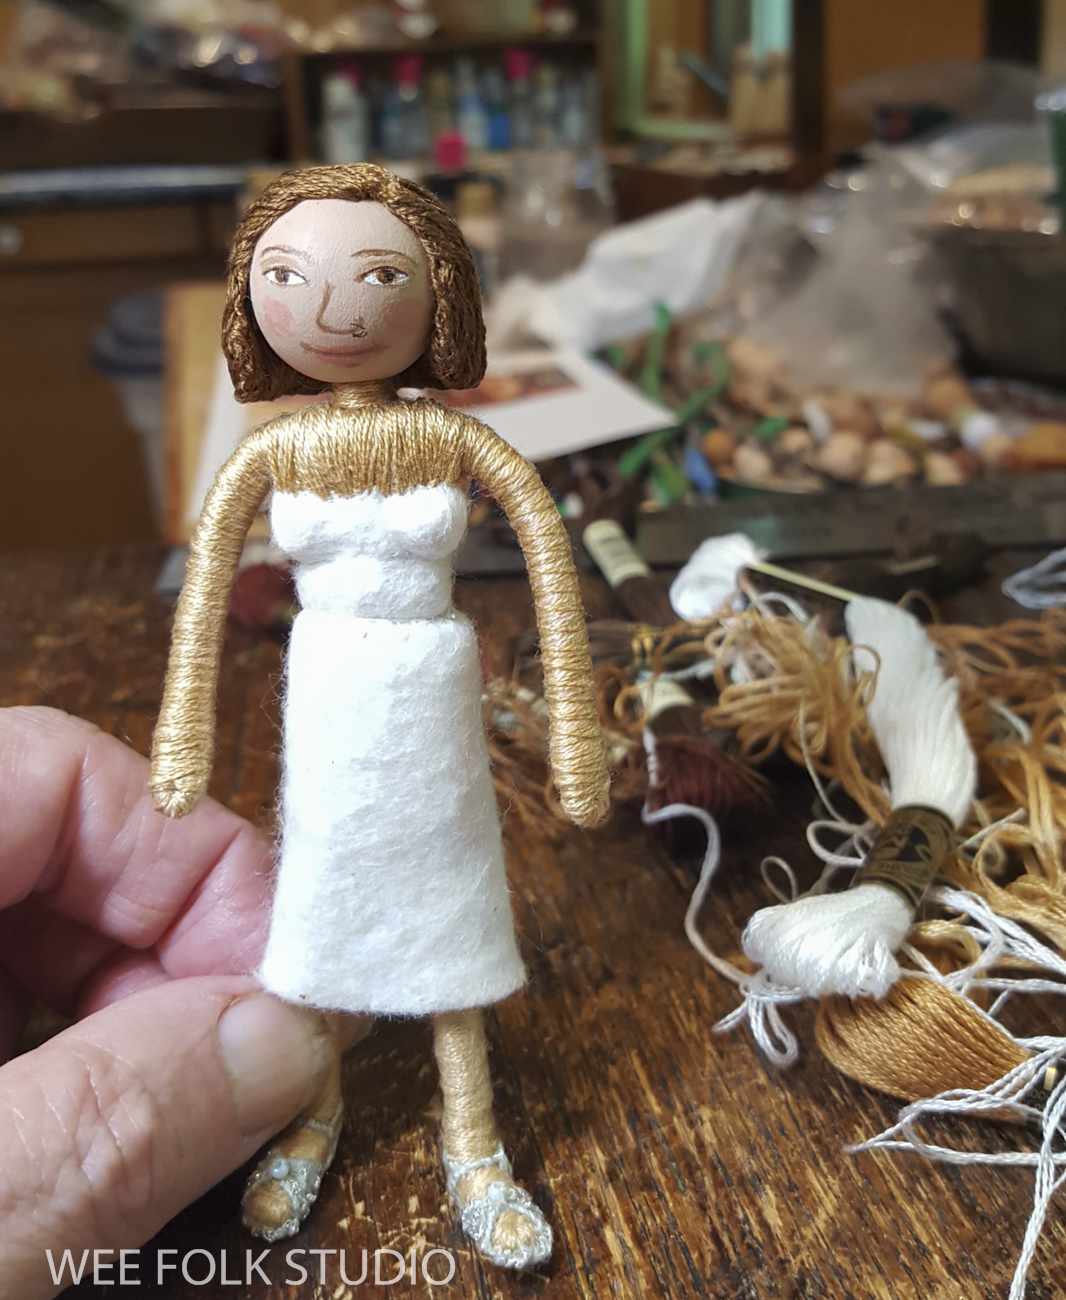
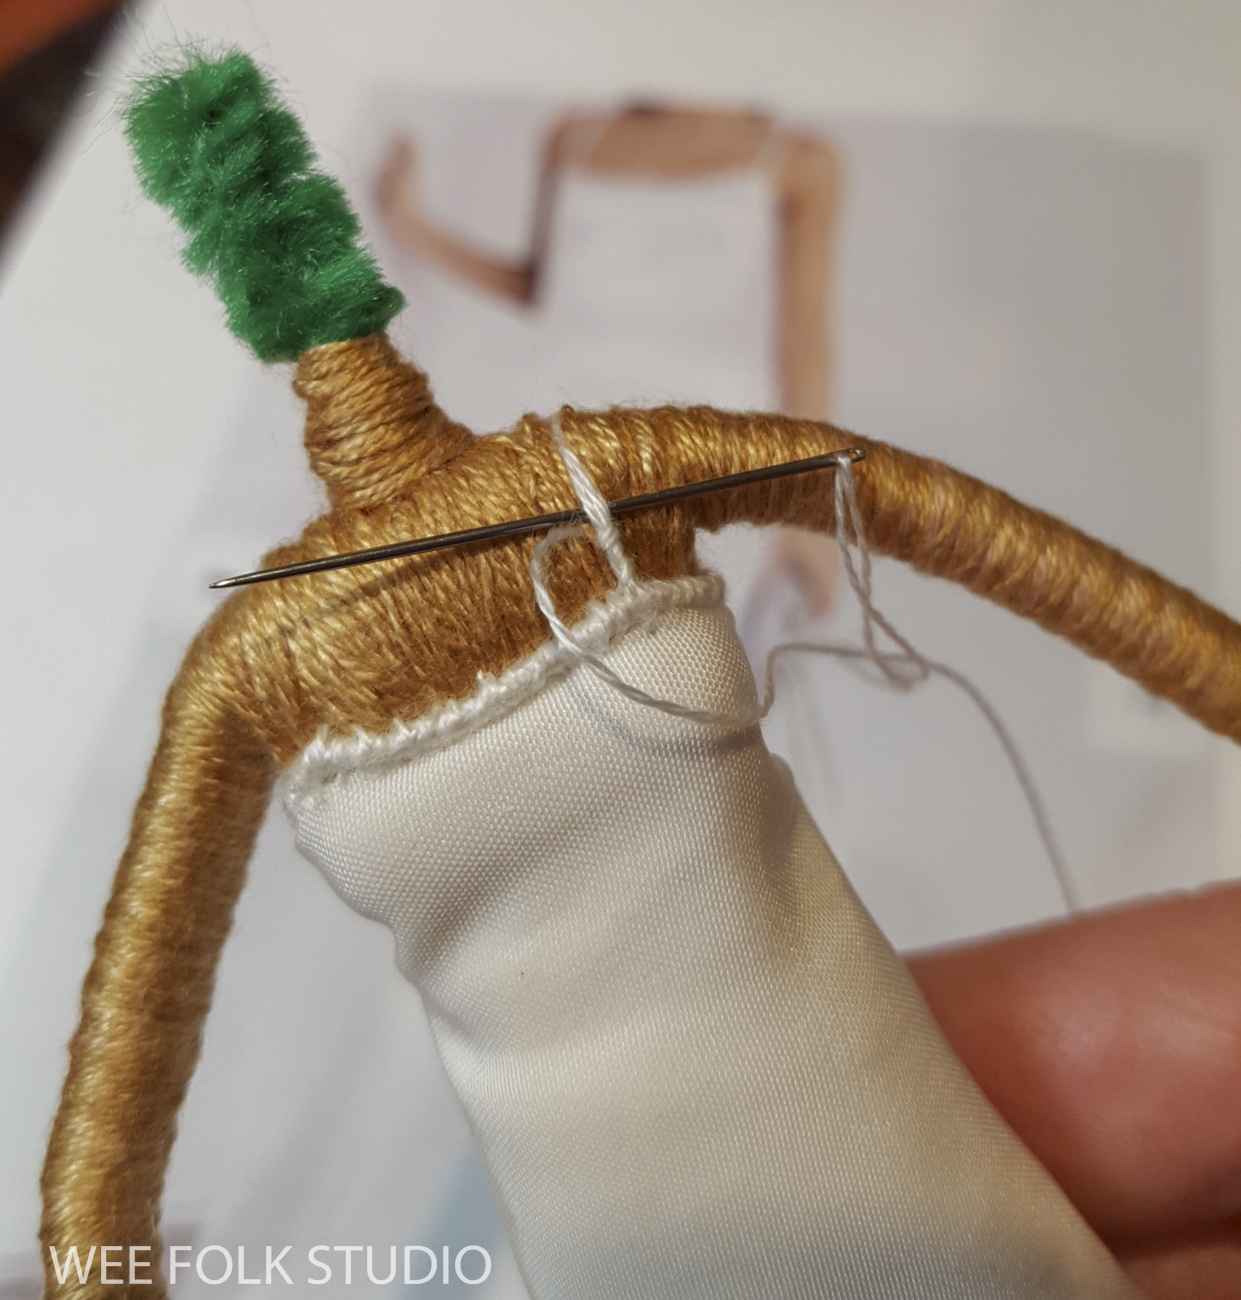
Normally, I wait until a piece is finished before writing blog posts about it, but I couldn’t wait to give you a preview of Summertime and whet your appetite for what’s to come! The following 2 posts show photos and stitch minute videos documenting my process, including this raspberry video.
Studio News
Summertime makes the finish line!

Studio News

Baltimore Oriole Sneak Peek includes photos and videos of creating the bird for Summertime.

BEDTIME STITCHES TOURING EXHIBITION
Bedtime Stitches in Pacific Northwest shared the news that Bedtime Stitches was on view last winter at the Pacific Northwest Quilt & Fiber Arts Museum.
Summer Tidbits announced several opportunities to see my work in person, including Bedtime Stitches last summer at the Southeastern Quilt and Textile Museum and this past fall at the Southern Vermont Arts Center.
Bedtime Stitches 2024 Schedule:
March 2 – May 5, 2024, Upcountry History Museum, Greenville, SC
July 27, 2024 – mid-Feb. 2025, Albany Institute of History and Art, Albany, NY.

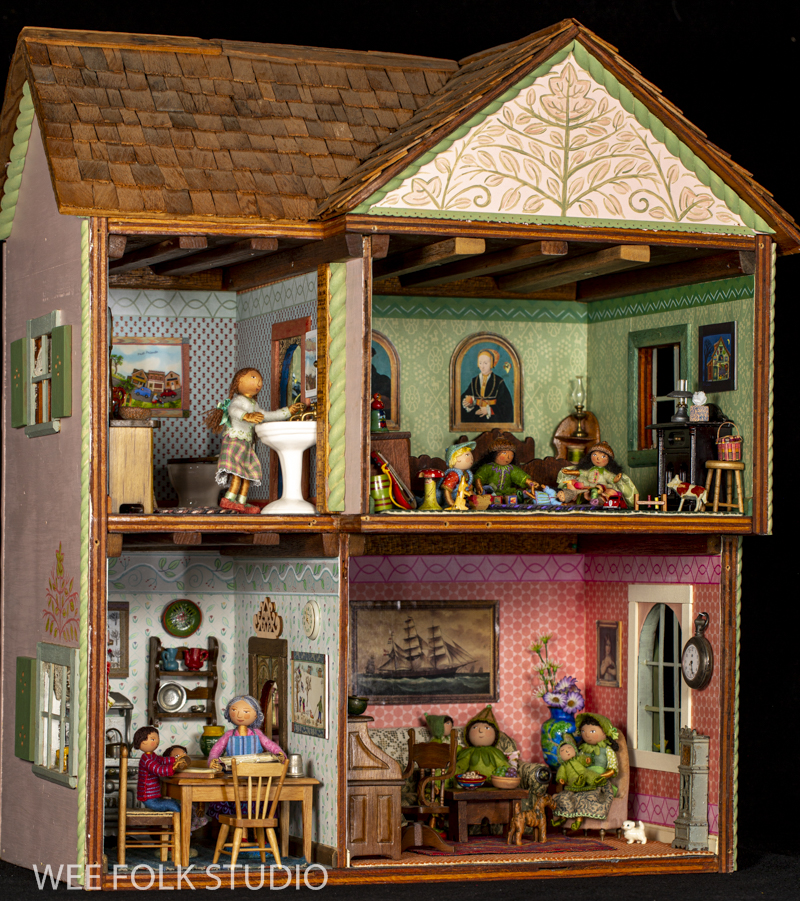
THE WEE WORLDS OF SALLEY MAVOR
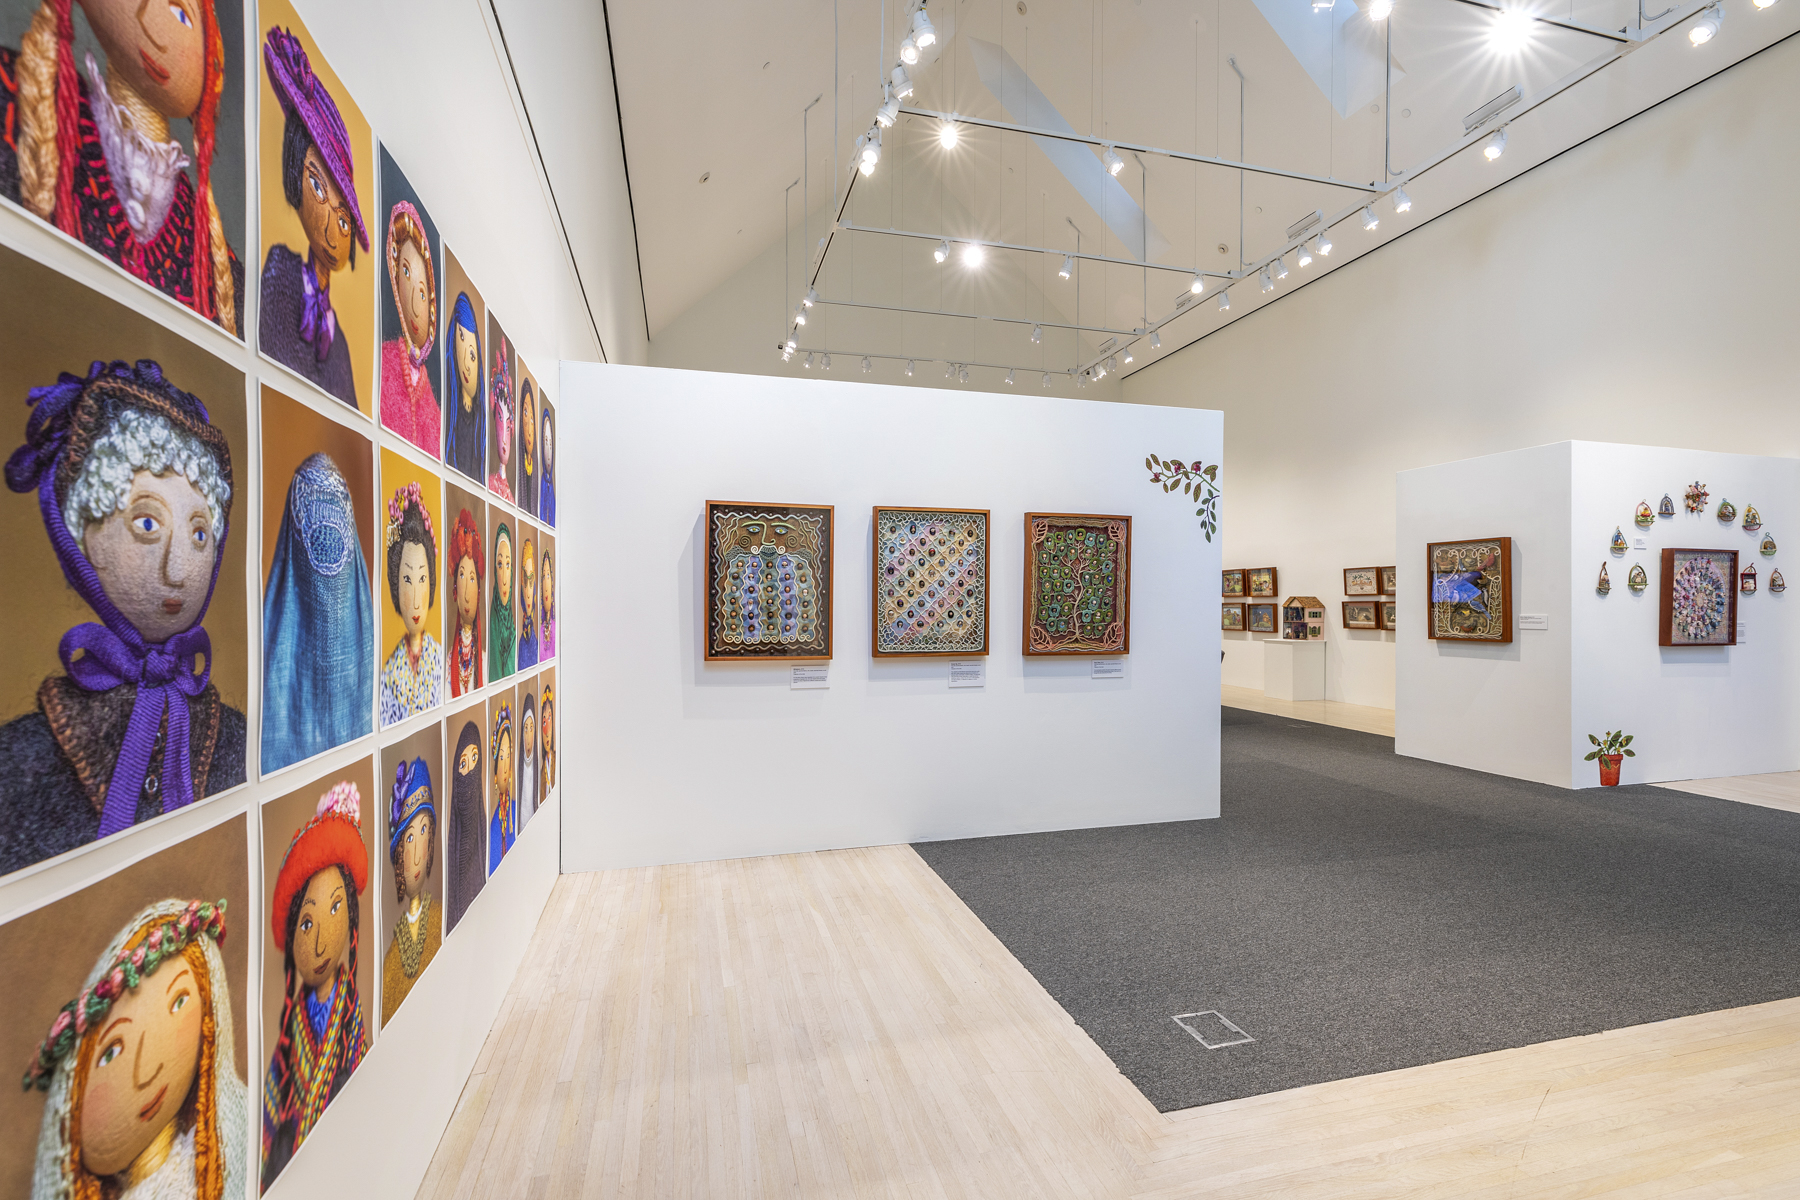
Wee Worlds on view in Vermont is an overview of my exhibition, The Wee Worlds of Salley Mavor at the Southern Vermont Arts Center (on view until Jan. 7, 2024)

The Wee Worlds of Salley Mavor at the Southern Vermont Arts Center

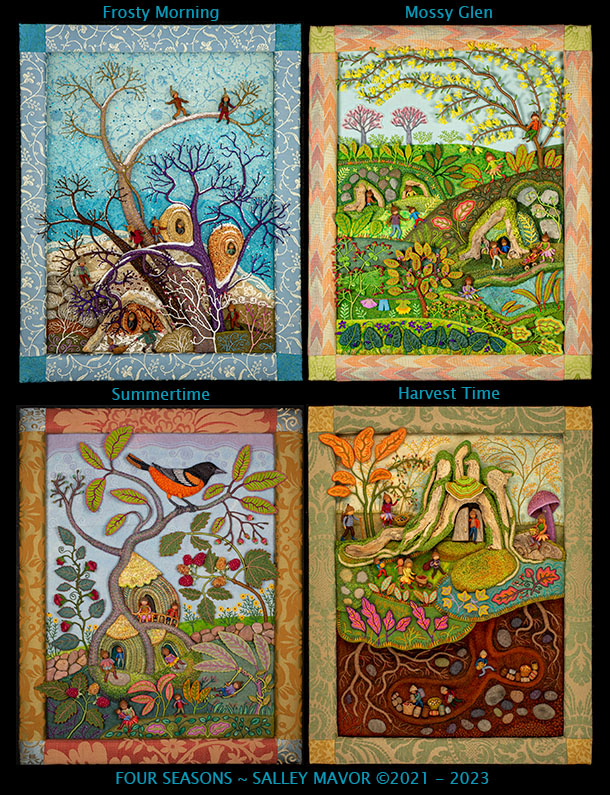
This was the first time that all four pieces in my recently completed seasonal landscape series were shown together. Over the past few years, I’ve shared photos, commentary and videos that give a behind the scenes peek at how I created these bas-relief embroideries. You can catch up in the archives here: Frosty Morning, Mossy Glen, Summertime, Harvest Time. Summertime will be added in 2024.

Wee Worlds exhibition video Watch a video of the Vermont show and find out the reasons behind my decision to stop selling my original pieces.

The Wee Worlds of Salley Mavor at the Southern Vermont Arts Center

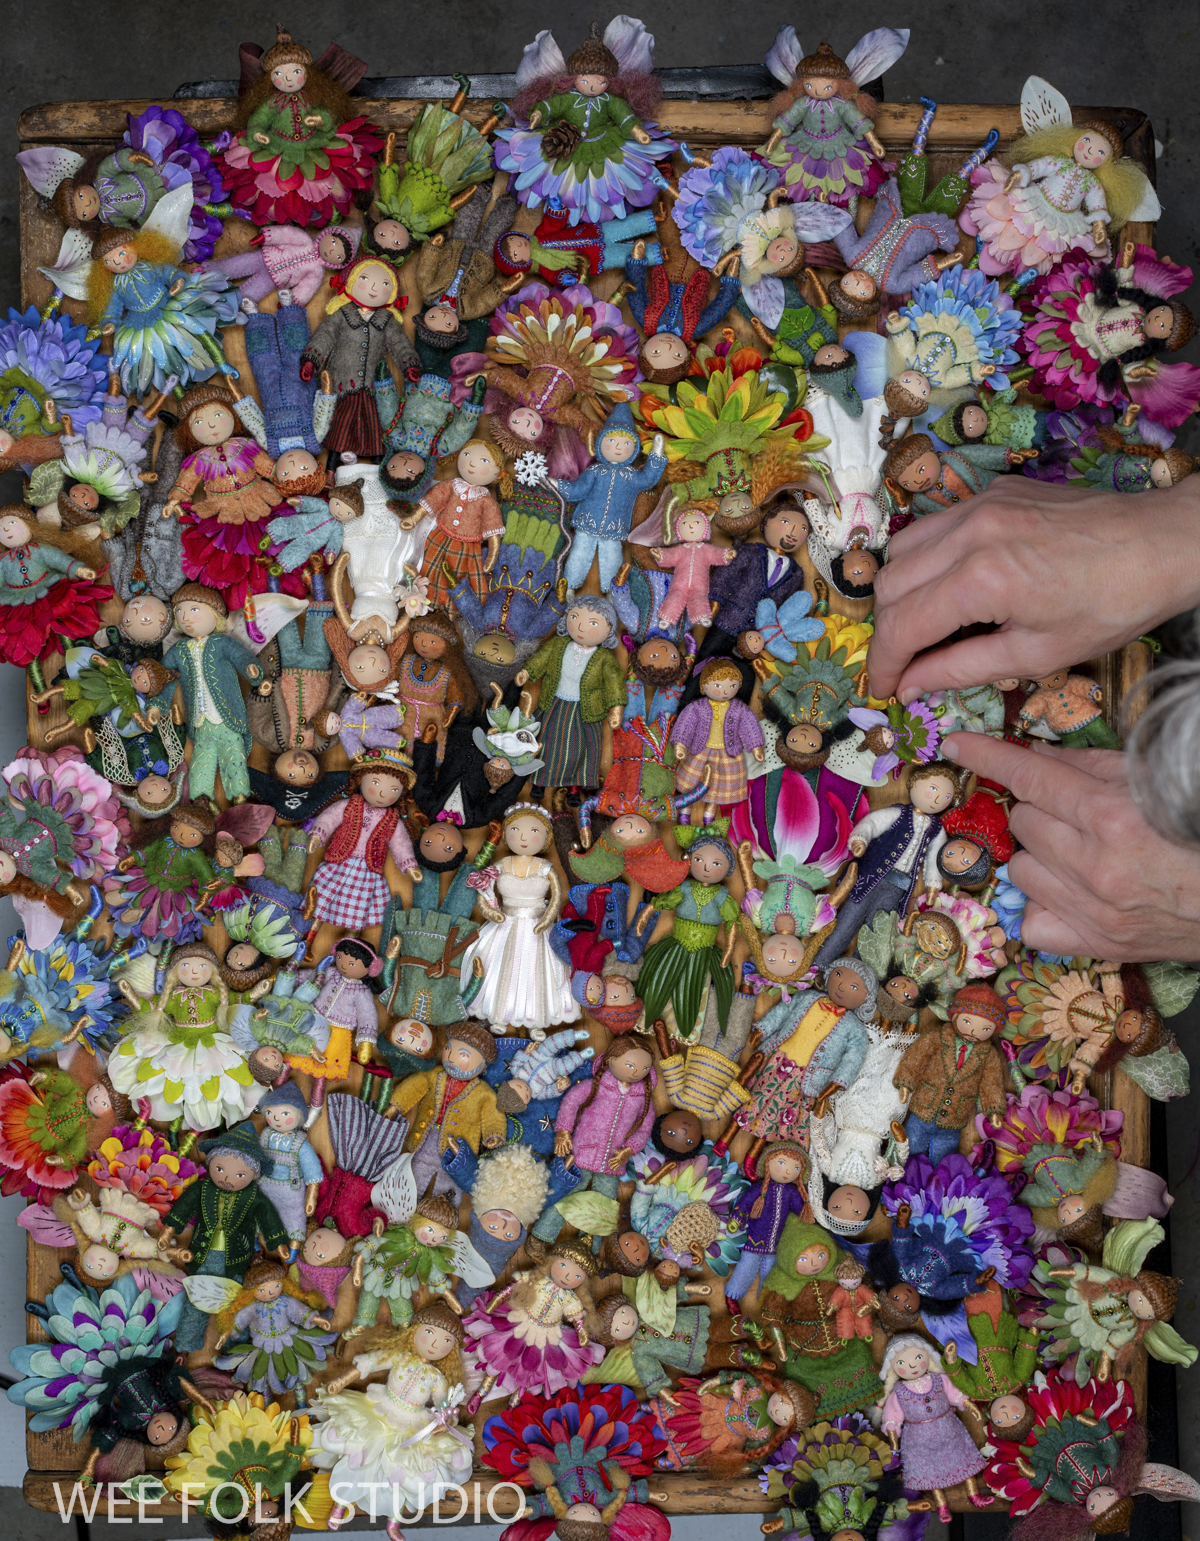
Wall of Wee Folk describes how I gathered and affixed the display of about 150 little dolls to the gallery wall.

The Wee Worlds of Salley Mavor at the Southern Vermont Arts Center

NEW PUZZLES
NEW Wee Folk Group Portrait gives an inside view of setting up and taking a photo of 20 years worth of little dolls for a puzzle image.

What’s new in my shop announces the addition of more jigsaw puzzles and a CD that feature my artwork.

Vintage Valentine gives a background look at collecting and arranging vintage spools for my nostalgic assemblage and introduces a new jigsaw puzzle and a spiral bound notebook featuring its image.

To keep up with new posts, please subscribe to this blog. Your contact info will not be sold or shared. If you’d like to see more frequent photos tracking the projects in my studio, please follow me on Facebook and/or Instagram.

NEW Wee Folk Group Portrait!

A few days before my collection of dolls headed to Vermont to become the Wall of Wee Folk, I had the idea of taking a group portrait that could be used for a jigsaw puzzle. We had to act quickly because they’d soon be out of town for 3 months.

“The Wee Worlds of Salley Mavor” will be on view
at the Southern Vermont Arts Center thru Jan. 7, 2024.

The Wee Worlds of Salley Mavor on view at the Southern Vermont Arts center thru Jan. 7, 2024

I crowded over 100 dolls together, arranging them every which way on my grandmother’s old breadboard. I figured that the more disorganized the better. Rob took a hires photo and the dolls were free to go to Vermont! Now, I’m happy say that Wee Folk puzzles and notebooks are now available in my Etsy Shop. The supply is limited, so if you want them before Christmas, please order now.

Many of the dolls are sample projects from my how-to book, Felt Wee Folk. All manner of young and old characters are nestled together, including multiple fairies, a pirate, Robin-hood, a wizard, a jester, a witch, and several brides and grooms.

I’ve spent my whole life figuring out ways to make little dolls that are true to what I first envisioned and longed for as a child. It just took a while to develop the skills to bring them to life. My aim in writing Felt Wee Folk was to offer others the kind of how-to book that I would have loved to find.

The group photo we took almost 10 years ago for the cover of Felt Wee Folk was a very different setup. For that photo-shoot, the dolls were carefully positioned on ascending steps inside a light box.

Wee Folk puzzles and notebooks are available in my Etsy Shop.

When the first shipment of Wee Folk puzzles arrived, I immediately set up a card table and sat down to put it together. The puzzle was more challenging than I expected, which is a good thing. You’d think that my familiarity with the subject matter would make it easy, but the haphazard nature of the composition threw me for a loop! This puzzle would be fun for both adults and older children. Here’s a short video that shows a condensed version of piecing together the puzzle.

There are now 8 puzzles in my shop, including Summertime,
Birds of Beebe Woods, Rabbitat, Harvest Time, Mossy Glen,
Frosty Morning and Thread Spool Heart.

To keep up with new posts, please subscribe to this blog. Your contact info will not be sold or shared. If you’d like to see more frequent photos tracking the projects in my studio, please follow me on Facebook and/or Instagram.

Wall of Wee Folk

When you enter my exhibition at the Southern Vermont Arts Center, you will be greeted by about 150 little dolls which form the Wall of Wee Folk. It’s a small part of the exhibition, but the collection of wee folk set the stage for the rest of show, which includes over 75 bas-relief scenes that span 25 years of my career.
The Wee Worlds of Salley Mavor will be on view through January 7th, 2024.

On the wall are a whole cast of characters, including public figures like RBG, Greta Thunberg and Abe Lincoln. Many of the dolls are sample projects from my how-to book, Felt Wee Folk. Over the past 20 years, I’ve accumulated quite a collection, which I purposefully haven’t sold, so they can be exhibited along with my wall pieces.

They are usually displayed in cases, but for this show, I tried a new kind of presentation, which you can see in this video. I understand that it will be very tempting for both young and old to touch the dolls. However, I’m willing to take the risk. It’s important to me that visitors have an opportunity to look closely at my work without a barrier, since just about everything else is protected behind glass.

I’ve thought about displaying a group of dolls directly on a wall for a long time, so when I visited the museum to get a sense of the exhibit space, I envisioned a wall dotted with wee folk. I just had to come up with a way to hold them in place.

This photo shows what the gallery looked like when Rob and I were helping install the exhibition. The Wall of Wee Folk is straight ahead, on the distant wall behind stack of boxes that the artwork was transported in.

Installation of The Wee Worlds of Salley Mavor at the Southern Vermont Arts Center

Many of the dolls are ltd. edition Blossom Fairies I used to make, including a sleeping fairy in a nest I made out of grass.

My solution to how to affix them to the wall involved tiny clear plastic clips with a pin backing. These were given to me by Alison Crites, who helped curate the show.

In preparation at home, I spent a few evenings sewing the clip/pins to the back of each doll.

Also ahead of time at home, I arranged the dolls on a white sheet on the floor to get an idea of their spacing.

Once in the museum, we drilled small holes in the gallery wall and stuck the pins in, with a little Goop to hold them in place. Hopefully, they won’t take a walk!

In the coming weeks, I’ll share more photos of the exhibition. Here I am, standing in front of the wall with Anne Corso, the museum’s executive director and Alison Crites, the manager of exhibitions.

The Wee Worlds of Salley Mavor will be on view at the Southern Vermont Arts Center, through January 7th, 2024. Besides the Wall of Wee Folk, the exhibition includes a wide array of original picture book illustrations spanning my career, including BEDTIME STITCHES, the touring exhibition of artwork for MY BED: Enchanting Ways to Fall Asleep around the World. Also on view are pieces that explore cultural diversity, migration, fashion, the natural world, and a range of social narratives, from the everyday to topical subjects.

To keep up with new posts, please subscribe to this blog. Your contact info will not be sold or shared. If you’d like to see more frequent photos tracking the projects in my studio, please follow me on Facebook and/or Instagram.

Sam and Louisa’s wedding dolls

This summer, both my son Ian and Sam, his best friend from childhood, got married. Here they are at age 3 and at Sam’s wedding last weekend. So, I had the pleasure of making personalized cake toppers for 2 wedding couples! You can see the post I wrote about Ian and Liz’s dolls here.

Sam and Louisa hosted a heart-felt and whimsical ceremony and reception, full of do-it-yourself touches, at their home in Falmouth, MA. Sam is a radio announcer and reporter for WCAI, our local NPR station and Louisa teaches ballet and is also the handwork teacher at the Waldorf School of Cape Cod.

A few weeks before the wedding, Sam and Louisa sent photos of their wedding attire and accessories, including their shoes. As I teach in my how-to book, Felt Wee Folk, the figures are constructed from the feet upward.

I also asked them to send head shots, specifically with closed mouths – no toothy grins, which are difficult to paint. When depicting real people, I like to paint their likenesses way in the beginning of the process. That way, I feel attached to them. They aren’t just dolls, but individuals with unique characteristics who are dressing up for a special occasion.

After forming the bride’s limbs with pipe cleaners and wrapping the arms and legs with embroidery floss, I sewed felt around the torso and stitched on boob beads.

Then, I covered the torso and boob beads with a layer of cotton batting and stitched more embroidery floss onto the upper chest area. Dressing bride dolls is a challenge because so often they wear skimpy gowns that show a lot of exposed skin. It’s so much easier to make the groom’s suit out of wool felt!

To make Louisa’s hair, I stitched embroidery floss onto the felt “wig”, which I’d previously glued onto her wooden bead head (see photo above). I should mention that at this point, her head is not yet glued onto the neck. That came at the end, after her clothing was finished. I popped her head on and off throughout the process to check how it looked.

I found some white silk (or silk-like) fabric in my stash to make Louisa’s gown.

I formed Sam’s pipe cleaner body and he lay on my work table in his underwear, while I waited for photos of his suit.

Using photos of Louisa’s family heirlooms, I fashioned her veil and pearl necklace.

With Sam still in his underwear, I pressed forward and made the platform that they would stand on, which is basically a piece of wood covered with felt. I chain stitched their wedding date in orange and outlined the numbers in purple to make them more prominent.

I used a spider web technique to embroider ribbon roses, which I learned on YouTube.

I added more ribbon embroidery and bead embellishments.

I glued a piece of felt to the bottom of the wooden platform and stitched the embellished felt top piece to it around the outside edge. Then I edged the base with twisted memory wire and braid.

As soon as the photo of Sam in his black velvet jacket appeared on my phone, I got to work creating its wee version.

To make Sam’s floral bow-tie, I decorated silk ribbon with markers and stitched it to his shirt.

It didn’t take long to sew his jacket onto the pipe cleaner body, and glue his head on top. Now, he was all ready to get married!

For her bouquet, i weeded through my collection of miniature flowers, guessing what it might look like. In reality, it turned out that she held a bouquet of dahlias in a very similar color scheme.

Before covering the wooden base with felt, I had drilled holes for sewing their feet in place. I had marked the location of the drill holes on the felt, so it was easy to anchor their feet with a few stitches using a long sewing needle.

Here they are, atop their lemon poppy seed wedding cake, which was homemade by the bride’s sister. Congratulations and best wishes to Sam and Louisa!

To keep up with new posts, please subscribe to this blog. Your contact info will not be sold or shared. If you’d like to see more frequent photos tracking the projects in my studio, please follow me on Facebook and/or Instagram.

Mossy Glen: Part 8 – wee folk

This is the 8th and final part of the series about making the spring landscape, Mossy Glen. All spring I’ve shared photos, videos and commentary about how I created the piece, from stitching moss to forming wire stems. I’ve saved the best for last – today’s post is about making the wee folk characters! 
Part 1 is all about stitching a moss-like texture, Part 2 gives a glimpse at how I made the cherry trees, Part 3 is about the stone walls, Part 4 shows how I made the forsythia blossoms, Part 5 features wire and felt leaves, Part 6 is about chain-stitching leaves and Part 7 looks at the violets and berries.

Before delving into how I made the wee folk in Mossy Glen, I’d like to announce the opportunity to see a large selection of my work in person this summer. The exhibition, What a Relief, has been in the works for years and I’m happy to say that its doors are open to the public this week! For those of you who live too far away to come see the show, I’ll be sharing photos and videos of the exhibition in future posts.

WHAT A RELIEF: The Art of Salley Mavor
June 7 – Sept. 11, 2022
Brick Store Museum, Kennebunk, ME
Meet the Artist on June 25, 1 – 3 PM

This is the first major retrospective exhibition of my artwork, spanning over 40 years, from early on in my career to the present day. Rarely seen works on loan from private collections fill multiple galleries on the Museum’s entire first floor. The show is laid out somewhat chronologically, so visitors can see the evolution of my style and techniques through the years. Over 150 framed pieces and sculptural objects are on display, including the series of original illustrations from my most recent picture book, MY BED.

What a Relief, Brick Store Museum

Wee Folk in Mossy Glen
Now, let’s turn our attention back to the characters frolicking in the Mossy Glen. I’m never sure who is going to appear in these landscapes. They just show up one by one and claim their spots. After many months building places for the wee folk to live, it feels satisfying to finally meet them and let them take over.

The figures are similar to the acorn-capped dolls in my how-to book, Felt Wee Folk, just smaller in scale. Instead of pipe cleaners, I made the armatures with 24 gauge jewelry wire. You have to wind a lot of thread around the wire to make the limbs look proportional and not too spindly. At least you don’t have to deal with pipe cleaner fuzzies poking out.

After wrapping the wire armature with either embroidery floss or tapestry yarn, I embellished the torso and arms with faux knitting. which is basically rows of chain stitching.

I first started experimenting with fake or faux knitting when I made Polly’s Irish sweater by embroidering patterns and textures on felt. I’m not very experienced with knitting or crocheting, so this seemed like a good solution.

Since then, I’ve left out the felt and stitched directly onto the thread wrapped bodies. It’s fussy for sure, but the clothing comes out looking the way I want it to.

Here’s a Stitch Minute video showing some of my faux knitting.

I know this fellow looks uncomfortable, but I didn’t want to hide what he endured for the sake of fashion.

I made this stroller out of wire, which I covered with embroidery floss. The wheels are beads. As usual, I was so absorbed in figuring out how to make it, that I didn’t think to take photos along the way. I’ll try better with the next scene.

I hope that you’ve enjoyed this series about making Mossy Glen. Here’s a list of the different parts:
Mossy Glen (overview)
Part 1 (moss)
Part 2 (cherry trees)
Part 3 (stone walls)
Part 4 (forsythia)
Part 5 (wire and felt leaves)
Part 6 (chain stitched leaves)
Part 7 (violets and berries)

To keep up with new posts, please subscribe to this blog (top right column on the home page). Your contact info will not be sold or shared. If you’d like to see more frequent photos tracking the projects in my studio, please follow me on Facebook and/or Instagram.

Frosty Morning – part 6 (wee folk)

This 6th and final part in the Frosty Morning series is about making the wee folk characters who live in the winter landscape. All of the other stuff, the trees, the icy snow cover and the sparkling sky are just meant to set the stage for the little people to frolic in. While I worked on this piece, I thought about what the wee folk would look like and what they would be doing. Adding a narrative element with human (or animal) faces helps me fall in love with what I’m making. The scenery may be lovely, but without play actors, there is no story. And without that, what’s the point?

This year, I’m working on a group of seasonal landscapes that capture the wonder and magic of the natural world, both real and imagined. Frosty Morning, Mossy Glen, Summertime and Harvest Time are available as jigsaw puzzles and note cards in my shop here

The full figures are about 2″ tall, with smaller ones peeking out of the holes in the shelters. To make them, I used the same basic techniques that I teach in my how-to book Felt Wee Folk, with some adjustments in the armature material and clothing.

I used wool tapestry yarn or mending wool to stitch and wrap their winter clothing. Whenever I share photos showing dolls wearing sweaters, people actually think I knit them! For something this small it’s much easier to create the allusion of knitting with rows of chain stitches. For other examples of faux knitted outfits, see Polly Doll‘s Irish knit sweater here and her Fair Isle vest here.

When making people, I always start by painting their faces on wooden beads. Then, after meeting them, I feel motivated to bring them to life.

I’ve been saving some really small acorn caps for just this kind of project.

Instead of pipe cleaners, which would be too bulky, I formed the body armature out of 24 gauge jewelry wire. The bead heads were glued to the wire neck at the very end, when the clothing was finished. I glued small pieces of felt onto the top of the bead heads, in a kind of Mohawk. Later, when I added yarn hair, the felt gave the threaded needle something to catch onto.

Miraculously, this old mending wool from my collection of deceased relatives’ ephemera escaped being eaten my moths. It was the perfect weight with which to stitch miniature clothing.

In this sequence of photos, you can see how I wrapped and stitched yarn around the wire arms and legs and then made a separate faux knitted coat to go on top. I completed the look with French knot buttons, striped leggings, wool hair, and a glued on acorn cap.

The group of little people grew and grew until there seemed to be the right amount.

The sled is made from a pod I found so long ago that I can’t remember where it came from. An image search identified it as a coming from a Foxglove tree.

With just a few stitches, I sewed the characters in place – pulling the sled, looking out from shelters and climbing along tree branches.

When all of the parts were finished, it was time to mount the piece.

I made a border frame by padding and covering a wooden stretcher with upholstery fabric. I then hand sewed the layered background fabrics to the back of the stretcher, making it as taught as possible. After that, I sewed the different landscape sections to the background surface, starting with the lace snow cover, stone wall and driftwood house and ending with the trees.

To help prop up the tree limbs, I sewed beads to the back and stitched them to the background fabric.

I hope that you’ve enjoyed this close look at the process of making Frosty Morning. When the Spring scene is finished, I’ll write about it as well.

Part 1 shows how I made the tree trunks.
Part 2 gives a close look at how I formed and wrapped the wire tree branches. Part 3 is about constructing the rounded shelters.
Part 4 is about making the stone wall and the ice covered bush in front of it.
Part 5 is about adding sparkle to the scene.

To keep up with new posts, subscribe to this blog. If you’d like to see more frequent photos tracking the projects in my studio, please follow me on Facebook and/or Instagram.

making Face Time (part 1)

This post was first published in 2015.

About a year ago, my newest piece, Face Time started taking shape. I took pictures along the way, during the many months that its collection of little heads occupied my work table. The piece was completed this past winter after about 6 months of work.

IMG_9725

I’m often asked how long it takes to make a large piece like this (24″ x 30″). It’s hard to say for sure, because my days are interspersed with so many other activities (and distractions) having to do with the business side of being an artist. Of course, I’d rather be stitching every day in my studio, but I fear that would lead to an obscure life, without a presence beyond my studio walls. I’d guess that at least 50% of my work time is spent promoting my art in some way; e-mails, interviews and other publicity, Etsy Shop, editors and publishers, social media, entering and arranging exhibits, etc. OK, that’s enough of a reality check–shall we stick with the romantic notion of spending all day stitching in a window seat?

family tree-2

I’d like to take you through the making of Face Time, so you can have a sense of what’s involved.  If you’ve read my post, When to tell how and when not to, you’ll know that I don’t always show my process, but this is one of those instances when I’ve taken enough photos to warrant a 3 part series. I’m excited to share the new direction my work has taken!

For Face Time, I started in the usual way, thinking about the idea for a long time before jotting down tiny drawings in my sketch book. While I work, the concept remains strong and constant, while the overall design changes with time. I also consider how the parts will be rendered in embroidery and 3 dimensional needlework.

FaceTime-2051

I wanted to show different people from all over, evolving through time, from long ago civilizations at the bottom, to present day people at the top. I wasn’t so interested in making a personal family tree, but a depiction of the world’s collective heritage. I envisioned a group of faces from a variety of backgrounds and cultures peeking out of the greenery, all linked to a tree-like form.

FaceTimeWM-9573
FaceTime-9577

Researching fashion history was very fun! Online, I found pictures of hair styles, beards, hats and garments. In addition to wigs and painted facial features, each wooden head had a bit of clothing showing at the neck and shoulders. They expand on the wee folk doll projects from my how-to book, Felt Wee Folk – New Adventures. Wire glasses were something new, which I thought contributed to the individuality of some characters.

FaceTimeWM-9612

Over a period of many weeks, the heads grew in number, filling my modest work table.

FaceTimeworktable-1

There ended up being 41 heads in all, covering many centuries. Here they are, in a group shot, before they were separated by leaves and branches in the finished piece. I will show more about that in part 2.

FaceTimegroupWM-

To keep up with new posts, please subscribe to this blog. Your contact info will not be sold or shared. If you’d like to see more frequent photos tracking the projects in my studio, please follow me on Facebook and/or Instagram.

Doll house stories – all moved in

In this final part 5 in the Doll House Stories series, you will see the completed rooms in my newly refurbished doll house, along with its wee folk inhabitants. The house, which I built in 1975 while in art school, is on view in the exhibition “Bedtime Stitches” at the Cahoon Museum in Cotuit, MA through Dec. 19, 2020.

In addition to showing the original illustrations for my new picture book MY BED, the Cahoon Museum is displaying many rarely seen creations from my art school days to the present, including this doll house. These extra items are only included in the Cahoon Museum show and will not travel in the touring exhibition.

Since “Bedtime Stitches” opened in mid-September, I’ve heard from many people who’ve gone to see the exhibition with their children, grandchildren, parents and friends. One woman said, “After our visit, my husband said it was the best day of 2020.” Another wrote to say, “It feels like your art is the antidote to, I don’t know, maybe most of the rest of the world.”

I’m so glad the show will be up for another 6 weeks (through Dec 19), so that more folks can make the trip to see it. Not only has the Cahoon Museum done a beautiful job presenting my work in the gallery, they have protocols in place to ensure a safe and welcoming experience for their visitors, with timed entry in 1 hour intervals and required face coverings. Click here for hours, registration and Covid safely information.

For the past few weeks, you’ve seen several posts about the doll house. Here’s a list if you’d like to review them:
How the house was used over the past 45 years – part 1 (history)
Before and after shots of wallpapering – part 2 (wall-papering)
The process of making wee folk characters – part 3 (kitchen)
How I re-upholstered a 1930’s era sofa – part 4 (re-upholstery).

After arranging the furniture and figuring out who would live in the house, I moved the whole setup into the basement so that Rob could photograph it. He also made a little film, which pans from room to room throughout the house.

For the soundtrack, Rob recorded crickets and other night sounds outside. In the middle of summer, he sat on our patio with a microphone and headphones, listening in the dark, with the moon above.

I hope you enjoy this little house tour.

It was so much fun working on the house over the summer! I probably wouldn’t have taken the time to indulge in something so seemingly unimportant, if not for the deadline to get it fixed up for the “Bedtime Stitches” exhibition. But, after allowing myself the luxury of “playing house” again, I feel connected to my younger self – The child who spent blissful hours engrossed in creative play, the 13 year old who kept her love of dolls a secret and the self-conscious art student who lay in bed thinking about decorating her new doll house. Throughout my life, I’ve been on the same search – to find ways to make what I imagine into something real to share. And it makes me happy to share it with you!

What are they making in the kitchen? Cheese Straws! This cozy scene is printed on a card with my family recipe for cheese straws on the back. Cards are available in my shop.

To keep up with new posts, please subscribe to this blog. Your contact info will not be shared. If you’d like to see more frequent photos tracking the projects in my studio, please follow me on Facebook and/or Instagram.

Doll house stories: kitchen

In this part 3 in the Doll House Stories series, I show how I made the family of dolls gathered around the kitchen table in my newly renovated doll house. Other posts in this series: part 1 (history), part 2 (wallpapering), part 4 (re-upholstery.

Here’s a short video of the kitchen scene.

I suppose the boy could be rolling out dough for lots of different baked treats, but I imagined them making cheese straws, which is a family tradition going back several generations. In the past, I’ve shared the recipe for the best cheese straws in the world on this blog.

Since so many of you’ve enjoyed the recipe over the years, I decided to make a card with the cozy kitchen scene (above) on the front and the recipe for making cheese straws printed on the back. That way, it’s a greeting card (or Christmas card) and recipe card all in one.

The Cheese Straws card is available in my shop in packs of 4 or 8.

To make the figures in this scene, I started by painting their faces on wooden beads. After seeing their personalities come to life, I’m motivated to make the rest of their bodies. The doll making process is based on the instructions and patterns in my how-to book, Felt Wee Folk – New Adventures.

I glued felt wigs to the crown of the bead heads, making a surface that a needle can grab onto. Then, I stitched their hair with mending wool, which is just the right weight for this kind of detailed work. It seems like all of my relatives kept cards of wool to mend sweaters, so I now have a nice supply of browns and grays to choose from.

I bent wire in the shape of hands and wrapped the fingers and palms with embroidery floss. I’m frequently asked to show in detail how I make hands, but I choose to keep that process private.

Just like I teach in Felt Wee Folk, their bodies are constructed with pipe cleaners.

Here, you can see how the skirt fabric is gathered and sewn to her waist. It’s okay if it’s messy underneath because it will be covered by a sweater.

Since their clothes are sewn on, these dolls can’t change outfits very easily.

I used a chain stitch to sew stripes on this shirt.

To give this character a womanly shape, I sewed beads to her chest.

To finish off her cooking outfit, I made a little apron.

The dough is made with polymer clay. To give it a more realistic color, I kneaded in dried mustard, which is an ingredient in the cheese straws recipe. As mentioned earlier, Cheese Straws cards are available in my shop here.

Stay tuned for part 4 in the Doll House Stories series. I will share how I re-upholstered a vintage 1930’s miniature sofa.

To keep up with new posts, subscribe to this blog. Your contact info will not be shared. If you’d like to see more frequent photos tracking the projects in my studio, please follow me on Facebook and/or Instagram.

Doll house stories- wallpapering

This part 2 in the Doll House Stories series shows how a little light demo work and new wallpaper transformed the interior of my 45 year old doll house. It was a welcome indulgence to spend the summer fixing up the house. My excuse was that the house needed some home improvements to make it presentable for my exhibition, “Bedtime Stitches” at the Cahoon Museum (through Dec. 19, 2020). As you can see, the wallpaper was showing a level of wear and tear that strategically hung pictures could not hide much longer. Other posts in this series: part 1 (history), part 3 (kitchen), part 4 (re-upholstery).

Years of neglect as well as the Wee Folk Players theater troupe’s multiple set changes and general mayhem had taken its toll on the place.

The kitchen was in an especially sorry state.

I demolished the tile splash board.

And made new wallpaper.

I cut out separate pieces for each wall, cutting out the window and door openings. Then I glued them in place, covering up the grimy old paper with the new stuff.

For the other rooms, I used newly purchased scrap-booking paper and some other paper I’ve had in store since I first made the house 45 years ago. It’s true, I don’t throw out anything of an artistic nature that shows promise.

Once all of the rooms were newly wallpapered, I set about putting back the furniture and picking out new pictures to hang on the walls.

My son Ian made a tiny painting of a suspended egg, which is one of his favorite themes.

I printed out a miniature reproduction of the snow scene from my book “You and Me”, mounted it on mat board and hung it up in the kitchen.

It was fun setting up this domestic scene in the bright and cheery new kitchen. I already had most of the furniture and appliances, but I made a new wall clock out of a Timex watch face set inside a plastic curtain ring.

Stay tuned for part 3 in the Doll House Stories series. – I will share how I made the woman and children and give some clues about what they’re cooking.

To keep up with new posts, subscribe to this blog. Your contact info will not be shared. If you’d like to see more frequent photos tracking the projects in my studio, please follow me on Facebook and/or Instagram.