Summertime makes the finish line!

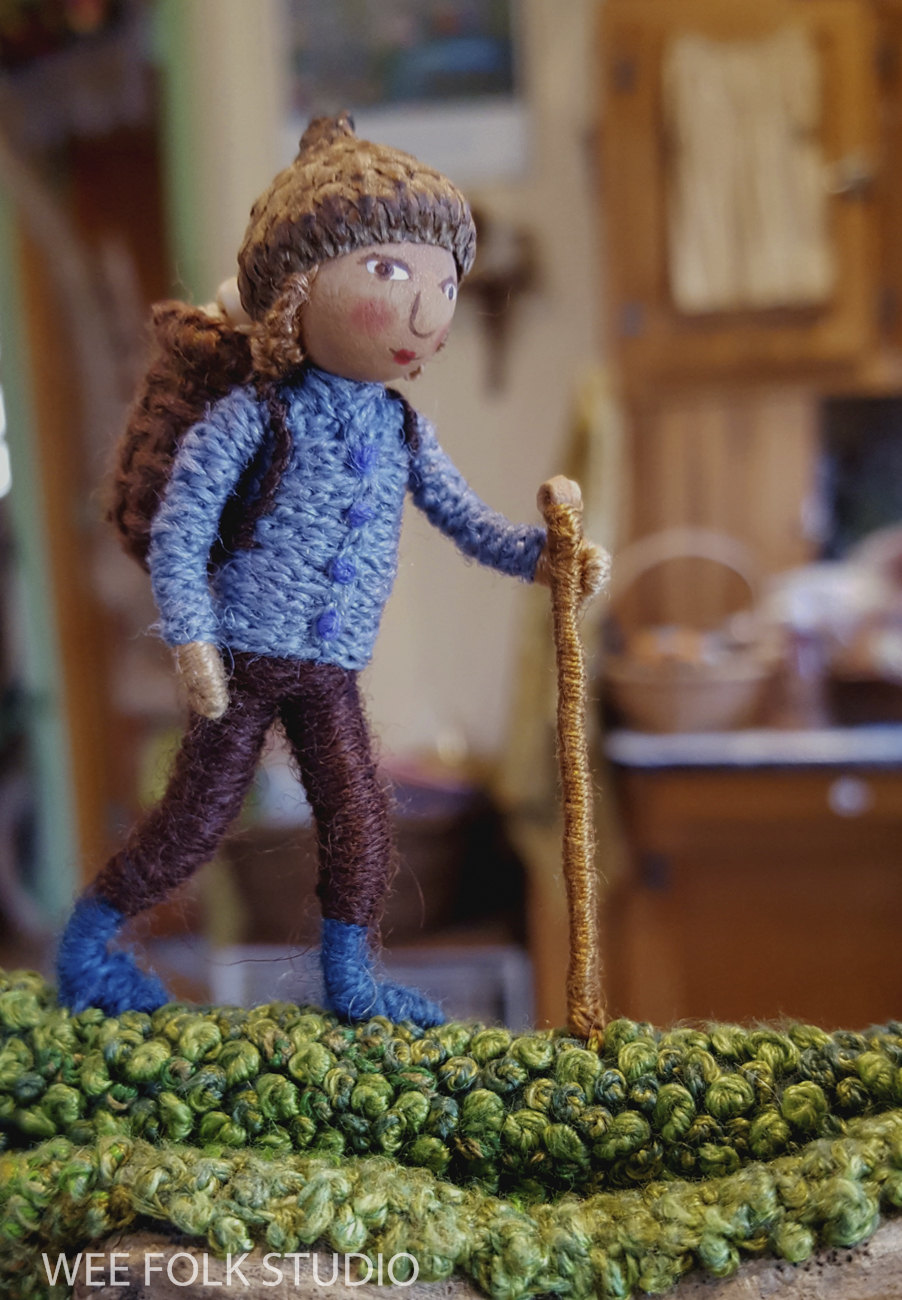
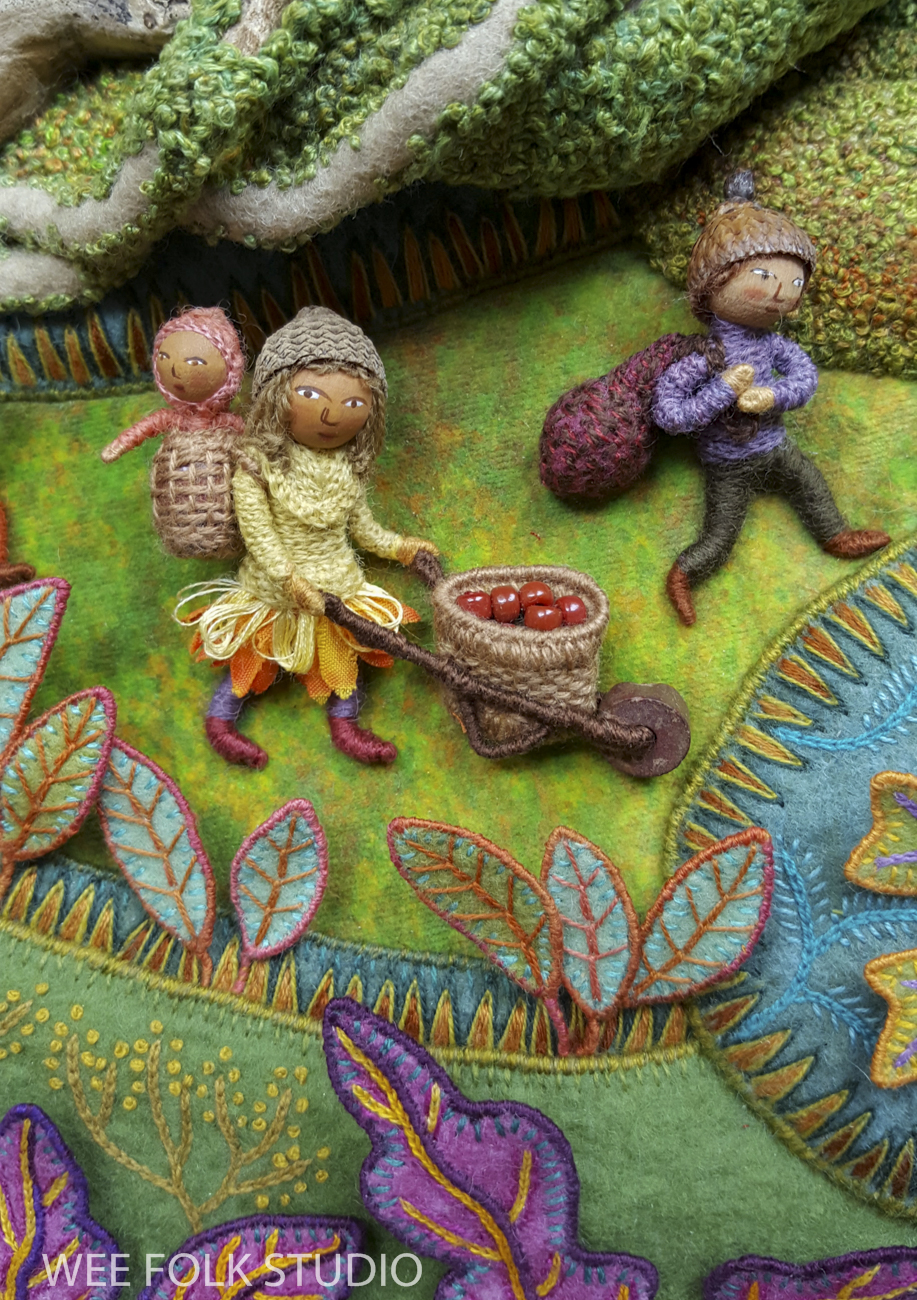
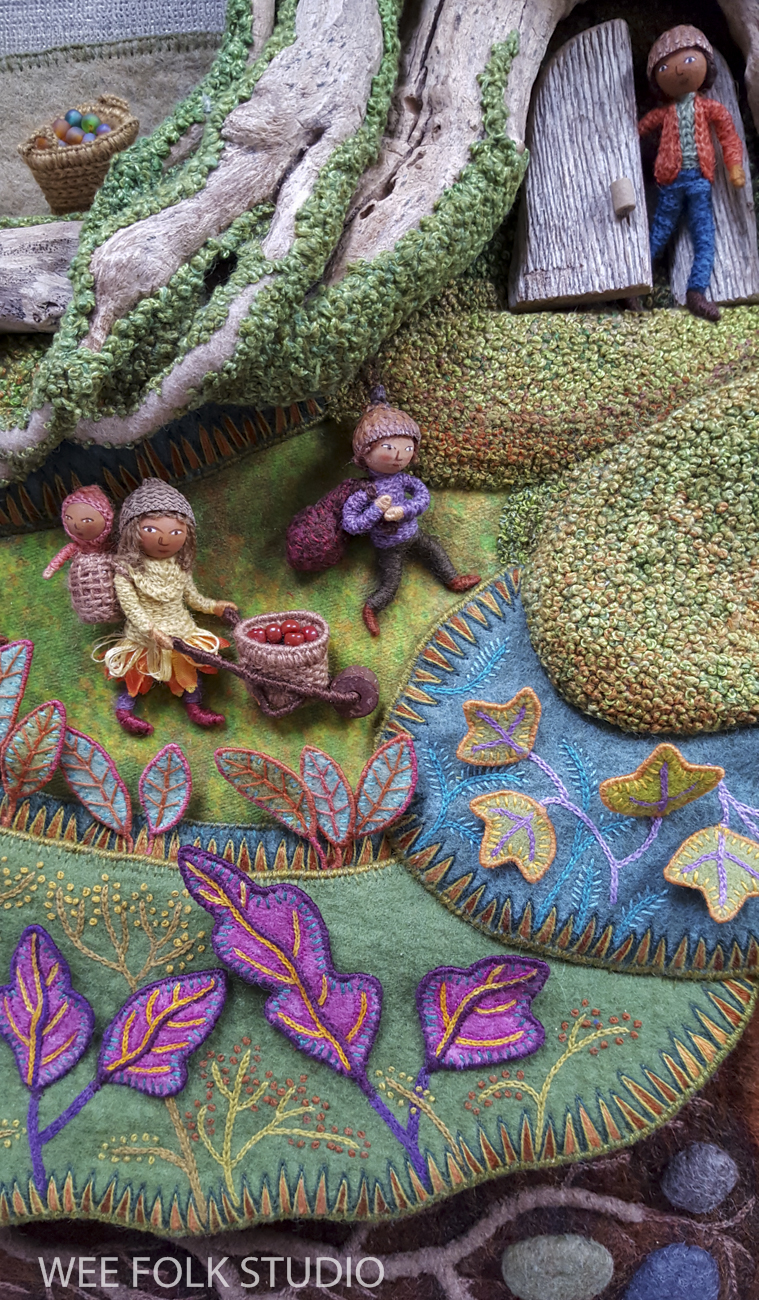
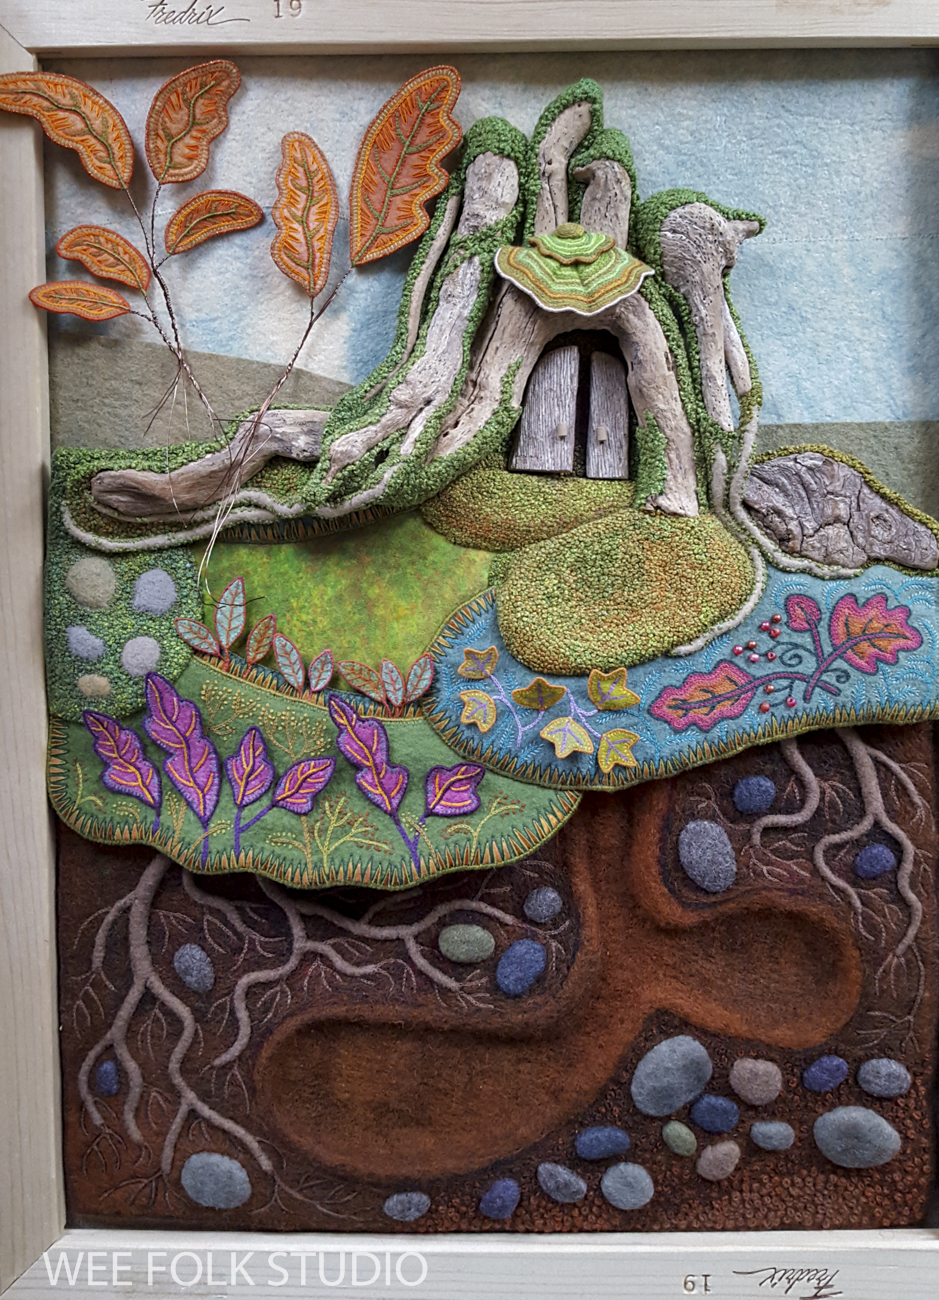
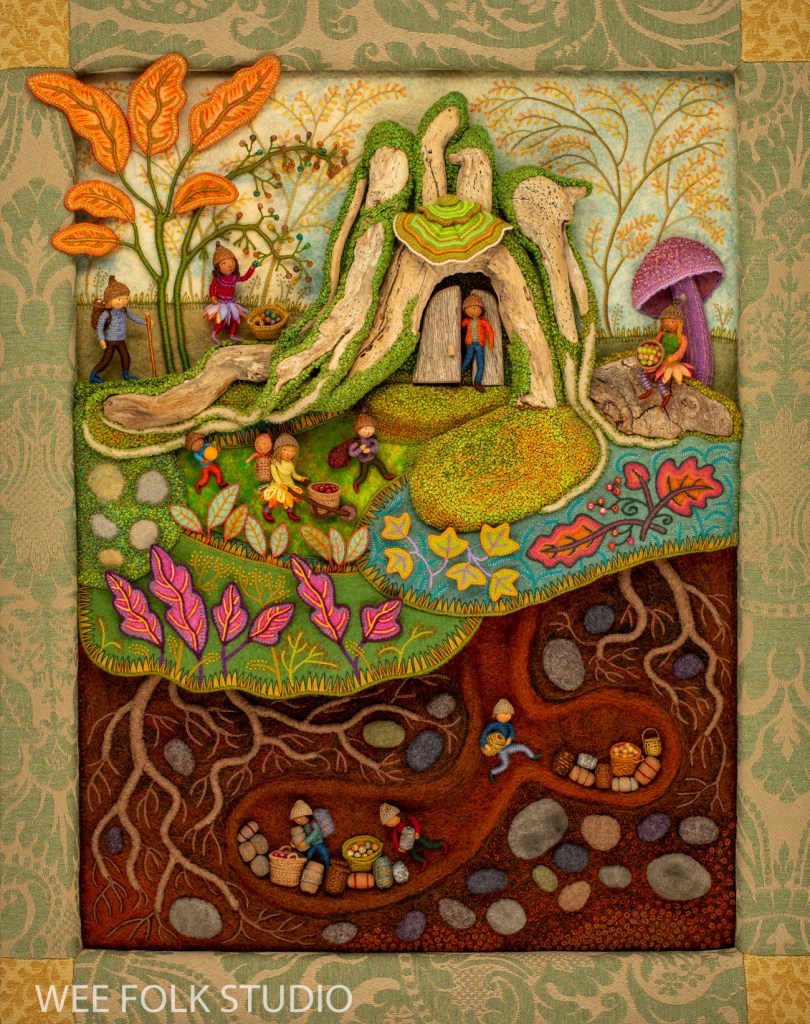
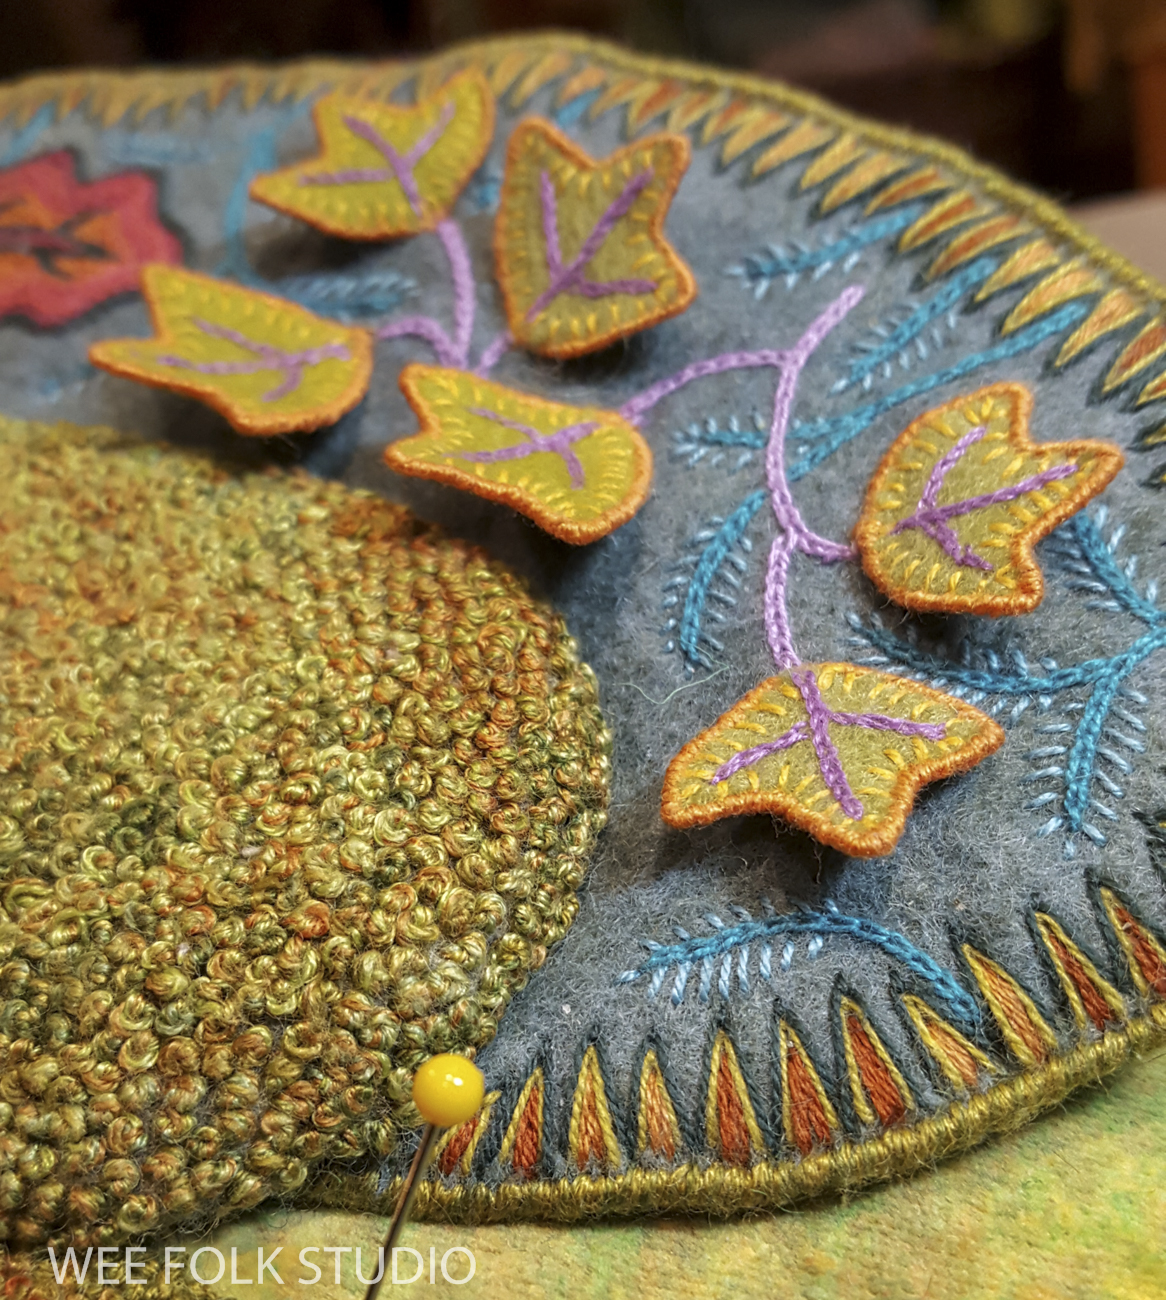
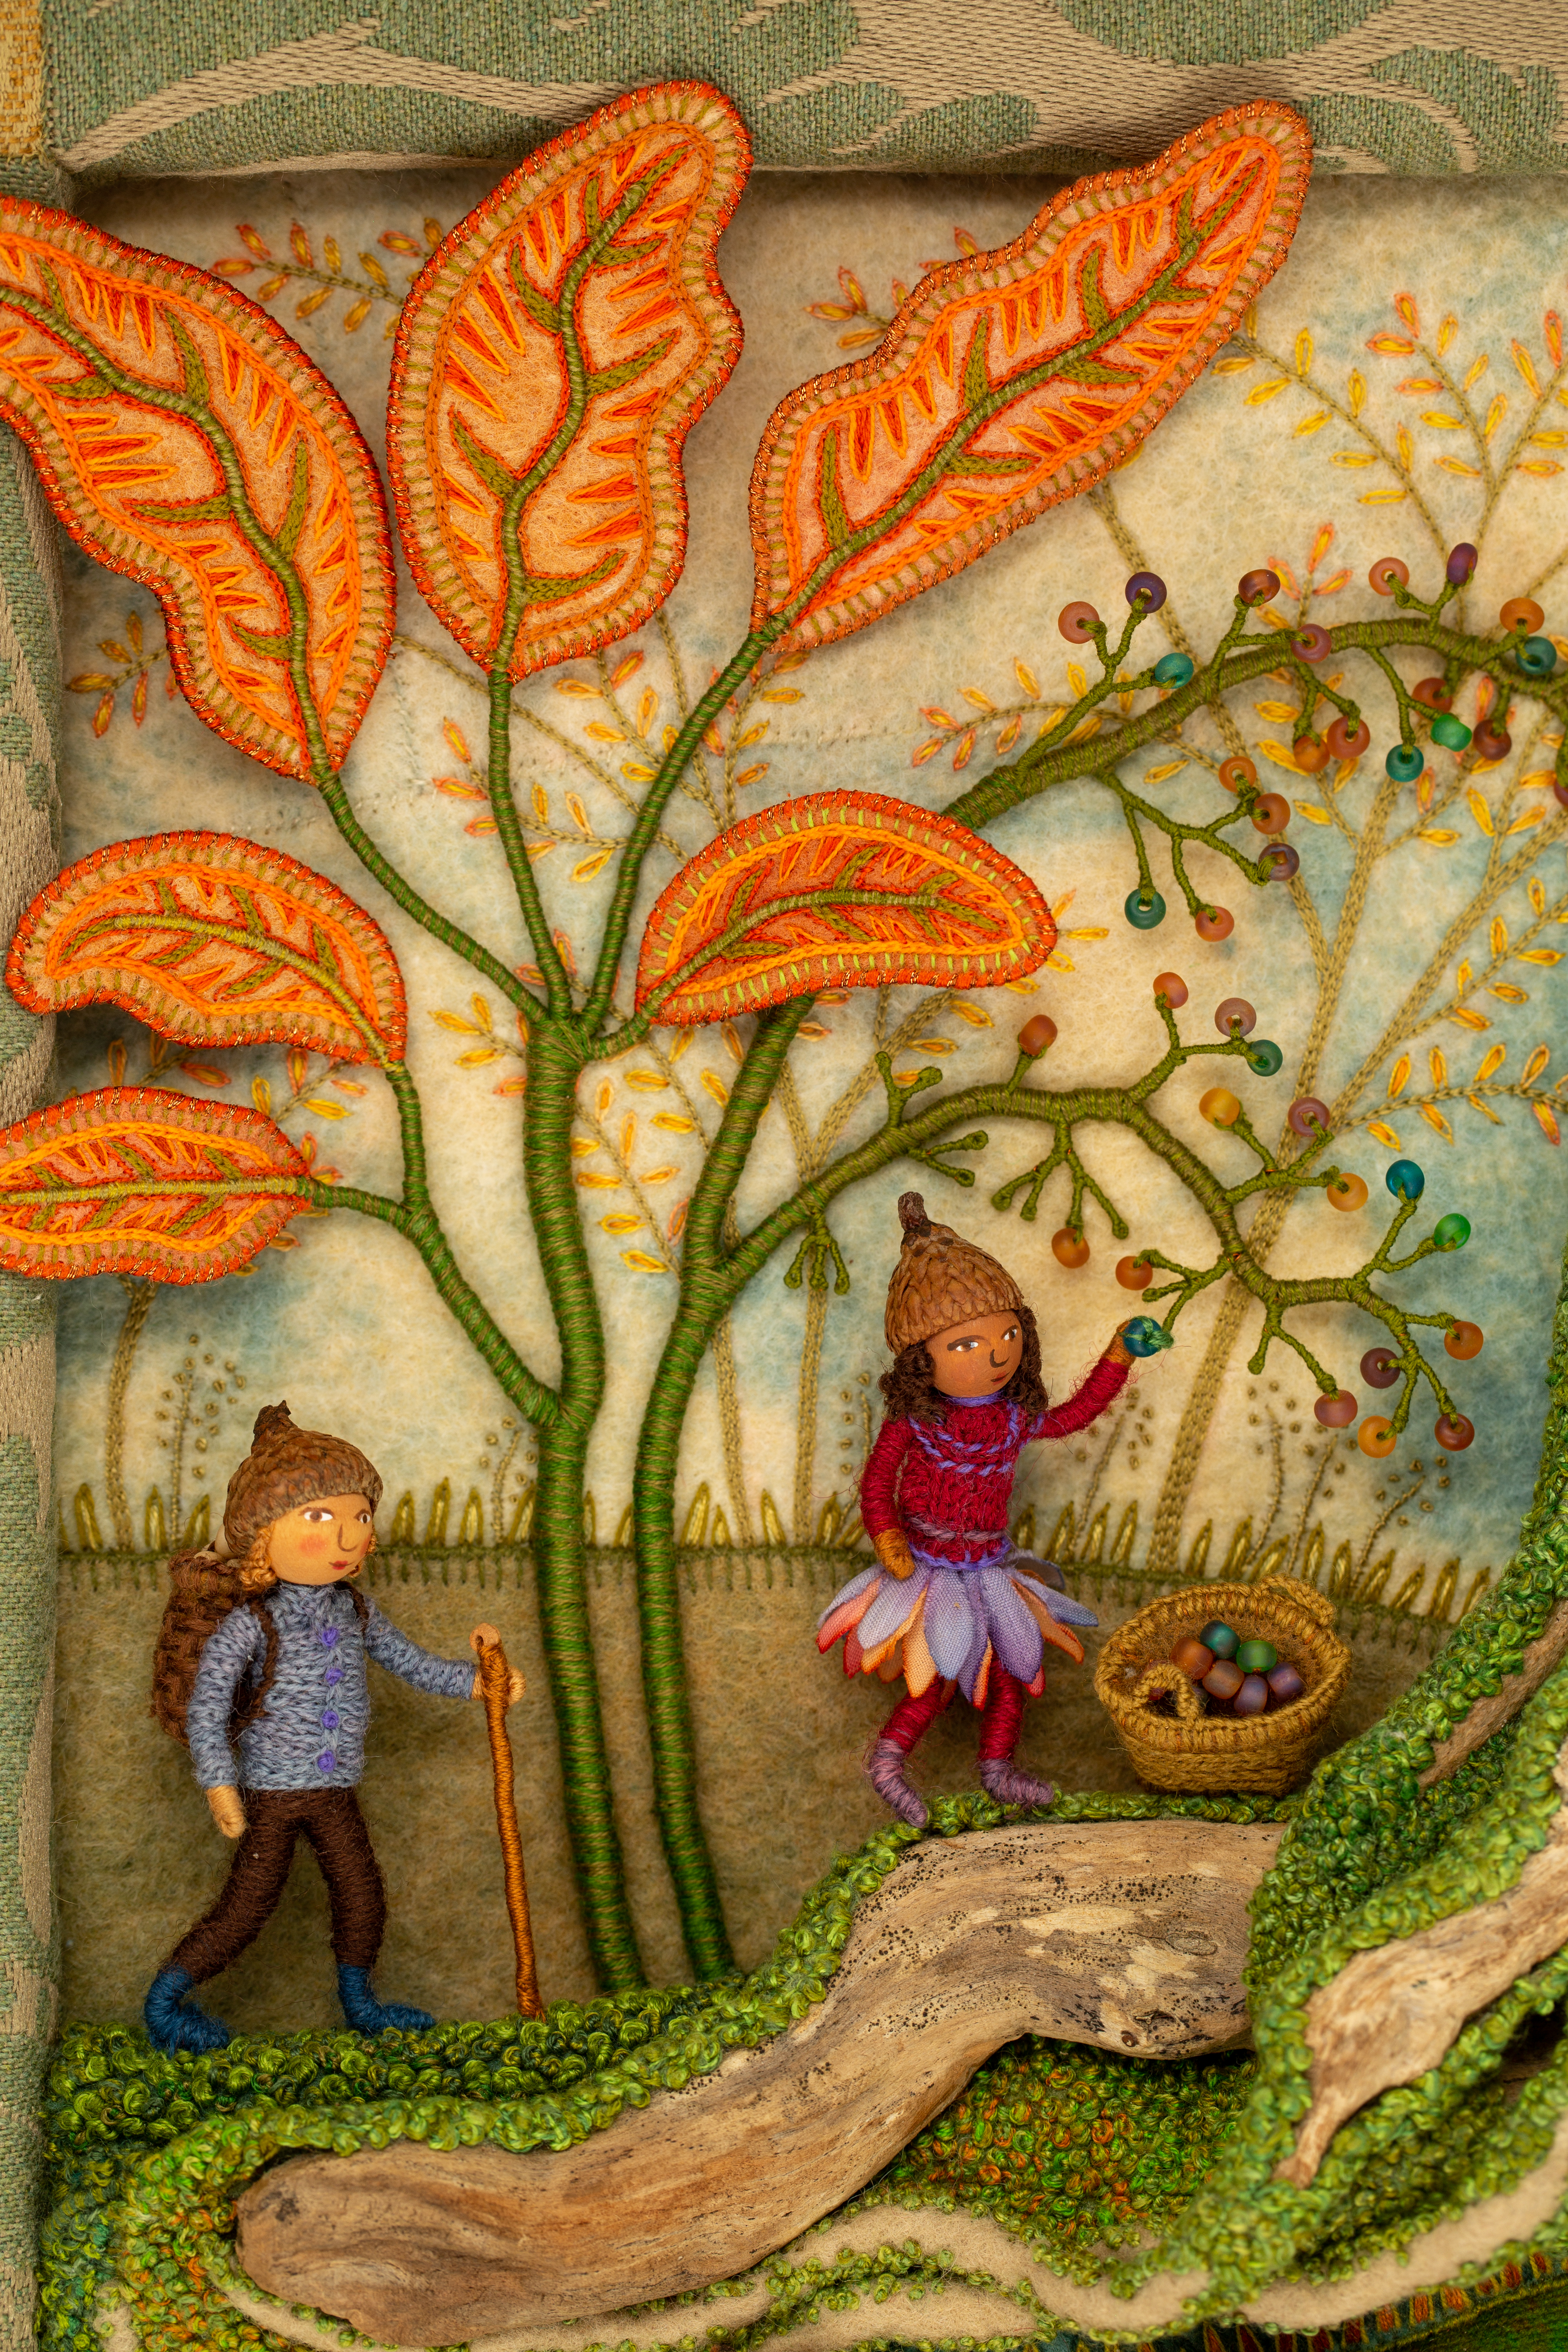
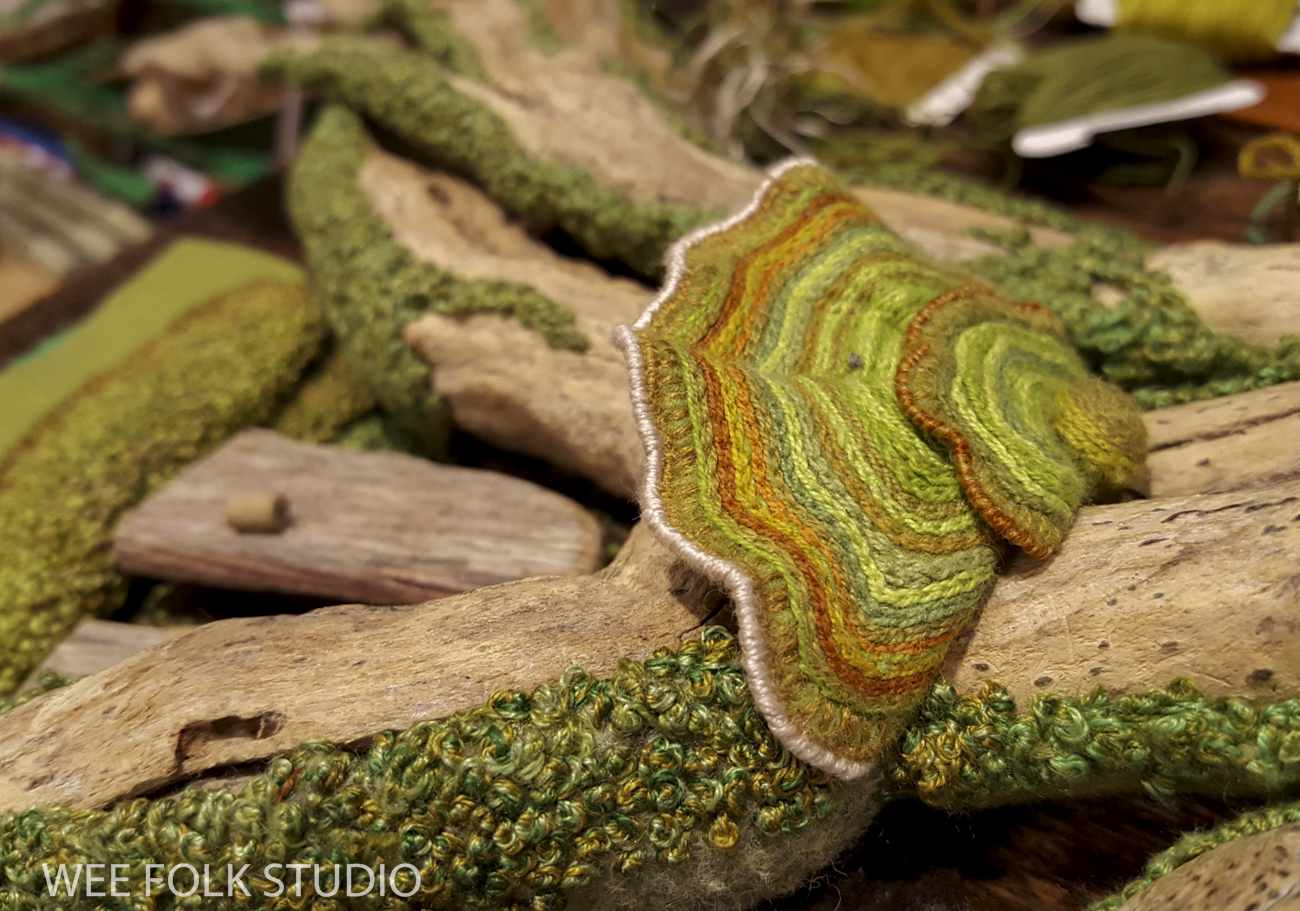
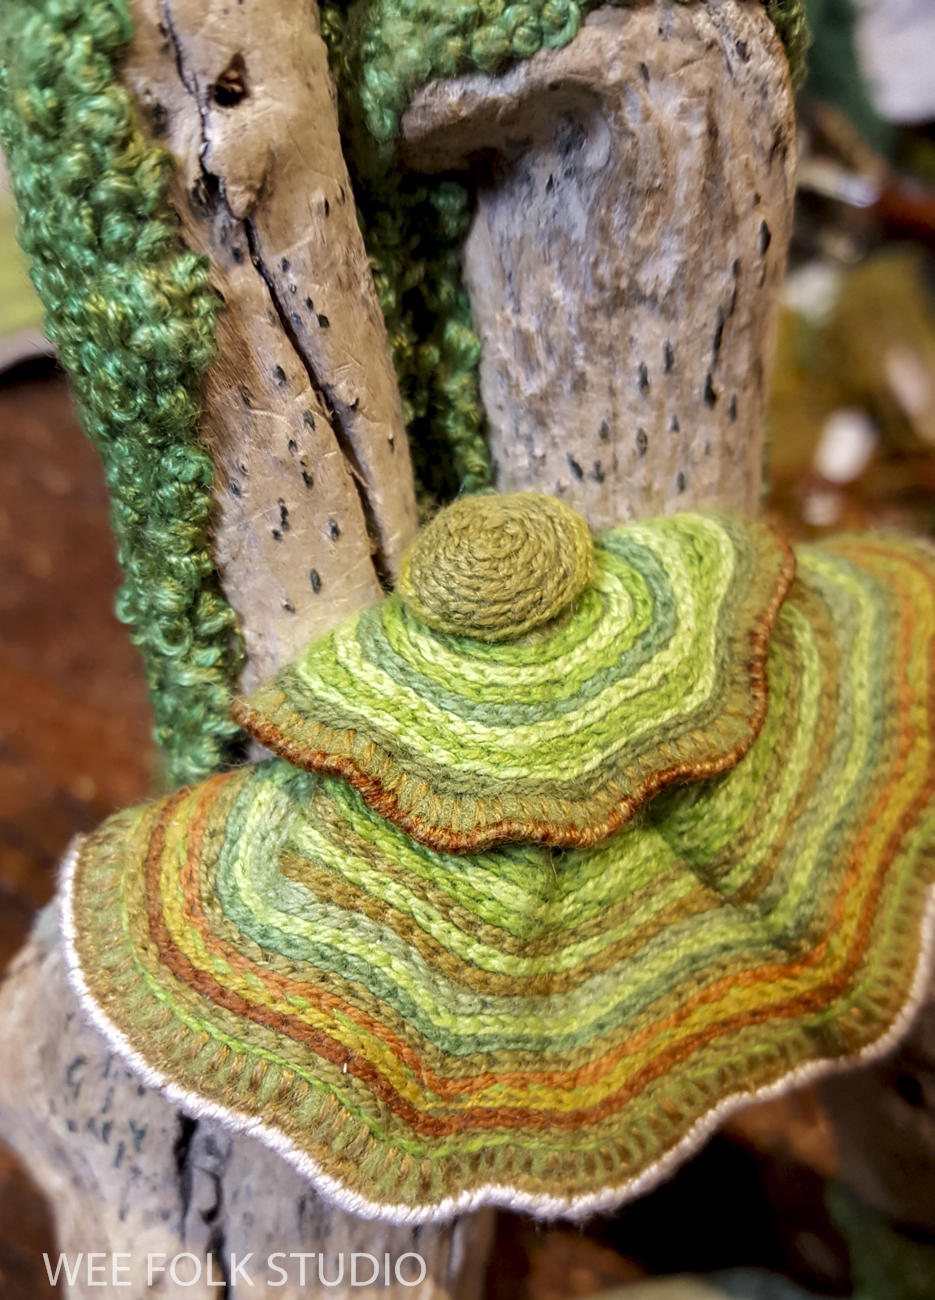
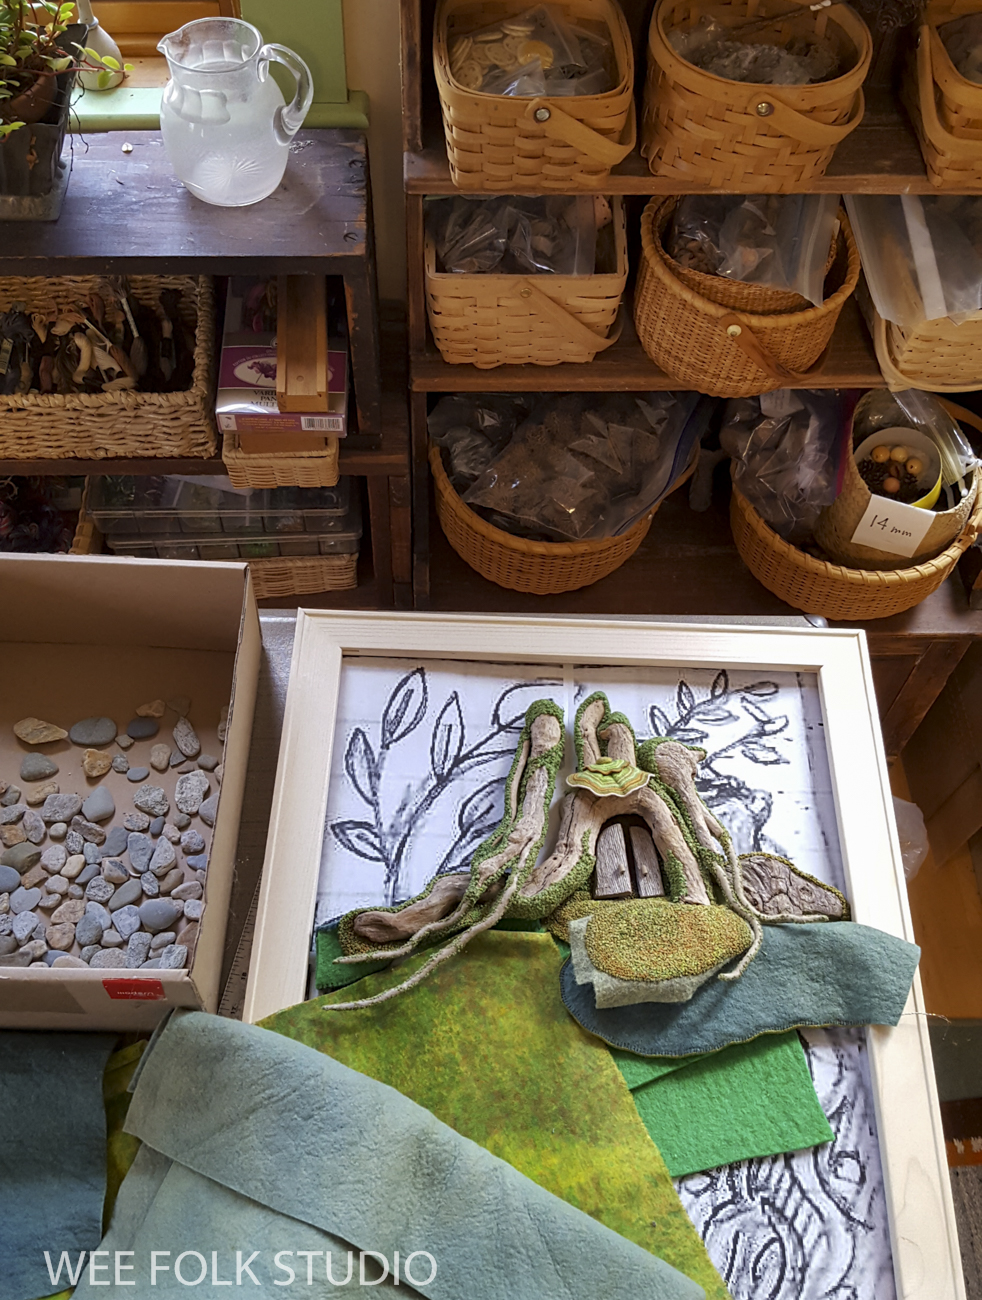
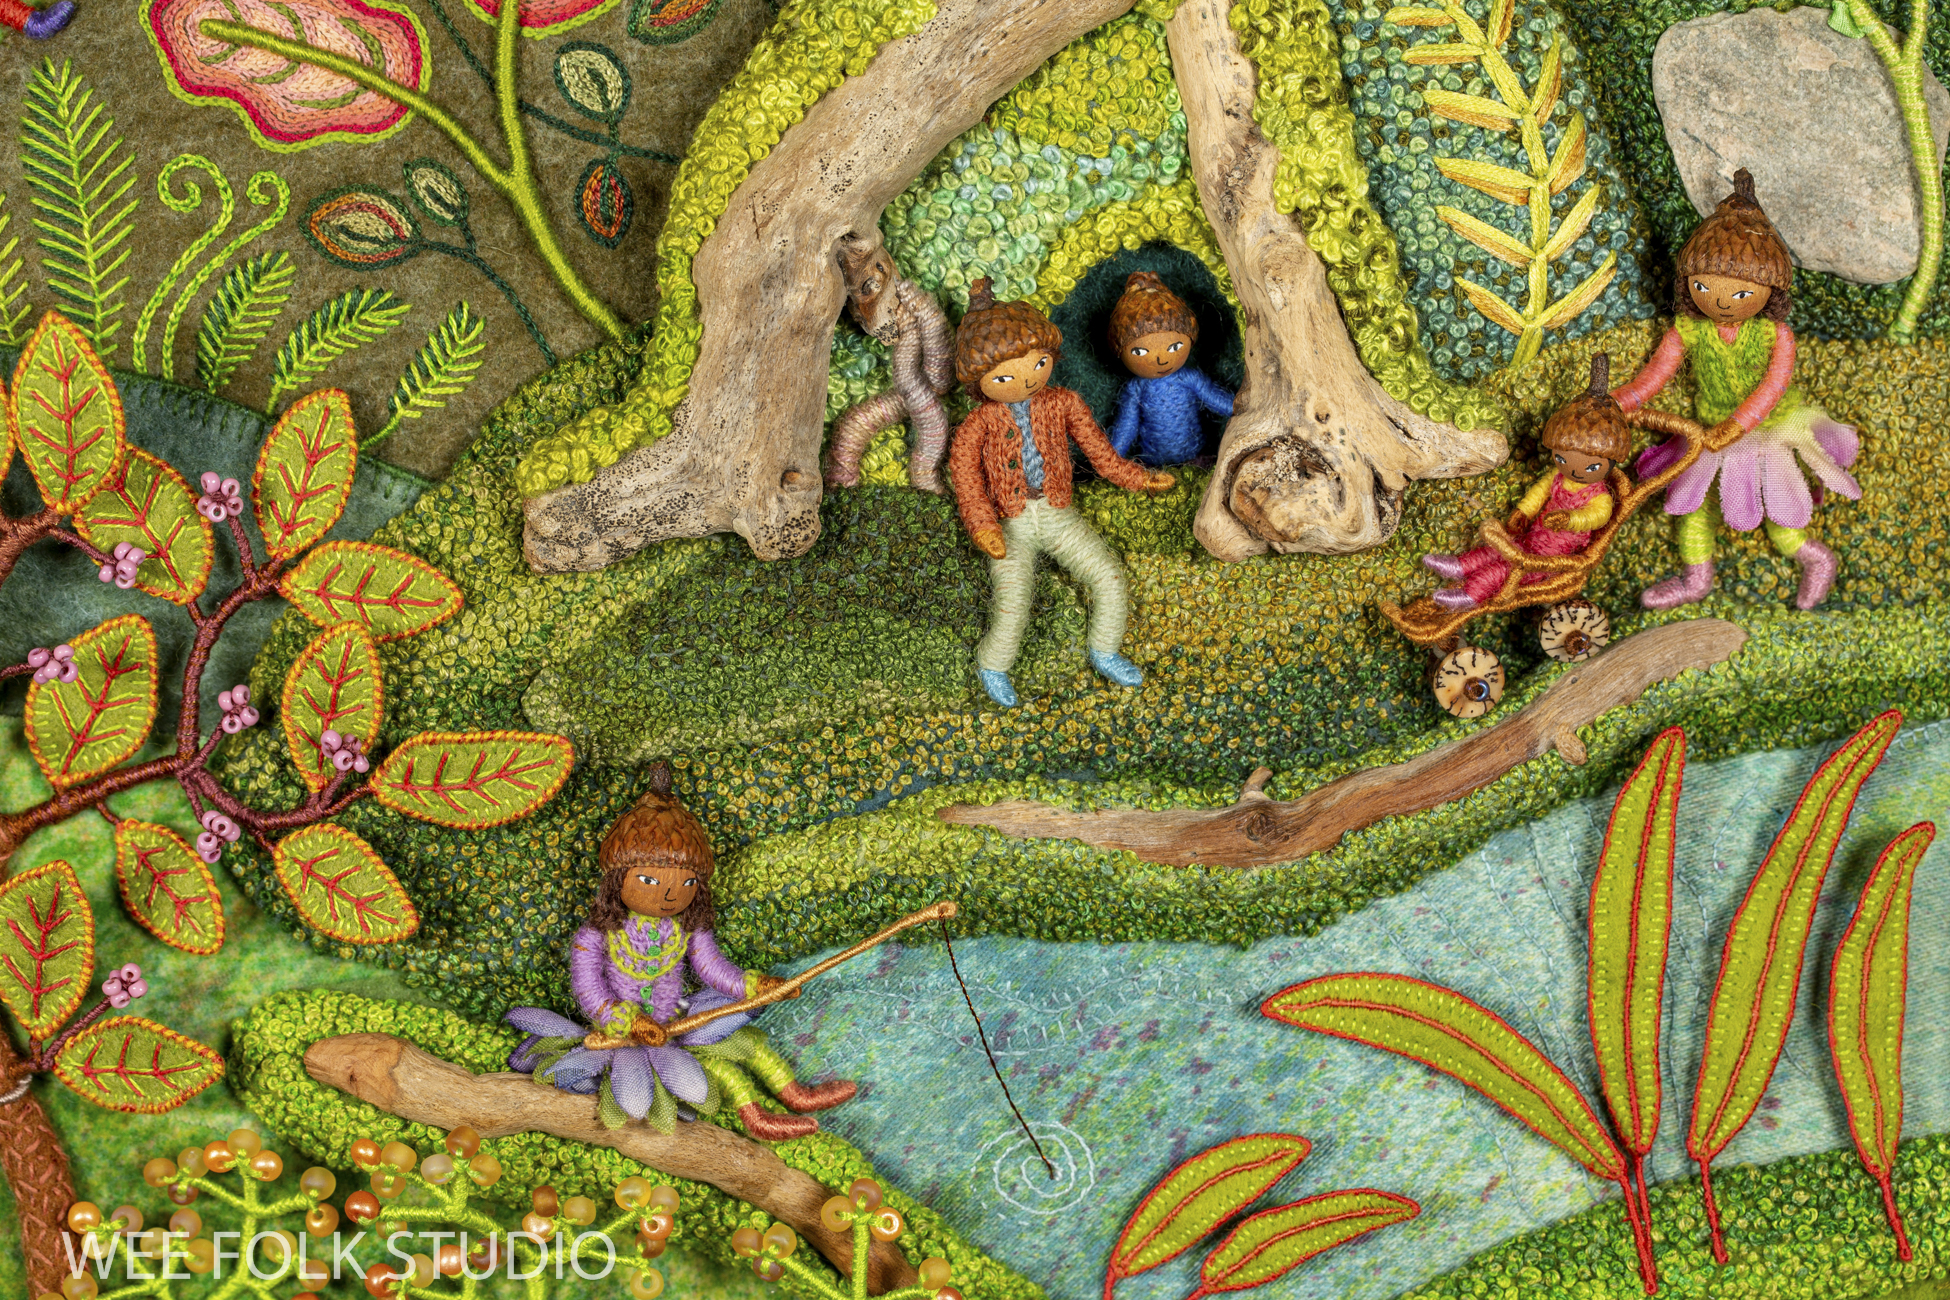
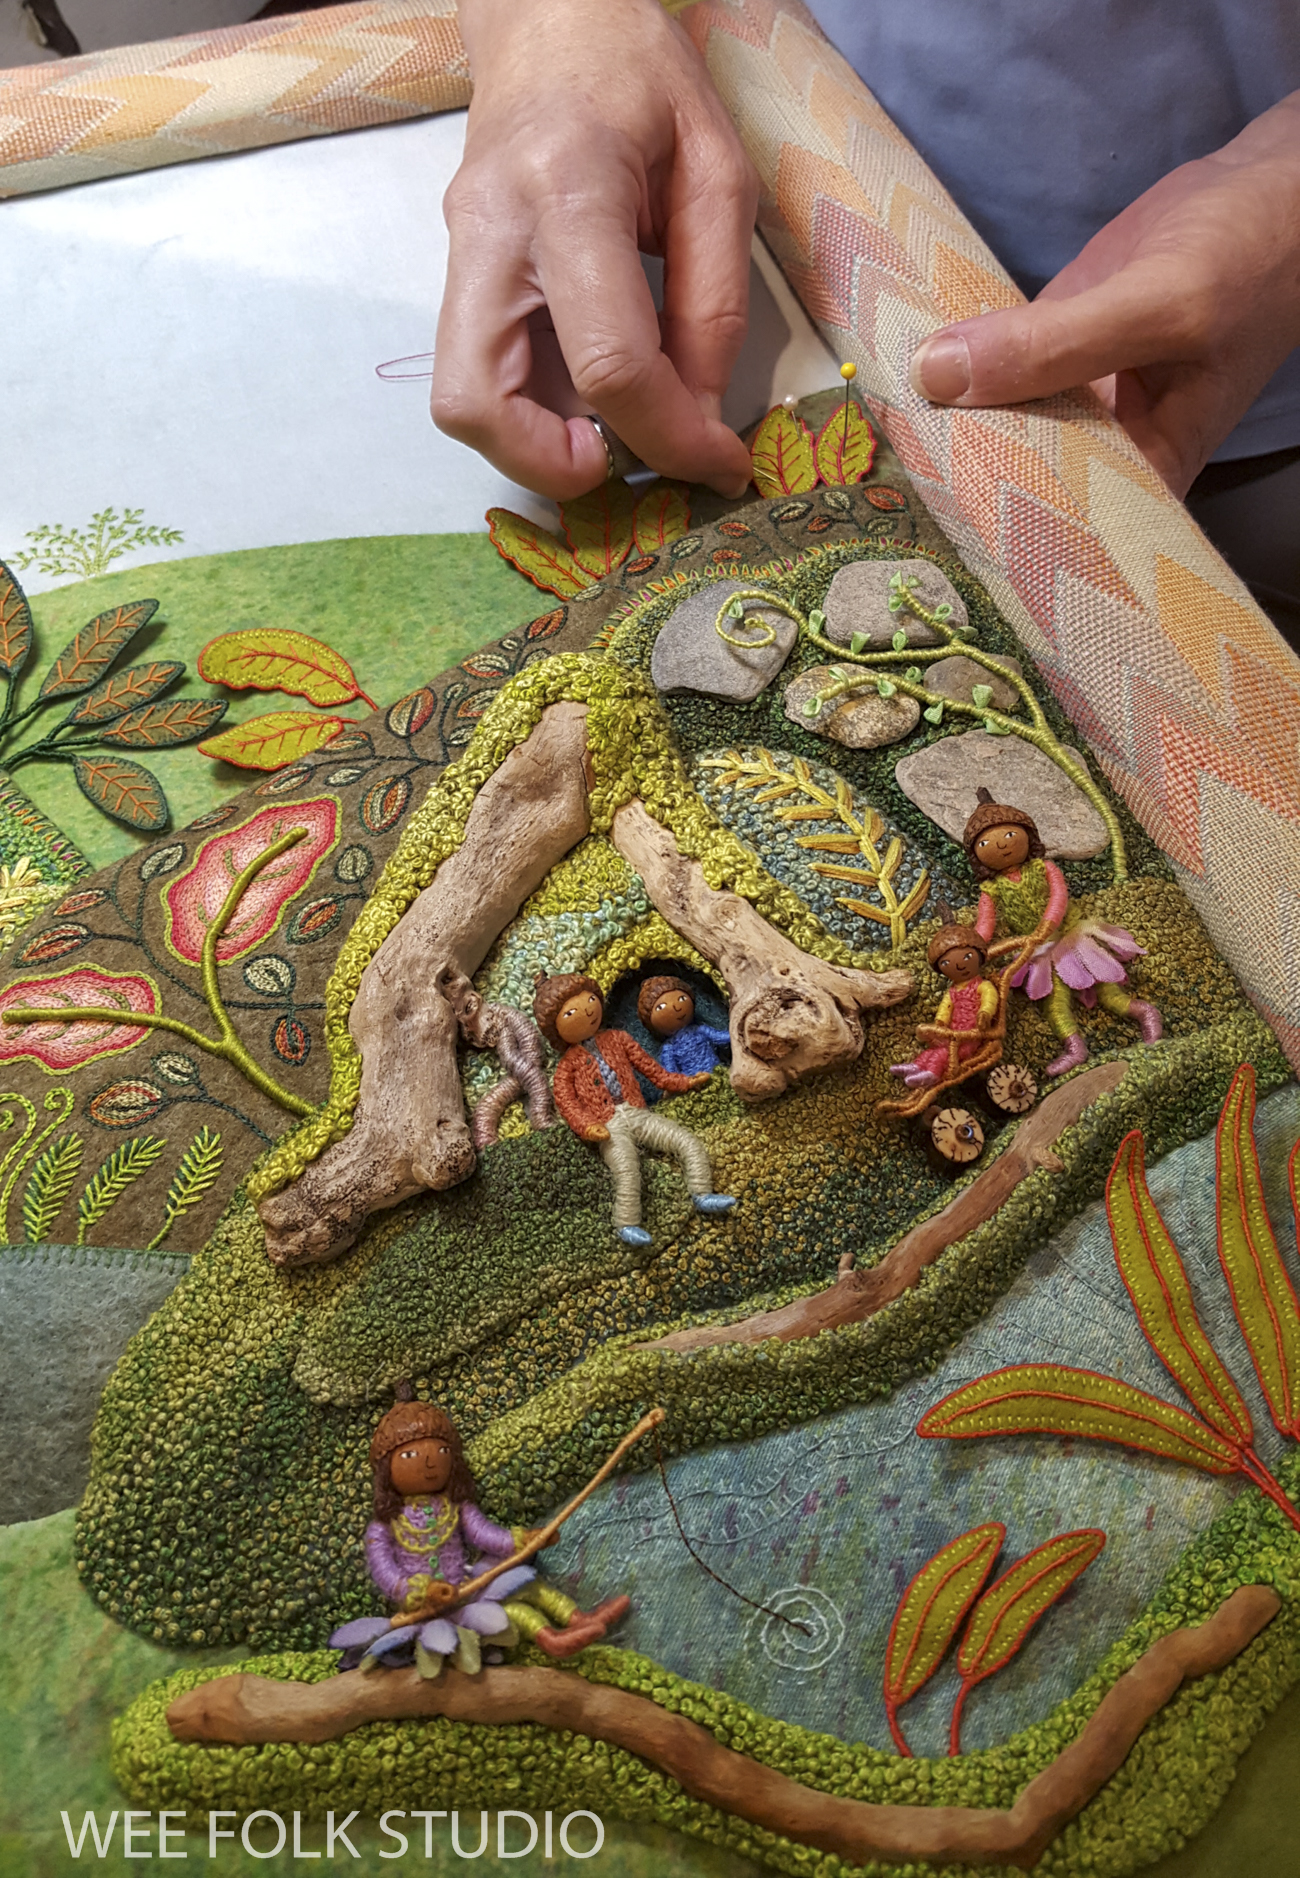
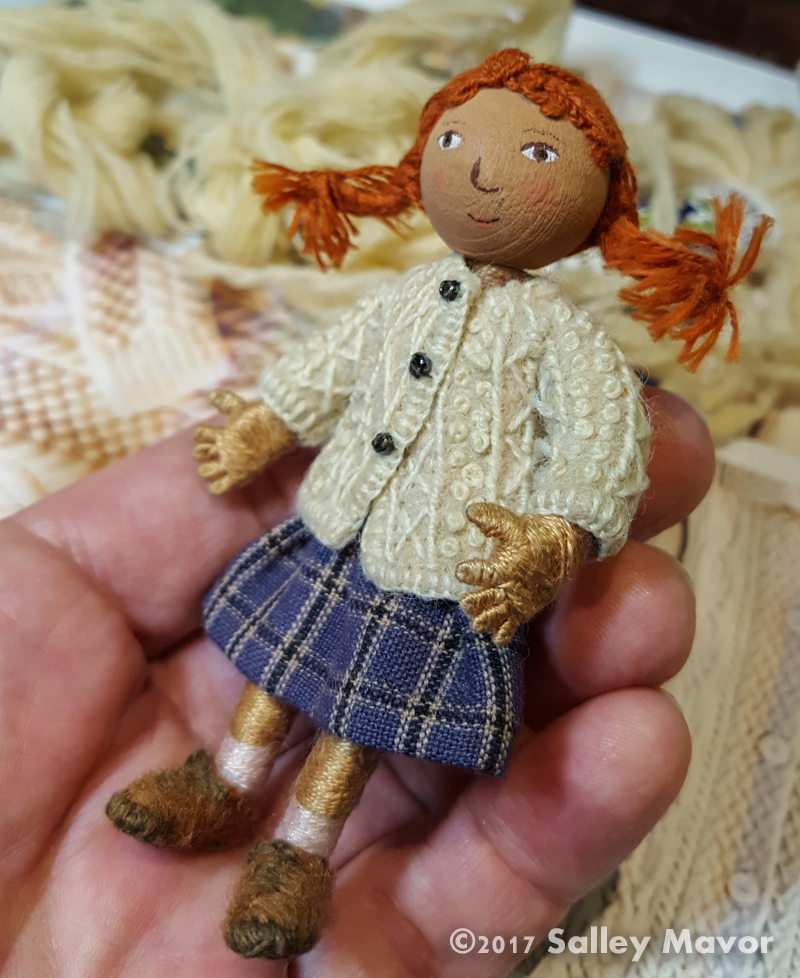
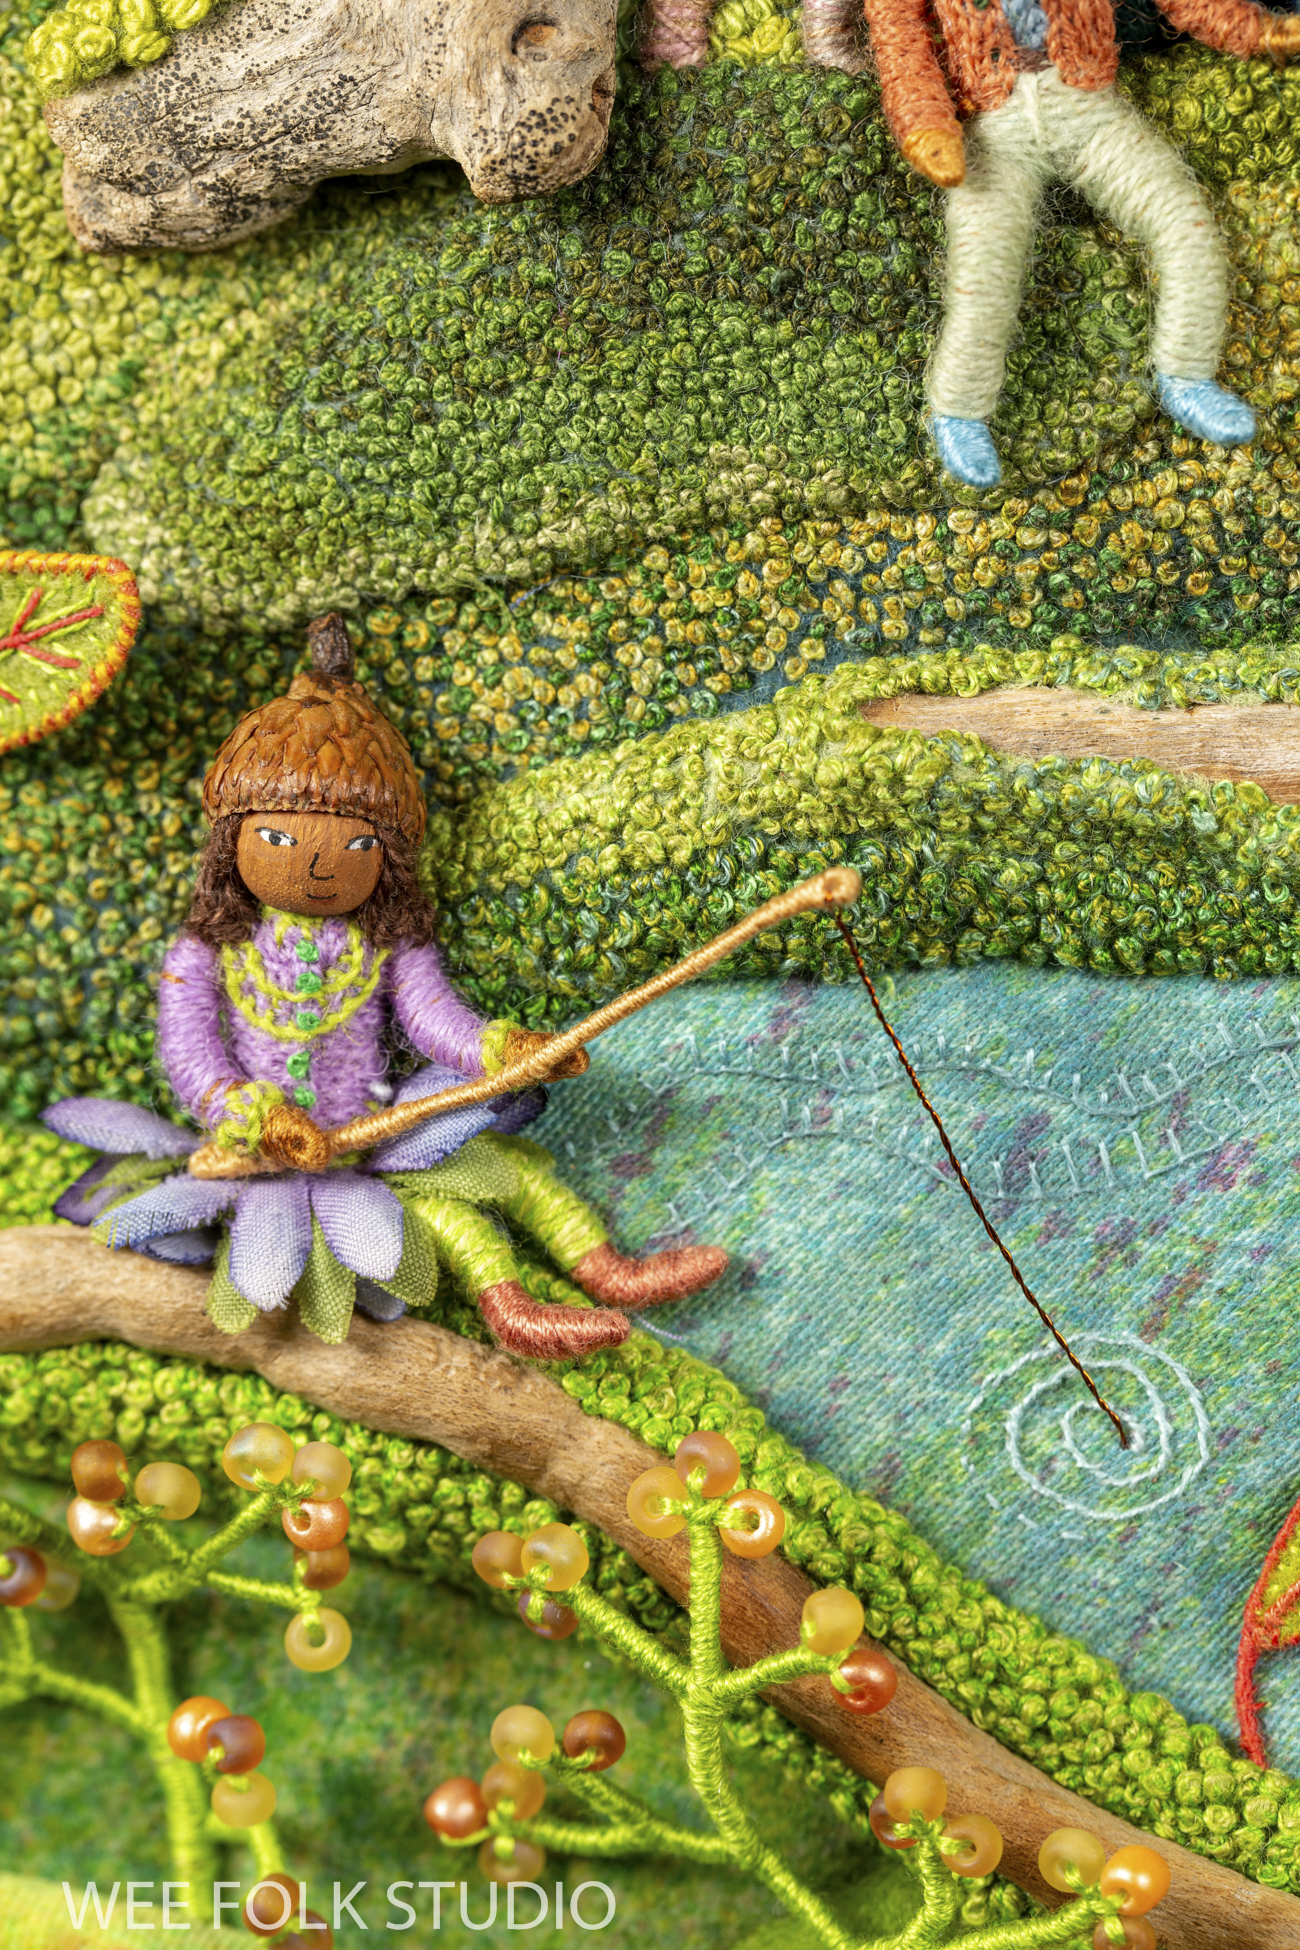
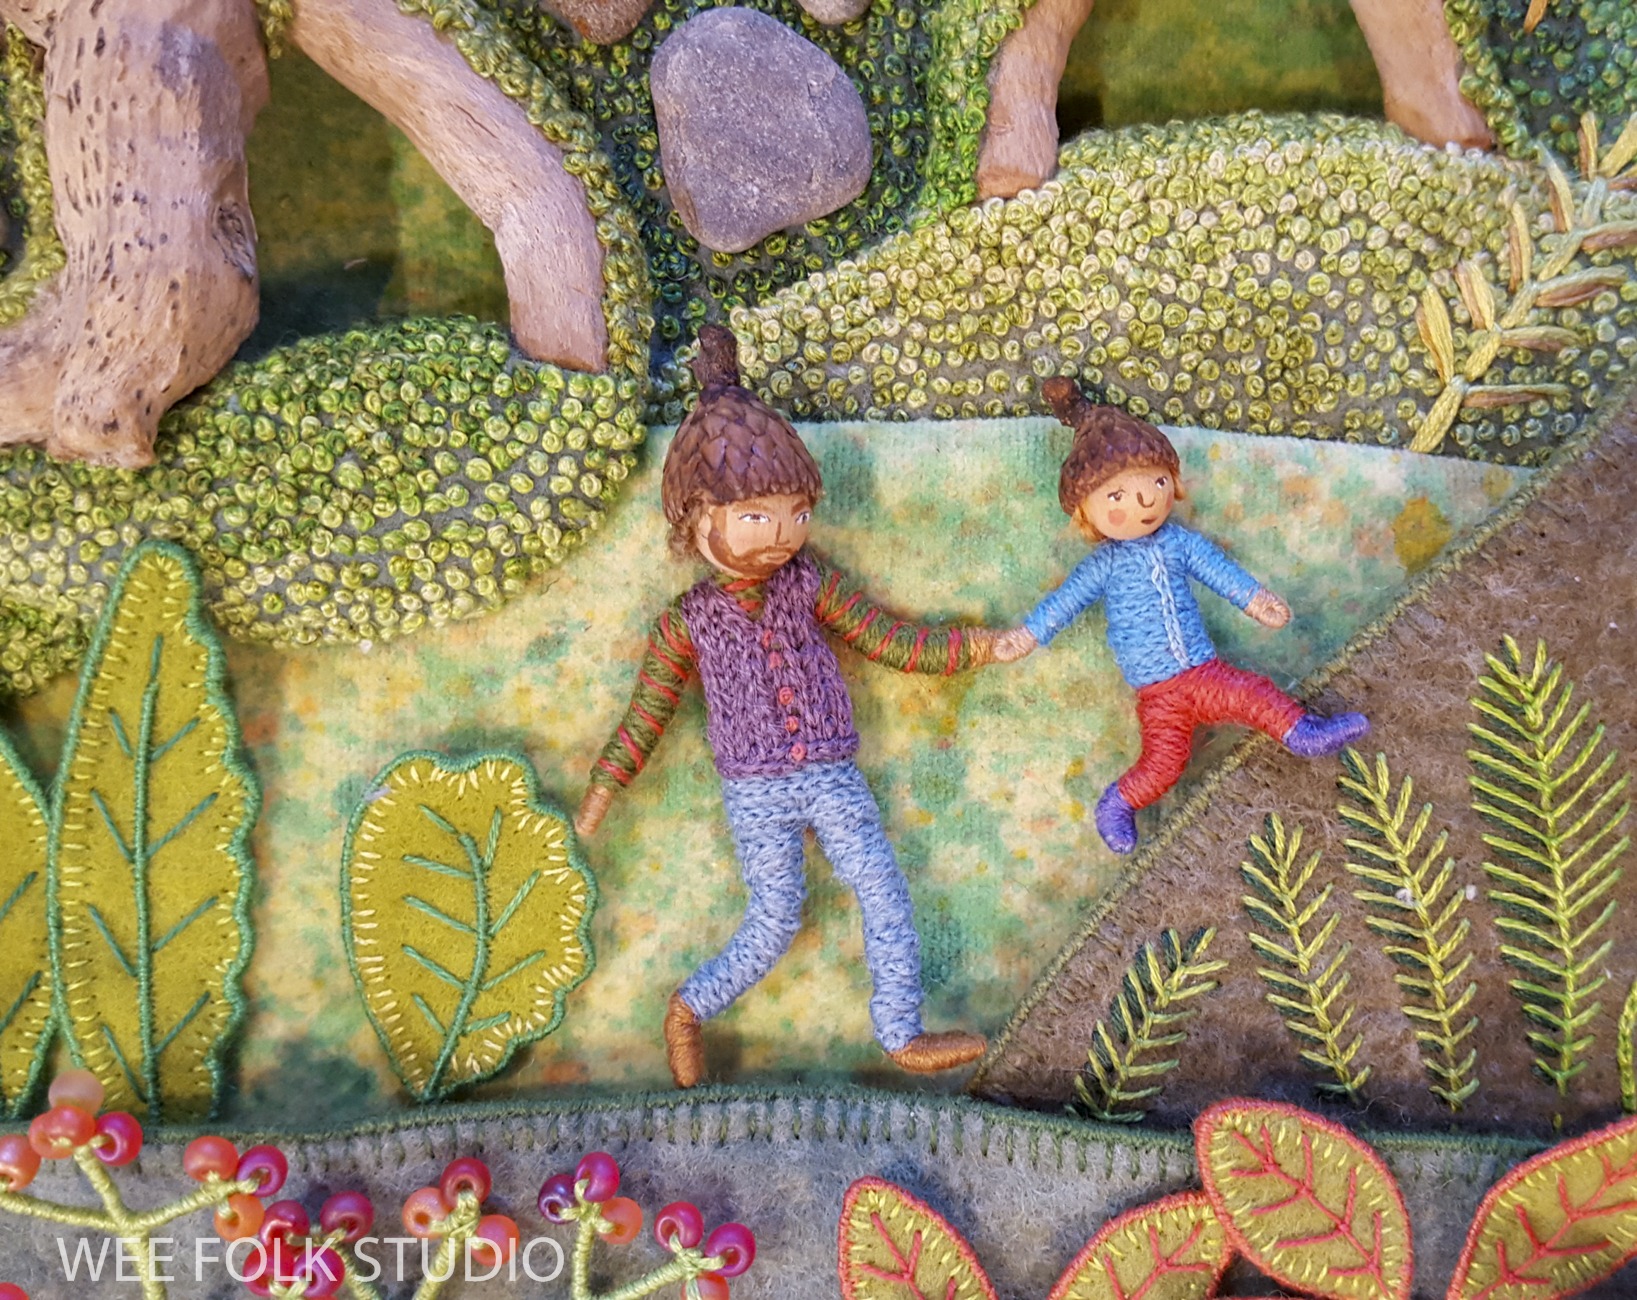
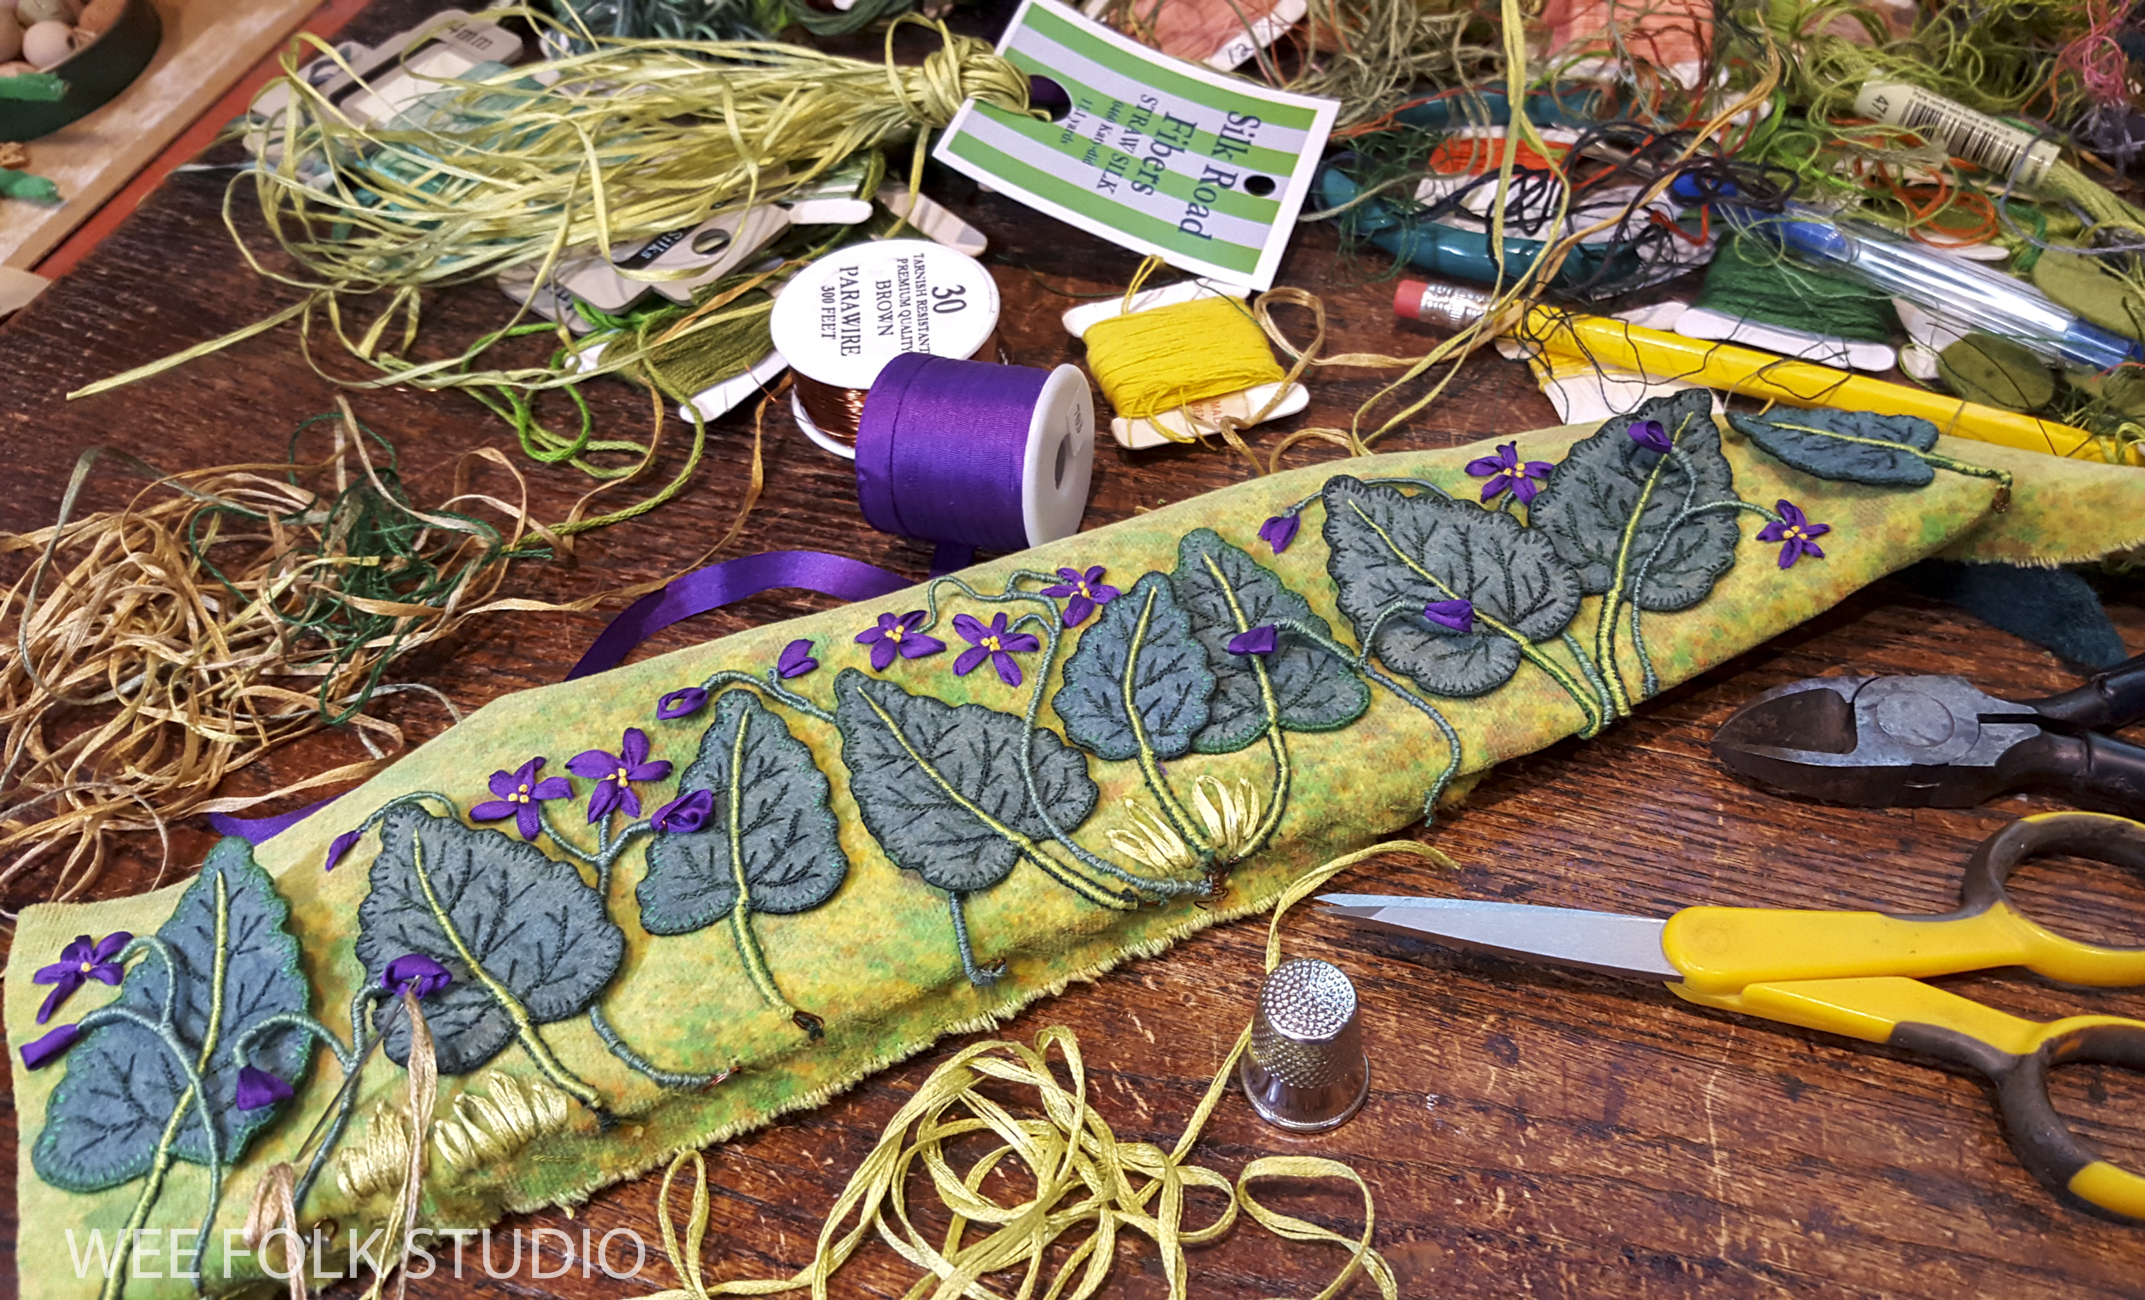
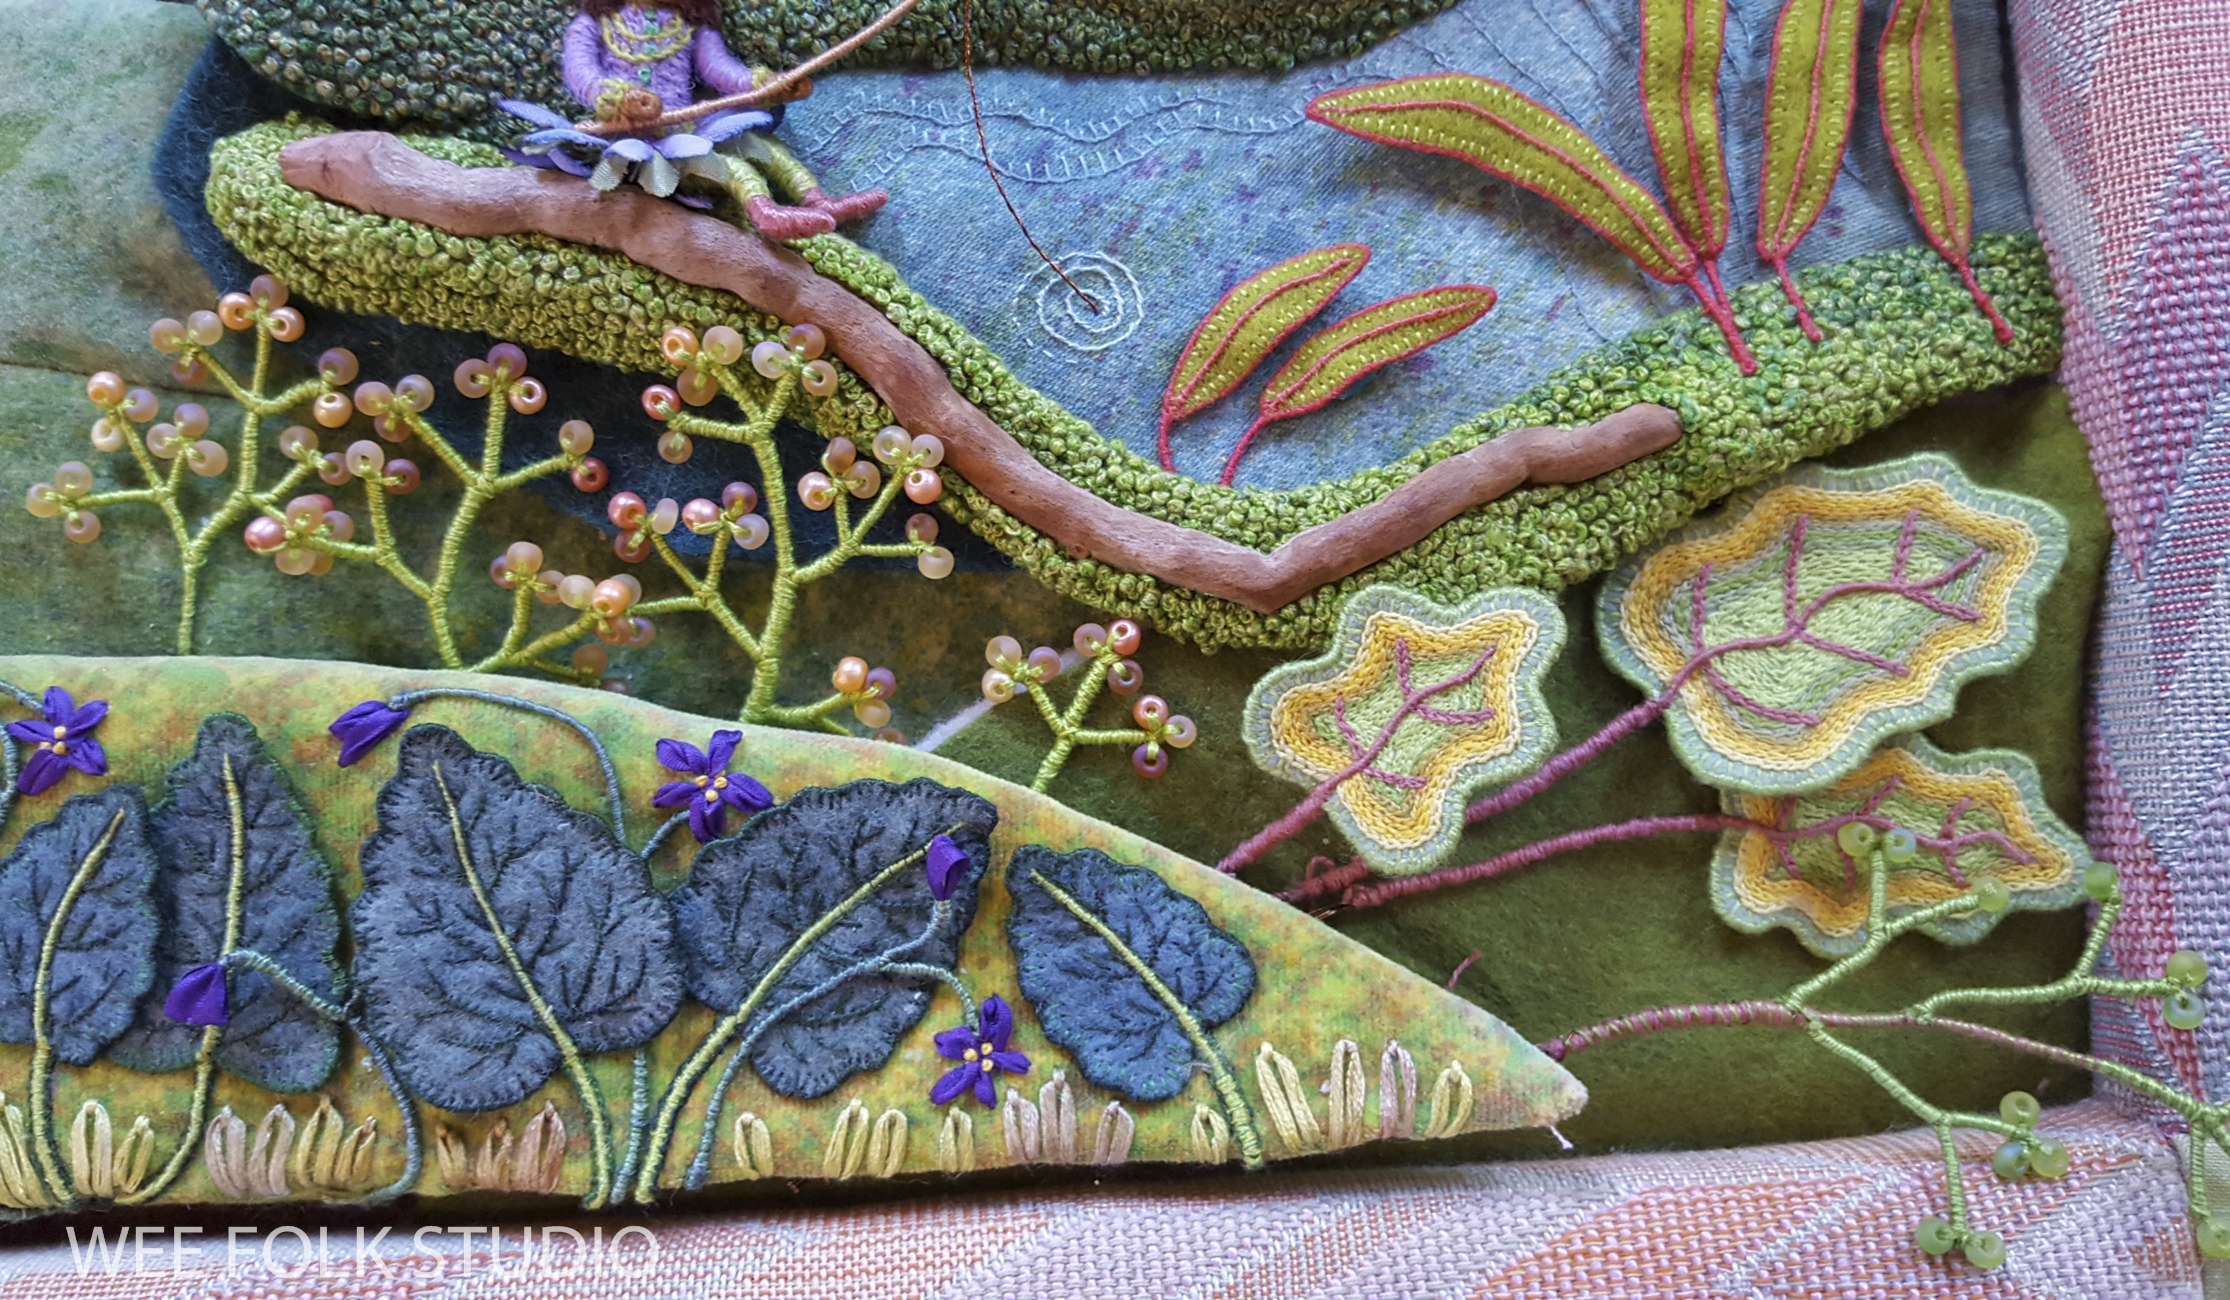
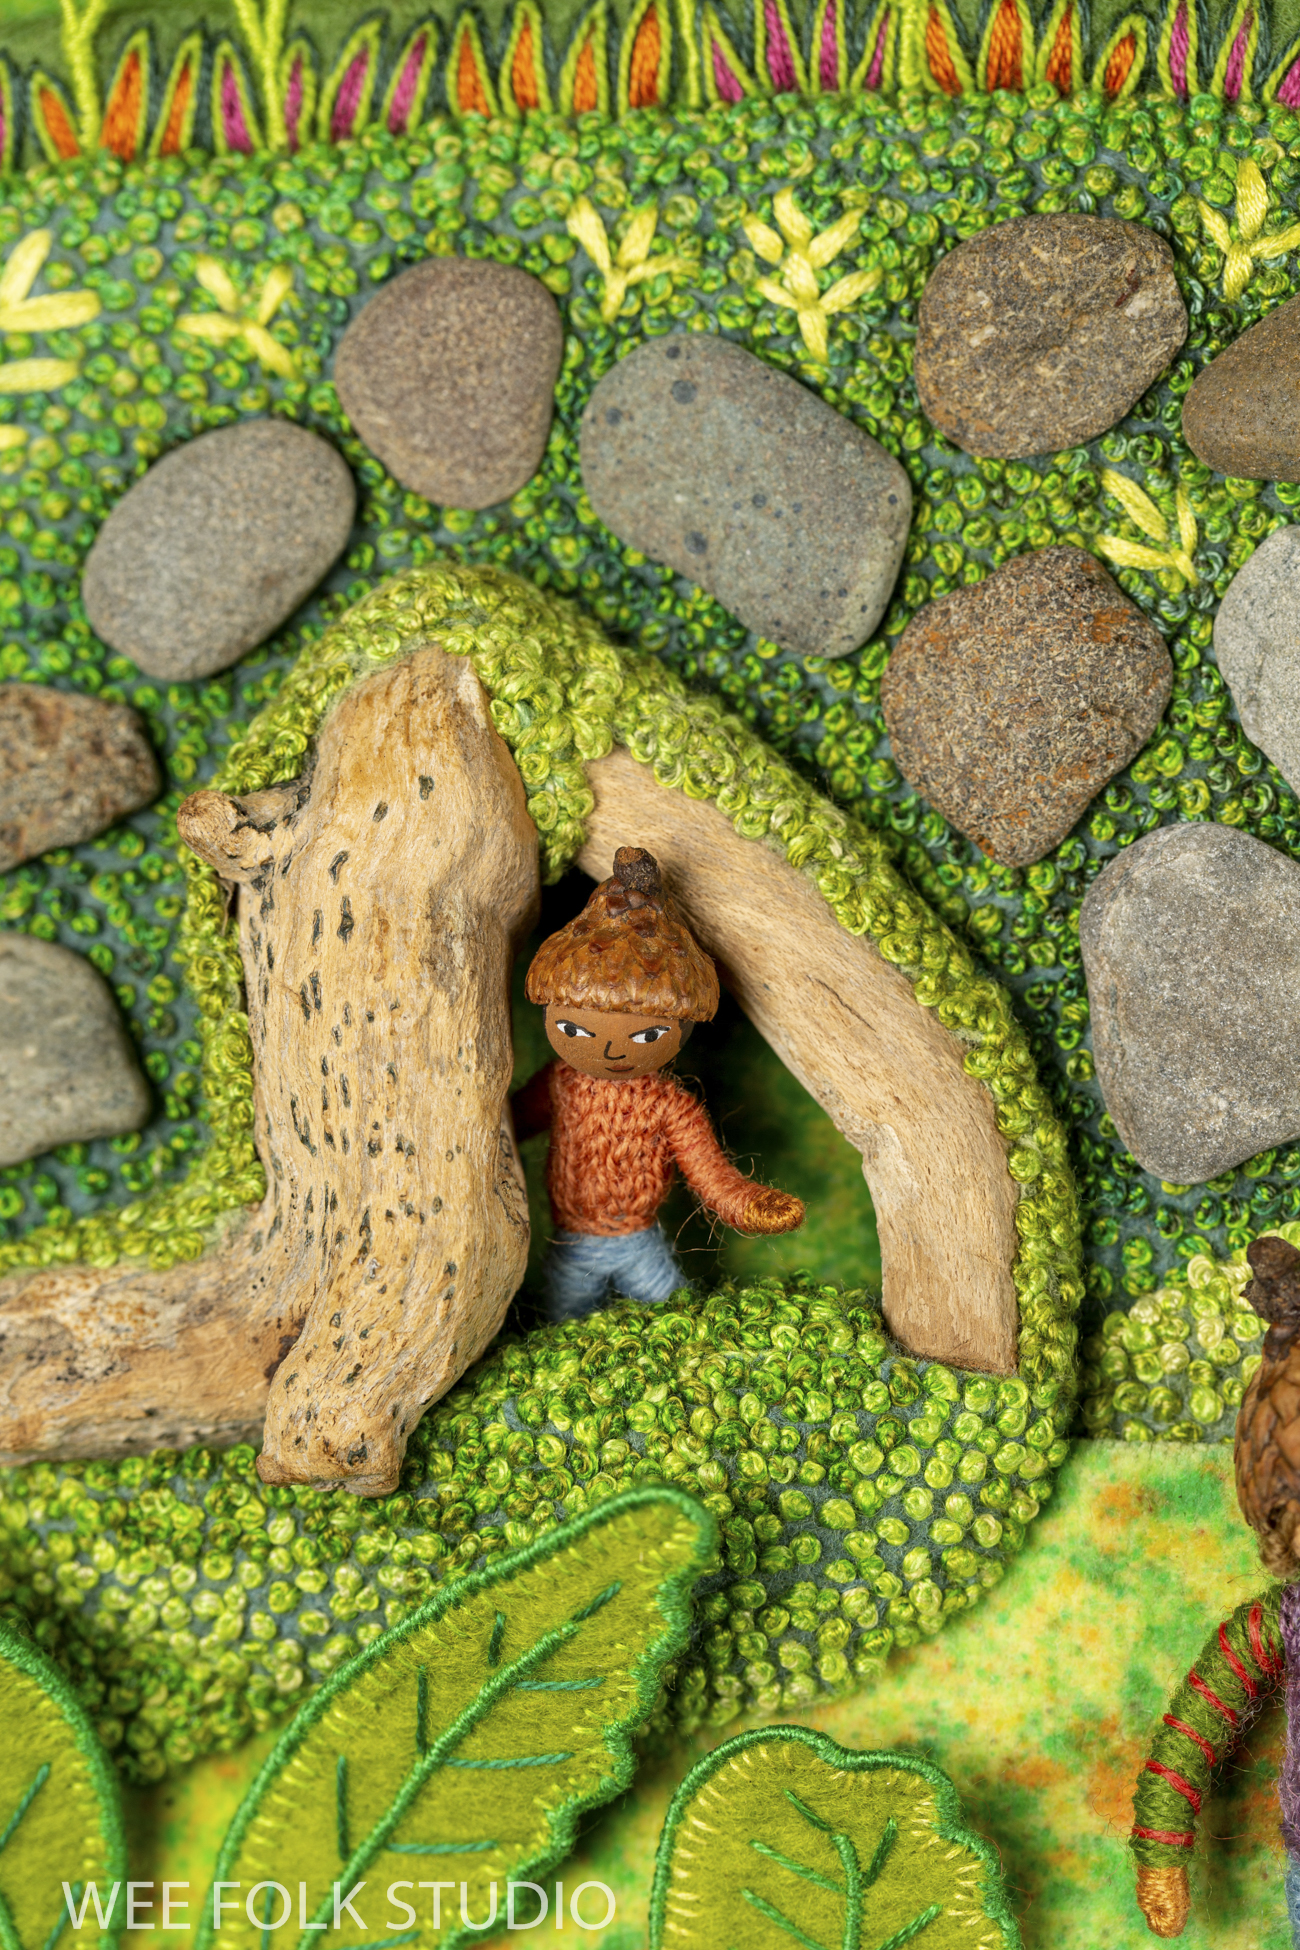
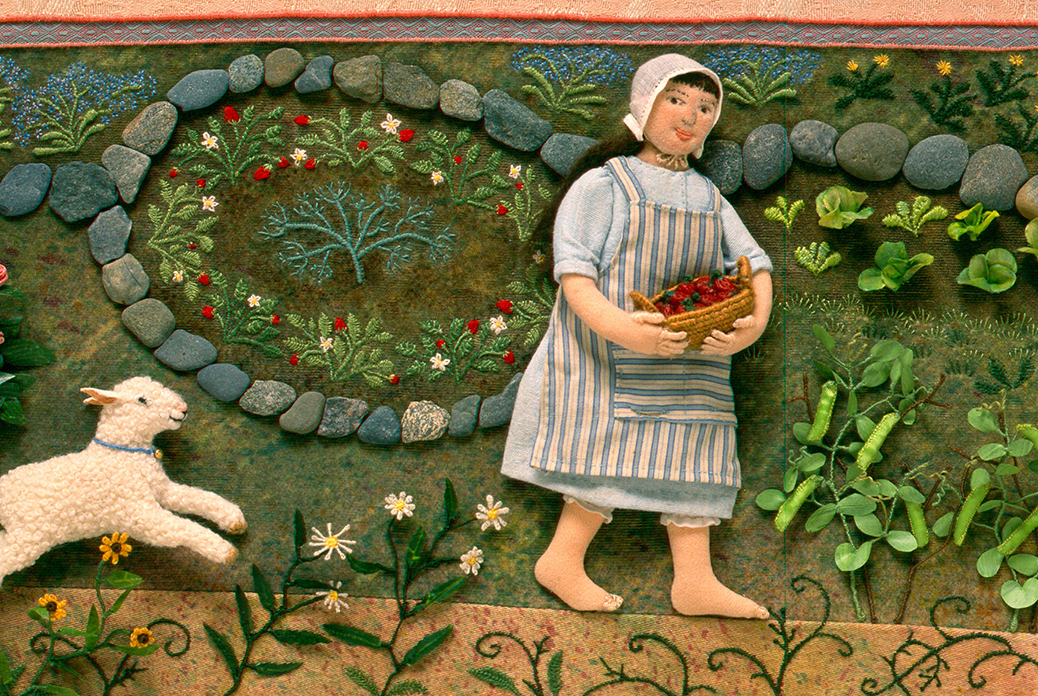
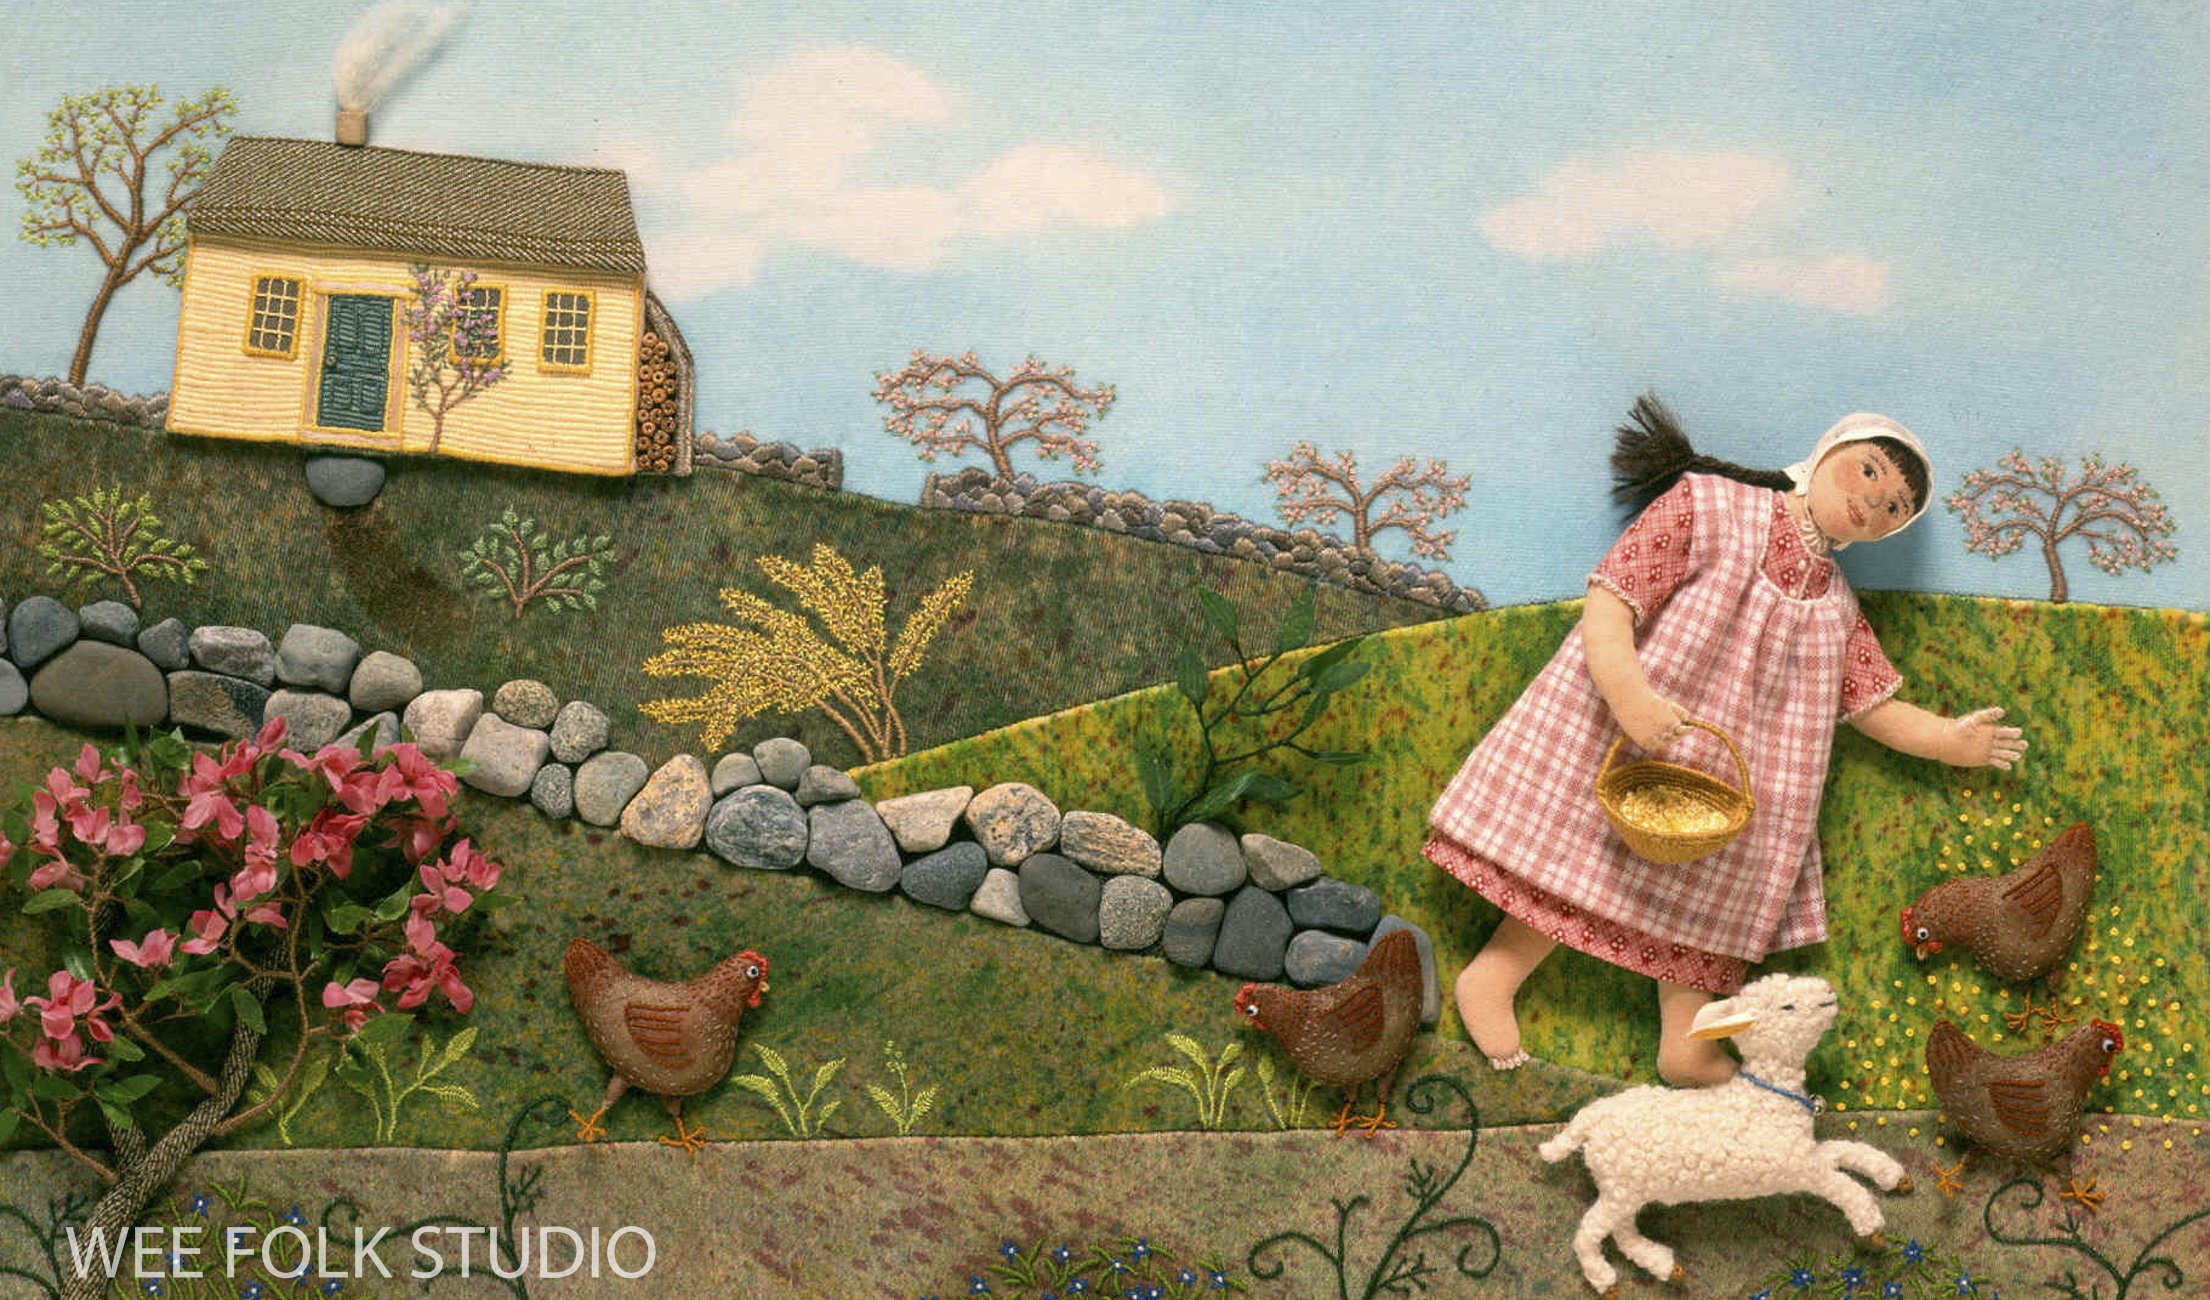
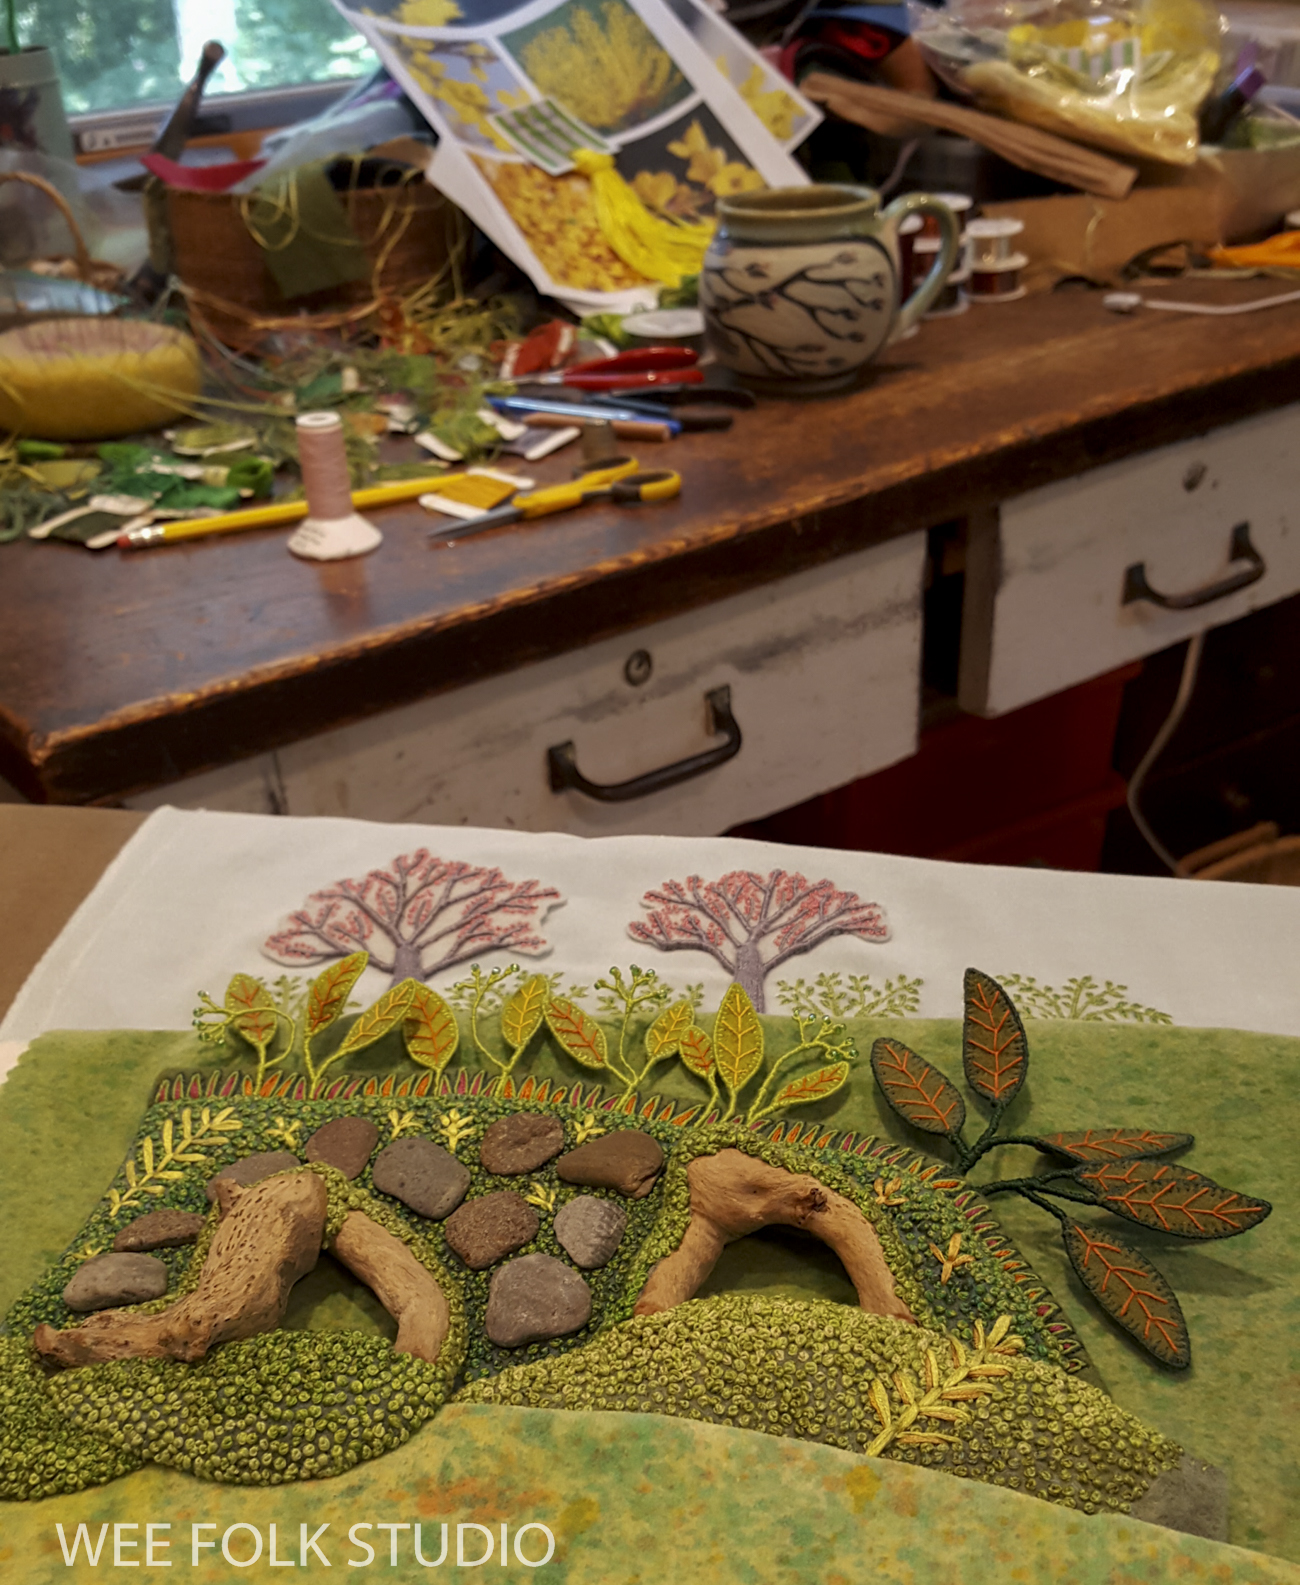
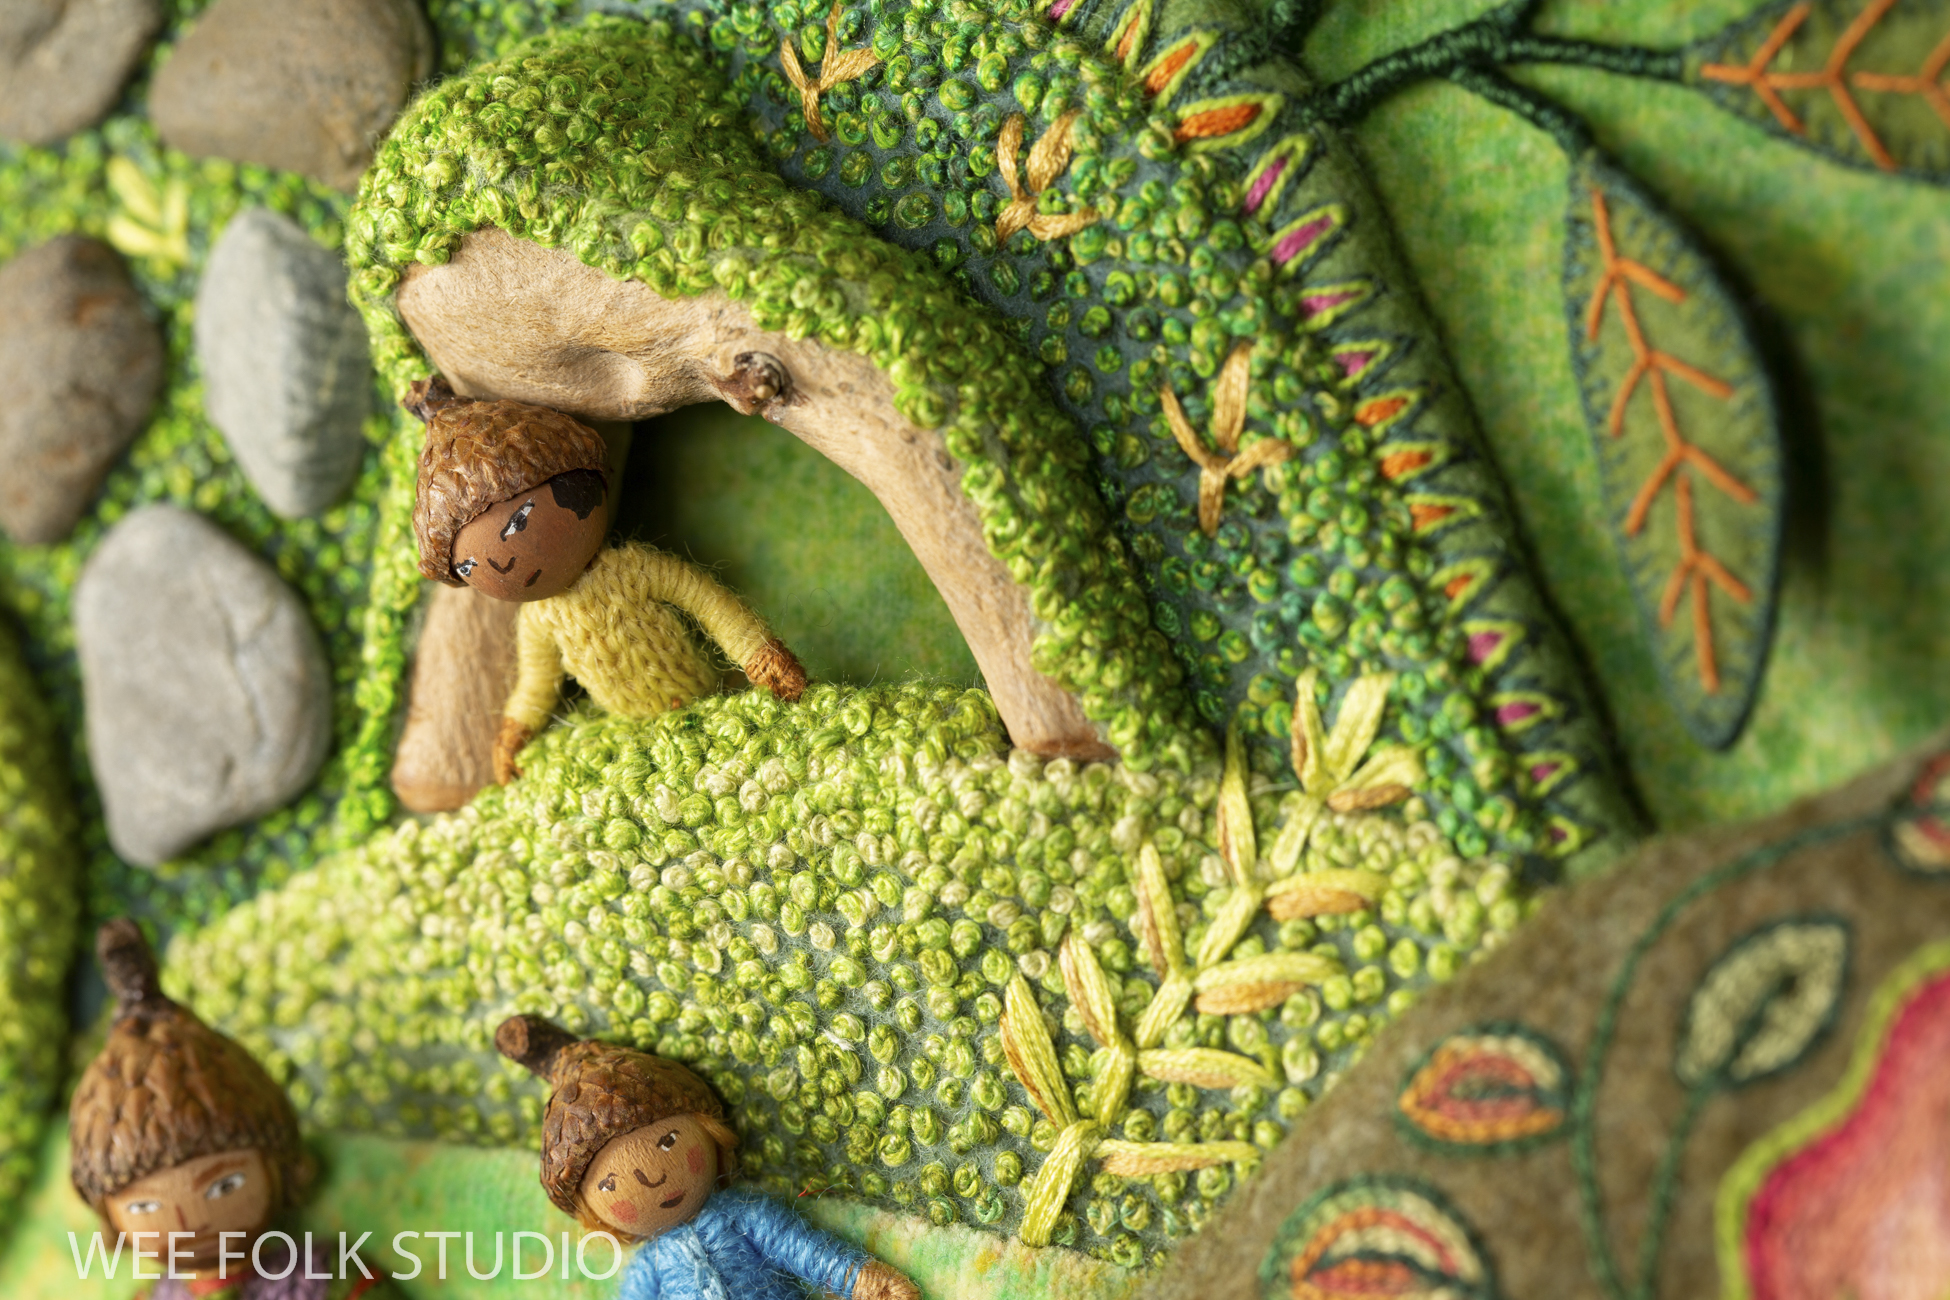
I’m happy to report that after almost a year of work, Summertime, the newest scene in my seasonal landscape series, is finished! Now all four seasons will be included in my upcoming exhibition at the Southern Vermont Arts Center. The Wee Worlds of Salley Mavor will be on view Sept. 30, 2013 – Jan. 7, 2024.

Further ahead in this post, you will find information about the exhibition, a preview of future posts about making Summertime and new items in my Etsy Shop.

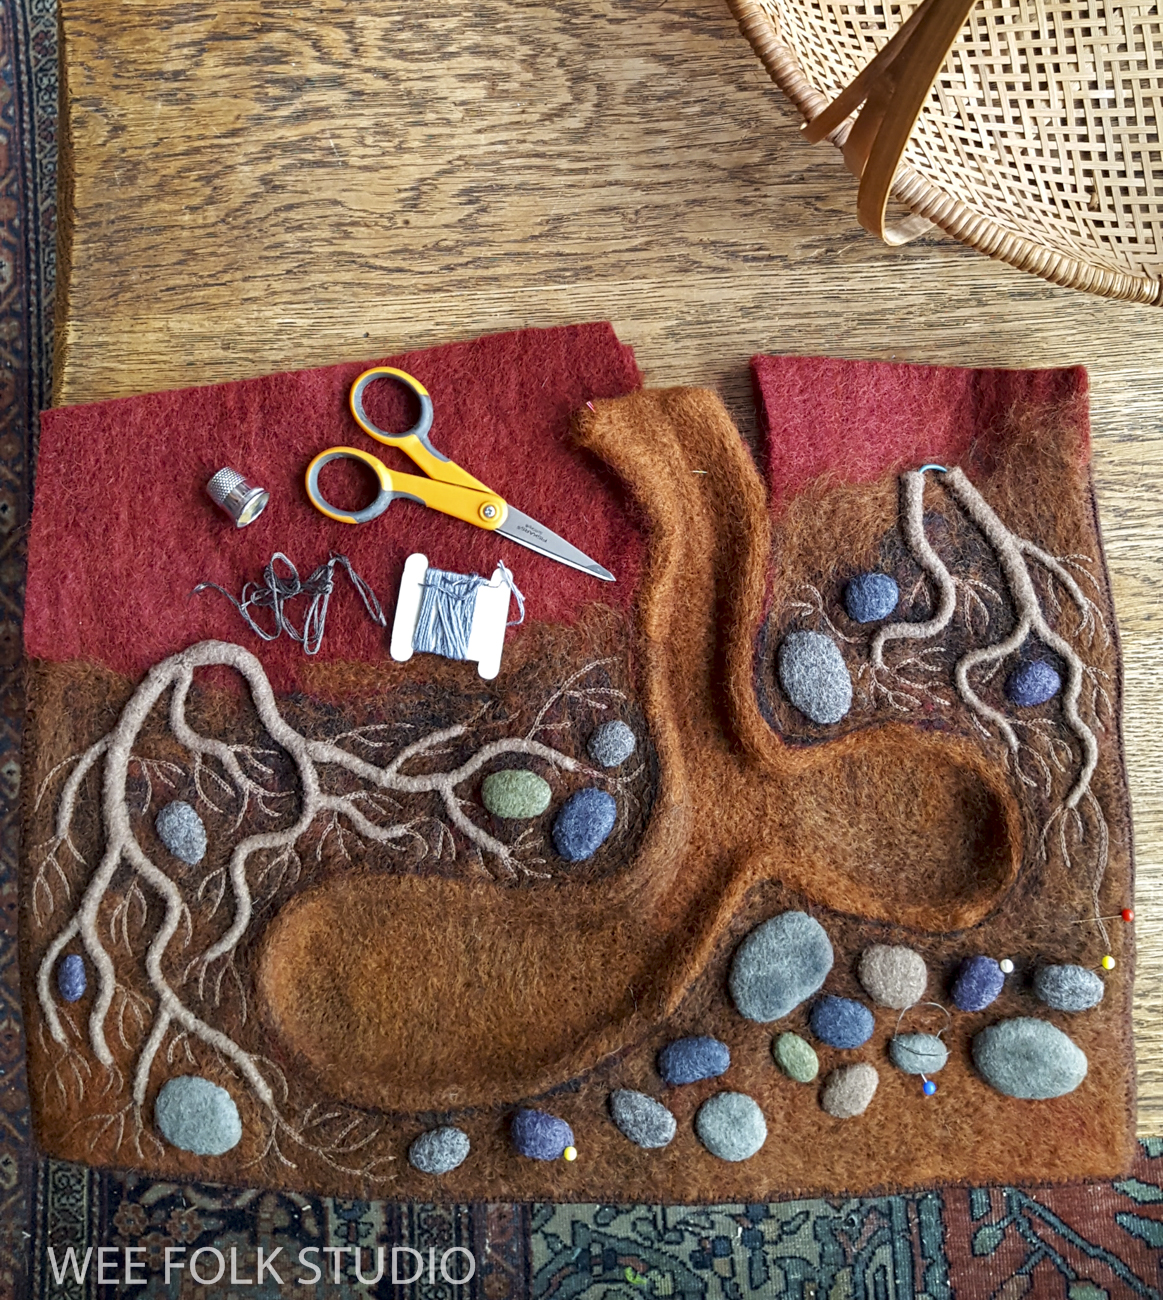
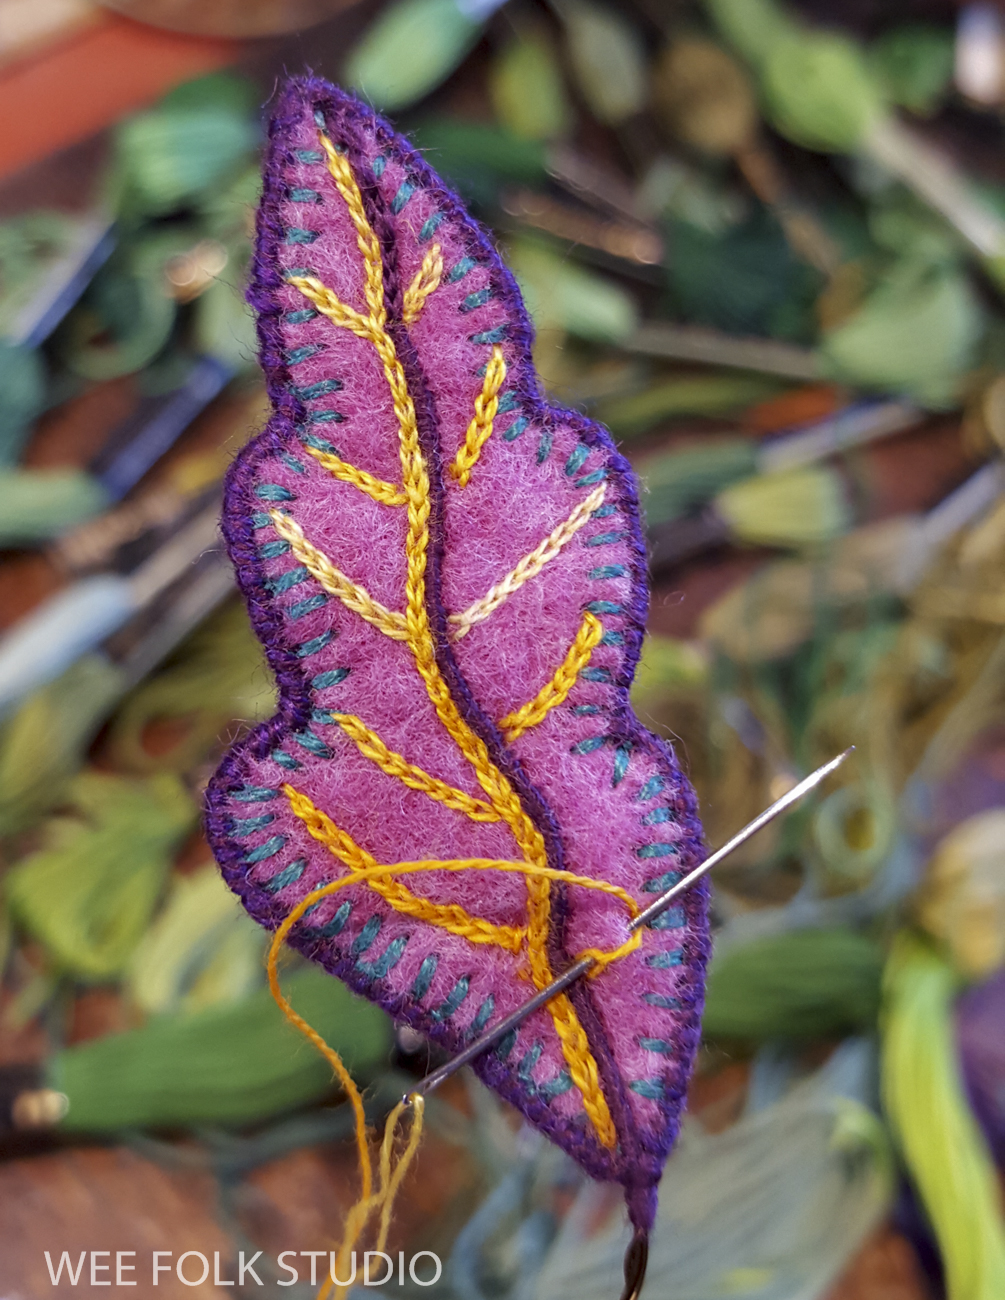
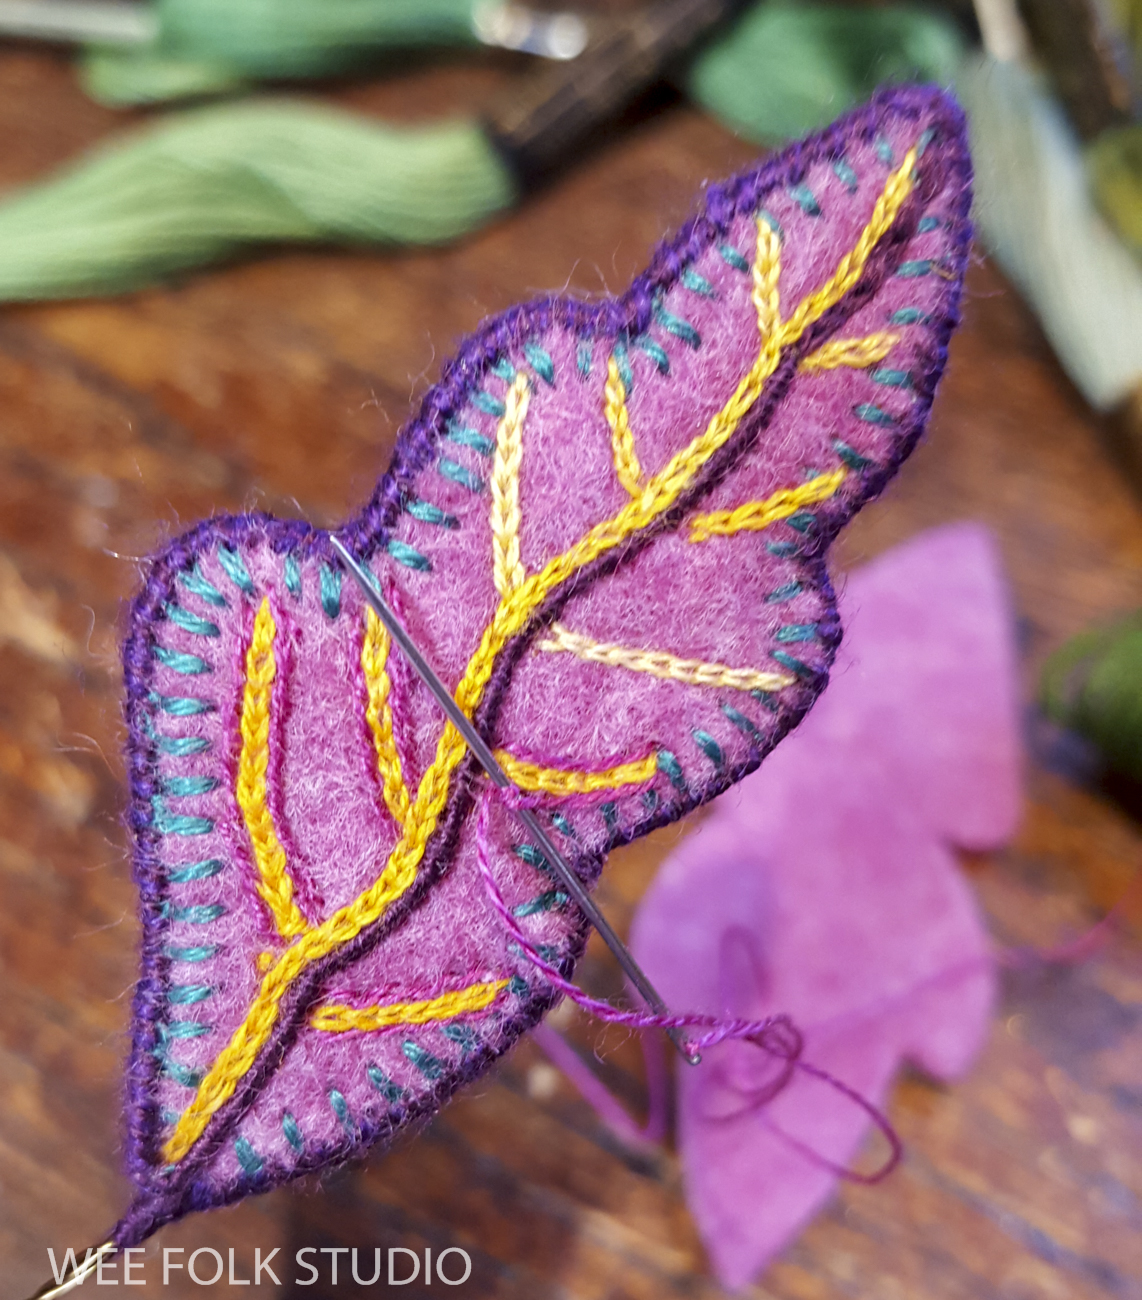
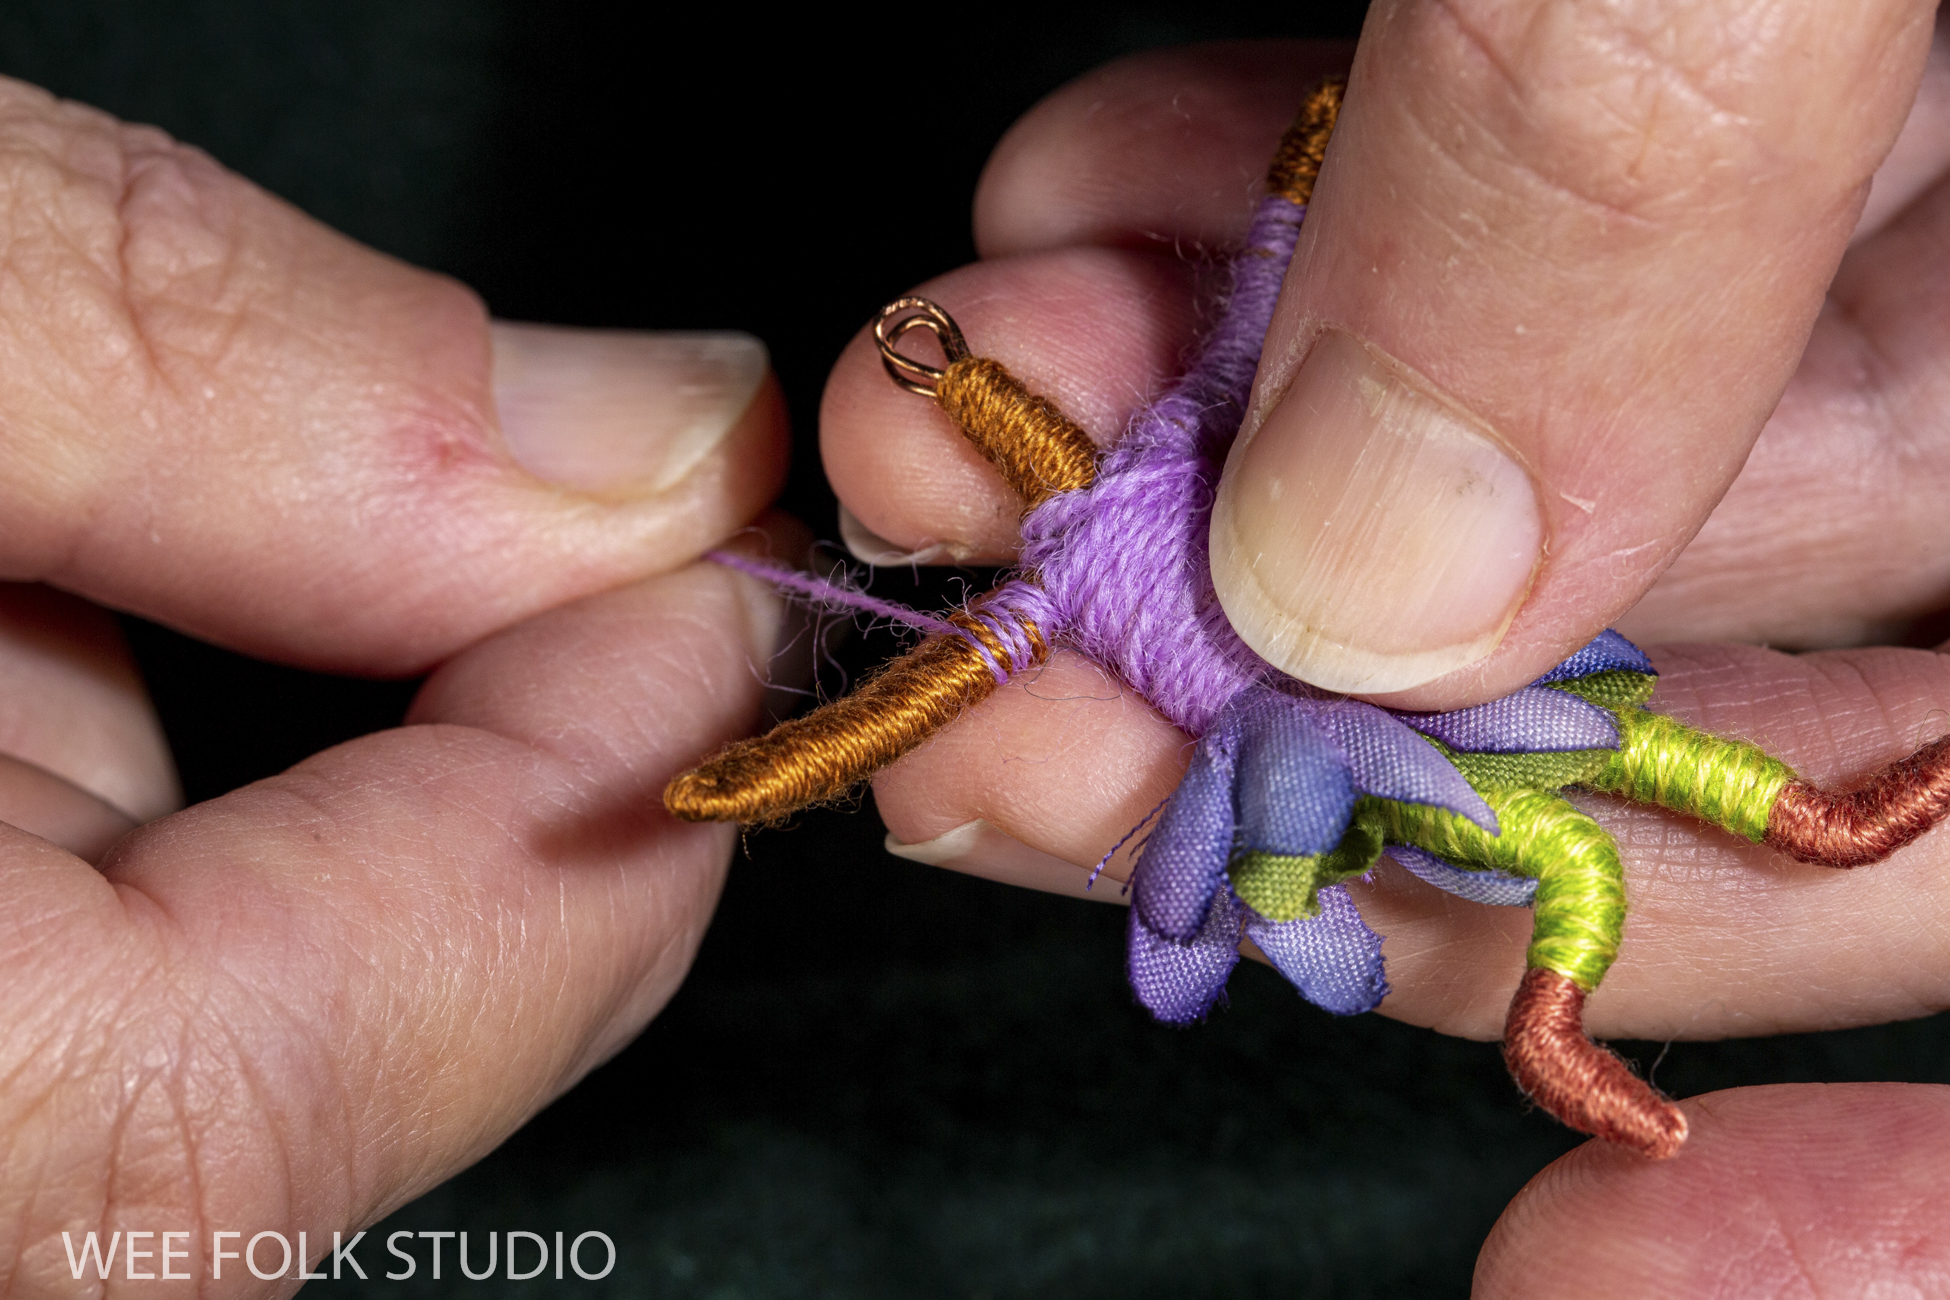
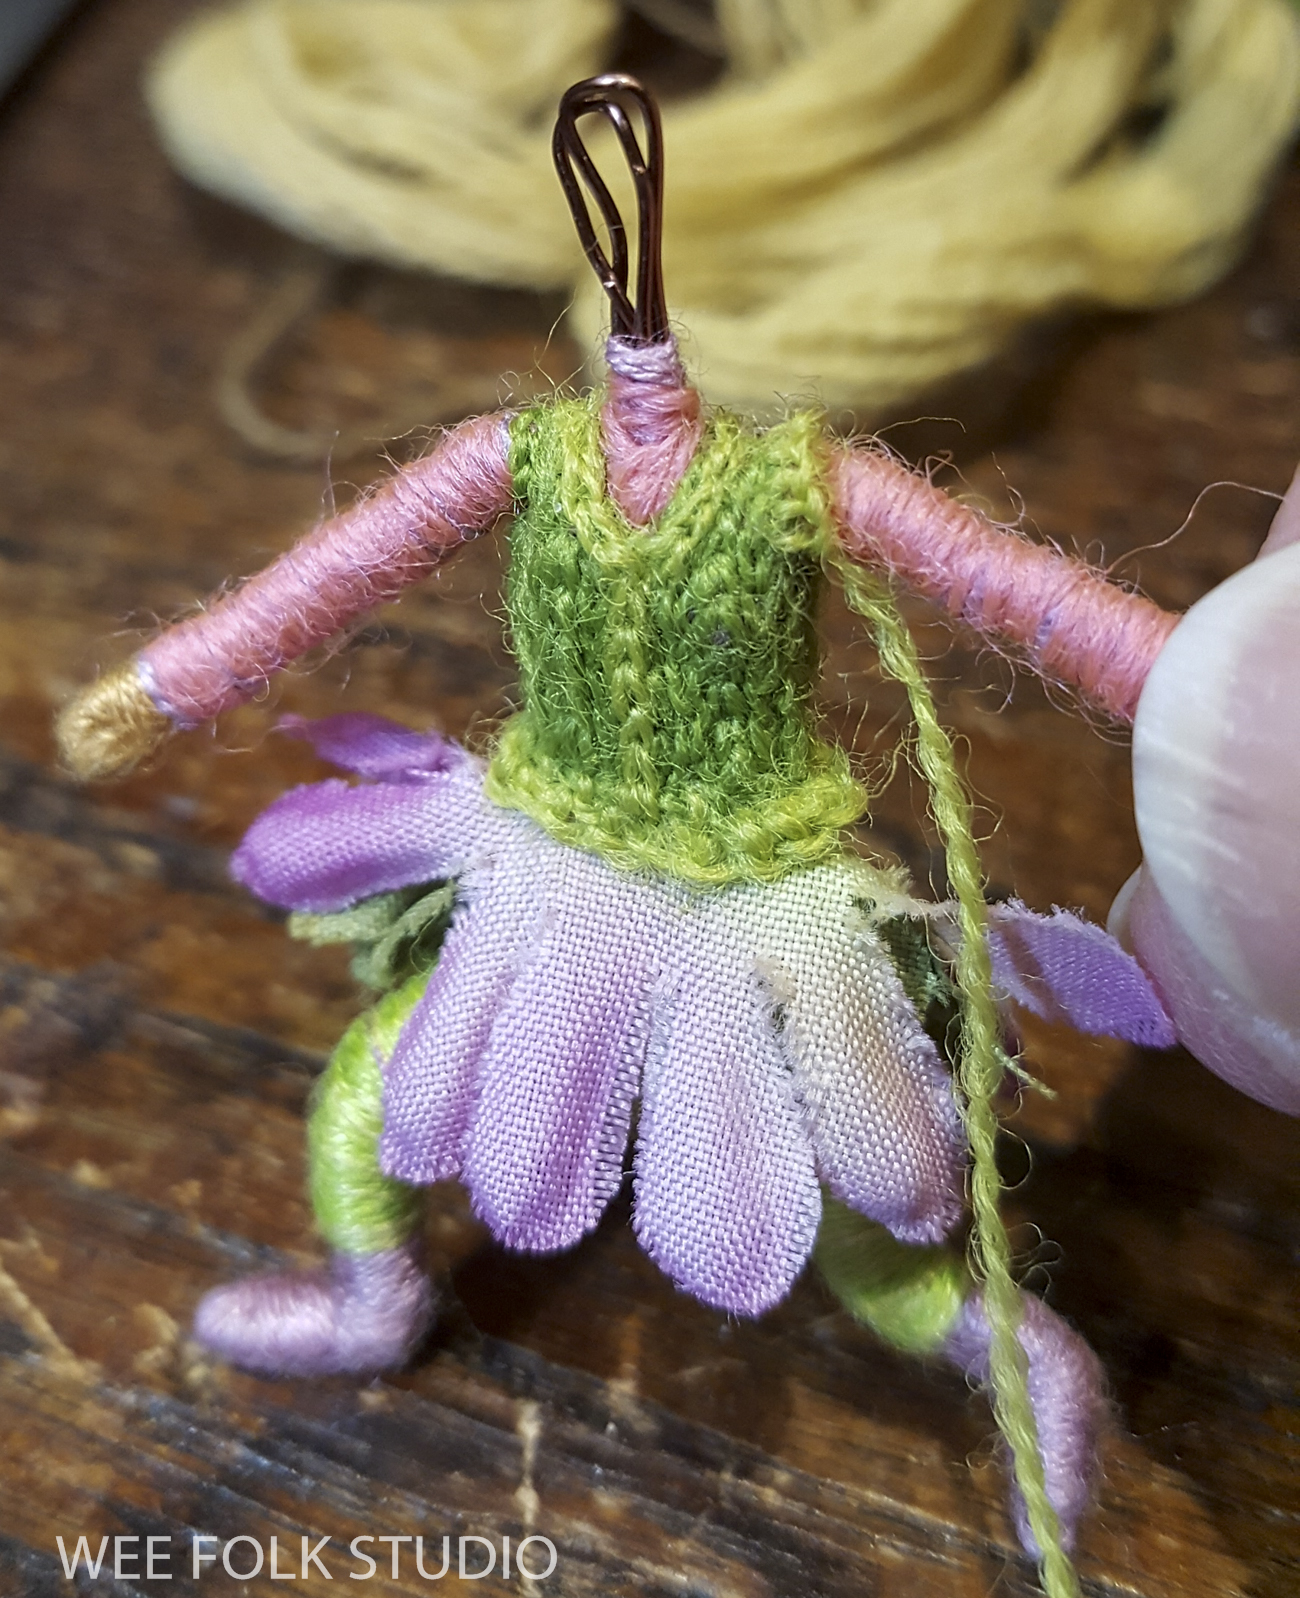
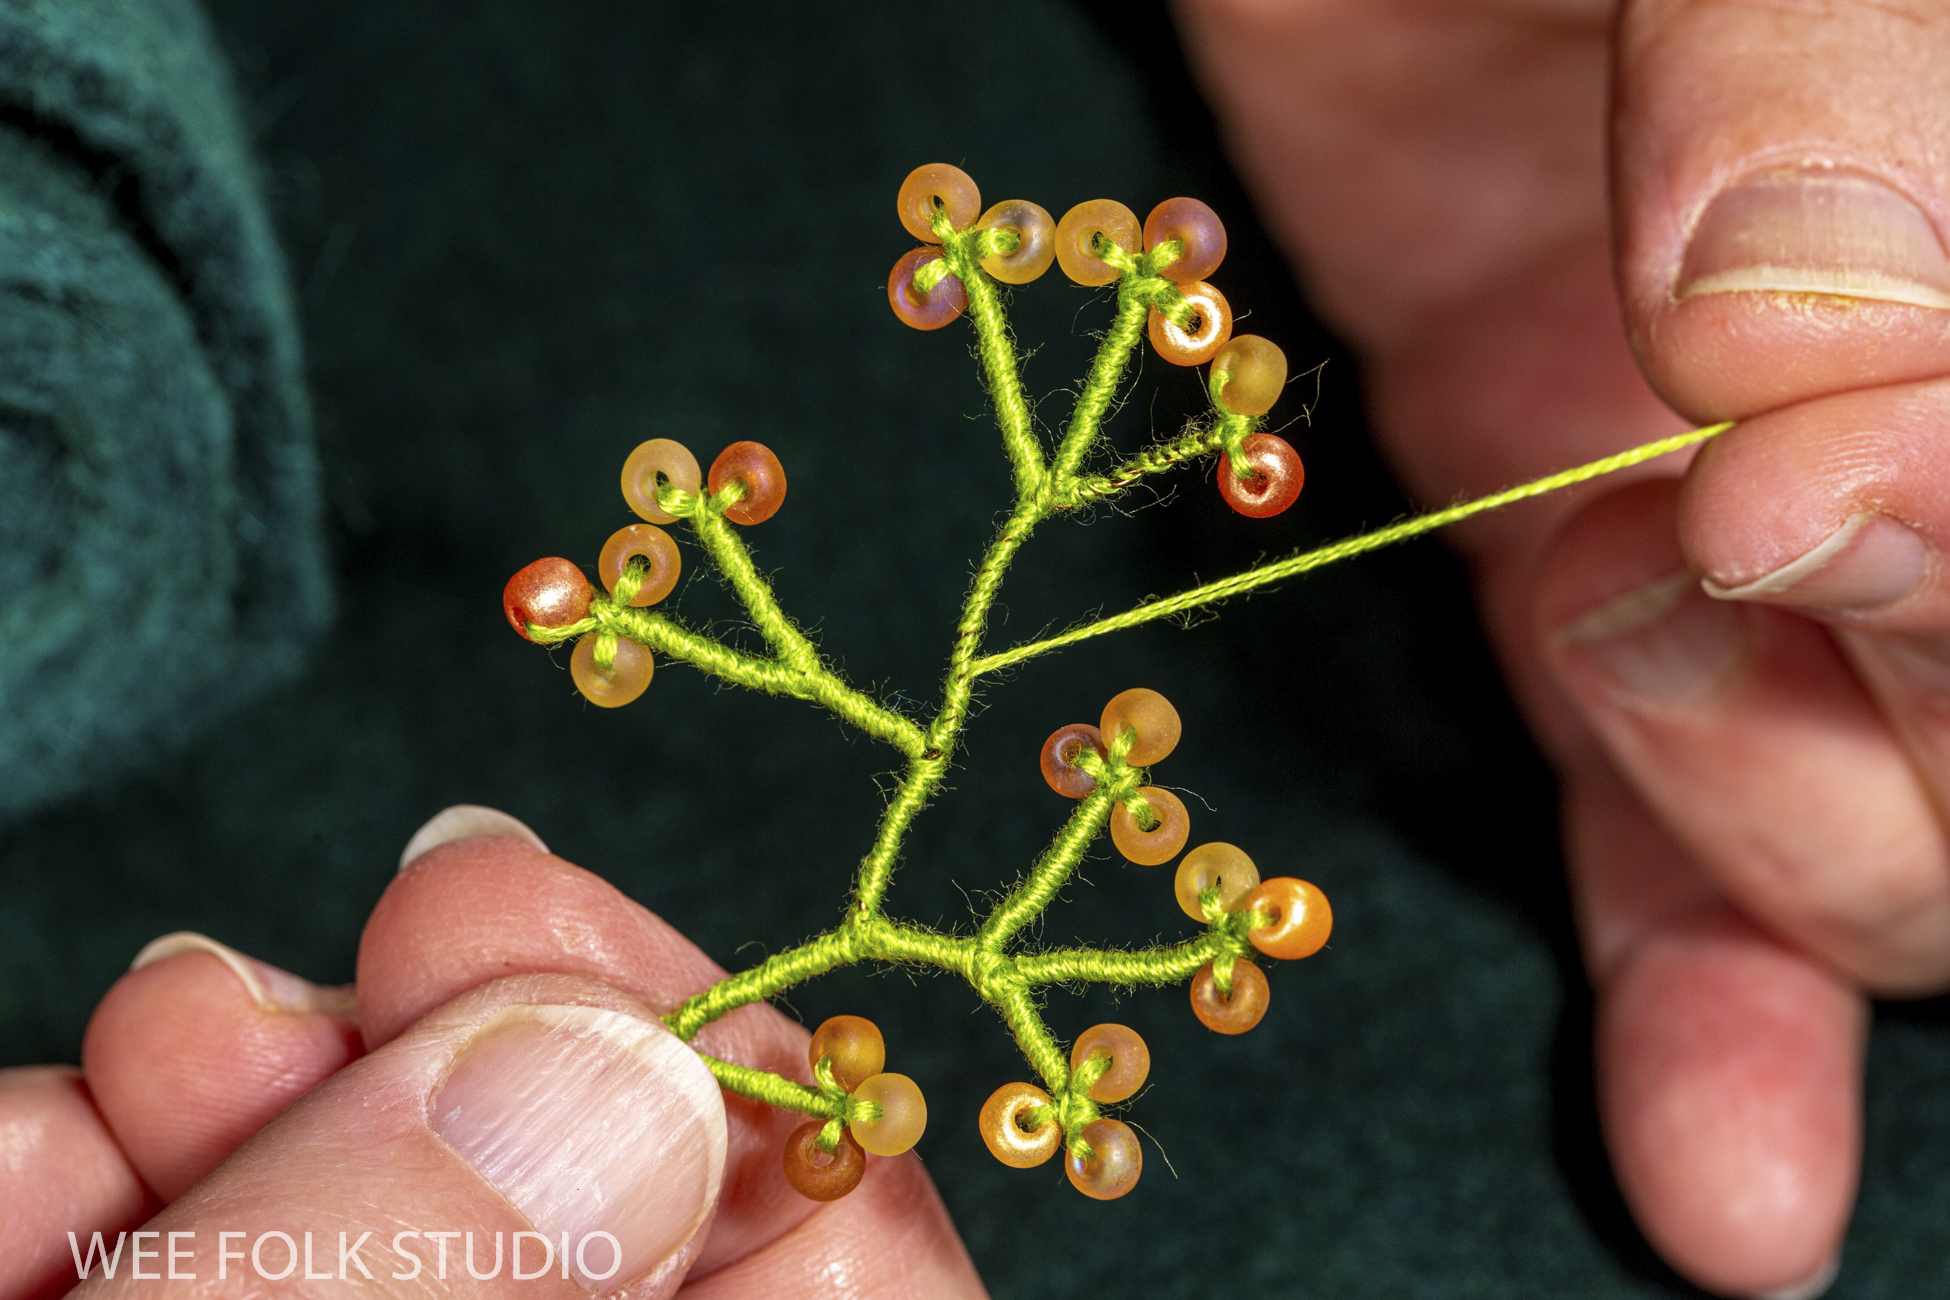
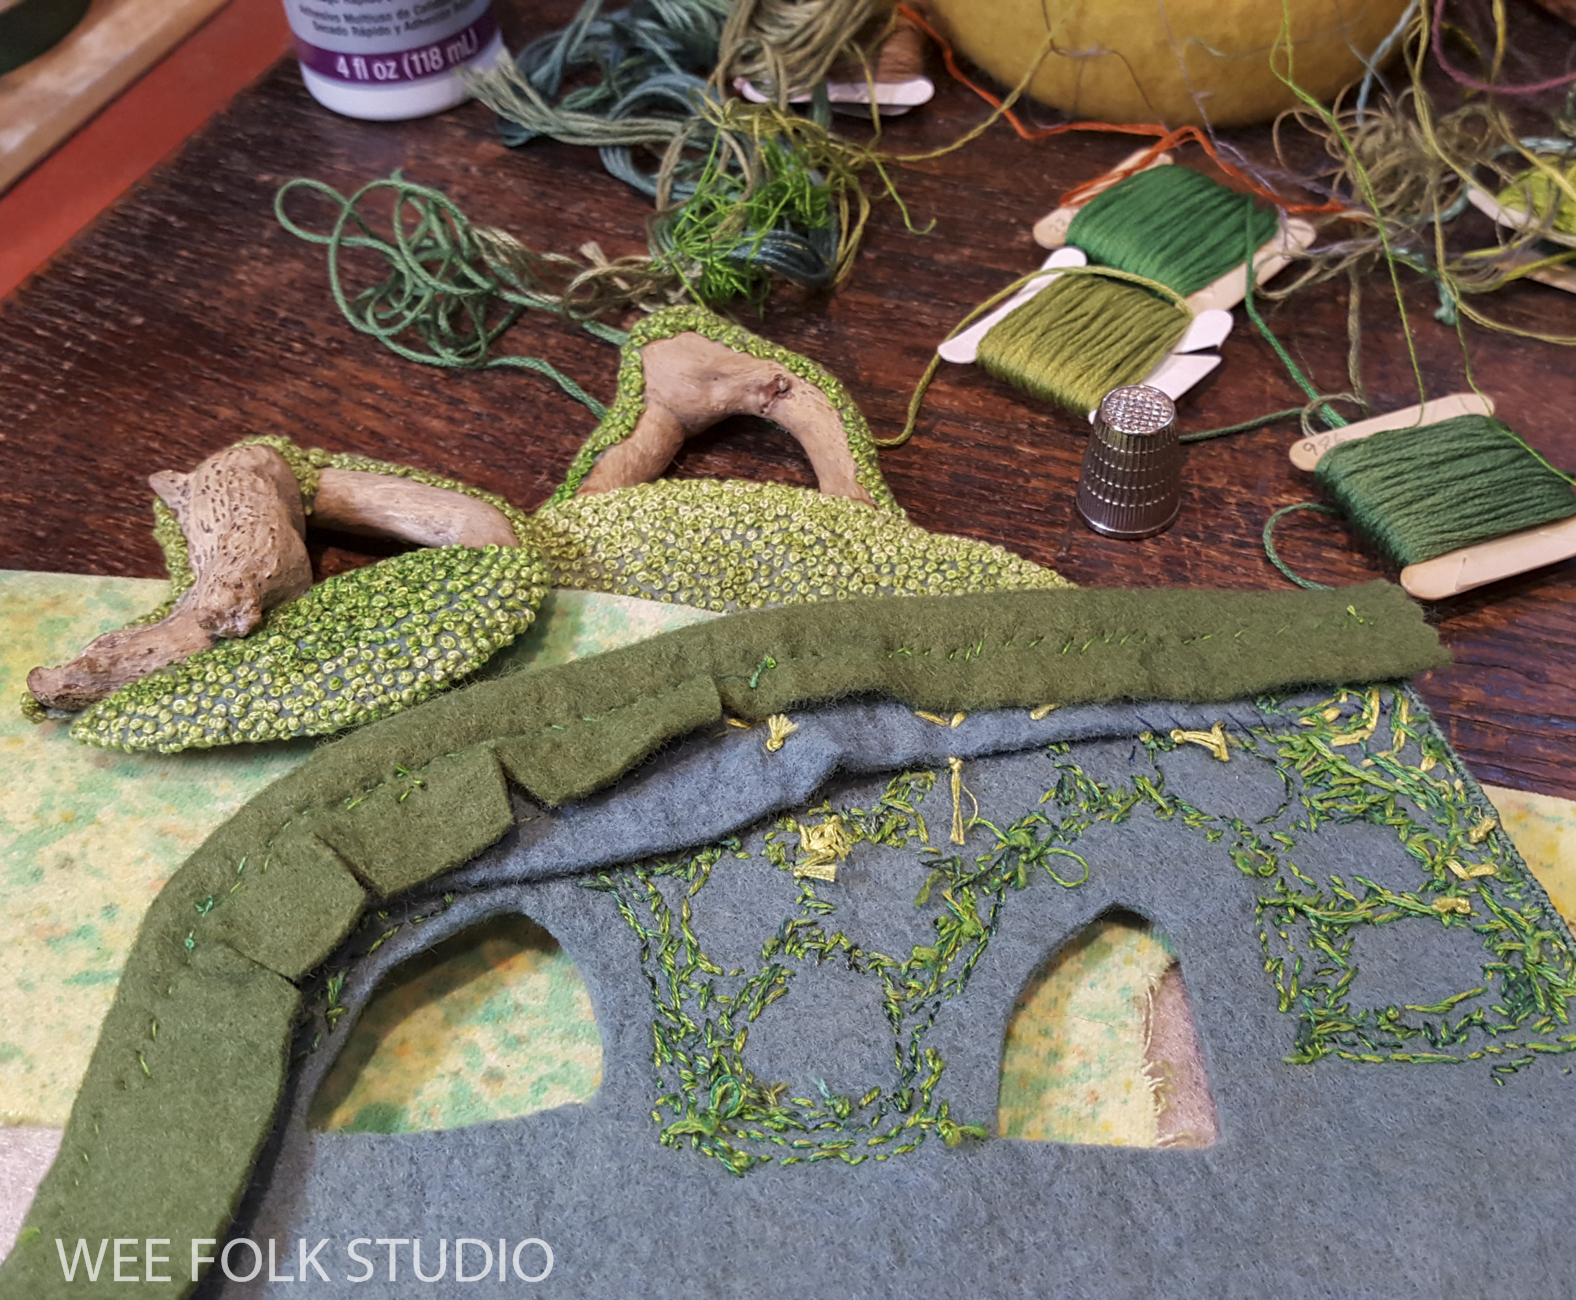
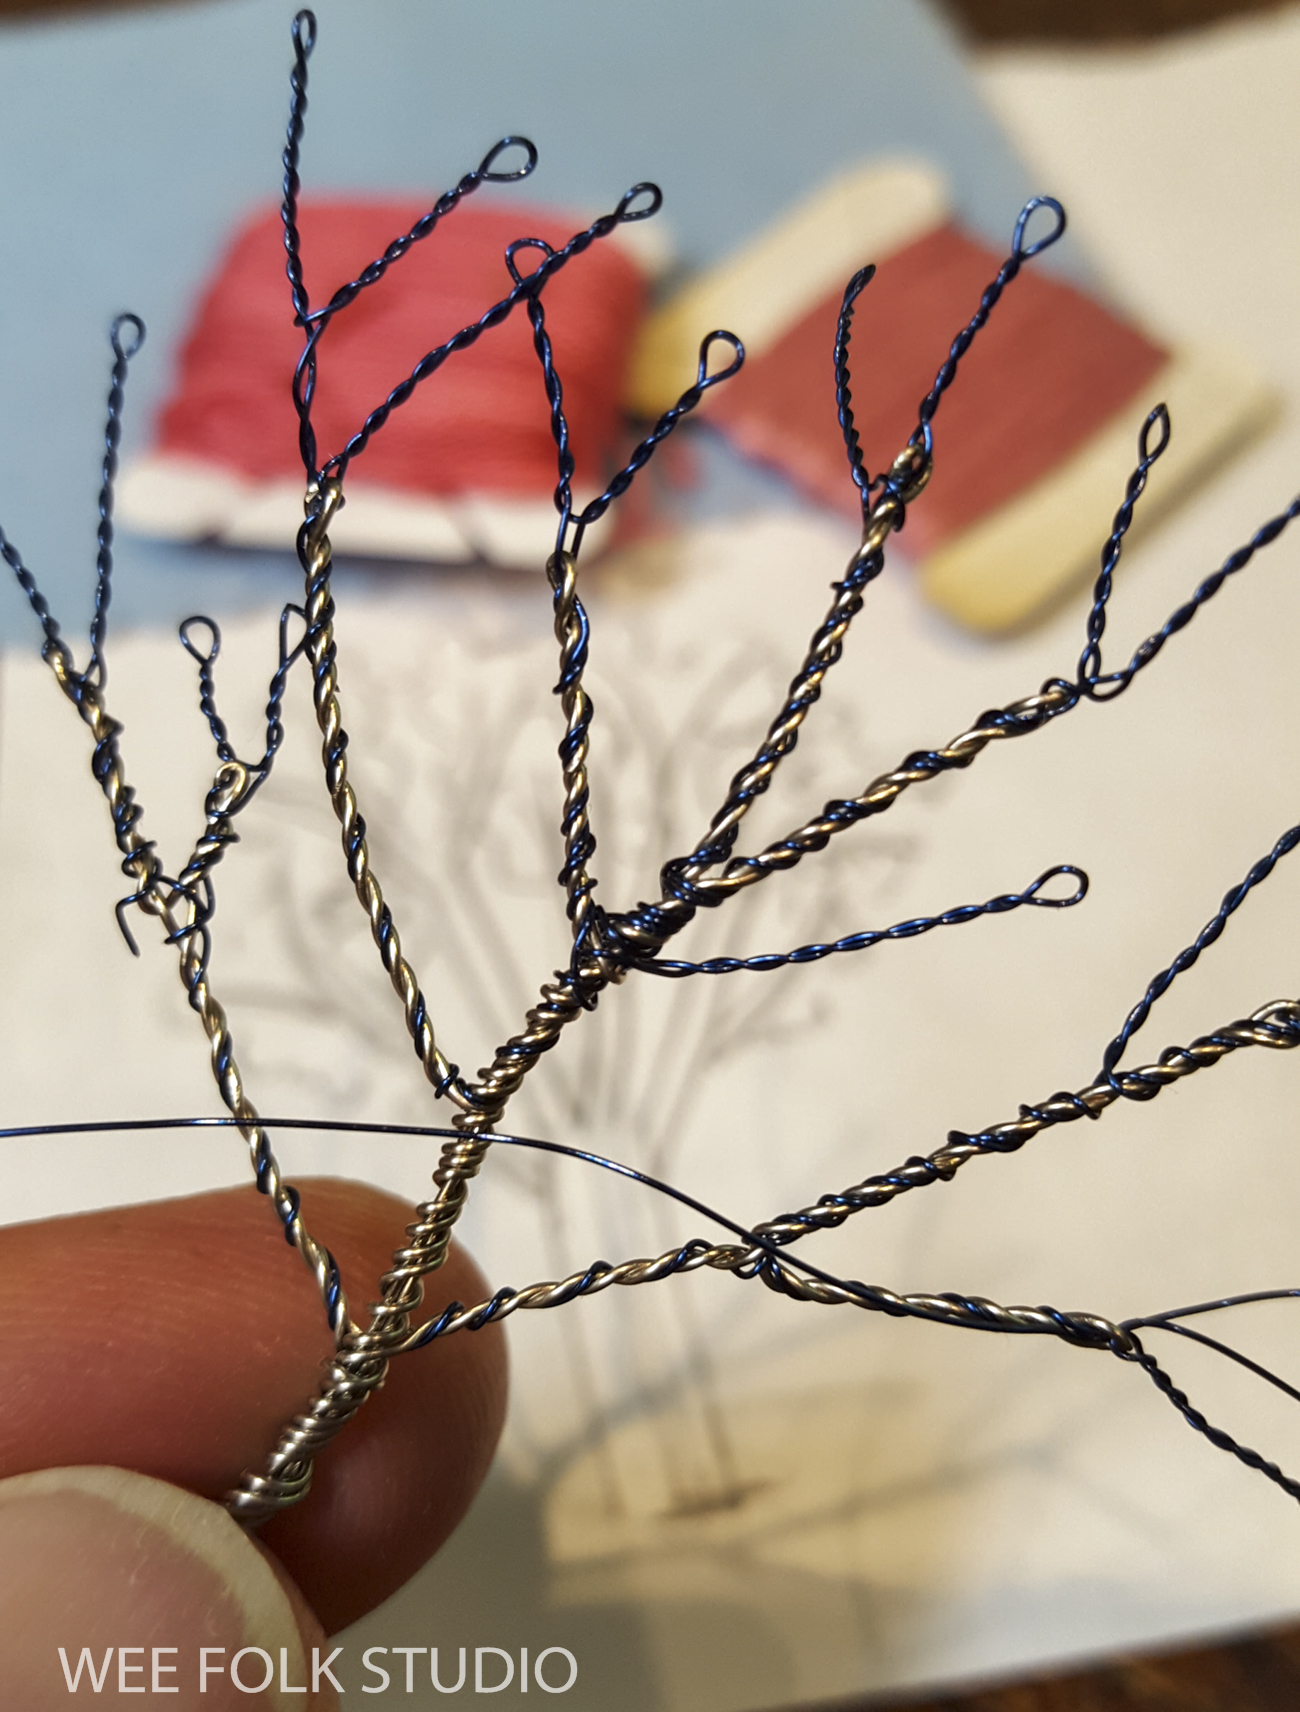
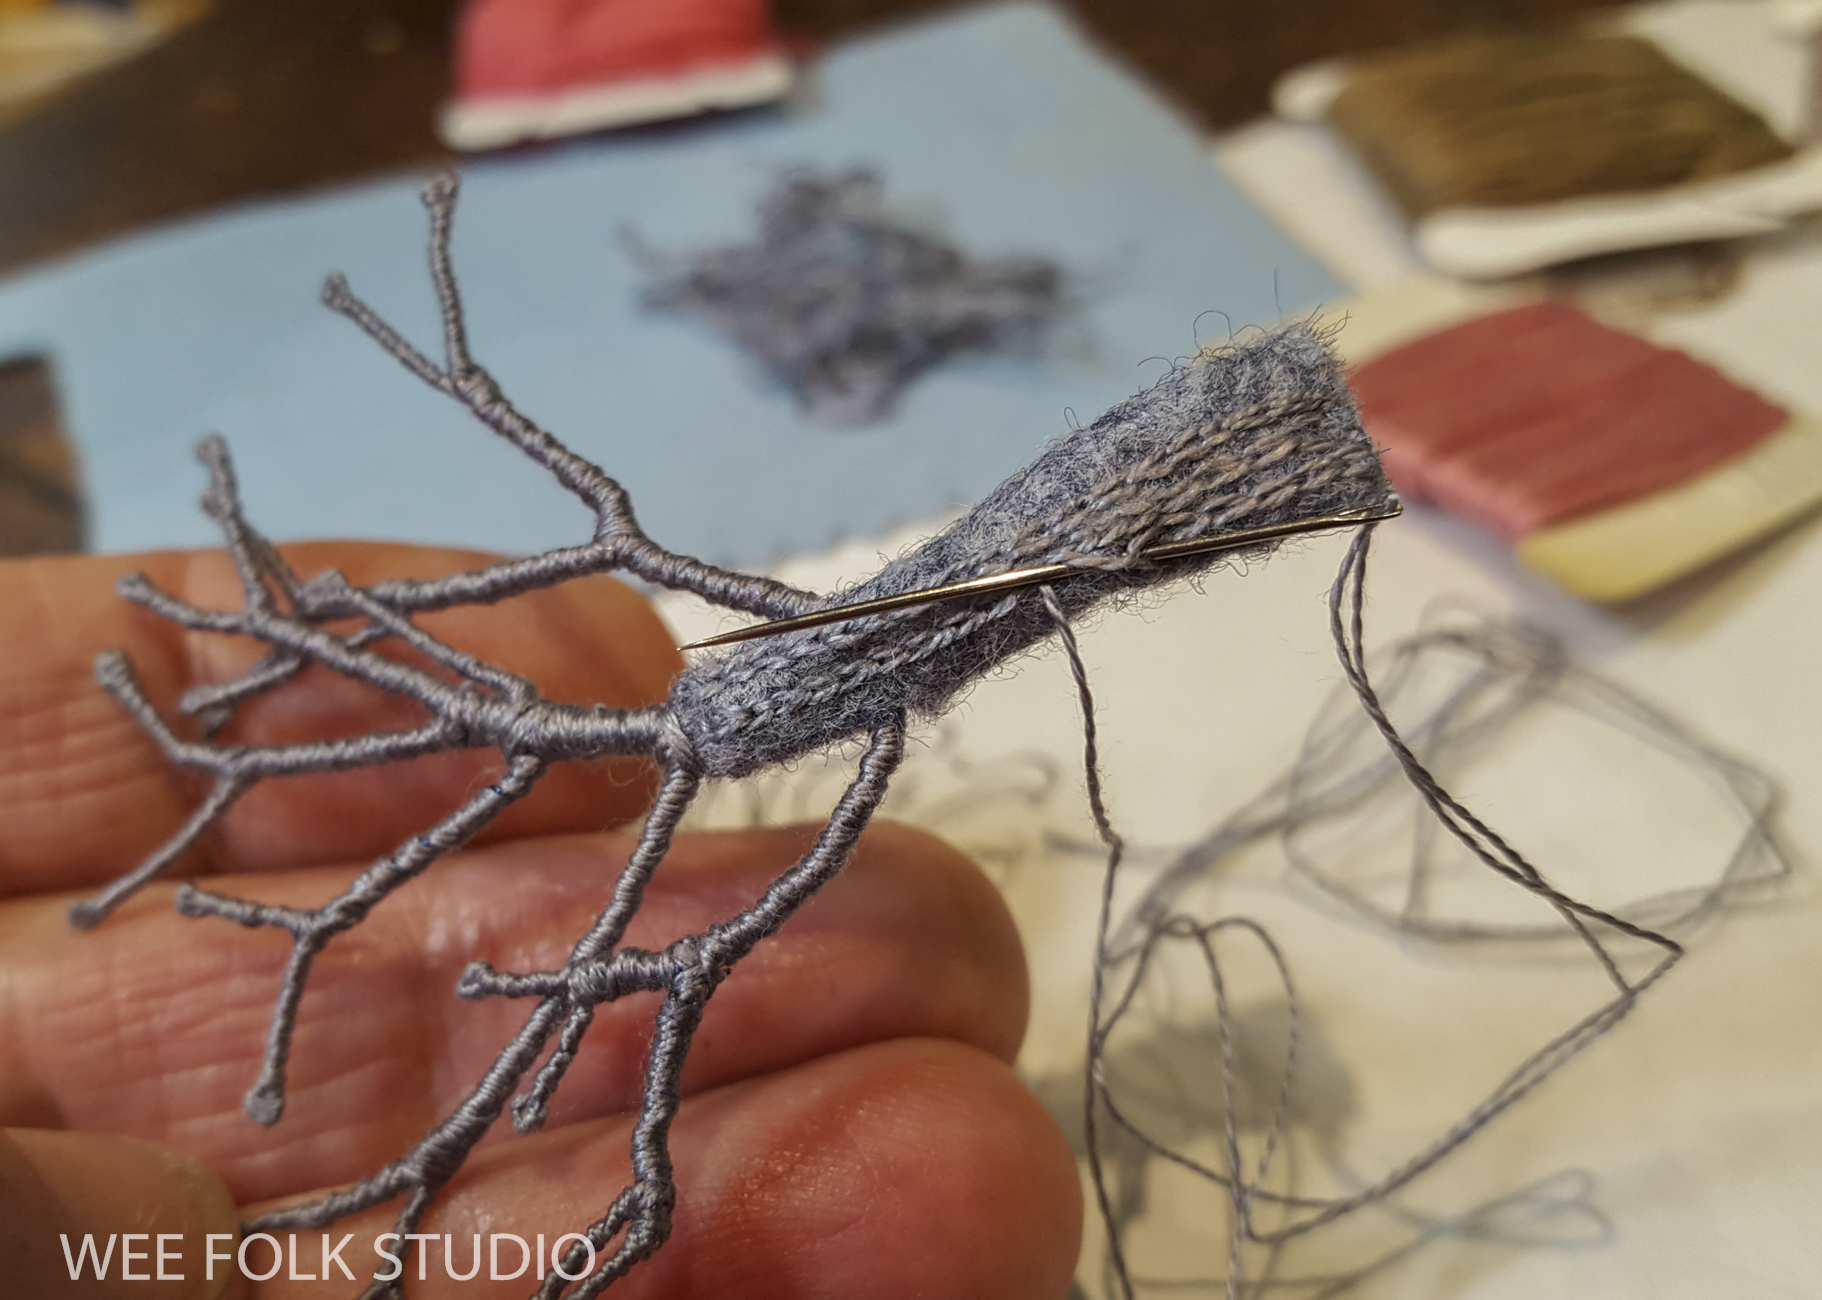
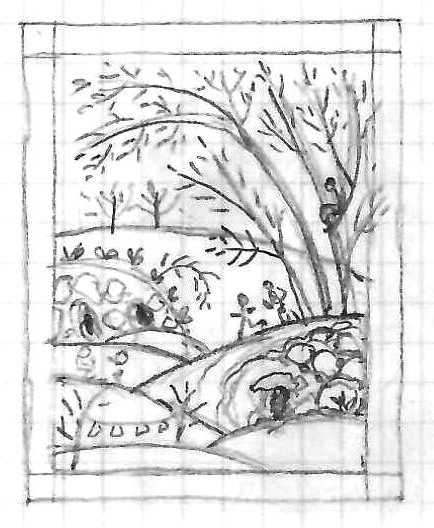
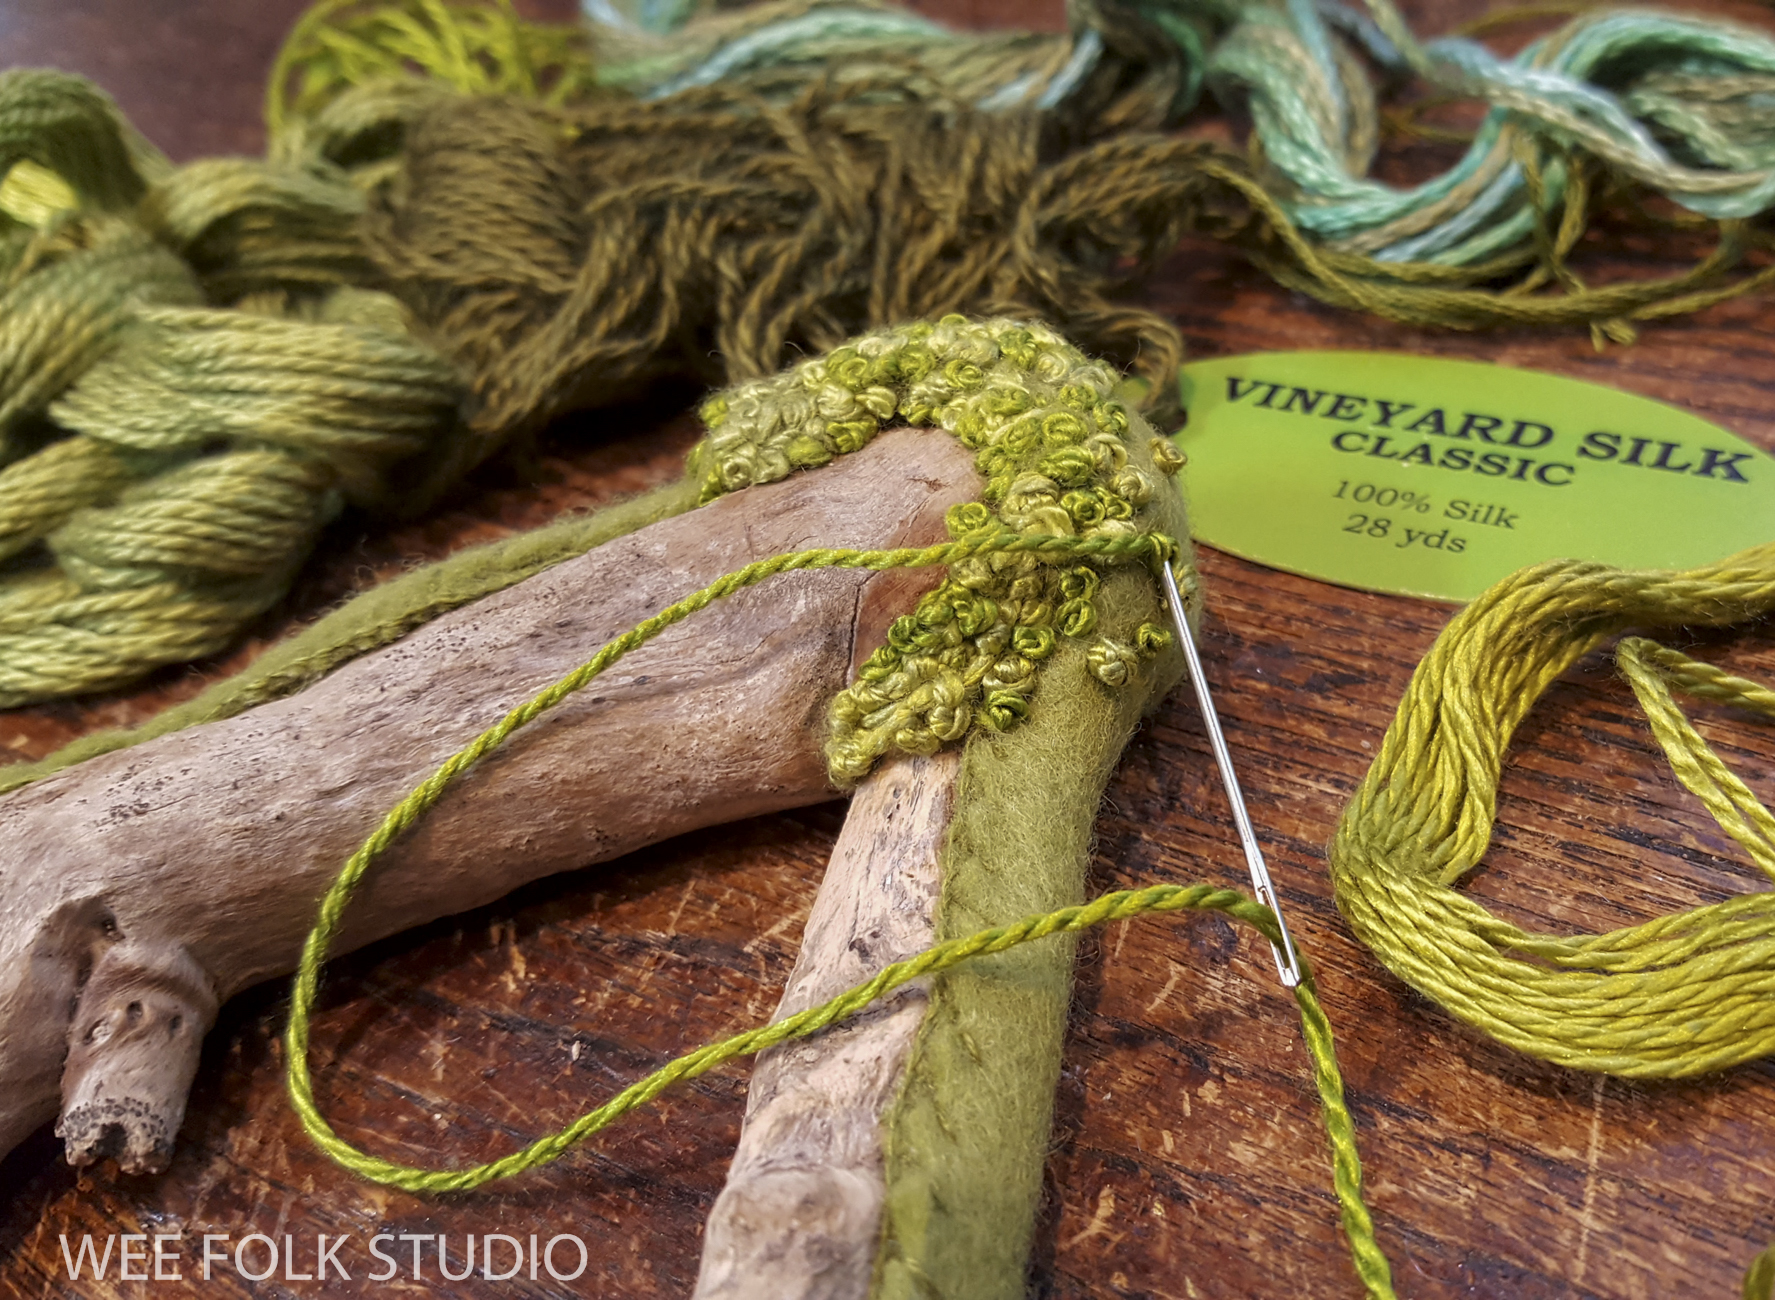
I don’t know why Summertime took so much longer to complete than the other seasons in the series. Mossy Glen, Frosty Morning and Harvest Time also have a gazillion stitches, but they each only took about 4 months to make. It could have something to do with the change in my daily routine since my grandson, Elias was born in January. Playing with the baby is now high on my list of essential activities, which includes sleeping, eating and stitching. Obviously, my priorities have shifted!

To reach the exhibition deadline, I spent the past few months stitching as much as possible, including in the evenings, like I used to do when my children were little. That’s why this is the first blog post I’ve written in months!

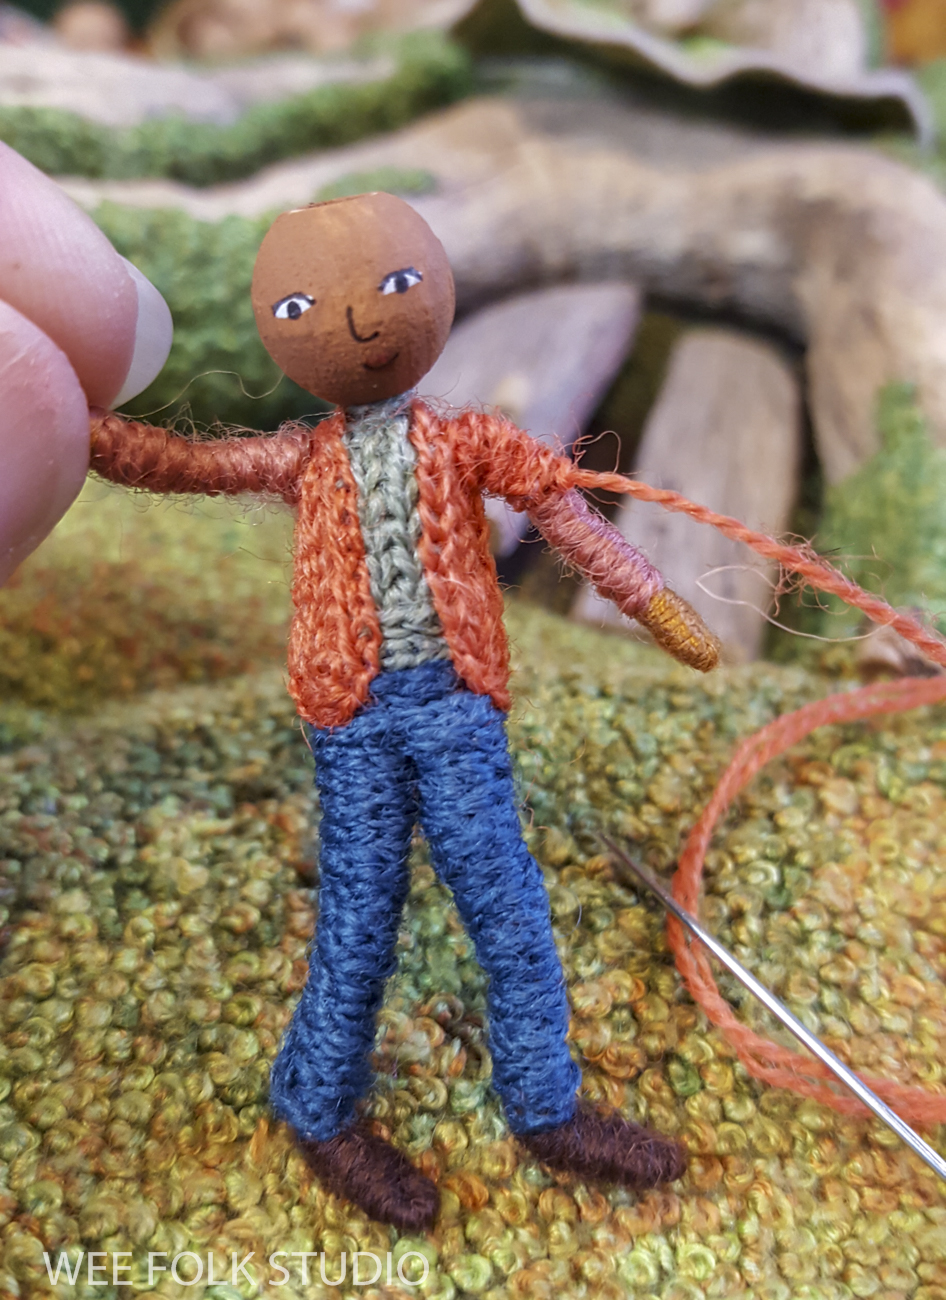
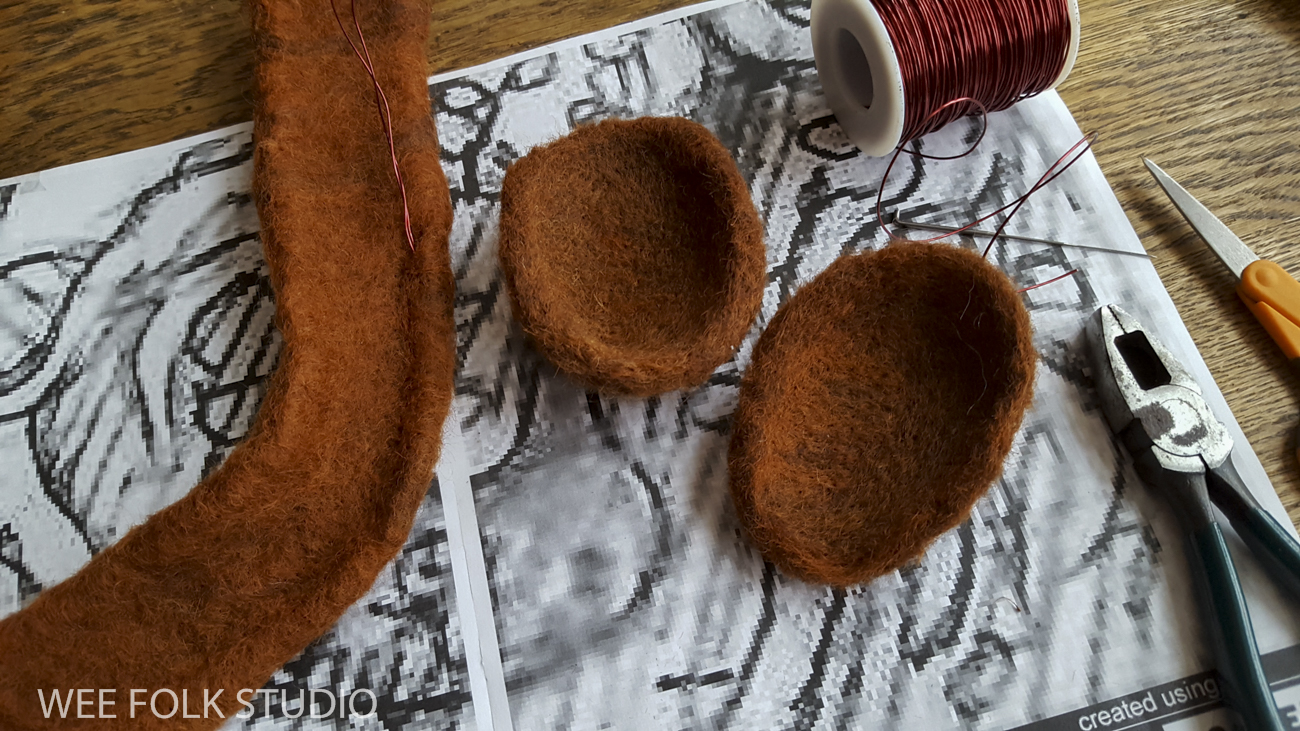
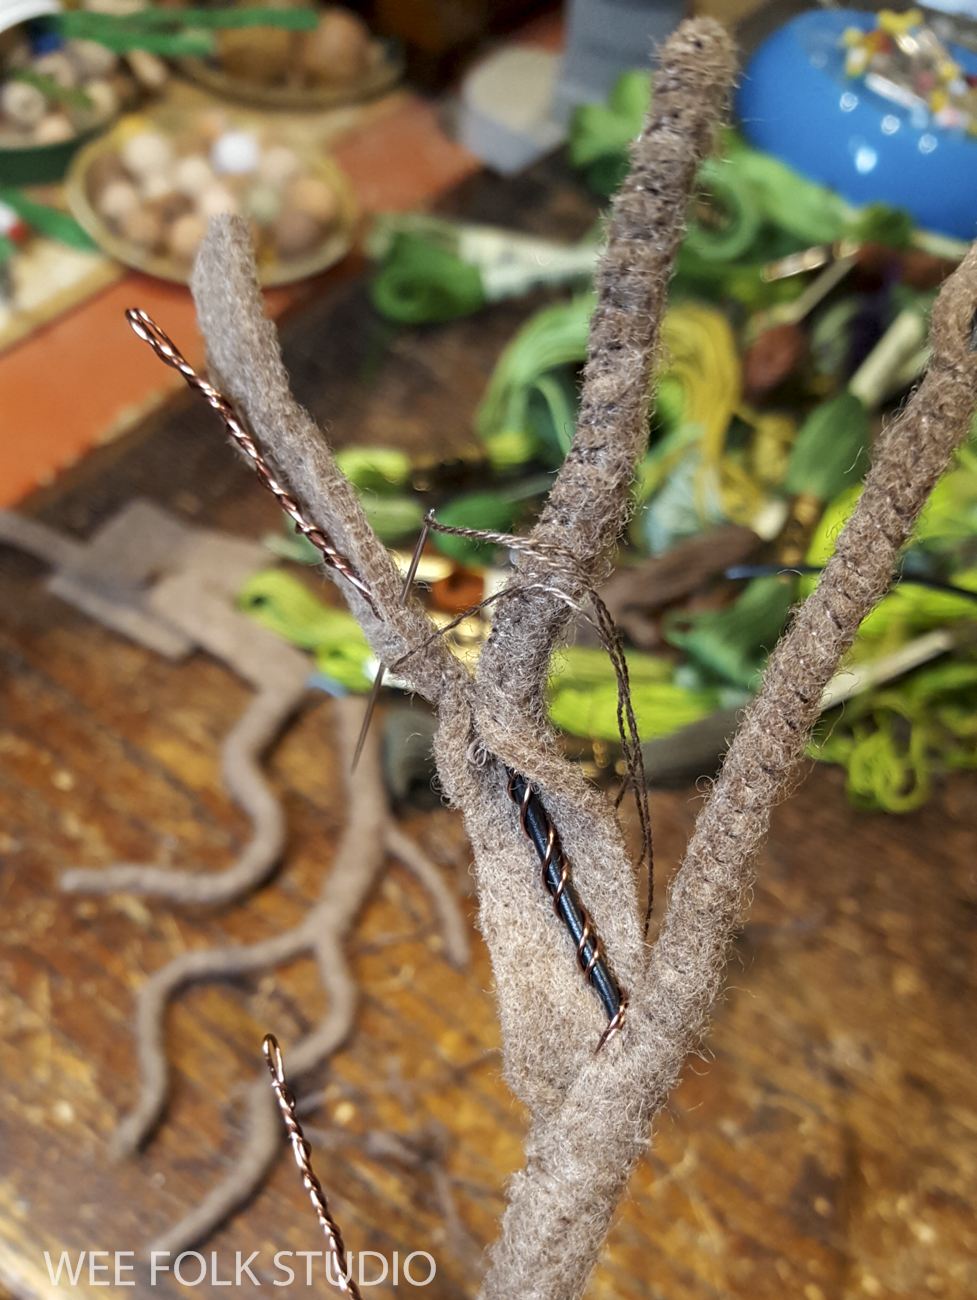
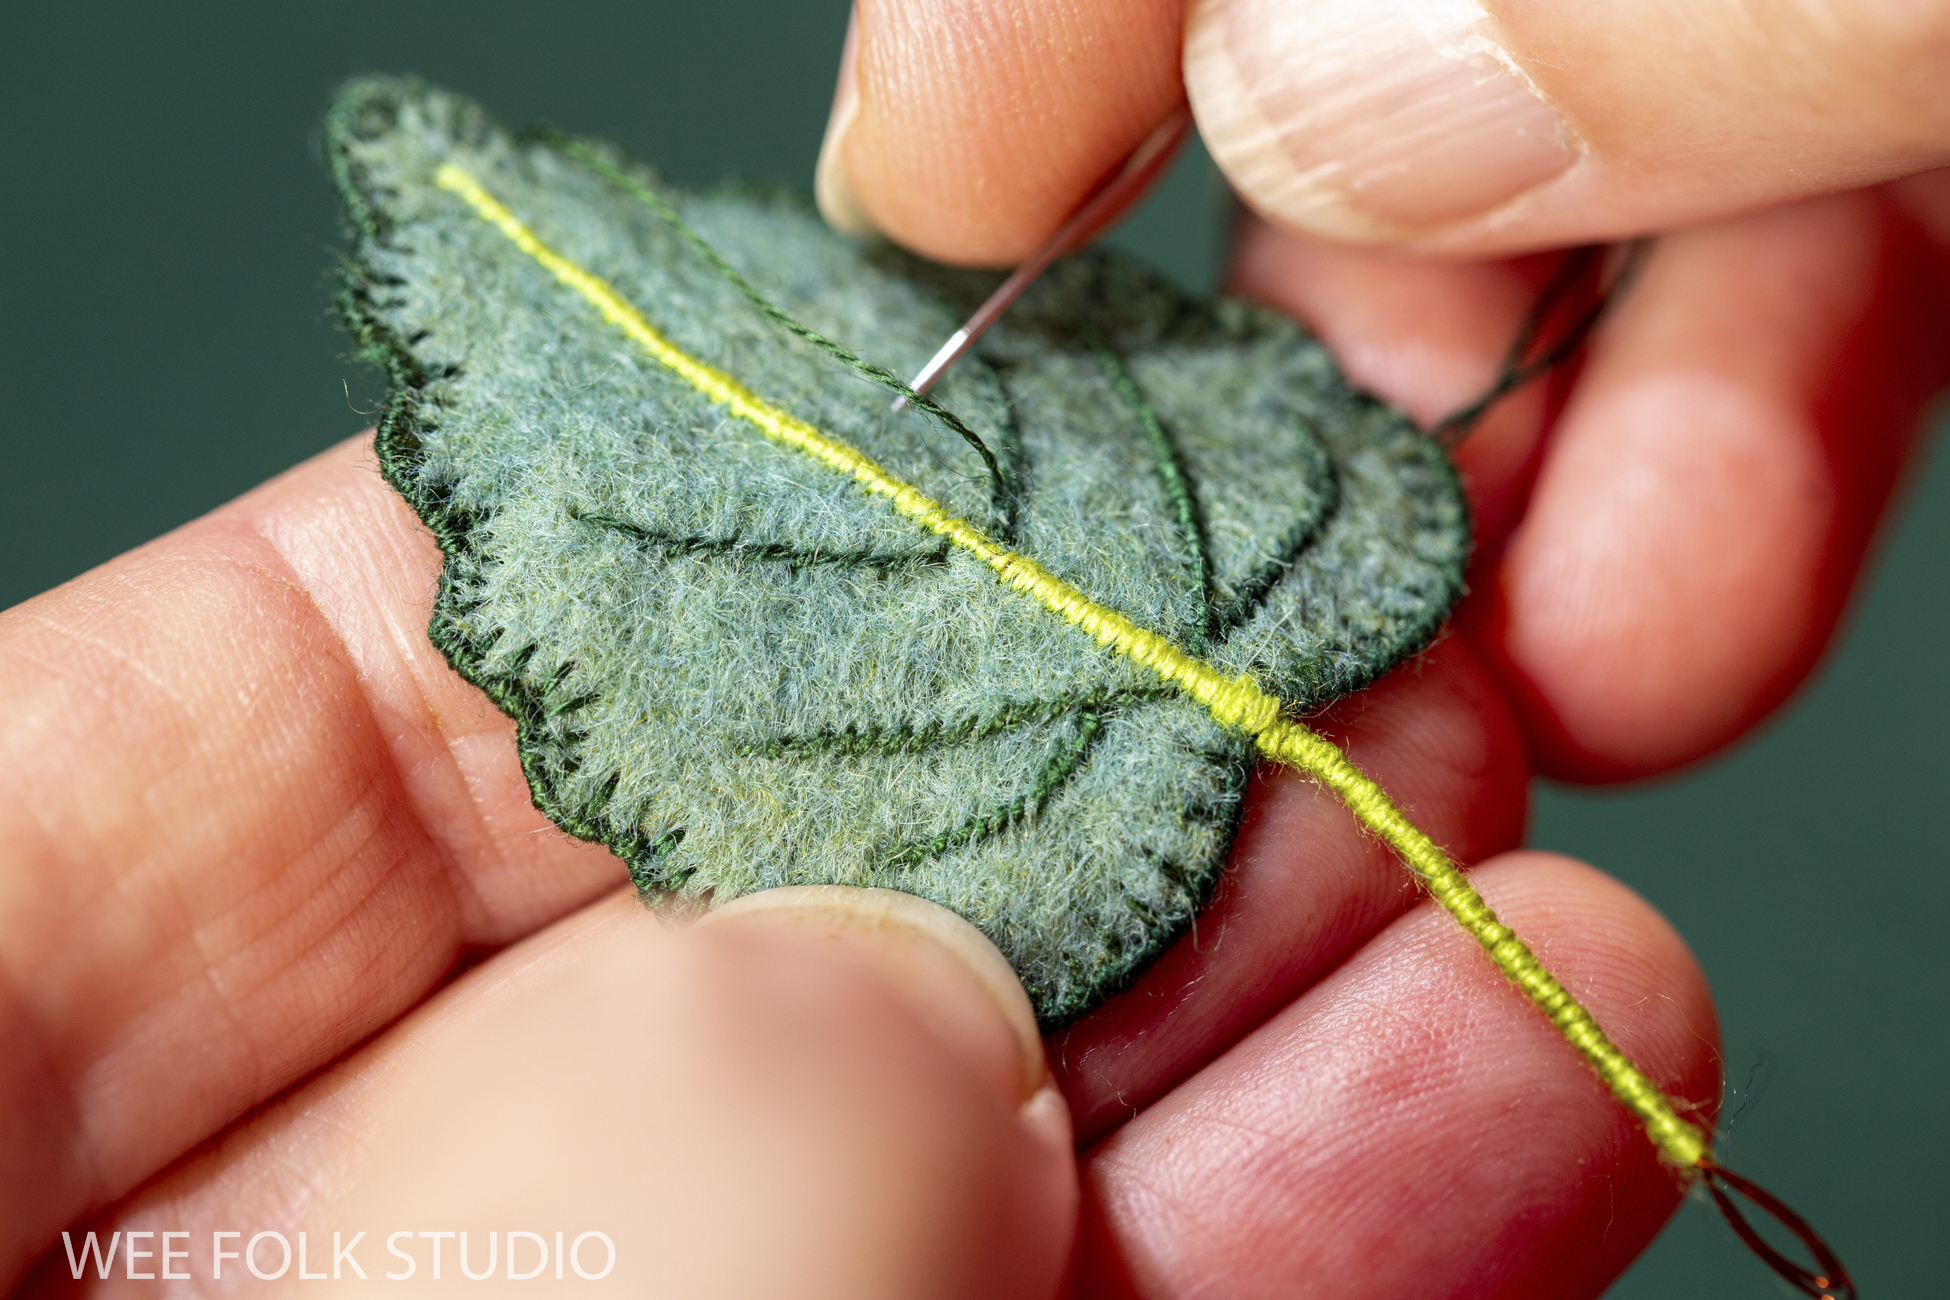
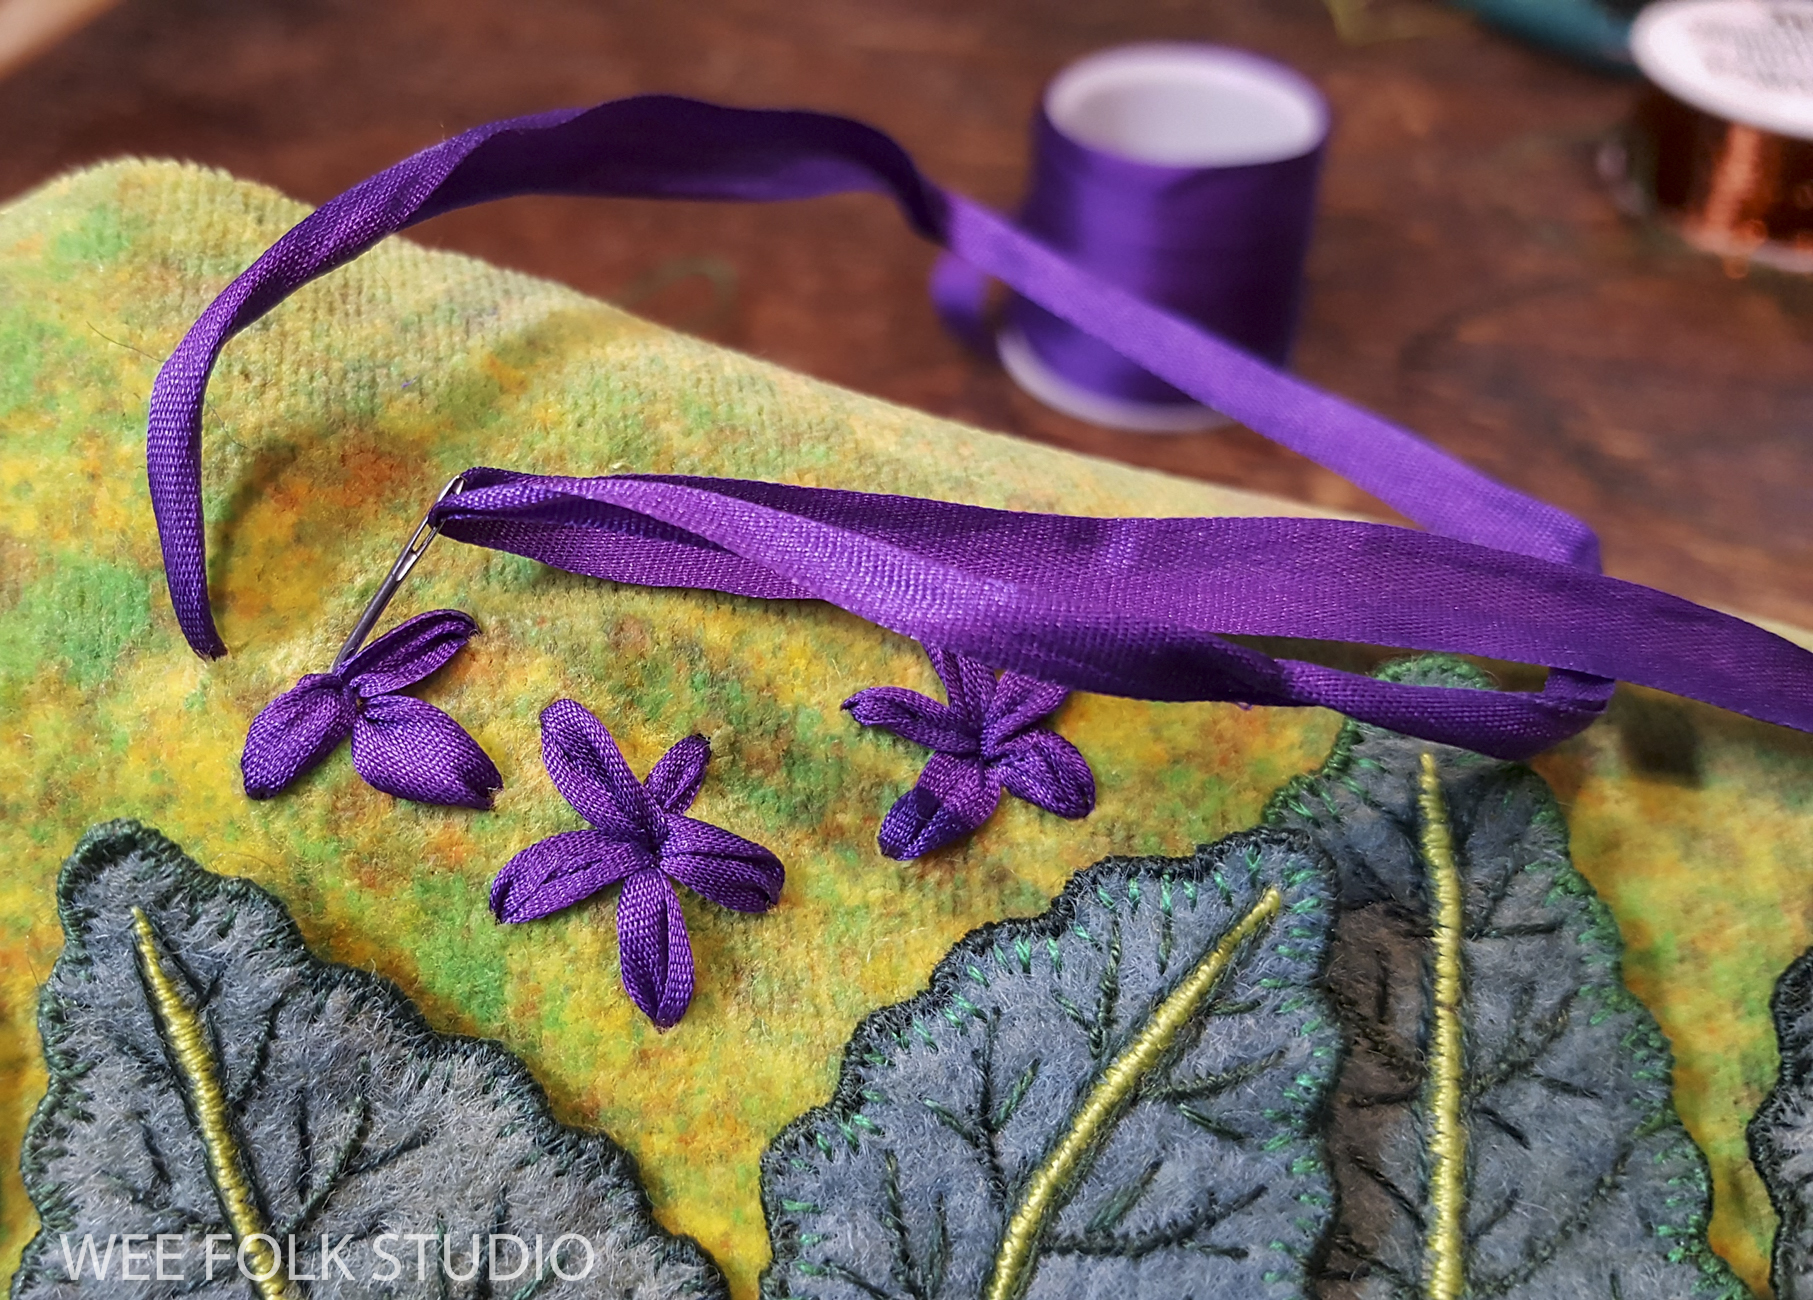
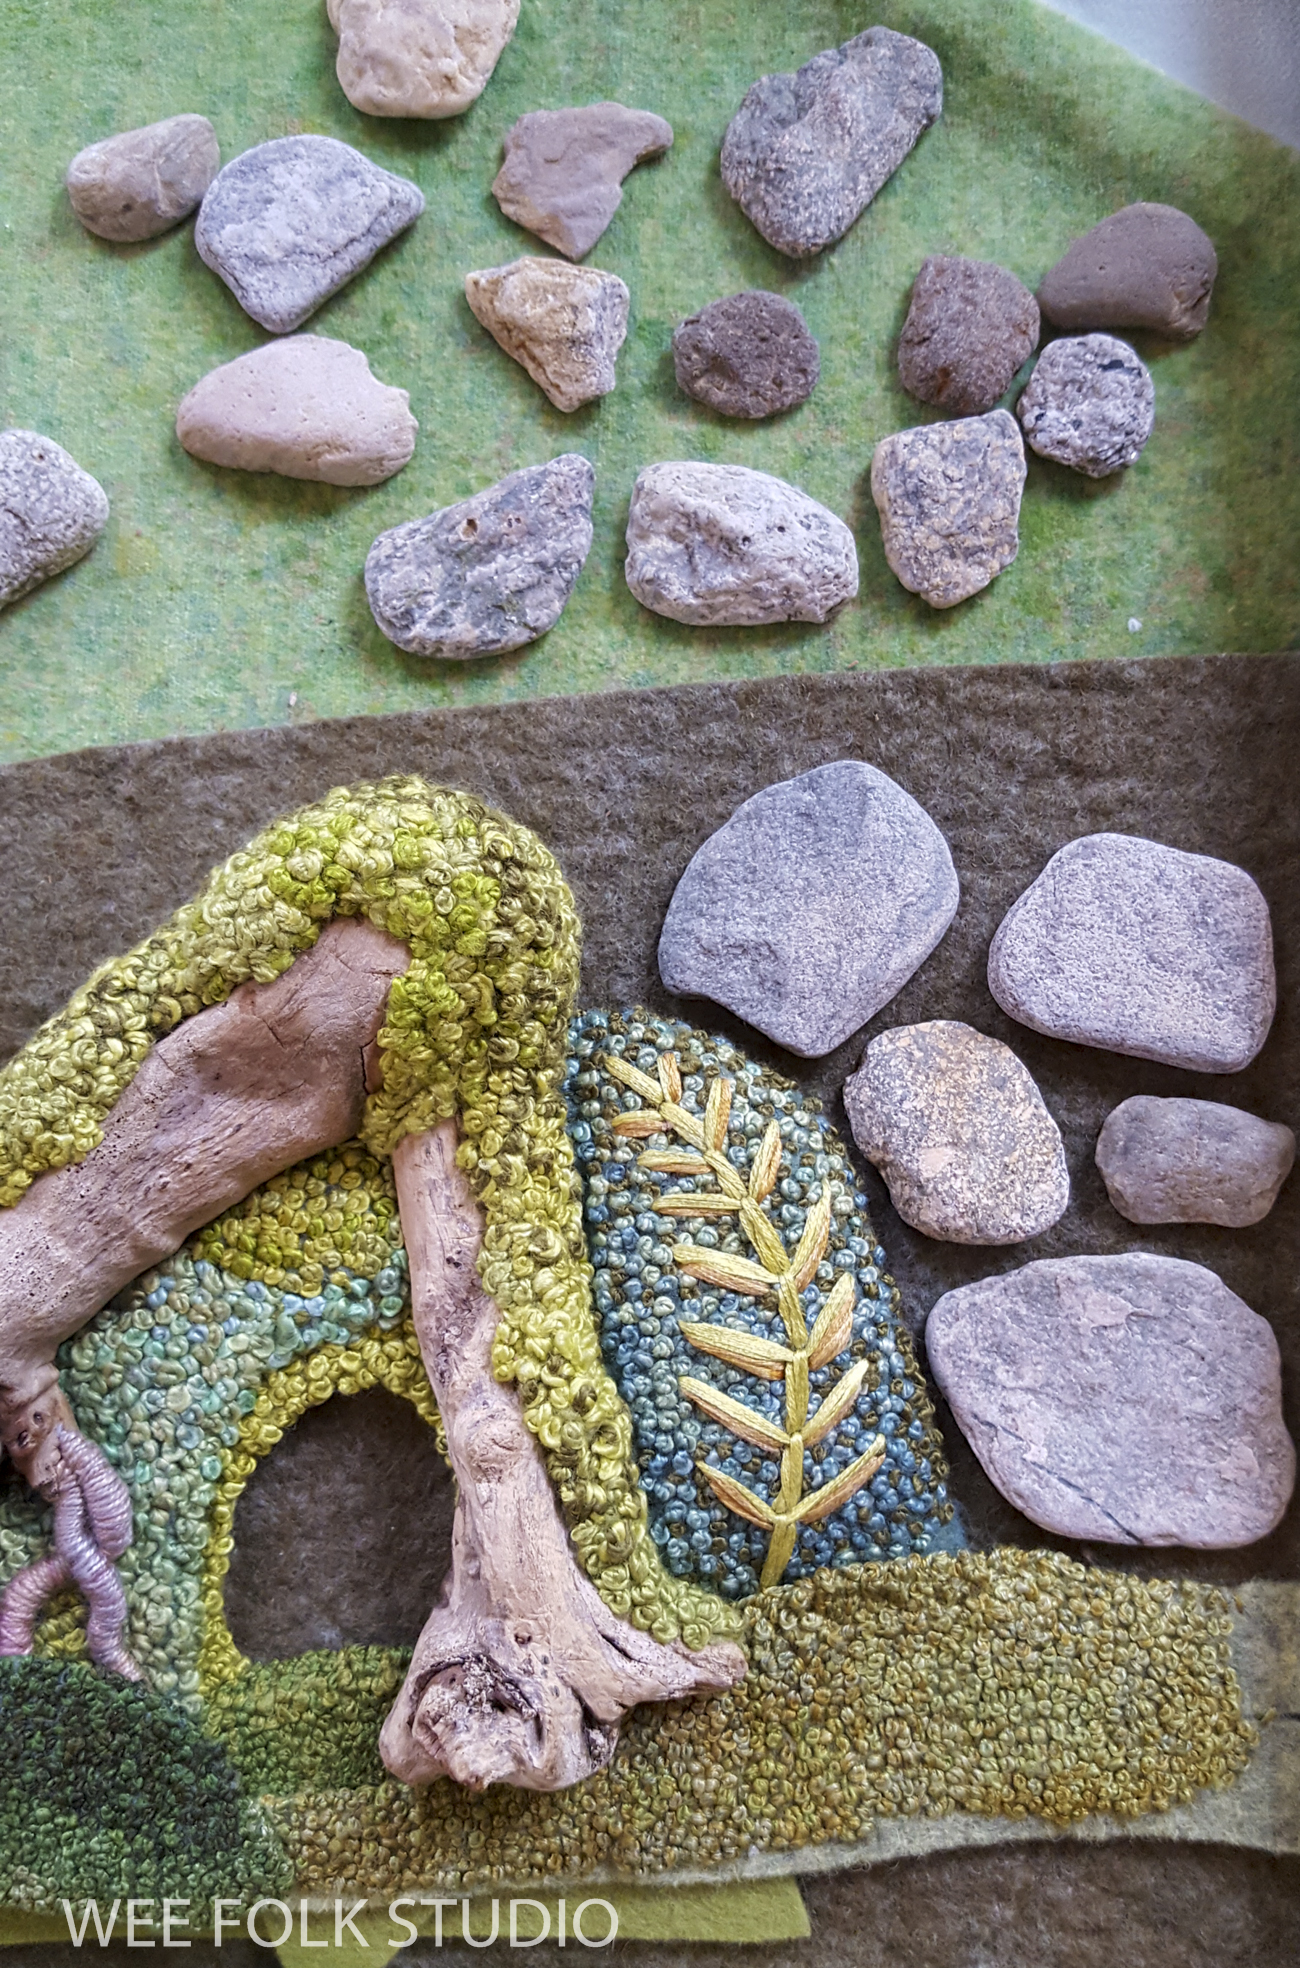
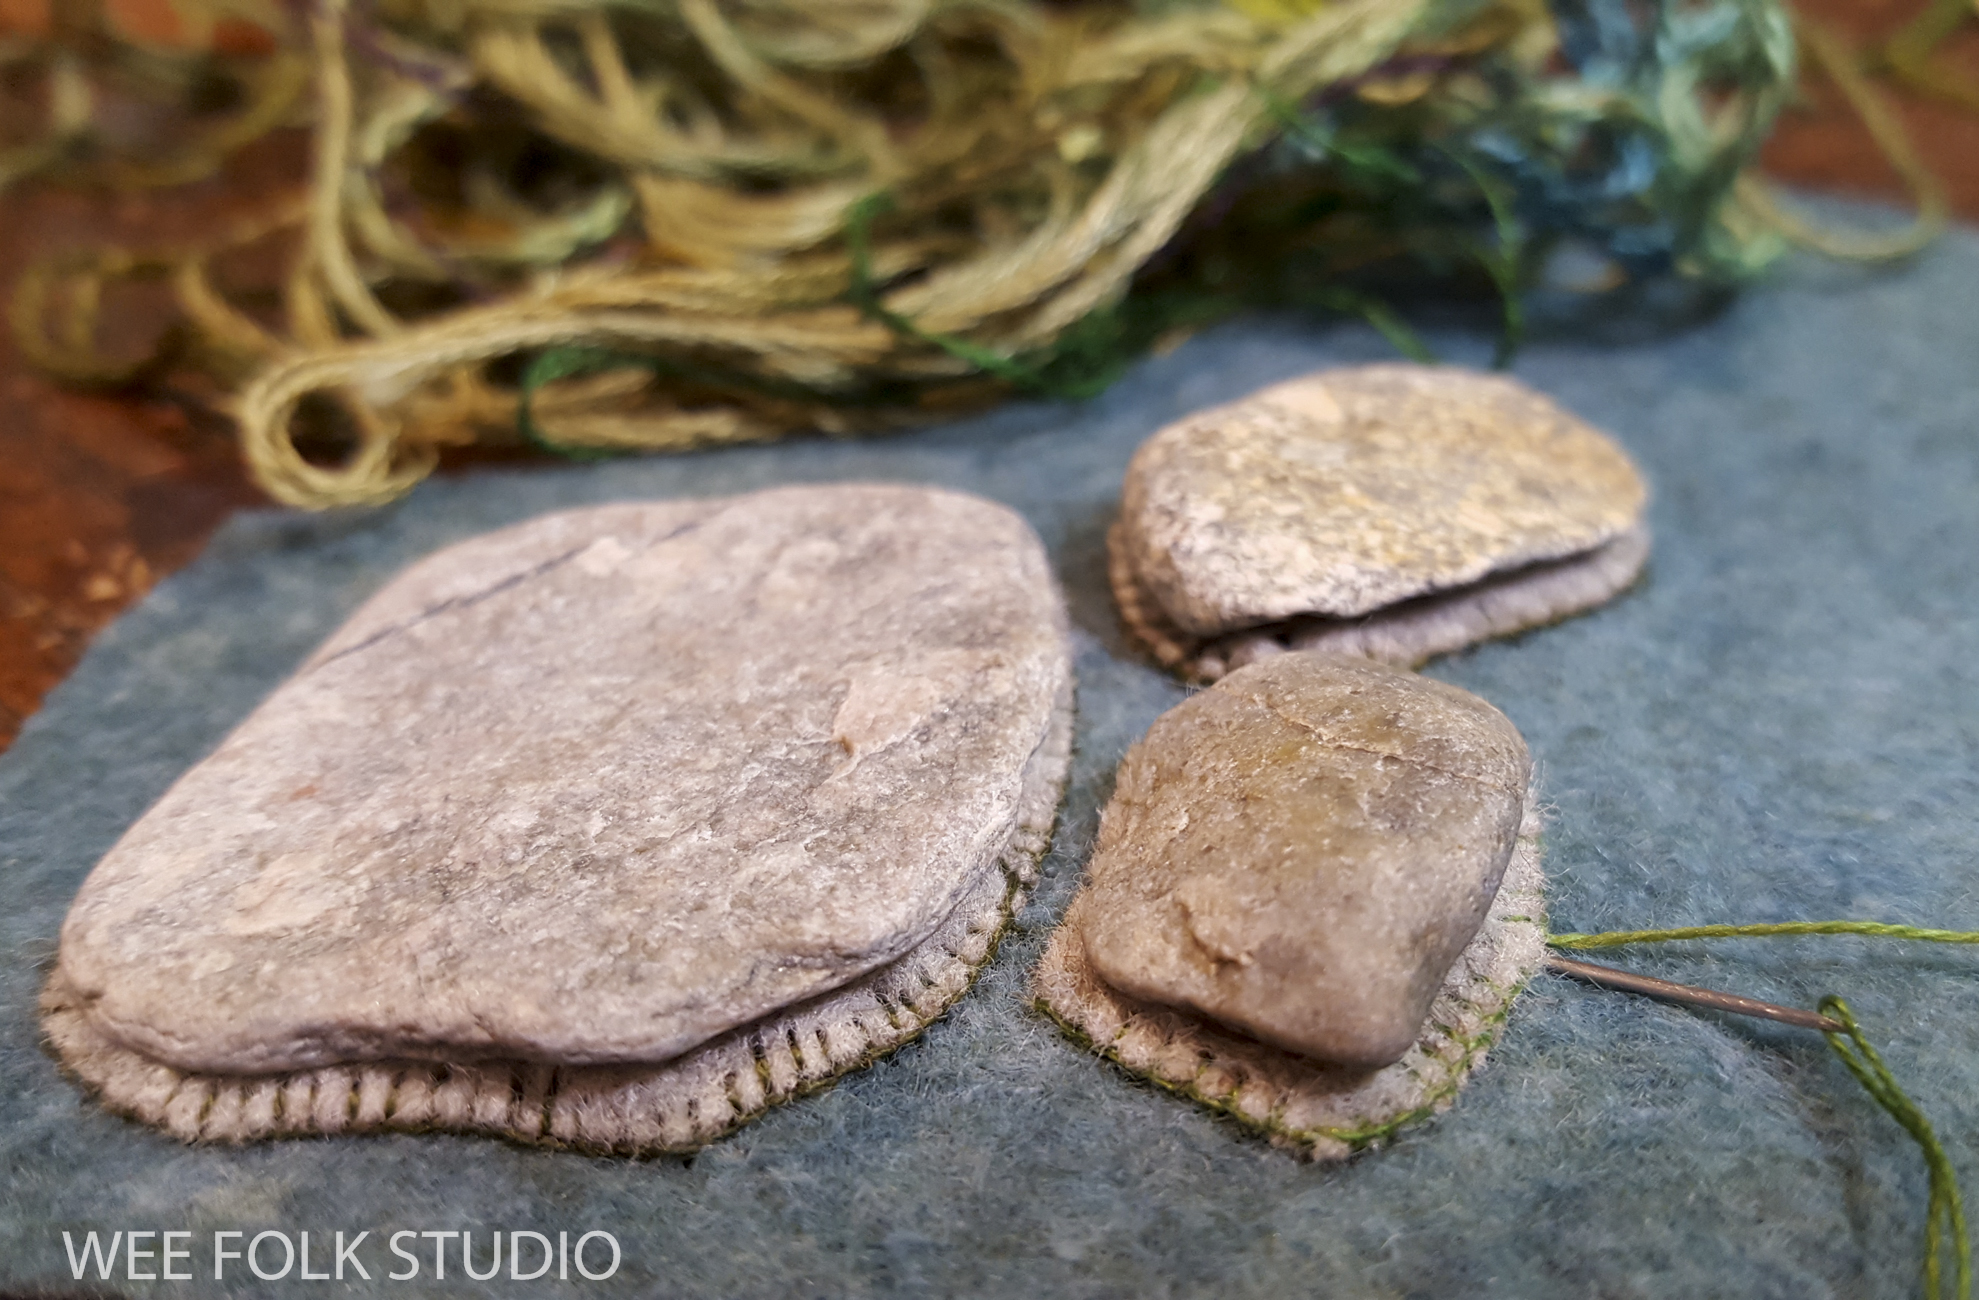
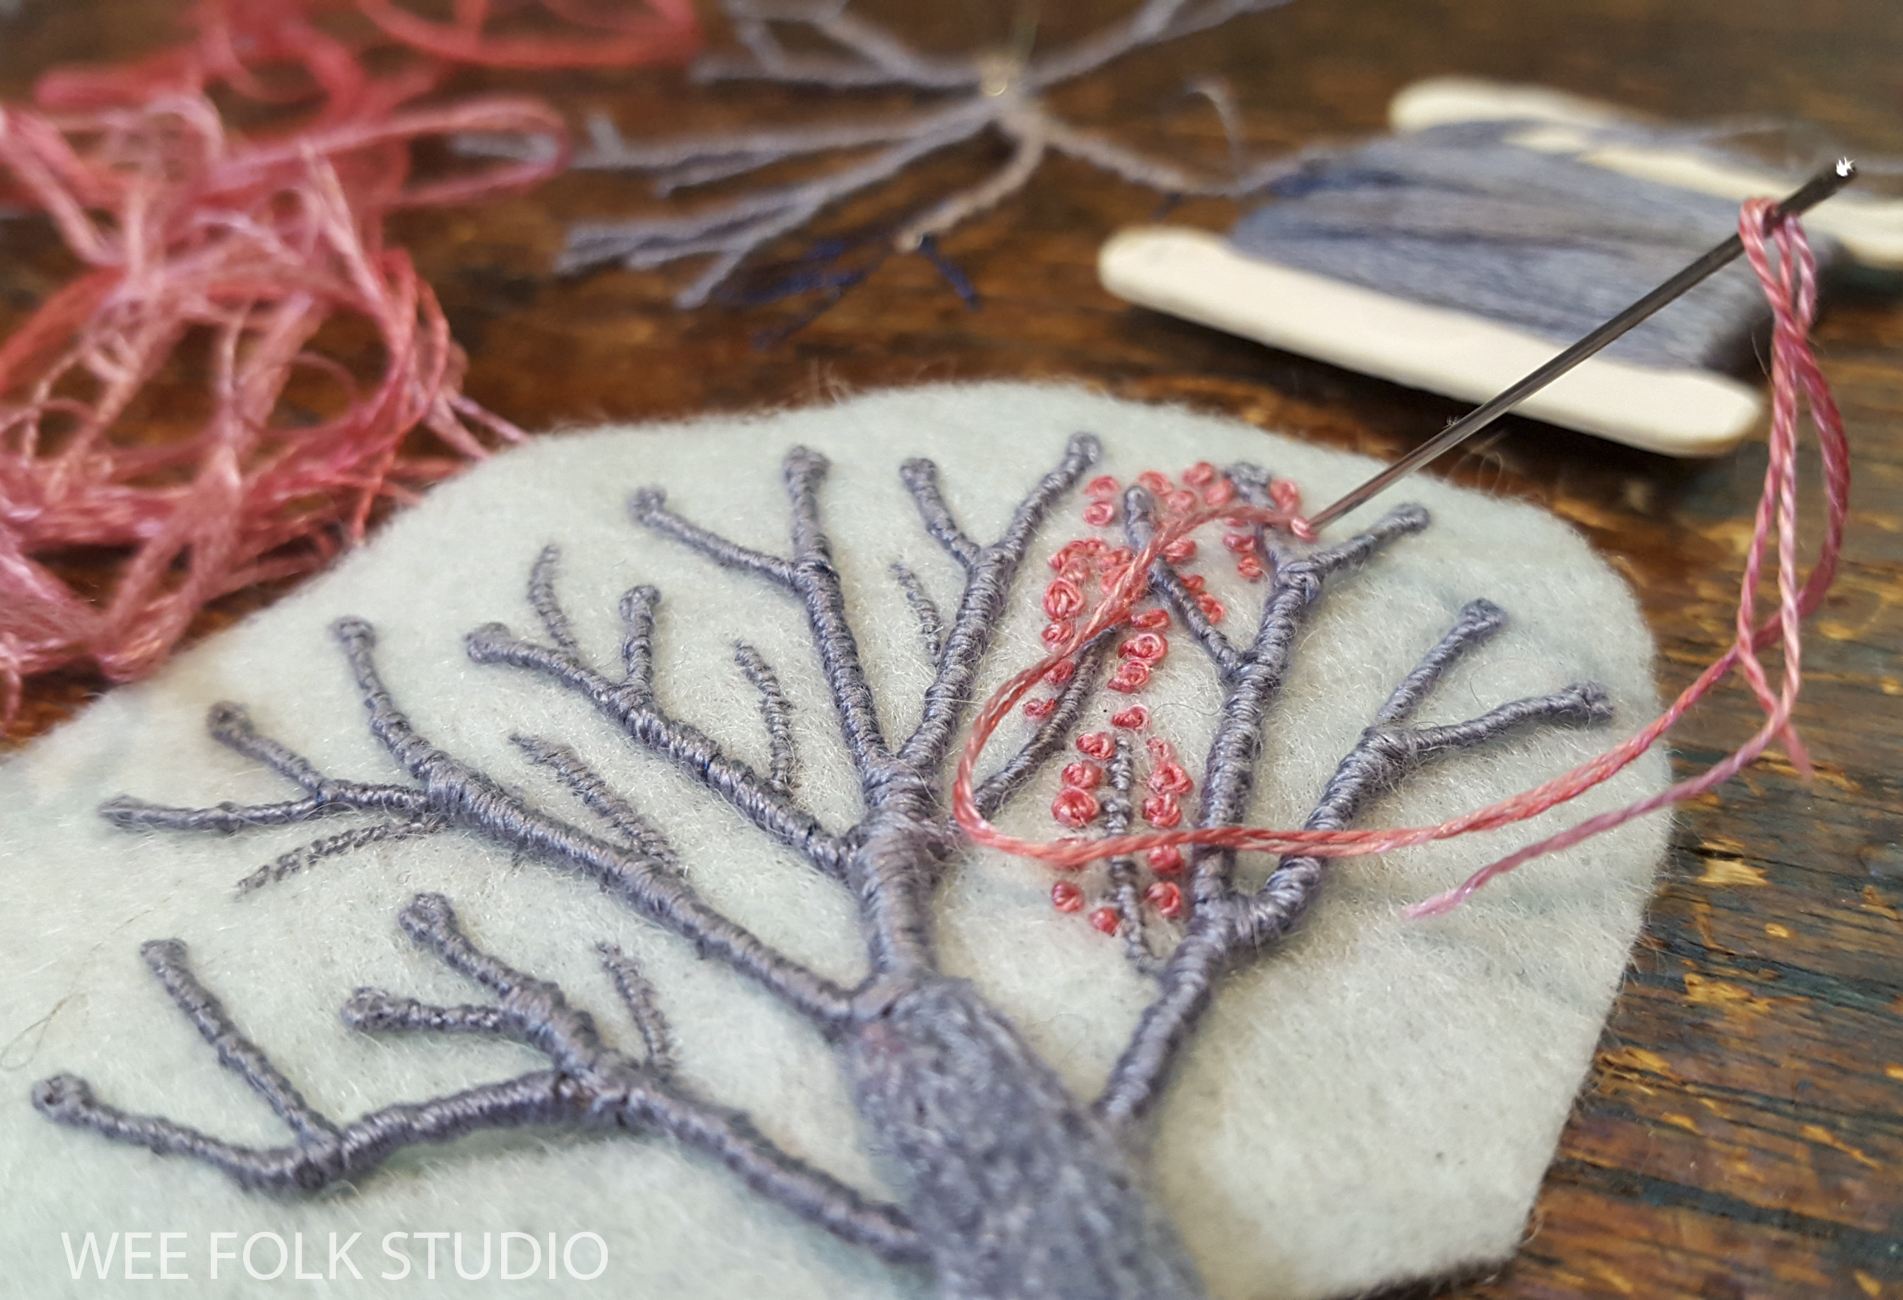
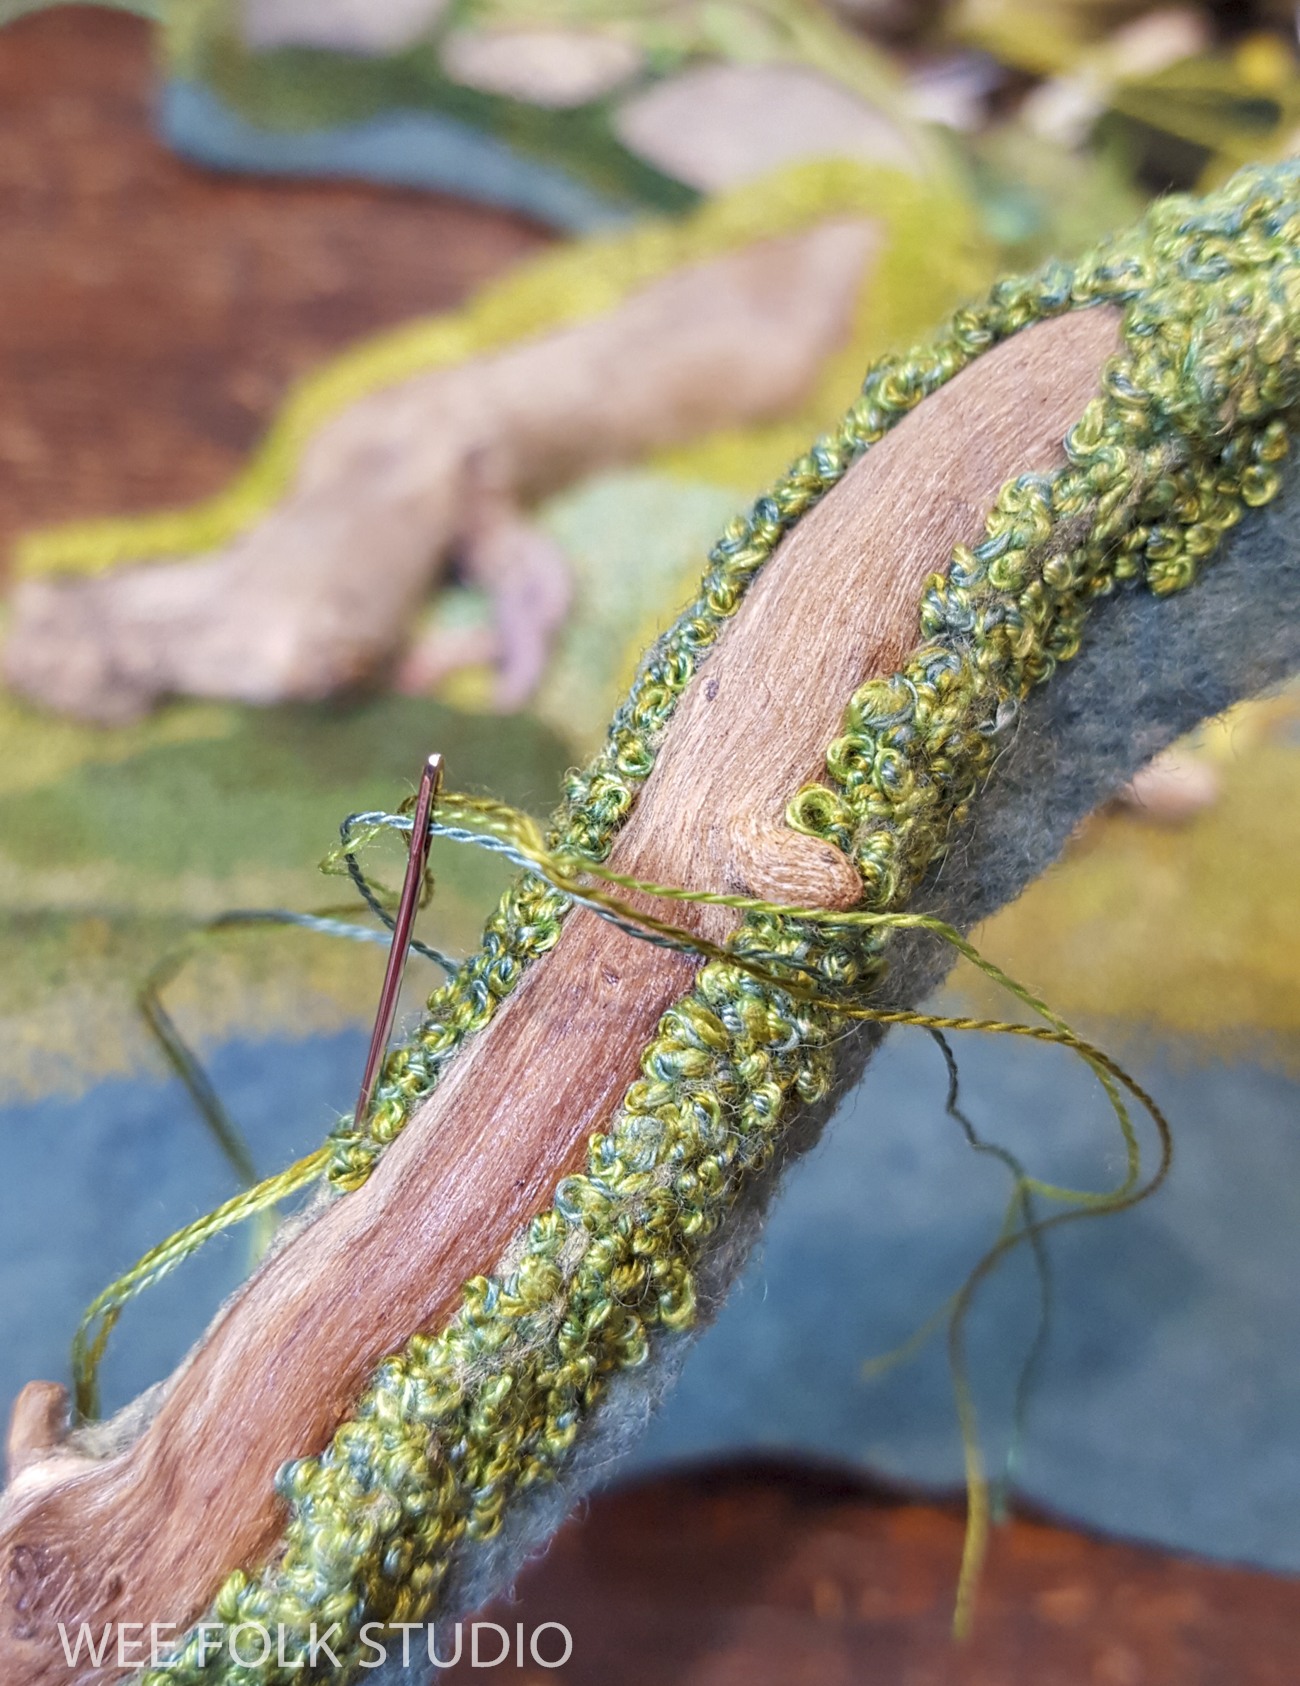
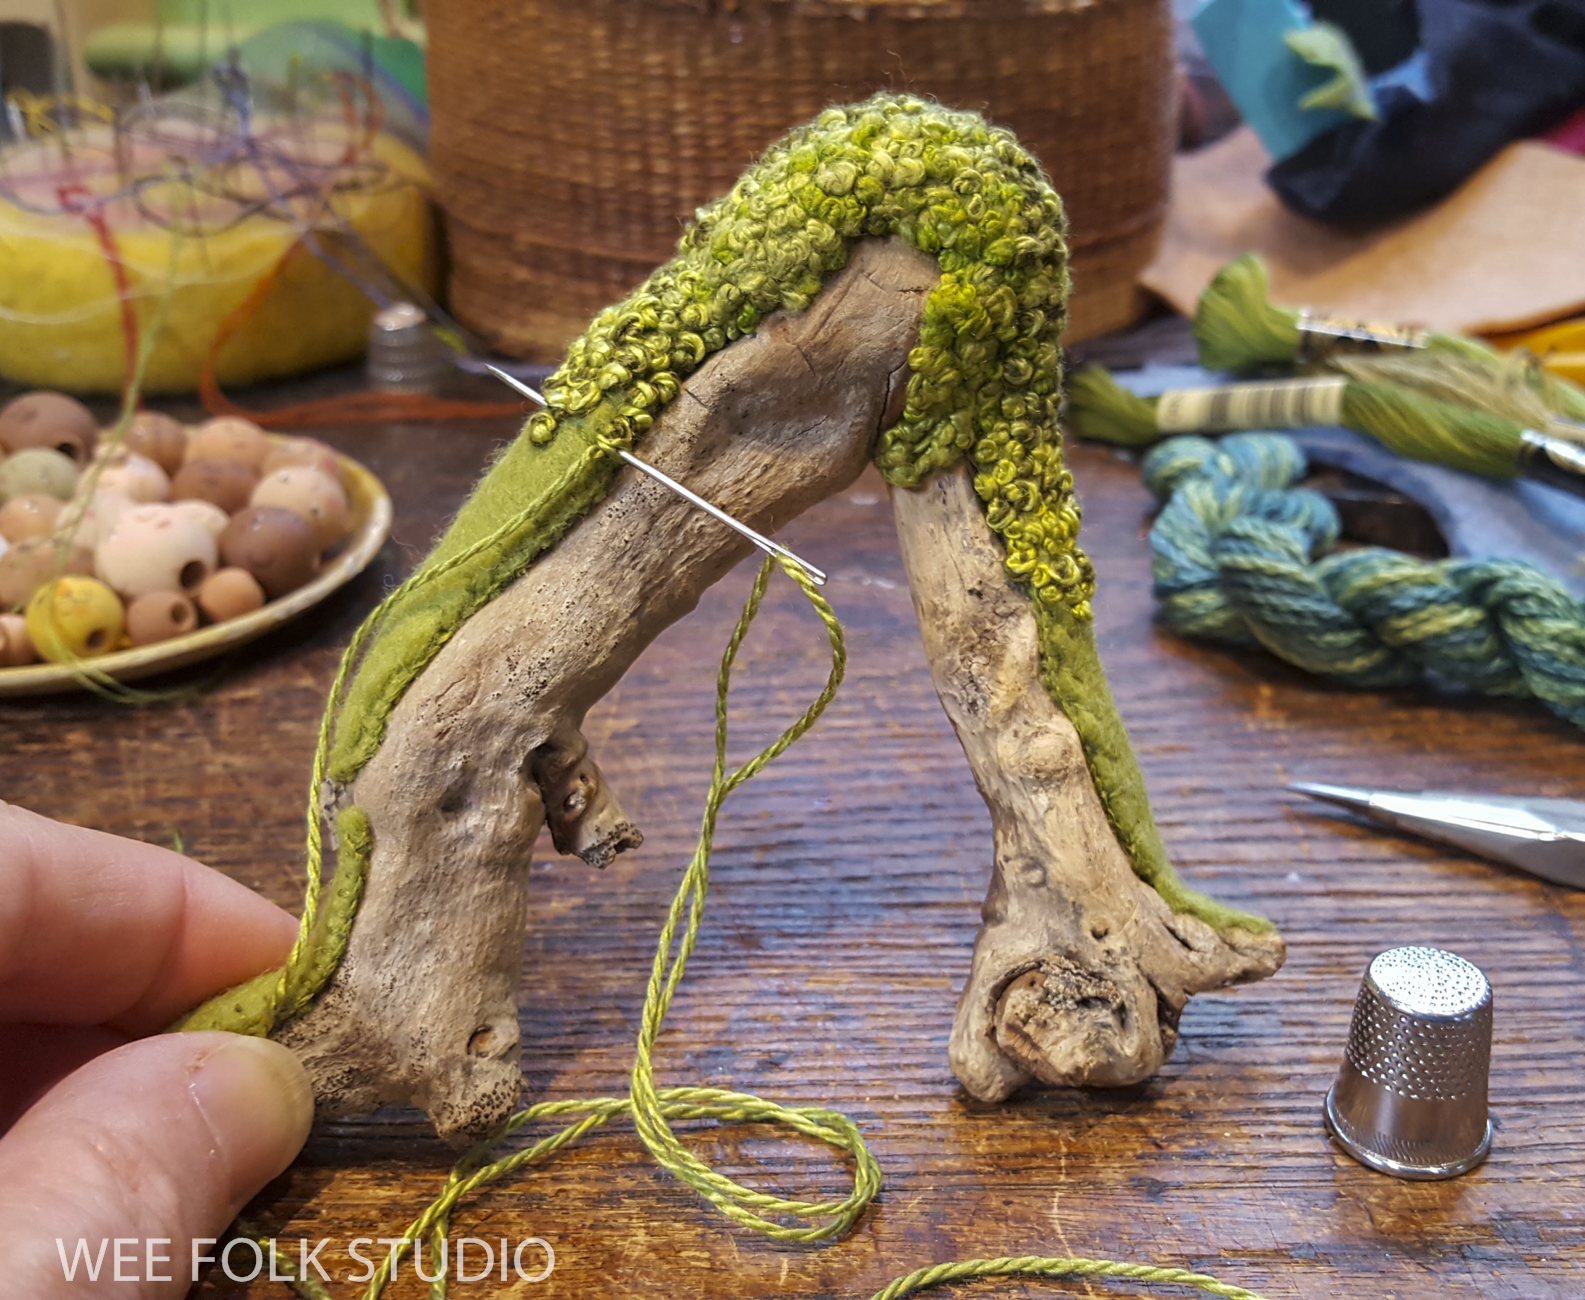
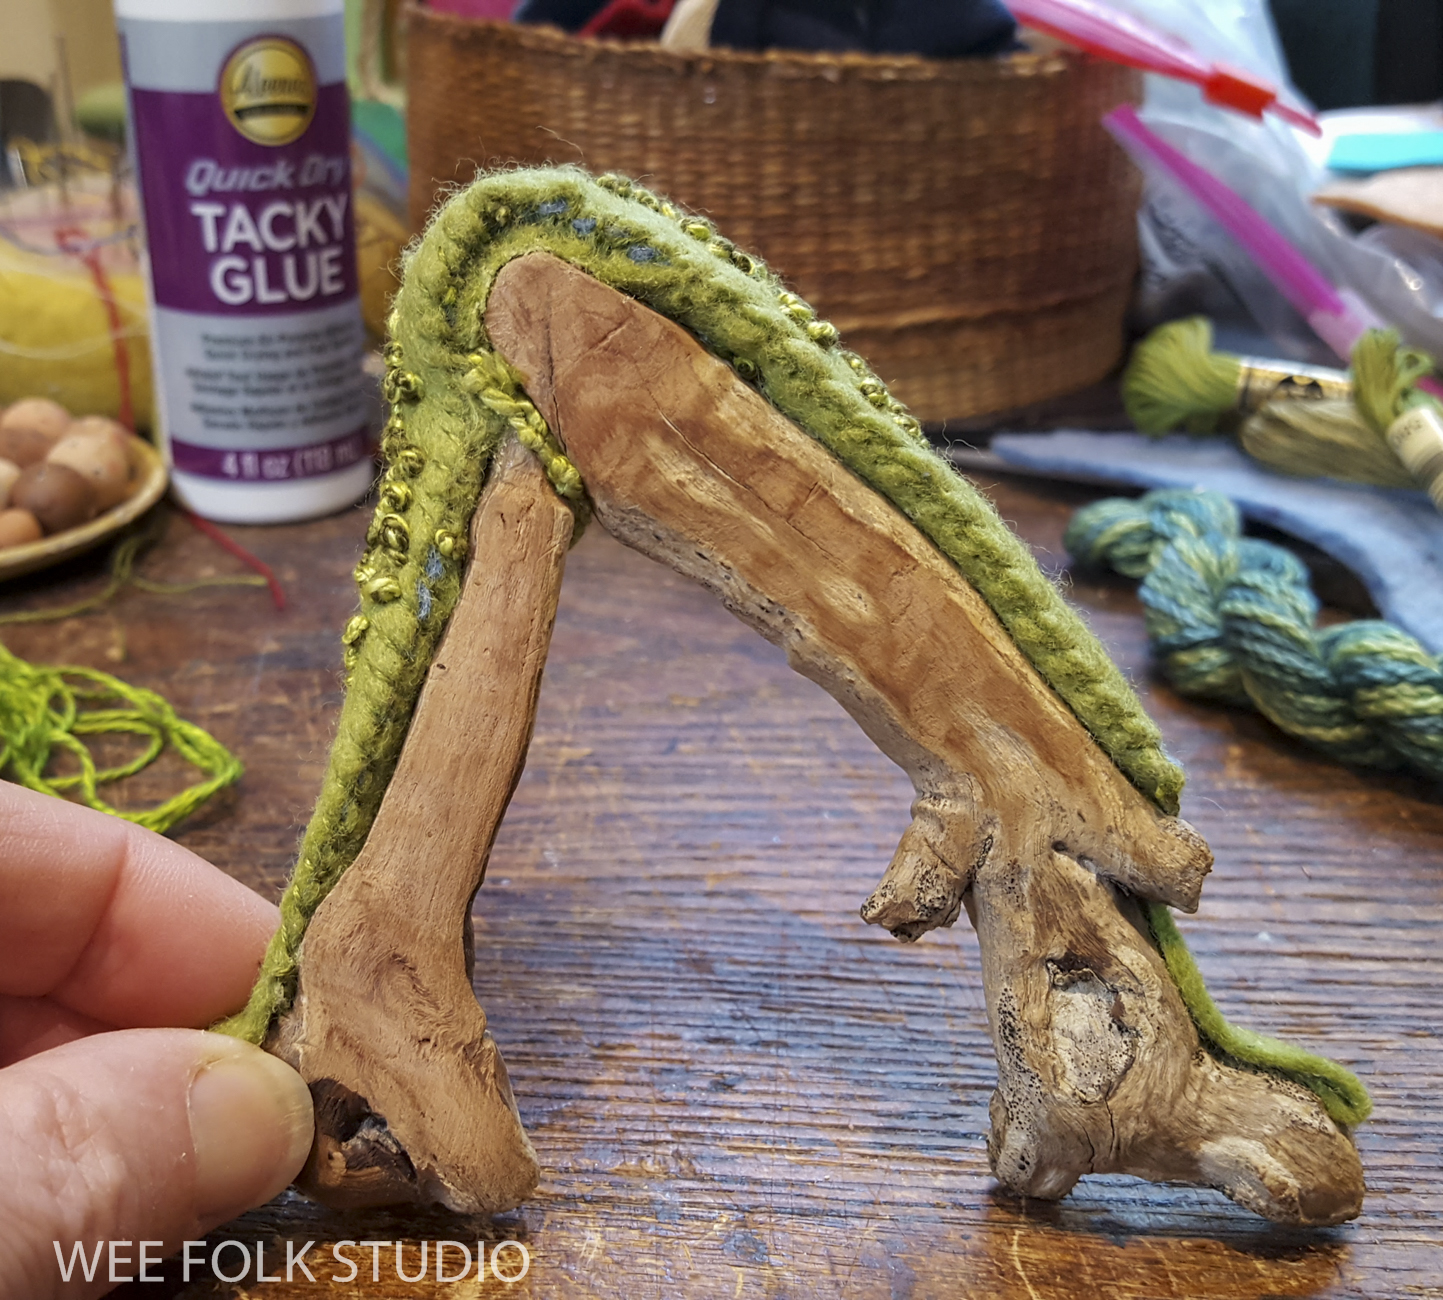
As with the other landscapes in the 4 Seasons series, I documented the process of making Summertime with photos and videos along the way, so there’s a lot of material to share in future blog posts, including a varied assortment of Stitch Minute videos.

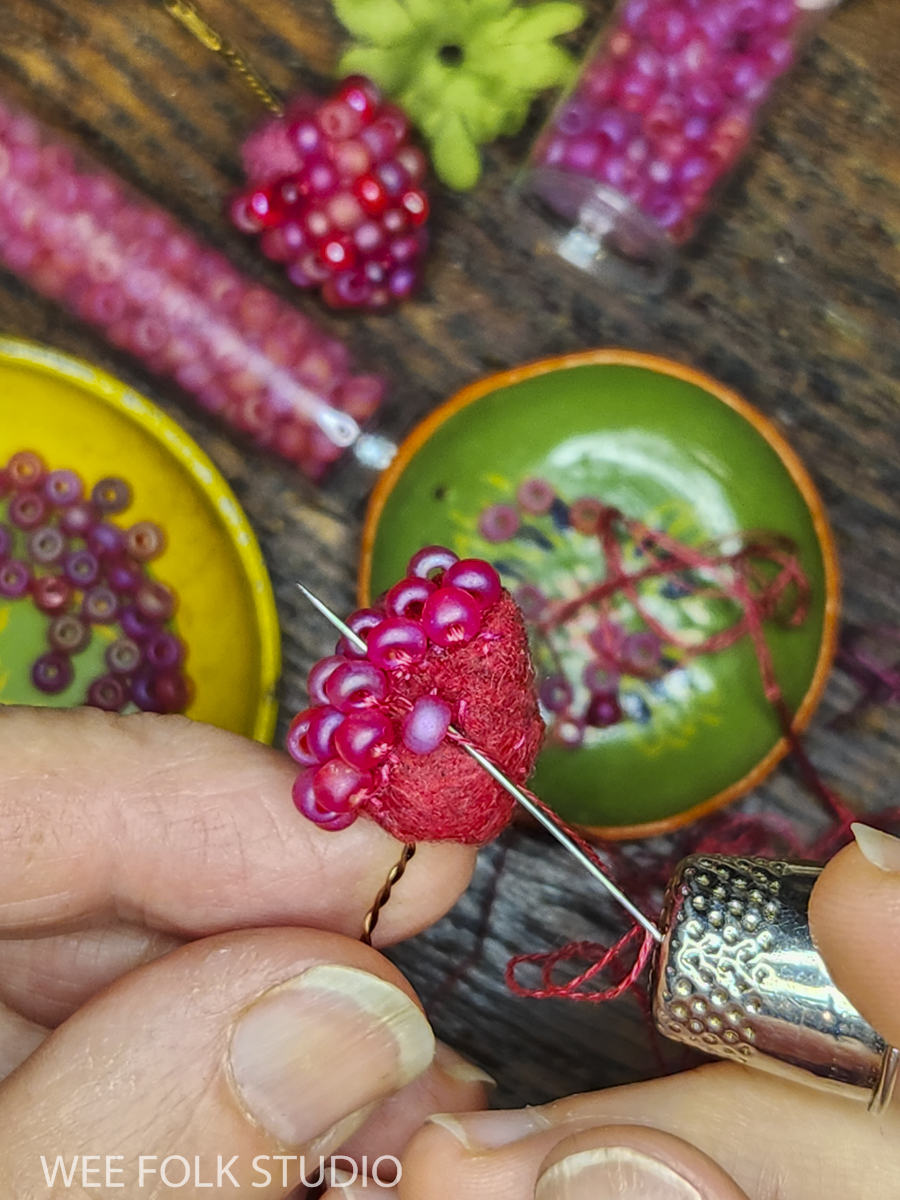
If you’ve followed me on Instagram and Facebook during the past year, you’ve seen Stitch Minute videos that show different aspects of my process. I’m happy to offer photos and minute-long peeks over my shoulder while I work, but please don’t ask me to explain my techniques in detail. Much of what I do is instinctual and I worry that over-analyzing my process would spoil the magic for me. To learn my personal philosophy about sharing knowledge, please read my post to teach or not to teach.

Here are two Stitch Minute videos that I made in August, while working on Summertime.


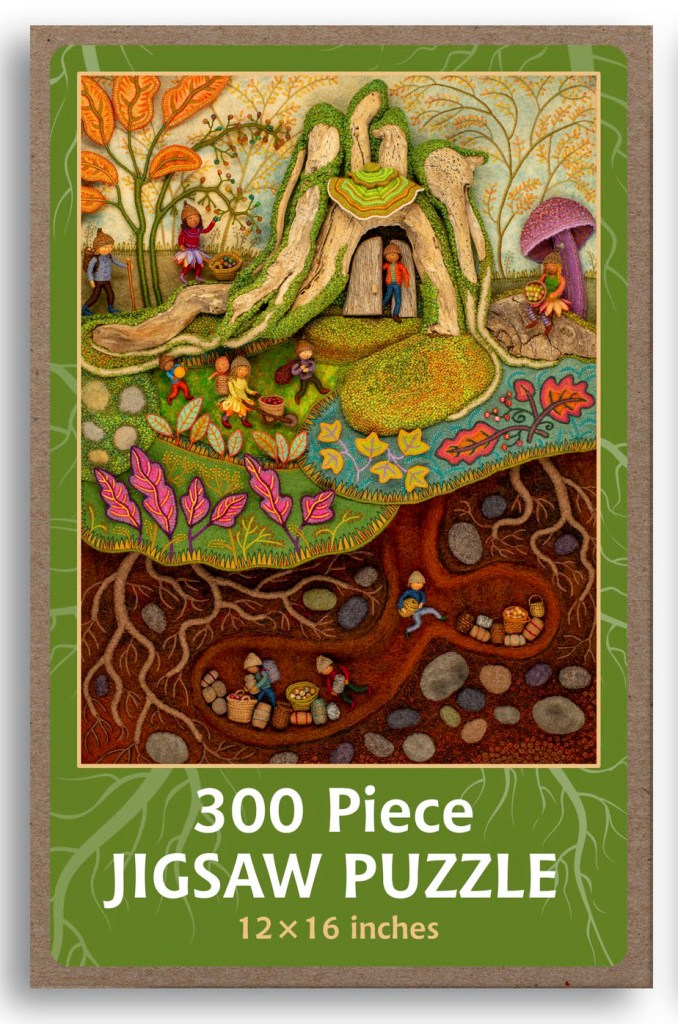
New 4 Seasons Items in my Esty Shop

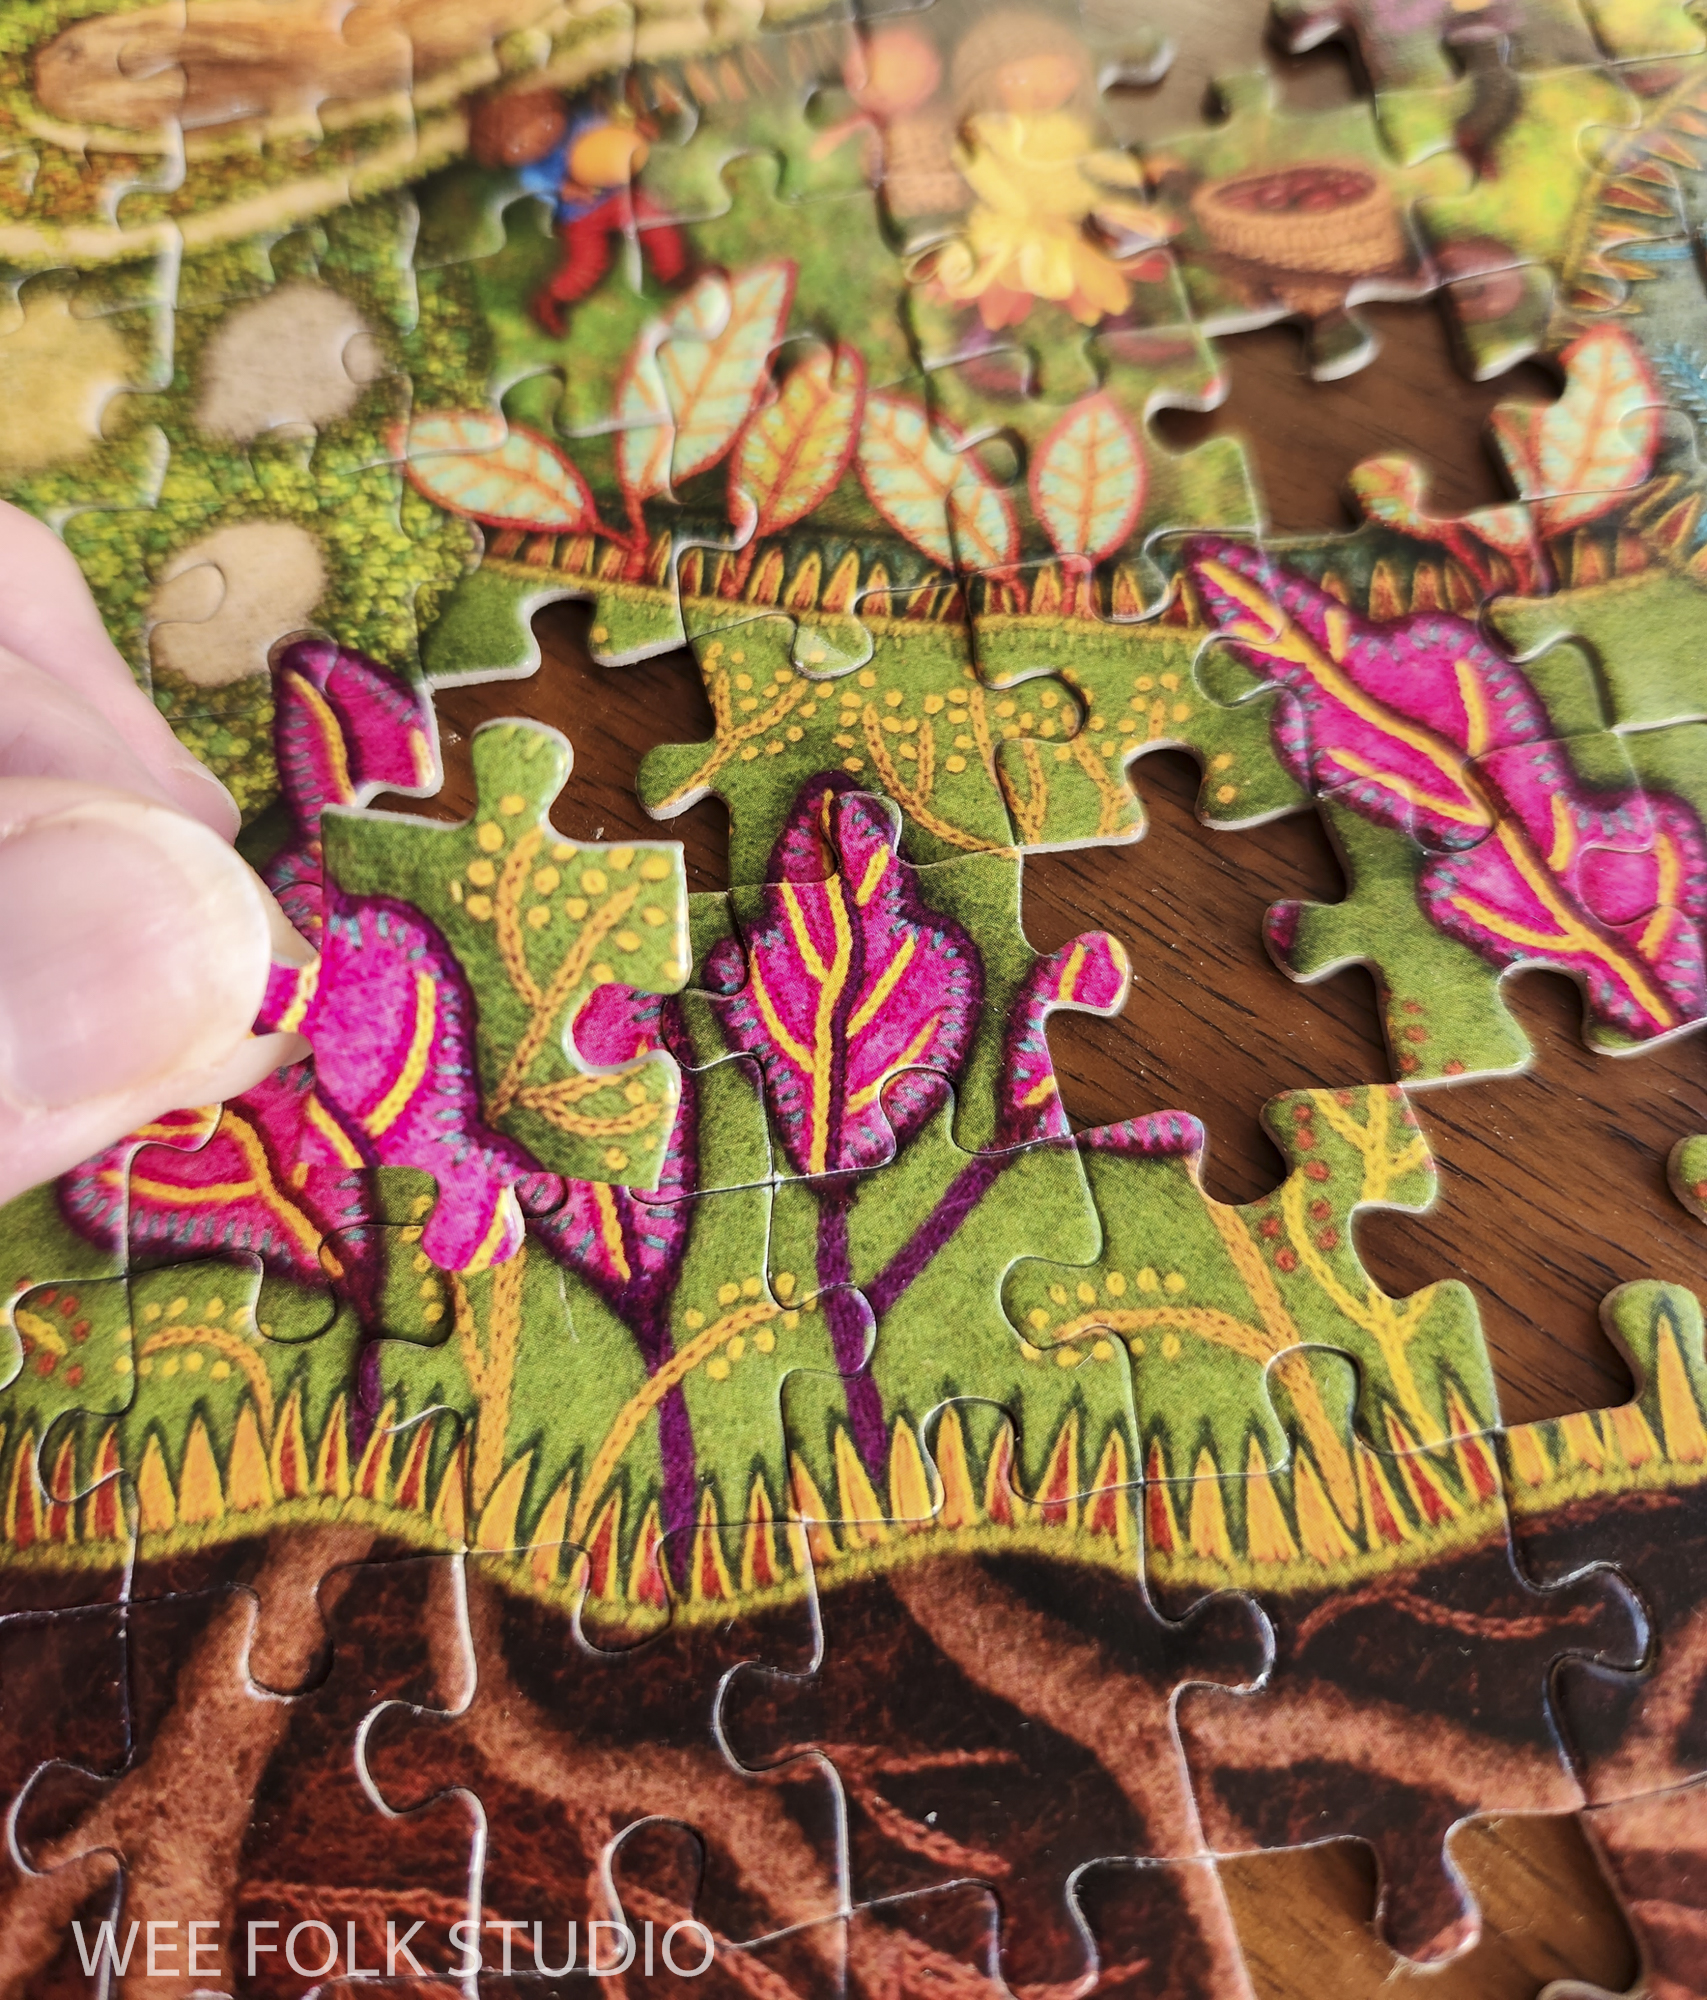
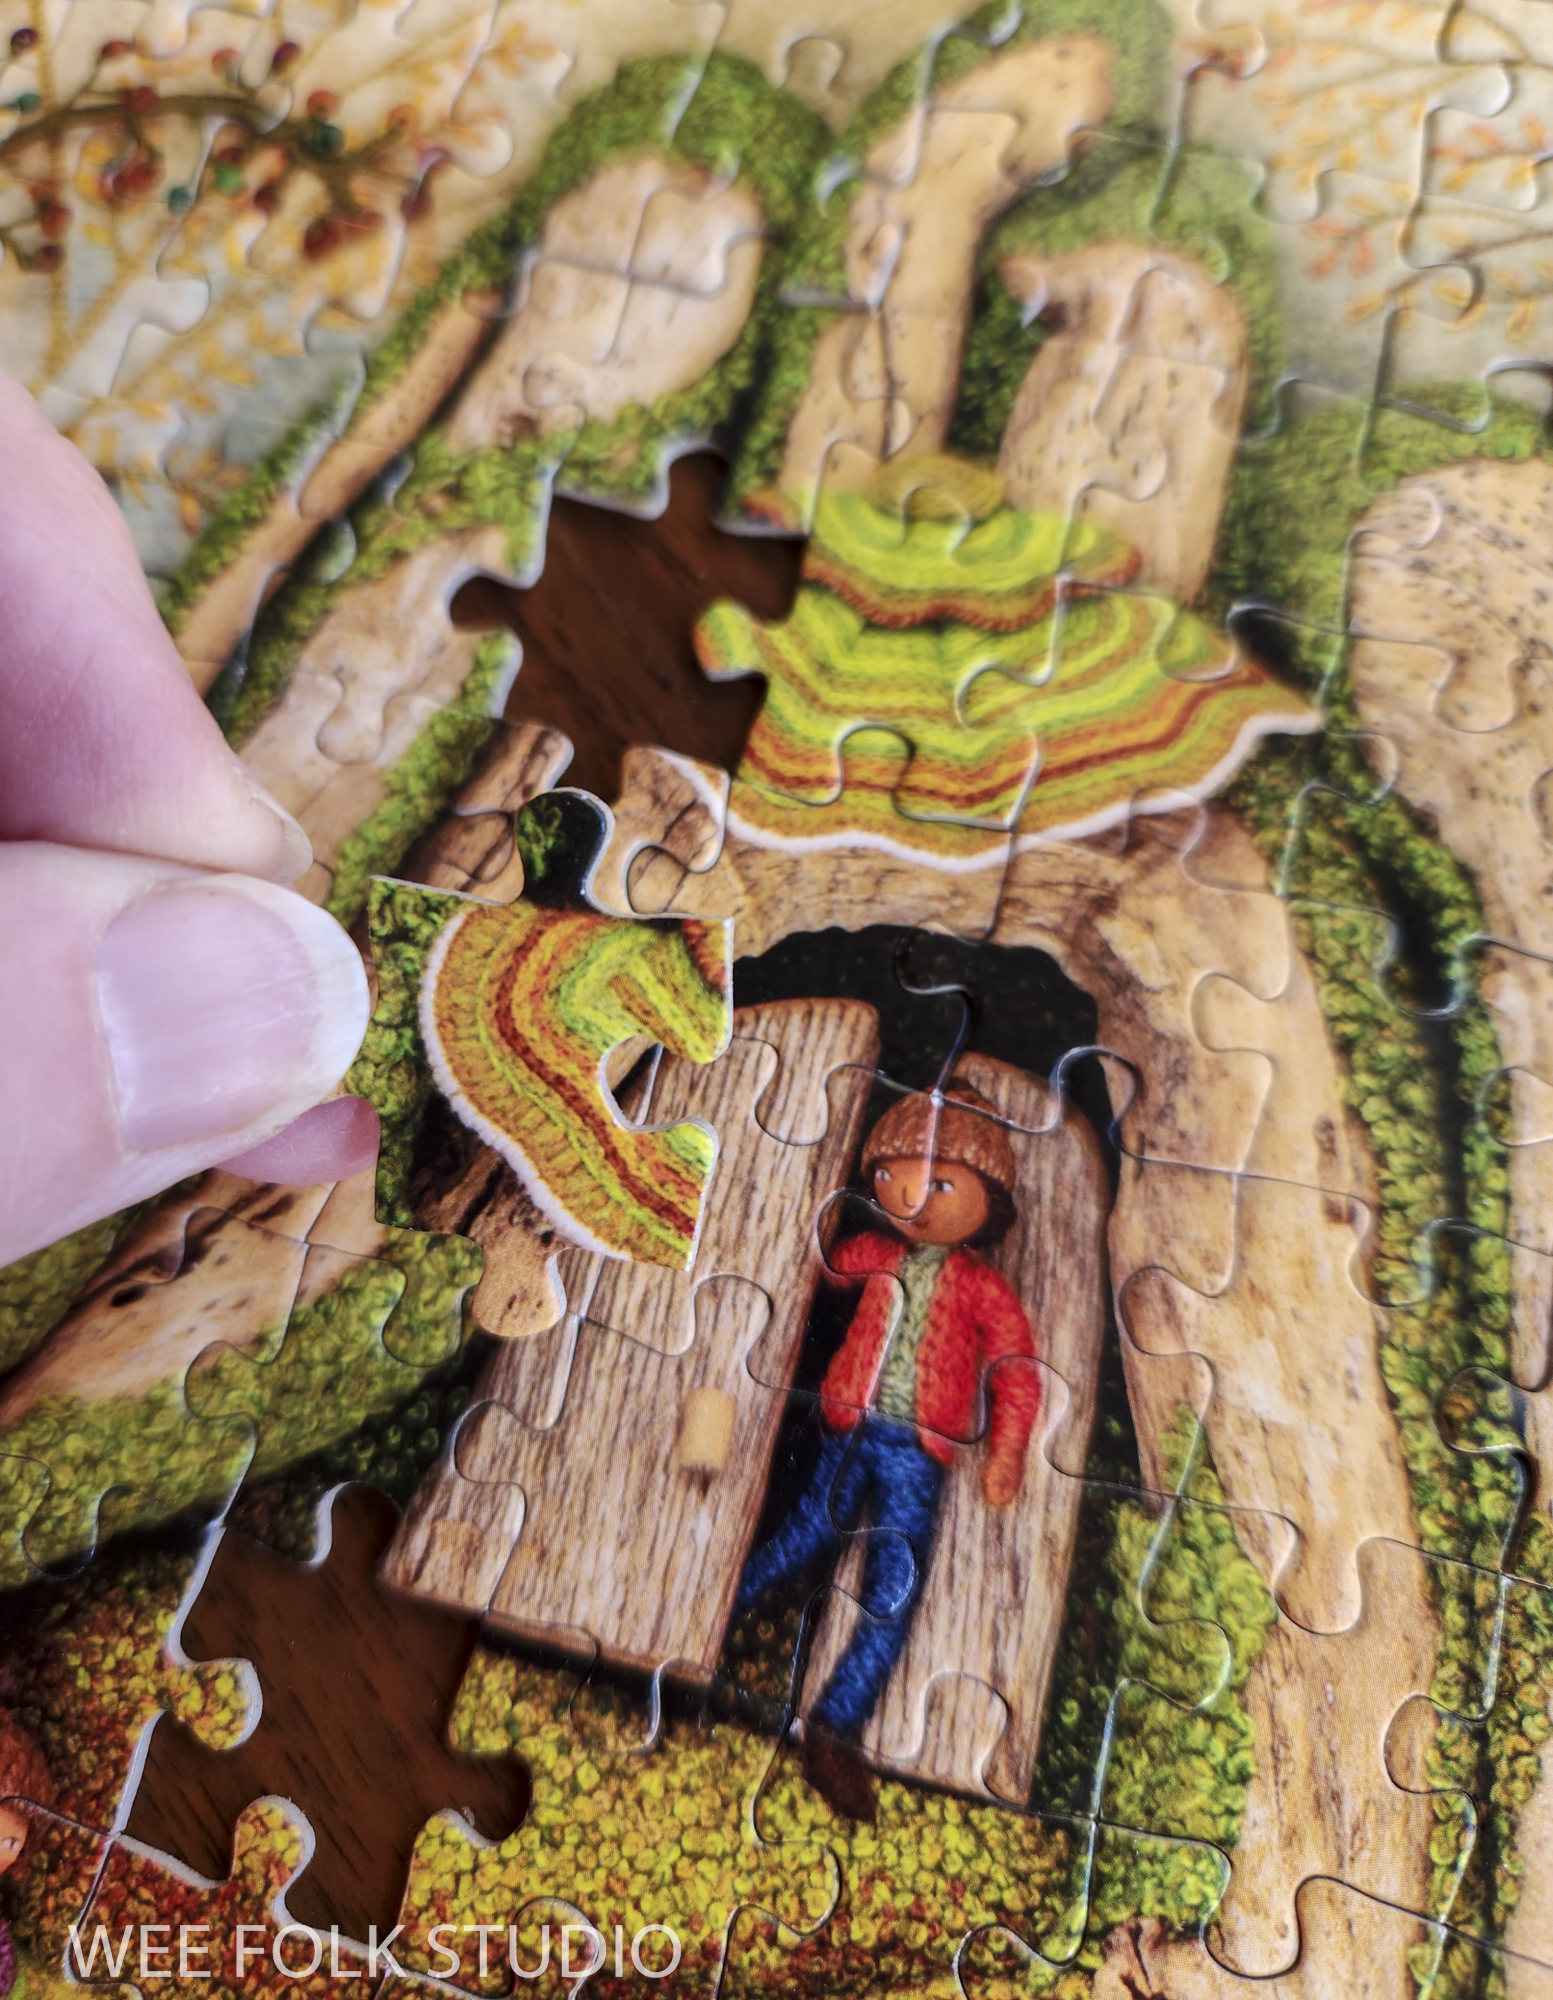
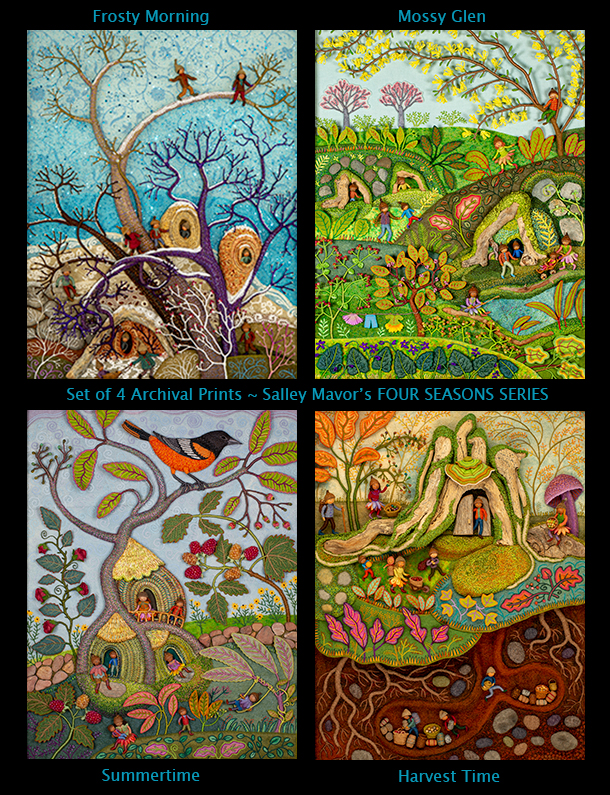
Now that the seasonal landscape series is finished, I’m excited to offer note cards, jigsaw puzzles and archival prints of all four seasons:
Summertime, Mossy Glen, Harvest Time and Frosty Morning.
My Etsy Shop offers FREE SHIPPING on US orders of $35.00 or more. I’m sorry to disappoint my international fans, but due to the prohibitive cost of shipping overseas, I now only take orders from the USA and Canada.

$ Seasons Note Card Sampler is available in my Etsy Shop
Summertime Jigsaw Puzzle is available in my Etsy Shop
8.5 x 11 Archival Print of Summertime is available in my Etsy Shop

The Wee Worlds of Salley Mavor exhibition

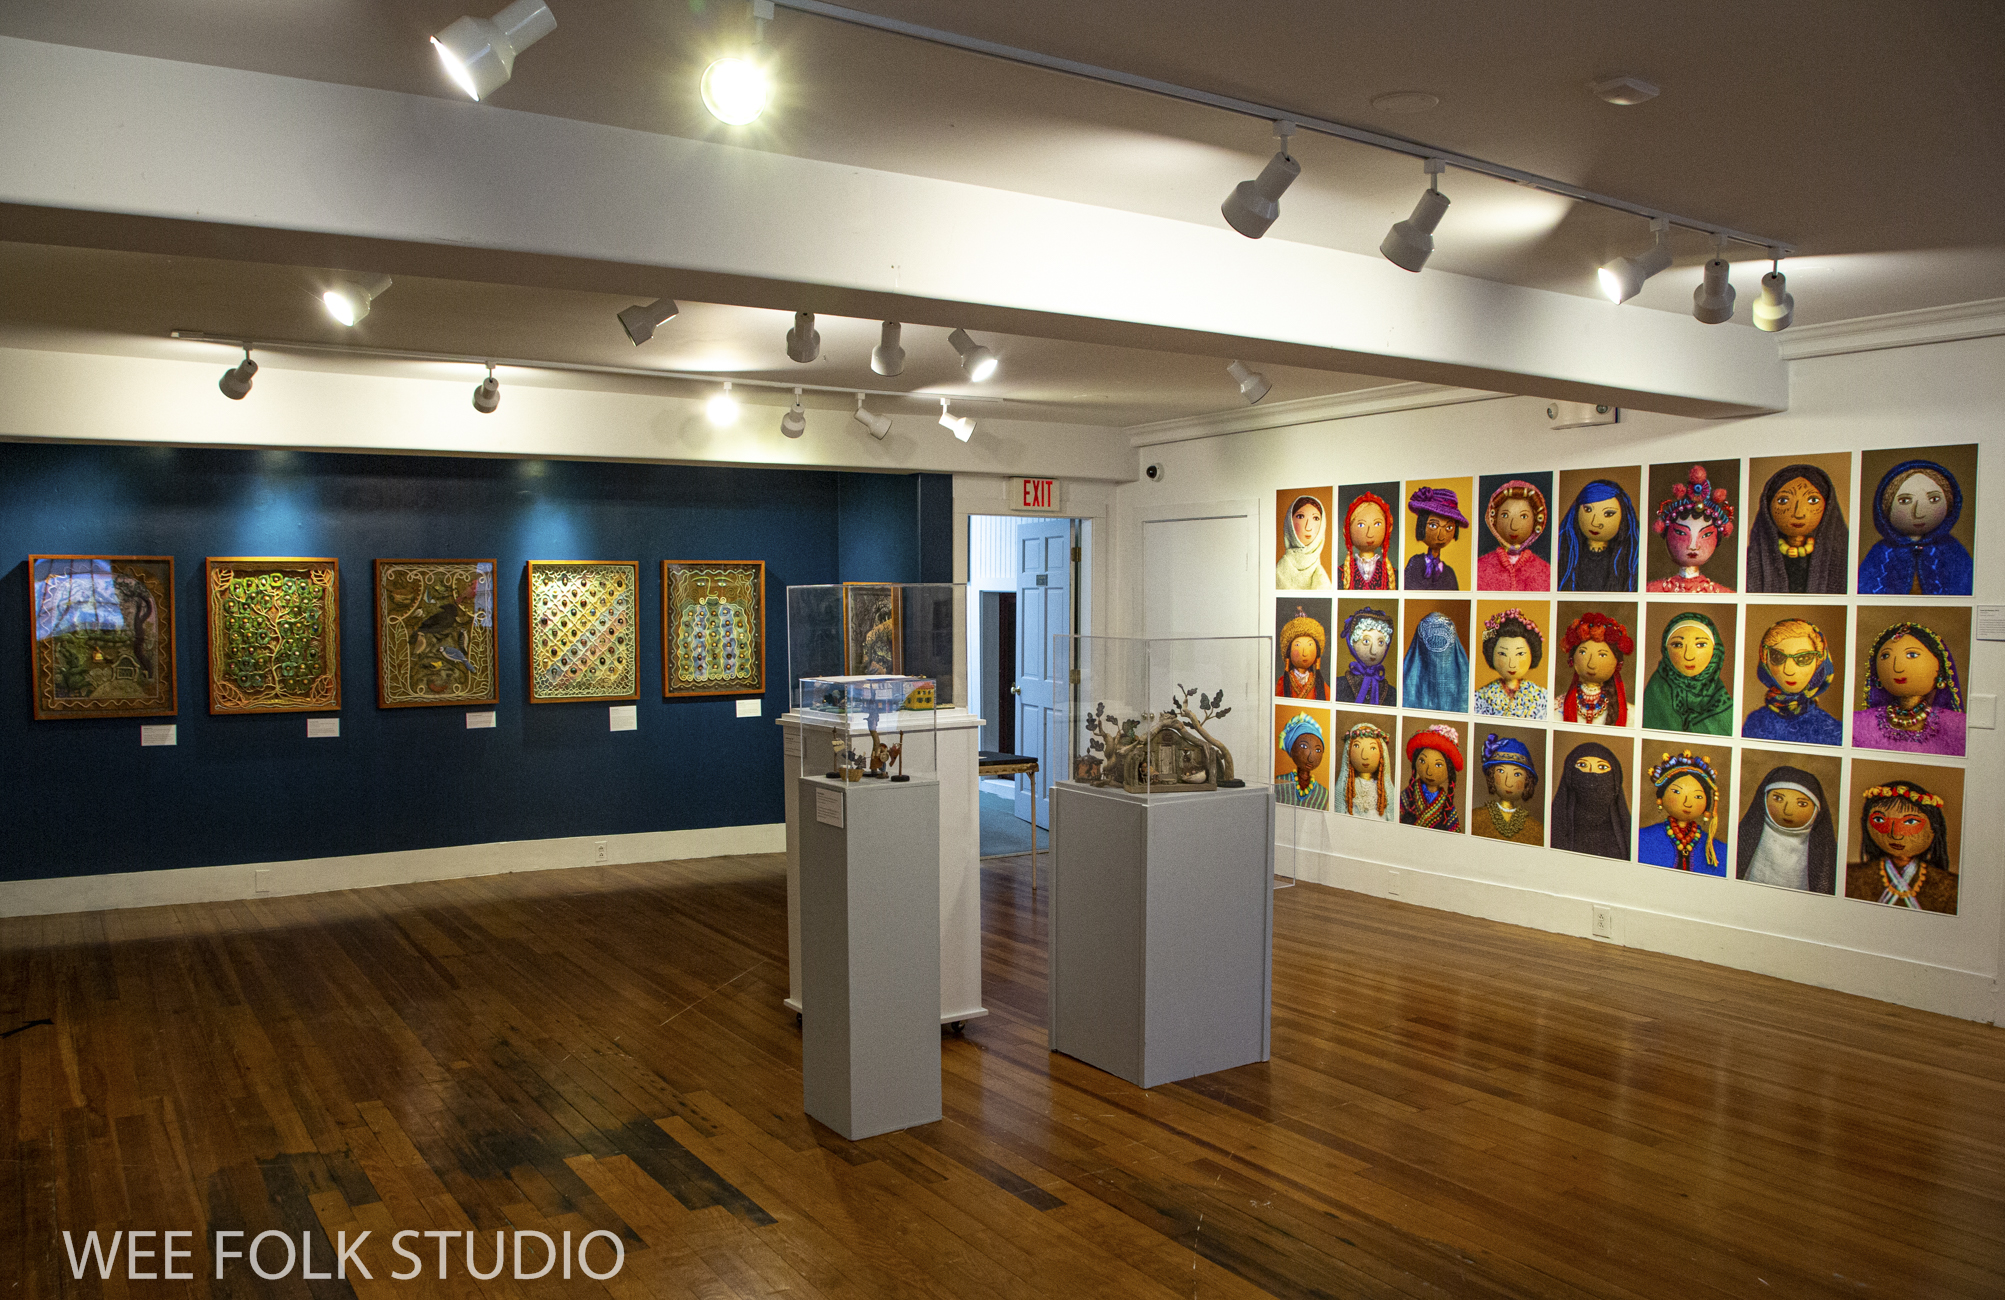
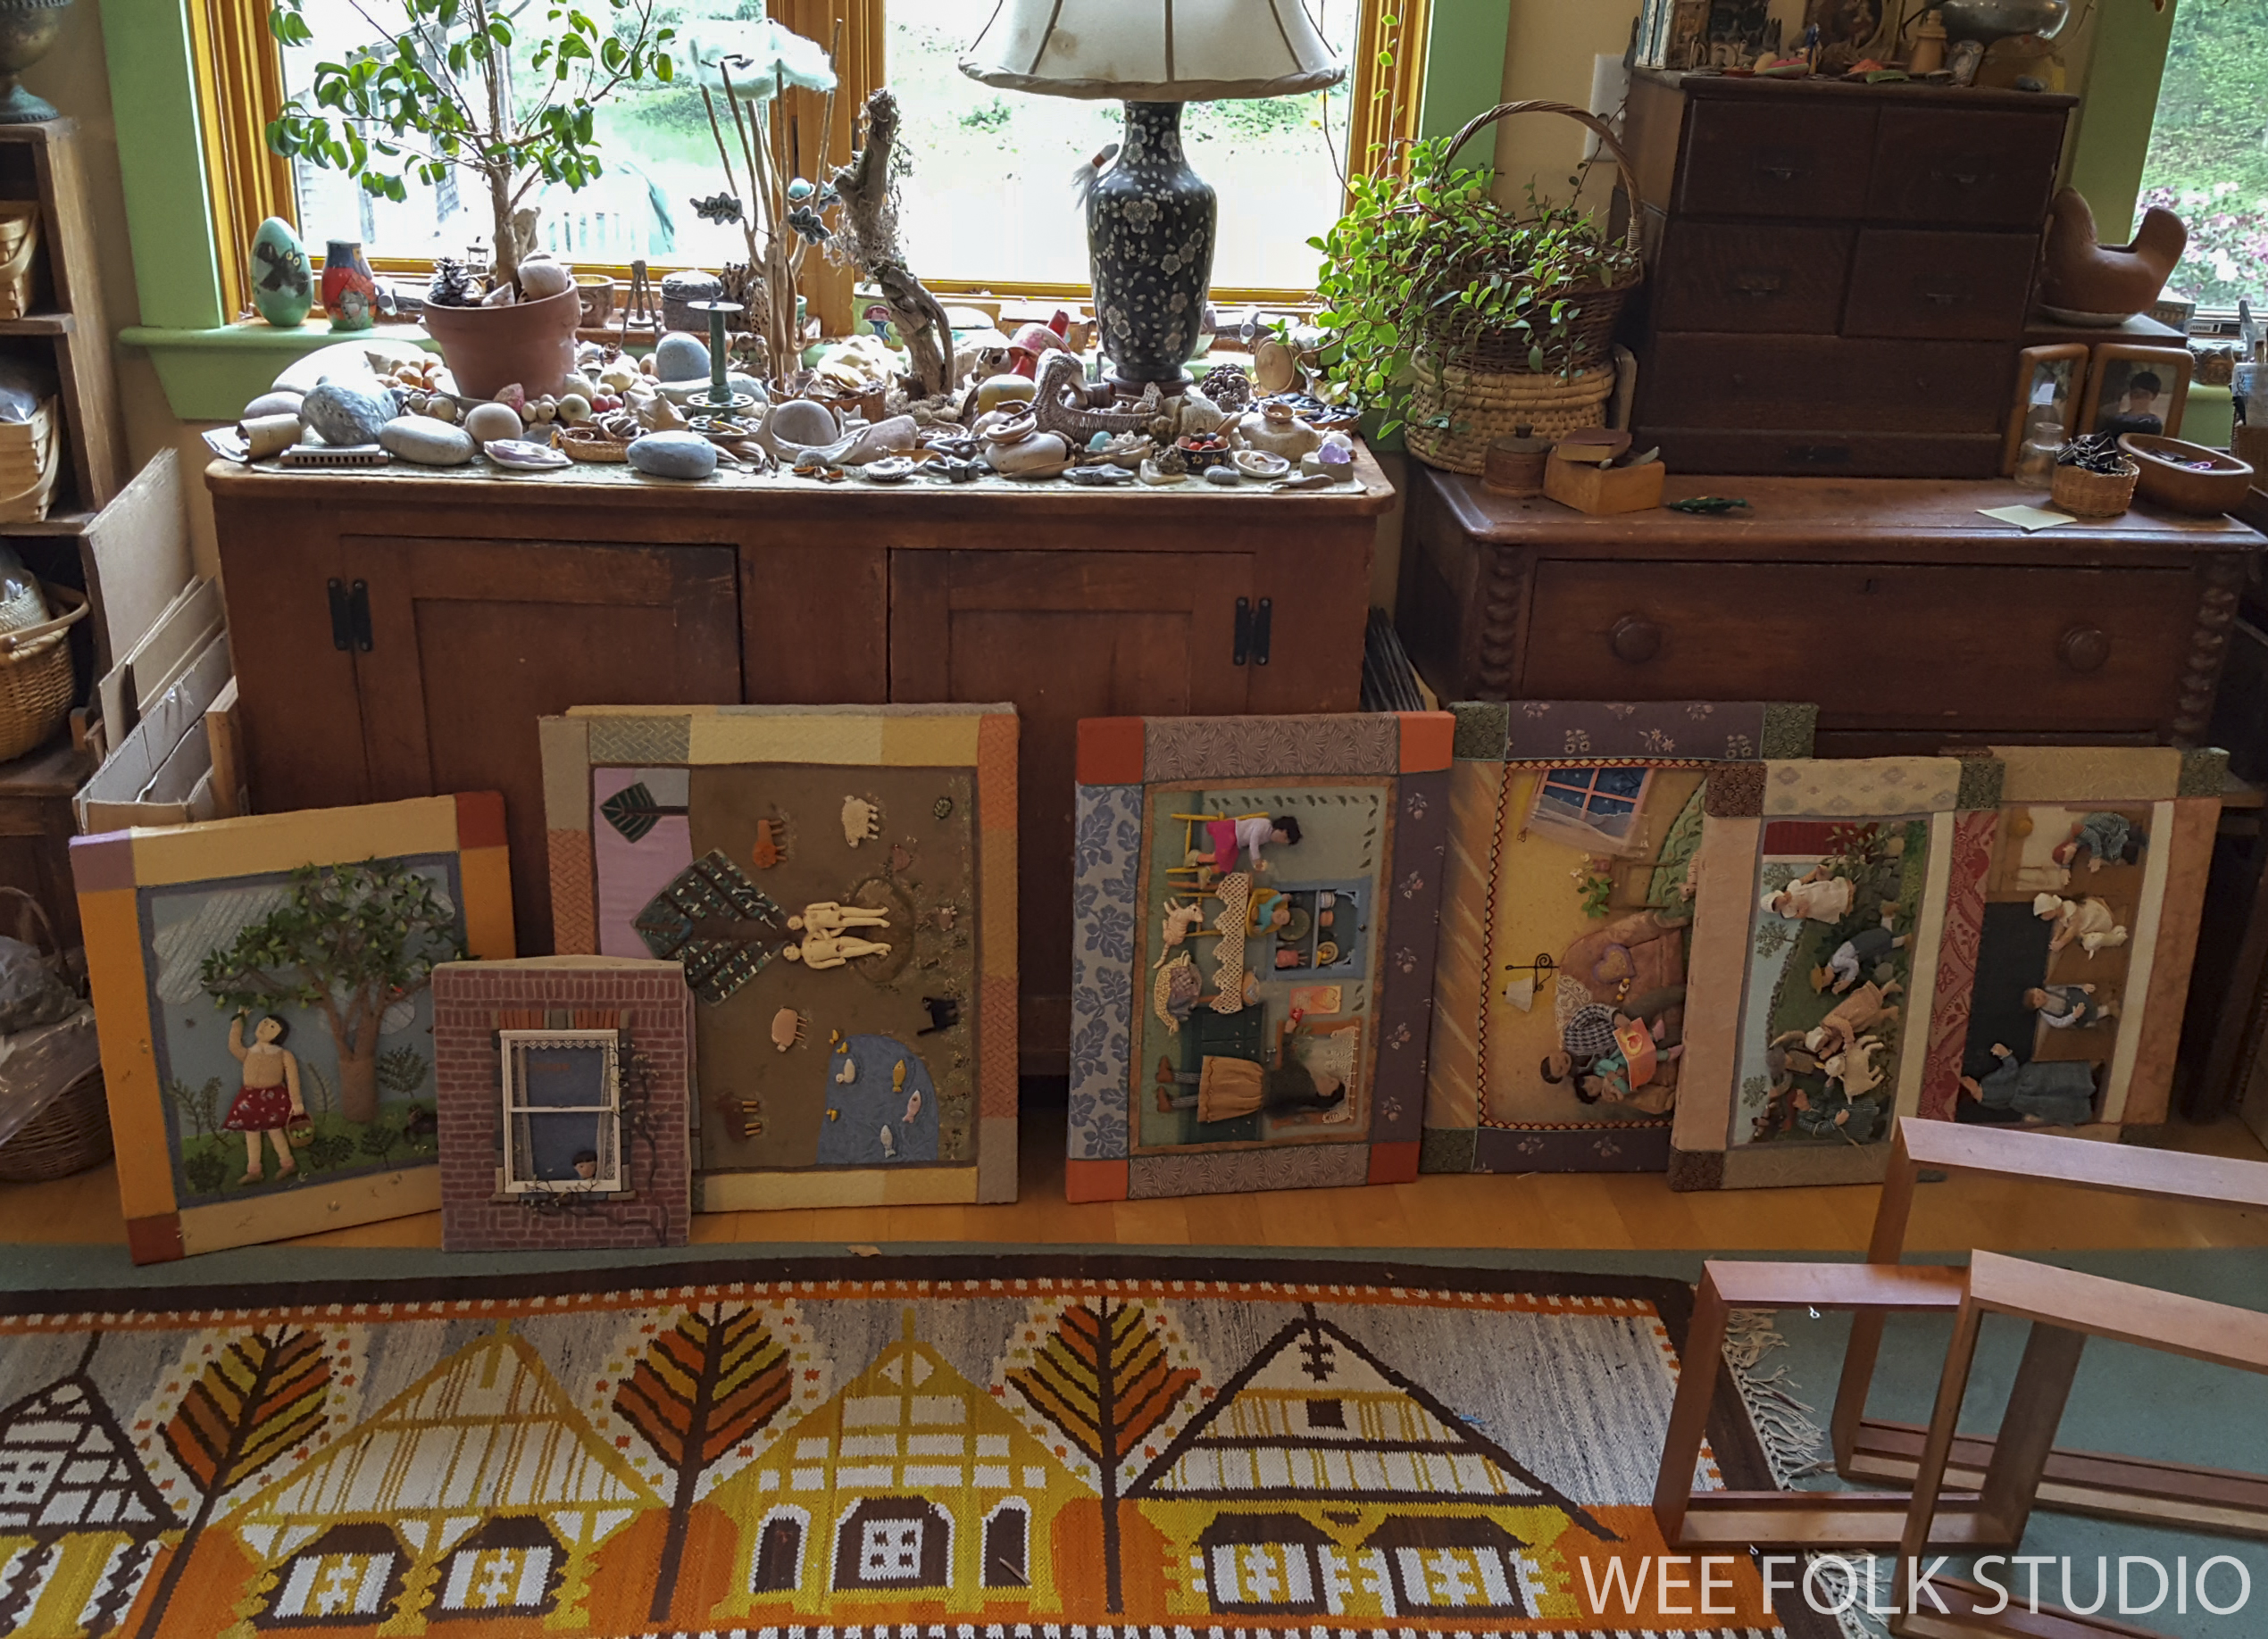
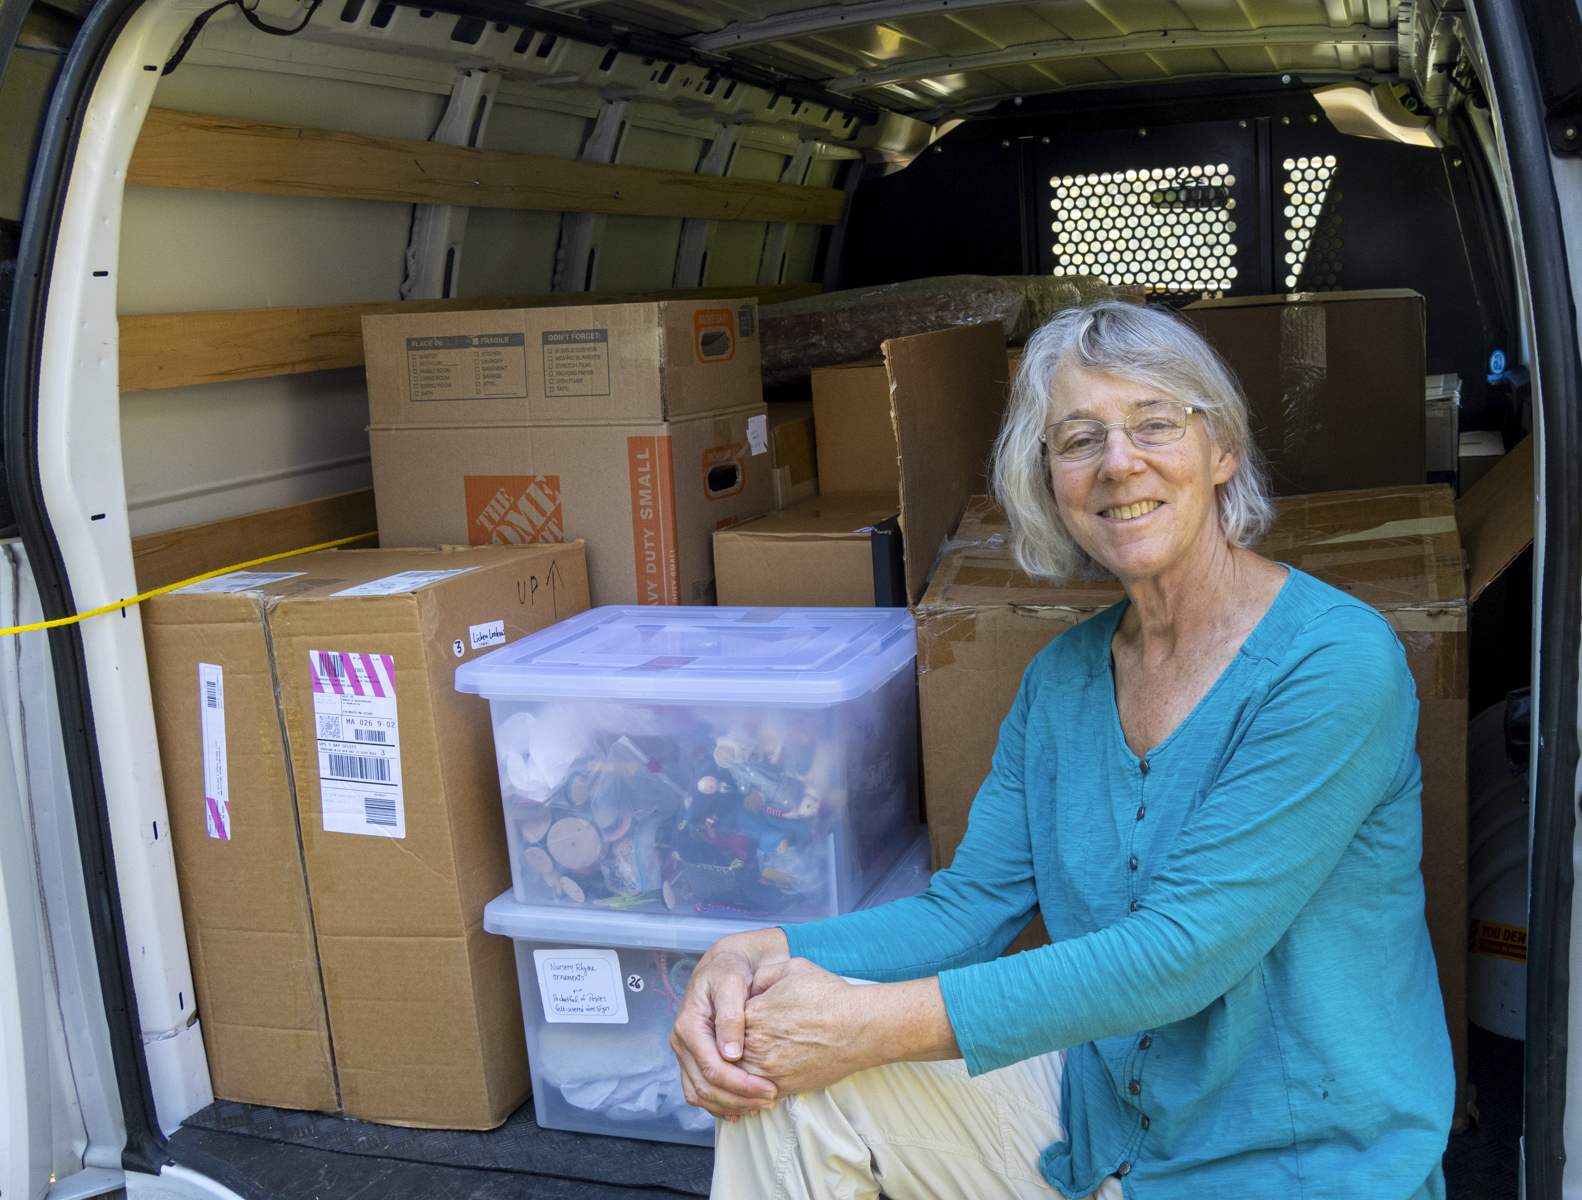
Yesterday, my artwork was picked up and driven in a van to Manchester, Vermont for my exhibition at the Southern Vermont Arts Center. It’ll be a large show, with over 75 pieces, including the 4 Seasons and the original illustrations for my most recent picture book, MY BED. On view will be a wide range of work, from early in my career to today, as well as a wall covered with over 100 wee folk dolls!

There will be a lot to enjoy at the Southern Vermont Arts Center this fall, especially for those of you with a playful bent. I’m so pleased that my work will be just around the corner from a fascinating and whimsical display of the late illustrator Ashley Bryan’s collection of toys, objects, puppets and paintings. Ashley Bryan: The Spirit of Joy and The Wee Worlds of Salley Mavor will be on view Sept. 30, 2013 – Jan. 7, 2024. I hope to see some you at the opening reception on Sept. 30th, where l will give a gallery talk at 3:00 PM.

This image has an empty alt attribute; its file name is svac-flyer2.jpg

To keep up with new posts, please subscribe to this blog. Your contact info will not be sold or shared. If you’d like to see more frequent photos tracking the projects in my studio, please follow me on Facebook, Instagram and BlueSky.

Harvest Time – Part 7 (wee folk)

In Part 7 in the continuing series about making Harvest Time, I share photos and commentary about the wee folk characters who populate the landscape. In the coming weeks, I will post more stories that focus on different aspects of making the fall scene, including the miniature storage containers and the embroidered trees. So far, I’ve written the following posts:
The overview introduces the Harvest Time piece.
Part 1 features moss making.
Part 2 is about making the turkey tail mushroom.
Part 3 shows the construction of felt leaves.
Part 4 gives a peek at embroidering the plants.
Part 5 is about making the toadstool mushroom.
Part 6 covers the underground tunnels, roots and stones.

Harvest Time is the fall scene in a series of seasonal landscapes that capture the wonder and magic of the natural world, both real and imagined. Note cards and jigsaw puzzles of the this and other scenes in the series (Frosty Morning and Mossy Glen) are available in my Etsy Shop.

Everything I make includes some sort of living being with eyes, be they animal or human. I can’t imagine spending months working on a piece that is purely decorative, abstract or simply a landscape, without a storytelling element. The interplay between characters and their surroundings is what drives me to create. As I paint their faces, form their little bodies and stitch their clothes, I grow to care about them. This emotional connection is what motivates me to spend copious amounts of time creating an imaginary world that is worthy of their existence.

For this scene, I painted more faces than I needed, in different sizes and shades. That way, I could select a cast of characters later. I’m never sure how many figures I’ll need or exactly where they’ll end up. They are like actors in an improvisational skit or a group posed in a tableau.

The little people range in size between 1″ to 2″ tall. They were made the same way as the wee folk dolls in my how-to book, Felt Wee Folk, with slight variations. For instance, I used wire instead of pipe cleaners for their tiny armatures.

In keeping with the harvesting theme, all of the people are bringing produce to the mossy stump, where it will be stored in the cellar.

I’m often asked, “How do you knit their tiny outfits?” There might be someone out there who can knit or crochet a tiny sweater for a 2″ doll, but I challenge them to stuff their arms through the sleeves! Remember, this is make believe. The wee folk never have to bathe or change their clothes. Why knit, when you can embroider a piece of clothing directly onto a body? Rows of chain stitching are pretty convincing, don’t you think? I call it faux knitting.

Please stay tuned for more stories about making Harvest Time, including the storage containers and embroidered trees.
The overview introduces the Harvest Time piece.
Part 1 features moss making.
Part 2 is about making the turkey tail mushroom.
Part 3 shows the construction of felt leaves.
Part 4 gives a peek at embroidering the plants.
Part 5 is about making the toadstool mushroom
Part 6 covers the underground tunnels, roots and stones.

To keep up with new posts, please subscribe to this blog. Your contact info will not be sold or shared. If you’d like to see more frequent photos tracking the projects in my studio, please follow me on Facebook, Instagram and BlueSky.

Harvest Time – part 6 (underground)

In Part 6 in the continuing series about making Harvest Time, I share photos and commentary about making the tunnels, roots, and stones in the underground portion of the landscape. In the coming weeks, I will post more stories that focus on different aspects of making the fall scene, including the wee folk figures, their storage containers, and the embroidered trees. So far, I’ve written the following posts:
The overview introduces the Harvest Time piece.
Part 1 features moss making.
Part 2 is about making the turkey tail mushroom.
Part 3 shows the construction of felt leaves.
Part 4 gives a peek at embroidering the plants.
Part 5 is about making the toadstool mushroom

Harvest Time is the fall scene in a series of seasonal landscapes that capture the wonder and magic of the natural world, both real and imagined. Note cards and jigsaw puzzles of the this and other scenes in the series (Frosty Morning, Mossy Glen and Summertime) are available in my Etsy Shop.

I’m never sure where my ideas come from. The usually appear in my head as pictorial concepts that ferment for a long time before transferring into my sketchbook and then as finished pieces. The fall scene lived in my imagination for many months before I began visualizing 3 separate areas – sky, a forest floor and below ground. I’ve always been fascinated by dioramas of underground tunnels and burrows dug by animals. I wanted to create similar storage areas for the wee folk to keep their fall harvest.

Once I became fixated with the idea of a cut-away underground view, I couldn’t wait to bring it to life! From the start, I knew that translating the picture in my mind’s eye into something real was going to require exploring different ways of working. While mulling over the possibilities, I decided to try both wet and dry felting, which I’ve dabbled in over the years.

Felting does have an appeal, but in the end, all that poking and meshing of wool fibers creates a uniform fuzzy texture that blends everything together. I wouldn’t ordinarily want that in my work because I’m more interested in creating lines and clear, defined edges. But for this project, a soft texture might be exactly what I needed for the dark soil below ground.

I also thought that felting would be a good way to form the concave shaped tunnel and storage areas. After reviewing the wet felting process on this YouTube tutorial, I wrapped a couple of stones and a curved stick with brown wool fleece and felted them in soapy water. When they dried, I cut through the thick felt and removed the stones and stick.

At this stage of the process, I needle felted the different parts together. An advantage to working with a barbed needle is that with enough jabbing, you can make seamless joints. Then, I cut out openings in a sheet of red felt (it happened to be what I had), inserted the tunnel, and needle felted them together.

To create the soil color, I needle felted layers of brown fleece on top of the red felt background.

I made the underground roots by covering wire with felt, the same way that I make trees.

The stones are made with 2 layers of heather shades of felt, folded over and sewn on the back.

Once the roots and stones were sewn in place, I could go in and add embroidered details like the chain stitched finer roots…

and French knot “dirt”.

After all of the manic stabbing with a barbed needle, it was a relief to get back into stitching mode. It felt great to get out a large embroidery needle, thread it with tapestry yarn, and create a distinctive texture that contrasted with the fleecy wool.

With the underground section in place and most of the landscape complete, I could now begin to focus on populating the scene with the wee folk who lived and worked there.

Please stay tuned for more stories about making Harvest Time, including the wee folk figures, storage containers, and embroidered trees.
The overview introduces the Harvest Time piece.
Part 1 features moss making.
Part 2 is about making the turkey tail mushroom.
Part 3 shows the construction of felt leaves.
Part 4 gives a peek at embroidering the plants.
Part 5 is about making the toadstool mushroom

To keep up with new posts, please subscribe to this blog. Your contact info will not be sold or shared. If you’d like to see more frequent photos tracking the projects in my studio, please follow me on Facebook, Instagram and BlueSky.

Harvest Time – part 3 (felt leaves)

In Part 3 in the series about making Harvest Time, I share photos, commentary and a stitch-minute video about embellishing the felt leaves that appear on the ground-cover and bushes. Please note that when I use the word ‘felt”, I’m referring to the noun, not the verb. Felting is agitating and manipulating wool fleece fibers with a barbed needle or soapy water to create a felted surface. That’s how I made the brown soil in the underground part, which I’ll describe in a future post.

In the coming weeks and months, I will post more stories that focus on different aspects of making the fall scene, including the toad stool mushroom, wee folk figures, needle felted tunnels, roots, stones and foliage of all kinds. Part 1 featured moss making. Part 2 is about making the turkey tail mushroom.

Harvest Time is the fall scene in a series of seasonal landscapes that capture the wonder and magic of the natural world, both real and imagined.
Harvest Time note cards and a jigsaw puzzle are available in my Etsy Shop.

When envisioning this piece, I wasn’t sure how it would come together, but that’s normal for me. I knew that I needed to figure out a way to clearly define the edge between above ground and below ground. This is the kind of thing I think about when doing busy work, like stitching hundreds of French knots. I’m always one step ahead, planning the next move. I ended up creating a kind of flap with two sections of felt “sod” that overlapped the underground tunnel to the root cellar.

Felt Leaves
After edging the felt leaves with blanket stitches, I bent wire to match the shape and stitched it to the outside edge. Then I kept going around until the wire was completely covered with thread. I used single strands of floss to give it a fine finished look.

I wanted to fill the ground cover with an eye-catching array of textures, colors and shapes that would balance the composition of the whole piece. To help the leaves perk up and create shadows, I pushed the wire stems through a small hole to the back of the felt background, where it became a leverage point.

Because this scene has an element of fantasy, I felt free to incorporate bright unnatural looking shades.

I searched through my stash and found some variegated yellow embroidery floss to use for the chain stitched veins on these hot pink leaves.

When I embellish with thread, I constantly think about how to enhance and articulate the form, without becoming too cluttered. For instance, adding a dark pink outline around the veins on this leaf help emphasize the lines.

I hadn’t noticed it before, but now I see that the leaves are all made with complimentary colors. That way they pop out at you, both visually and physically!

This Stitch Minute video shows how I made a wire edged felt leaf.

As you can see, I constructed this background piece separately from the other parts of the scene. At the very end, after months of work, I assembled all of the pieces and stitched the sections onto one stretched fabric layer.

I also made larger orange leaves for the berry bush that’s growing next to the moss covered stump.

In future posts, I will focus on different aspects of making Harvest Time, including the toad stool mushroom, wee folk figures, needle felted tunnels, roots, stones and foliage of all kinds.
The overview introduces the Harvest Time piece.
Part 1 features moss making.
Part 2 is about making the turkey tail mushroom.
Part 3 shows the construction of felt leaves.
Part 4 gives a peek at embroidering the plants.
Part 5 is about making the toadstool mushroom
Part 6 shows the process of making the underground

Harvest Time – Part 2 (turkey tail mushroom)

In Part 2 in the series about making Harvest Time, I share photos, commentary and a stitch-minute video about creating the turkey tail mushroom overhanging the doorway in the stump. In the coming weeks and months, I will post more stories that focus on different aspects of the process of making the fall scene, including the toad stool mushroom, wee folk figures, tunnels, roots, stones and foliage of all kinds.
The overview introduces the Harvest Time piece.
Part 1 features moss making.
Part 2 is about making the turkey tail mushroom.
Part 3 shows the construction of felt leaves.
Part 4 gives a peek at embroidering the plants.
Part 5 is about making the toadstool mushroom
Part 6 shows the process of making the underground

Harvest Time is the fall scene in a series of seasonal landscapes that capture the wonder and magic of the natural world, both real and imagined. Harvest Time and 2 other scenes I’ve completed and written about, Frosty Morning and Mossy Glen, are available as note cards and jigsaw puzzles in my shop here.

Harvest Time Puzzles are available in my Etsy shop.

Turkey tail mushrooms or shelf fungi are found all over the world. They usually grow on dead hardwood stumps and downed hardwood trunks or branches.

Turkey Tail Mushrooms

I love how Glen Carliss used shelf fungi for the roofs in “Glendell Towers”, which he made for The Fairy Houses of Highfield Hall, an outdoor exhibition that I curated in 2015. Glen told me that he’d been eyeing the mushrooms growing on trees along his road for years, imaging what to do with them.

Glendell Towers by Glen Carliss

I didn’t use actual mushrooms in Harvest Time, but I was inspired by their fanciful appearance. My photo search came up with multiple color combinations, from earthy hues to shades as garish as 1960’s fashion. I chose a more subdued mixture of fall colors for the mushroom roof.

To make the striped concentric pattern, I chain stitched rows and rows of different shades of green and orange DMC cotton flower thread to a piece of felt. It took two tries to get the shape and colors the way I wanted it.

In this Stitch Minute video, I demonstrate chain stitching the stripes and adding wire.

After we filmed it, I wasn’t happy with the overall shape and color combo, so I started over and made a new one that was more curvy and included orange and yellow.

I stitched wire around the outside edge and covered it with white embroidery floss.

Then I made a smaller mushroom and a really little one that looked like a pompom on top of a hat. It’s been a year since I started working on this piece, so my memory is a bit foggy. I can only guess at how I formed the layers into a roof shape and attached it to the driftwood. I do remember that the mushroom wasn’t very cooperative and I had to torture it into shape. Most likely, I glued felt to the wood and then sewed the mushroom to the felt.

During the process, I constantly measured the depth of the trunk to make sure that it would fit behind the glass when the finished piece was framed. After the mushroom roof was added, there was just enough clearance!

My use of found objects is mostly limited to individual items that are sewn in place and incorporated into embroidered scenes. This trunk was different because it was made up of several driftwood parts that created a fairly large mass that stuck out from the background. Its depth and breadth would determine how I created everything else in the landscape.

Now that the trunk was finished, I could start building the other parts of the scene, including the ground at its base.

Next time, I will show the process of making the felt and stitched foliage growing on the ground at the foot of the tree trunk.

Mossy Glen: Part 8 – wee folk

This is the 8th and final part of the series about making the spring landscape, Mossy Glen. All spring I’ve shared photos, videos and commentary about how I created the piece, from stitching moss to forming wire stems. I’ve saved the best for last – today’s post is about making the wee folk characters! 
Part 1 is all about stitching a moss-like texture, Part 2 gives a glimpse at how I made the cherry trees, Part 3 is about the stone walls, Part 4 shows how I made the forsythia blossoms, Part 5 features wire and felt leaves, Part 6 is about chain-stitching leaves and Part 7 looks at the violets and berries.

Before delving into how I made the wee folk in Mossy Glen, I’d like to announce the opportunity to see a large selection of my work in person this summer. The exhibition, What a Relief, has been in the works for years and I’m happy to say that its doors are open to the public this week! For those of you who live too far away to come see the show, I’ll be sharing photos and videos of the exhibition in future posts.

WHAT A RELIEF: The Art of Salley Mavor
June 7 – Sept. 11, 2022
Brick Store Museum, Kennebunk, ME
Meet the Artist on June 25, 1 – 3 PM

This is the first major retrospective exhibition of my artwork, spanning over 40 years, from early on in my career to the present day. Rarely seen works on loan from private collections fill multiple galleries on the Museum’s entire first floor. The show is laid out somewhat chronologically, so visitors can see the evolution of my style and techniques through the years. Over 150 framed pieces and sculptural objects are on display, including the series of original illustrations from my most recent picture book, MY BED.

What a Relief, Brick Store Museum

Wee Folk in Mossy Glen
Now, let’s turn our attention back to the characters frolicking in the Mossy Glen. I’m never sure who is going to appear in these landscapes. They just show up one by one and claim their spots. After many months building places for the wee folk to live, it feels satisfying to finally meet them and let them take over.

Mossy Glen is the spring scene in a series of seasonal landscapes that capture the wonder and magic of the natural world. Note cards, prints, bookmarks, and jigsaw puzzles of Mossy Glen and the other scenes in the series (Frosty MorningHarvest Time, and Summertime) are available in my Etsy Shop.

The figures are similar to the acorn-capped dolls in my how-to book, Felt Wee Folk, just smaller in scale. Instead of pipe cleaners, I made the armatures with 24 gauge jewelry wire. You have to wind a lot of thread around the wire to make the limbs look proportional and not too spindly. At least you don’t have to deal with pipe cleaner fuzzies poking out.

After wrapping the wire armature with either embroidery floss or tapestry yarn, I embellished the torso and arms with faux knitting. which is basically rows of chain stitching.

I first started experimenting with fake or faux knitting when I made Polly’s Irish sweater by embroidering patterns and textures on felt. I’m not very experienced with knitting or crocheting, so this seemed like a good solution.

Since then, I’ve left out the felt and stitched directly onto the thread wrapped bodies. It’s fussy for sure, but the clothing comes out looking the way I want it to.

Here’s a Stitch Minute video showing some of my faux knitting.

I know this fellow looks uncomfortable, but I didn’t want to hide what he endured for the sake of fashion.

I made this stroller out of wire, which I covered with embroidery floss. The wheels are beads. As usual, I was so absorbed in figuring out how to make it, that I didn’t think to take photos along the way. I’ll try better with the next scene.

I hope that you’ve enjoyed this series about making Mossy Glen. Here’s a list of the different parts:
Mossy Glen (overview)
Part 1 (moss)
Part 2 (cherry trees)
Part 3 (stone walls)
Part 4 (forsythia)
Part 5 (wire and felt leaves)
Part 6 (chain stitched leaves)
Part 7 (violets and berries)

To keep up with new posts, please subscribe to this blog (top right column on the home page). Your contact info will not be sold or shared. If you’d like to see more frequent photos tracking the projects in my studio, please follow me on Facebook and/or Instagram.

Mossy Glen: Part 7 – Violets and Berries

In this Part 7 of the series about making the spring landscape, Mossy Glen, I share photos, videos and commentary about how I created violets and berry bushes. Part 1 is all about stitching a moss-like texture, Part 2 gives a glimpse at how I made the cherry trees, Part 3 is about the stone walls, Part 4 shows how I made the forsythia blossoms, Part 5 features wire and felt leaves and Part 6 is about chain-stitching leaves.

winding wire stems with embroidery floss

Mossy Glen is the spring scene in a series of seasonal landscapes that capture the wonder and magic of the natural world. Note cards, prints, bookmarks, and jigsaw puzzles of Mossy Glen and the other scenes in the series (Frosty MorningHarvest Time, and Summertime) are available in my Etsy Shop.


While I write this post, I’m in the midst of preparing for my upcoming retrospective exhibition in Kennebunk, Maine at the Brick Store Museum. Even though I’ve hardly picked up a needle and thread this spring, I’m still being creative, but in a different way. My approach to curating this show is similar to how I imagine and labor over my artwork. It’s all about taking a lot of small details and arranging them in a way that contributes to the story. The exhibition, What a Relief: The Art of Salley Mavor will tell the story of my evolution as an artist, from childhood to today. Just like my art, this exhibit will be very busy, with a ton of original 3-dimensional pieces to eye as closely as you like. As my husband Rob says, “With Salley’s art, more is more.”

Early work from the 80’s and 90’s on loan for the exhibition, What a Relief: The Art of Salley Mavor.

What a Relief: The Art of Salley Mavor at the Brick Store Museum in Kennebunk, Maine, (June 7 – Sept. 11, 2022). I will be there on Sat., June 25th from 1 – 3 pm for a meet and greet and book-signing event.

The retrospective exhibition will feature a large selection of my artwork, spanning over 40 years, from early on to the present day. Over 100 pieces from my collection and rarely seen works on loan from private collections will fill walls a cases in multiple galleries on the museum’s entire first floor. Original picture book illustrations, including the entire series from my most recent book, MY BED will also be shown.

Now back to the patch of violets, which appear in the lower left foreground of Mossy Glen. I chose violets because I thought a dark leafed plant would bring some weight to the bottom of the composition. I also wanted something larger scale, to offset all of the itty bitty berries and leaves.

I constructed the leaves out of wool felt and wire and embroidered the veins.

You can see the process of making the leaves in this Stitch Minute video.

After sewing the leaves to the background fabric, I stitched flowers with silk ribbon.

I created stems with wire, silk ribbon and embroidery floss.

The silk ribbon was so fun to use that I couldn’t resist adding some “grass” to the bottom edge.

Scattered throughout Mossy Glen are berry bushes, which I make with wire, glass beads and embroidery floss.

You can see how I form wire and bead berry bushes in this Stitch Minute video.

Wire and glass bead berry bush

At this stage of the project, I picked out some upholstery fabric from my stash and used it to cover the stretcher frames. It hurts my brain to try to explain why and how it’s done, but the process involves cotton padding and lots of contorted hand sewing, kind of like upholstering a piece of furniture. In putting the covered stretcher on top, I’m basically freeing up an extra 1/2″ of depth that would normally be wasted behind the stretched fabric.

I then stapled the background fabric to the back of the covered stretcher and started assembling the pieces on top, inside the upholstered border frame.

Stay tuned for a final post about making the wee folk characters in Mossy Glen.
Mossy Glen (overview)
Part 1 (moss)
Part 2 (cherry trees)
Part 3 (stone walls)
Part 4 (forsythia)
Part 5 (wire and felt leaves)
Part 6 (chain stitched leaves)

To keep up with new posts, please subscribe to this blog. Your contact info will not be sold or shared. If you’d like to see more frequent photos tracking the projects in my studio, please follow me on Facebook and/or Instagram.

Mossy Glen: Part 3 – stone walls

In this Part 3 of the series about making the spring landscape, Mossy Glen, I share photos and commentary about how I incorporated stone walls into the scene. Part 1 is all about making moss and Part 2 gives a glimpse at how I made the cherry trees.

Why did I use real stones instead of making them with felt, as I did for Frosty Morning, (which you can see here)? I’ve asked myself the same question and have no clear answer, besides a feeling that real stones somehow balanced out and matched the realness of the wooden doorways.

Mossy Glen is the spring scene in a series of seasonal landscapes that capture the wonder and magic of the natural world. Note cards, prints, bookmarks, and jigsaw puzzles of Mossy Glen and the other scenes in the series (Frosty MorningHarvest Time, and Summertime) are available in my Etsy Shop.

I first time I used real stones in my artwork was in 1995 for the picture book, Mary had a Little Lamb. I can remember sitting on the beach, sifting through the sand for small flat stones to use in the garden scene. When it came time to glue them to the background fabric, I was a nervous wreck, afraid of dropping glue in the wrong place by mistake and ruining all my work.

This time, I found more stones than sand to sift through at the beach.

Woodneck Beach, Falmouth, MA

I came home with a varied selection of stones, ranging in size from 1/2″ to 1 1/4″. They needed to be thin so they wouldn’t be too heavy and flat on the back so the glue would have a surface to adhere to.

As I played around with their arrangement, I decided to add a mossy felt section to the composition, which I embellished with silk ribbon. This ribbon is made by Silk Road Fibers.

One downside of using glue is that once you’ve cemented something in place, that’s where it stays. I’d rather have the flexibility to move parts around, so I glued stones to individual pieces of felt. That way, I could make adjustments as I built the wall. It’s a lot easier to rip out a bunch of stitches than move a glued object.
Aleene’s makes a variety of fabric embellishing adhesives that all work well. Do I use hot glue? No, because it’s stringy, messy, shoddy looking and I don’t trust its holding capabilities.

Once the stones and their felt backings were sewn in place, I covered the felt and filled in the cracks with a gazillion french knots, making a carpet of moss.

As with the moss in other parts of the Mossy Glen (that you can see here), I combined different shades of green embroidery floss to give it a naturalistic appearance.

As I stitched french knots around the stones, I realized that the mossy wall was too plain and would look better with something growing in front of it.

So, I formed a vine out of wire, silk ribbon and embroidery floss. Even though I documented the process with photos, it’s hard to remember exactly how I made it. All I know is that the silk ribbon loopy leaves came first and then I covered the wire and ribbon with embroidery floss. In my head, can hear my mother’s voice saying that the floss covered a multitude of sins.

I sewed the vine in place in the spaces between the stones.

I expanded the Mossy Glen neighborhood to include another stony bank with 2 more doorways.

This time, I glued the stones directly to the background fabric because I was more confident about their placement.

When I stitched around the stones, I left some room between the knots, so the blue green felt showed through. Again, I thought the hillside was too plain, so I stitched a few plants with silk ribbon.

As I embellished around the stones, I periodically checked the positioning of the moss covered wooden doorways, to make sure that they fit OK.

Here’s a photo showing the back of the hillside, with a green felt strip along the top edge. It’s kind of like piping without a cord filler inside.

I added the green strip along the top of the mound to create a space for blades of grass. In contrast to the myriad of greens, I used bright warm colors to stitch the grass.

Stay tuned for more posts about making Mossy Glen. Other parts in the series will focus on the forsythia bush, leaves, embroidered embellishments and the wee folk characters.
Mossy Glen (overview)
Part 1 (moss)
Part 2 (cherry trees)
Part 4 (forsythia)

Mossy Glen: Part 2 – Cherry Trees

Flowering trees in the spring are glorious, aren’t they? Maybe we appreciate them because their showy display is so brief. In this Part 2 of the series about making Mossy Glen, I share photos, videos and commentary about how I created the cherry trees that sit atop the hillside, off in the distance.

Mossy Glen is the spring scene in a series of seasonal landscapes that capture the wonder and magic of the natural world. Note cards, prints, bookmarks, and jigsaw puzzles of Mossy Glen and the other scenes in the series (Frosty MorningHarvest Time, and Summertime) are available in my Etsy Shop.

The pink tinted trees against the blue sky remind me of the blossoming apple trees in this book jacket illustration for my 1995 book, Mary Had a Little Lamb.

Mary Had a Little lamb 1995

Of course, apple and cherry trees are shaped differently and their flowers aren’t the same shade of pink. I also constructed them differently – the apple trees are embroidered directly onto cotton velveteen, whereas the cherry trees in Mossy Glen are made with a combination of wrapped wire and embroidery on wool felt.

I also made the cherry trees as separate objects that could be shifted around. That way, I could adjust their position according to how the surrounding parts came out. Over the years, I’ve found that keeping an open-ended playful element in my process is more and more important. The idea of following a set pattern or grid, without much wiggle room, such as in knitting, cross-stitching or weaving makes me feel trapped and constrained, without room to breath.

I formed the tree shapes with wire, using a finer gauge for the smaller branches. The loops on the ends were big enough to sew a needle and thread through.

I wrapped the branches with embroidery floss and covered the trunk with wool felt, which I embellished with vertical rows of chain stitching. This Stitch Minute video shows how I wrapped the wire and stitched the blossoms with french knots.

Stitch Minute – wire tree

This was the first time I can remember creating a tree with its own section of sky attached. Luckily, I had some pale blue felt that was almost the same shade as the cotton velveteen background sky.

After sewing the wire tree to the felt, I embroidered a few extra branches to fill in the gaps and added pink blossoms with french knots.

I made a patch of sorts, by cutting the felt around the contours of the treetop. At this point, I’d figured out where to put the trees, so it was okay to decorate the surrounding area. Watch this Stitch Minute video to see how I stitched some little bushes onto the velveteen background.

Stitch Minute – bushes

In the future, I’ll give a closer look at how I made the foliage on the hillside that’s positioned below and in front of the cherry trees.

Stay tuned for more posts about making Mossy Glen. Other parts in the series will focus on the stone walls, forsythia bush, embroidered embellishments and the wee folk characters.
Mossy Glen (overview)
Part 1 (moss)
Part 2 (cherry trees)
Part 3 (stone walls)
Part 4 (forsythia)

To keep up with new posts, please subscribe to this blog Your contact info will not be sold or shared. If you’d like to see more frequent photos tracking the projects in my studio, please follow me on Facebook and/or Instagram.

Mossy Glen: Part 1 (moss)

Wouldn’t it be nice to step out your front door onto a mossy carpet every morning?  In this Part 1 of the series about making Mossy Glen, I share photos, videos and commentary about how I created just that for the wee folk who live there.

Mossy Glen is the spring scene in a series of seasonal landscapes that capture the wonder and magic of the natural world. Note cards, prints, bookmarks, and jigsaw puzzles of Mossy Glen and the other scenes in the series (Frosty MorningHarvest Time, and Summertime) are available in my Etsy Shop.

I always start a project with an image in my head. In this case it included a forsythia bush overhanging a neighborhood made up of stone walls and doorways nestled into moss covered mounds. I drew a thumbnail sketch of the basic composition and printed it out in full scale using Block Posters. Over the 5 months working on Mossy Glen, I used the enlarged drawing as a general guide, not as an exact template.

Faux Moss
About 10 years ago, I fell in love with stitching moss while making my piece Rabbitat, which you can learn about in this film.

Rabbitat 2011

I can’t believe it’s taken so long to get back into embroidering moss. The simple idea of stitching multiple French knots side by side to form a naturalistic ground cover isn’t a new concept, but it reached a heightened level of obsession with Mossy Glen. It’s one of those repetitive activities that has you totally mesmerized.

Out of curiosity, I calculated that each square inch of faux moss contains an average of 144 knots, depending on the thickness of the thread, number of strands and the density of the stitches. That means that Mossy Glen is covered with several thousand knots.

If you follow me on Facebook and/or Instagram, you’ve gotten a preview of the process of making Mossy Glen. Last summer I shared photos and videos of whatever part I was working on that particular day. One constant question was, “How do you stitch on wood?” Back then, I was immersed in the act of creating and didn’t want to switch on the explaining part of my brain. Now, I’m ready to talk about it.

So, how do I stitch onto wood? It helps to think of art is an illusion, that the goal is to make the viewer perceive something in a way that suspends disbelief, like magic. The thing is, people who make stuff are super curious and aren’t satisfied until they can make sense of how something is done.

Here’s the simple rundown – 1. find interesting pieces of wood, 2. glue pieces of felt to the wood, 3. stitch onto the felt. As long as there is something to catch a needle with, you can make stitches. I usually shy away from using glue because it’s messy and unpredictable, but decided to try it for this purpose. Aleene’s glue makes a variety of fabric embellishing adhesives that all work well. Do I use hot glue? No, because it’s stringy, messy, shoddy looking and I don’t trust its holding capabilities.

French knots/Colonial knots
It’s been pointed out by people who know such things, that I’m actually making a Colonial knot, not a French knot. It has something to do with the twist at the end. Being self-taught, I’ve never paid attention to the names of different stitches or doing them the “right” way. I just use the basics in combinations that work for me. Here’s a Stitch Minute video that shows how I stitched the knots.

Stitch Minute – Moss

Thread
To make the moss, I used all kinds of thread, from silk to cotton floss, depending on what kind of look I was after. The naturalistic appearance comes from combining different shades of green in groups of 3 or 4 strands. I used these threads: DMC cotton floss, Vineyard Silks and Watercolours by Caron,

This 2 minute video gives a further glimpse into my process.

Stitching Moss with Salley Mavor

Stay tuned for more posts about making Mossy Glen. Future parts in the series will focus on the stone walls, the cherry trees, the forsythia bush, the embroidered embellishments and the wee folk characters.
Mossy Glen (overview)
Part 1 (moss)
Part 2 (cherry trees)
Part 3 (stone walls)
Part 4 (forsythia)

To keep up with new posts, please subscribe to this blog Your contact info will not be sold or shared. If you’d like to see more frequent photos tracking the projects in my studio, please follow me on Facebook and/or Instagram.