little standing animals

Update (June 2014): Things have changed in the 3 years since this post was published. After emphatically stating I wouldn’t write another how-to book, I surprised myself this past year by working on Felt Wee Folk: New Adventures, which will be released by C&T in the spring of 2015. Read posts about it here. These animals will not be included in the new book, but there will be lots of other fun dolls to make.

I made this group of animals about 10 years ago, when I was gathering ideas for my how-to book, Felt Wee Folk. They didn’t make the book’s cast, so the little critters have been waiting behind the curtain ever since. I’ve pretty much decided not to write another instructional book (read ahead for more on that), so they can come out on stage, now.

animalcostumes1WM

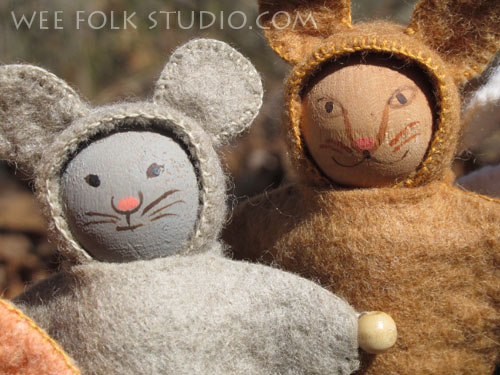
They are made with wooden forms that have a simple dowel on the bottom, with a turned ball on the top. You can find the wood shapes here. At about 2 inches tall and similar to finger puppets, these can stand up by themselves.  The small wooden bead “paws” are a choking hazard, so they shouldn’t be added if a young child plays with them.

animalcostumes3WM

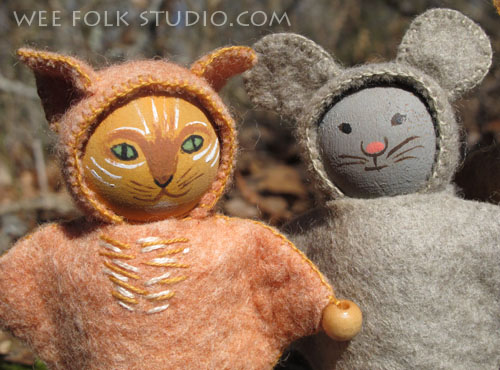
They look a bit like Halloween trick or treaters in felt costumes, with their hoods and painted faces.

animalcostumes8WM

It’s so wonderful to hear from readers who have enjoyed making the dolls and other projects in Felt Wee Folk and many have urged me to write another instructional book. The publisher is willing, too. So why can’t I say yes? I am clearly ambivalent, because I had a great experience working with C&T Publishing. It’s just that I’ve moved on to other things and don’t feel the same push to get it out of my system, like I did 10 years ago. It’s not that I don’t have any ideas for new projects, they’re just more complicated and personal. I’m resisting the pull to work on another book because I want to spend time exploring new ways of working, to experiment and grow as an artist. Just the process of formulating my thoughts for this post has helped me understand why I’ve been dragging my feet.

The trouble is, I know what it takes to produce an instructional book and I also know that I’m not up to it. It’s writing out those pesky directions that has me stumped. When I approached C&T with my proposal for Felt Wee Folk. I had a strong desire to share my ideas, enough to force myself through the quagmire of analysis and explanation. I’ve always had a problem with describing how to make what I do, even back in the days when I designed projects for Better Homes and Gardens. I know that I can do it, but I can’t bring myself to jump down that rabbit hole. I want to give myself over to the mysterious process of creating something without later having to give a detailed description of how I made it.

So, I’ll be sharing projects and ideas from time to time, but without patterns and instructions. Hopefully, my readers will feel inspired enough to want to try a hand at figuring out how to make something of their own!

Iris Fairy

I’ve finished another limited edition of 25 fairies, just in time for the holidays. Iris has auburn braids and a purple petal skirt and wings.

Iris Fairy

Update: All of the Iris fairy dolls have sold. Sorry, but I no longer make dolls to sell.

Iris Fairy

I’ve found that I can usually find enough matching flower petals and wings to make a group (or swarm) of 25 fairies.

a swarm of fairies?

It’s a manageable number to make at one time and then I feel free to move on to other projects.

fairy legs

Instructions and patterns for making fairies like this are in my how-to book,  Felt Wee Folk: New Adventures.

embroidered fairy tunics

Here are the petal petticoats, all stacked and ready to dress the fairies.

petal fairy petticoats

Now they’re waiting for their turn in the braiding salon.

before going to the braiding salon

Wee Folk: Pearl & Urchin

I took Pearl and Urchin out for a climb up a beech tree. They patiently waited and stayed still as I took their picture. We were all quiet as I played with my camera, adjusting the aperture and speed settings.

I suppose you could call Pearl and Urchin “retired”, a term used in the collecting business for sold out. They were the models for a Ltd. Edition and there are 25 other pairs out in the world. After a few years spent sealed in a plastic bag, I thought they could use some fresh air.

Wedding Banner (Leigh & Brendan)

The 2nd summer wedding is coming up soon, so I’m making another felt banner for Leigh and Brendan (see Karen & Graham’s on an earlier post here). I get the impression that the bride and groom are kind of traditional, so I’m resisting the temptation to go wild with color and add too many funky embellishments.


I started by bending 32 gauge cloth-covered wire to form the names and wedding date. I’m really having fun bringing language into my artwork this way. I started figuring out this technique a few years ago when I was working on Pocketful of Posies, and have no idea if the same kind of thing has been done before. Once you get into the rhythm, the wrapping goes quite fast. After all those years wrapping fuzzy pipe cleaners with embroidery floss for fairy limbs, this seems easy.

I had to put in some color, though and wrapped the wire names in bright pink variegated embroidery floss. The couple’s invitation had a seaside motif, so I added a metal shell charm and got out a dried star fish from my collection of found objects. The dark blue and had too much weight compared to the names, so I lightened it by winding around a single strand of pink floss.

After bending and wrapping the characters for the date, I cut out a piece of yellow felt to mount them on. I don’t make patterns and plan everything out ahead of time, but construct as I go. I always start with the lettering and then figure out later how much room they’re going to need.

Then, I had to figure out how to place everything on the purple blue felt background. At this point, I realized that the star fish didn’t have anything to offer and would have to go. I go through this editing process often, latching onto some interesting found object and then seeing that it has served its purpose of moving the design along and is no longer needed. A writer friend describes the revision process the same way. She said, “You have to be willing to let go of favorite words and phrases.”

I decided to incorporate a more conventional floral decoration and added some of Mimi’s Kirchner’s felt roses and some glass leaf beads. If you haven’t learned how to make them yet, go to her tutorial on her blog here. I also got out the dreaded glue because that was the only way to attach some shells around the date. The yellow felt piece called out for some embellishment, so I added a chain-stitched loopy line around it.

Then, I cut out  a banner of blue felt, with scallops on the bottom and blanket stitched all around with variegated pima cotton from the Caron Collection. I found an old shell necklace, the souvenir kind from Hawaii, and sewed some shells to the scalloped bottom edge. I was glad that they already had holes.

I sewed a casing for a drift wood stick at the top, then tied and braided a pima cotton strap.

Here’s the finished banner, ready to wrap up and bring to the wedding.

To keep up with new posts, subscribe to this blog (top right column on the home page). If you’d like to see more frequent photos tracking the projects in my studio, please follow me on Facebook and/or Instagram.

Wedding Banner (Karen & Graham)

wedbanner12WM Update: See other banners with wrapped wire lettering here

This summer I’ve been invited to two weddings, with the first being held on June 25th on Cape Cod. Both the bride and groom are  designers and I thought they would like something artsy and personal for a wedding gift. wedbannerWM I started by writing out Karen & Graham in a flowing script and then enlarging it to a lower case height of about 1/2″ . Then, using long-nosed pliers, I bent some 32 gauge cloth wrapped wire, using the hand written lettering as a guide. wedbanner2WM This is a technique that I figured out while sewing the book cover design for my children’s book, Pocketful of Posies, which you can see here. I wanted letters that were raised enough to create shadows. And because the wire was a separate flexible piece, it was easy to move the words around for proper positioning on the artwork. wedbanner3WM After determining the size of the names and their placement, I cut out a square of orange wool felt and added my customary wavy edge and some cut out holes. I then wrapped the wire with 2-ply variegated embroidery floss, hiding the knots in the back. wedbanner4WM This is where I do most of my work, on an old ironing board. The light green floss wrapped wire didn’t provide enough contrast with the background, so I wrapped a single strand of dark green floss around the wire, candy cane style. wedbanner4aWM The banner was cut out of a light teal colored wool felt that matched Karen & Graham’s invitation. Then I blanket stitched around the orange felt edges with pink variegated embroidery floss. I chose some fish beads and a heart made of bone to decorate around the wedding date. wedbanner6WM Then I made some tiny 1/4″ roses following Mimi Kirchner’s great instructions from her easy felt rose tutorial. Some silk ribbon leaves were added, too. wedbanner5WM After I figured out how much space to leave for the date and beads, I cut out the scalloped bottom edge of the banner. The outside edge was blanket stitched with some variegated pima cotton (Caron Collection). From my collection of stuff, I picked out some more beads and some beach stone pendants with holes drilled in them to hang from the scallops. wedbanner7WM I then stitched the floss wrapped wire words and numbers in place and sewed the beads and stone pendants to the banner. It needed some color on the bottom to balance the orange square on top, so I added another clump of felt roses and silk ribbon leaves. wedbanner8WM I made a sleeve of felt at the top and slipped a piece of driftwood through. After drilling 2 holes in the driftwood, I threaded some pima cotton through and braided a strap for hanging the banner. wedbanner9WM Here is the finished banner, which I hope Karen & Graham will enjoy for many years! wedbannerfinishWM

To keep up with new posts, please subscribe to this blog (top right column on the home page). Your contact info will not be sold or shared. If you’d like to see more frequent photos tracking the projects in my studio, please follow me on Facebook and/or Instagram

Pins (part 3)

Continued from Pins (part 2).

In an effort to meet people and to make more for my labor, I became a member of the Christmas Store, a seasonal cooperative in Cambridge and commuted from the Cape to do my work shifts. For a display, I built a fruit and vegetable stand with crates made out of popsicle sticks.  Later, I made patterns and wrote directions on how to make the pins for the 1982 Holiday Crafts issue of Better Homes and Gardens magazine.     

 After about 5 years of mass producing the pins, I moved on to other things, including motherhood.  Since then, I’ve had several business ventures, which inevitably reach a point when I’ve had to make a decision to grow or stop all together. I’ve always chosen freedom, never wanting to spend all of my time running a business, even though I see the promotional part as an important element of a creative project. And it’s not as if I walked away from a gold mine. At the wholesale price, I was making so little for my time. Being an artist means coming up with new ideas and making the same thing over and over has therapeutic, although limited appeal. Even the idea of hiring others to do the work made me nervous. I knew that I would be a miserable boss, having to hold others to a high standard of workmanship at low pay. And, I realized that I am happiest while making things myself! I have no exact record of how many pins I made, but it must have been well over a thousand. Throughout, the peapod was a best-seller, which was ironic because it was the simplest and fastest to make of all.   

To keep up with new posts, please subscribe to this blog. Your contact info will not be sold or shared. If you’d like to see more frequent photos tracking the projects in my studio, please follow me on Facebook and/or Instagram.