Pocketful of borders: Little Boy Blue

Little Boy Blue, come blow your horn; the sheep’s in the meadow, the cow’s in the corn.

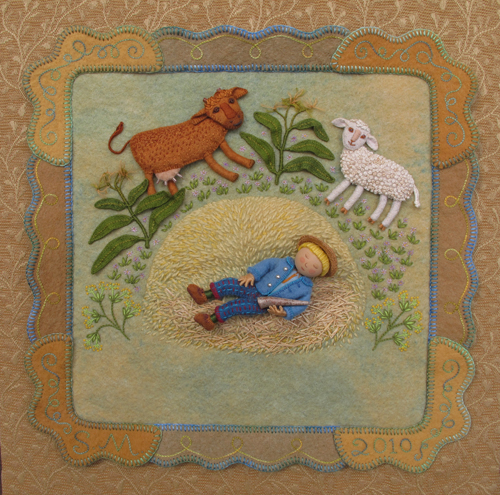
Here is the original fabric relief illustration for the rhyme, Little Boy Blue, from my book, Pocketful of Posies. The embroidered piece is first mounted on a foam core board for the photographer. Afterward, I stitch a felt border, remount, and frame each piece, making it ready to hang.

illustration of “Little Boy Blue”

I tried out some different shades of upholstery fabric for the background and selected this warm brown with a vine pattern. Then I cut the border sections out of wool felt.

I used variegated pima cotton to edge the pieces with blanket stitch. Later, I added chain stitched curly cues with variegated embroidery floss.

Sheep are so fun to make, with their curly fleece. Yes, these are all french knots, but they are spaced out a bit, compared to the dense knots in the lambs from my Mary Had a Little Lamb book. (see lambs here)

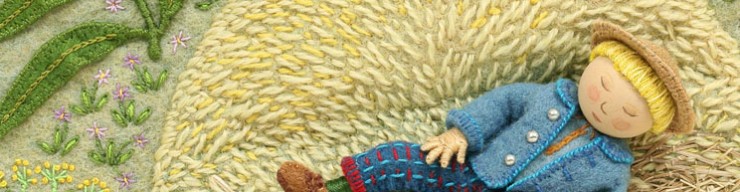
The haystack is padded with wool stuffing and the texture is stitched with tapestry wool, with real pieces of straw sewn in, too.

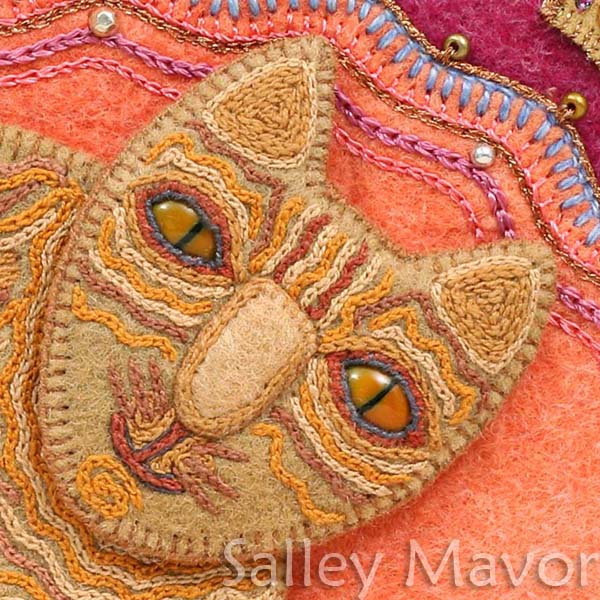
Little Boy Blue’s hat is made from thread wrapped wire and his horn is a cactus thorn.

This original illustration was one of 50 pieces of artwork from the book in the touring exhibit, Pocketful of Posies from 2010 to 2015.

Note: See other posts from the Pocketful of Borders series here.

To keep up with new posts, please subscribe to this blog (top right column on the home page). Your contact info will not be sold or shared. If you’d like to see more frequent photos tracking the projects in my studio, please follow me on Facebook and/or Instagram

Shirley’s Thanksgiving Centerpiece

Shirley from Madison, Mississippi sent me these pictures of her wee folk tableau. She said, “At the urging of one of my daughters I’m sending you some photos from our Thanksgiving table decoration. Thanks for the inspiration to make such fun little people.”

I like they way she captured the spirit of Thanksgiving by giving this woman a rolling-pin.  The dolls look comfortable in their natural environment, surrounded by moss, flowers and branches. Great job,  Shirley, and thank you for sharing a part of your Thanksgiving celebration!

She learned how to make these dolls from my how-to book, Felt Wee Folk: Enchanting Projects. It’s rewarding to see how people use the patterns and directions from the book as a spring board to creating their own characters and scenes.

“Posies” front cover

detail from “Pocketful of Posies”

When we first started talking about the front cover for Pocketful of Posies, the editors and I didn’t yet have a title.  We were a few years into the project when one of the members of the production team suggested that I incorporate the title and byline  into my artwork, thereby stitching the letters instead of dropping in the usual type set words. After going back and forth with title ideas for several months, someone from Houghton Mifflin came up with a name we all liked, Pocketful of Posies. We added the subtitle A Treasury of Nursery Rhymes to emphasize that this was a collection of  rhymes, rather than a story book.

My first drawing for the cover had a circling group of characters from the book, echoing the ring around the rosies theme. I presented it to the powers that be and it and was asked to try again. No problem, I needed try something different. The design was too balanced and straight forward and, well, too boring and static for a cover, which should be dynamic. When it comes to sales, books are judged by their cover, especially picture books. People should feel the compulsion to open the book and look inside!

I decided to keep some of the characters, but had them doing different actions in a natural environment. I played around with angles and curves, adding large leaves to separate the sub-title and by line. I decided to enclose the action with a border and bendy, circular vines, which move your eye around inside the picture.

Some of the characters were removed in the process of translating this final sketch into the finished sewn illustration. I never know how things are going to turn out until I start cutting out shapes and constructing dolls. I made sure that  both boys and girls were represented, as I didn’t want my sewn artwork to come across as too girly centric.

I wasn’t sure how I was going to make the letters, but I wanted to try something that had depth, so that the title would pop out. I figured that if it didn’t work, the graphic designers could always type set the words. I found some titles done in a nice flowing script in a book my mother had as a child, Chimney Corner Stories, by Lois Lenski. I liked the way the P looked, which featured prominently in my title, so I used this lettering as a guide.

from “Chimney Corner Stories” 1925

Using green cloth-wrapped florist wire, I wrote out the words by bending the wire to form the connecting letters. I then wrapped the wire by hand with 2 ply variegated embroidery floss. I don’t really remember how I finished off the ends, but probably made knots at the back (no glue). The picture below shows my first attempts at bending and wrapping. I had to try different ways of compressing the U and Y, so that the words could all fit on the leaves. I also changed the floss color to something lighter, so there would be more contrast with the green leaf background.

Besides the title, the cover illustration has a lot of other thread wrapped wire. The stems, vines and every leaf are edged with wire, making it possible to bend and shape the parts, tweaking until the last-minute, when the photograph is taken. See other posts with wire lettering here and here. I used red felt for the background, so that the green leaves and vines would stand out.  Also, many of my recent books have had blue covers and I wanted something different.

Pocketful of Posies is sold in my Etsy Shop and includes a free bonus copy of my 2001 book In the Heart.

detail of “Pocketful of Posies” front cover


Close-ups (fall trees)

We had our first frost last night and the crisp air really feels like fall. In this series of trees, I’ll explain a bit about how I made some of the parts. This first closeup is from Apple Orchard, an early piece (1992) which I wrote about in another blog post here. The apples are made from wooden beads, covered with a sheer red fabric.

Apple Orchard, fabric relief 1992

The apples from this illustration in Mary Had a Little Lamb, are made from small red wooden beads. The leaves are cut from larger artificial leaves and sewn to the end of thread wrapped wire branches.

detail from "Mary Had a Little Lamb" 1995

In this scene from In the Heart, the hearts and leaves on the lawn are painted with a home made stencil.

detail from "In the Heart" 2001

Here’s a fall tree from my board book version of Jack and Jill.

detail from "Jack and Jill" 2006

These last two are from my new book Pocketful of Posies: A Treasury of Nursery Rhymes. They are illustrations from the rhymes “A wise old owl lived in an oak”…

detail from "Pocketful of Posies" 2010

 and “Hush-a-bye-baby”.

detail from "Pocketful of Posies" 2010

Note: See other posts in the Close-ups series archive here.

Pocketful of Borders: Bow, wow, wow

Last summer, in the rush to finish making borders for the Pocketful of Posies Traveling Exhibit, I forgot to take pictures while I was working on the border for this illustration. It’s for the rhymes, Diddlety, diddlety, dumpty, the cat ran up the plum tree… and Bow, wow, wow! Whose dog art thou? Original artwork from my book  Pocketful of Posies will be on display until Oct 31st at Highfield Hall in Falmouth, Mass. and then the show will open on Nov. 13th at the Danforth Museum in Framingham, Mass. See future locations here.

illustration from “Pocketful of Posies” 2010

Here are some early layouts of the page, showing the progression of the design. Originally, there were three children, with the Diddlety rhyme positioned in upper left corner. I incorporated an island to make the tree and characters grounded, instead of floating around in  red space.  The mound was also big enough  to hold the Bow, wow, wow rhyme.    

Time went by, maybe a year or more before I started working on this page. I looked at the design with new eyes and was unhappy with the type placement.   So, I redid the layout, enlarged the tree and repositioned the Diddlety rhyme on top.                                       


The tree was inspired by some wrought iron gates I saw, with graceful interwoven branches. I added bead leaves and glass pear-shaped beads. Here are some details of the finished border.

Note: See other posts from the Pocketful of Borders series here.

Wedding Cake figures

My friends, Shona and Amy are tying the knot this Saturday. Their wedding is looking to be more of a do-it-yourself type than the formulaic extravaganzas I’ve been to lately.  Their’s will be much looser, with lots of friends helping out, which reminds me of 30 years ago, when my husband and I got married.  My friend Terry and I volunteered to make their wedding cake. Terry has already baked the cake and she and I will be spending friday working on the decorations. We’ve been planning this cake for months and I’ll try to remember to take pictures as we add the personal touches. I just finished making Shona and Amy dolls to fit a toy boat, which will be on the cake.

To start, I found a wooden toy boat of the right size and type at Bella Luna Toys. I then made two 3 1/2 inch tall pipe cleaner doll forms, the same way as explained in my how-to book, Felt Wee Folk.

This is what the dolls look like undressed. I wrapped some cotton batting around their middle sections and sewed small beads for breasts, which show that these are women, not girls. Just adding stuffing doesn’t look natural and the beads appear more true to life when they are clothed. I started using beads for breasts a few years ago, when I made my self-portrait, because I wanted to show maturing over time. See my piece, Self-Portrait: A Personal History of Fashion here.

Then, I dressed them in clothing that I thought fit their style and personality.

Now that the dolls had heads, they needed a trip to the hairdresser. I put glue on the top and sides of the bead heads and then draped felt over, using pins to keep the felt in place while it dried. I started devising this wig making technique when I made all of those dolls for my Self-Portrait.

After the glue dried, I cut the felt in the back to conform to the round head and glued the felt to the back. Pins hold the felt in place while it dries. I felt like giving the dolls little fashion magazines to read like women in salons, who sit and wait with curlers or foil origami on their heads.

I sewed the seams together and blanket stitched around the felt edges, using flower thread, which is thicker than embroidery floss. DMC discontinued making flower thread, which is too bad, because it’s great stuff. I still have some of this golden wheat color that worked for both Amy and Shona’s hair.

Shona has curls, so I twisted the thread around the needle and pulled it through, like loose french knots. I really felt like a hairdresser then.

Amy’s doll had straight hair.

I made a flag with their names that would fly above the dolls on the boat. Wire along the flag’s edge helps keep its shape.

I painted the boat and sewed the finished dolls to tiny screw eyes on the cabin. Amy loves to fish, so I made her a fishing rod and attached a bead fish.

Shona, who is a bit of a show-off, is ready at the bow, holding on to the flag pole. I’ll let you know how the launching goes.

To keep up with new posts, please subscribe to this blog. Your contact info will not be sold or shared. If you’d like to see more frequent photos tracking the projects in my studio, please follow me on Facebook and/or Instagram.

Pocketful of Borders: Pussy Cat, where have you been?

from “Pocketful of Posies”

Update: This post was written in 2010, so the events and dates mentioned are long past.
Over the next few weeks, I’ll be showing pictures I took this past summer. They will show the process of adding borders to the original illustrations from my book Pocketful of Posies. All of the originals are currently on display in Falmouth, Mass. until Oct. 31st, 2010 and then they’ll move to the Boston area for the rest of the year. See the traveling exhibit schedule with future locations on this page. This is the illustration for the rhyme Pussy cat, pussy cat, where have you been?  The original was made at 90%, so it was enlarged just a little for the book. I don’t know why, but some characters and designs are easier for me to make on a smaller scale. Since I’m aiming for the work to be reproduced, it can be blown up to the necessary size, as long as the proportions are correct. I picked out an orange upholstery fabric for the back ground and some lavender felt for the border. I then blanket stitched around the border pieces with variegated pima cotton. The bottom corners were chain stitched with the date and my initials, while the top corners had doodles. The corners need warming up, so I outlined the edge with some golden wool crewel yarn. I added some loopy chain stitching to the side pieces… and sewed it all together. To see a closeup of the cat, see this post. To see other posts in the Pocketful of Borders series, click here.

Autographed copies of the book are available in my Etsy Shop here.

To keep up with new posts, subscribe to this blog (top right column on the home page). Your contact info will not be sold or shared. If you’d like to see more frequent photos tracking the projects in my studio, please follow me on Facebook and/or Instagram.

Wee Folk centerpiece

In the last post, I mentioned making a centerpiece for the Pocketful of Posies book release party at Highfield. Since I forgot to take pictures of the finished setup, here are some shots taken during the construction phase. Many of the dolls were models for projects in my how-to book Felt Wee Folk: Enchanting Projects and were unearthed for this event.

I arranged driftwood and logs that the wee folk could sit on and climb up. Old, dried up bayberry bushes, with their compact spread of small branches make good wee folk scale trees.

I drilled holes in the wood for small screw eyes, which served as anchors for the dolls. I felt like a prison guard, shackling their tiny ankles and tying their waists to the screw eyes with wire. But, it was to protect them from easy escape into the hands of big folk.

One vertical log needed a rope ladder, so I gathered some possible materials; jute rope and twine, old fishing line, a woven wooden slat place mat .

I selected the fatter jute rope and pulled out a wooden slat from the place mat. To make the rungs, I fed broken off wood sections through the rope and lashed them in place with an improvised knot. I wished we had learned knot tying in girl scouts. You never can tell when you’ll need outdoor survival skills!

Here’s Jack climbing up the finished rope ladder. See Jack climbing the bean stalk here.

Here are some characters from Felt Wee Folk.

Princess from “Felt Wee Folk: Enchanting Projects”

Jester from “Felt Wee Folk: Enchanting Projects”

Hansel & Gretel and the Witch from “Felt Wee Folk: Enchanting Projects”

And a grandpa with his grandchildren. It sure was fun playing with these dolls again and bringing them on a short outing to my exhibit at Highfield.

Pocketful of Borders: Jack Sprat & My son John

All of the borders from Pocketful of Posies are finished and the artwork is hung at Highfield for the first leg of the tour. The book release party will be held at Highfield Hall in Falmouth, MA on Sunday, Sept. 26, from 4 to 6pm. I hope to see some of you there!  

I still have some photos which show the border making process for a few more illustrations. This one incorporates two different rhymes, Jack Sprat (who ate no fat) and Deedle, deedle dumpling, my son John (who went to bed with his trousers on).   


The gray of the driftwood house is too monochromatic for me, so I added a favorite color combination of orange and blue to the figures and props. I used cool colors on the felt border, allowing the warmer browns and oranges to pop out visually. Jack Sprat and his wife are holding doll house utensils.   


I embroidered the border pieces with variegated thread.   


The driftwood beams and floor boards are sewn onto the felt background through tiny drilled holes. No dreaded glue! Now that I think of it, I did use some glue on the furniture.   


But sewed son John’s bed in place.   


I can remember really liking the process of building the house, which was so different from sewing. There was sawing, sanding, drilling, carving and whittling. Sawdust mingled with threads on the floor.   

Jack Sprat from "Pocketful of Posies" 2010

Note: See other posts from the Pocketful of Borders series here.