Little Jack went up the bean stalk in my garden the other day. The magic Big Mama lima beans were growing so fast and tall, that he felt compelled to see what was at the top. He’s still climbing toward the sky!


Little Jack went up the bean stalk in my garden the other day. The magic Big Mama lima beans were growing so fast and tall, that he felt compelled to see what was at the top. He’s still climbing toward the sky!
Sunday was another beautiful morning on the bike path to Woods Hole. All around me there were people setting up traffic cones and water stations for the triathlon. I managed to take a few pictures before the race started at 7:30. I’ve just been informed by a reader that the invasive knapweed below is a neuro-toxin and should not be handled!

Young Queen Anne’s Lace looks like an umbrella forced inside out by the wind.

And then later, the flower forms into a properly domed umbrella.


board book version
The next border to finish up for Pocketful of Posies: A Traveling Exhibit is the illustration for the rhyme, “Hey, Diddle, Diddle!”. The new book includes all of the rhymes from my board book series, but they are represented by new illustrations. I really liked compressing the scene into one image, instead of stringing out the action over several pages. Most of the main characters from “Hey, Diddle, Diddle!” are similar to the ones in my board book version, with the exception of the cat, which is made in a different style. The plate is made from polymer clay and the spoon is a doll house miniature.

detail from " Pocketful of Posies" Houghton Mifflin 2010

cat from "Pocketful of Posies"
The new book, Pocketful of Posies: A Treasury of Nursery Rhymes includes many cats made in my new Halloween costume style. The head is a wooden bead, with face painting and a felt hood with ears attached. The cat’s paws and chest are whitened with acrylic paint. The fiddle is felt, with a thread-wrapped wire neck and bow. The illustration’s existing brown border was wide enough to cut in a wavy pattern, so I didn’t add another felt border. After several tries with different colors, I chose a blue pima cotton for the blanket stitched edging.

I then embroidered my initials and the date with some variegated dark purple raw silk thread. It called out for embellishment, so I started doodling along the border with light blue raw silk thread.

The light blue line lacked contrast, so I outlined it with a single strand of orange embroidery floss.

For the corners, I added spirals and unintentionally doodled a pattern in the Celtic style. After outlining a few sections, I decided that the orange floss attracted too much attention, so I ripped it all out. That’s what is so great about stitching, you can change your mind mid stream. Borders, like any kind of framing, should compliment the artwork, not compete.

I thought that a little height and firmness would perk up the border, so I added 32 gauge florist’s wire to the outside edge.

I then covered the wire with 2-ply orange/red variegated embroidery floss.

At this point, I was glad that I’d removed the orange outline around the doodles and saved the color for the outside edge, which defined the border against the upholstery fabric background.

I bent the wavy wire so that it lifted up the outside edge.

Here is the finished “Hey, Diddle, Diddle!” piece, ready to frame for the traveling exhibit of original art.

My husband, Rob, has been making shadow box style frames in the basement. He’s doing a beautiful job and the 51 cherry wood frames are about half way done. We are both making progress toward the Sept. deadline for the first show in Falmouth.

Note: See other posts from the Pocketful of Borders series here.

I took Pearl and Urchin out for a climb up a beech tree. They patiently waited and stayed still as I took their picture. We were all quiet as I played with my camera, adjusting the aperture and speed settings.

I suppose you could call Pearl and Urchin “retired”, a term used in the collecting business for sold out. They were the models for a Ltd. Edition and there are 25 other pairs out in the world. After a few years spent sealed in a plastic bag, I thought they could use some fresh air.

How fair is a garden amid the trials and passions of existence. ~Benjamin Disraeli
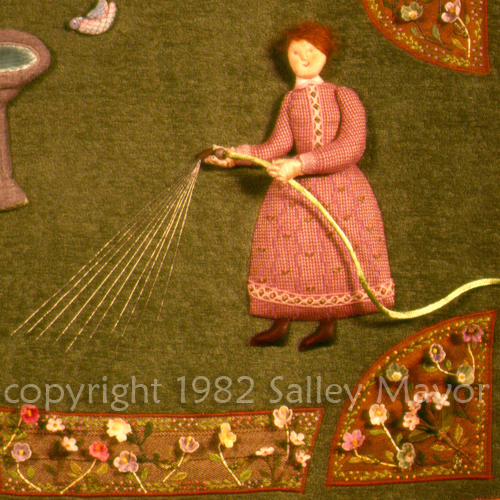
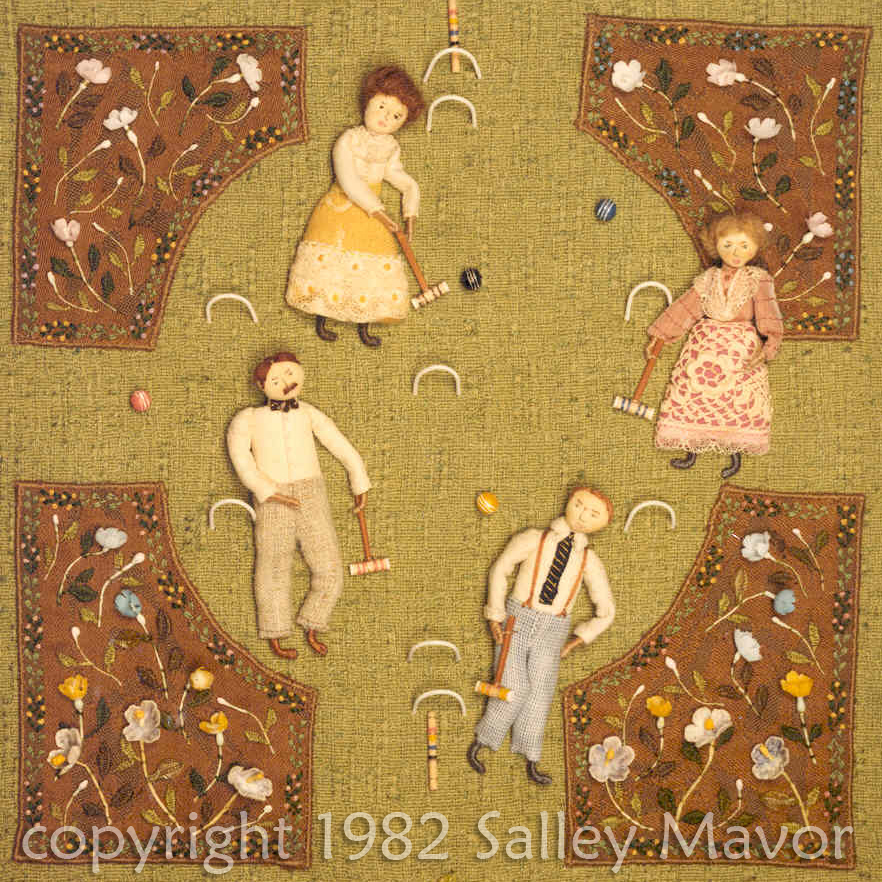
Here are a couple of pieces that I made in 1982, when I was transitioning from 3d sculptural work to flatter, framed pieces. I started using the term “fabric relief” about then because people kept asking what they were called. It’s still hard to explain what I do at cocktail parties!
The water coming out of the hose is metallic thread. The figures playing croquet are very early “wee folk” with cloth heads instead of the painted wooden ones I use now.
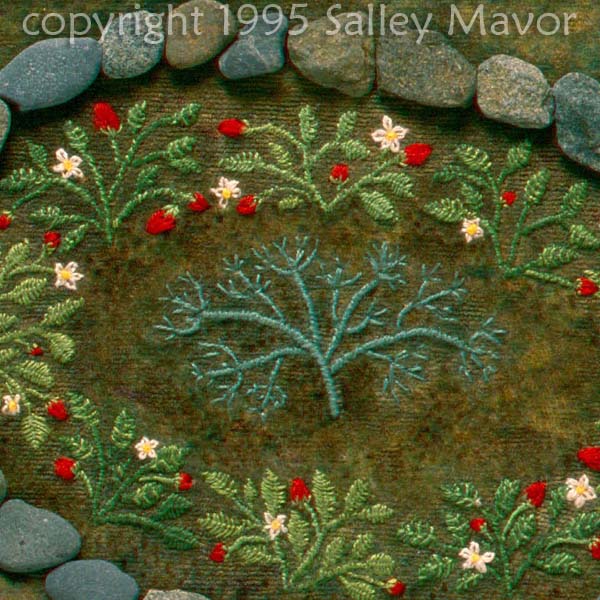
This is a detail from the strawberry garden scene in a illustration from Mary Had a Little Lamb. The stones were glued onto the velveteen background fabric.
Here’s another Mary character in her garden, this one from The Hollyhock Wall. Her hair is wool fleece and the background is embroidery on dyed velveteen.

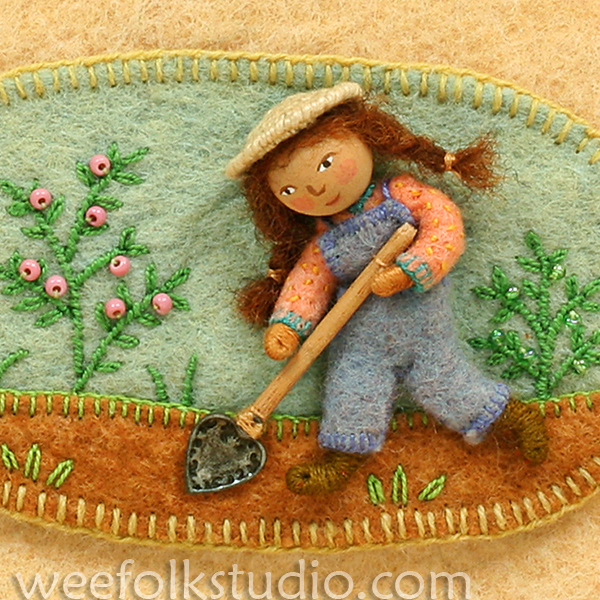
“Eleven, Twelve, dig and delve”. This illustration is part of a rhyme in Pocketful of Posies. The straw hat is made with thread wrapped wire and the spade blade is a heart charm.
Note: See other posts in the Close-ups series archive here.
With a good balance of sun and rain, along with warm temperatures early in the spring, it’s been an incredible garden season. Both vegetables and flowers are healthy and beautiful. At this point, I just grow flowers that are easy and take care of themselves. If they live through the winter, I divide the plants in the spring and give them away or find new ground to cover.

I forgot to cut back the trumpet vine this year and it looks more like a tree than a vine.

The clematis is so showy and brilliant purple.

Lilies are taking over!

I love the way hydrangea look at their different stages of growth. This could be clusters of french knots or seed beads.


More and more lillies.


detail from "Queen of Hearts" from "Pocketful of Posies" 2010
I’ve been continuously working on the illustrations from Pocketful of Posies, getting them ready for framing. The traveling show of original fabric relief artwork will be launched in mid-Sept. and my husband just began making the wooden shadow box frames. Here’s a series of pictures of the “Queen of Hearts” rhyme, showing the process of adding an additional felt and metallic braid border and mounting it on red upholstery fabric.


Note: See other posts from the Pocketful of Borders series here.
My husband and I went 50 miles down Cape to the National Seashore and visited a cedar swamp. The outer part of Cape Cod has low growing pines, which are stunted from the wind and salt spray coming from the Atlantic Ocean. It’s also much more sandy and open to the elements compared to the forested, sheltered and harbor filled southwestern part where we live.

The Cedar swamp is a short hike inland and downhill to a protected, peat-filled wetland. A board walk circles through the forest, so you can really see inside. This light and decay resistant wood was prized by the early European settlers and quickly cleared out of the Cape’s swamps.

The resilient cedars have returned, but the trees are no where near the 3′ in diameter that the settlers cut. The green moss-covered ground contrasted with the red tinted swamp water. A biologist friend told me that the orangey red color appears when the iron in the decaying material is oxidized.

It’s a magical place, with so many perfect areas for fairy houses. I wish that I’d brought some dolls along, to take their picture, but the park service wouldn’t have liked me dancing across the moss!


Here are some fairies that were caught on film during the month of July a few years ago. They were all sighted within a 1/4 mile of my house.


Also, take a look at my interview with the Empty Easel, an online art magazine which features practical advice, tips, and tutorials for creating and selling art.

The 2nd summer wedding is coming up soon, so I’m making another felt banner for Leigh and Brendan (see Karen & Graham’s on an earlier post here). I get the impression that the bride and groom are kind of traditional, so I’m resisting the temptation to go wild with color and add too many funky embellishments.

I started by bending 32 gauge cloth-covered wire to form the names and wedding date. I’m really having fun bringing language into my artwork this way. I started figuring out this technique a few years ago when I was working on Pocketful of Posies, and have no idea if the same kind of thing has been done before. Once you get into the rhythm, the wrapping goes quite fast. After all those years wrapping fuzzy pipe cleaners with embroidery floss for fairy limbs, this seems easy.

I had to put in some color, though and wrapped the wire names in bright pink variegated embroidery floss. The couple’s invitation had a seaside motif, so I added a metal shell charm and got out a dried star fish from my collection of found objects. The dark blue and had too much weight compared to the names, so I lightened it by winding around a single strand of pink floss.

After bending and wrapping the characters for the date, I cut out a piece of yellow felt to mount them on. I don’t make patterns and plan everything out ahead of time, but construct as I go. I always start with the lettering and then figure out later how much room they’re going to need.

Then, I had to figure out how to place everything on the purple blue felt background. At this point, I realized that the star fish didn’t have anything to offer and would have to go. I go through this editing process often, latching onto some interesting found object and then seeing that it has served its purpose of moving the design along and is no longer needed. A writer friend describes the revision process the same way. She said, “You have to be willing to let go of favorite words and phrases.”

I decided to incorporate a more conventional floral decoration and added some of Mimi’s Kirchner’s felt roses and some glass leaf beads. If you haven’t learned how to make them yet, go to her tutorial on her blog here. I also got out the dreaded glue because that was the only way to attach some shells around the date. The yellow felt piece called out for some embellishment, so I added a chain-stitched loopy line around it.

Then, I cut out a banner of blue felt, with scallops on the bottom and blanket stitched all around with variegated pima cotton from the Caron Collection. I found an old shell necklace, the souvenir kind from Hawaii, and sewed some shells to the scalloped bottom edge. I was glad that they already had holes.


I sewed a casing for a drift wood stick at the top, then tied and braided a pima cotton strap.

Here’s the finished banner, ready to wrap up and bring to the wedding.

To keep up with new posts, subscribe to this blog (top right column on the home page). If you’d like to see more frequent photos tracking the projects in my studio, please follow me on Facebook and/or Instagram.
