I wrote this post 2 years ago and don’t know why it stayed in the drafts folder all that time. It was clearly written during a period of procrastination or when there was a gap in my work schedule, because it mentions cleaning my studio, which rarely happens. Right now, I’m engrossed in the process of working on a new children’s book, which you can follow here. It’s a calming break from earlier this fall when my Liberty and Justice exhibit caused a ruckus because of its political satire. So, let’s take a little detour and visit some small things around my studio!
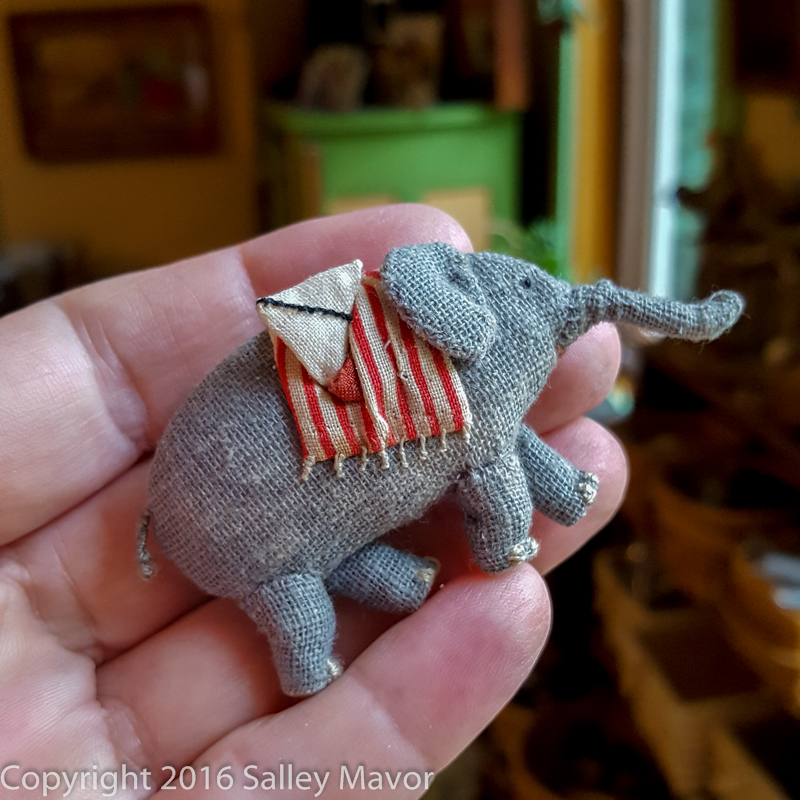
— While cleaning up my studio, I came across the elephant pictured above. Her name is Savi and she is the main character in The Way Home, my first book. This attempt at an elephant wasn’t up to my standards (I think the bumpy trunk bothered me), so she never made it into an illustration. She’s been hanging out in my studio for 25 years. I took her picture and posted it on Instagram and Facebook.
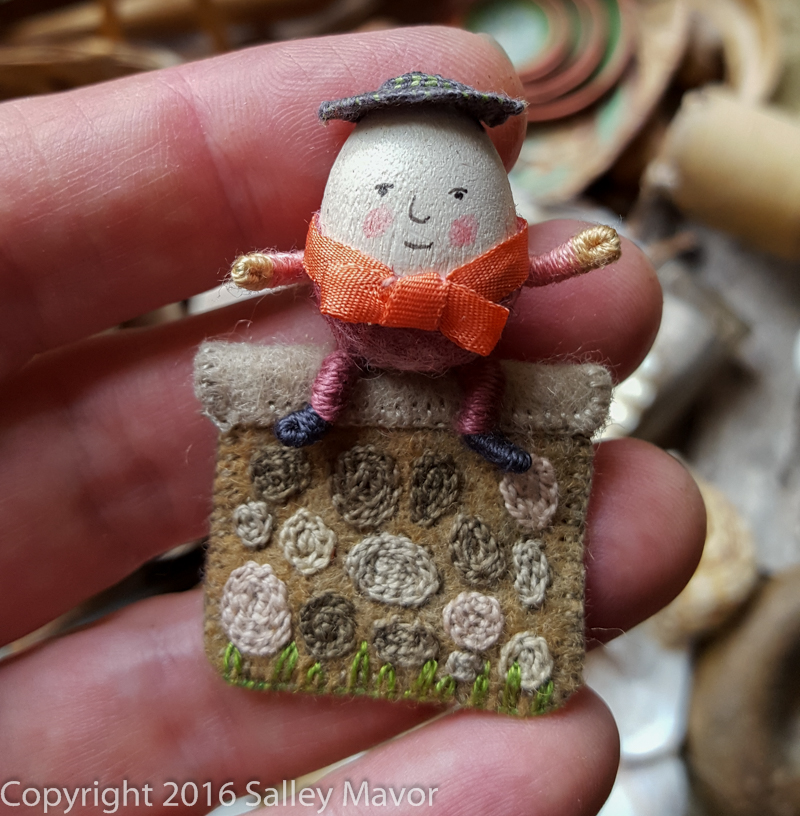
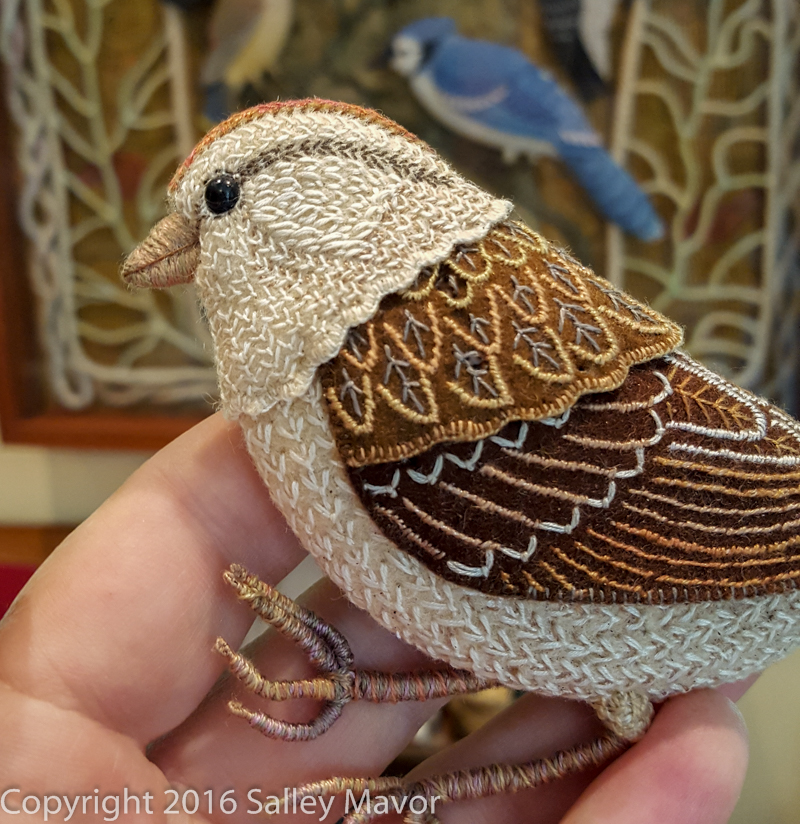
Since then, I’ve found more small things to photograph and post. I’m holding some of them, so you can see the scale in relation to my hand. There’s Humpty Dumpty, 1 inch wee folk characters, a house and leaves that were used as spot illustrations in Pocketful of Posies. There’s a chipping sparrow that wasn’t included in the finished Birds of Beebe Woods. And at the end is a yellow telephone I made while in art school over 40 years ago.
chipping sparrow
To keep up with new posts, please subscribe to this blog. Your contact info will not be sold or shared. If you’d like to see more frequent photos tracking the projects in my studio, please follow me on Facebook and/or Instagram.
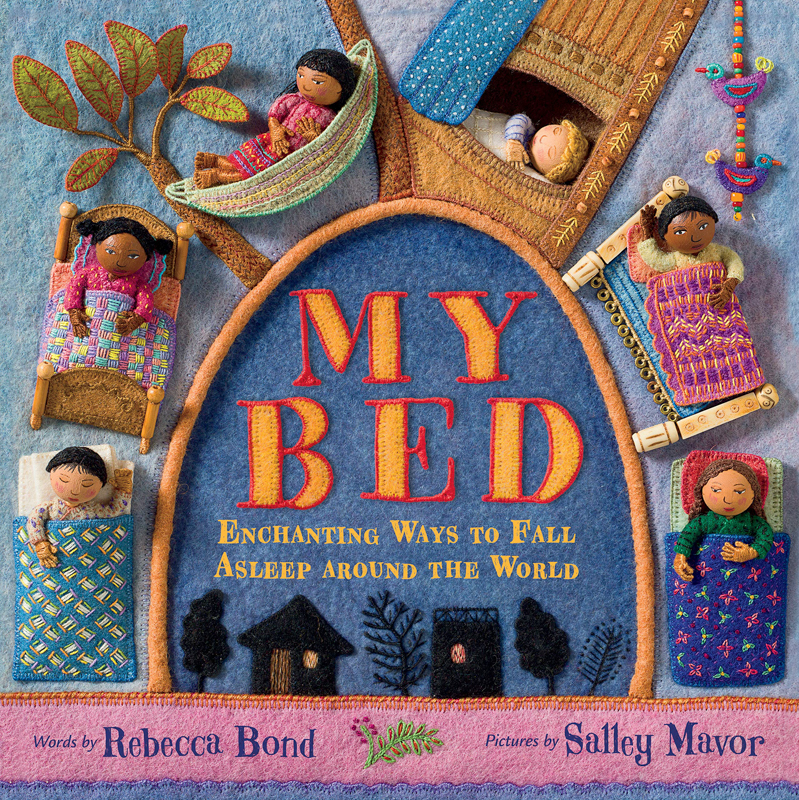
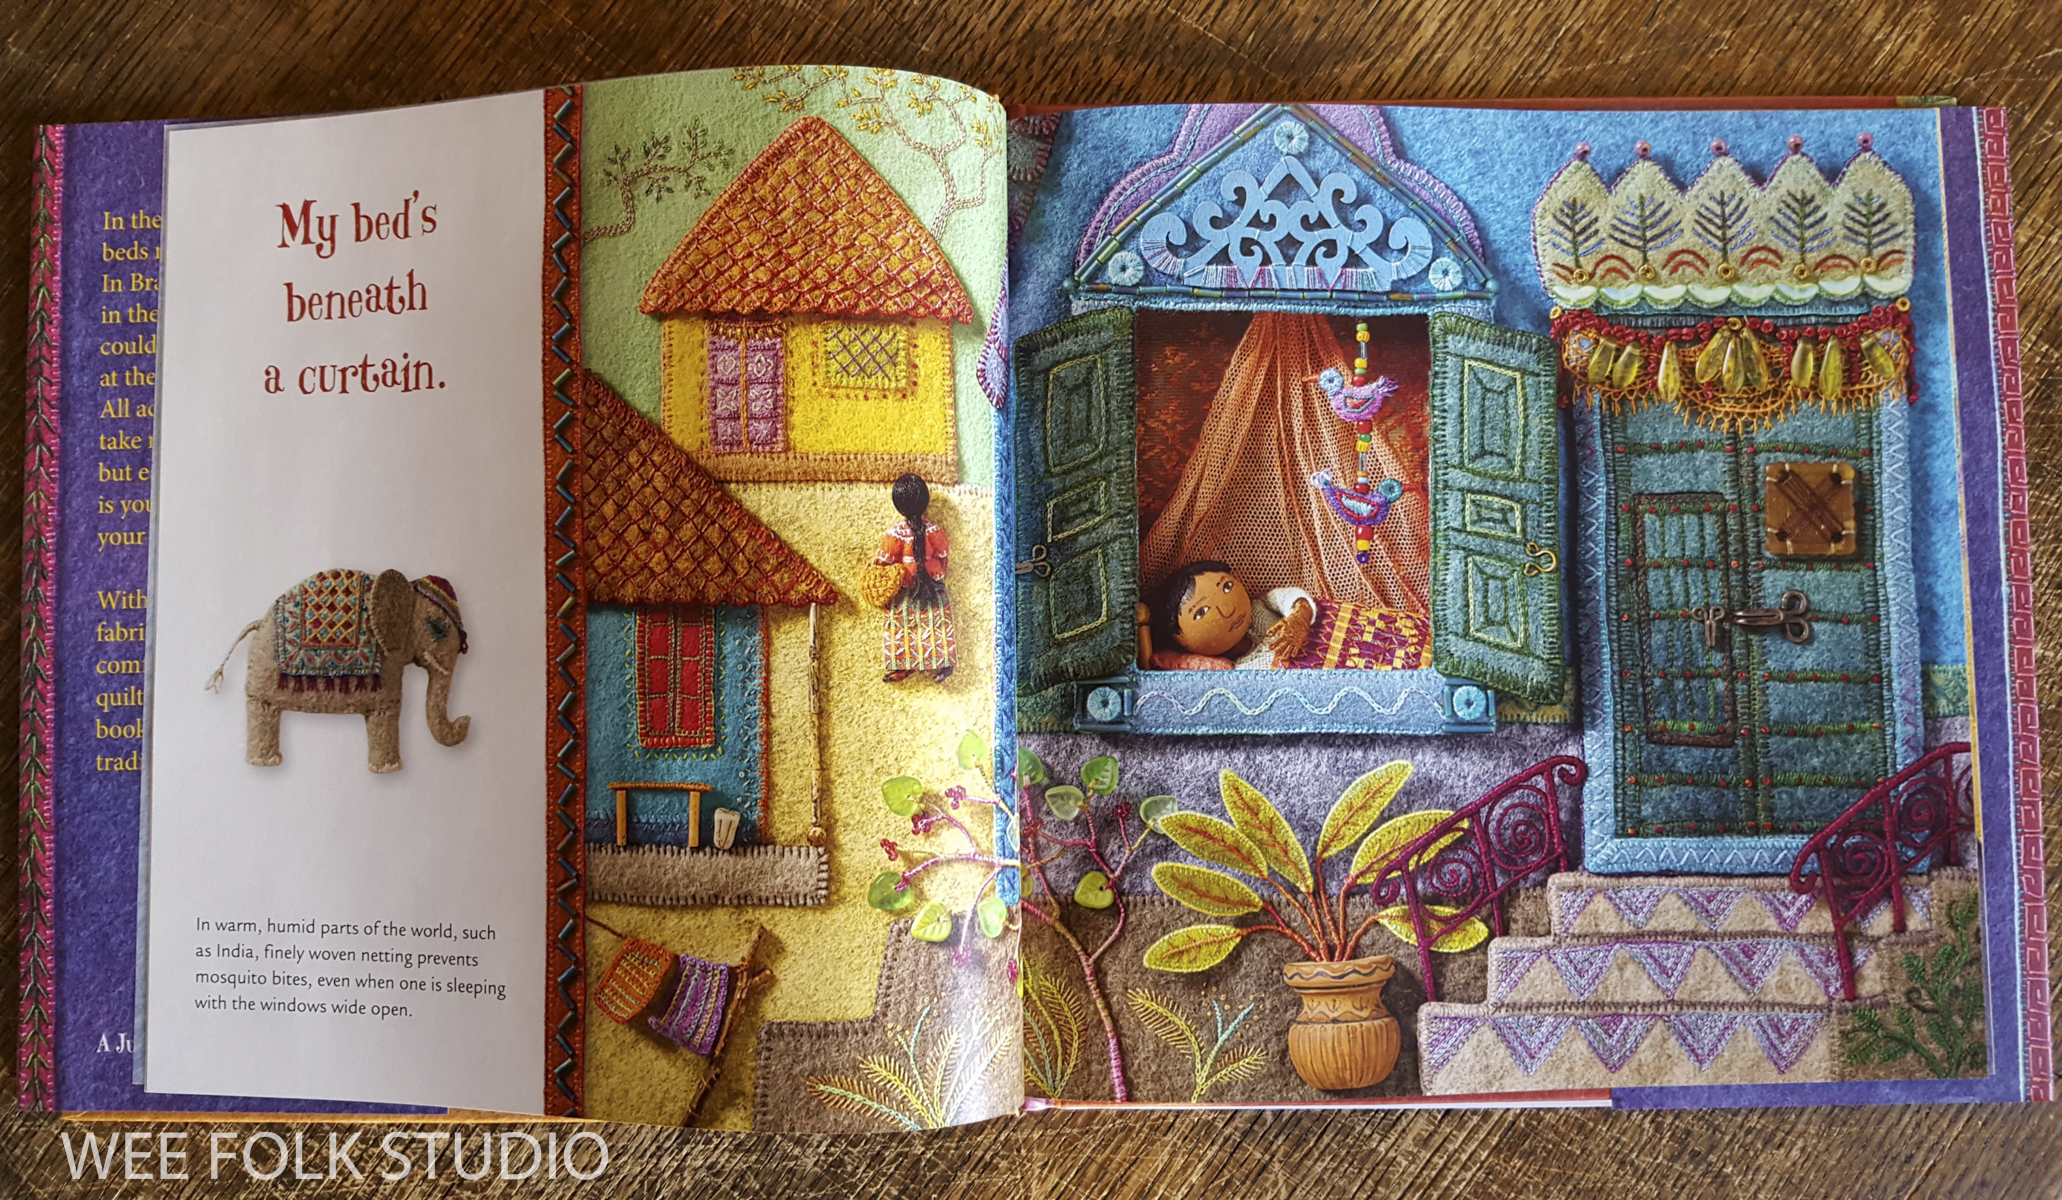
This is the third post about the North African illustration for my new children’s book. To see more, click the links for Part 1 and Part 2 in the series. The scene will be included in My Bed: Celebrating Children’s Beds Around the World. The story is written by Rebecca Bond and will be published by HoughtonMifflin in 2020. Here are links to posts showing other finished illustrations for the book: South America,Japan, India, Afghanistan, Russia. and Iran. To see a list of all my books, click here.
Update: Signed copies of My Bed can ordered in my shop here. 40 pages, 9″ x 9″, words by Rebecca Bond, pictures by Salley Mavor, published by Houghton Mifflin Harcourt. ISBN 978-0-544-94906-5
After constructing the houses with felt, wire and clay beads, and stitching the landscaping, I made this child to sleep on the rooftop terrace. With the exception of the fingers and toes, she is made the same way as the dolls in my how-to book Felt Wee Folk – New Adventures. Her bare feet are similar to the hands, but it’s a bit more tricky to make them look natural. (Sorry, the hand and feet technique is proprietary.)
Hair styling with thread brings out their individuality.
Her nightie is made from an old monogrammed hankie that was part of a relative’s trousseaux. I took advantage of its white edging while cutting out pieces of fabric for the garment.
Here she is, settling down for a cool night’s sleep on the roof deck.
The palm tree trunk texture was fun to replicate with lots of fly stitches. I played around with light and dark colors to give it definition and dimension.
To give the right appearance at the top, just below where the palm fronds fan out, I sewed a clump of glass leaf beads.
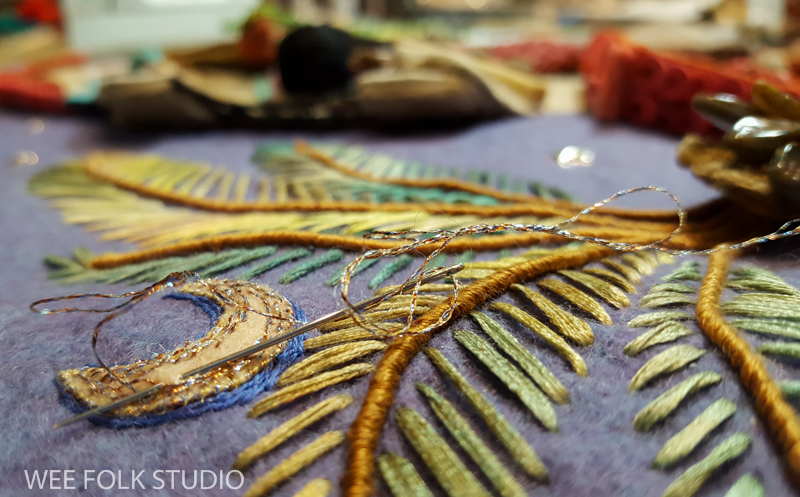
And then there was the really fun part, when I got to use variegated silk ribbon thread! It’s one the few new needlework products I actually buy. I really like the selection of straw silk from Silk Road Fibers.
A felt moon appeared from behind the leaves.
and started to shine with the addition of some metallic thread.
So, that’s it for this illustration. I’m working hard to complete the whole book by next winter’s deadline and will be sharing more scenes in the coming months.
To keep up with new posts, please subscribe to this blog. Your contact info will not be sold or shared. If you’d like to see more frequent photos tracking the projects in my studio, please follow me on Facebook and/or Instagram
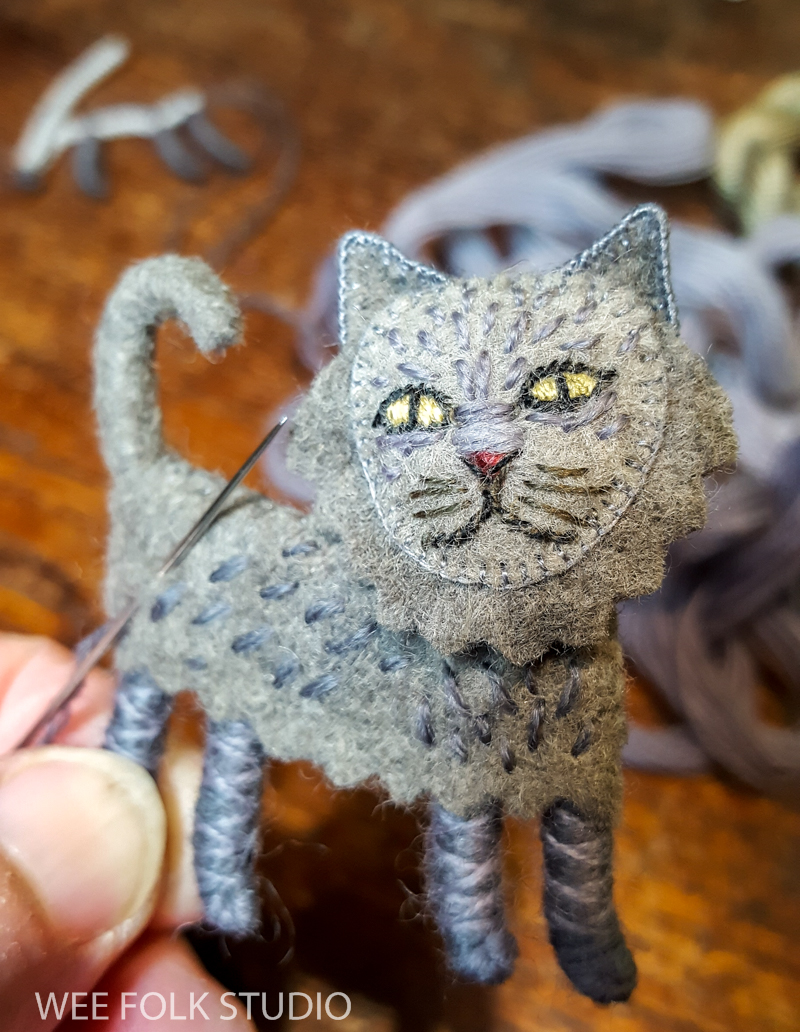
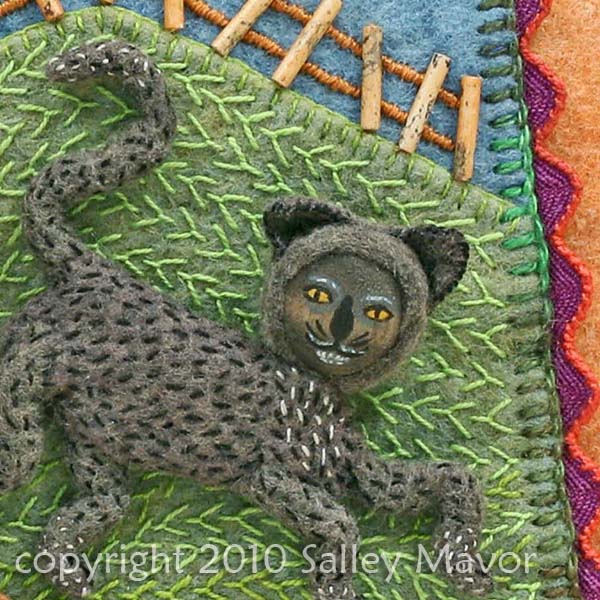
This Persian cat will be used as a spot illustration in the Iran spread in my upcoming picture book, My Bed. The story about children’s sleeping places in different cultures around the world is written by Rebecca Bond and will be published by Houghton Mifflin Harcourt in 2020. Children’s book publishers need at least a year to design, print and market a book, so I have to have everything finished by the winter of 2019. That means I’m practically working around the clock to get it done in time.
Update: Signed copies of My Bed can be ordered in my shop here. Watch this 8 minute documentary about how I created the illustrations for the book.
In addition to creating full page illustrations, I’m making a series of animal icons that will appear on the adjacent text panels throughout the book. The miniature stuffed animals relate to the geographic area of each corresponding scene.
The research on Persian cats led to photographs of fluffy dark grey felines whose faces are noticeably different from regular house cats. Their cartoon-like features remind me of those 1960’s paintings of wide-eyed waifs, with large eyes and stubby little noses.
First, I wrapped tapestry wool around its pipe cleaner legs. Then, I stitched features onto its felt face. With pinking shears, I cut a mane out of felt and stitched the face on top.
For the tail, I sewed a strip of felt around a pipe cleaner.
To help make the ears point up, I sewed wire along the top edges. For a finishing touch, I added some tapestry wool stitches to its coat.
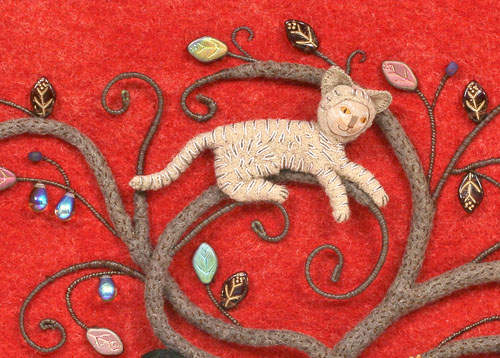
As a basis of comparison, I’ve selected a group of cat details from illustrations in my 2010 children’s book Pocketful of Posies: A Treasury of Nursery Rhymes. Autographed copies are available in my Etsy Shop.
from “Pocketful of Posies”detail from “Pocketful of Posies” 2010from “Pocketful of Posies”from “Pocketful of Posies”Pocketful of Posies
To keep up with new posts, subscribe to this blog. If you’d like to see more frequent photos tracking the projects in my studio, please follow me on Facebook and/or Instagram.
Now that our movie LIBERTY and JUSTICE is finished and being entered into film festivals, I’m resuming work on MY BED. It’s a picture book about children’s sleeping places around the world that will be published by Houghton Mifflin Harcourt in Sept. 2020. A touring exhibition of my original embroidered artwork for the book will travel around the United States. The tour schedule is listed here.
Update: Signed copies of My Bed can be ordered in my shop here. Watch this 8 minute documentary about how I created the illustrations for the book.
It will be a crunch to get the artwork completed by the deadline, so I’ll have to work even more obsessively than usual, if that’s at all possible! In addition to creating 3/4 spread illustrations, I’m making a series of animal icons that’ll be spot art, appearing on the adjacent text panels throughout the book. The miniature stuffed animals relate to the geographic area of each corresponding scene. Other animals in the series that I’ve written about so far are, parrot and sheep, rooster,cat,duck,bunny, giraffe, crocodile, cow, dog and camel.
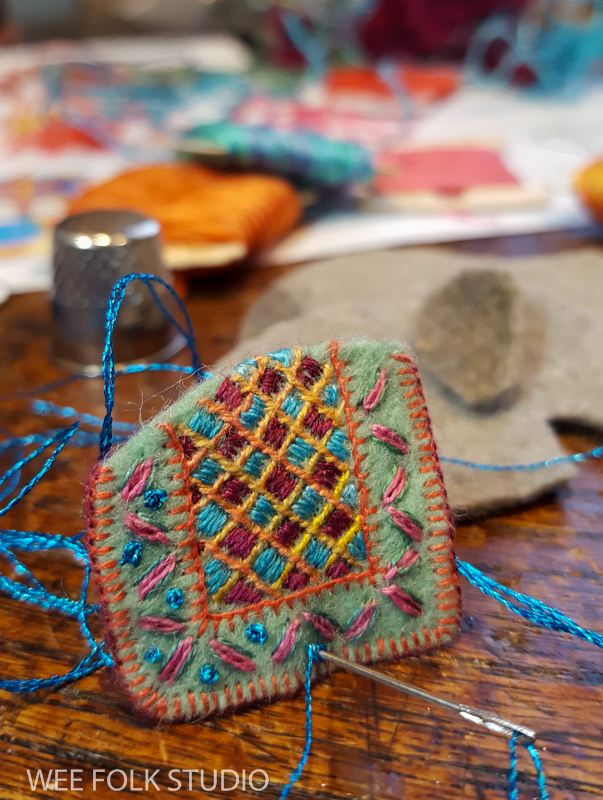
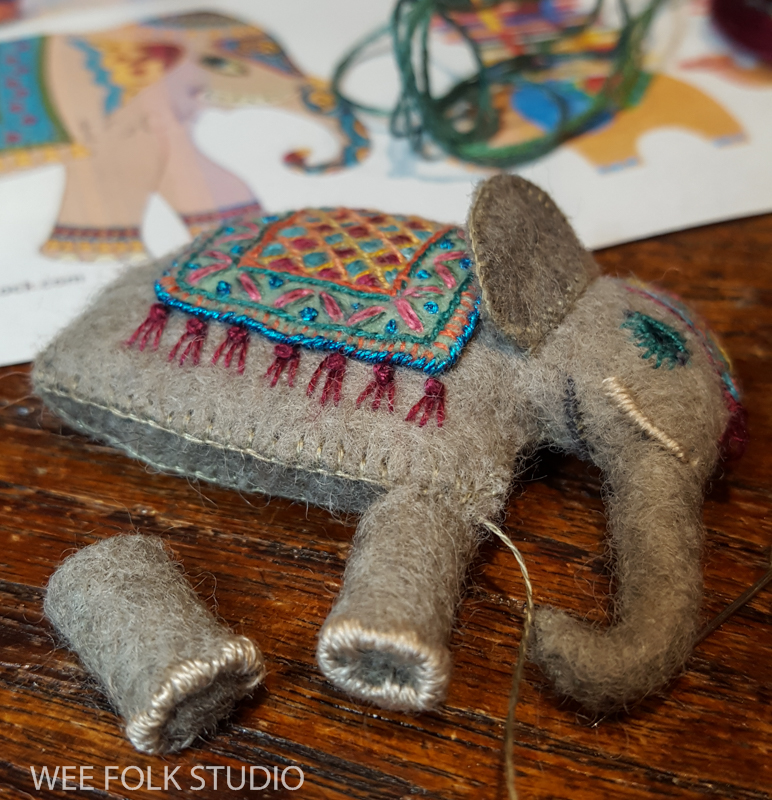
To get ideas, I researched traditional decorated elephants from India. After cutting the elephant shape out of grey felt, I embroidered a blanket with cotton floss and metallic thread. I just love the Indian sense of color and pattern!
The trunk has a wire inside to help it curl.
For the eye, I cut a slit in the felt and stitched it like a button hole for the bead to fit inside. Then, I chain stitched a head covering and added a tassel.
To make the legs, I rolled strips of felt into tubular shapes and embroidered toes onto one end. The wrapped wire tail came last.
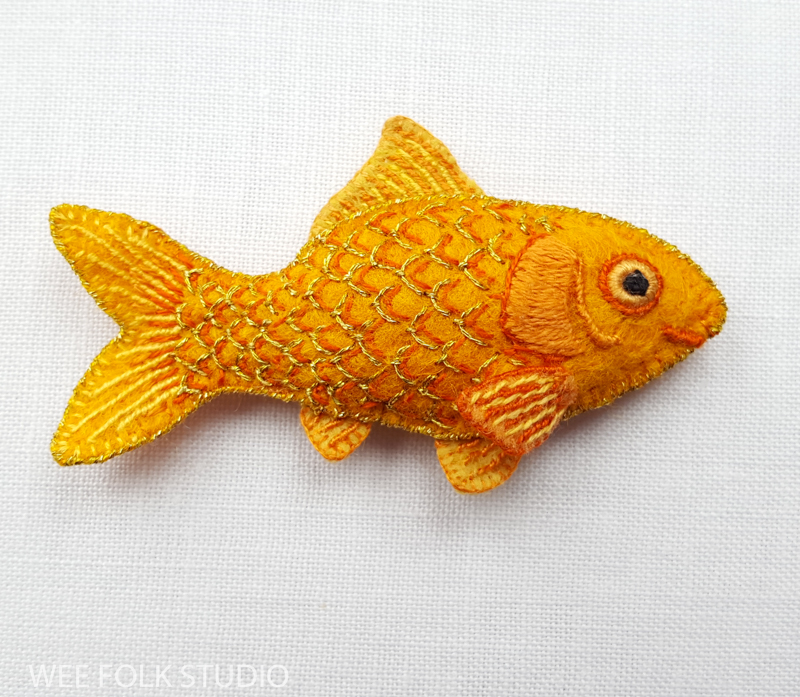
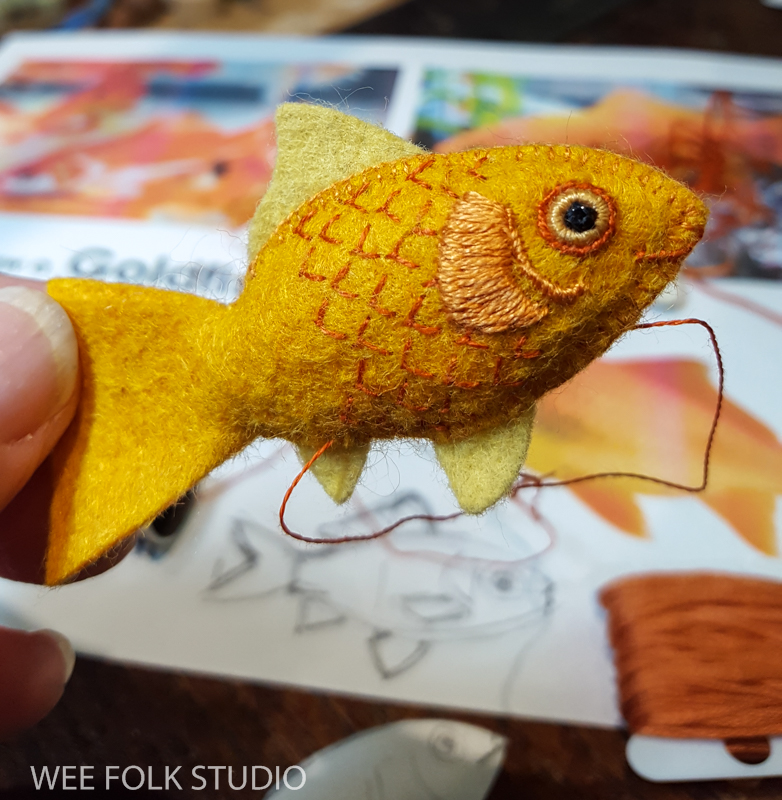
Beside all the yellow and orange tones, the fish needed just a hint of glimmer, so I added some metallic thread to its scales.
To see other animals and illustrations I’ve made for the book, click here.
To keep up with new posts, subscribe to this blog. If you’d like to see more frequent photos tracking the projects in my studio, please follow me on Facebook and/or Instagram.
Today, I am excited to share a couple of animals, which will be used as spot illustrations in my upcoming book MY BED. The story about children’s sleeping places in different cultures around the world is written by Rebecca Bond and will be published by Houghton Mifflin Harcourt in Sept. 2020.
Update: Signed copies of My Bed can be ordered in my shop here. Watch this 8 minute documentary about how I created the illustrations for the book.
In addition to creating full page illustrations, I’m making a series of animal icons that will appear on the adjacent text panels throughout the book. The miniature stuffed animals relate to the geographic area of each corresponding scene. Other animals in the series that I’ve written about so far are: elephant and goldfish, rooster,cat,duck,bunny, giraffe, crocodile, cow, dog and camel.
These little animals bring back memories of the late 70’s, when I made a line of fabric pins. Of course, what I’m making today is much more intricate, but they are similar in size and concept.
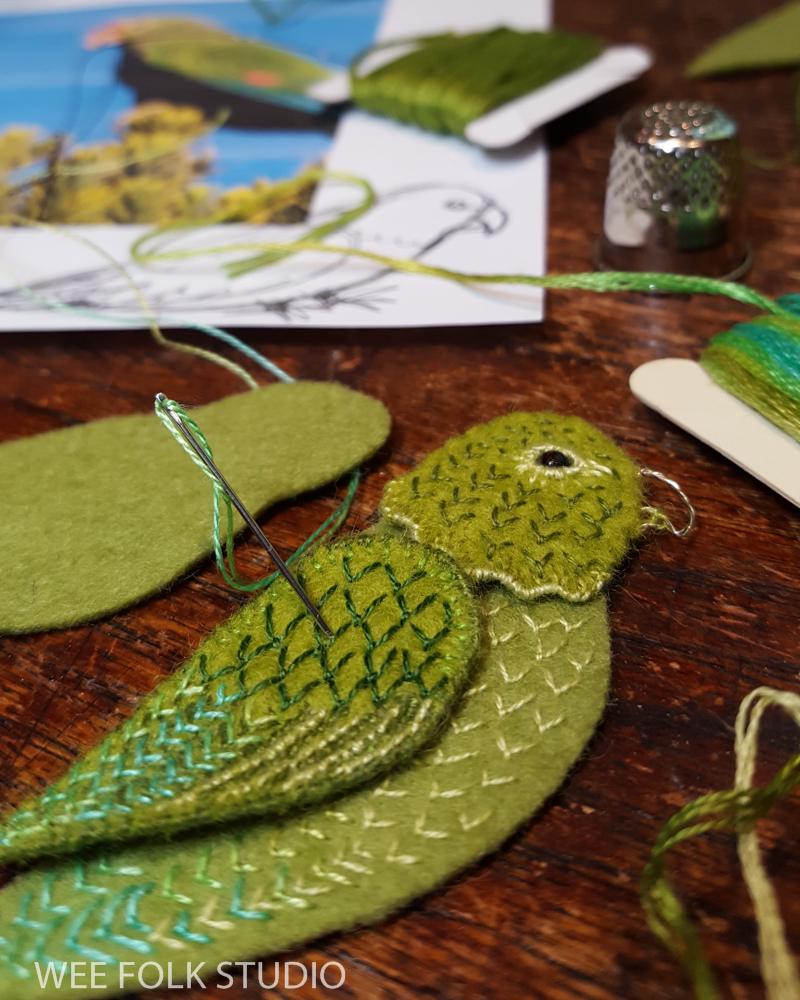
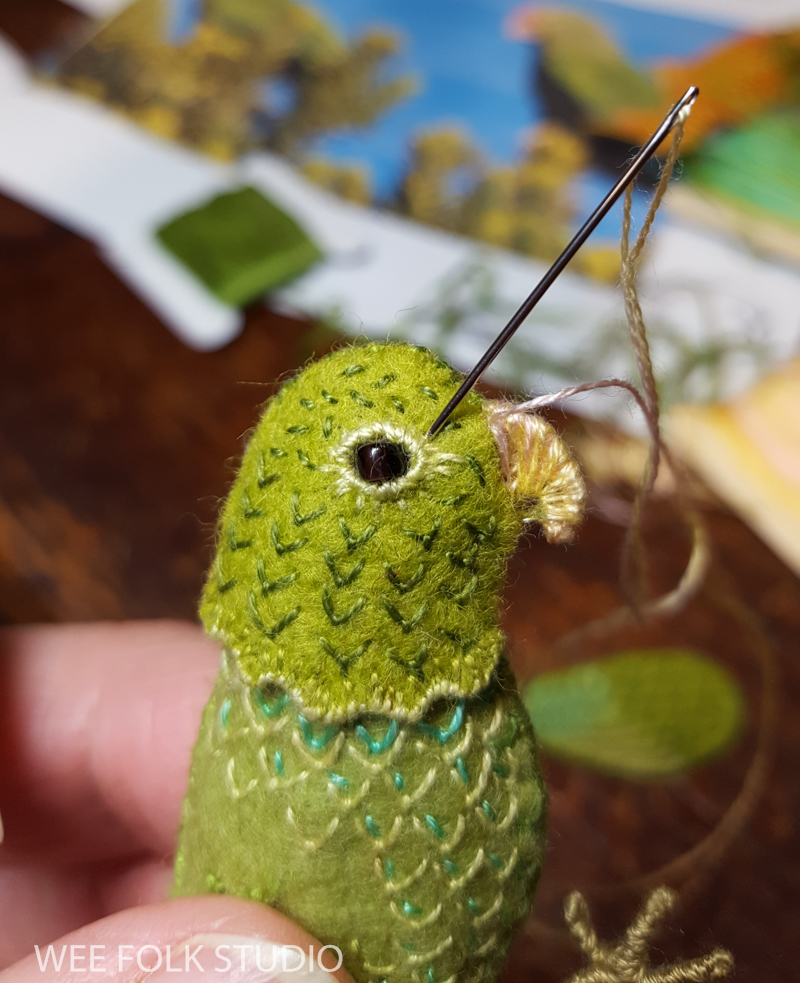
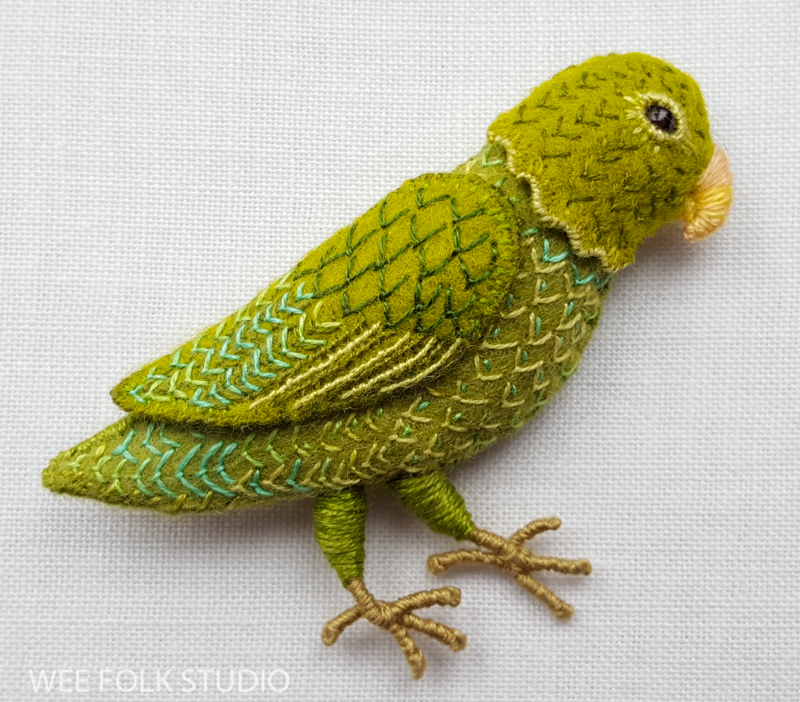
After doing photo research and drawing a simple parrot shape, I cut out pieces of felt and began embroidering feathers.
I formed the outline of the parrot’s beak with wire. Its eye is a glass seed bead, set inside a cut out hole.
I wrapped the beak with embroidery floss.
Then I added bird’s feet made of floss wrapped wire.
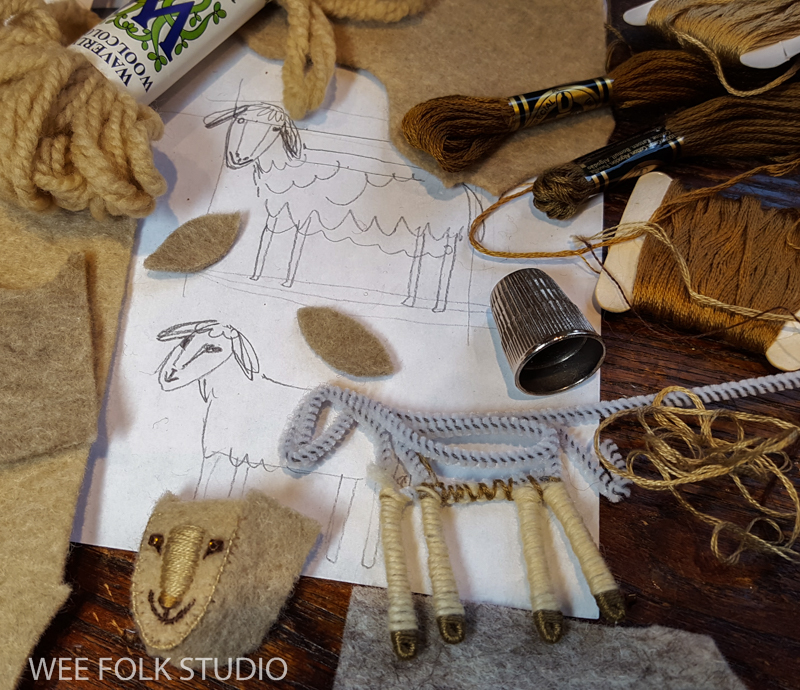
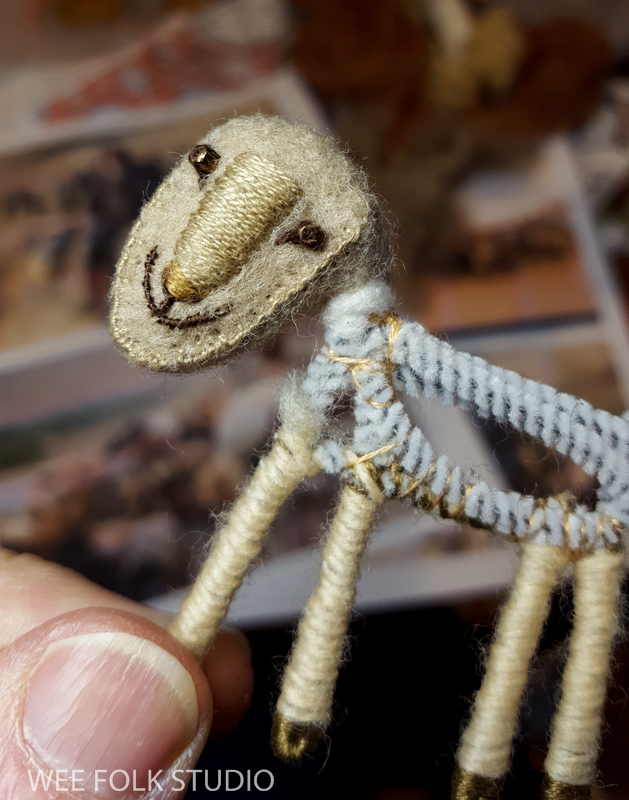
The sheep will go with the scene set in Afghanistan.
In my research, I found pictures of local breeds with particularly long faces and ears.
The sheep’s legs are made with a pipe cleaner, using the same basic technique that used for the dolls in my how-to book, Felt Wee Folk. It’s face is embroidered wool felt, with seed bead eyes.
Luckily, I had some wool yarn of the right natural shade for the fleece. It was fun to make a tangled mess of french knots.
Then, I sewed on it’s ears, hiding the ends on the top with wool yarn. I’ll be sharing more animals (and scenes) as the book progresses.
To keep up with new posts, subscribe to this blog (top right column on the home page). If you’d like to see more frequent photos tracking the projects in my studio, please follow me on Facebook and/or Instagram.
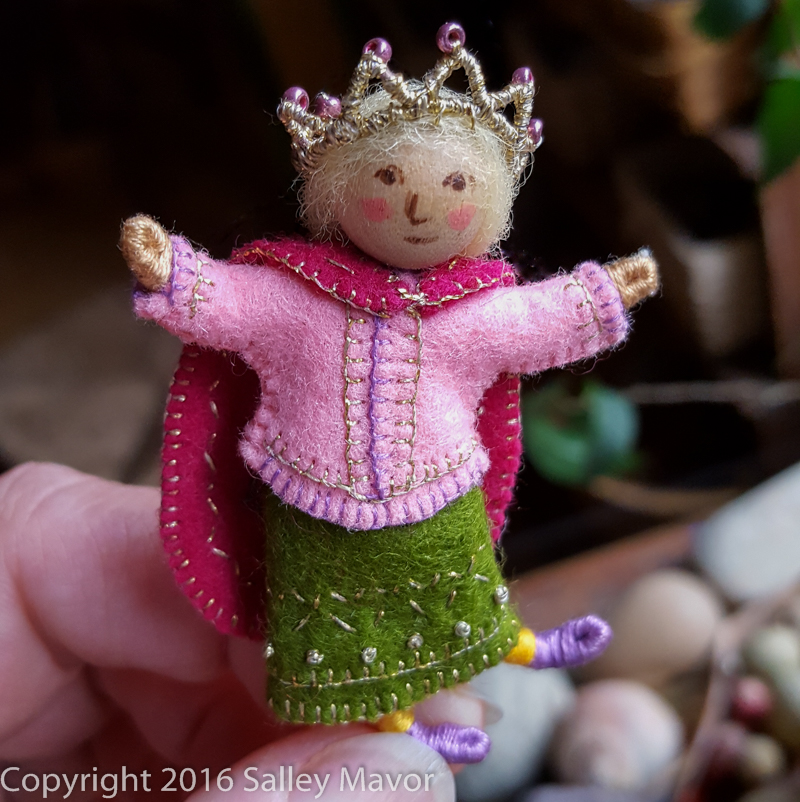
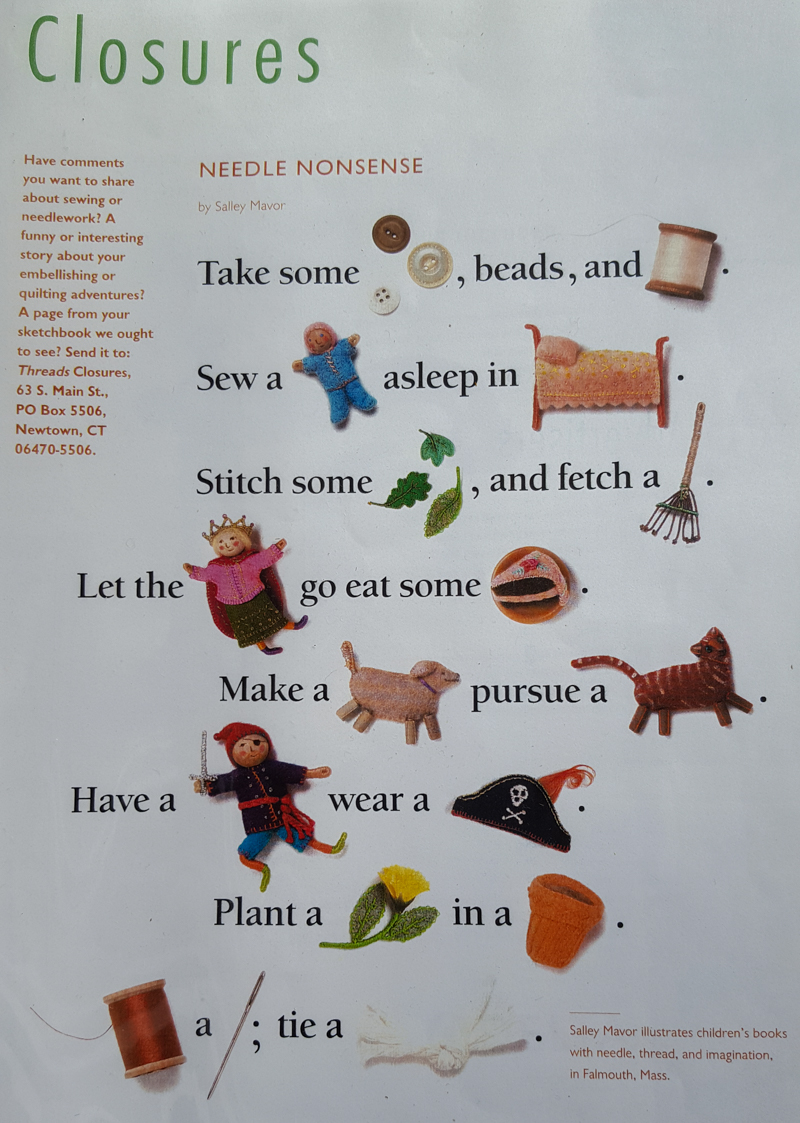
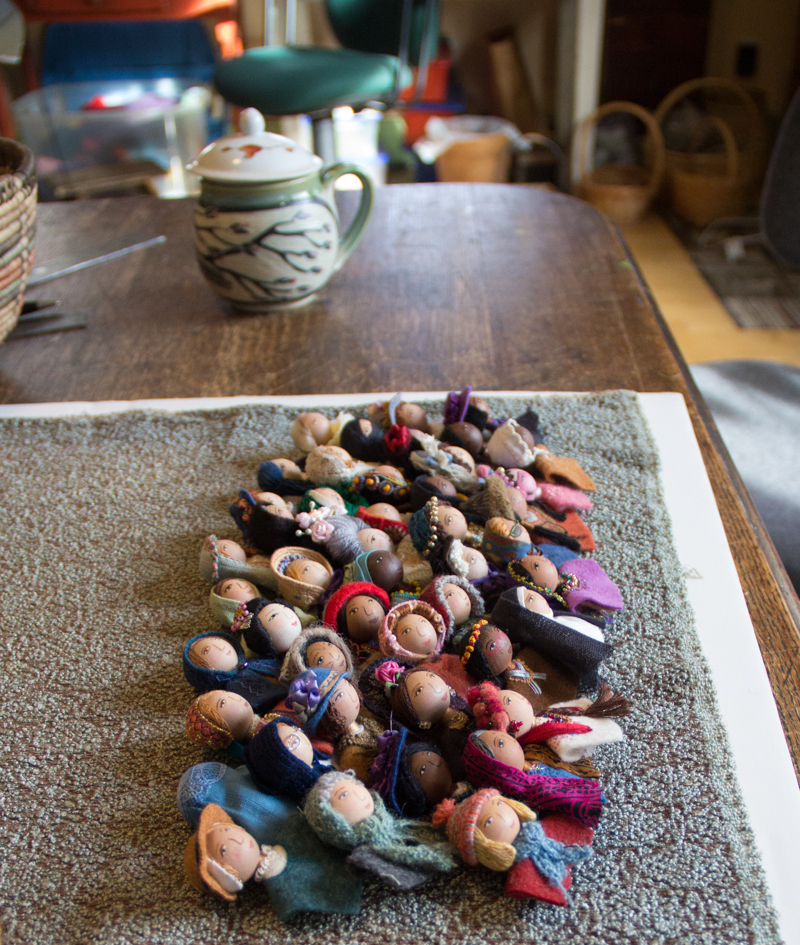
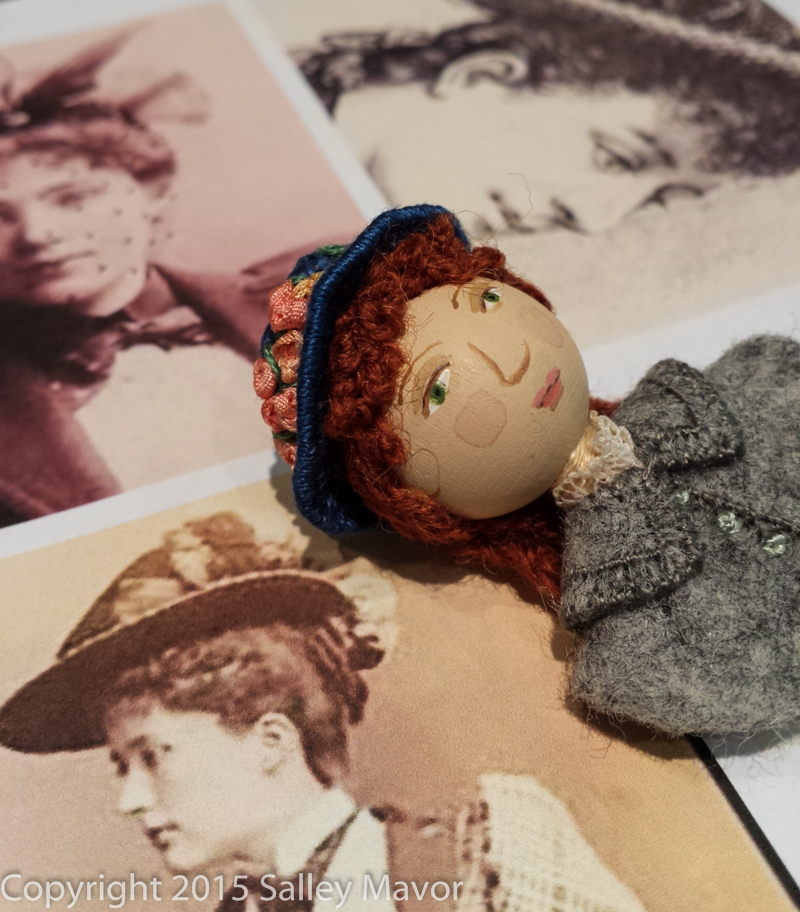
While cleaning up my studio last summer, I came across a plastic bag full of small characters and other props I’d made years ago. The items were used in place of words in a rebus I wrote and illustrated sometime around 2000 for Threads Magazine’s Closures page.
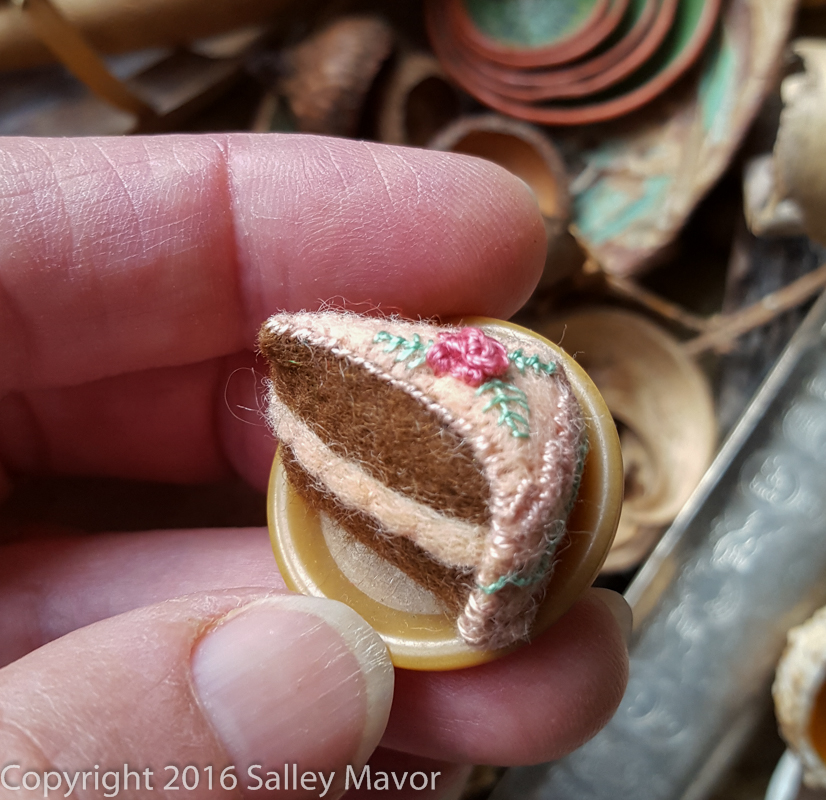
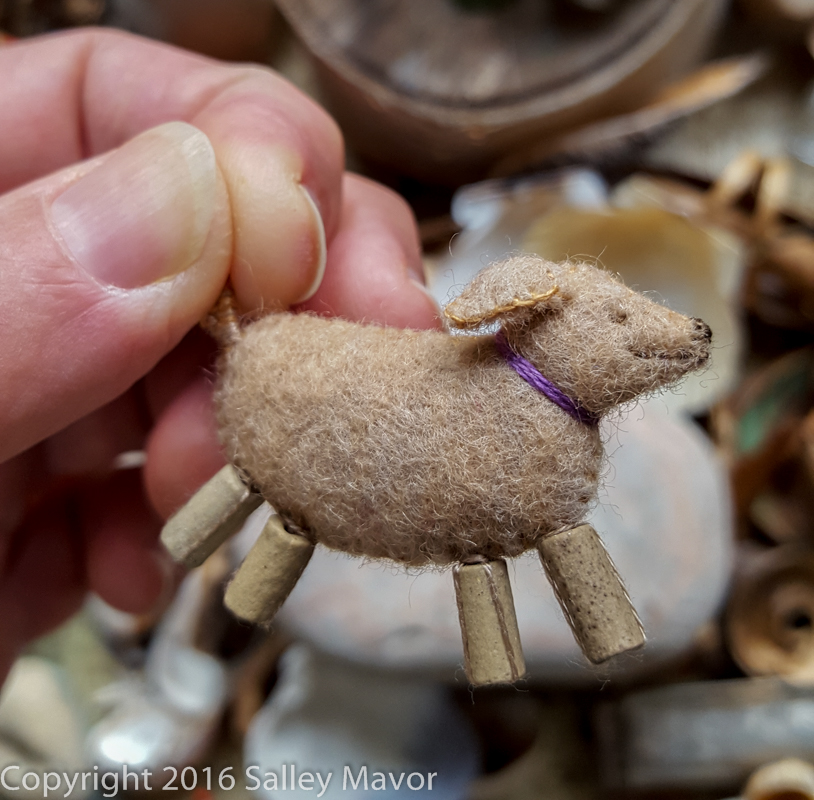
Since then, I’ve shared cell phone photos on Instagram and Facebook of little things I’ve found around my studio. The easiest way to do this was to hold them in my left hand while clicking the camera with my right hand. I realized that showing the scale of these tiny objects with a human hand as a reference point makes you see them differently. The uptick in viewer responses to these images led me to look for more small scale items to photograph in my fingers.
I looked at the printed rebus again and noticed how the images floating on the white page give no sense of scale. Other than the found objects like the buttons, needle and spools of thread, there’s no way of knowing the real size of the handmade objects.
With these new photos, you can see just how small everything is.
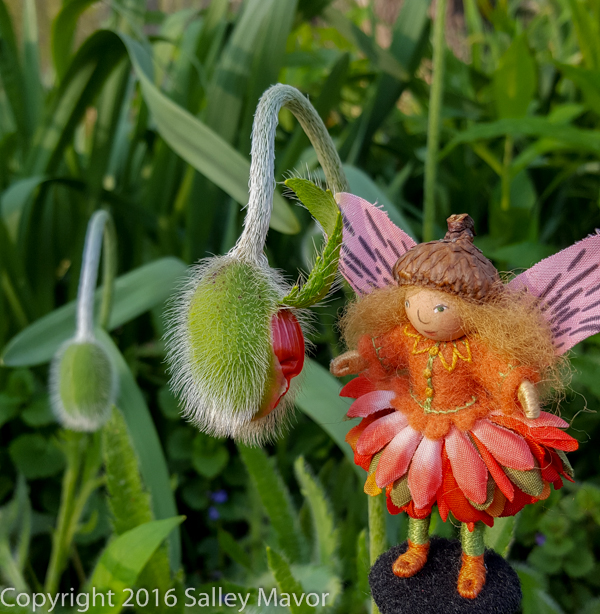
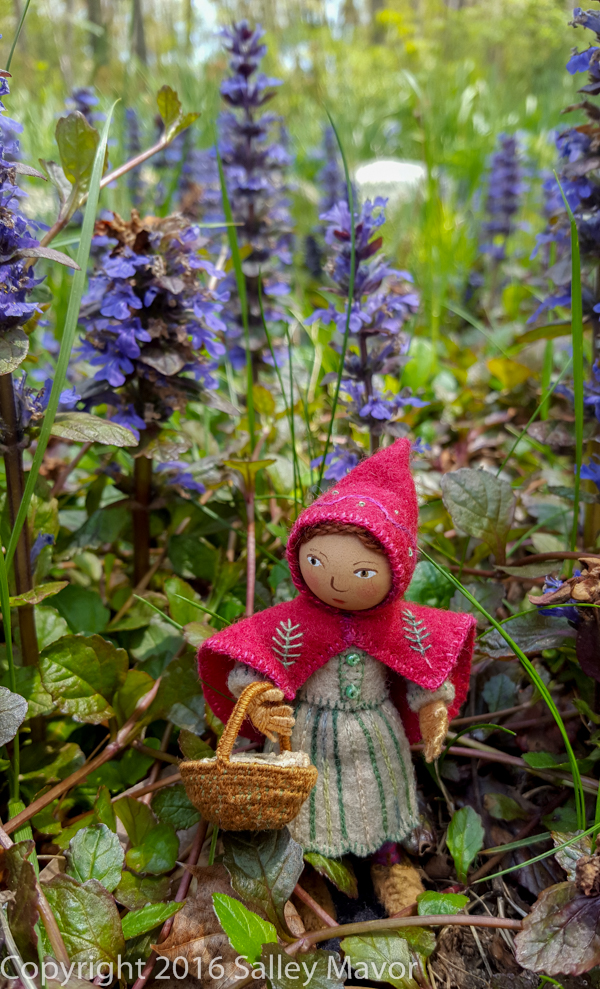
I can’t remember a more glorious spring here on Cape Cod! The days are clear and warm, but not too hot, with zero humidity. And the yard is full of perfectly scaled vegetation and flowers for wee folk to ramble through, including bugle weed, forget-me-nots and buttercups. Here’s a selection of characters who escaped from my studio into the outdoors, some from my how-to book, Felt Wee Folk – New Adventures.
How about a lattice topped pie in an acorn cap?
Poppies are ready to pop.
Little Red Riding Hood makes her way across the bugle weed forest…
And a fairy bride and groom dance through a field of buttercups!
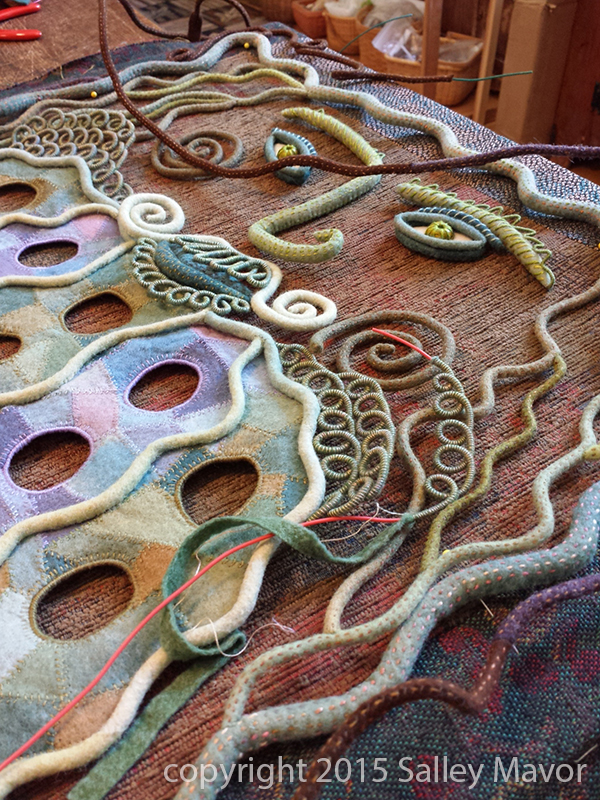
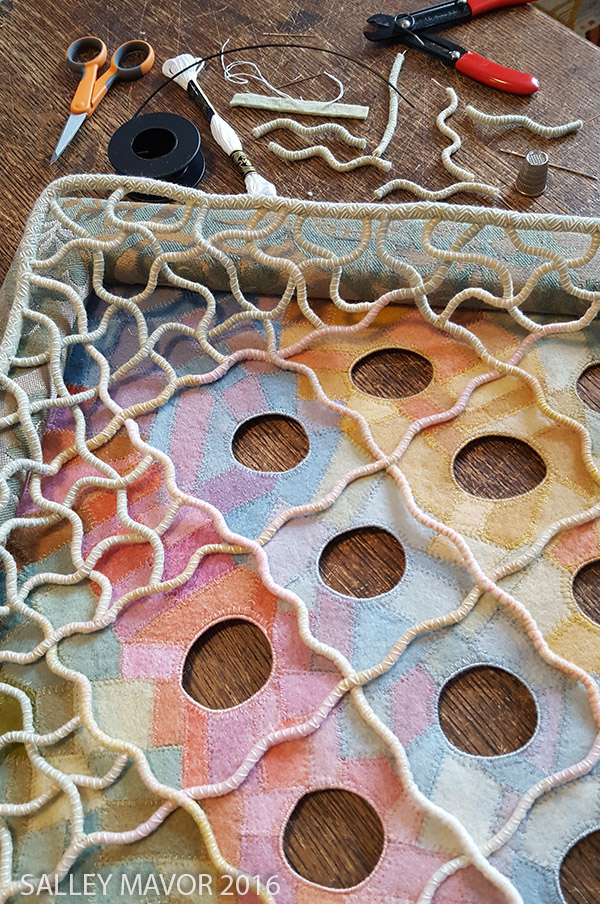
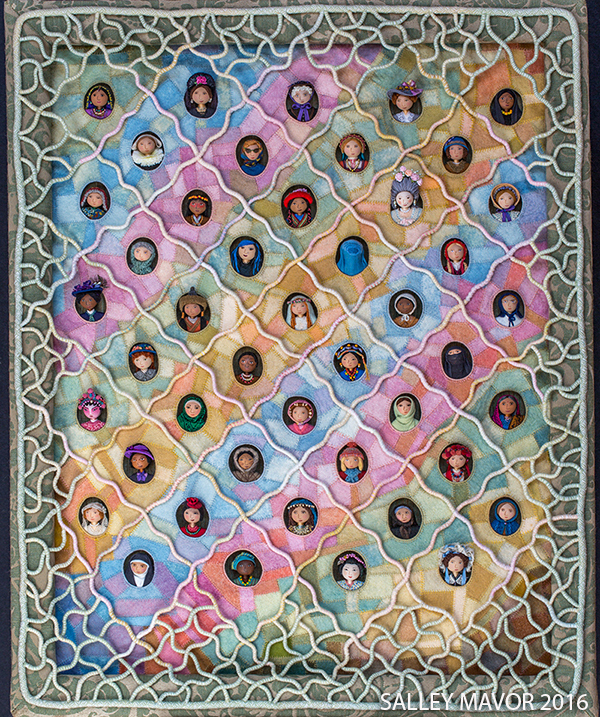
This is part 4 in a series of posts about my new embroidered bas-relief piece Cover Up. In part 1 and part 2, the collection of “covered” women are introduced and discussed. Part 3 shows how I made the pieced felt background.
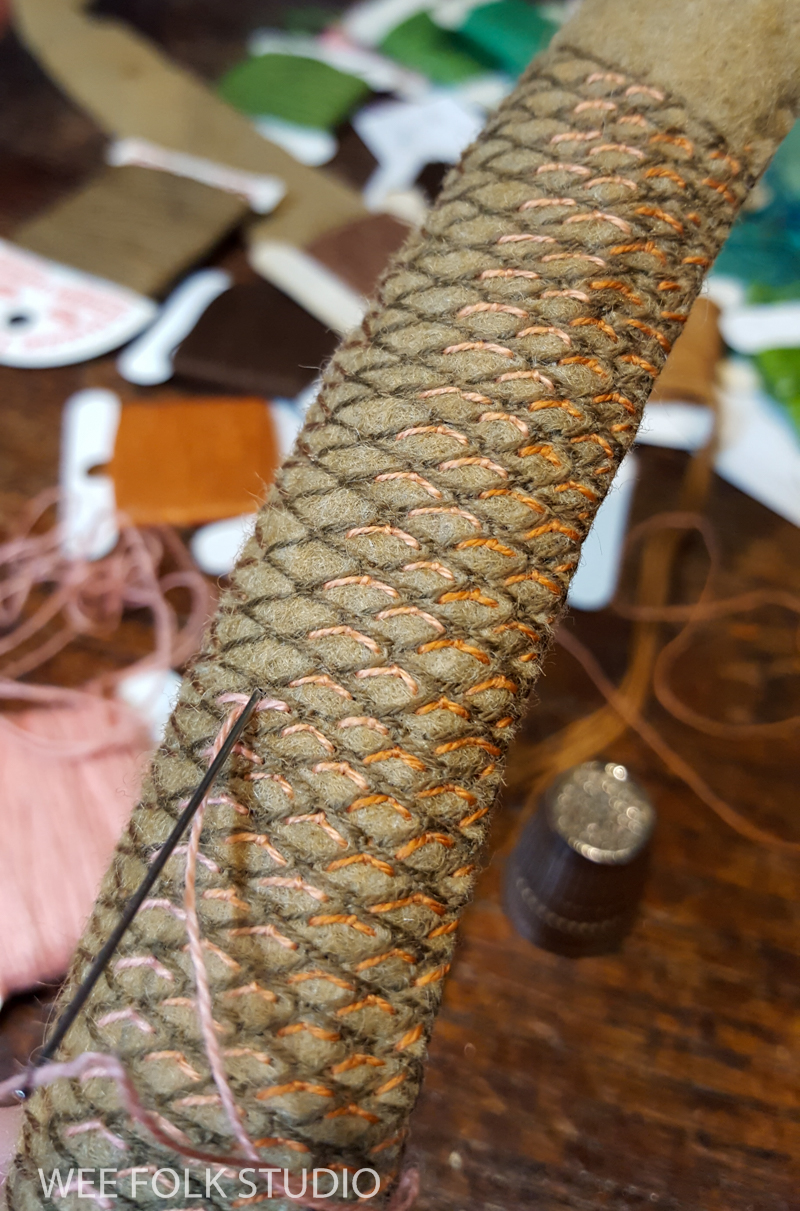
The next phase in the project involved making a felt covered wire border, which is a new technique I’ve developed over the past few years. The idea originated with a desire to form and stitch lines that have a 3-dimensional quality. I’ve used wire in my work for many years, but mostly in miniature scale. With larger gauge wire, covered in strips of embroidered felt, I have been able to incorporate bolder, linear patterns and designs into my work, like in the pieces shown below; Birds of Beebe Woods, Face Time,Whiskers and Rabbitat.
Birds of Beebe WoodsBirds of Beebe WoodsRabbitat animationFace TimeBirds of Beebe WoodsWhiskersRabbitatWhiskers
Cover Up’s border started with a sketch of a vine-like pattern. As usual, plans changed once my hands began the process of forming and articulating the wire lines. It ended up looking more like a lattice topped pie or a chain linked fence.
I sewed strips of felt to lengths of insulated electrical wire and embroidered the felt with pastel shades of variegated floss. Straight lines seemed too rigid and unwelcoming, so I wiggled the wire and arranged them in a diagonal grid.
This video shows close-ups of me covering and stitching wire with my non-manicured fingers.
For the lattice pattern, I used many worm shaped lengths of covered wire. I joined the wire ends in a way that’s hard to explain. Let’s just say that it involves poking wire through felt, with lots of fussy sewing to keep the wire from pulling out.
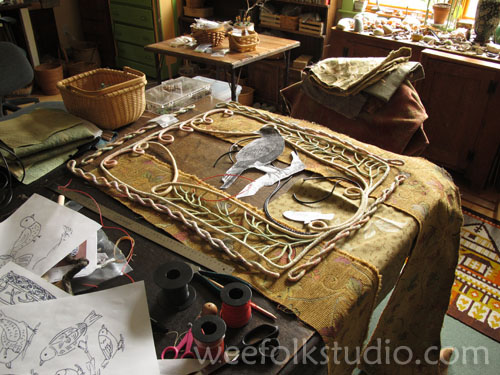
Here I am, working on the border downstairs, all cozy and warm in front of the wood stove, with snow outside.
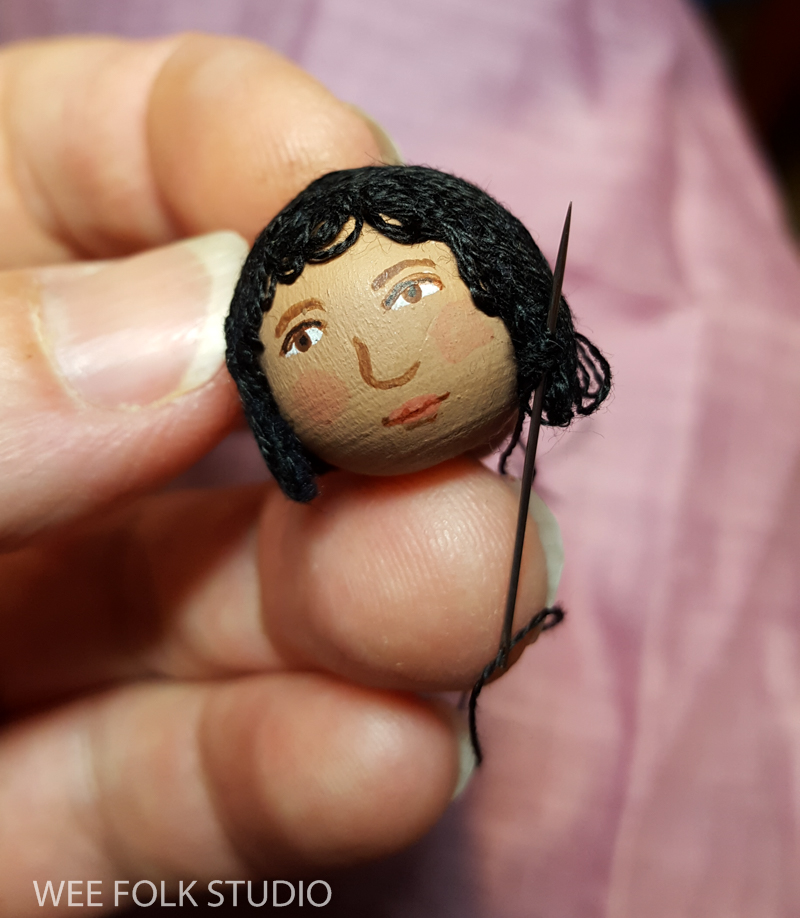
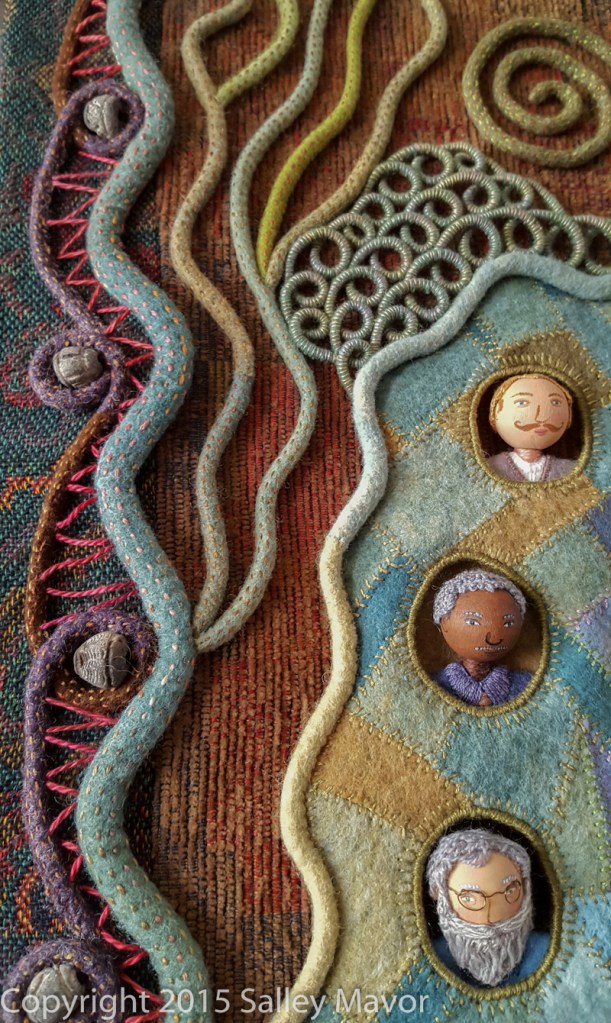
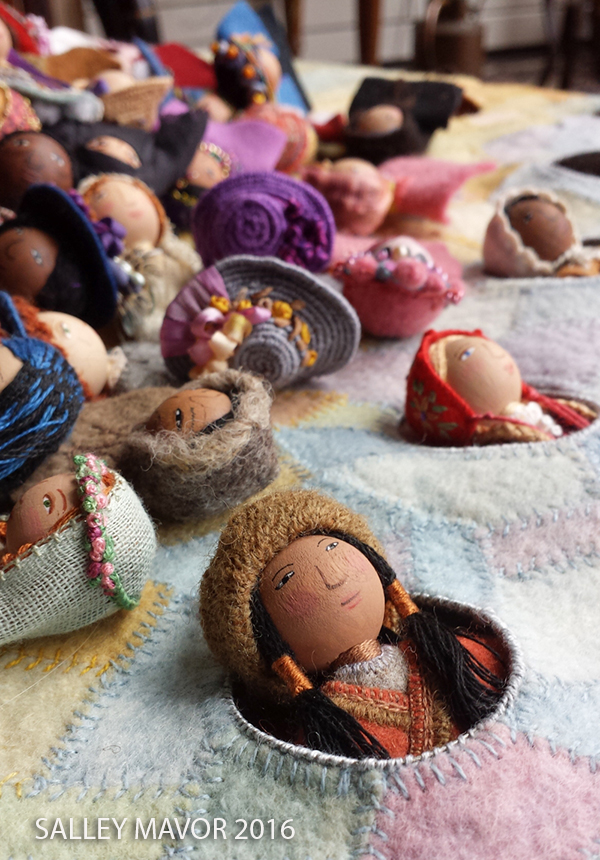
When the border was finished, I spent a long time repositioning the doll heads until I was satisfied with the arrangement. I then secured each portrait inside their hole with a few stitches on their shoulders.
I want to mention the time commitment, because people are always curious. This size (24″ x 30″) piece usually takes 3 or 4 months of solid work. But, I must add that I believe time alone doesn’t give a piece of art its value. Like other artists who do labor intensive work, I am not deterred by the prospect of spending countless hours on a single piece, as long as it holds the promise of transcending the effort involved. I hope that you are enjoying this series of posts as much as I relished the process of making Cover Up. Stay tuned for one more post in the series! By the way, you can receive notice whenever I publish a new post by subscribing to this blog (at the top of the right column on the home page). Rest assured that I will not share your information.
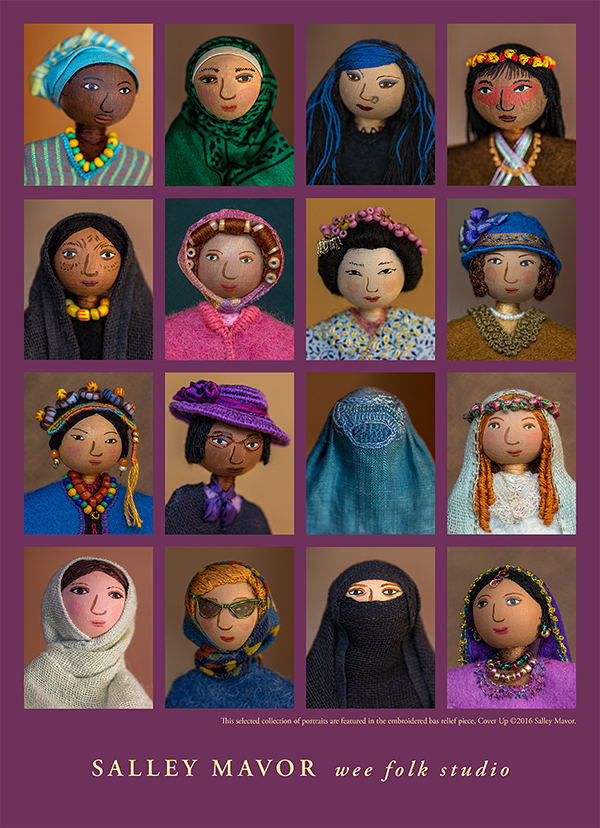
Poster – Cover Up
12 x 17 posters featuring of a selected group of portraits from Cover Up are available in my Etsy Shop here.
Cover Upis part of a series that includes Face Timeand Whiskers, which focus on bringing to life different people from around the world, using themes of history, style and cultural identity. In each piece, head and shoulder busts peek out of “cameo” framed holes. Their faces are painted 20mm wooden beads, with wigs and adornments, similar to the doll heads in my how-to book Felt Wee Folk – New Adventures.
The next post (part 5) will show the end of the process, with the finished piece. Read Cover Up (part 1), (part 2) and (part 3).
To keep up with new posts, please subscribe to this blog Your contact info will not be sold or shared. If you’d like to see more frequent photos tracking the projects in my studio, please follow me on Facebook and/or Instagram.
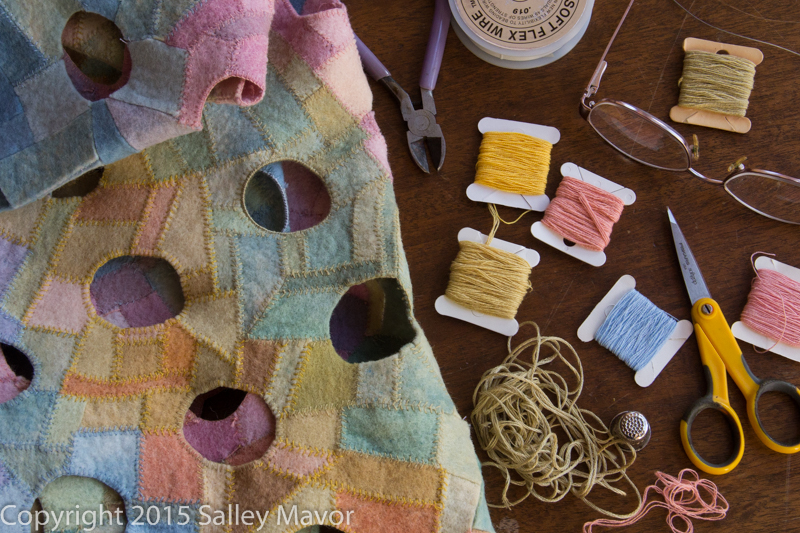
This is part 3 in a series of posts about my new embroidered bas-relief piece Cover Up. In part 1 and part 2, the collection of “covered” women are introduced and discussed. Now, I will show how the pieced felt background was made. There’s also a short video my husband Rob filmed, which shows me stitching various stages of the project.
I knew that the piece would be populated with portraits of women, with each peering through an oval opening, but I didn’t know how many characters would be included. I did some simple drawings to get an idea of its composition and proportions and then calculated that 45 portraits would have enough breathing room within the 24″ x 30″ size. As you can see in this sketchbook page, there were lots of possibilities for border treatment.
The background needed to be done in a way that would compliment the portraits and not compete with the detail of the individual women. I also wanted the colors and design to work from a distance and also entice viewers to take a closer look.
I grouped my felt scraps in piles according to color and pieced them together crazy quilt style in diagonal strips according to their hue. It was done in a similar way to the beard in Whiskers. I find that large solid colors can be too overpowering and simplistic, whereas breaking up the field into small parts brings a softer, more natural appearance. I guess it’s more like impressionist art that way. I used plant dyed wool/rayon felt that I bought years ago from Textile Reproductions. Unfortunately it is no longer being produced, so every little piece is as good as gold.
The odd-shaped pieces are held together on the back with a simple slip stitch. On the front, I used a fly stitch to join and outline the felt pieces. Here’s a video of some of the stitching:
It was great winter project, which I worked on through the holidays and into the new year.
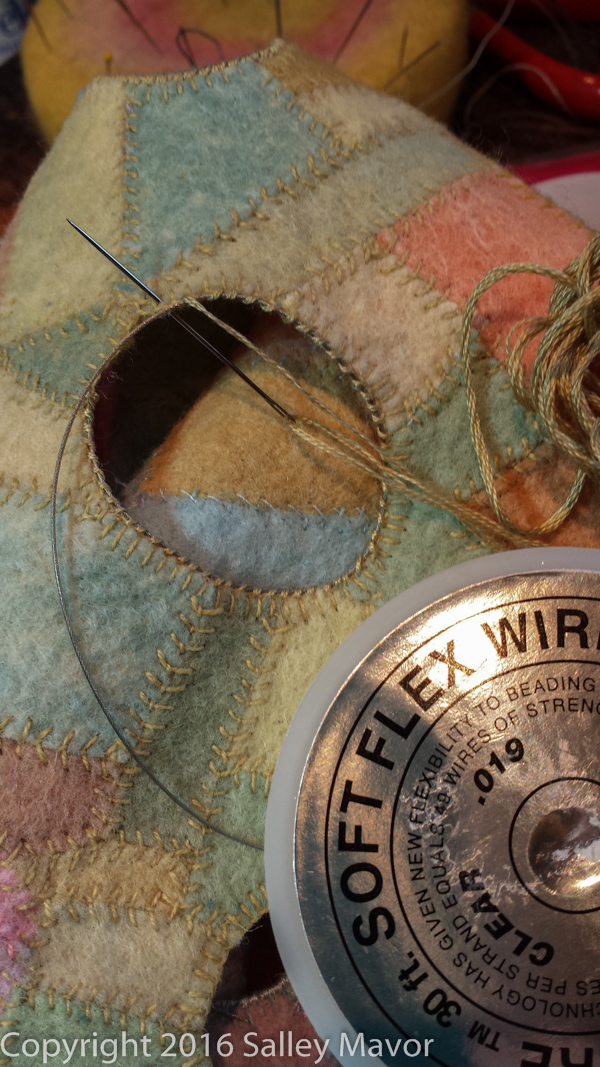
I used Soft Flex beading wire to outline the holes and give them a clean edge and some structure.
I had fun playing around with the arrangement of the women.
Before sewing the portrait heads in their holes, I sewed the pieced felt background to a stretcher frame covered with upholstery fabric.
The next post (part 4) will show the process of making the border for Cover Up. Read Cover Up (part 1) here and (part 2) here.
Poster – Cover Up
12 x 17 posters featuring of a selected group of portraits from Cover Up are available in my Etsy Shop here.
Cover Upis part of a series that includes Face Timeand Whiskers, which focus on bringing to life different people from around the world, using themes of history, style and cultural identity. In each piece, head and shoulder busts peek out of “cameo” framed holes. Their faces are painted 20mm wooden beads, with wigs and adornments, similar to the doll heads in my how-to book Felt Wee Folk – New Adventures.
To keep up with new posts, please subscribe to this blog Your contact info will not be sold or shared. If you’d like to see more frequent photos tracking the projects in my studio, please follow me on Facebook and/or Instagram.
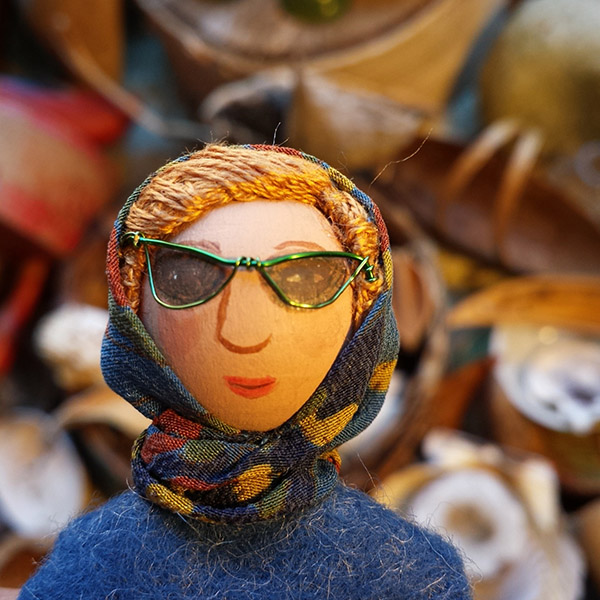
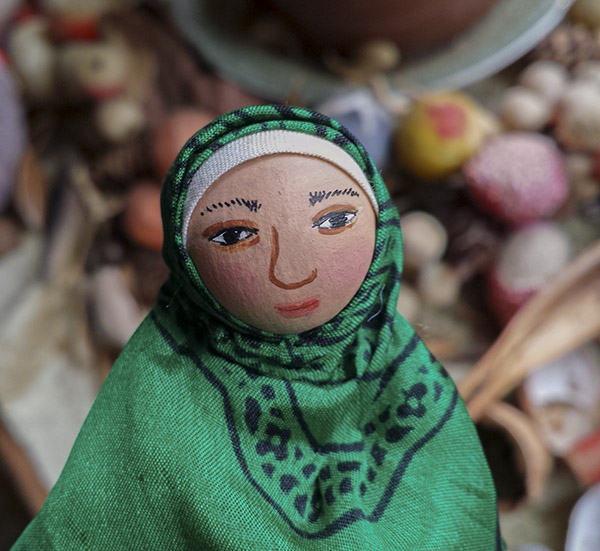
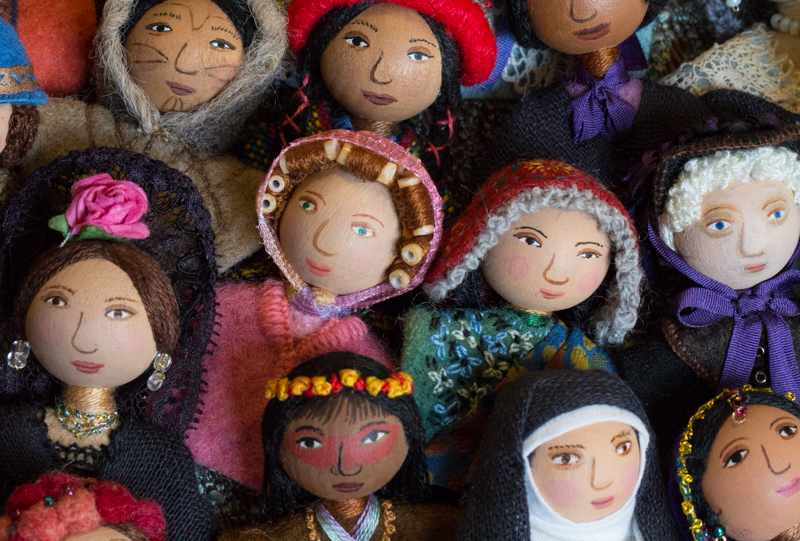
This is the first in a multi-part series of posts about my new fabric relief piece, Cover Up. It’s the female counterpart to Whiskers, my previous exploration of men’s facial hair styles.Cover Upfocuses on women’s head coverings that serve as identifying markers imposed by the conventions of a particular time and place throughout history. I wanted the 45 characters to invite comparison and point out contrasts and similarities between different societies, whether they are open or restrictive in tolerating self-expression and individuality.
I loved the research phase of the project and spent many days hunting down images of women from around the world, each wearing a form of covering that reveals something about the culture they come from. I’ve depicted individuals with all sorts of veils, scarves, hats, makeup and facial markings that reflect different notions of female modesty, attractiveness, fashion, status and conformity.
While searching through the images, I considered this question, “At what point does a bold, new fashion statement evolve into just another form of conformity that brands a group identity?” I also reflected on being a part of our diverse American society that is made up of immigrants and how this experience may influence one’s perception of “the other”.
The possibilities were endless and I could have kept making new heads for a long time, but I had to narrow it down and chose styles that I thought would best represent a variety of cultures. In a lot of cases it came down to choosing depictions that had characteristics I found personally intriguing.
Poster – Cover Up
After finishing the portraits and before making the background field to put them in, I took separate photos of each one and shared them on Instagram and Facebook. I invite you to follow me on these other social media sites for more frequent postings and notices, which include behind the scenes pictures.
The response to the photos was so enthusiastic that I decided to print a poster which shows enlargements (200%) of a selected collection of these portraits. The 12 x 17 poster (shown left) is available in my Etsy Shop here.
Cover Up is part of a series that includes Face Timeand Whiskers, which focus on bringing to life different people from around the world, using themes of history, style and cultural identity. In each piece, head and shoulder busts peek out of “cameo” framed holes. Their faces are painted 20mm wooden beads, with wigs and adornments, similar to the doll heads in my how-to book Felt Wee Folk – New Adventures.
Please stay tuned for more posts about making Cover Up. Coming up are more photos of the portraits and how the felt background was made. My husband Rob is even working on a short video with material he filmed while I was stitching the piece. Read (part 2) and (part 3 & video).
To keep up with new posts, please subscribe to this blog Your contact info will not be sold or shared. If you’d like to see more frequent photos tracking the projects in my studio, please follow me on Facebook and/or Instagram.