Mossy Glen overview

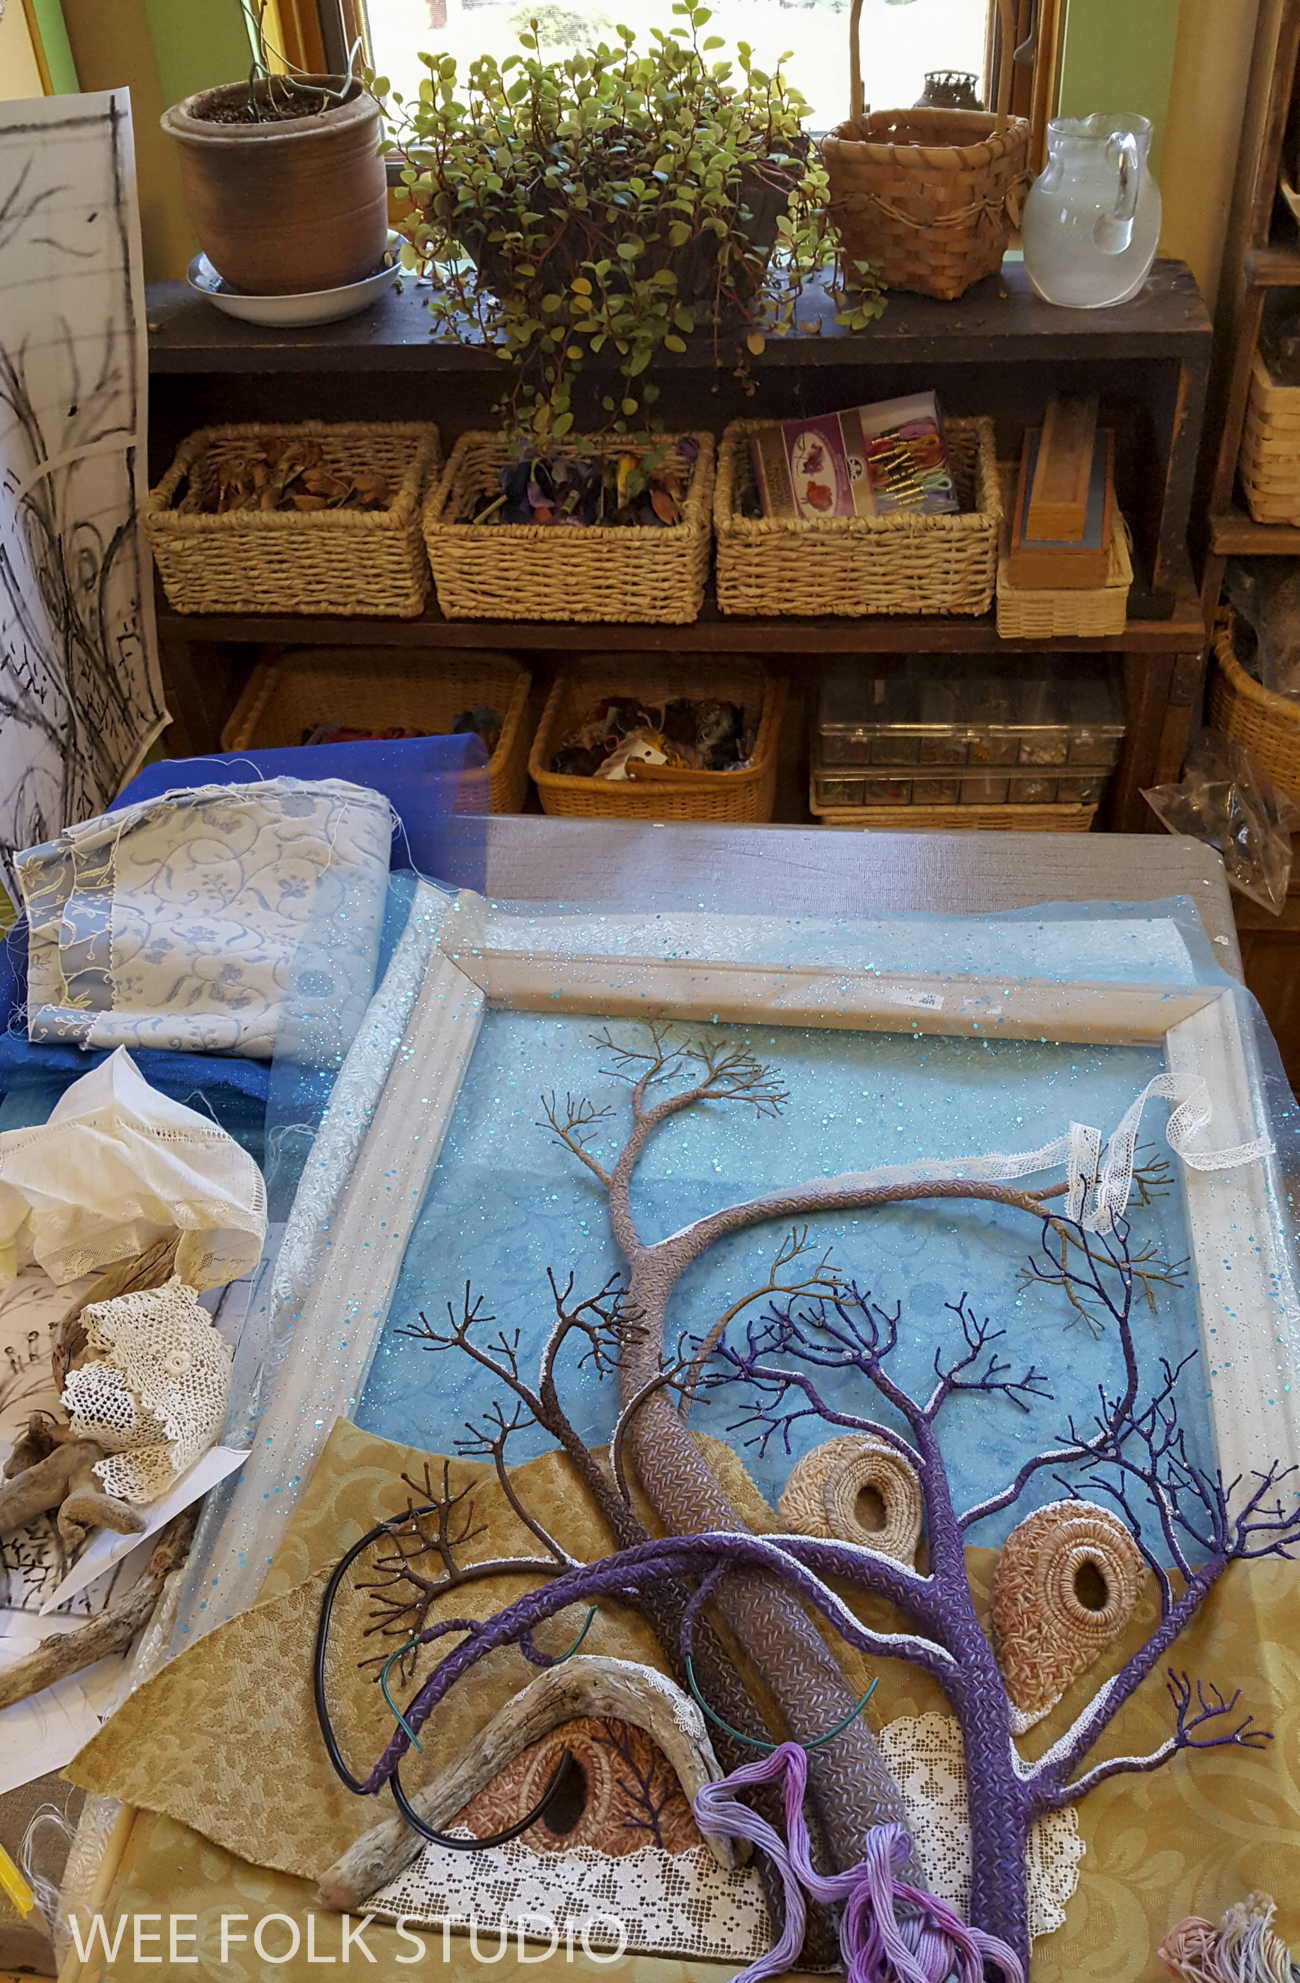
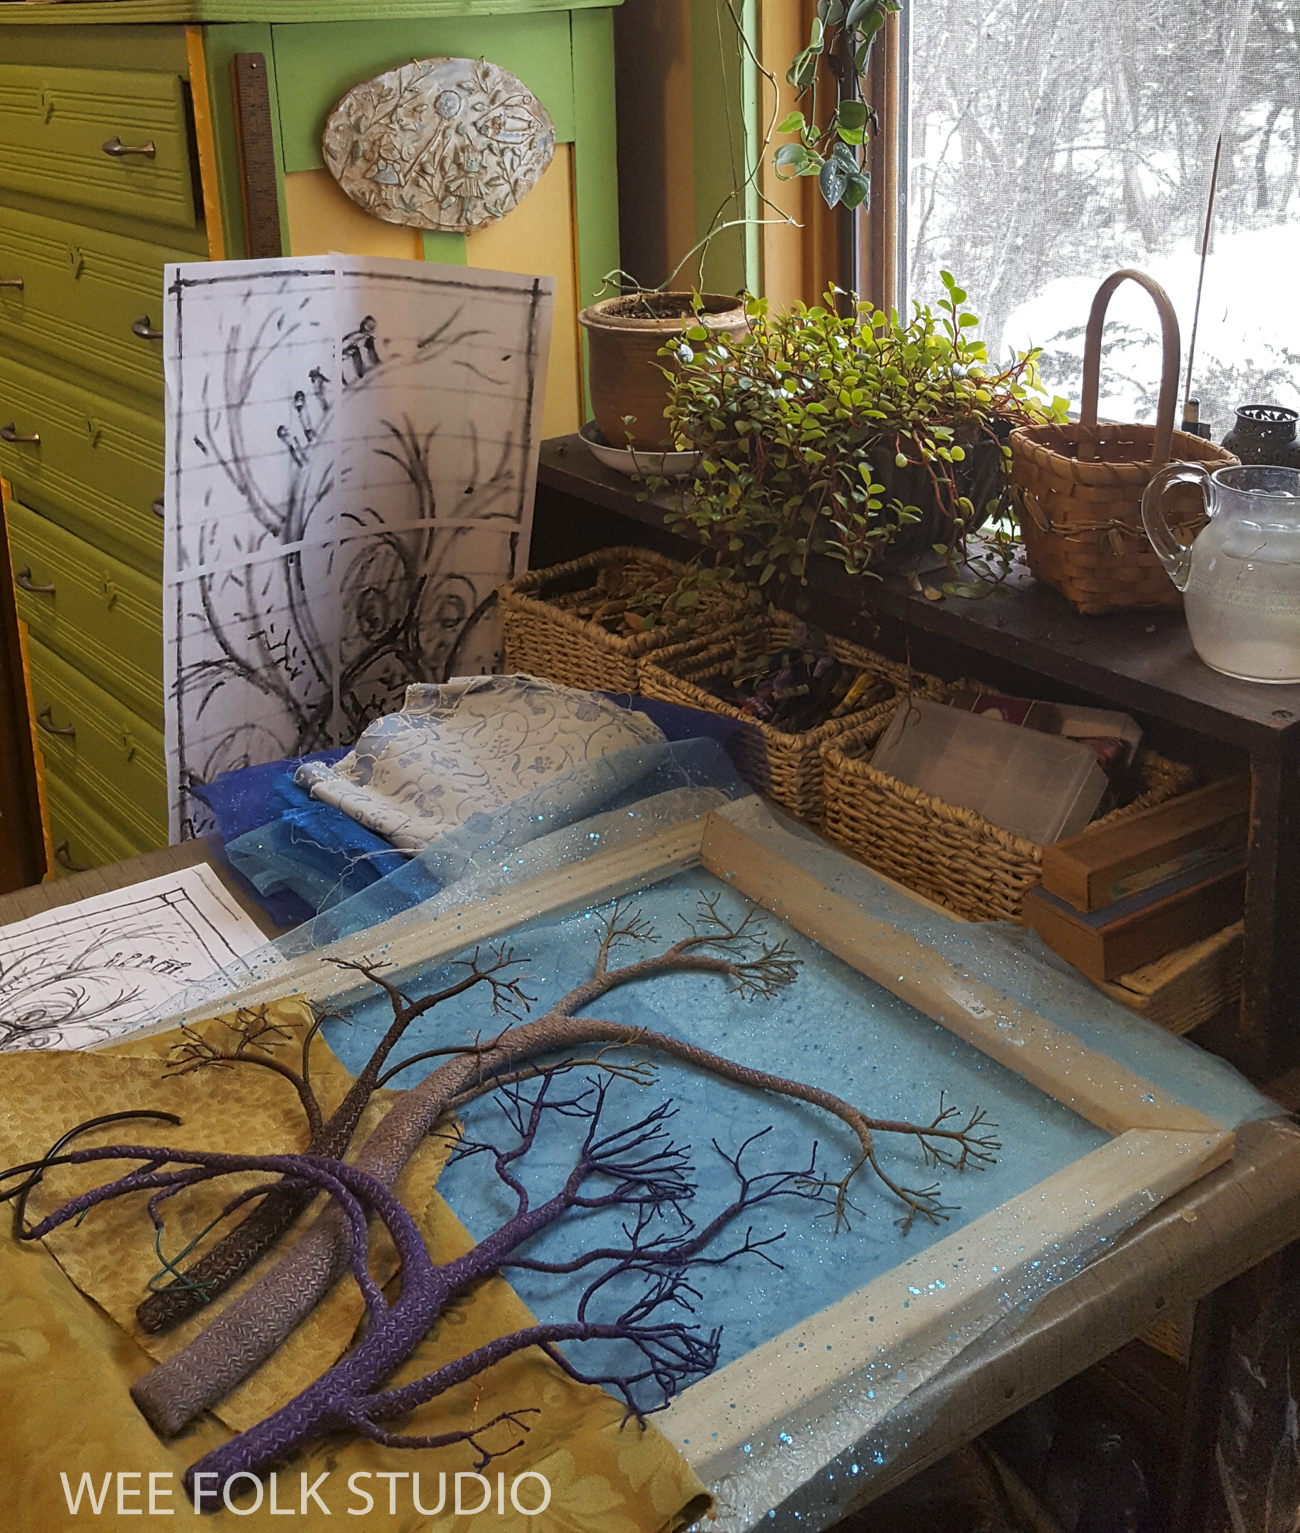
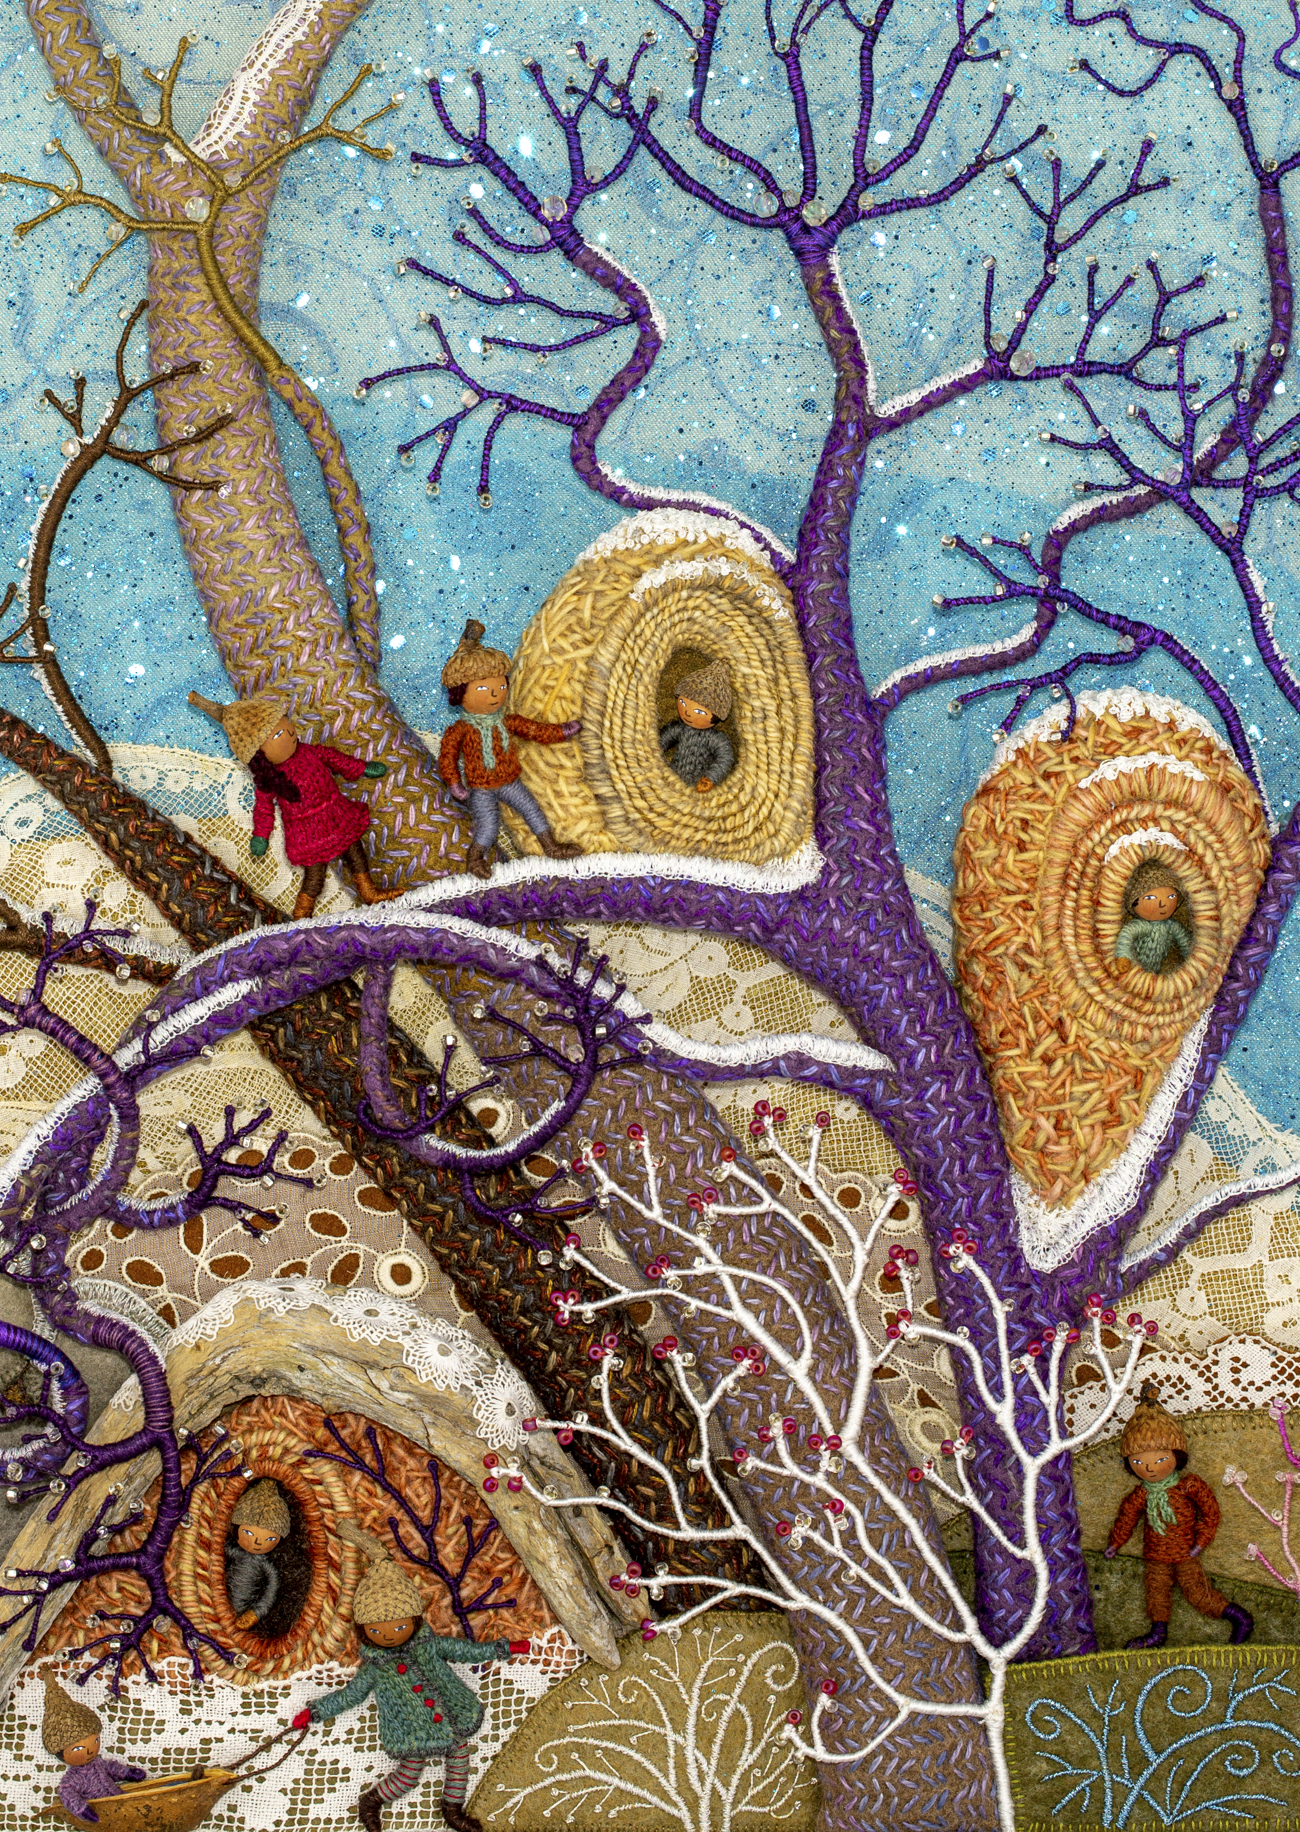
On this cold January day, I’d like to transport us all to springtime in the Mossy Glen. I began making this new piece in my 4 seasons series last May, just when light green buds started appearing on the maple trees. While I worked on it all summer and into the early fall, I took photos of different stages of the process. As with last year’s winter landscape, Frosty Morning, I will be posting several stories about how I created the different parts for Mossy Glen, from the plants and moss to the little characters frolicking about.

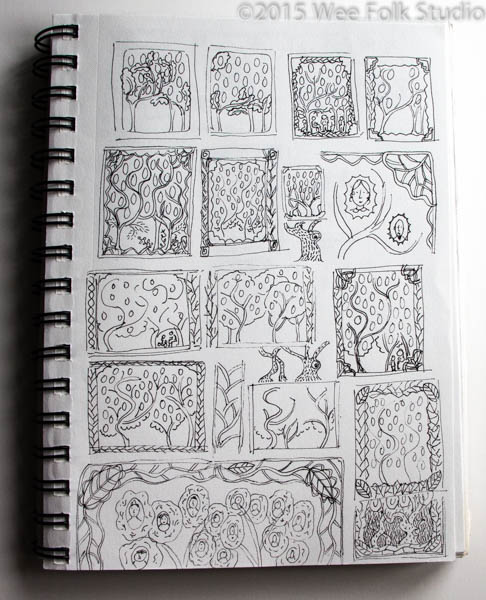
To do that, it’s going to take some adjustment on my part. First off, I’m going to have to turn on the explaining part of my brain, which has been dormant for quite a while. Writing this introductory post and sorting out which photos to include is a way to ease the transition from doing to talking about doing. While I’m in the middle of a project, I give myself over to whatever I’m envisioning and trust that it will work out. I solve each problem as it appears, always keeping the big picture in mind. I don’t try to explain the process, even to myself, for fear of dispelling the magic.

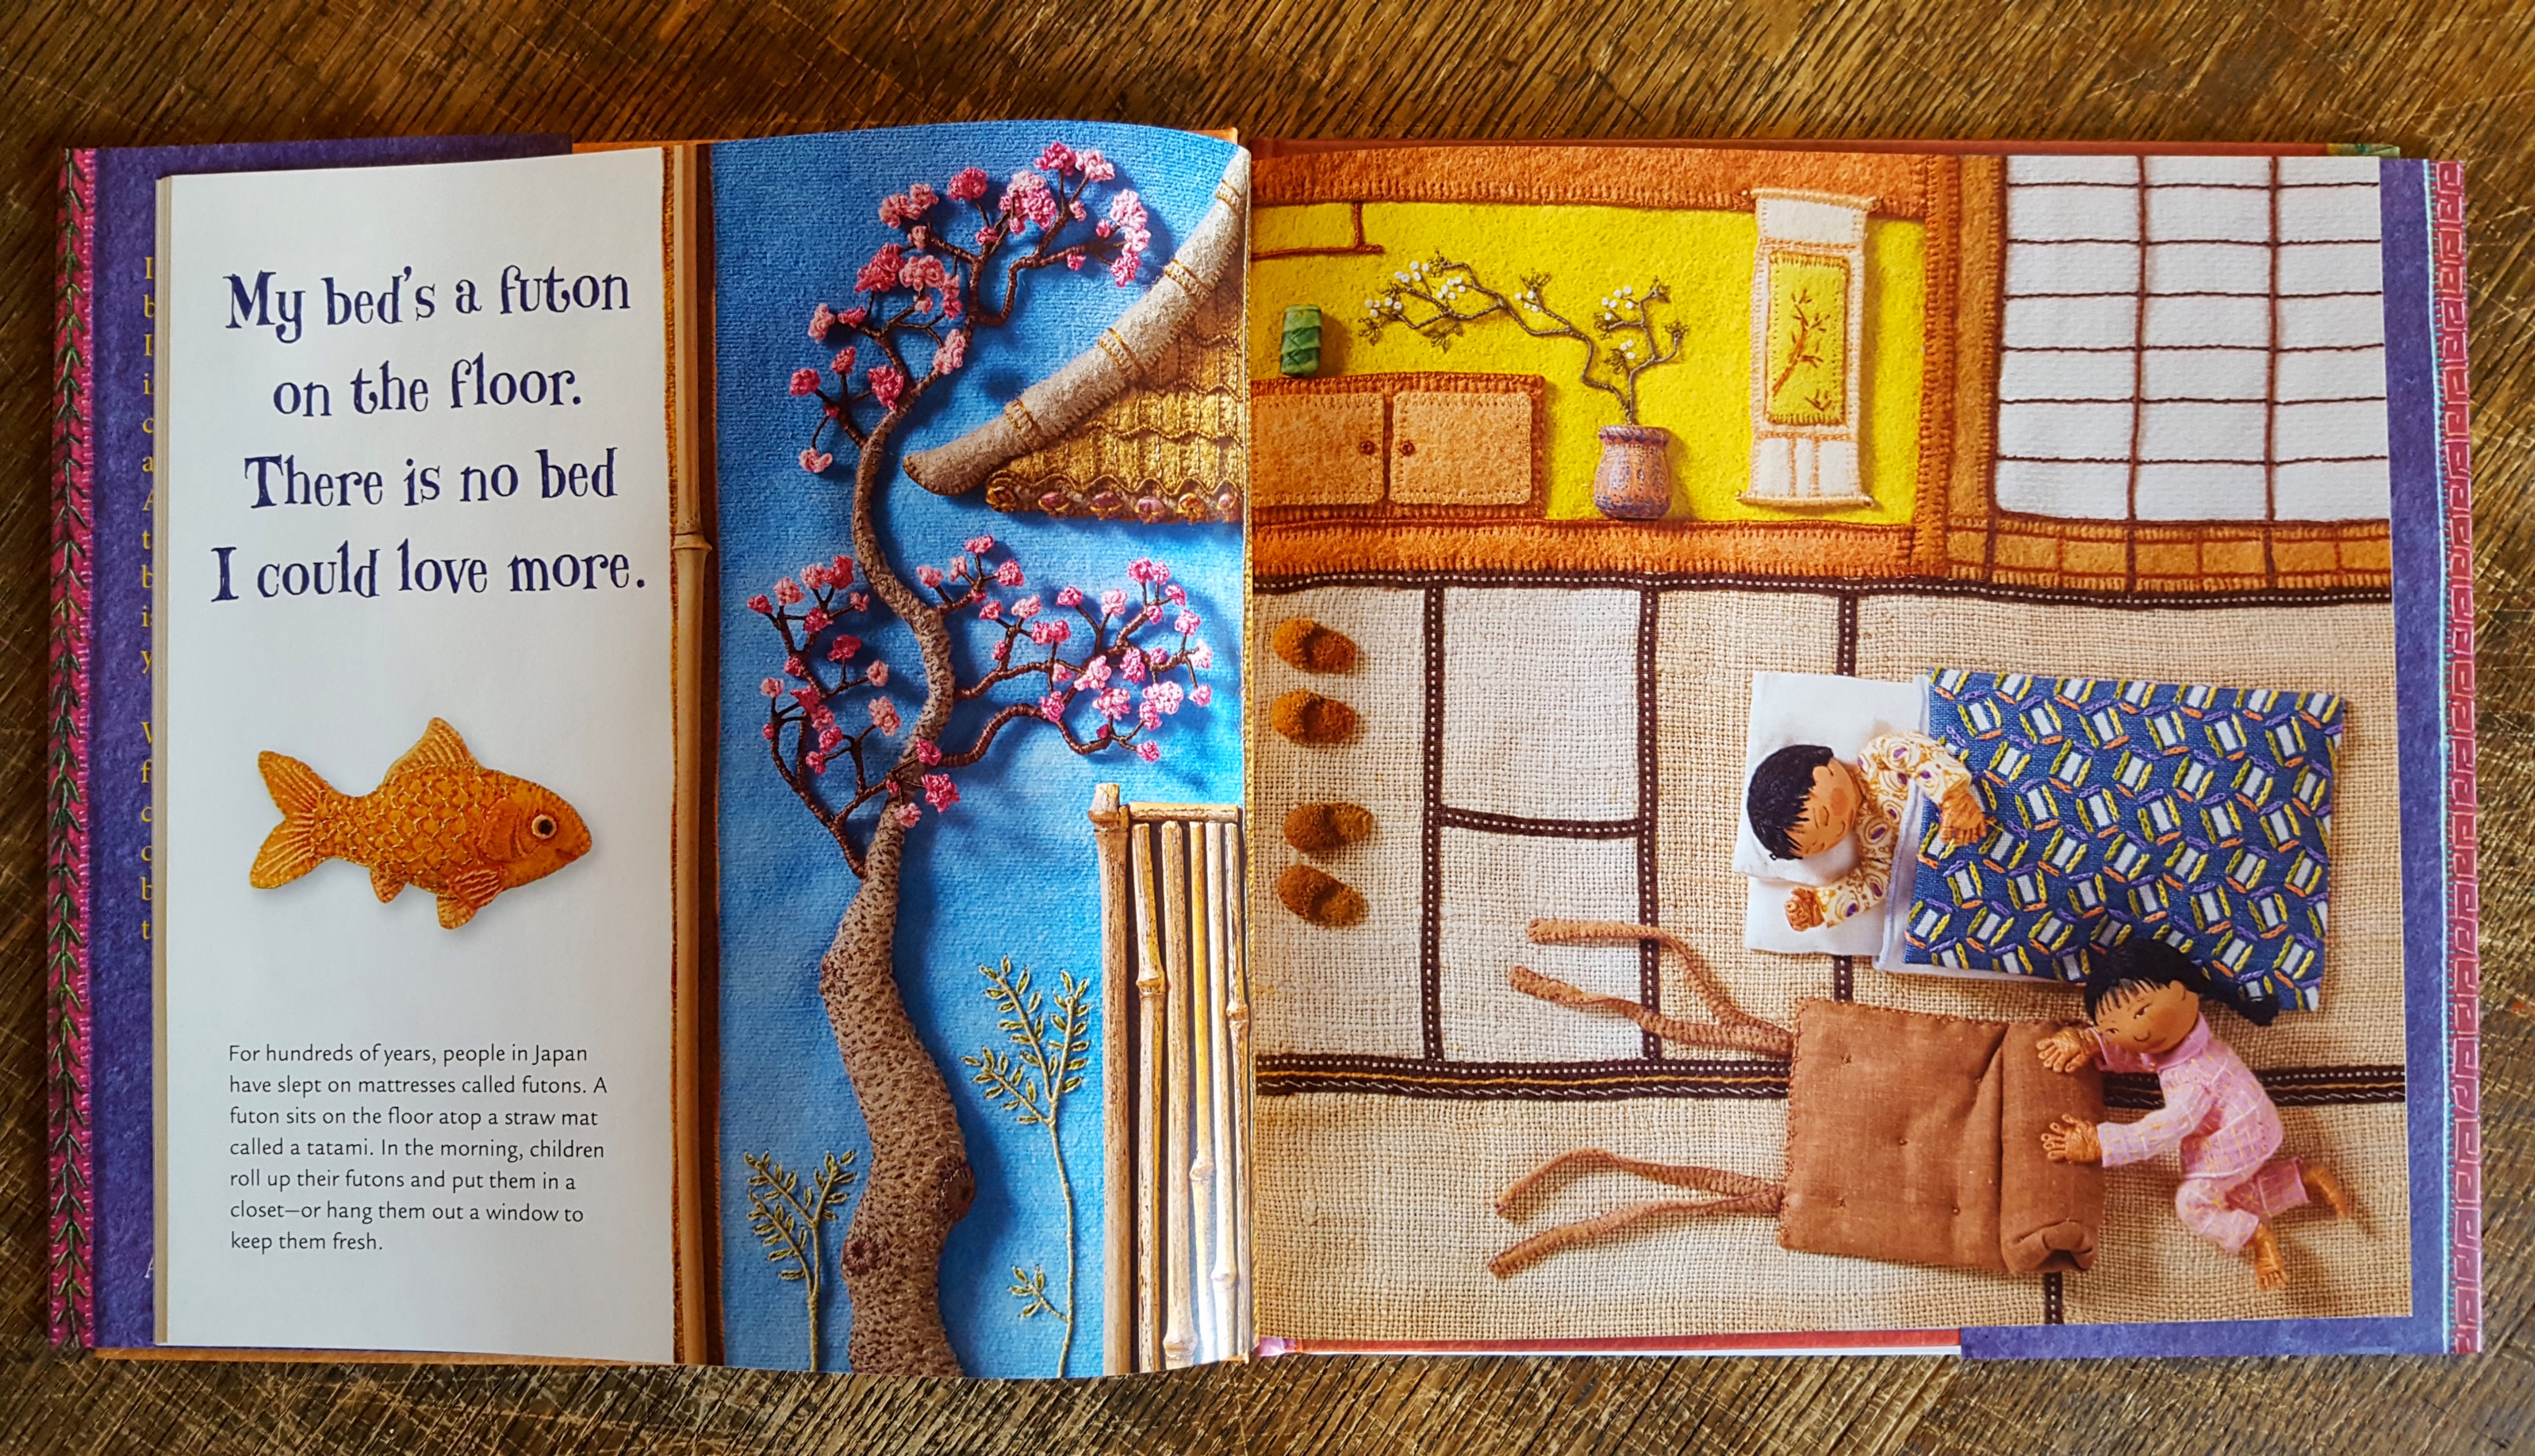
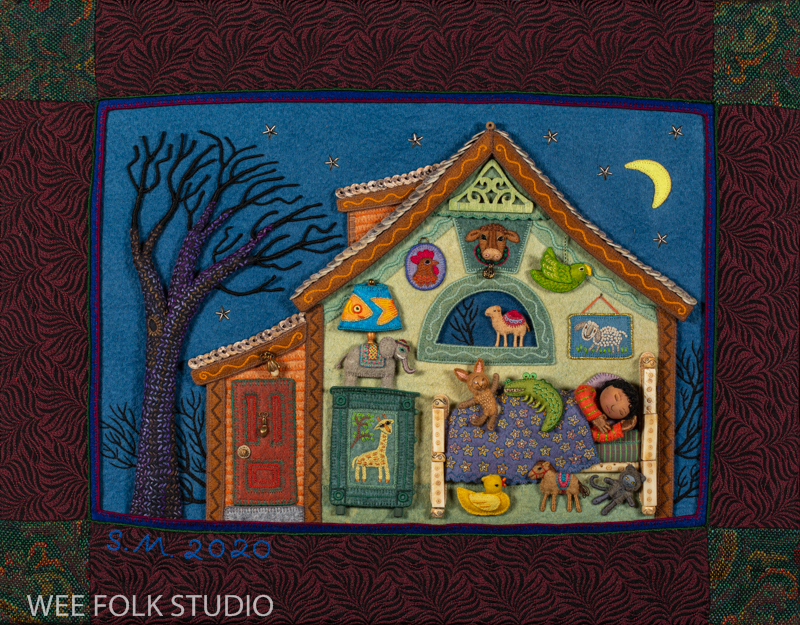
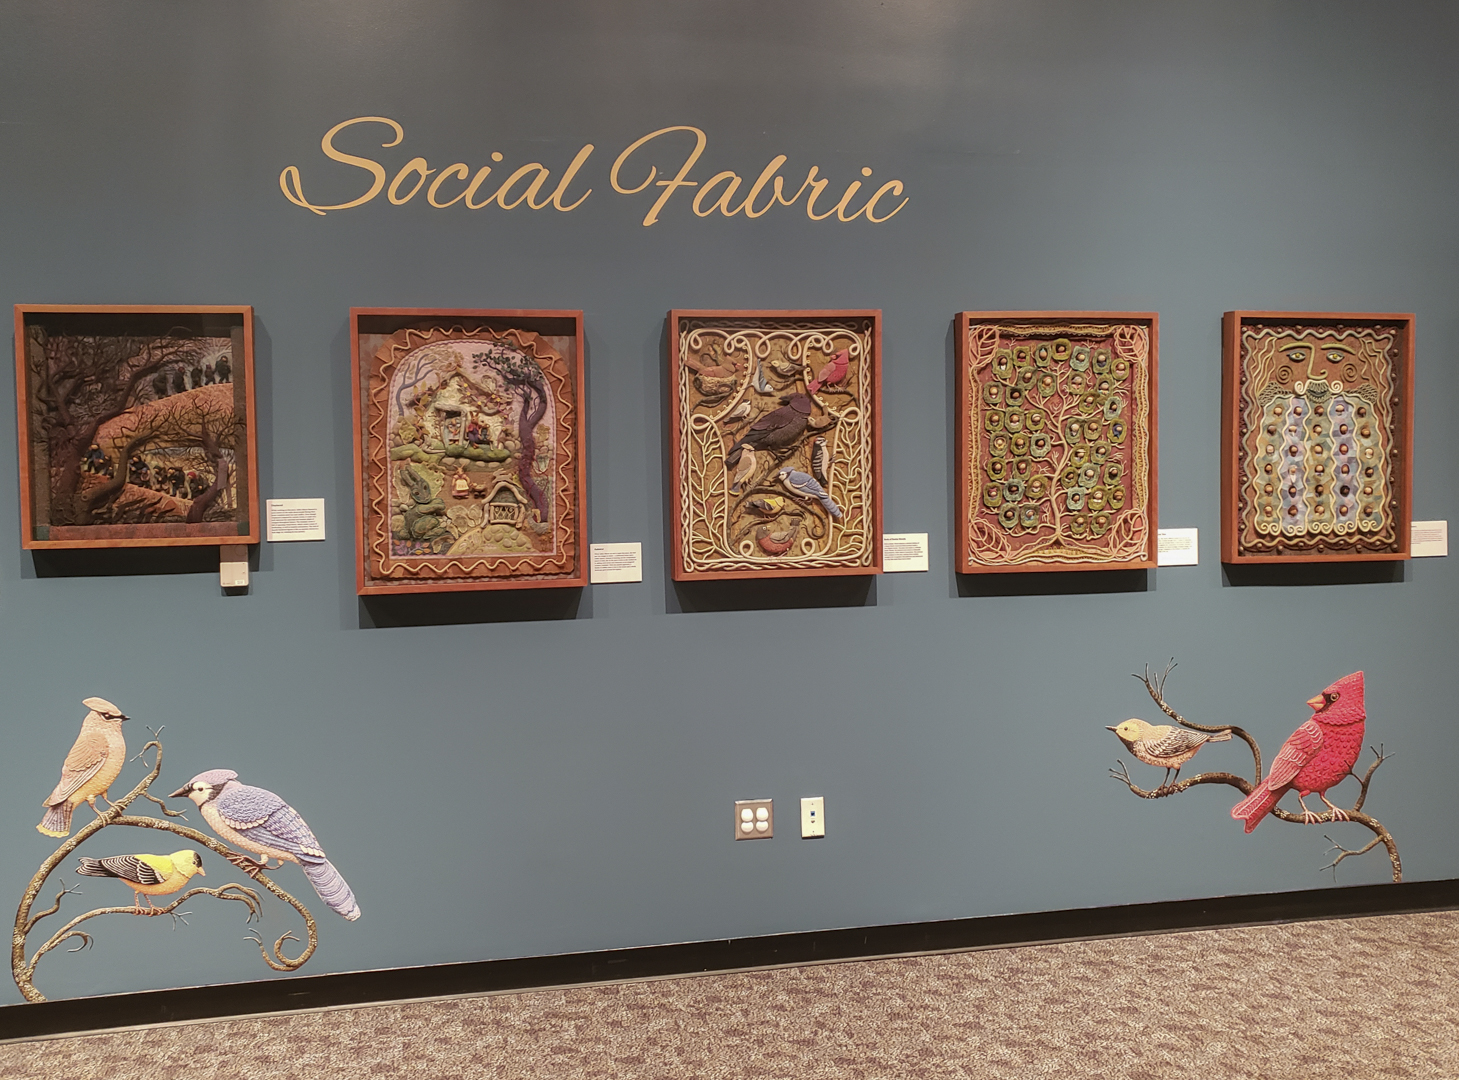
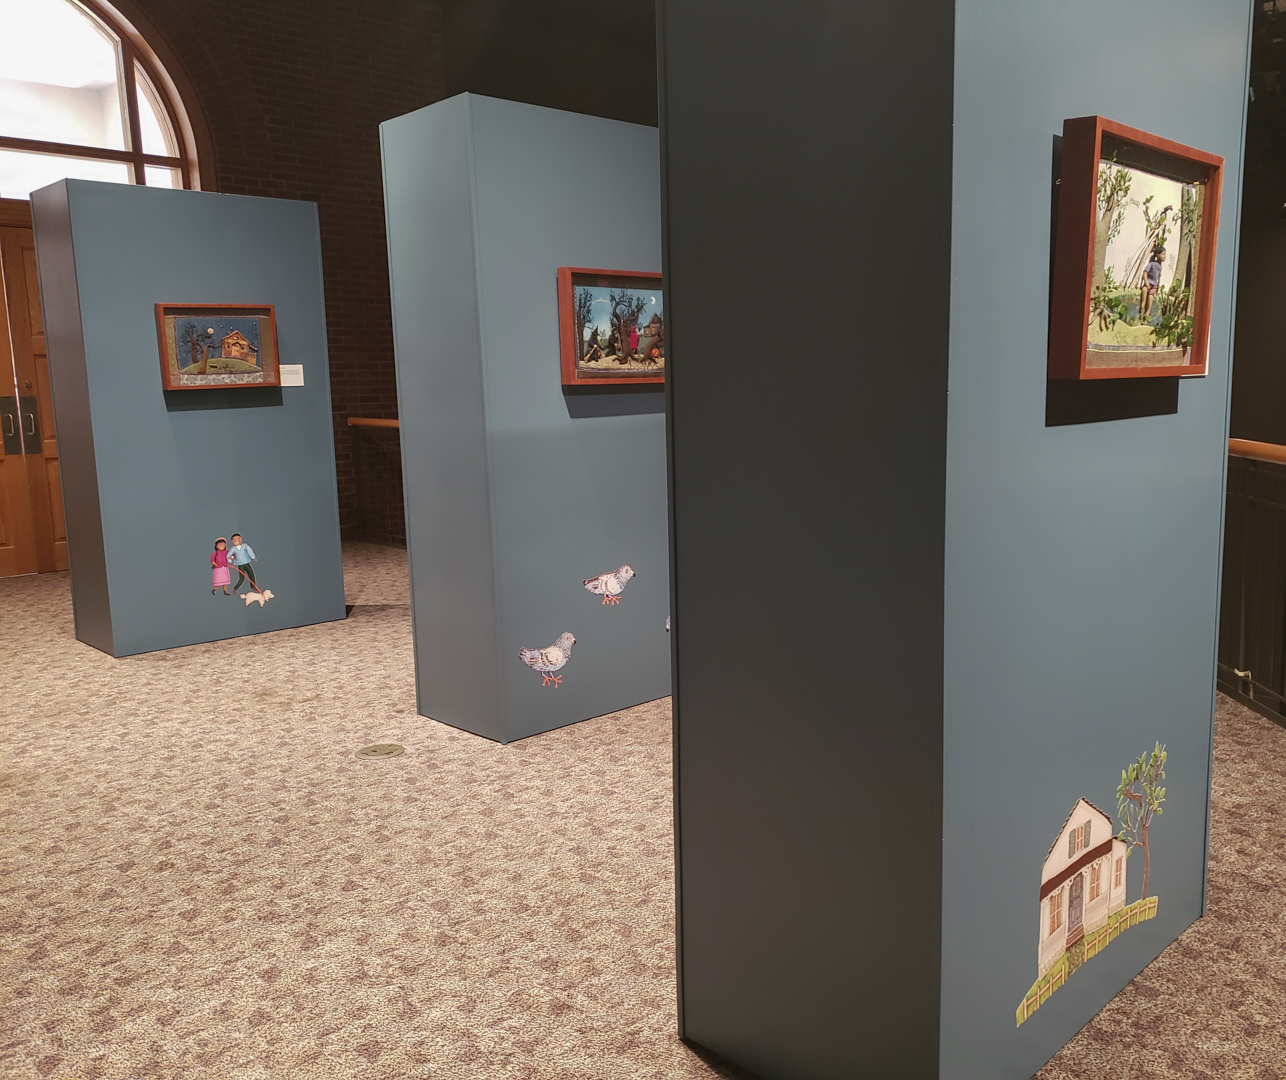
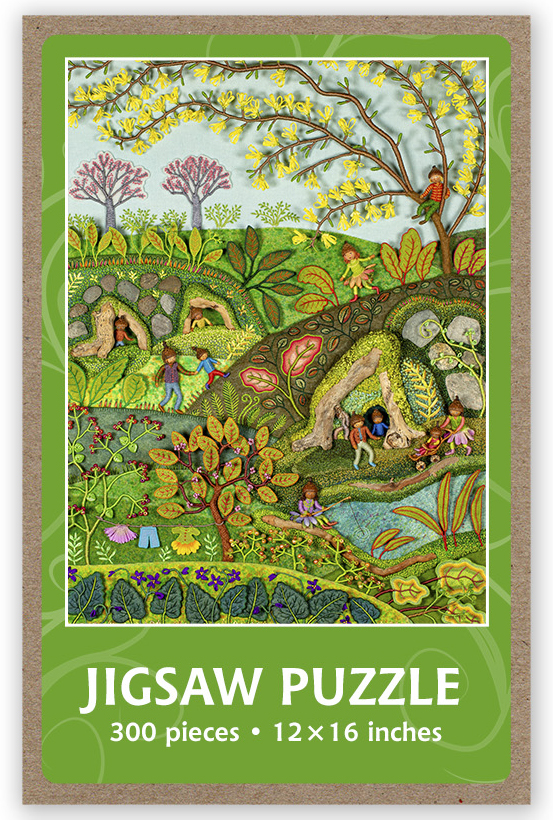
Mossy Glen is the spring scene in a series of seasonal landscapes that capture the wonder and magic of the natural world. Note cards, prints, bookmarks, and jigsaw puzzles of Mossy Glen and the other scenes in the series (Frosty Morning, Harvest Time, and Summertime) are available in my Etsy Shop.

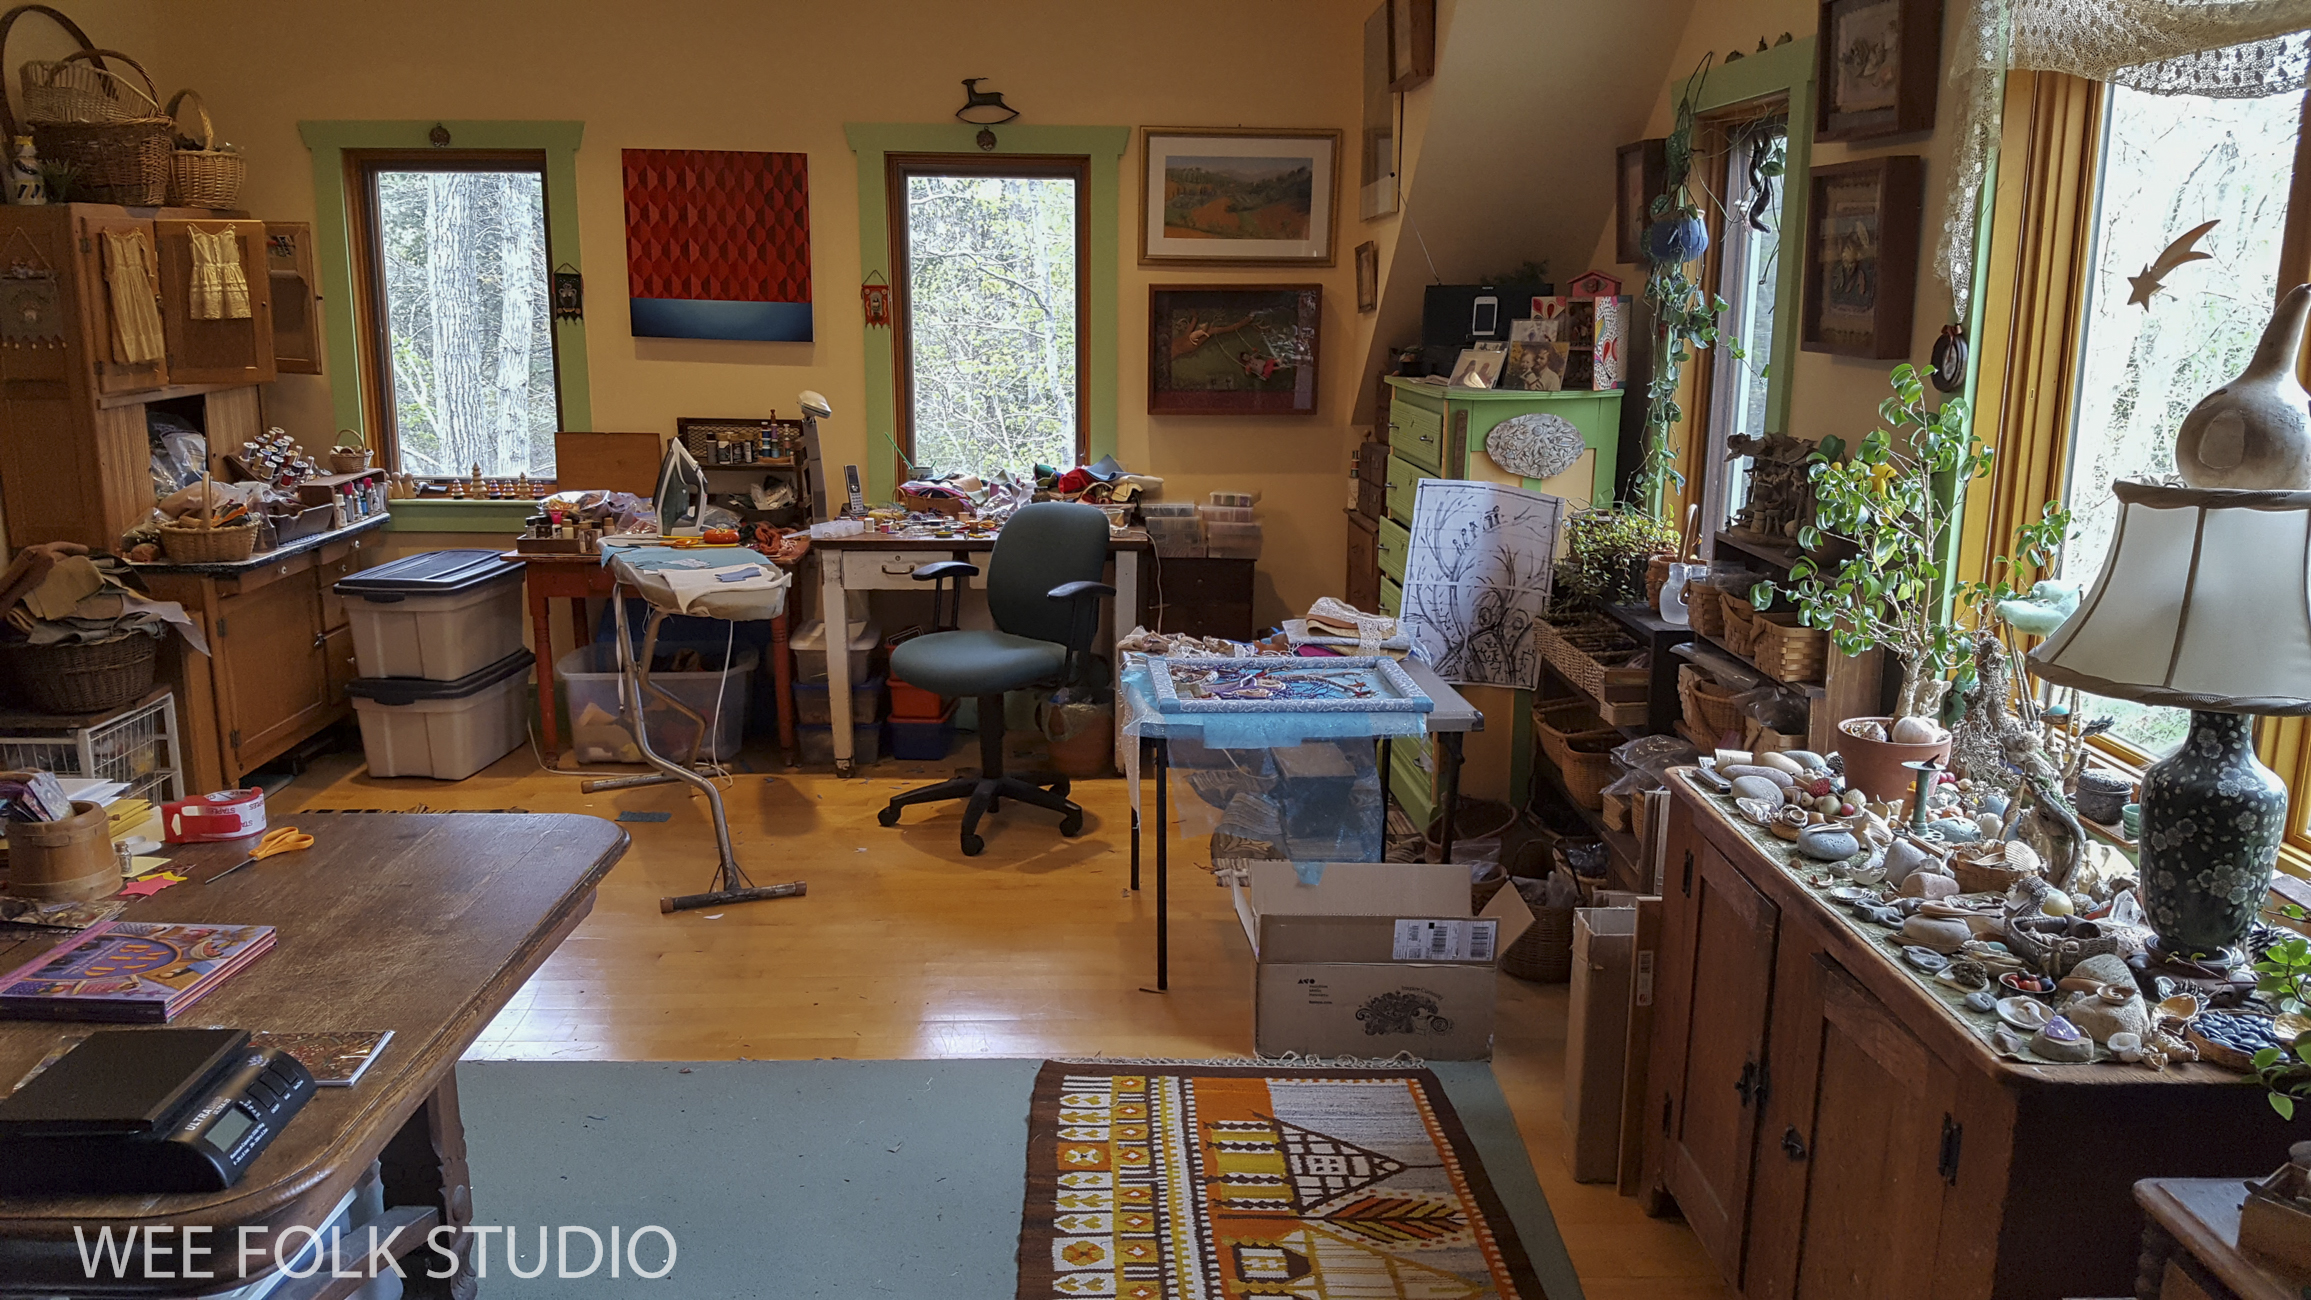
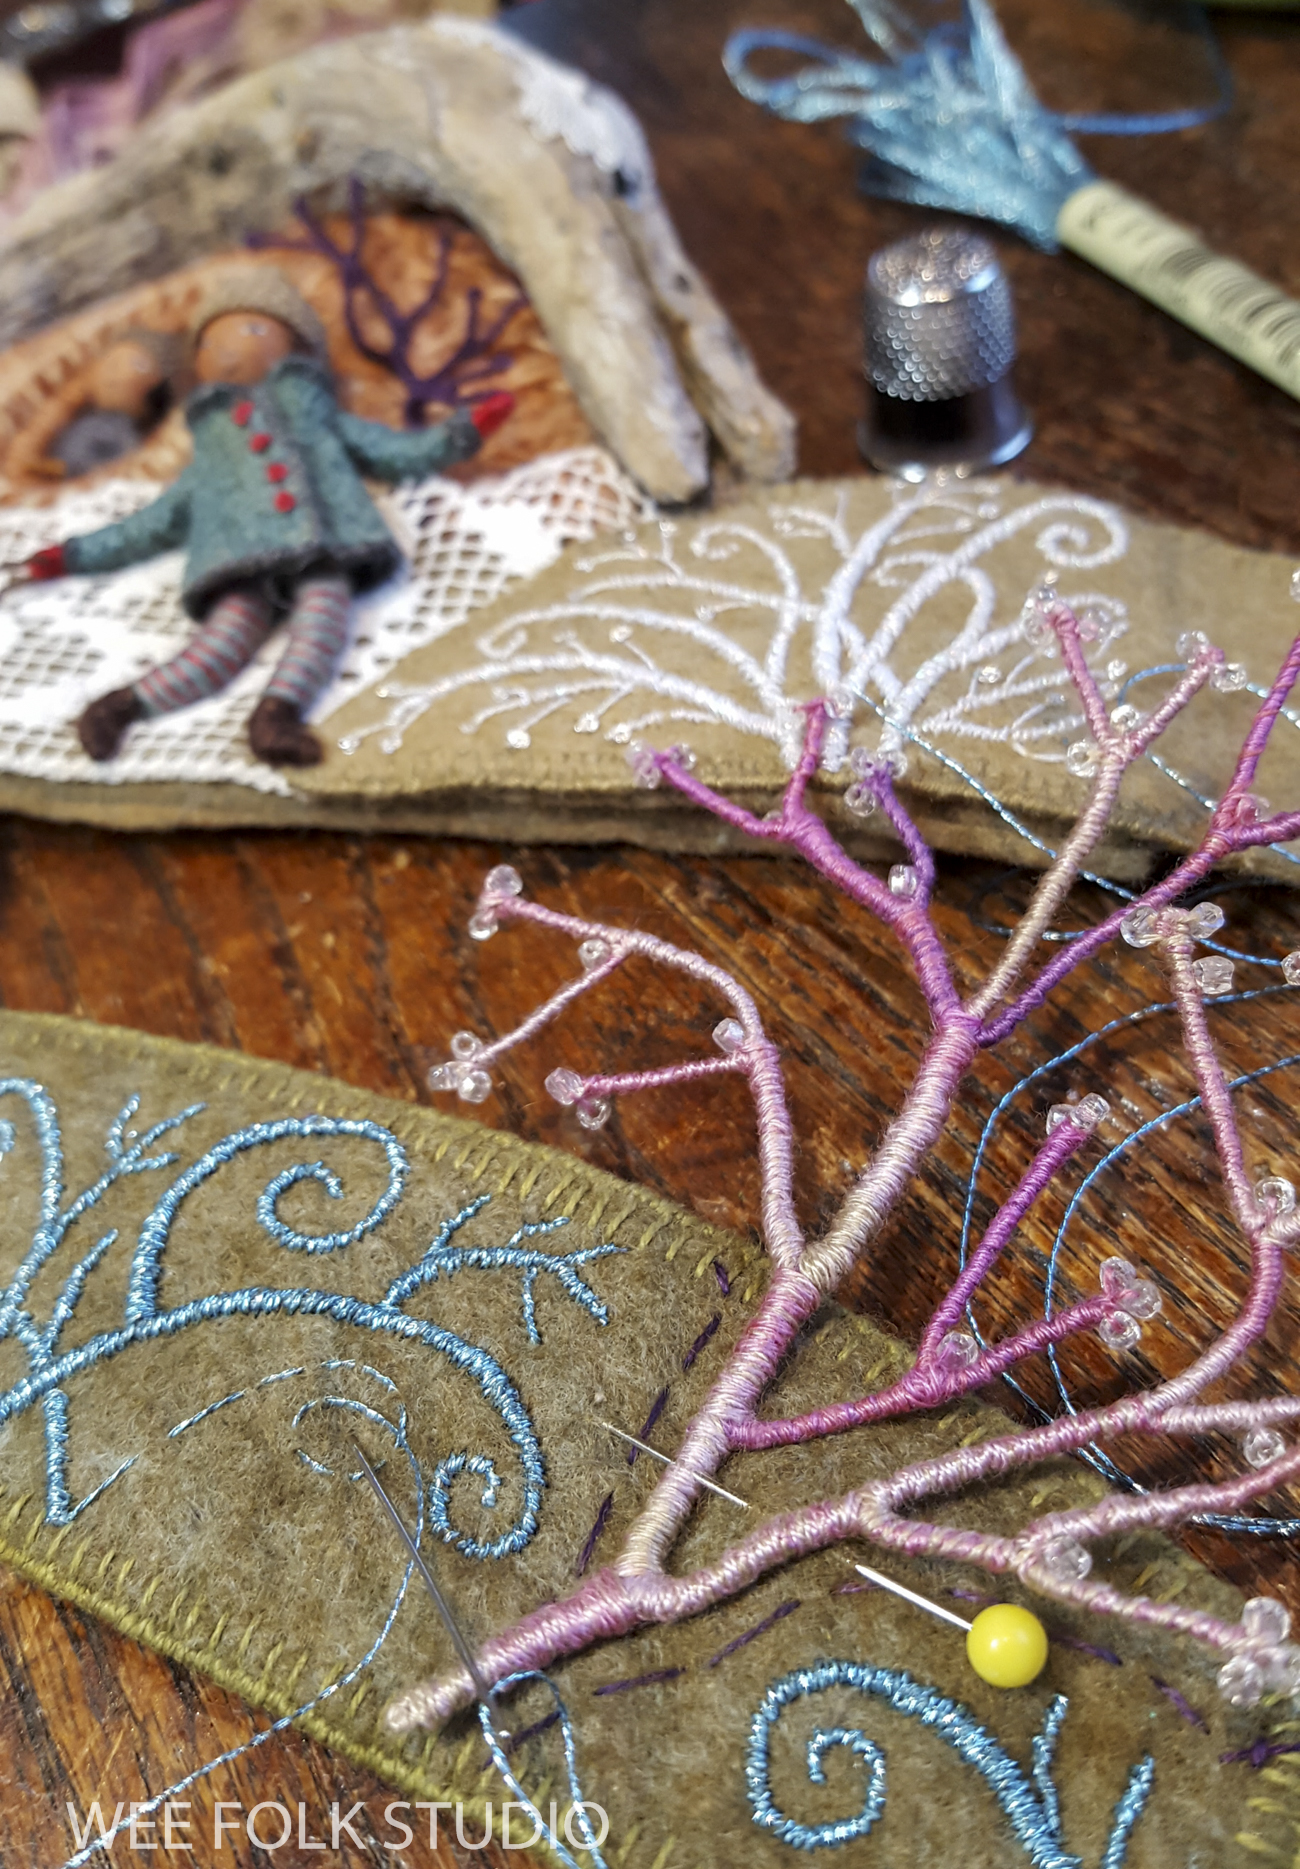
Throughout the months that I was making Mossy Glen, I shared glimpses of my work table on Facebook and/or Instagram. Understandably, my followers were curious about how this or that was made. I gave brief and evasive answers, like “I’ll explain later when it’s finished.” and “Let’s just call it magic.” It’s a tease of sorts, but true to my experience. Now that the piece has been finished for a while, I’m free to go back and review the process with a more analytical eye.

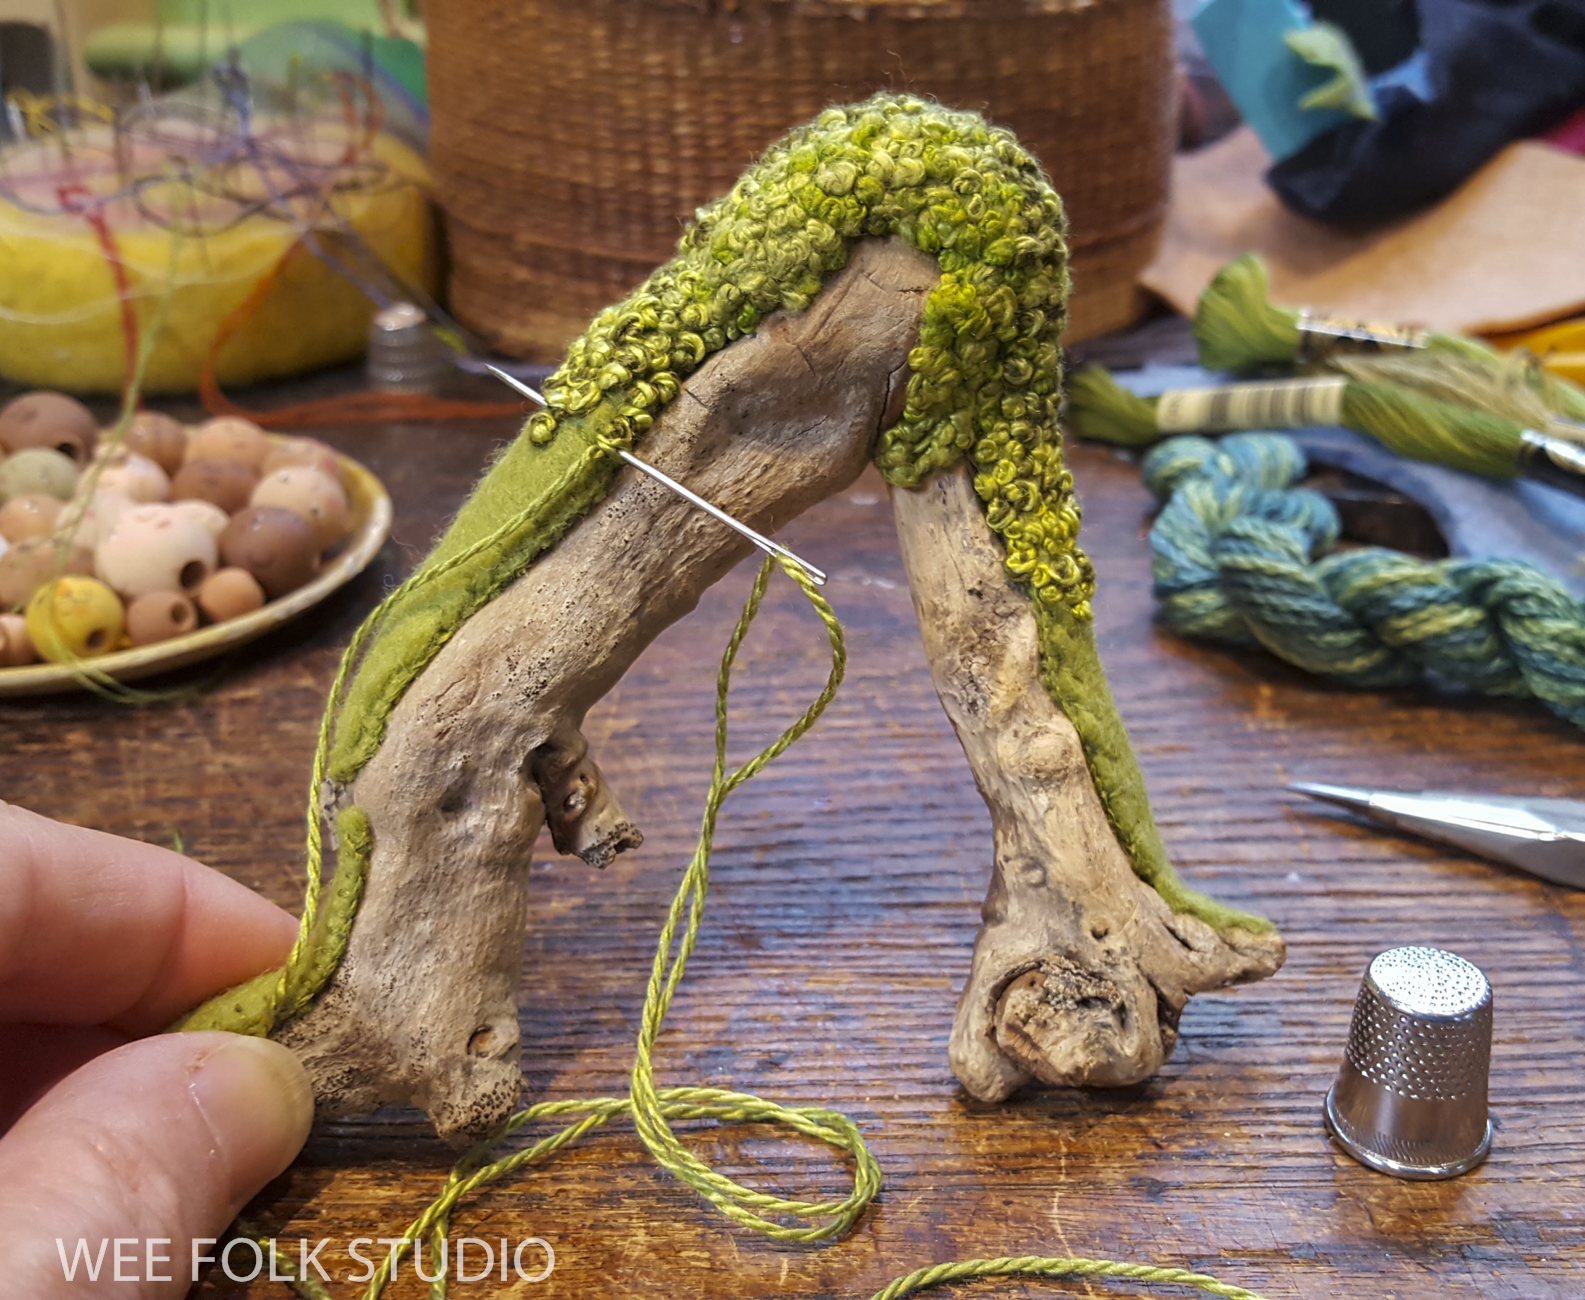
There’s a lot to show and I’m still figuring out how to organize the parts. I’ll be sharing several Stitch Minute videos that give closeup views of me working on different sections of the piece.

I’ll be covering moss-making and stone wall building…

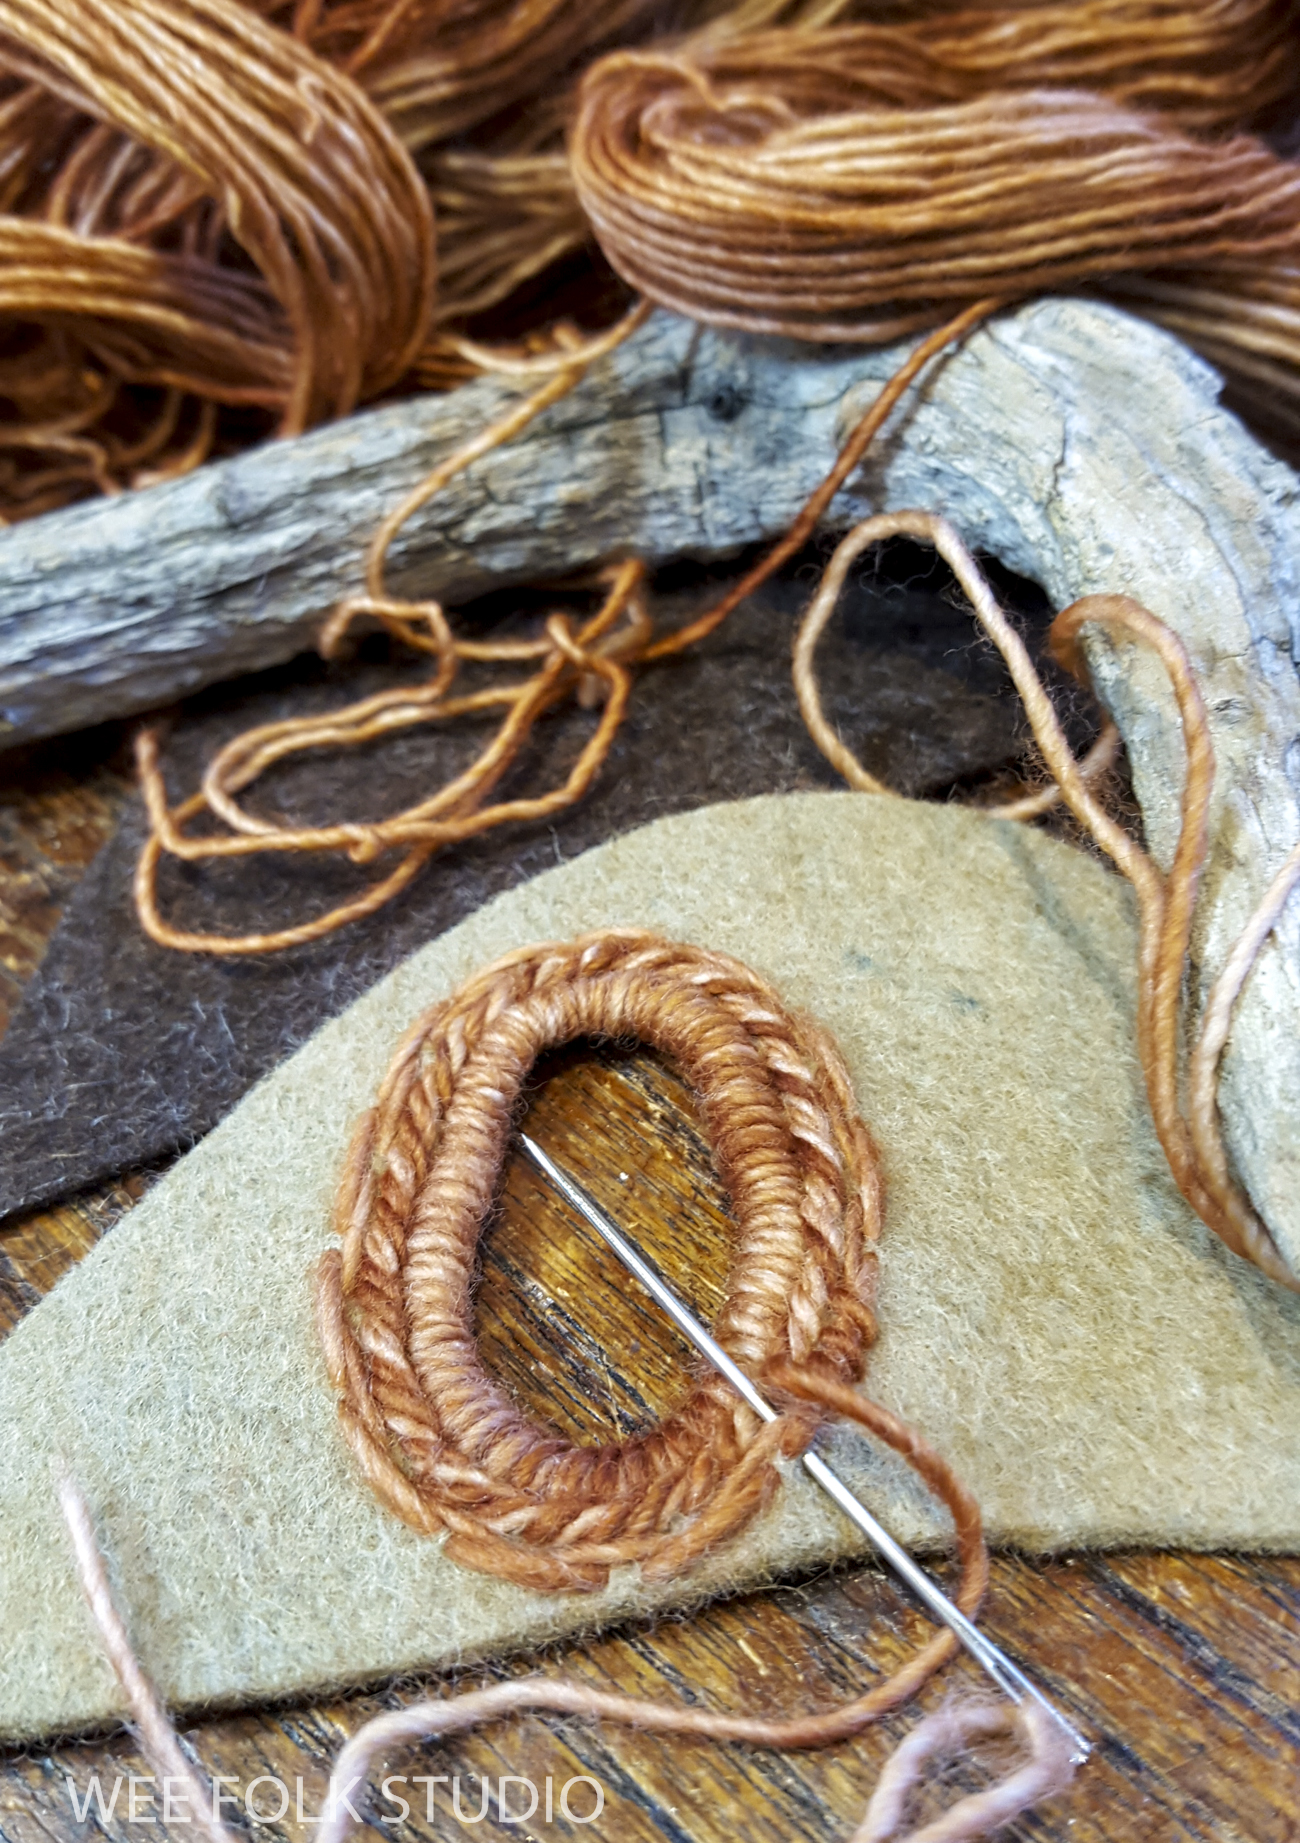
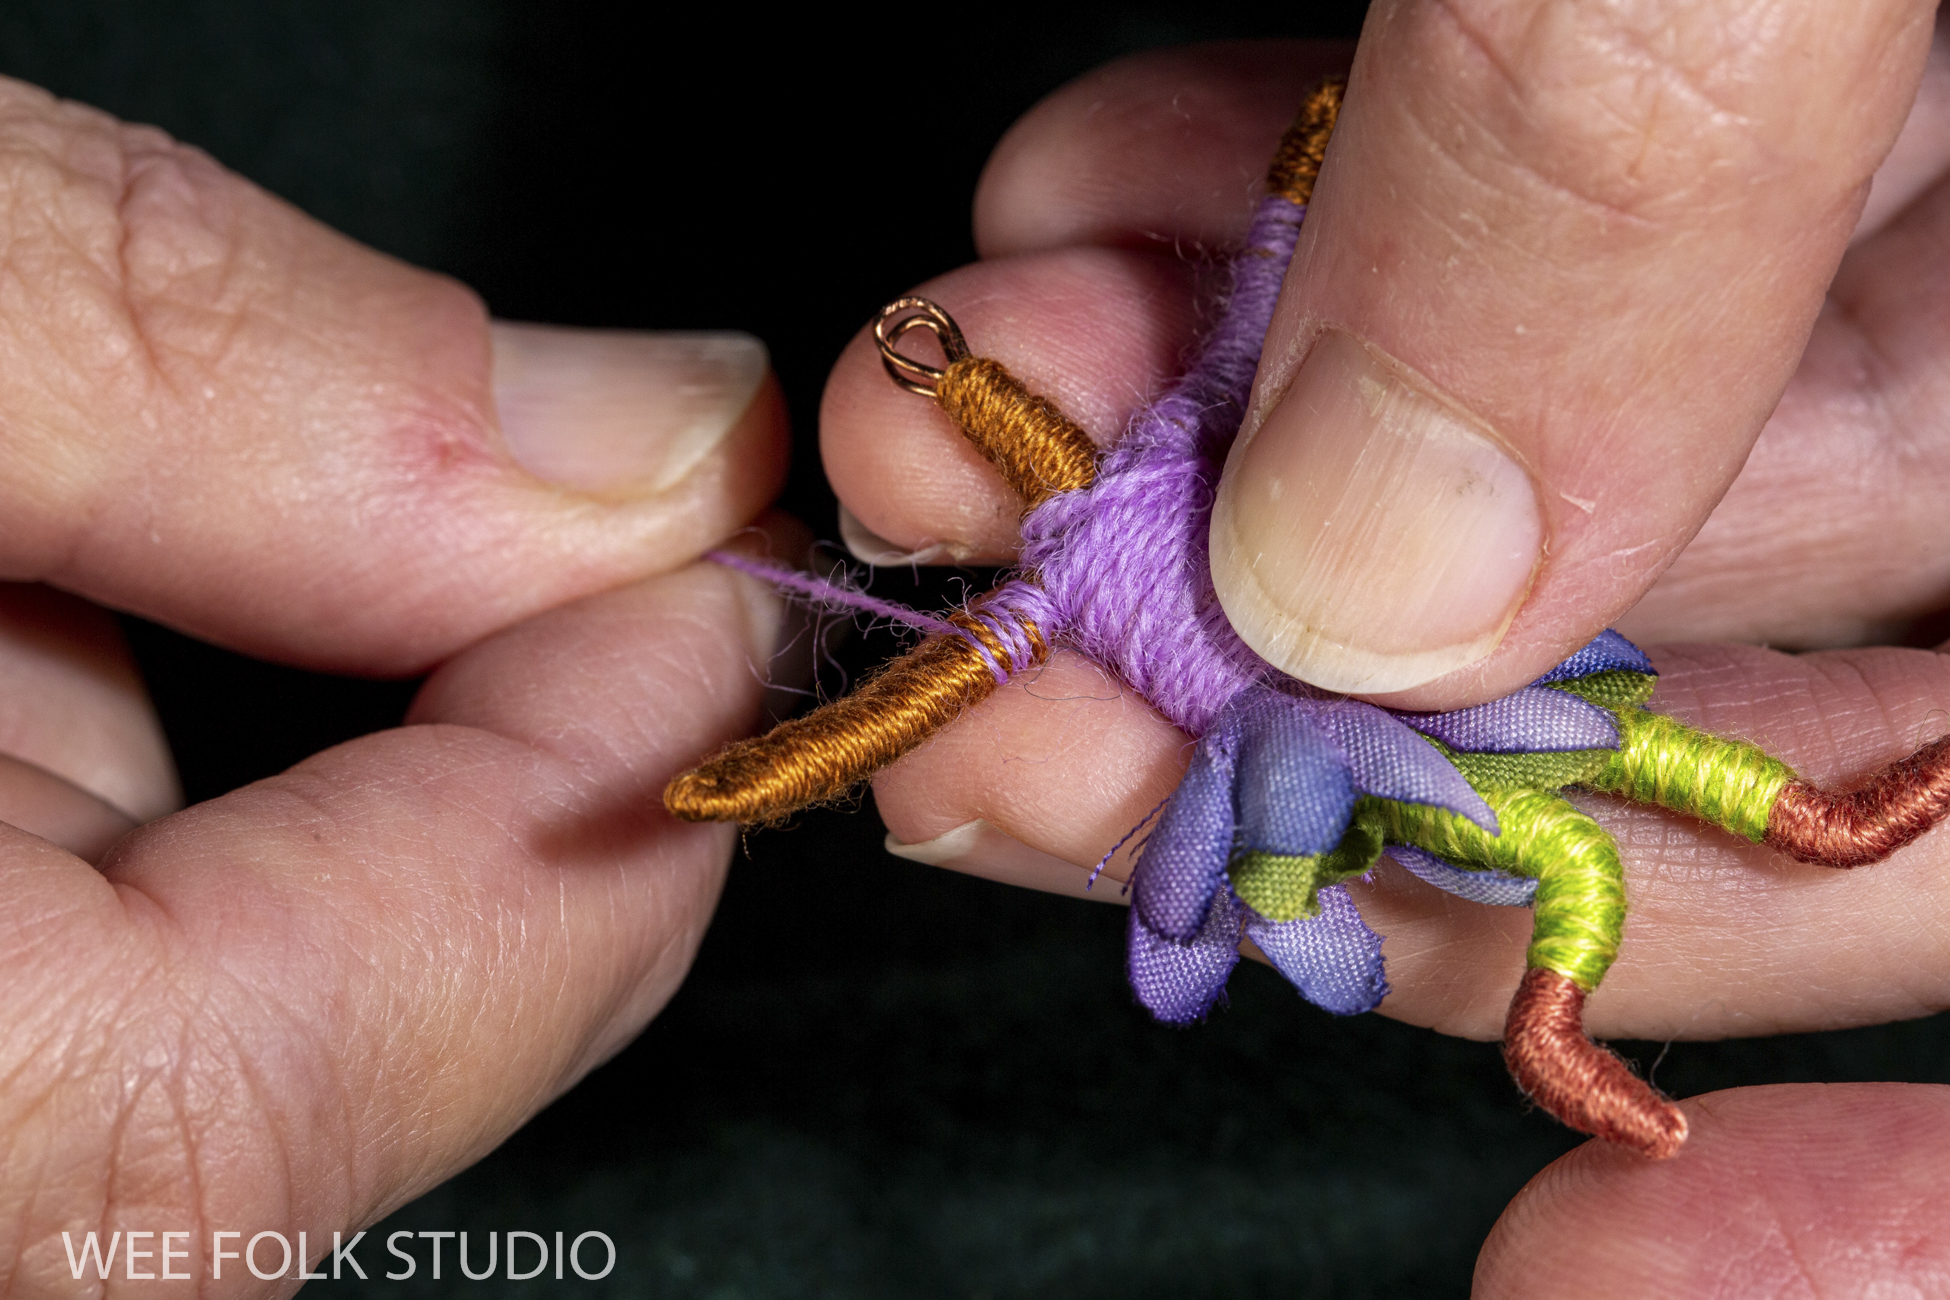
and forsythia blossoming…

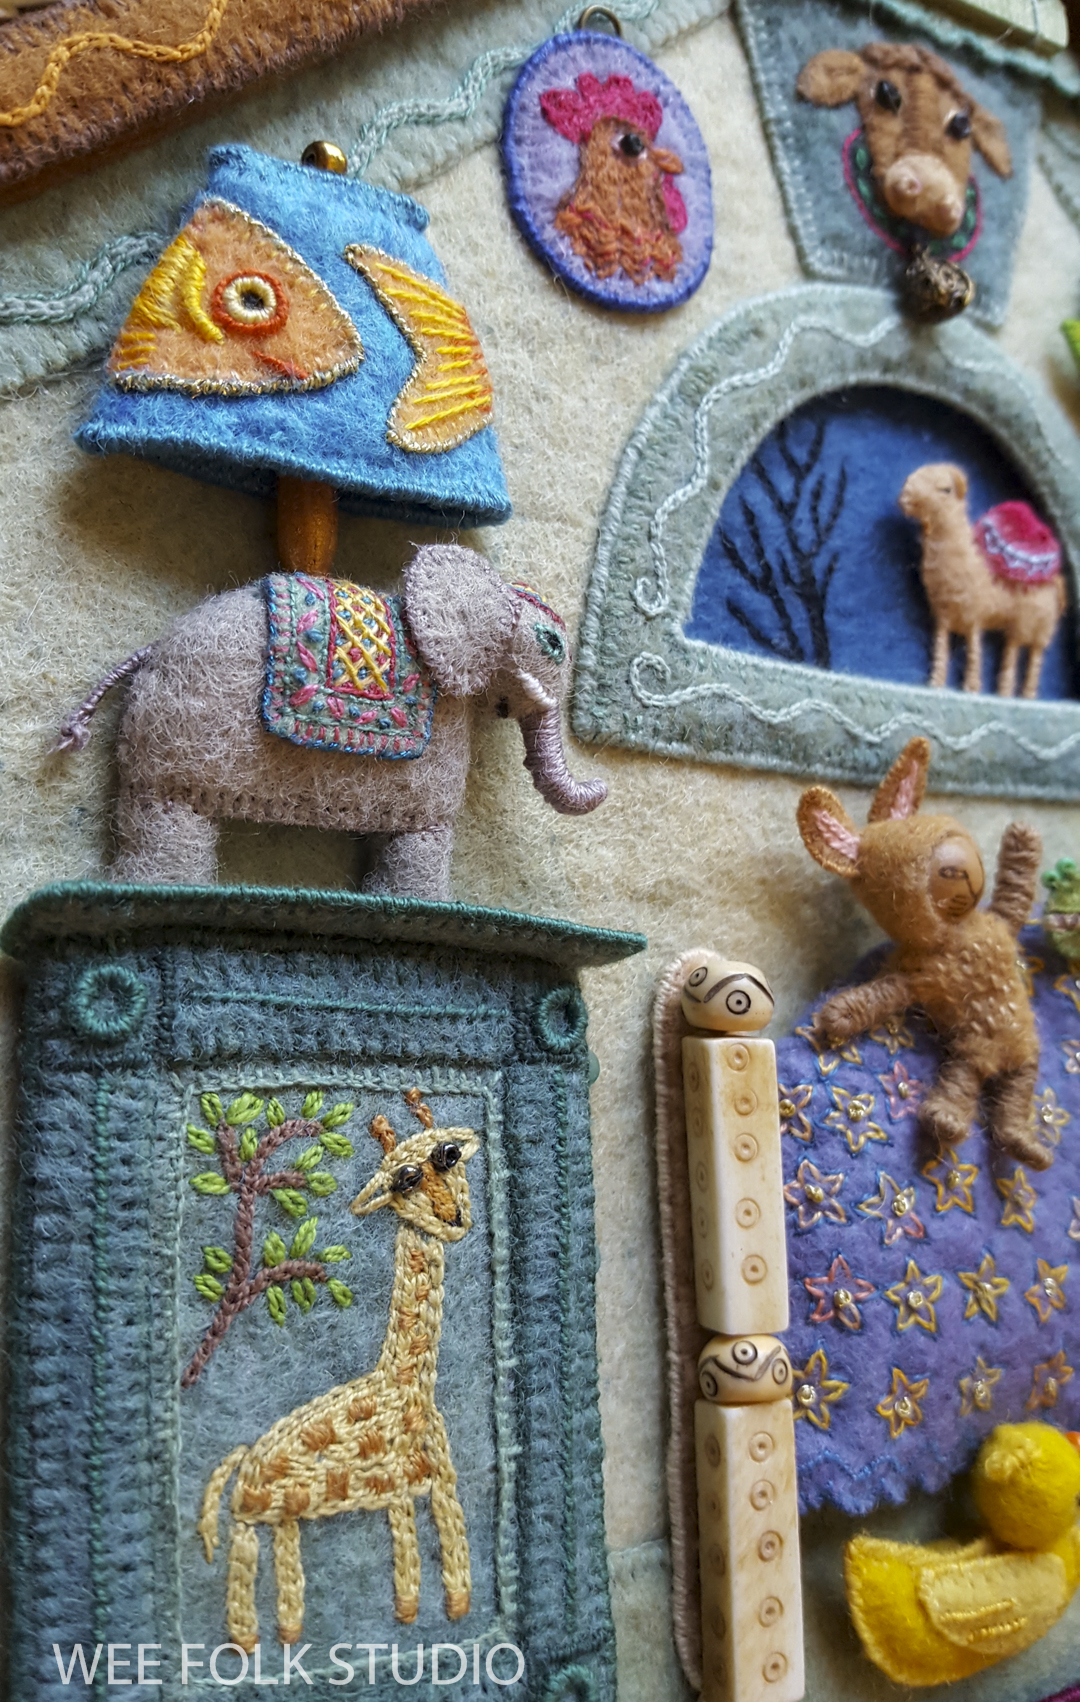
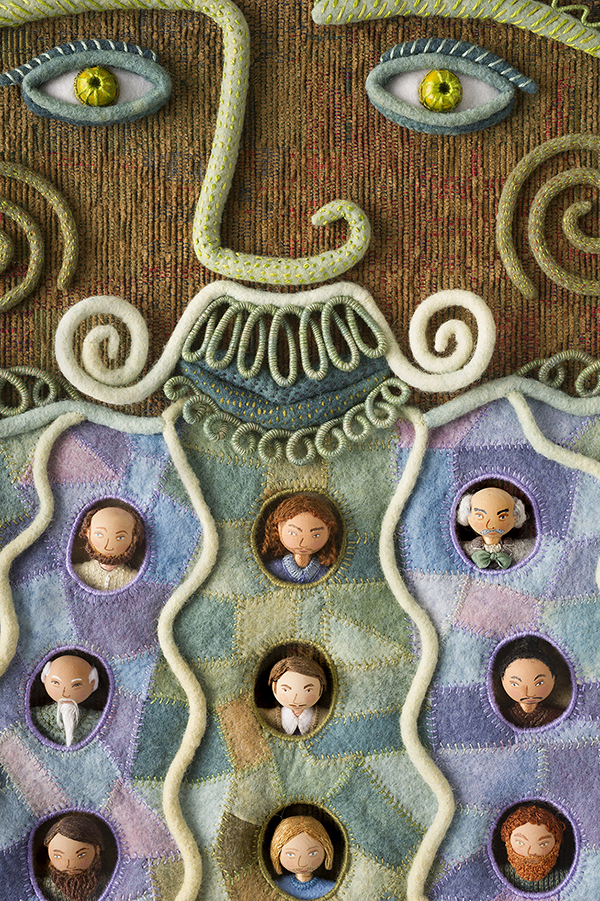
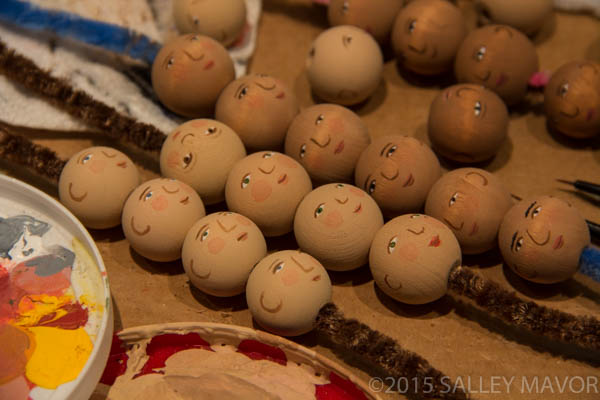
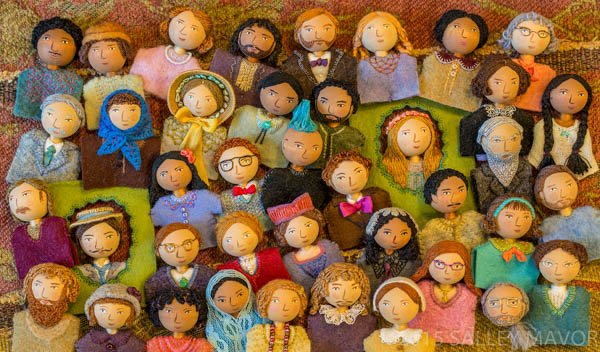
and views of constructing the little figures living in the hillside.

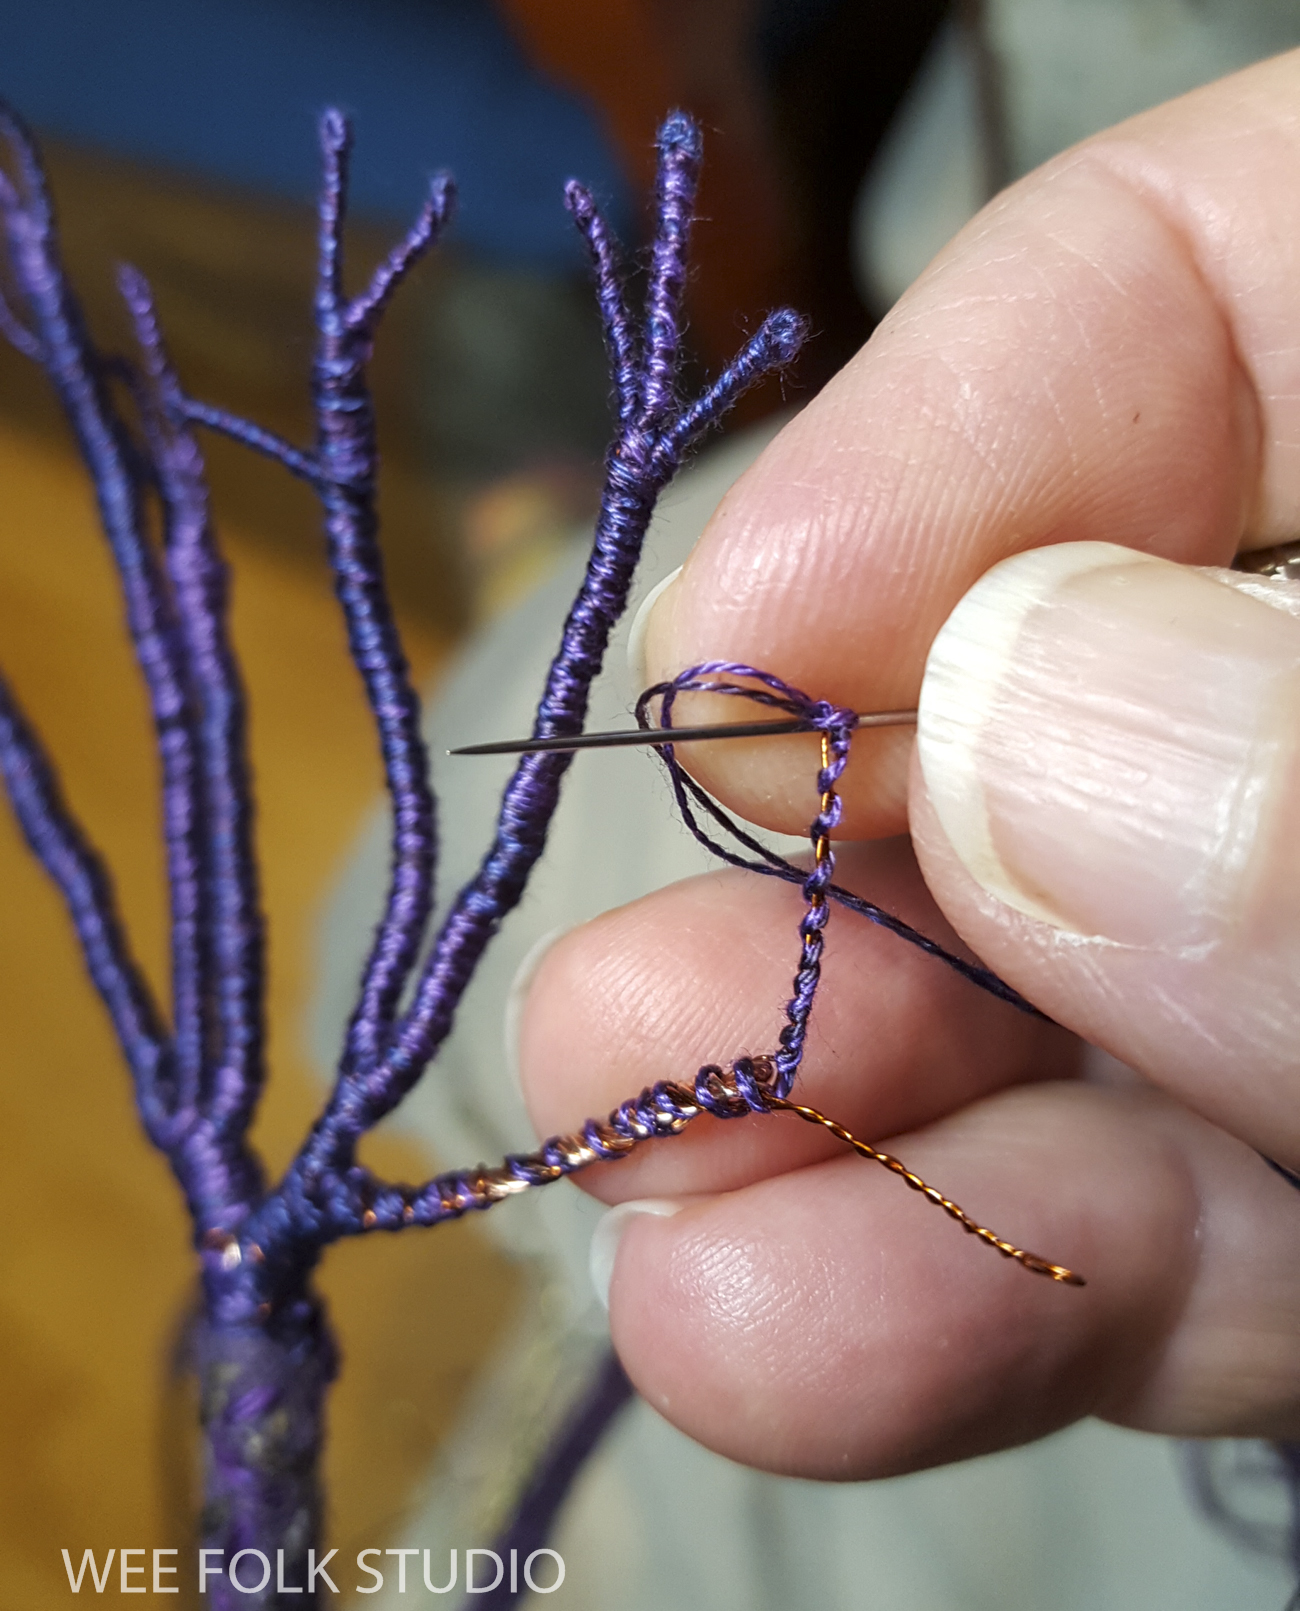
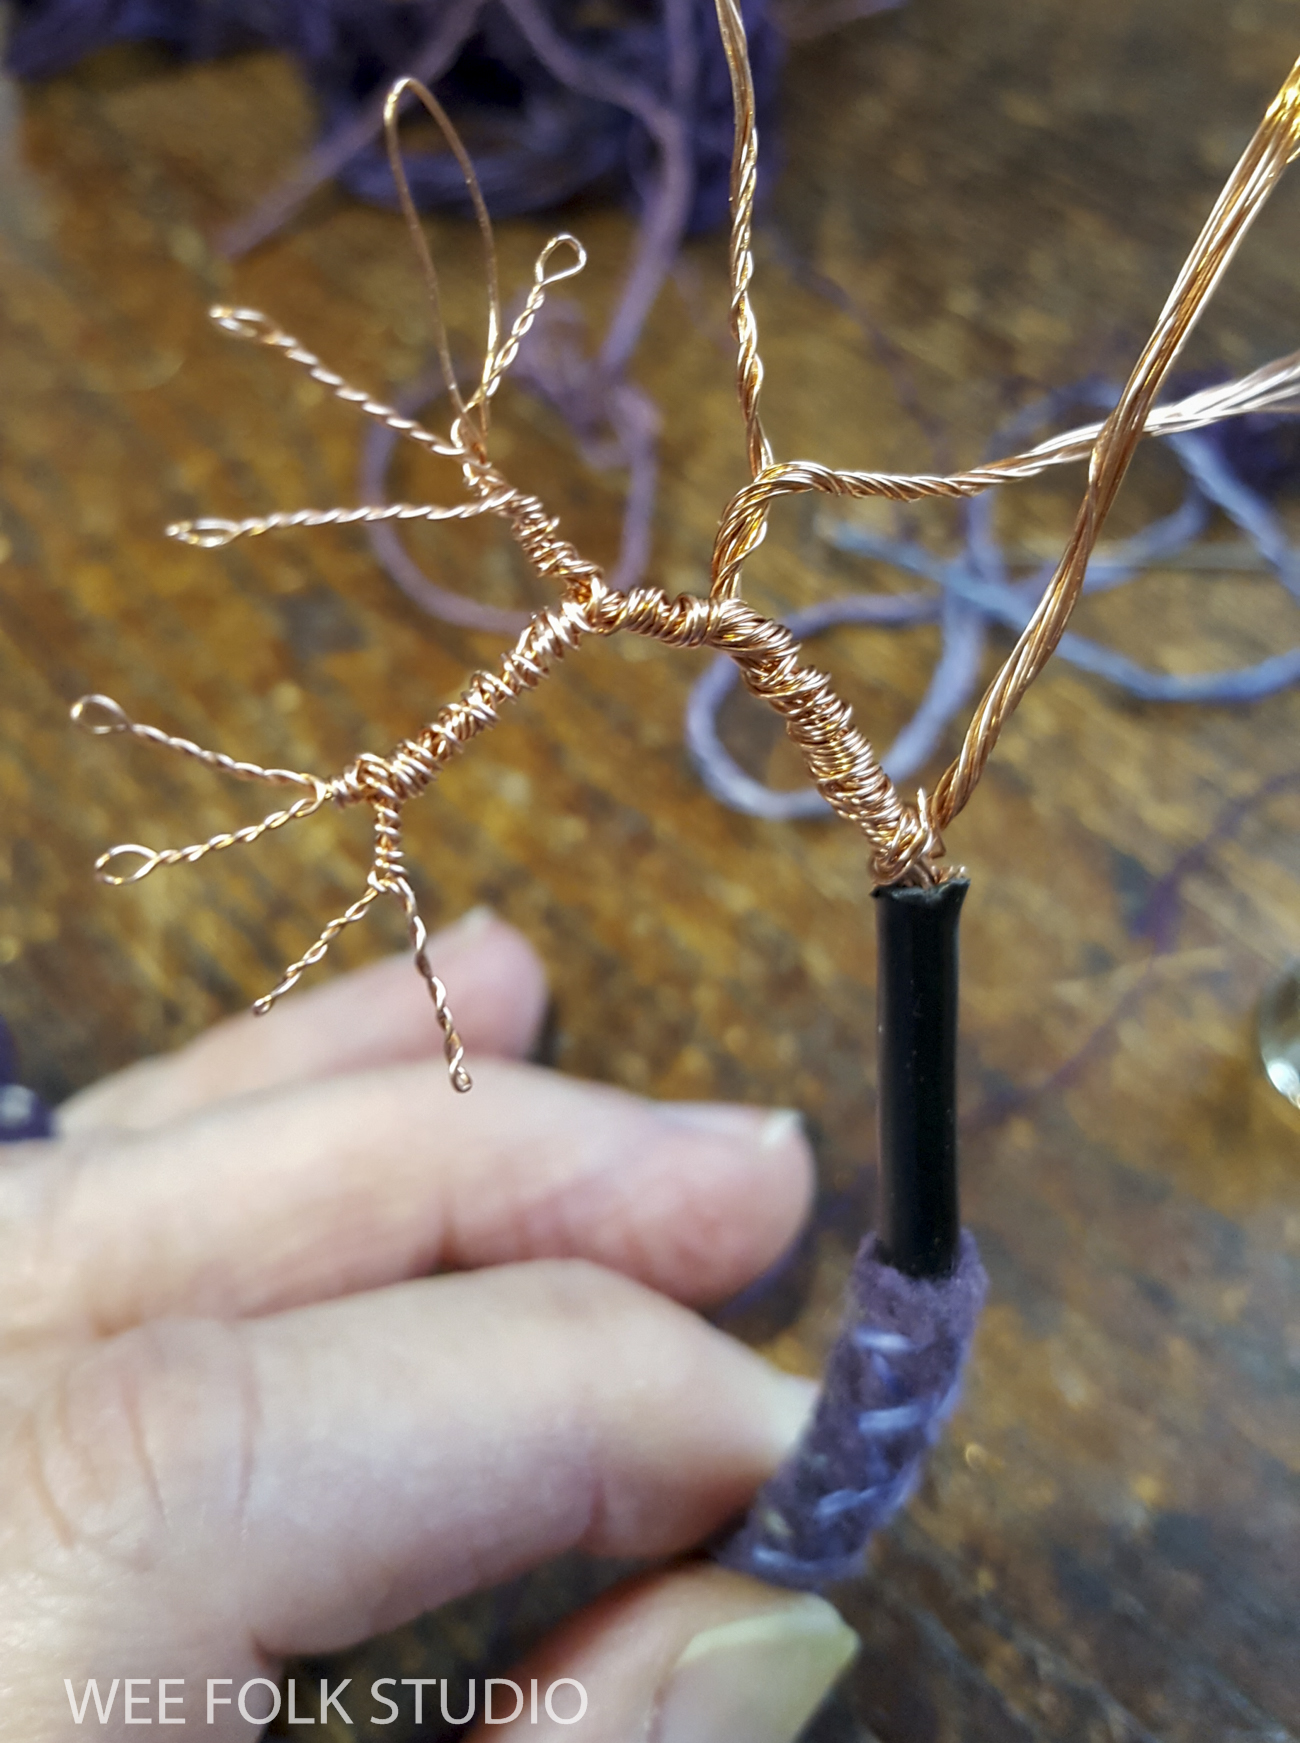
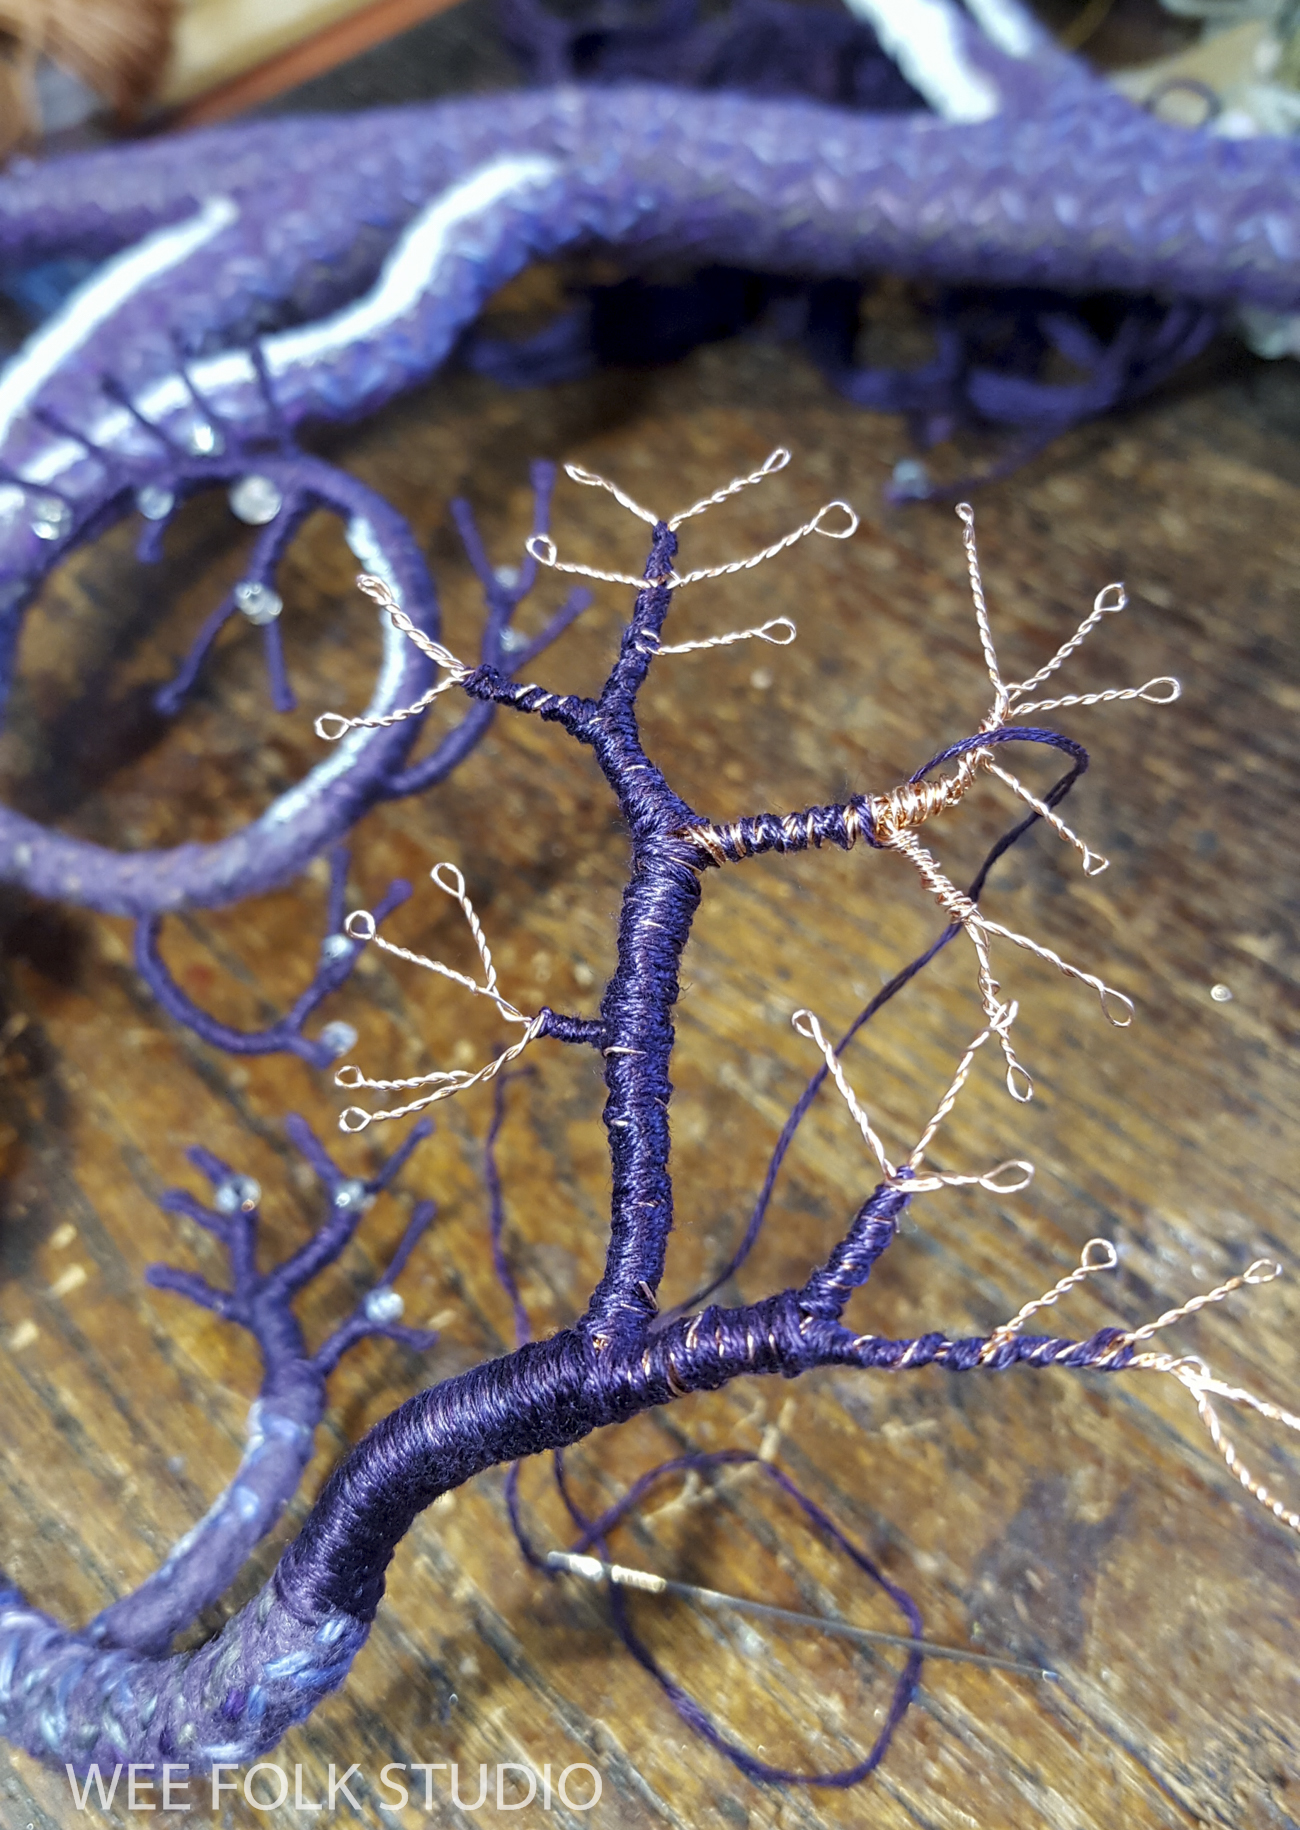
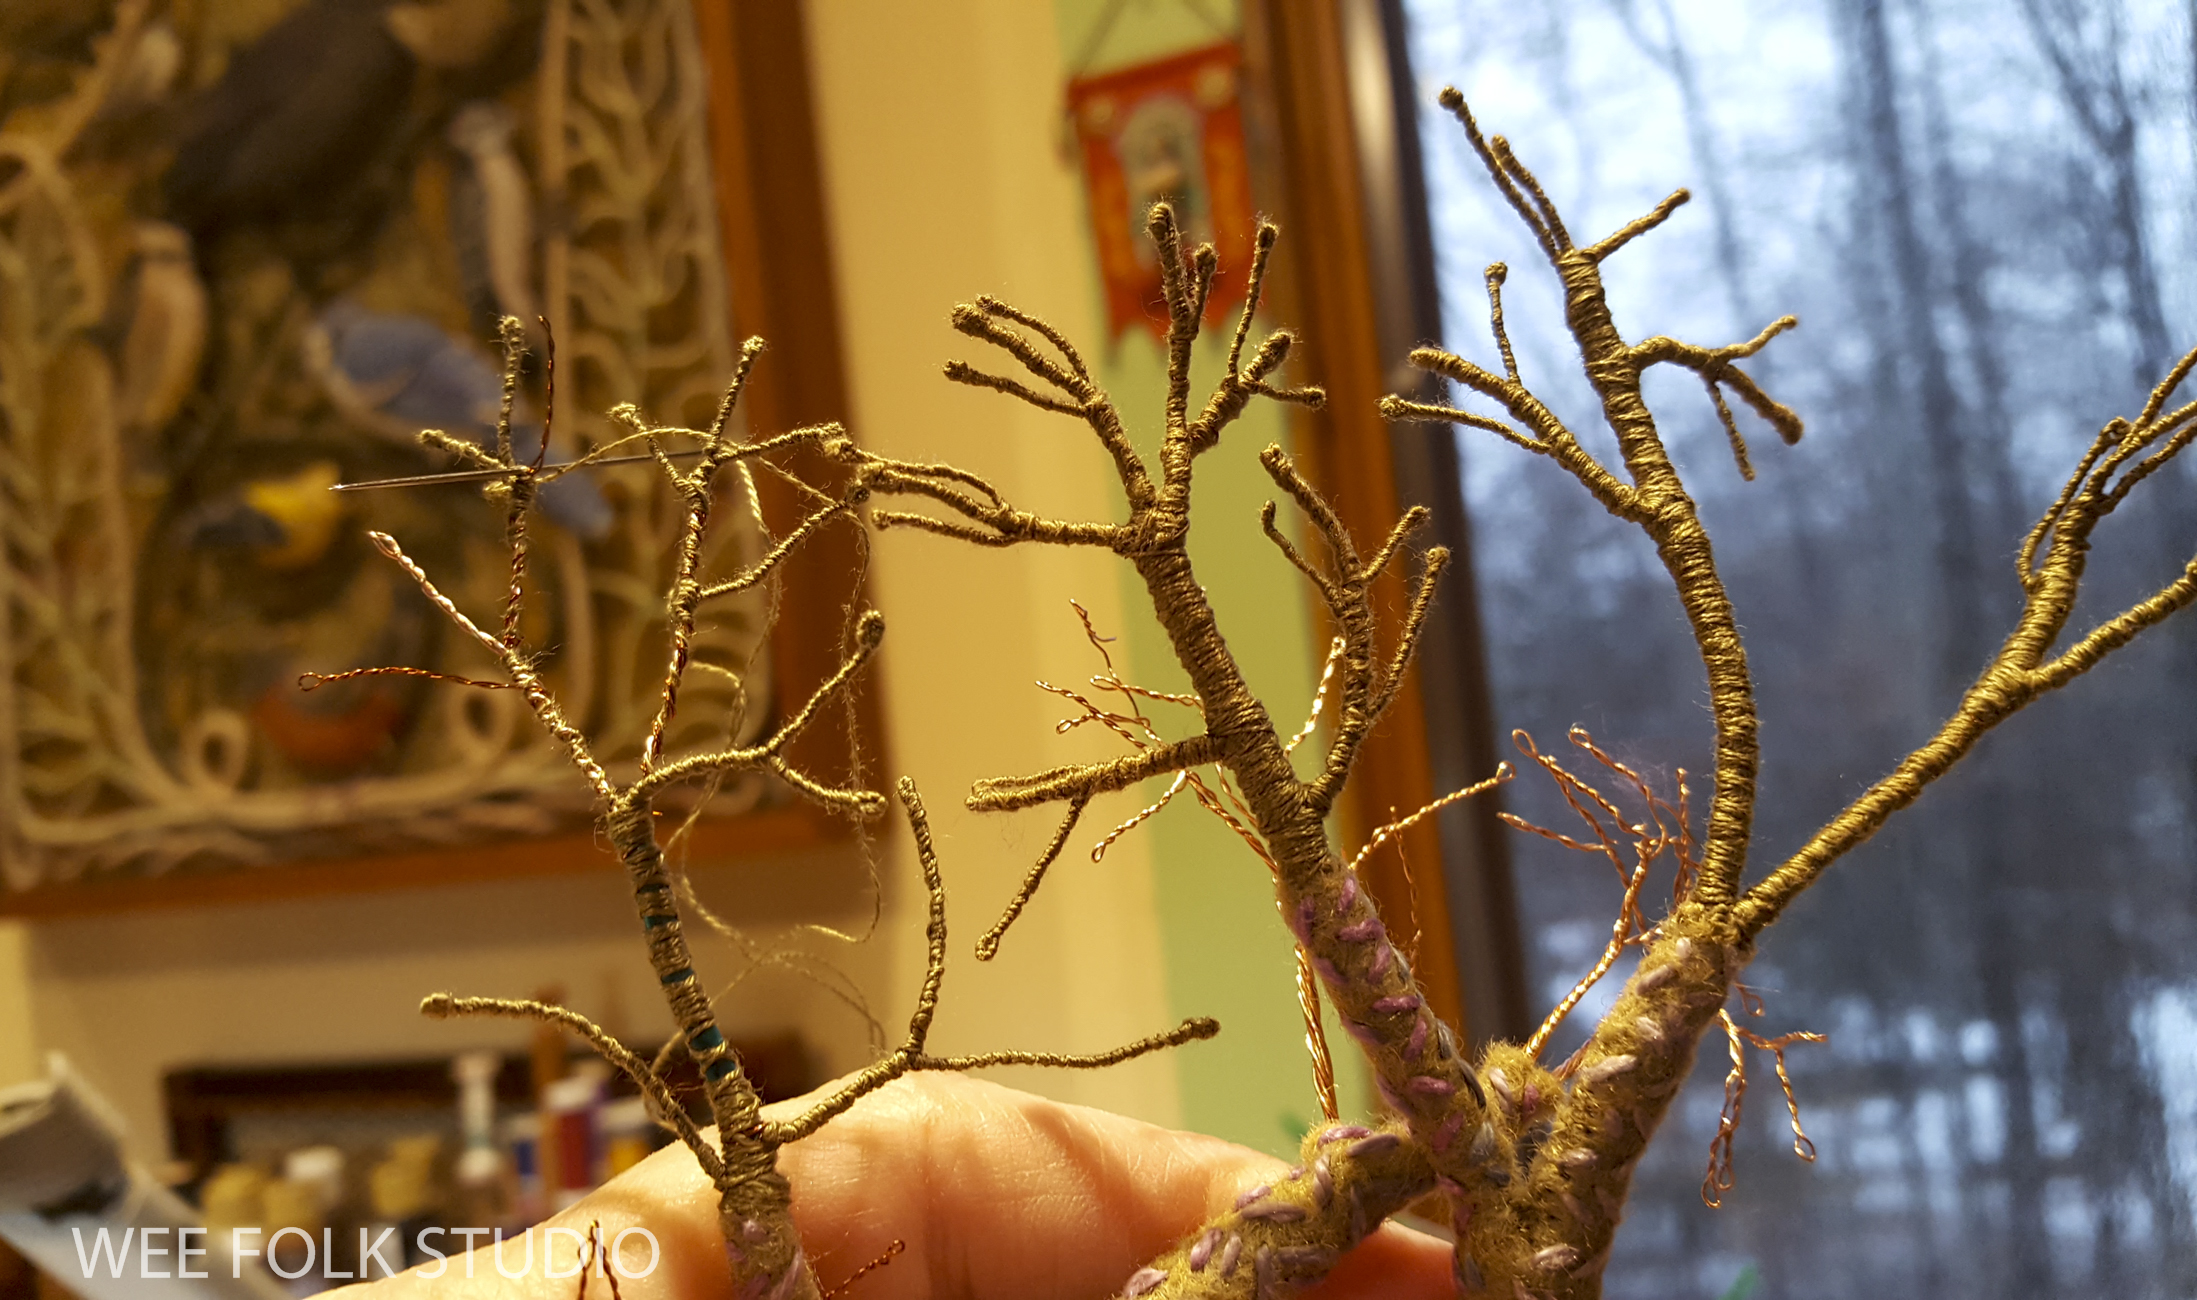
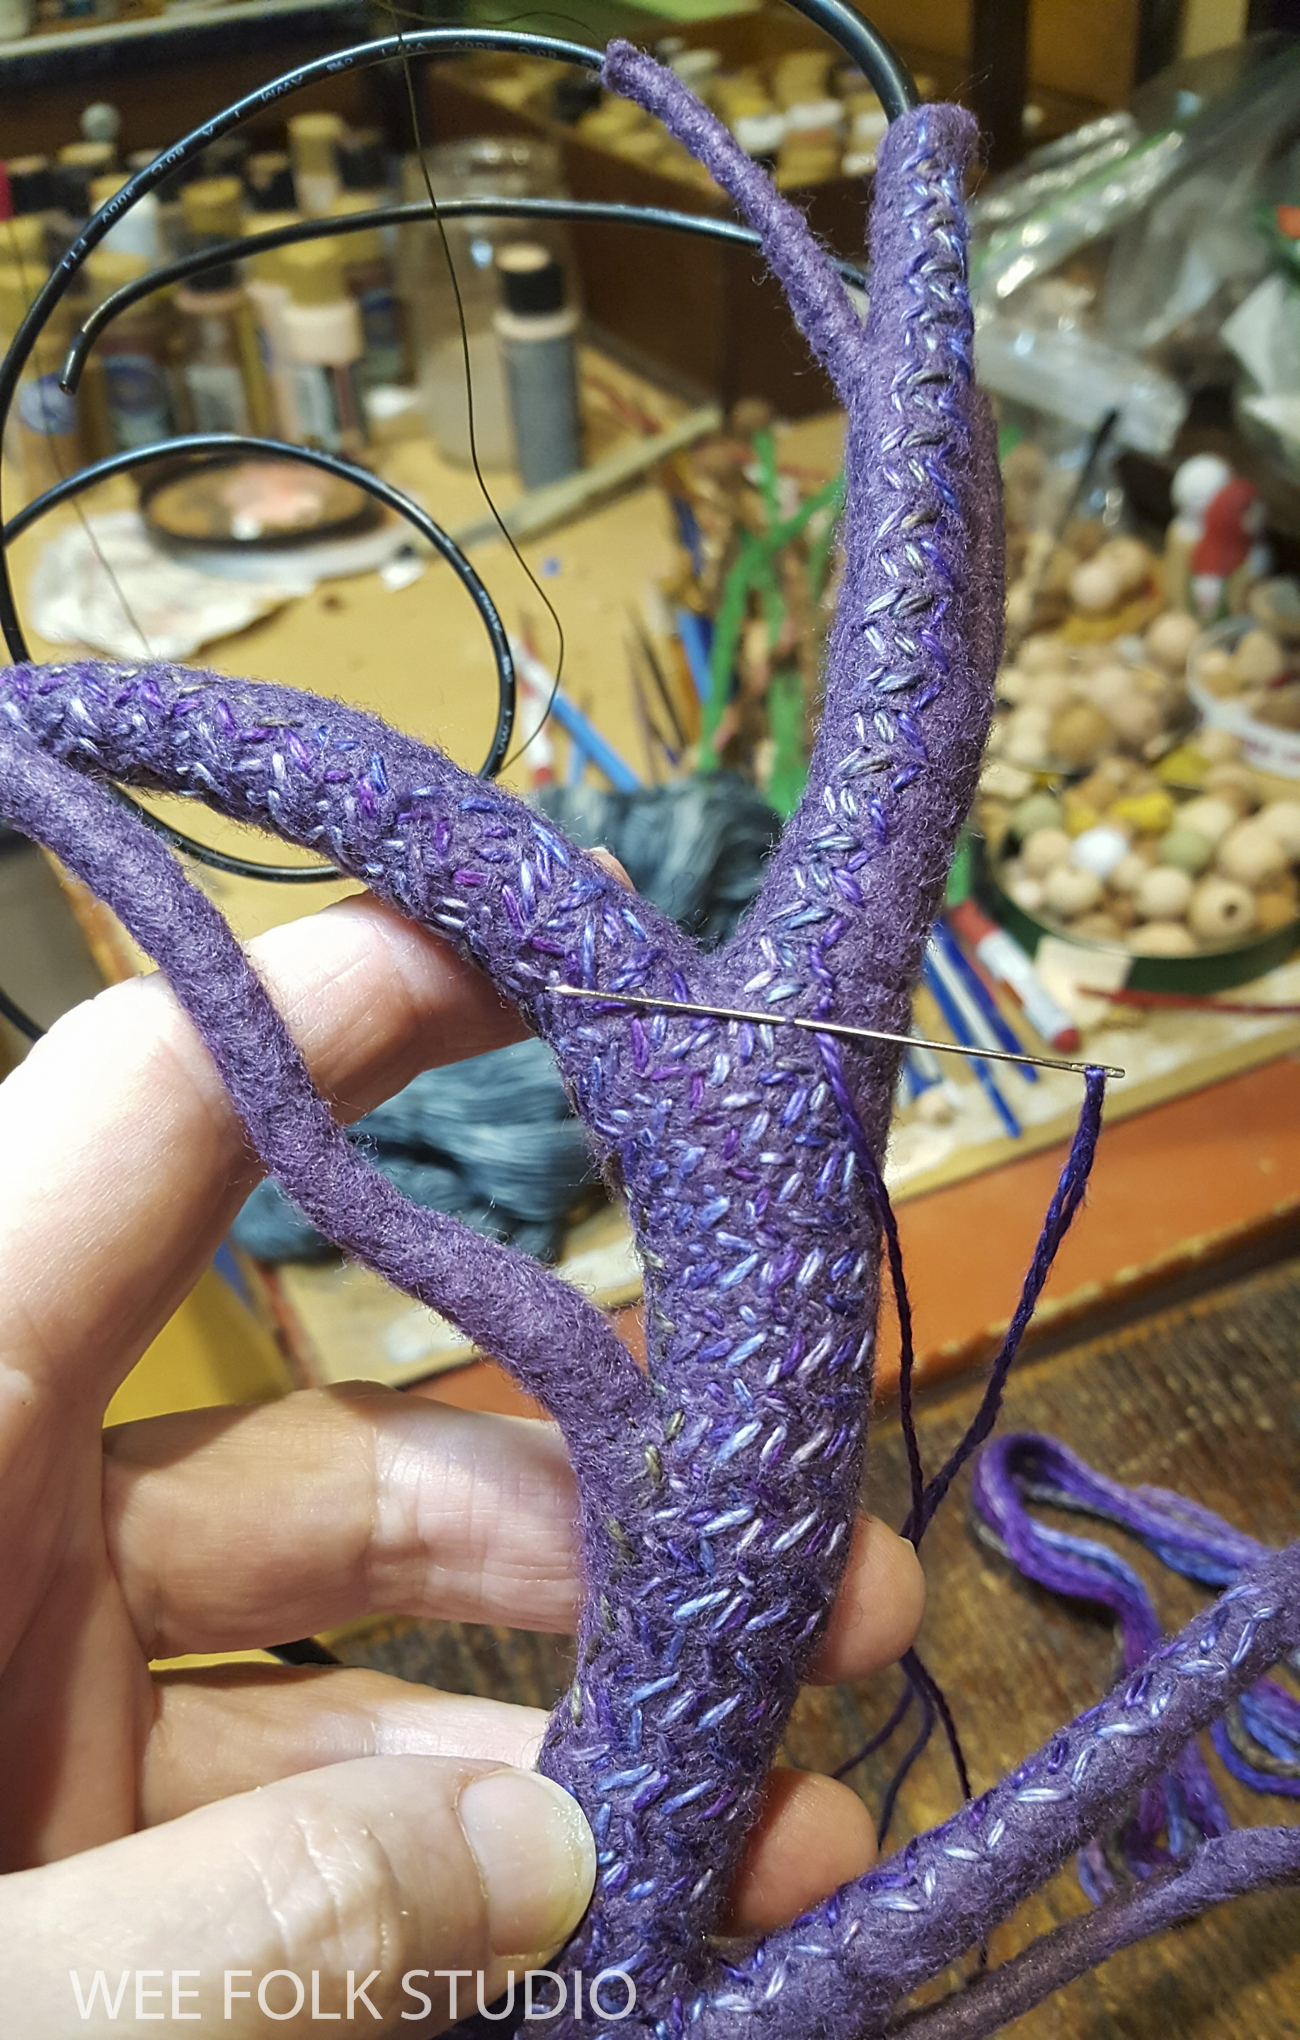
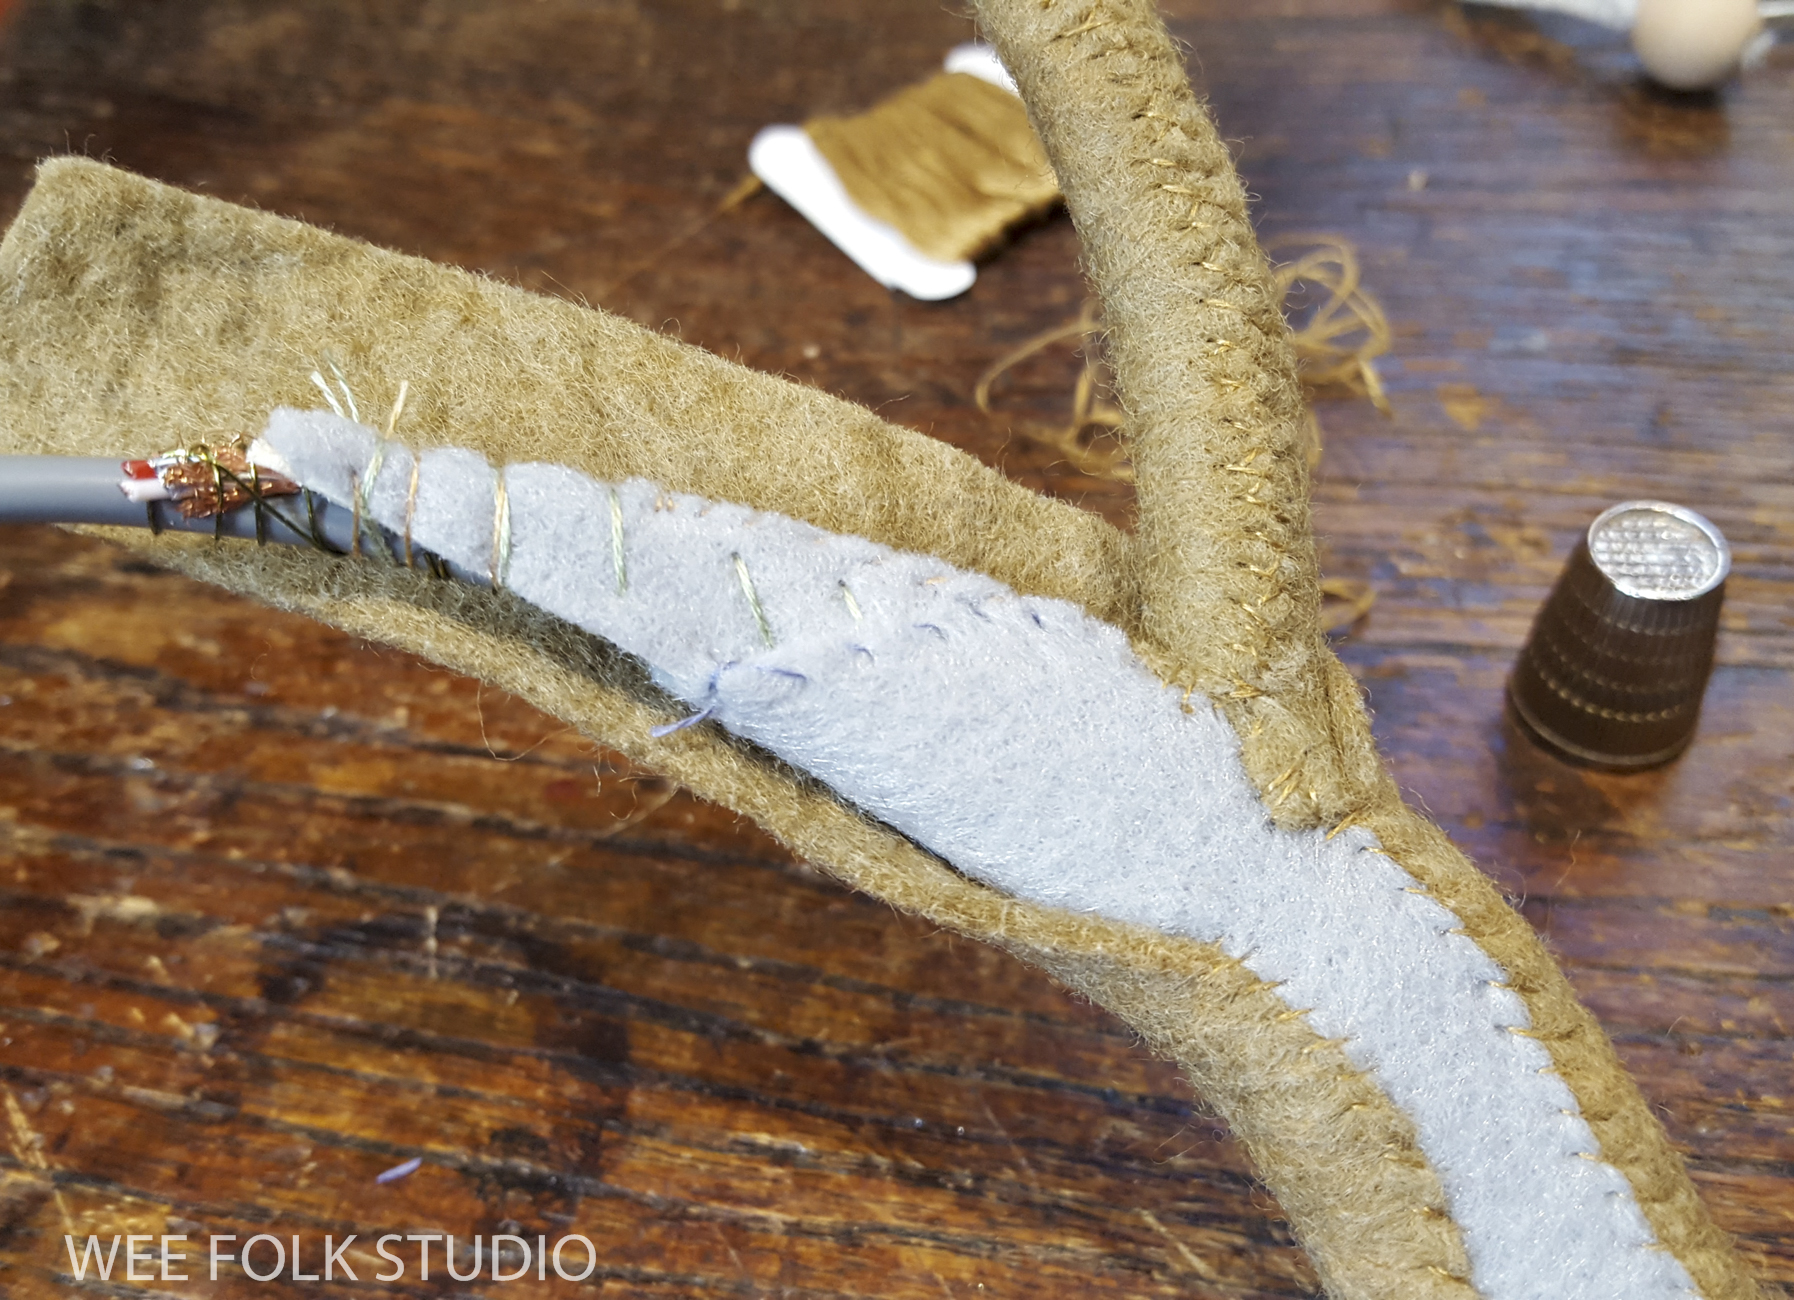
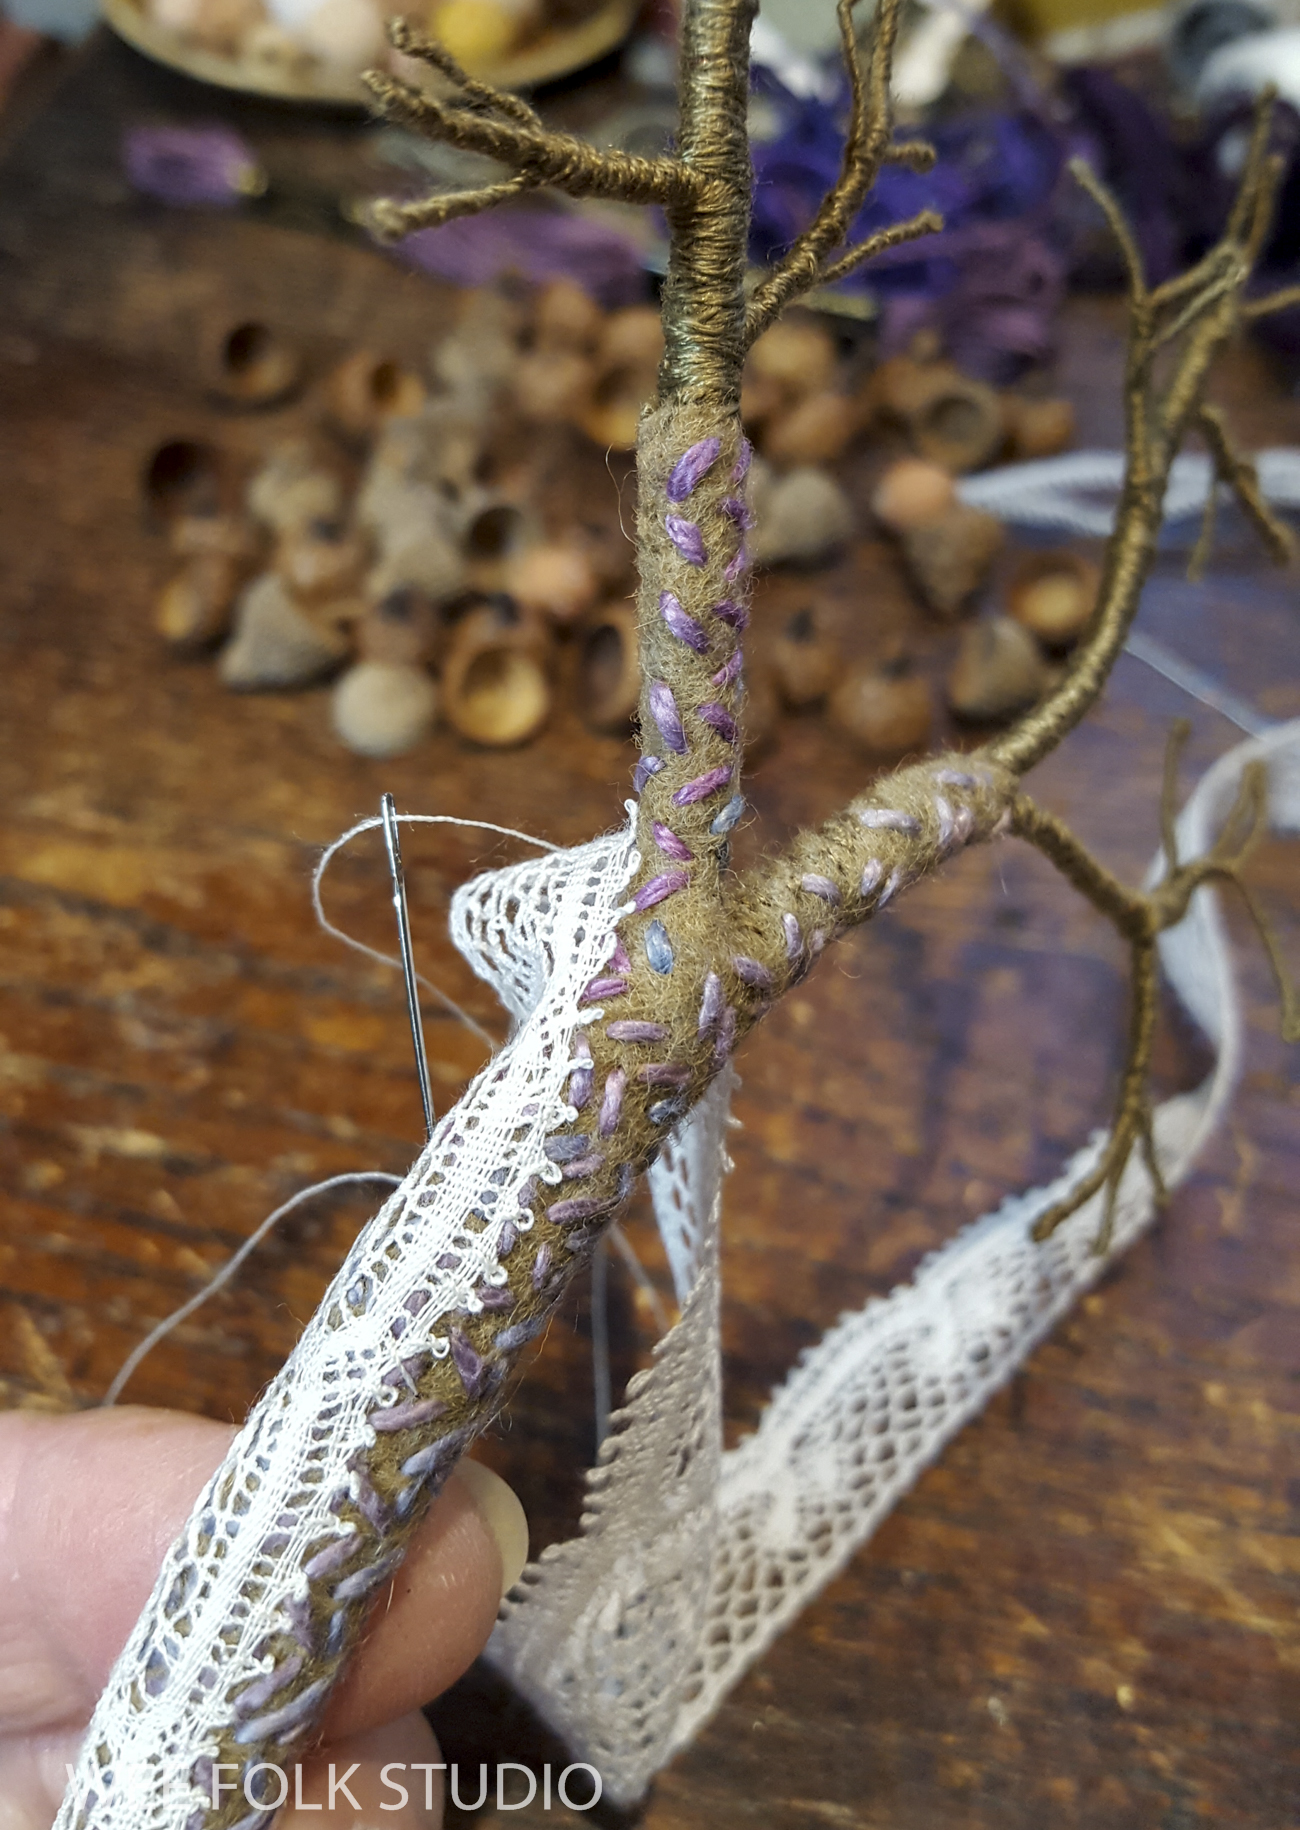
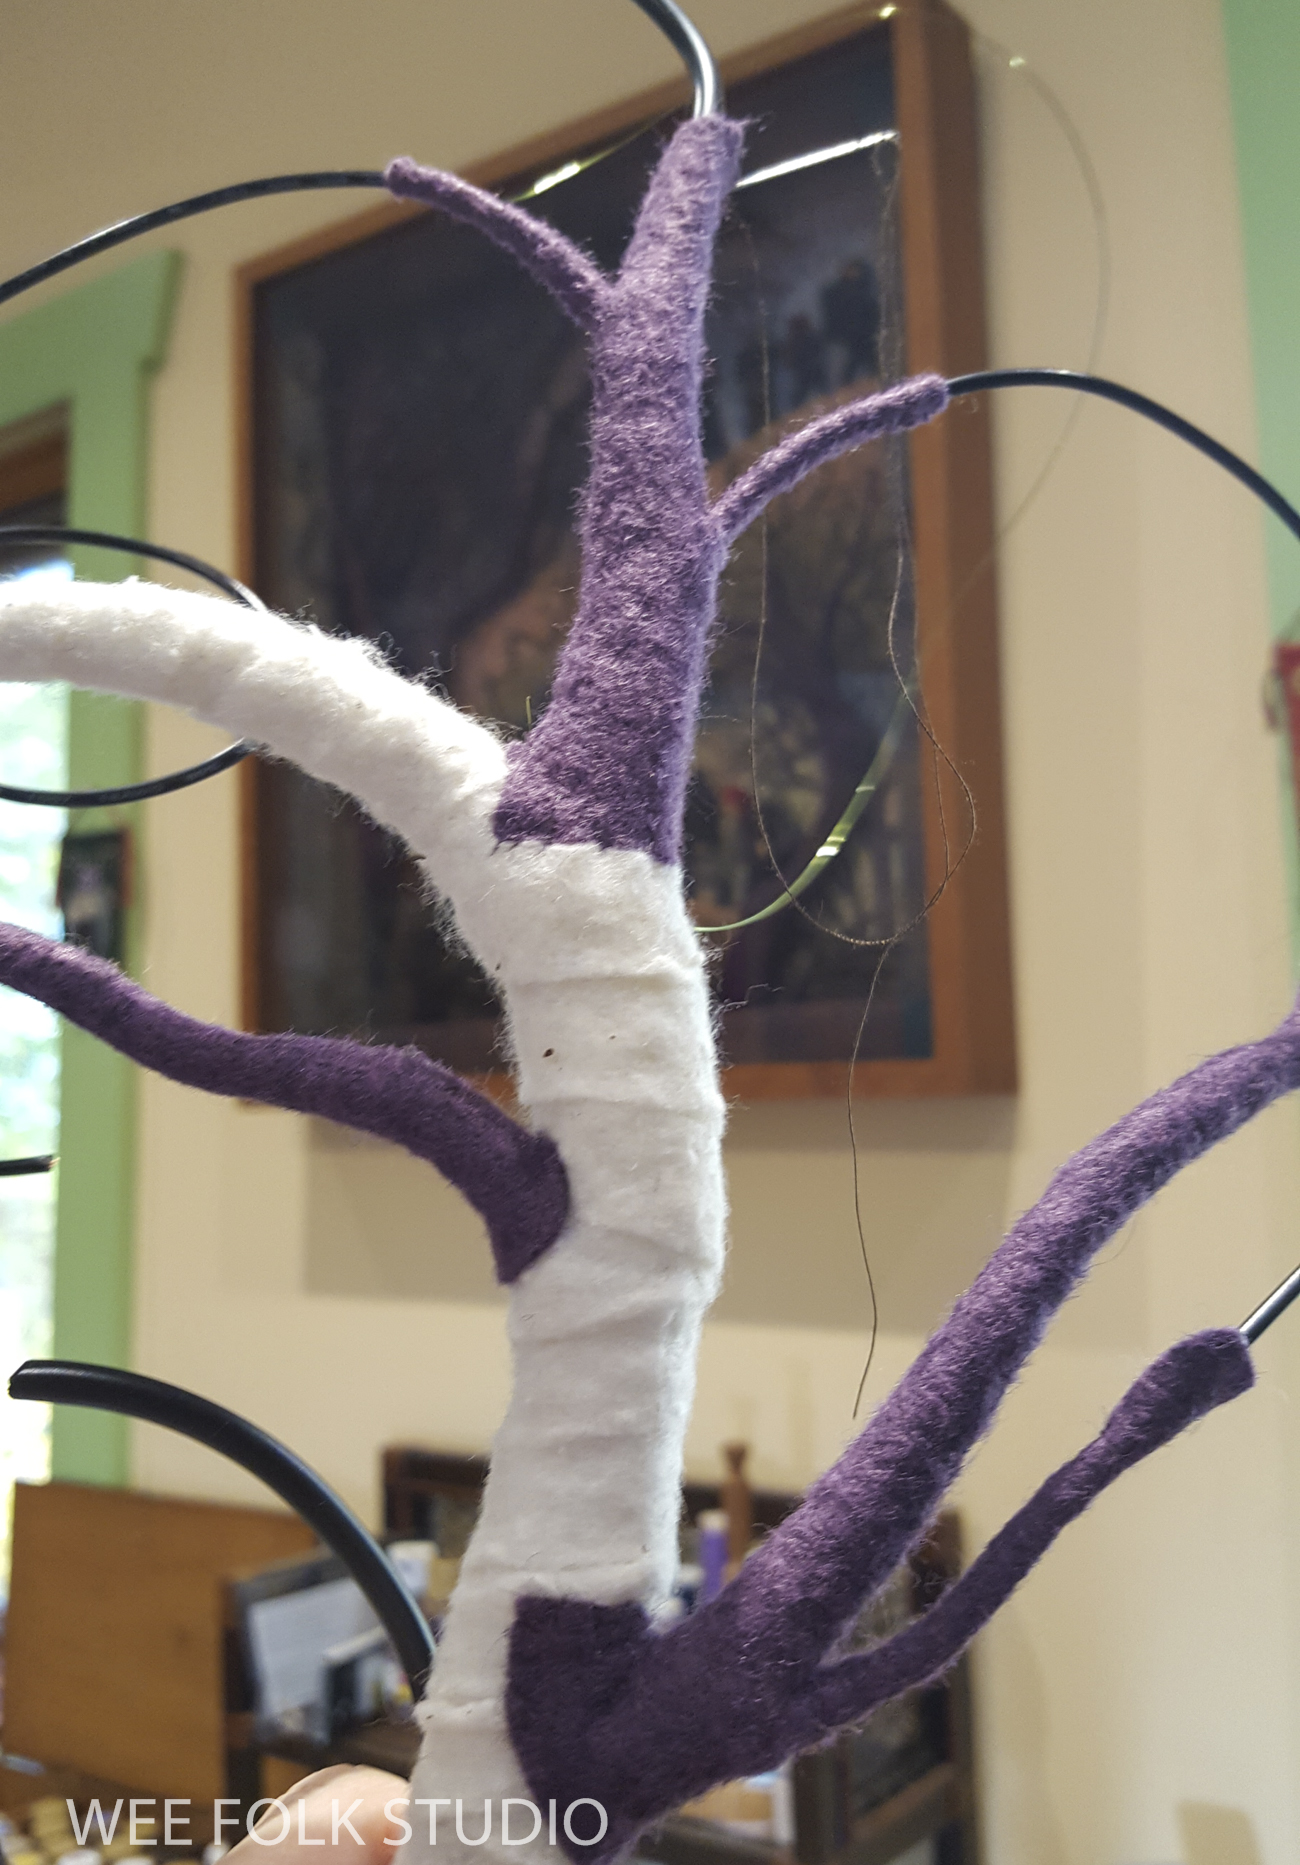
I’ll show how I made the cherry trees…

and violets…

and even a mini clothes line.

Please stay tuned for more photos, videos and explanations in the coming weeks.
Part 1 (moss)
Part 2 (cherry trees)
Part 3 (stone walls)
Part 4 (forsythia)
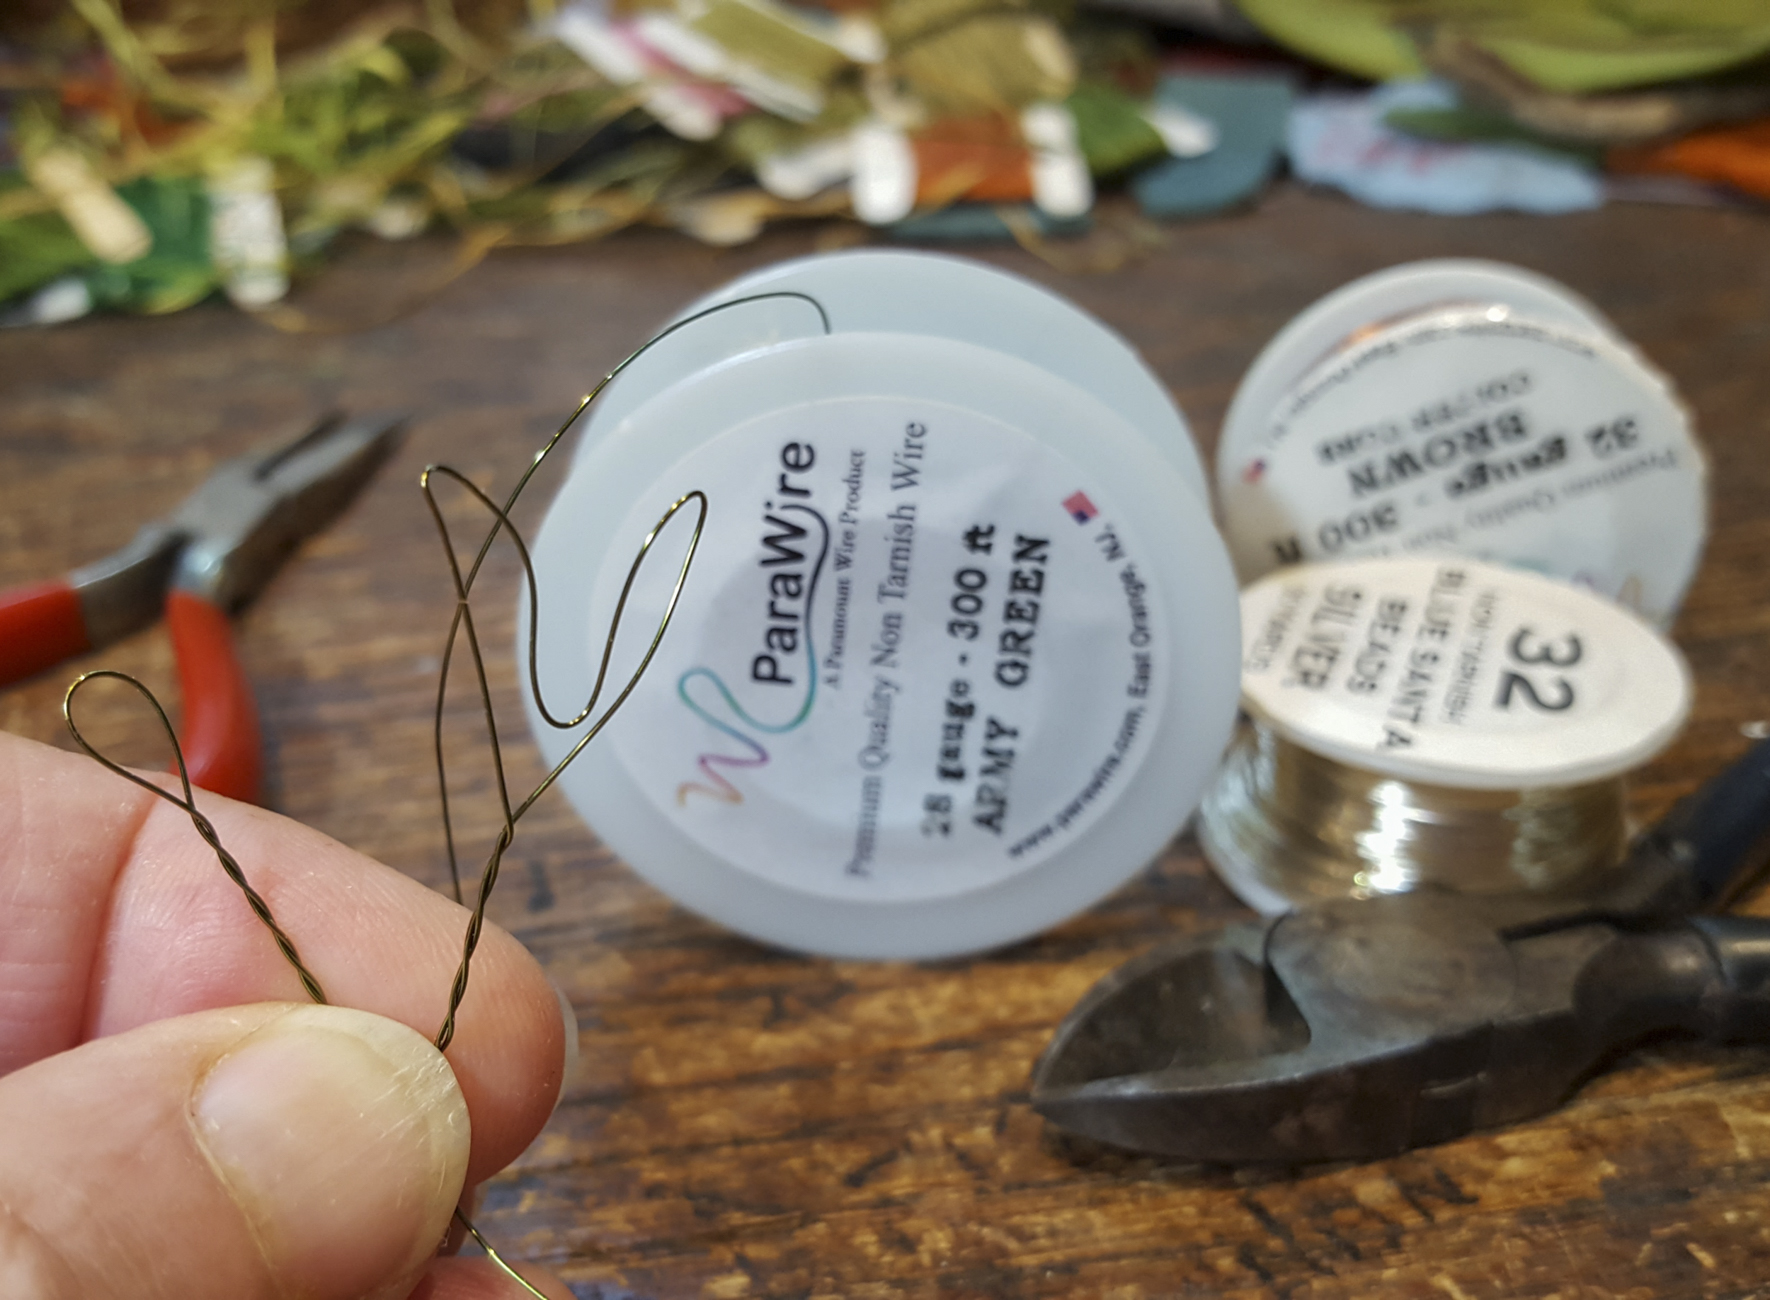
Part 5 (felt and wire leaves)
Part 6 (stitched leaves)

Mossy Glen, Frosty Morning and Harvest Time jigsaw puzzles and note cards are available in my Etsy shop.

To keep up with new posts, please subscribe to this blog Your contact info will not be sold or shared. If you’d like to see more frequent photos tracking the projects in my studio, please follow me on Facebook and/or Instagram.

MY BED – Home: Part 4

PART 4 – Elephant Lamp and Goldfish Lampshade: Today’s post shows how I made the elephant lamp and goldfish lampshade in the child’s bedroom scene at the end of my picture book, My Bed.
Part 1 gives an overview of the page.
Part 2 focuses on the outside architectural details of the cut-away house.
Part 3 takes a peek inside at the furniture and the sleeping child.
Part 5 is about all of the other animal icons represented in the scene.

Signed copies of My Bed are available in my shop here. Watch this 8-minute documentary about making the artwork for the book.

My original idea for this illustration was to show a universal child sleeping in bed, surrounded by stuffed toys that looked like the animal icons featured throughout the book. I soon realized that the bed and floor around it wouldn’t accommodate all of the animals, so I came up with other ways spread them around the room.

The sturdy elephant turned into a lamp base and the goldfish ended up swimming around a sea blue lampshade. The goldfish icon first appears on the text panel in the Japanese spread in the book.

To make the lampshade, I appliqued an embroidered felt goldfish head and tail onto a piece of blue felt.

I added a felt back piece and edged the front and back with wire on the top and bottom. That way, it would stick out and stay curved like a real shade.

For the lamp base, I shrunk the elephant down to about 1/2 the size of the spot illustration on the text panel on the Indian page of the book.

To make the armature, I bent a pipe cleaner and threaded one end through a wooden bead. The bead would become the head and the pipe cleaner extension would form the trunk.

Then I wrapped the pipe cleaner trunk with embroidery floss, covering the fuzzies like the dolls’ arms and legs are made in my how-to book Felt Wee Folk.

I sewed pieces of felt inside the body to fill in the void and give it bulk.

I then covered the bead head and body with pieces of felt. It’s been a few years, so I can’t remember exactly how this part was done, but I remember that it was rather fussy. I probably used 2 separate pieces for the front and back of the body and the head.

You can see the difference in scale between the 2 elephants in the photo of my work table below. They’re like the mother and baby elephant in my first children’s book, The Way Home.

Replicating the blanket at 1/2 size was also fussy, but at least it was flat!

Wouldn’t it be fun to have a full size version of this lamp, with the elephant made out of clay or wood and a painted goldfish swimming around the shade?

Stay tuned for more posts about the other animals in this scene.

To keep up with new posts, please subscribe to this blog. Your contact info will not be sold or shared. If you’d like to see more frequent photos tracking the projects in my studio, please follow me on Facebook and/or Instagram.

MY BED – Home: Part 1

PART 1 – Overview: For the past few years, I’ve shared the process of making the 3-dimensional embroidered illustrations for my newest picture book, MY BED. The book has been out for a year and the Bedtime Stitches touring exhibition of the original artwork is well underway. So, I’d like to pick up where I left off last year and continue to show what goes into doing this kind of work. Posts I’ve written in the Bed Book Peek series so far are listed here.

The Bedtime Stitches touring exhibition is at the  New England Quilt Museum in Lowell, MA through Dec. 31, 2021 and will be at the International Quilt Museum, Lincoln, NE Jan. 25 – April 10, 2022. See the the full schedule here. Visitors often ask, “How did she make all of this in one year?”. It’s confusing because all of the pieces are consistently embroidered with the date 2020 on the border. Even though I worked on it over a 3 year period, the project was completed when it was published as a book in 2020.

Signed copies of My Bed can be ordered in my shop here. Watch this 8 minute documentary about how I created the illustrations for the book.

HOME – Near the end of the story, the illustration shows a child in bed, when it’s almost time to go to sleep. All of the animal icons from the different places featured throughout the book are gathered together in a snug little bedroom. I felt it was important to depict a universal child, who wasn’t clearly identifiable by gender or race, whom any child being read to could identify with. I also wanted the house to convey a warm and playful sense of “home” that could be imagined anywhere.

You can find out more about the Animal Icon spot illustrations in these previous posts – Rooster, Camel, Parrot, Elephant, Goldfish, Cat, Duck, Sheep, Rabbit, Cow, Crocodile, Giraffe, Dog, Pony.

To begin, I enlarged the thumb nail sketch to full scale and used it as a template. The drawing provided a general layout of the house and tree, but once I started making the animals, they took over and pretty much determined what the interior arrangement would be.

I worked on one double-page spread at a time. The background and parts accumulated on an old ironing board that served as an extra working surface. When I needed to press a piece of felt, the iron was right there.

Rob set up a camera and lights on top of the table, so we could make a little animated film before I sewed all of the parts together.

This is what it looks like when you compress 6 weeks into 9 seconds.

There’s is so much to show about making this scene that I’m going to write several posts focusing on different parts, including the animals, the child and architectural details. Stay tuned for more!

To keep up with new posts, please subscribe to this blog. Your contact info will not be sold or shared. If you’d like to see more frequent photos tracking the projects in my studio, please follow me on Facebook and/or Instagram.

Frosty Morning: part 3 (shelters)

Part 3 in the Frosty Morning series is about making these curious looking rounded structures. Part 1 showed how I made the tree trunks and Part 2 gave a close look at how I formed and wrapped the wire tree branches, from the inside out.

This year, I’m working on a group of seasonal landscapes that capture the wonder and magic of the natural world, both real and imagined. Frosty Morning, Summertime, Mossy Glen and Harvest Time are available as jigsaw puzzles and note cards in my shop here

From the start, I knew that the scene would include little characters who needed places to take shelter from the cold. So, I constructed cozy homes for them, like a wee folk housing development nestled in the trees.

Each shelter was custom made to fit between tree limbs. I first cut out pieces of wool felt in the basic shapes. Then, I cut out rounded doorways and trimmed them to conform to the surrounding branches.

To give the shelters a nest-like appearance, I stitched a random cross-hatched pattern onto the felt, using fingering weight Merino wool from Flying Finn Yarns.

As I worked, the spiral around the doorway grew larger, creating a shallow entrance, with an overhanging rim. On top, I added a bit of snow cover with white metallic thread and clear glass beads.

Each shelter was made to be different in shape and color.

This one was built to fit under a piece of driftwood.

In the back, I added layers of felt to make the walls puff out a bit.

Sometimes I drill little holes in wood to sew it in place, but in this case I glued the wood to the back layer of felt.

At this point, I wasn’t sure who would be moving into the neighborhood, but there was much more to finish before they started showing up, anyway

Stay tuned for Part 4 in the Frosty Morning series, which will zero in on the stone wall and its surroundings.

To keep up with new posts, subscribe to this blog. Your contact info will not be shared. If you’d like to see more frequent photos tracking the projects in my studio, please follow me on Facebook and/or Instagram.

Frosty Morning: part 2 (branches)

Part 2 in the Frosty Morning series gives a close look at how I formed and wrapped the wire tree branches, from the inside out. Part 1 was about making the tree trunks.

This year, I’m working on a group of seasonal landscapes that capture the wonder and magic of the natural world, both real and imagined. Frosty Morning, Mossy Glen, Summertime and Harvest Time are available as jigsaw puzzles and note cards in my shop here

I started experimenting with wire branches in the mid-80’s, while exploring new ways of adding dimension to my work. The trees in the winter scene below are an early example of the same basic technique I use today.

This piece from 1986, along with over 100 works spanning my 40 year career, will be included in next summer’s retrospective exhibition, WHAT A RELIEF: The Art of Salley Mavor, May 3 – Sept. 11, 2022 at the Brick Store Museum, Kennebunk, ME. Rarely seen works on loan from private collections will fill multiple galleries on the museum’s entire first floor. A large selection of sculptures, bas-relief pieces and original picture book illustrations, including the scenes from my newest book, MY BED, will also be shown.

I use jewelry wire or copper filled insulated electrical wire to form tree branches.

As I described in part 1, the trunk and thicker limbs were covered in felt.

Then came the fiddly part, where I wrapped the wire branches in embroidery floss. I wound thread up and down several times, until the wire was no longer visible and the branches looked smooth and even. Using variegated thread gives the tree a more naturalistic look because nothing in real life is just one color.

Despite its apparent fussiness, the process of wrapping the wire is strangely calming. People often remark at how patient I am, which ironically makes me feel annoyed and impatient. I know it’s meant as a compliment, but doing this kind of work has nothing to do with patience. For me, stitching is a grounding daily practice that verges on obsession. Somehow, that feels different than patience. Watch this video and see what you think.

Sometimes I used the copper wire filling inside insulated electrical cables I found at the hardware store.

Part 3 in the series will be all about making these curious looking rounded shelters.

To keep up with new posts, subscribe to this blog. Your contact info will not be shared. If you’d like to see more frequent photos tracking the projects in my studio, please follow me on Facebook and/or Instagram.

Frosty Morning: part 1 (trees)

Are you ready for a blast of cold air in the heat of summer? I hope so, because today, I am giving a behind the scenes peek at how I made the tree trunks for Frosty Morning. Part 2 in the series will concentrate on how I formed and wrapped the wire branches. As the summer progresses, I will share other features of the winter scene, including snow and ice, cozy little shelters, a stone wall and the ubiquitous wee folk characters dressed in warm winter outfits.

This year, I’m working on a group of seasonal pieces that capture the wonder and magic of the natural world, both real and imagined. Frosty Morning, Summertime, Mossy Glen and Harvest Time are available as jigsaw puzzles and note cards in my shop here

I’m currently deep in making mode, working on a completely different piece – the spring scene, which you can follow on Instagram and Facebook . So, writing this post requires switching my brain into explaining mode. You see, when I’m engrossed in making something, I don’t think about the actual process. I’m focused on bringing my vision to life.

So how did this vision develop? I started by picturing a winter scene in my mind, with expressive branches and sparkling ice crystals. When I sketched out some ideas, rounded shelters showed up, all nestled in the thicket of trees. The original drawing also included a line of little figures climbing high along a branch. The details changed along the way, but the basic thrust and curve of the center tree remained. Over the 4 months that I worked on Frosty Morning, I used the drawing as a guide, but never a template.

Because the center tree is the main focal point of the piece, I constructed it first. The photo below shows how I used matte board and wire to form the structure of the tree trunk.

The concept of using matte board as a base actually began over 40 years ago, when I designed a line of stuffed pins. You can follow the story of my pins here.

i still have the patterns for the various shapes, including the cat. The board inside gave a nice flat backing to stitch the pin fastener onto.

For the tree, I glued a piece of felt (the cheap stuff) to the back of the matte board. That way there is something for the needle to catch onto. Then, I wrapped a piece of felt (the good stuff) around the trunk, covering the front side and stitching it in place on the back.

Then, I stitched a zigzag pattern on the font side with variegated pima cotton made by the Caron Collection.

I used insulated wire of different gauges, sometimes stripping off the rubber/plastic coating to reveal multiple wires inside. It’s the kind of supply that can be found at hardware stores The skinnier wire inside became the finer limbs as the tree branched out.

I searched through my old lace collection until I found something that would evoke snow cover on the center tree’s outstretched branch.

I made the purple tree a little differently.

Being smaller in diameter, the purple tree didn’t need a board backing, so i just wrapped the wire armature with strips of cotton batting until they were the right thickness. I have no logical explanation as to why this tree is purple. I just wanted to cheer up the scene with something besides drab browns and grays.

Part 2 in this series, will be devoted to forming and wrapping the branches.

Frosty Morning note cards are available in my Etsy shop here.

To keep up with new posts, subscribe to this blog. Your contact info will not be shared. If you’d like to see more frequent photos tracking the projects in my studio, please follow me on Facebook and/or Instagram.

Frosty Morning Overview

Since January of this year (2021), I’ve been in full making mode, creating art for no reason other than the pure joy of it. It’s something I regularly promise myself at the end of long involved projects like illustrating a book or animating a film. I’m taking this year to work solely on a group of seasonal pieces that capture the wonder and magic of the natural world, both real and imagined.

Frosty Morning, which is the first completed scene in the series, was inspired by what I saw early one January morning, when every bare branch sparkled with ice crystals. I’m one of those rare people who loves winter so much that it never seems to last long enough. I think it’s because I like long periods of time to work without the distraction of warm weather.

This year, I’m working on a group of seasonal pieces that capture the wonder and magic of the natural world, both real and imagined. Frosty Morning, Mossy Glen, Harvest Time and Summertime are available as prints, jigsaw puzzles and note cards in my Etsy shop. 

UPDATE: All 4 seasons are included in my exhibition at the Albany Institute of History and Art in Albany, NY. Enchanting Threads: The Art of Salley Mavor has been extended to Match 2, 2025.

Right now, I’m working on the spring scene, which you can see documented in photos and videos here. My followers are so excited about the mossy landscape that it’s all I can do to fend off their questions about how I did this or that. I tell them, “I know you’re curious, but I’m in pure making mode right now and don’t want to dispel the magic by turning on the explaining part of my brain yet. That will come later when the piece is finished and I write about it on my blog.”

If you’ve been reading this blog for a while, you know that I operate outside of the mainstream, in a different needle and thread universe. It’s been a struggle to find my place in the technique-driven model ingrained in the needle arts community. In the essay, To Teach or Not to Teach, I discuss in detail my approach to making art and my personal philosophy about sharing knowledge.

So, with all of that in mind, I’m preparing to turn on the explaining part of my brain, at least enough to say something to go along with the photos. Over the summer, I will be telling the story of making Frosty Morning in a series of posts that focus on different aspects of my working process. My aim is to inspire more than instruct, to give a peek behind the curtain that may spark your own kind of creativity.

I took lots of photos along the way, so there’s enough material to delve more deeply into several areas including making trees, snow and ice, cozy little shelters, a stone wall and the ubiquitous wee folk characters. The following photos are just a sampling of what’s to come.

Frosty Morning Part 1 – trees, Part 2 – branches, Part 3 – shelters, Part 4 – stone wall, Part 5 – sparkles, Part 6 – wee folk.

See the series of Frosty Morning Posts: Part 1 (trees), Part 2 (branches), Part 3 (shelters), Part 4 (stone wall), Part 5 (sparkles) and Part 6 (wee folk).

Frosty Morning, Mossy GlenHarvest Time and Summertime jigsaw puzzles, prints and note cards are available in my Etsy shop.

To keep up with new posts, subscribe to this blog. Your contact info will not be shared. If you’d like to see more frequent photos tracking the projects in my studio, please follow me on Facebook and/or Instagram.

Social Fabric exhibition in Greenville SC

I’m excited to announce that my exhibition, Social Fabric is on display at the Upcountry History Museum in Greenville, South Carolina! It’ll be there for a good long while, through Sept. 5, 2021. Seeing the detail and 3-dimensional quality of my work up close is a very different experience than looking at printed or digital images. It feels like you’re peeking into the miniature stitched worlds from a side window, not just through the front entrance. So, I encourage those of you who live within a reasonable distance of Greenville, SC to visit the museum this summer. You won’t be able to miss the humongous banner hanging outside the building!

6 years ago, the Upcountry History Museum hosted my Pocketful of Posies exhibition and I’m pleased to have another opportunity to show my work there! In the near future, they will also be hosting the Bedtimes Stitches touring exhibition. We’re still working out the dates, but it looks like the show will be scheduled in late 2023 or early 2024.

SALLEY MAVOR: Social Fabric
April 3 – Sept. 5, 2021
Upcountry History Museum, Greenville, SC

The museum’s exhibition designer kindly sent photos of the display. I love how the cherry wood frames and the vinyl cutouts of birds look on the slate gray walls!

Birds of Beebe Woods

This exhibition includes a variety of pieces I’ve made over the past 20 years that interpret the theme of social connectivity. The works explore cultural diversity, migration, fashion, the natural world, and a range of social narratives, from the everyday to topical subjects.

The large pieces (24″ x 30″) average about 4 months to make, so it’s taken years to accumulate enough pieces to show together like this. That’s why I’ve decided not to sell my recent work, including Birds of Beebe Woods and Displaced.

Displaced, 24″ H x 22″ W, 2016

Large pieces that feature portraits of people who are connected to each other in various ways include Whiskers, Face Time and Cover Up. There’s also Walking the Dog, Rabbitat and several original illustrations from the picture books, You and Me : Poems of Friendship (1997) and In the Heart (2001).

Dana Thorpe, the director of the Upcountry History Museum wrote this about Social Fabric, “Your work is breathtaking, emotional, and energizing. I have the pleasure of walking through the Mezzanine Gallery, where the exhibition is on display, every day and am inspired.”

The Social Fabric exhibition also includes Self Portrait: A Personal History of Fashion, which you can see in this film. I hope that you enjoy the nostalgic soundtrack!

To keep up with new posts, subscribe to this blog. If you’d like to see more frequent photos tracking the projects in my studio, please follow me on Facebook and/or Instagram.

making Face Time (part 1)

This post was first published in 2015.

About a year ago, my newest piece, Face Time started taking shape. I took pictures along the way, during the many months that its collection of little heads occupied my work table. The piece was completed this past winter after about 6 months of work.

IMG_9725

I’m often asked how long it takes to make a large piece like this (24″ x 30″). It’s hard to say for sure, because my days are interspersed with so many other activities (and distractions) having to do with the business side of being an artist. Of course, I’d rather be stitching every day in my studio, but I fear that would lead to an obscure life, without a presence beyond my studio walls. I’d guess that at least 50% of my work time is spent promoting my art in some way; e-mails, interviews and other publicity, Etsy Shop, editors and publishers, social media, entering and arranging exhibits, etc. OK, that’s enough of a reality check–shall we stick with the romantic notion of spending all day stitching in a window seat?

family tree-2

I’d like to take you through the making of Face Time, so you can have a sense of what’s involved.  If you’ve read my post, When to tell how and when not to, you’ll know that I don’t always show my process, but this is one of those instances when I’ve taken enough photos to warrant a 3 part series. I’m excited to share the new direction my work has taken!

For Face Time, I started in the usual way, thinking about the idea for a long time before jotting down tiny drawings in my sketch book. While I work, the concept remains strong and constant, while the overall design changes with time. I also consider how the parts will be rendered in embroidery and 3 dimensional needlework.

FaceTime-2051

I wanted to show different people from all over, evolving through time, from long ago civilizations at the bottom, to present day people at the top. I wasn’t so interested in making a personal family tree, but a depiction of the world’s collective heritage. I envisioned a group of faces from a variety of backgrounds and cultures peeking out of the greenery, all linked to a tree-like form.

FaceTimeWM-9573
FaceTime-9577

Researching fashion history was very fun! Online, I found pictures of hair styles, beards, hats and garments. In addition to wigs and painted facial features, each wooden head had a bit of clothing showing at the neck and shoulders. They expand on the wee folk doll projects from my how-to book, Felt Wee Folk – New Adventures. Wire glasses were something new, which I thought contributed to the individuality of some characters.

FaceTimeWM-9612

Over a period of many weeks, the heads grew in number, filling my modest work table.

FaceTimeworktable-1

There ended up being 41 heads in all, covering many centuries. Here they are, in a group shot, before they were separated by leaves and branches in the finished piece. I will show more about that in part 2.

FaceTimegroupWM-

To keep up with new posts, please subscribe to this blog. Your contact info will not be sold or shared. If you’d like to see more frequent photos tracking the projects in my studio, please follow me on Facebook and/or Instagram.

Bedtime Stitches exhibition opens in Illinois

I am delighted to announce that the Bedtime Stitches touring exhibition is opening today at the Cedarhurst Center for the Arts in Mt. Vernon, IL, which is in the southern part of the state. This is an opportunity for those of you in the middle of the country to see the original bas-relief embroidered artwork for my picture book MY BED. UPDATE: The exhibition has been extended to August, 2021 (closing date TBA). I’ve already heard from fans who will be driving from Chicago, St. Louis and Nashville to see the show. Others from further away are planning overnight visits. I wish I could be there to greet you all, but my artwork will have to stand in my place.

Whenever I post announcements about the exhibition, I hear from folks who want the exhibition to come to places near where they live. I would love to be able to point to locations on a map and have them magically appear on the schedule, but that requires enlisting venues to partner with. So far, Bedtime Stitches is booked at locations in eastern, western, northern and southern parts of the country through mid 2023. The current schedule is at the end of this post.

So, will more locations be added? I’m open to extending the tour, if there is an interest. To make that happen I need your help. Over the past few years, I’ve contacted just about every quilt and textile related venue I could find, as well as other art museums. For whatever reason, sending proposals hasn’t worked. What has worked are personal contacts and extra motivated fans. Several bookings are at places that have shown my work before and a few came about as the result of fans telling their local museums about the opportunity to host the show. So, if you would like to see the exhibit come closer to your doorstep, I encourage you reach out to museums in your area. They are more apt to respond to an enthusiastic member of their community than to some random stitching lady they’ve never heard of before. Past experience has taught me that as more people experience the book and exhibition, the word spreads and new opportunities will arise. Interested museums are welcome to write me via the contact form at the bottom of this post.

The staff at the Cedarhurst Center for the Arts put together this Eye Spy game for their visitors. It could also be fun for those looking through the pages of the MY BED book at home. You can download it here:

SALLEY MAVOR: Bedtime Stitches
Feb. 28 – May 2, 2021, Cedarhurst Center for the Arts, Mount Vernon, IL
Sept. 14 – Dec. 31, 2021, New England Quilt Museum, Lowell, MA
Jan. 22 – May 8, 2022, Upcountry History Museum, Greenville, SC
June – September 2022, Brick Store Museum, Kennebunk, ME
Oct. – Dec., 2022, Historical and Cultural Center of Clay County, Moorhead, MN
Feb. 1 – Apr. 30, 2023, Pacific Northwest Quilt & Fiber Arts Museum, La Conner, WA
Additional locations will be added when they are confirmed.

Autographed copies of the book, MY BED are available in my shop here.

Watch MAKING MY BED, an 8 minute documentary film about how Salley Mavor created the illustrations for MY BED on YouTube.

To keep up with new posts, please subscribe to this blog. Your contact info will not be sold or shared. If you’d like to see more frequent photos tracking the projects in my studio, please follow me on Facebook and/or Instagram.

Go back

Your message has been sent

Warning.
Warning
Warning
Warning