I make 3-dimensional fabric relief pictures that are photographed and used to illustrate children’s books. I sew together different materials to create fanciful scenes in relief, much like a miniature stage set, with figures imposed on an embellished fabric background. My work is decorative and detailed, full of patterns from nature and found objects, all sewn together by hand with a needle and thread.
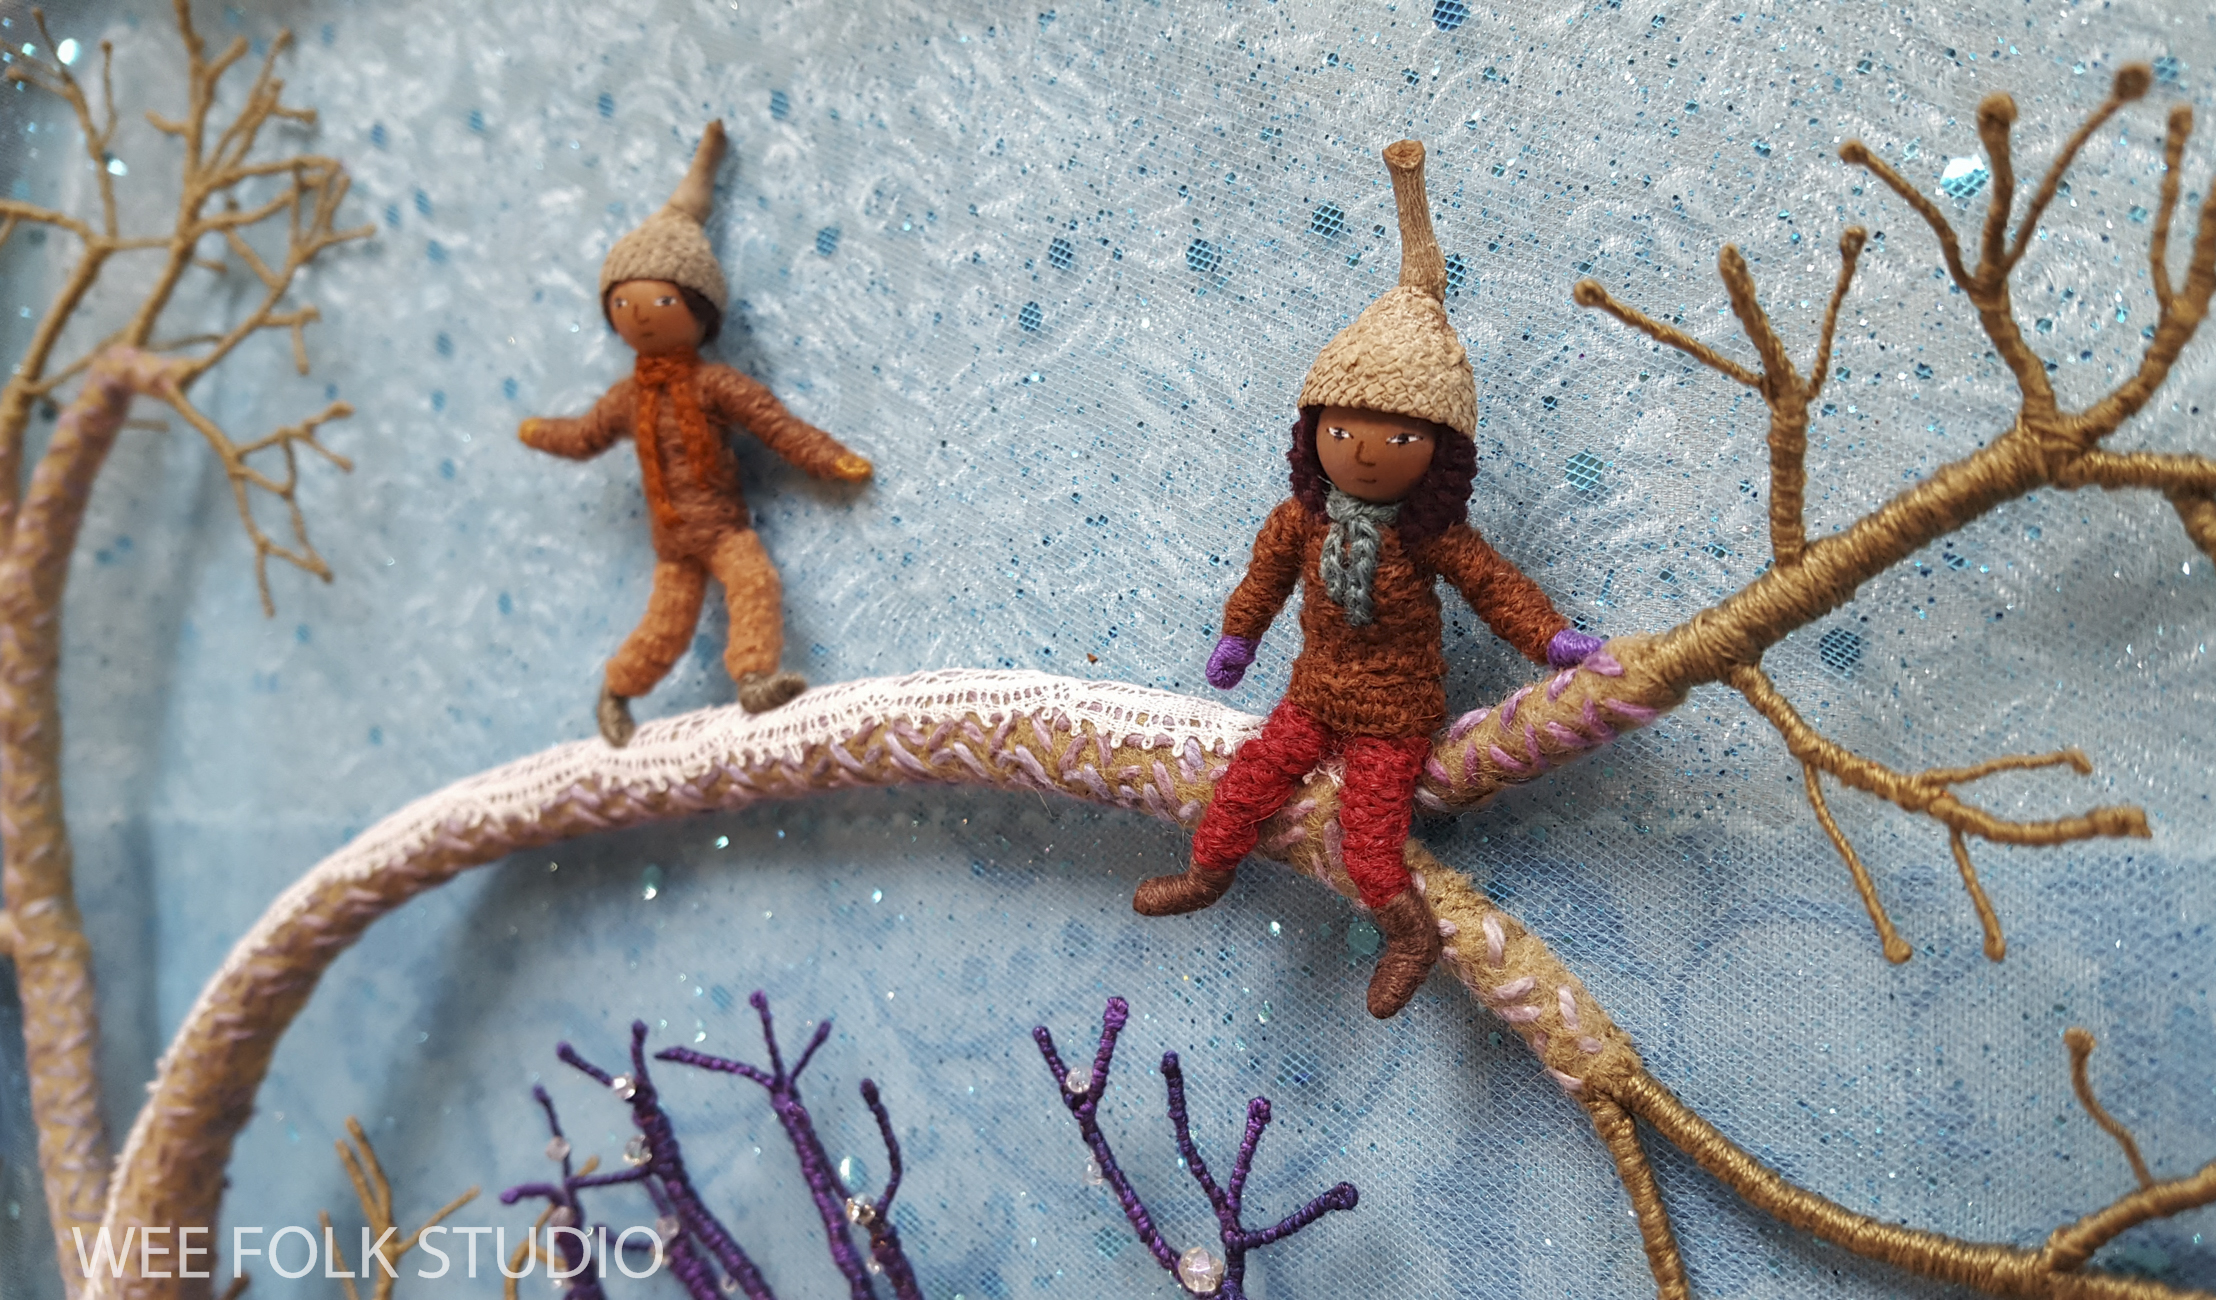
Happy Winter Solstice! On this shortest day of the year, I invite you to watch a one minute video that features a selection of my art that celebrates winter. I also sing the first snippet of the carol, “In the Bleak Mid-winter.” The winter wonderland that you see here is hardly bleak, but I think that Christina Rossetti’s words beautifully evoke the coming season. She wrote the poem in 1872, and it was put to music in the early 1900’s by Gustav Holst.
In the bleak mid-winter. Frosty wind made moan. Earth stood hard as iron, Water like a stone; Snow had fallen, snow on snow, Snow on snow, on snow. In the bleak mid-winter. Long ago.
To keep up with new posts, please subscribe to this blog. Your contact info will not be sold or shared. If you’d like to see more frequent photos tracking the projects in my studio, please follow me on Facebook, Instagram and BlueSky.
Winter arrived overnight on Cape Cod and snow is still falling as I write this. It’s the kind of snow that comes down gently and sticks to every branch. No howling wind and drifts to shovel, just a blanket of peace and quiet. What better way to feel the spirit of the holidays?
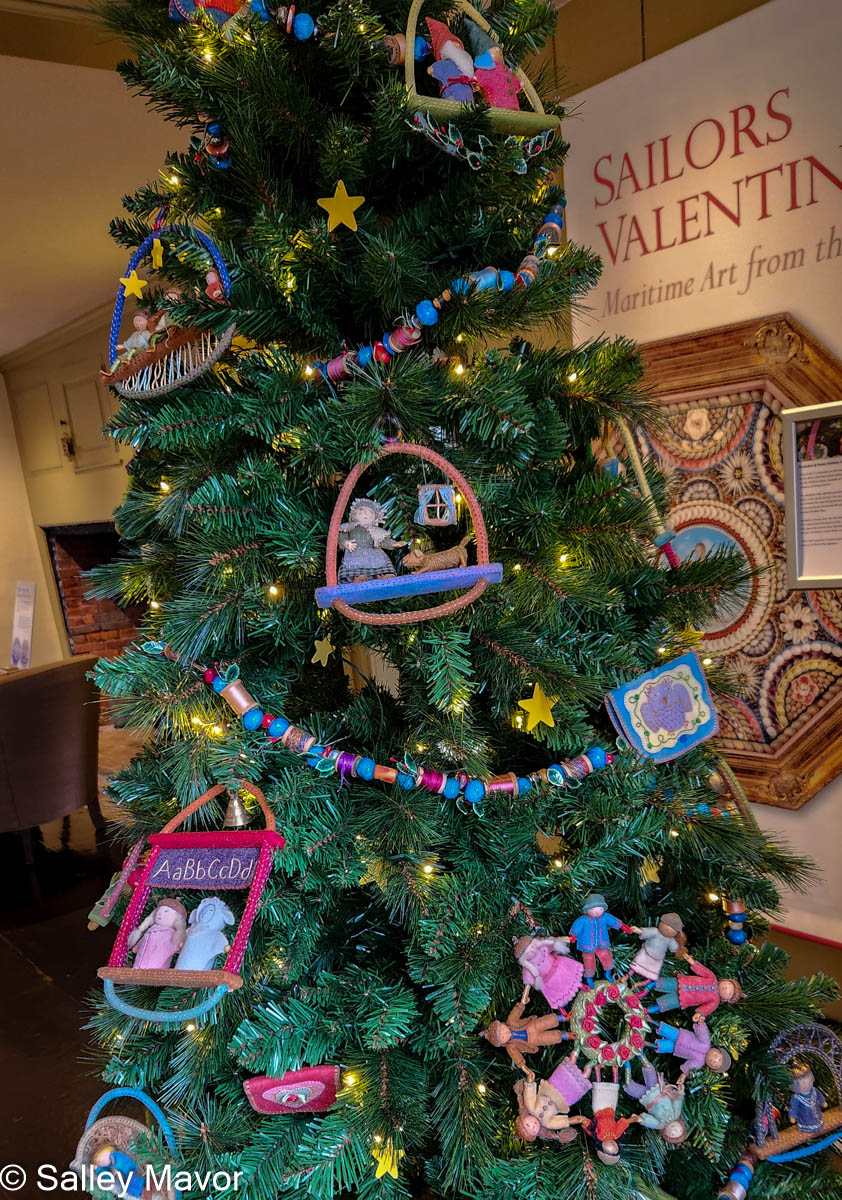
With that in mind, I’d like to let you know about the opportunity to see my Pocketful of Posies tree and come to an all-ages Storytime at the Cahoon Museum. For those of you from far away, I’ve posted photos of the tree, with lots of closeup views.
Pocketful of Posies Holiday Tree If you live locally, please stop by the Cahoon Museum of American Art in Cotuit, MA. My collection of nursery rhyme ornaments are displayed in the Pocketful of Posies Holiday Tree thru Dec. 21st.
Storytime with Salley Mavor Please join me on Sat., Dec. 20 at 11 AM for an all-ages Storytime. After I read selections from My Bed and Pocketful of Posies: A Treasury of Nursery Rhymes, I’ll be available to greet visitors, sign books, and answer questions.
I originally made these ornaments in 2012 to decorate a tree for the Concord Museum‘s annual Family Trees: A Celebration of Children’s Literature event. Every year, the museum organizes a slew of volunteers who craft handmade decorations for dozens of story trees inspired by classic and recent children’s books. When I was notified that my book, Pocketful of Posies, was selected as one of the titles in 2012, I offered to decorate the tree myself.
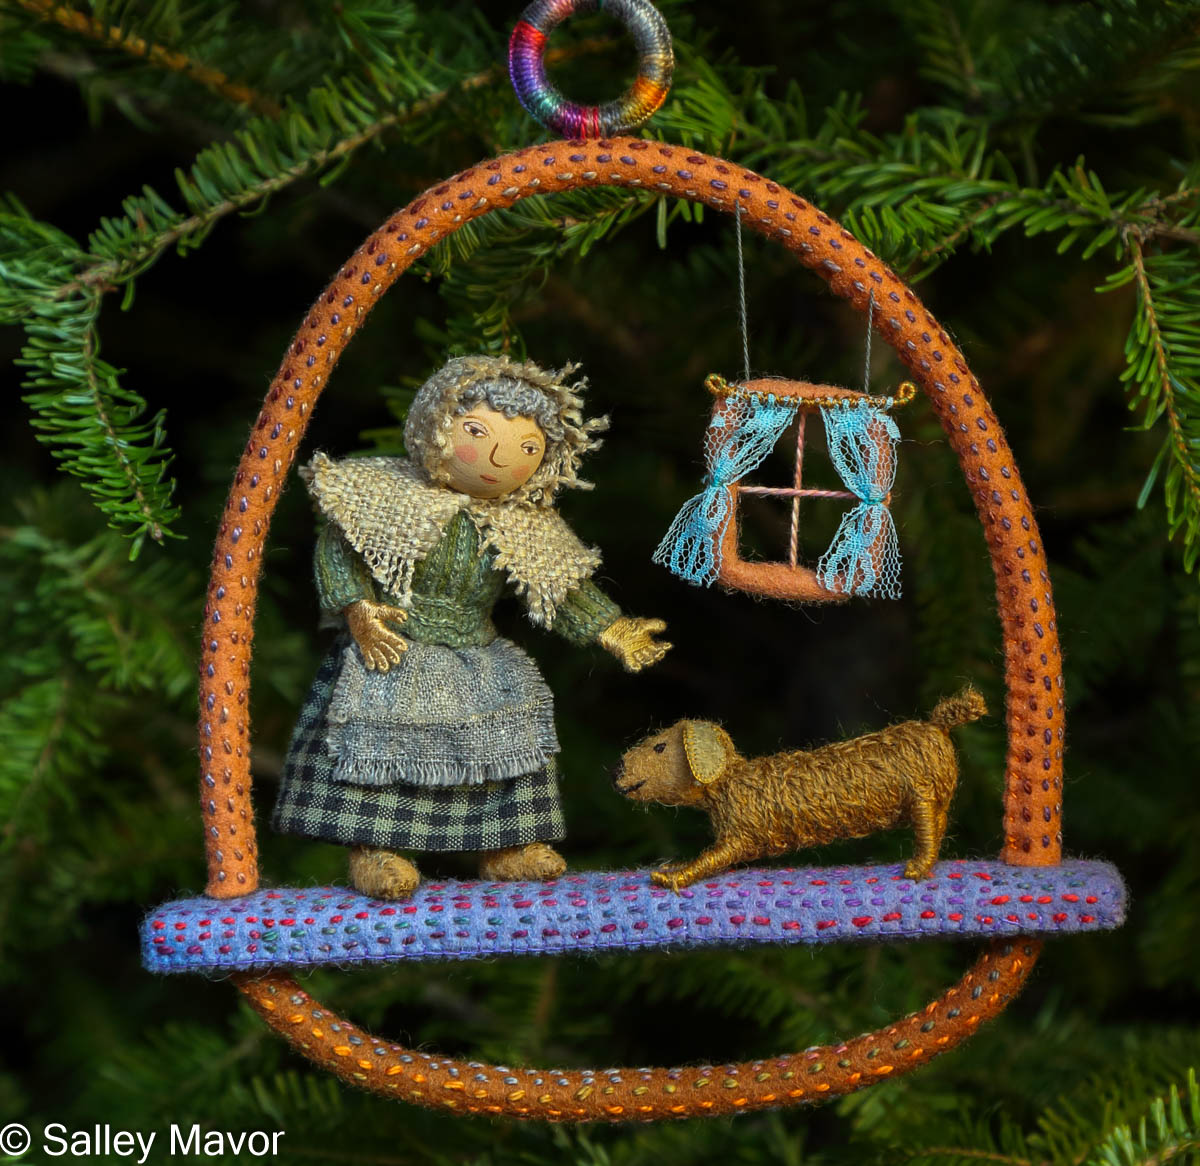
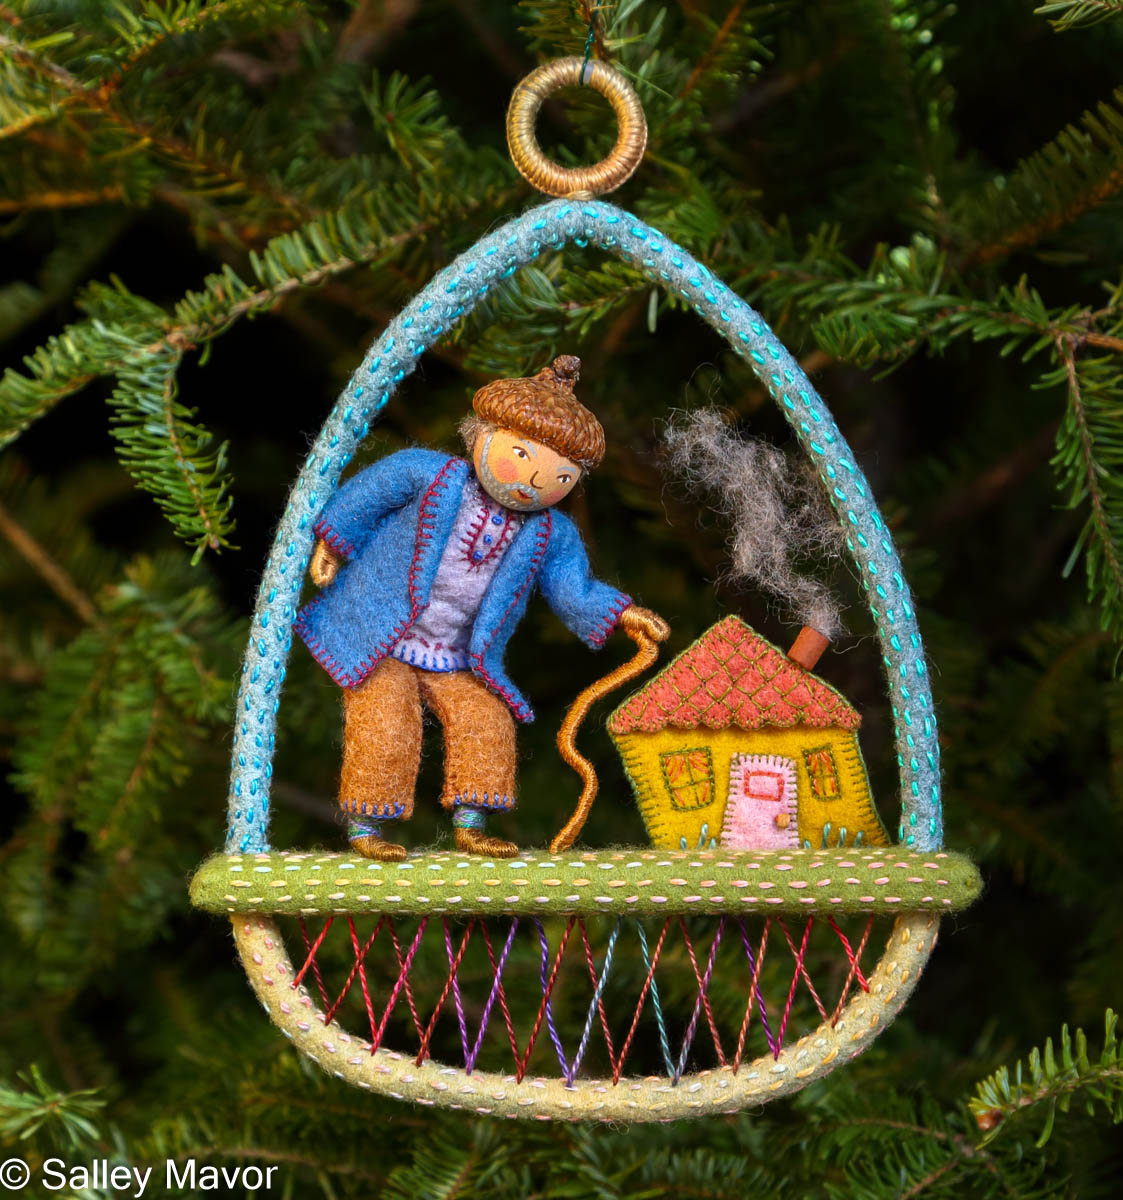
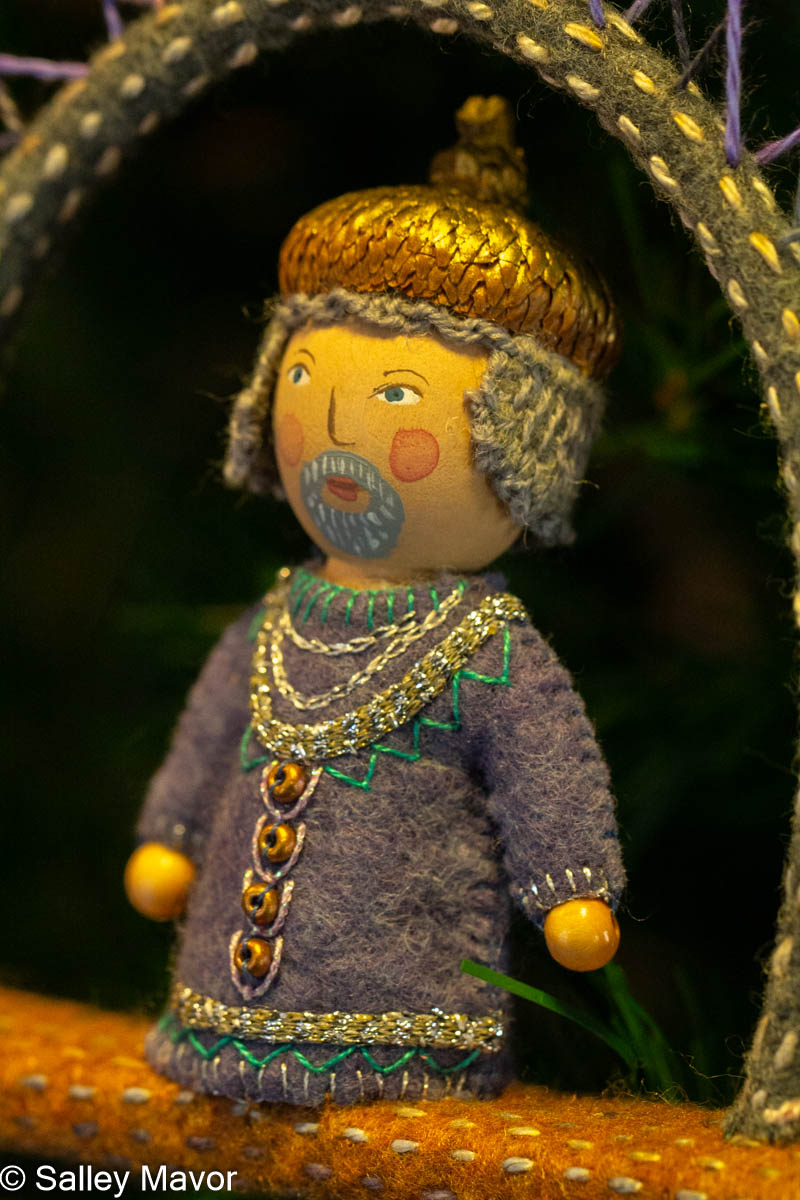
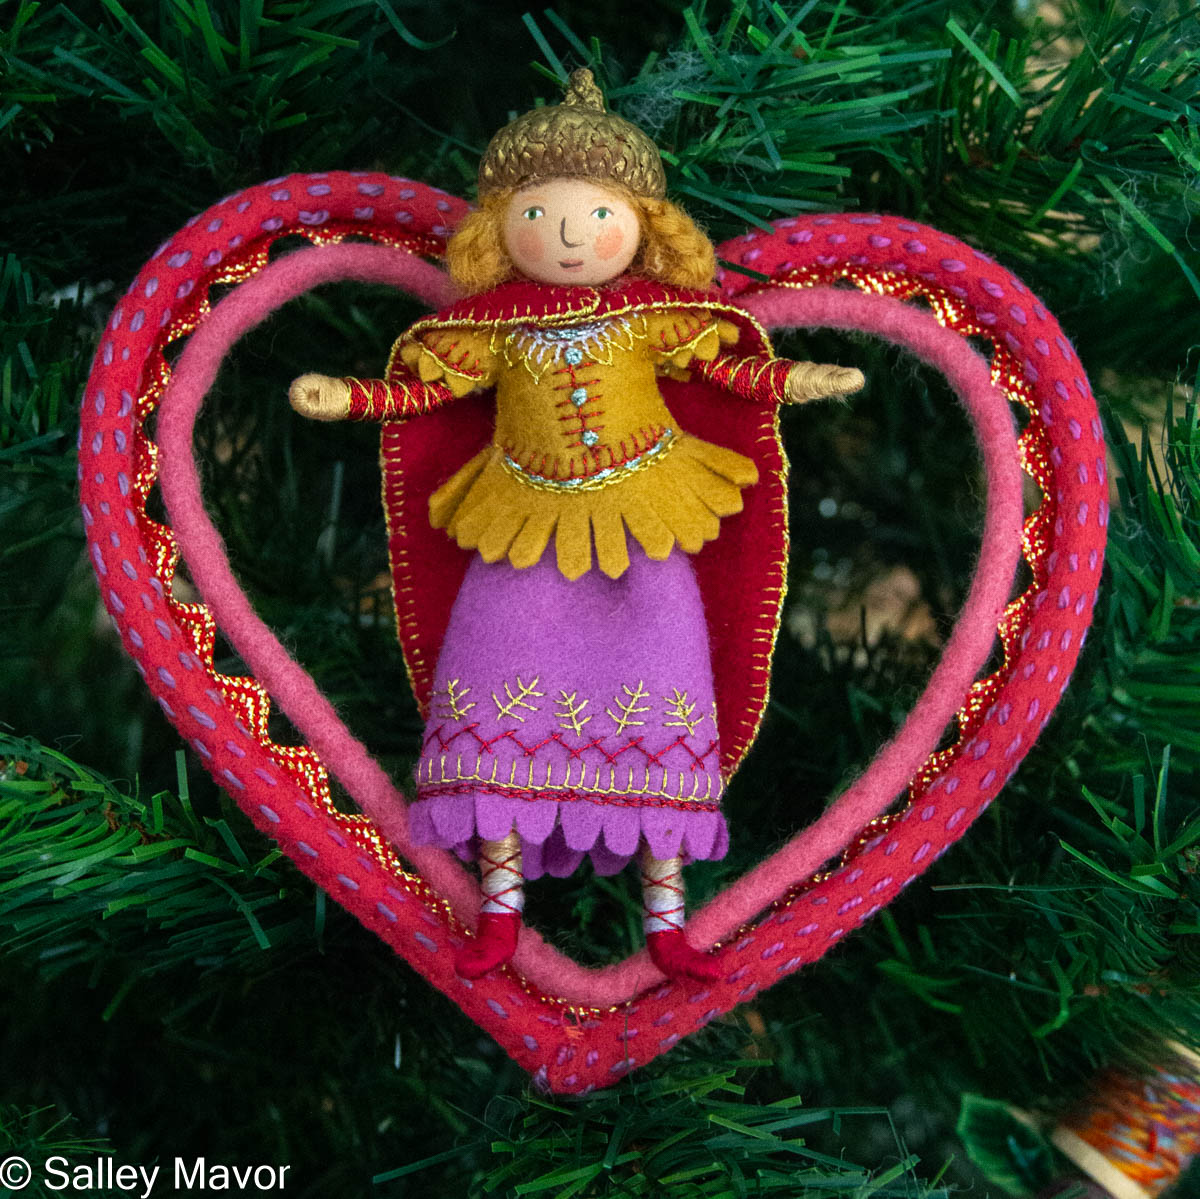
Over a period of 2 months, I made a collection of vignettes that feature different nursery rhyme characters from the book, from Humpty Dumpty to Old Mother Hubbard to Little Boy Blue.
The rhymes are acted out inside felt covered wire and wood frames that serve as little stage platforms. When I made these, I’d just completed Birds of Beebe Woods and was looking for other ways to incorporate felt covered wire into my work.
The figures are variations of the doll projects in my how-to book, Felt Wee Folk. I loved revisiting the nursery rhyme characters in a totally 3-d form!
I hope that you enjoy this glimpse at the vignettes. Season’s Greetings to you!
To keep up with new posts, please subscribe to this blog. Your contact info will not be sold or shared. If you’d like to see more frequent photos tracking the projects in my studio, please follow me on Facebook, Instagram and BlueSky.
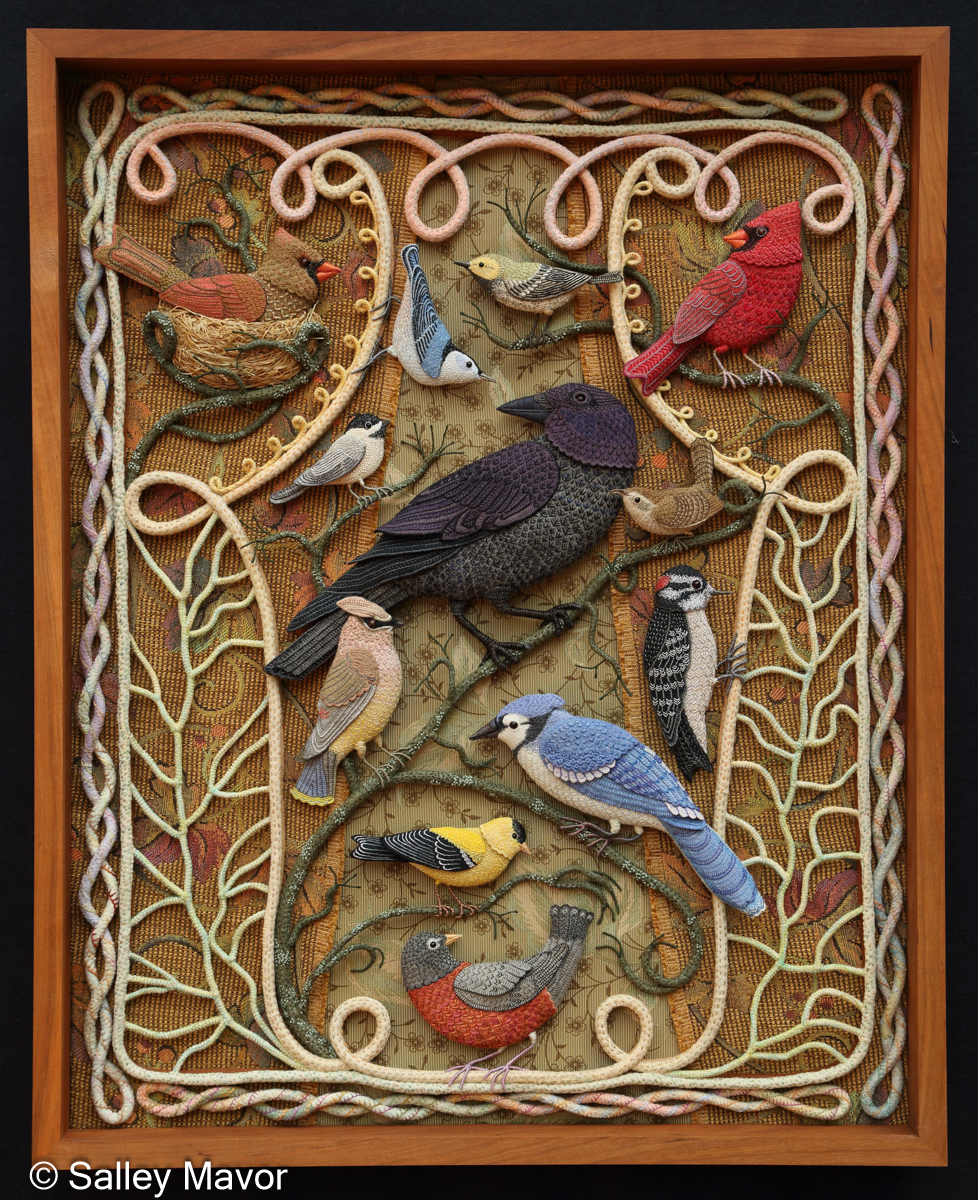
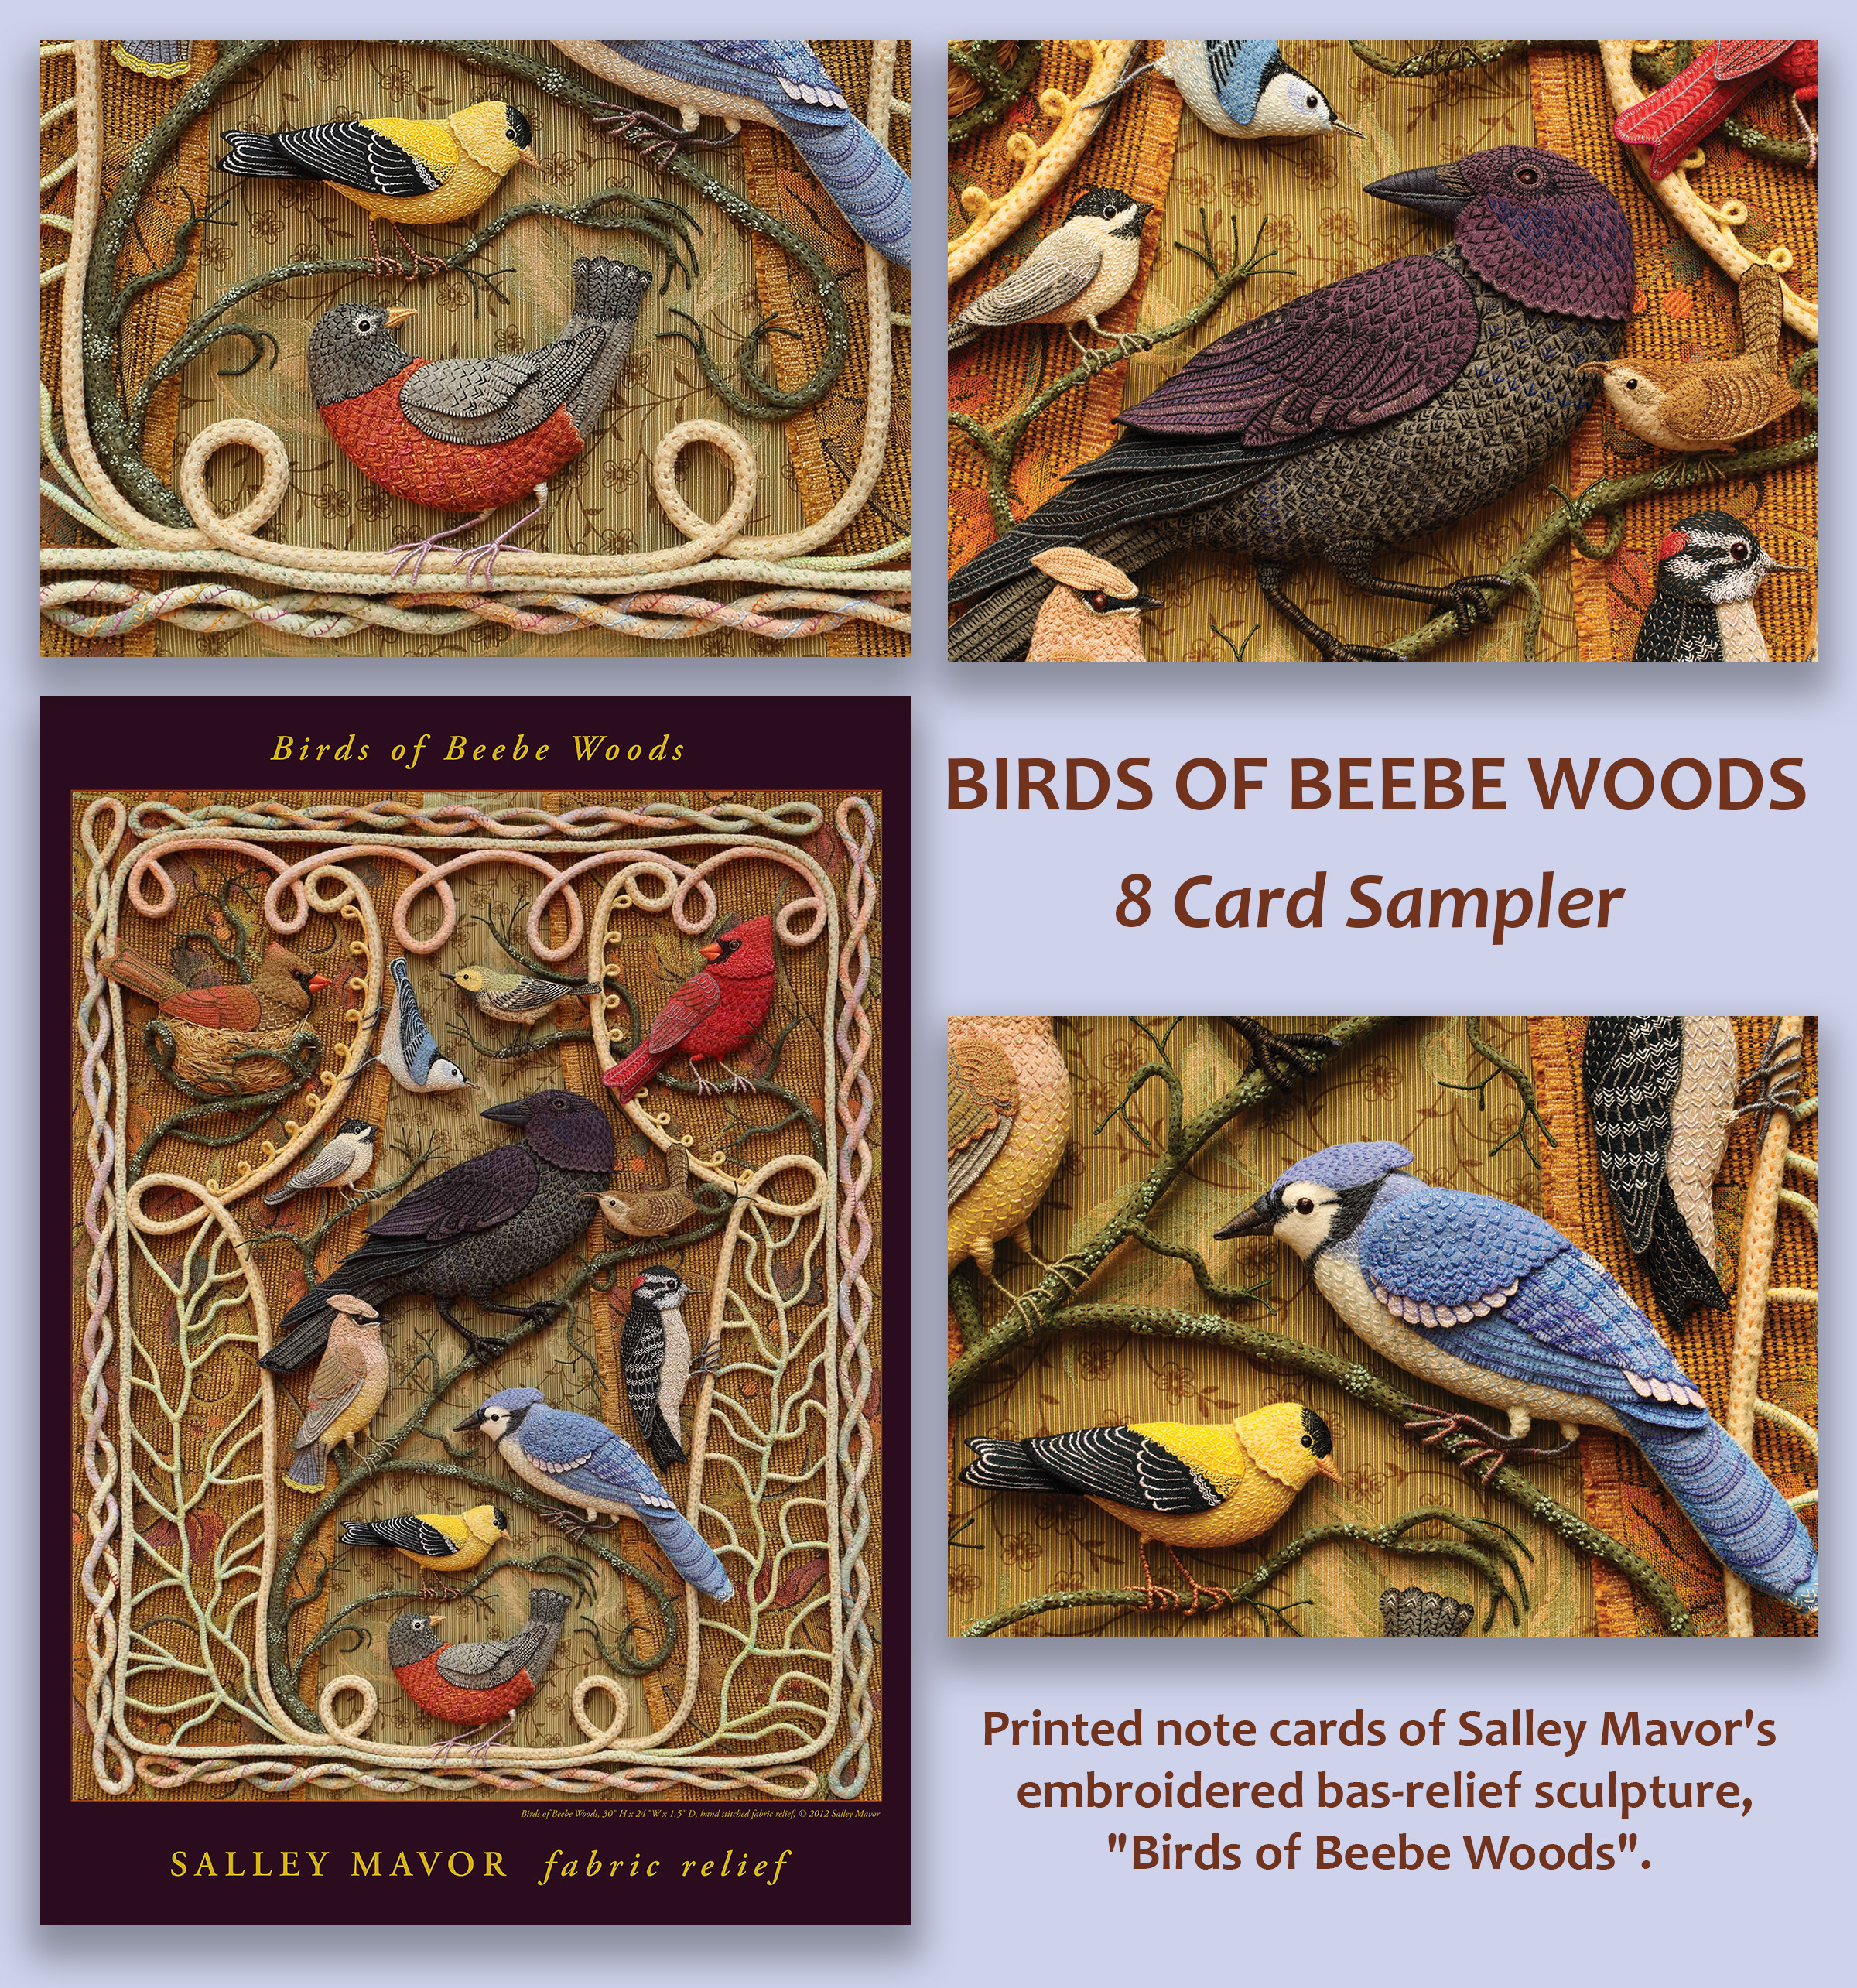
Today, I’d like to revisit Birds of Beebe Woods (2012) and share thoughts about what inspired this collection of hand stitched birds, as well as give a behind the scenes peek at how I made it 13 years ago.
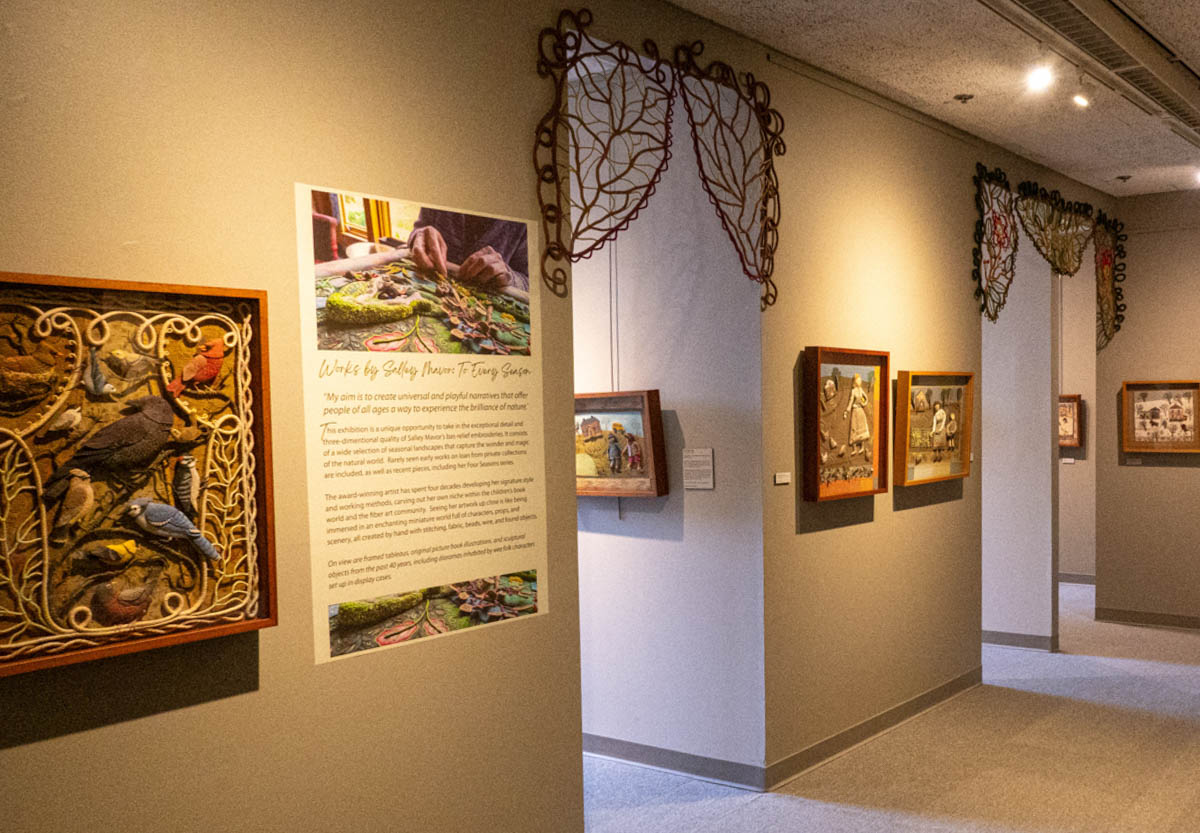
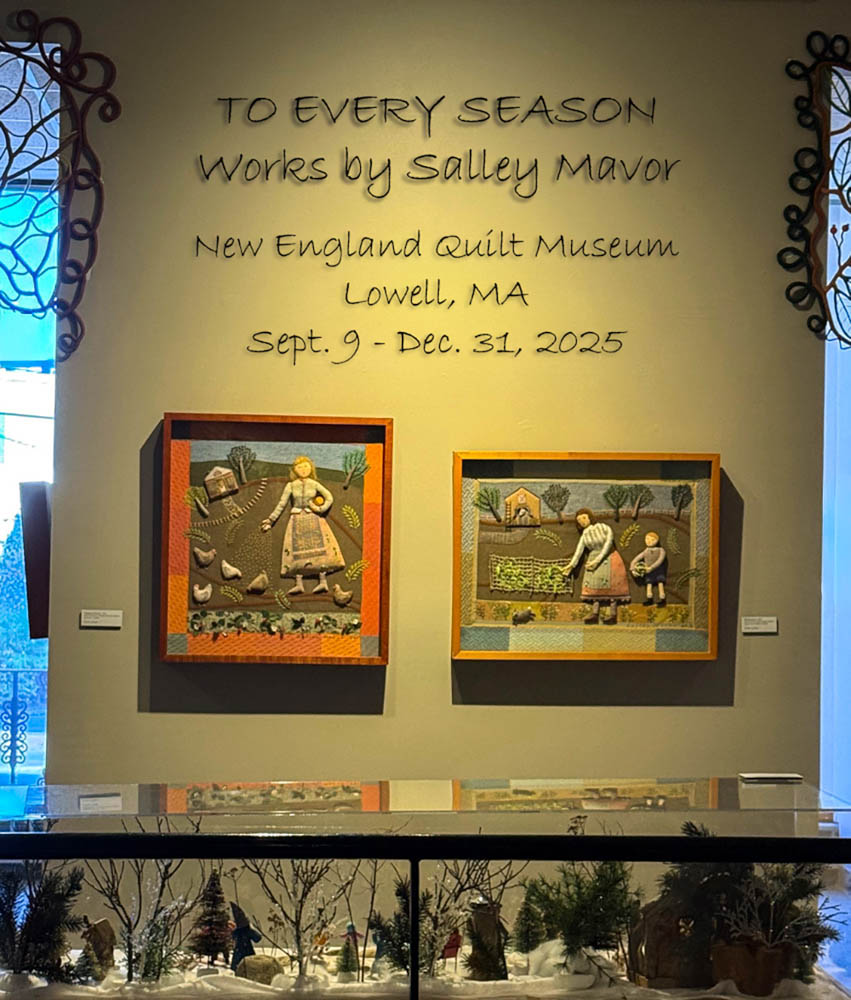
To Every Season: Works by Salley Mavor at the New England Quilt Museum
Origin Story In the spring of 2012, I was invited to make a piece for a group fiber art show celebrating Beebe Woods, the beloved town forest in my hometown of Falmouth, MA. The exhibition, titled The Intimate Woods: A Celebration of Beebe Woods was shown at Highfield Hall in the fall of 2012.
The assignment was to use fiber techniques to make art inspired by Beebe Woods. All of the artists in the group where local and quite familiar with the numerous paths and stone walls crisscrossing the 388 acre wooded conservation land. Normally, I wouldn’t be able to fit in a months-long project like this on such short notice, but thankfully my schedule was open. It helped that I’d (temporarily) sworn off doing another children’s book after the recent 3-year marathon to complete Pocketful of Posies.
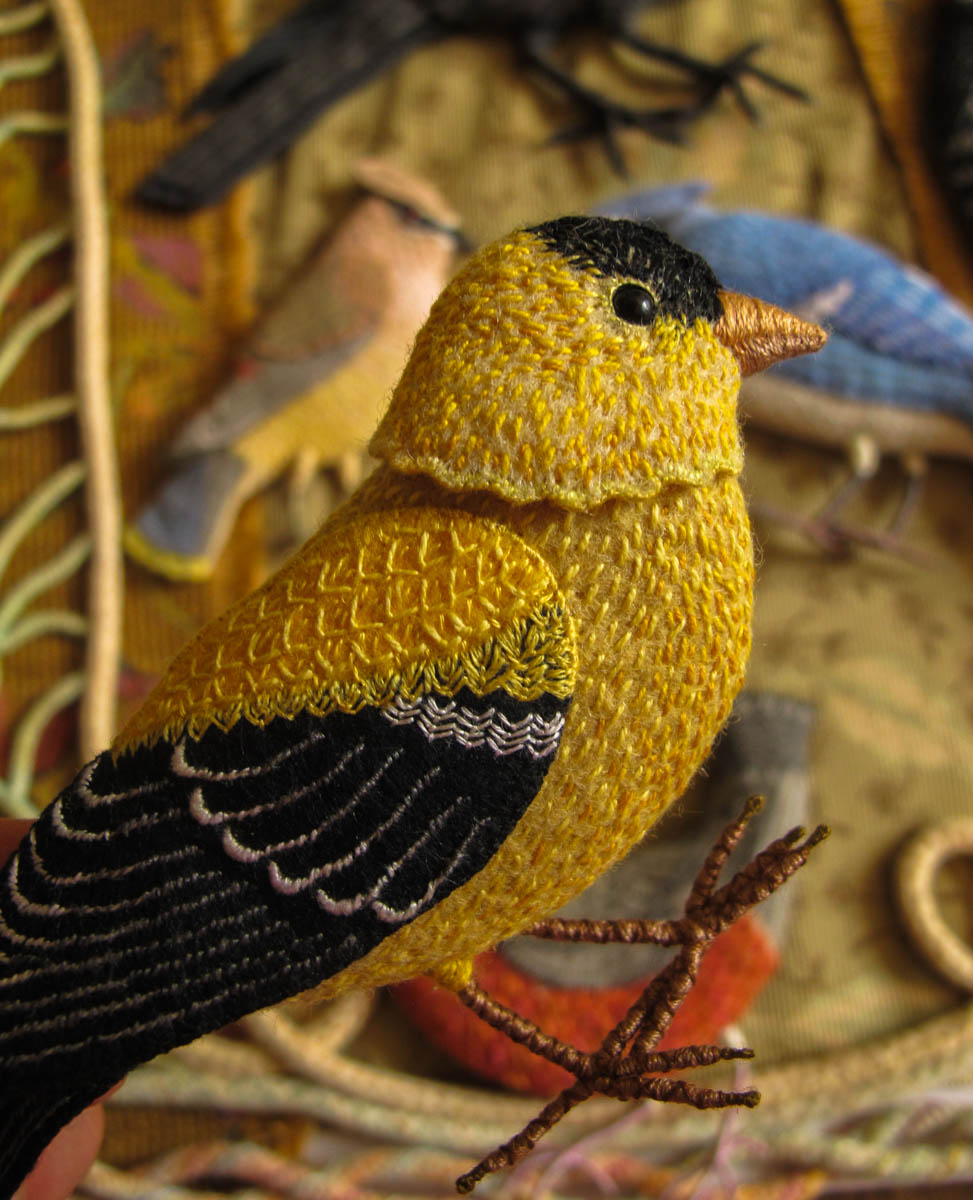
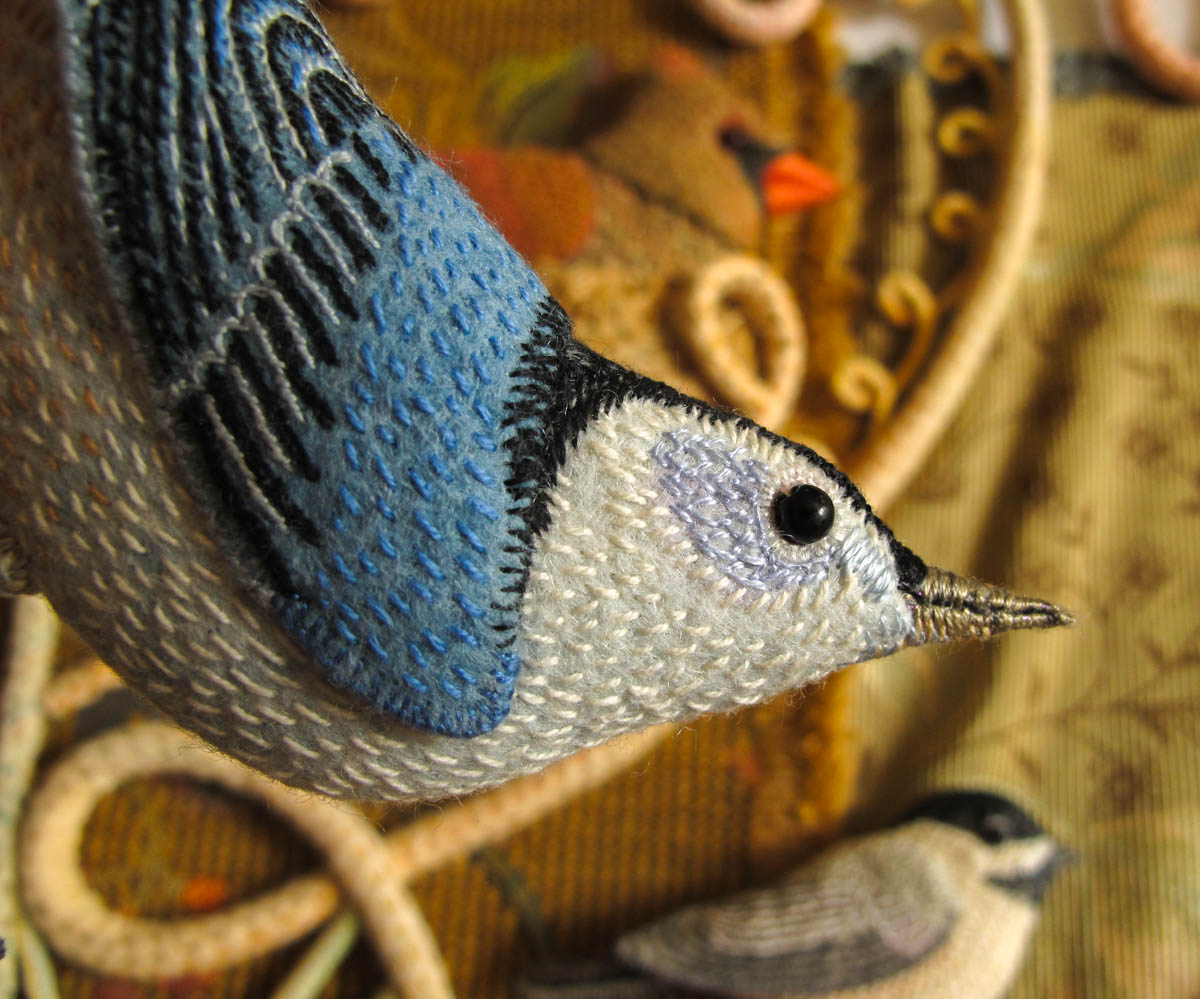
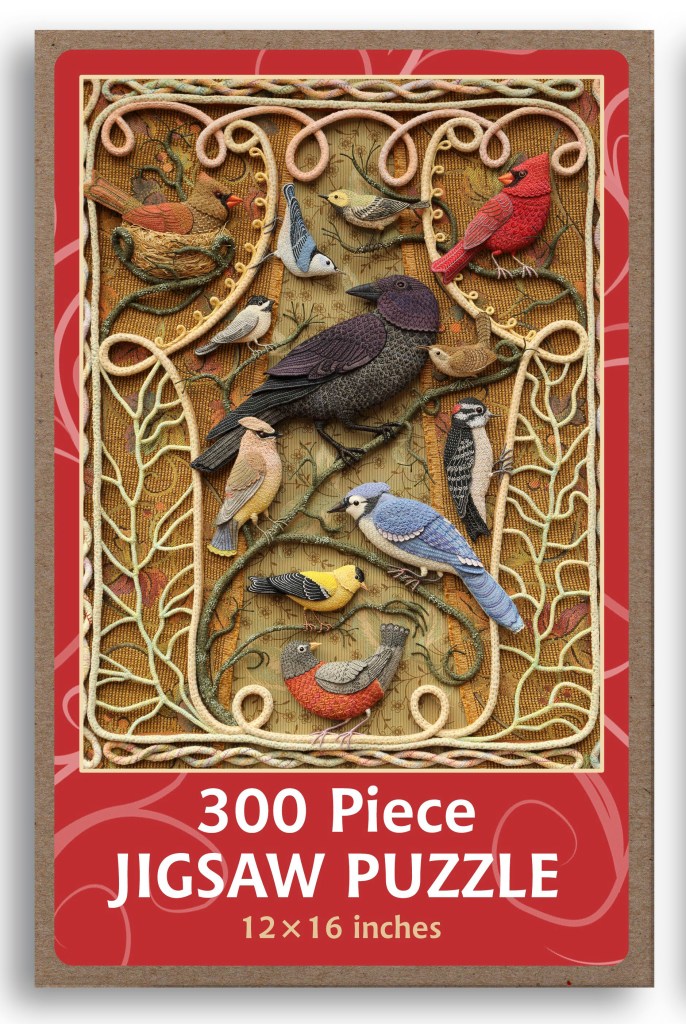
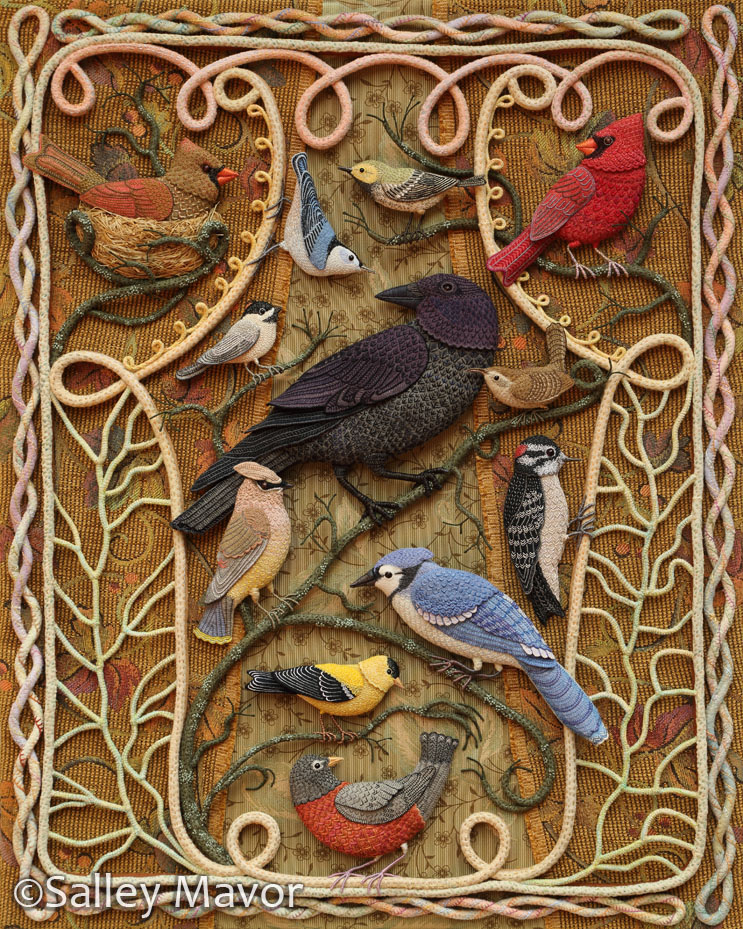
The 12 Birds Listed clock-wise from the top, the birds are female cardinal, nuthatch, black-throated green warbler, male cardinal, wren, downy woodpecker, blue-jay, robin, goldfinch, cedar waxwing, American crow and chickadee.
Show and Tell It was clear from the beginning that I wanted to do more than just convey the natural wooded environment in Beebe Woods. A landscape devoid of characters, whether they be human or animal, wouldn’t hold my attention for long – I need eyeballs to connect with! I chose to portray birds, making them realistic enough to be recognizable, but patterned and abstracted in a way that made them fun to stitch. I wouldn’t call myself an avid bird watcher, but after closely studying birds for this piece, I’ve become more in love with them.
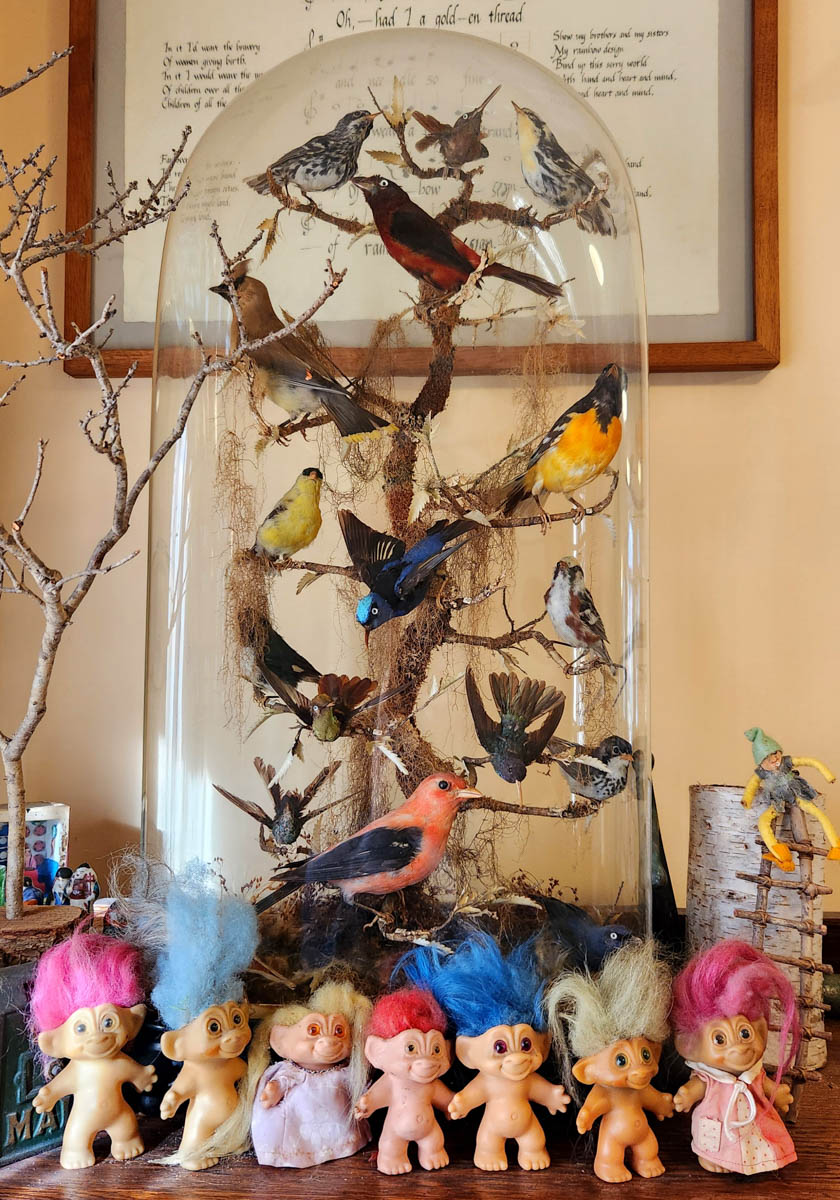
The first step was to jot down ideas in thumbnail sketches. The drawing I liked best was a group of birds perched on branches, framed by a woodsy border. At this point, the birds were pretty stylized and more like place holders. Looking back, I realize that I must have been influenced by my grandfather’s Victorian glass dome with taxidermy birds that sits in my studio.
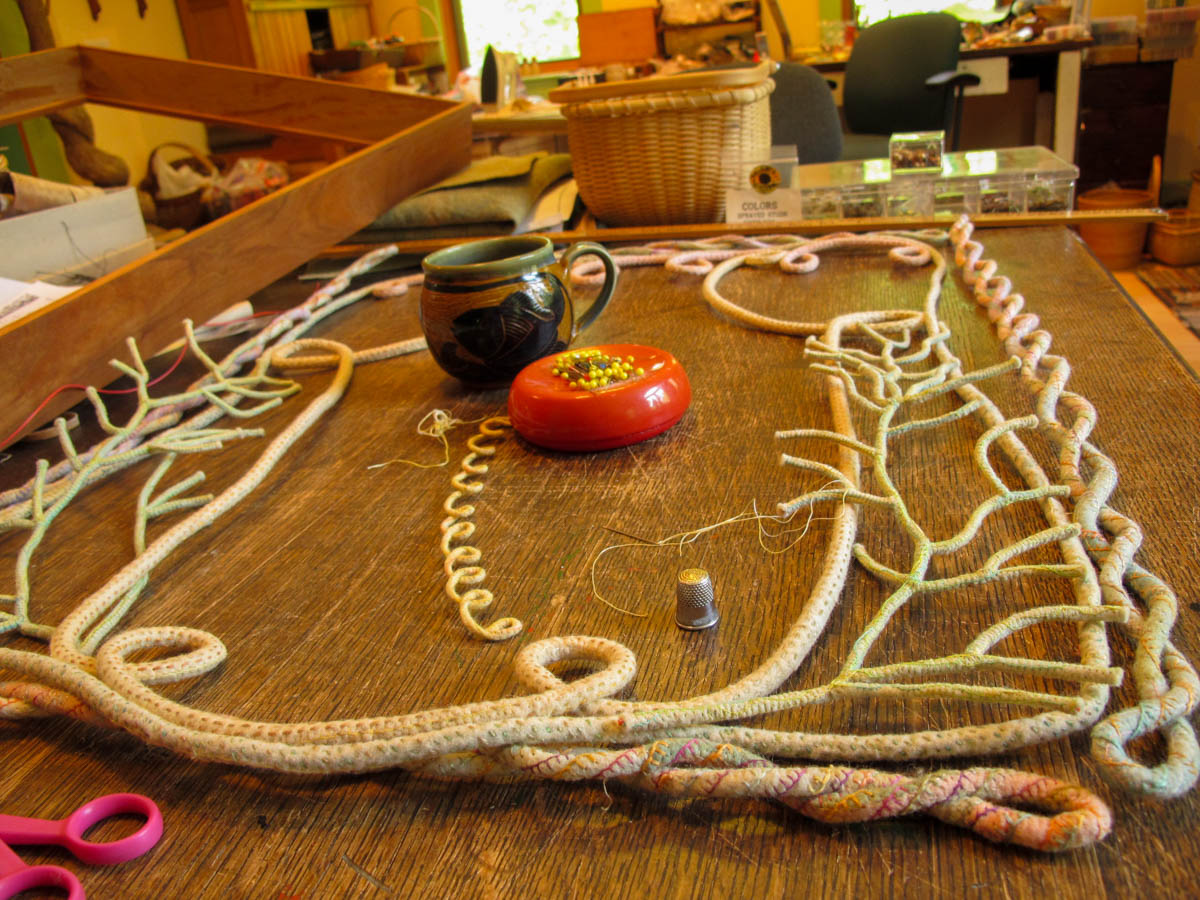
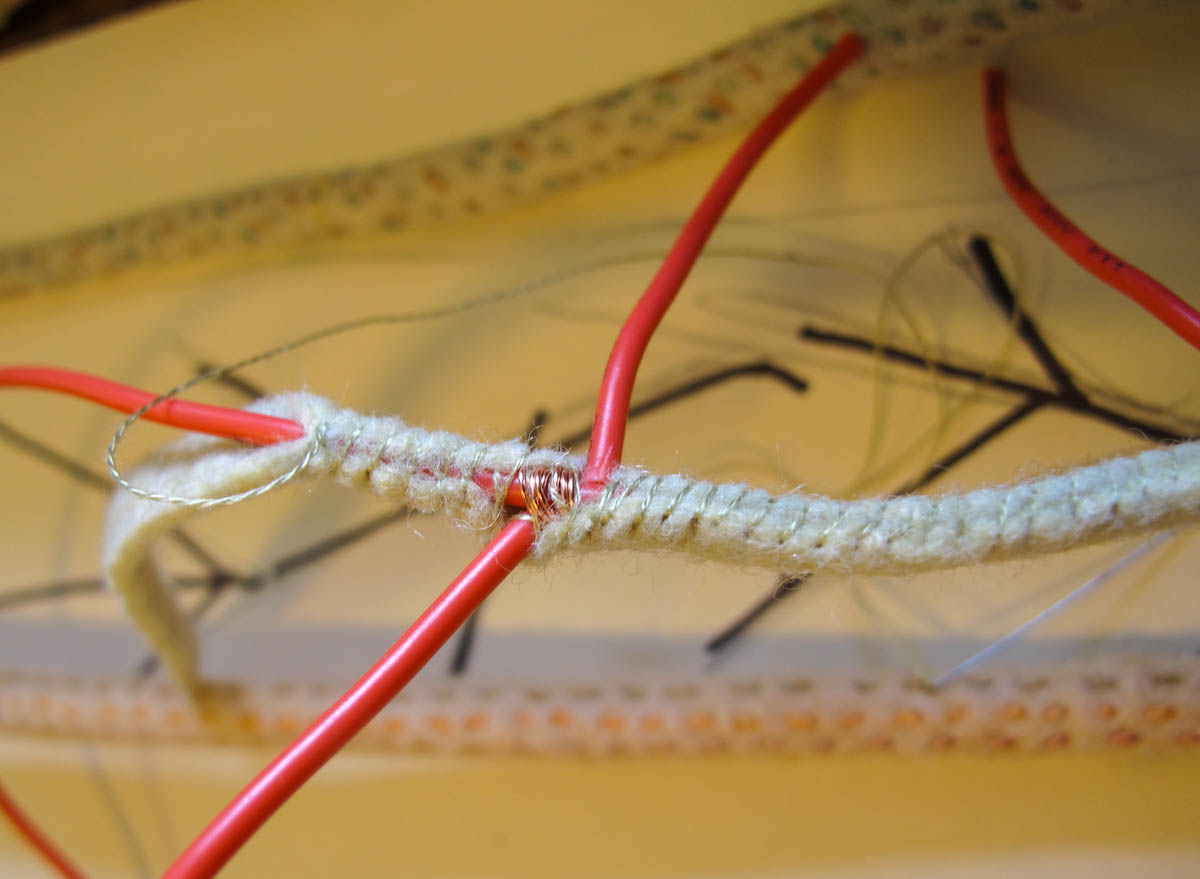
Next, I concentrated on the border, which set the stage for the collection of birds.
This may be my first example of making “felt filigree” sculpture, which involves covering wire with strips of felt to form intersecting lines. Felt covered wire has been a mainstay in my pieces for several years, including the recent collection of botanical sculptures hanging in the gallery entrances to my exhibition at the New England Quilt Museum.
After constructing the felt filigree border, I researched bird species that visit our corner of Cape Cod and picked out ones of a variety of sizes and plumage colors. I cut out paper birds and juggled them around. The finished composition wouldn’t be clear until the very end, after all of the birds were completed. I remember thinking that different birds would never mix together this way in real life. Then I reminded myself that I was making art, which didn’t have to conform to reality.
I printed out photos and illustrations of the birds to use as reference. The crow insisted on being made first and then I added the other birds one at a time.
I knew that the success of this piece was hinged on the dominant positioning of the crow and the strategic placement of the smaller birds around it.
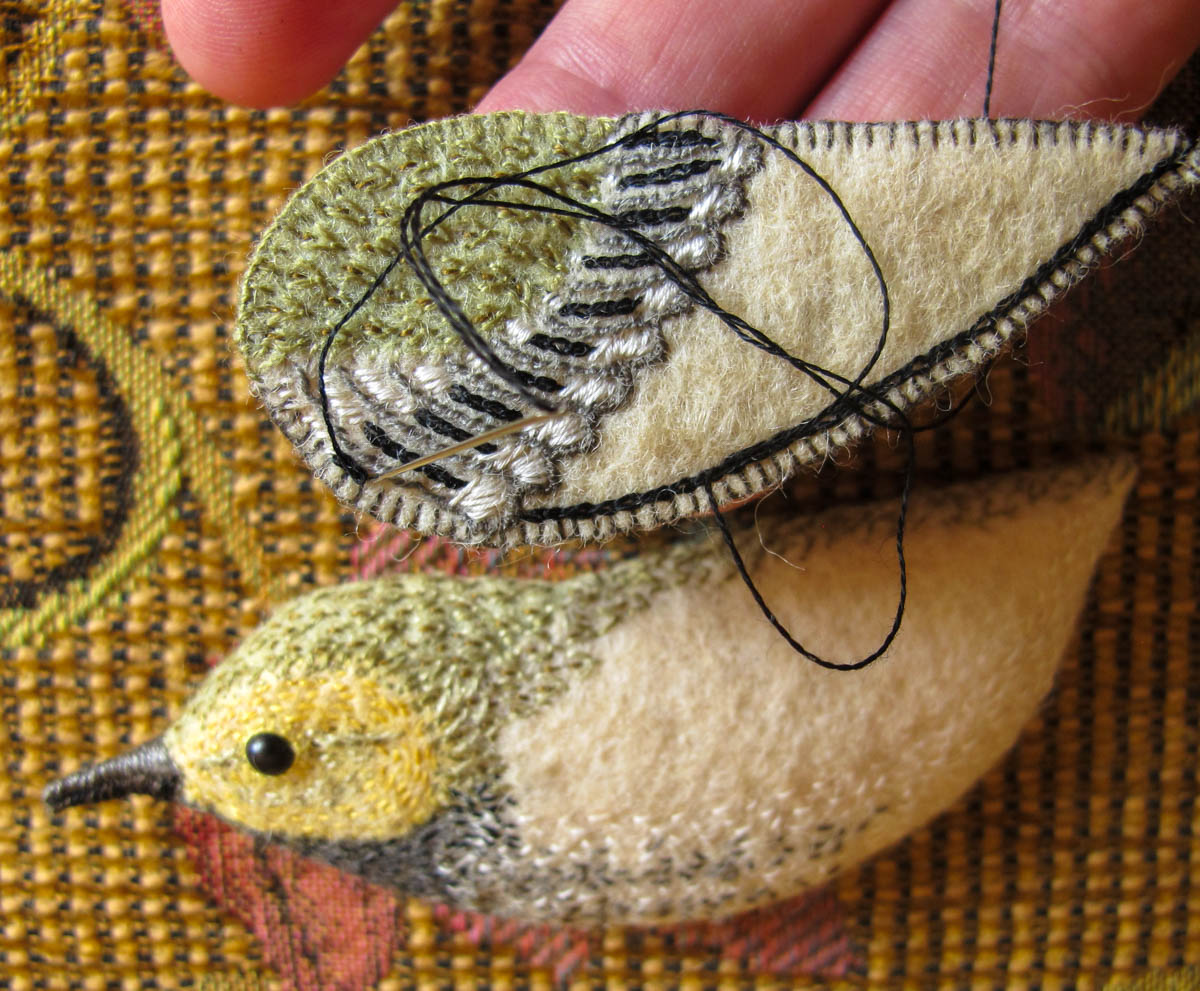
My approach to rendering the birds changed during the 4 months that I worked on the piece. Toward the end, when I sewed the nuthatch, chickadee, wren, and warbler, I referred to photographs more closely and was caught up in making them identifiable and naturalistic.
Goldfinch
The birds aren’t exactly life size, but they are close. The little wren could stand on its own, so I took its picture before sewing it in place.
Carolina Wren
Nuthatch
I cut the basic shapes of the birds out of wool felt and then embroidered their feather patterns.
I’m glad that I made the decision back in 2012 to not sell Birds of Beebe Woods. Before that, I sold just about everything I made, except for my Self Portrait, which was too personal to let go. Now, I don’t sell any original work. By holding on to these pieces, I am ensuring that there is a well-rounded and representative body of work ready for exhibition purposes. This way, many more people can experience my work in person!
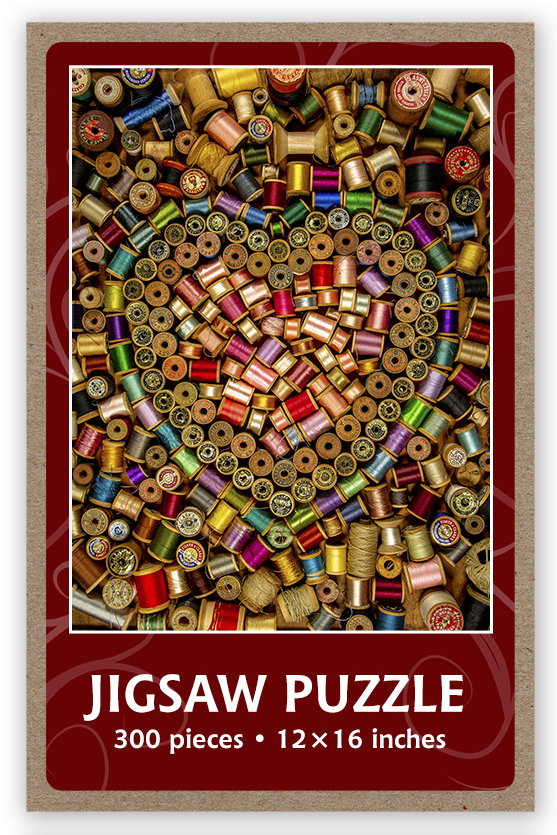
SHOP Printed reproductions (puzzles, posters, note cards, and bookmarks) of Birds of Beebe Woods are available in my Esty Shop.
note cardsnote cardsJigsaw Puzzle18 x 24 Poster
To keep up with new posts, please subscribe to this blog. Your contact info will not be sold or shared. If you’d like to see more frequent photos tracking the projects in my studio, please follow me on Facebook, Instagram and BlueSky.
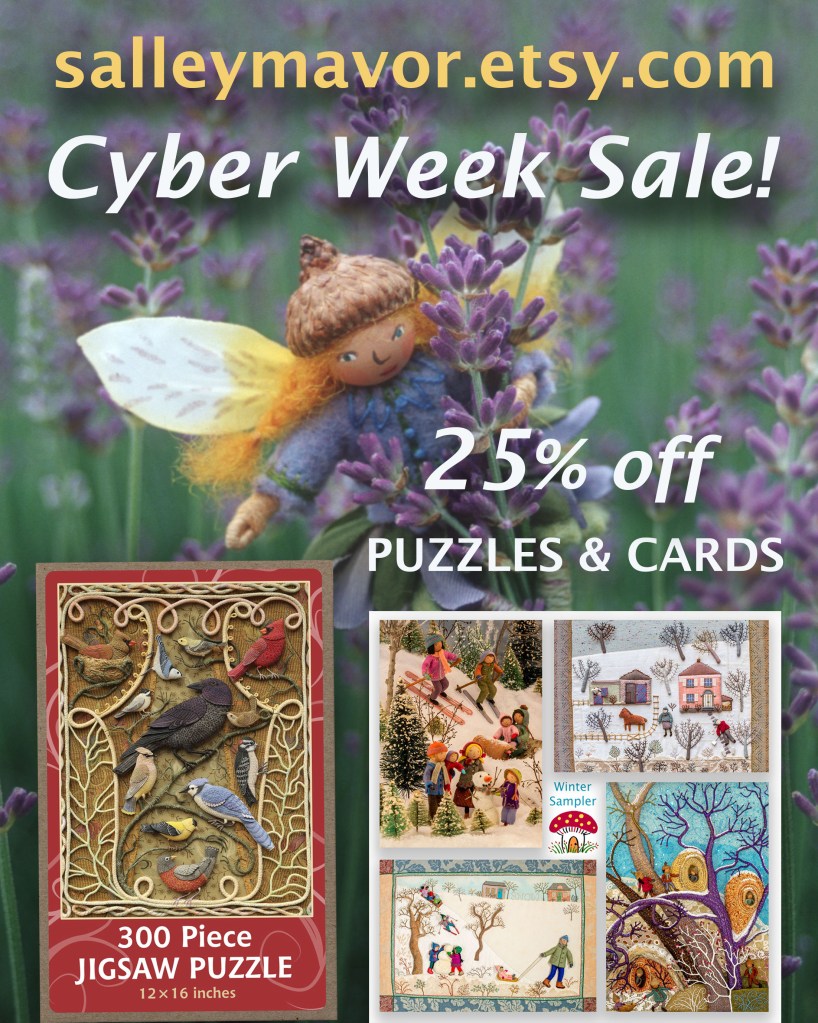
Everywhere you look, pre-holiday sales are going on, so I thought I’d get into the act and offer a Cyber Week Sale in my SHOP. You can save 25% on all jigsaw puzzles and note cards from Nov. 24 through Monday, Dec. 1st.
Birds of Beebe Woods Jigsaw Puzzle
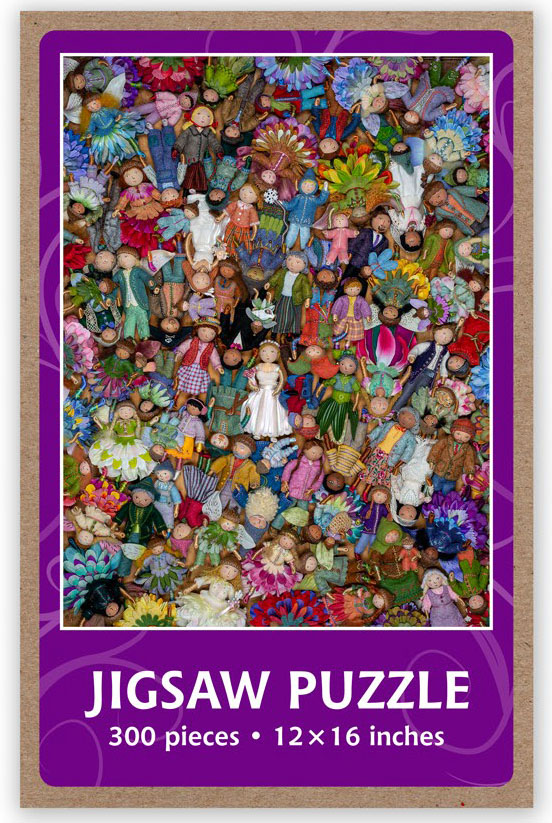
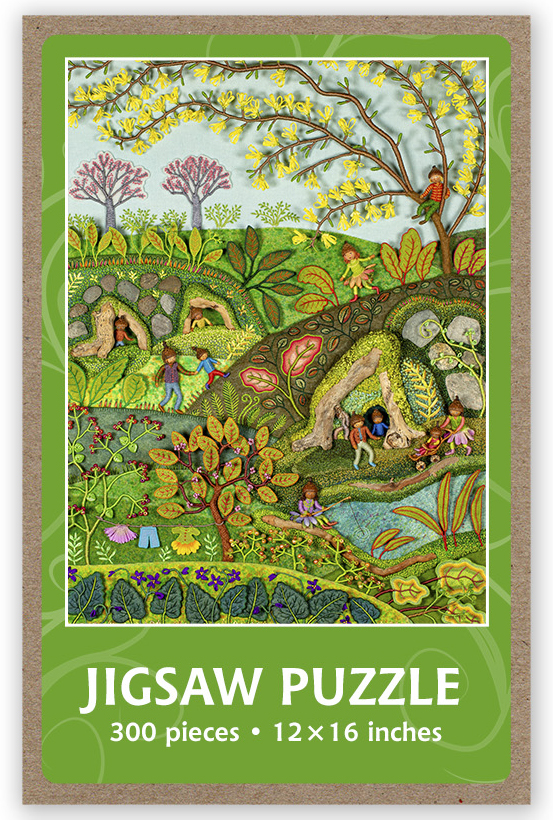
If you’ve followed me for a while, you’ll know that my original art is not for sale, so that a representative body of work is available to exhibit. However, I am pleased to offer printed reproductions of my hand-stitched little worlds. Please visit my Etsy Shop, to see a selection of autographed books, jigsaw puzzles, notebooks, prints, posters, note cards, and bookmarks that feature my artwork.
JIGSAW PUZZLES The detailed miniature aspect of my work makes it a perfect match for jigsaw puzzles, don’t you think? The 300 piece 12″ x 16″ puzzles are suitable for older children as well as adults. At this size, the puzzle pieces can easily spread out on a card table instead of taking over the dining room table. And it won’t take an interminable amount of time to piece together the image.
NOTE CARDS A wide variety of images of my work are printed as note cards. They are available in 4 and 8 card sets, as well as themed samplers, including winter, birds, seasons, and fairies. This sale is a great opportunity to stock up on holiday cards, too!
Please visit my SHOP HERE. Puzzles and Note Cards are listed with the 25% discount.
To keep up with new posts, please subscribe to this blog Your contact info will not be sold or shared. If you’d like to see more frequent photos tracking the projects in my studio, please follow me on Facebook and/or Instagram.
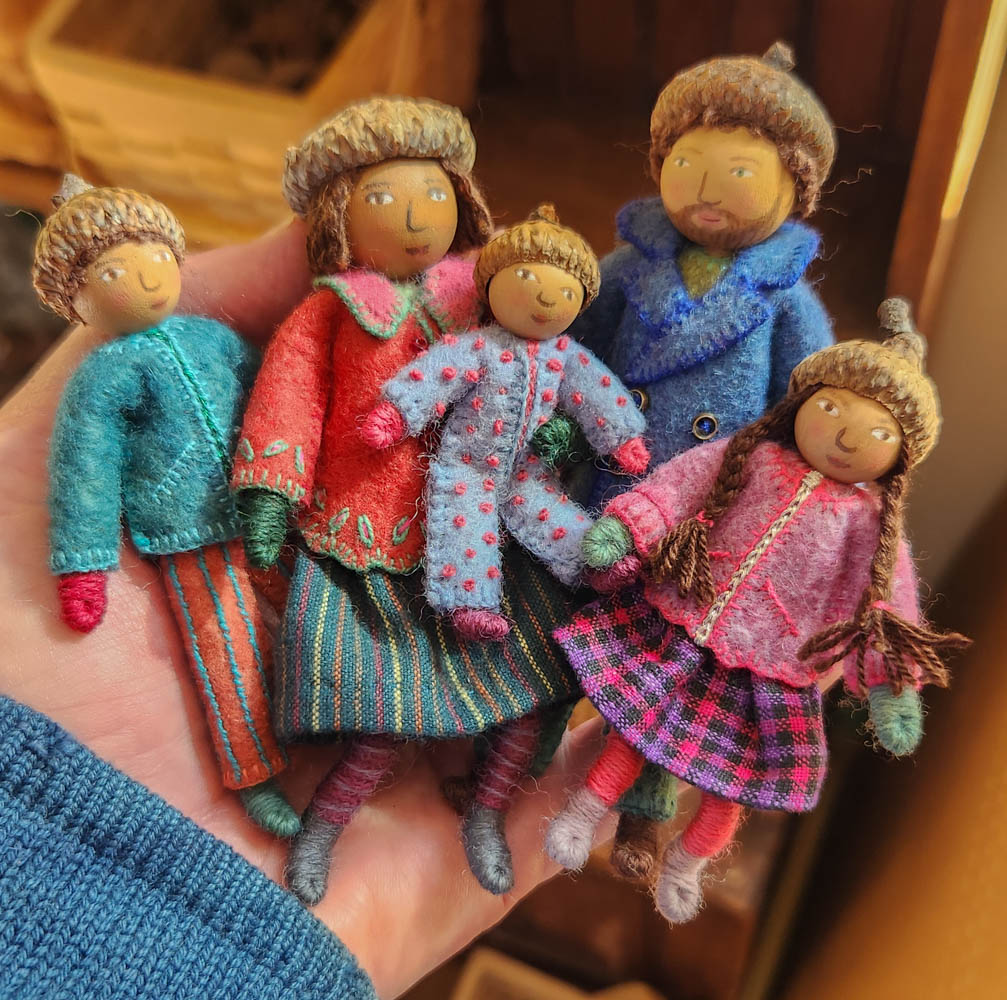
WEE FOLK FAMILY RAFFLE If you’ve followed this blog for a while, you’ll know that I no longer sell my original work. But occasionally, I can be persuaded to make something for a special fundraiser. So, I’m thrilled to announce this rare opportunity to win a Wee Folk Family of 5. Tickets are $25 each and proceeds are supporting the newly renovated kindergarten classroom at the Waldorf School of Cape Cod (my children’s alma mater). Raffle tickets can be purchased here. The winner will be announced on Dec. 10th. Good Luck!
The Wee Folk Family is based on the doll projects featured in my how-to book, Felt Wee Folk: New Adventures. The dolls’ armatures are the sturdy variety, with reinforced frames that hold up better to repeated bending and handling. Their sizes range from 2″ (baby) to 4″ (adult) tall.
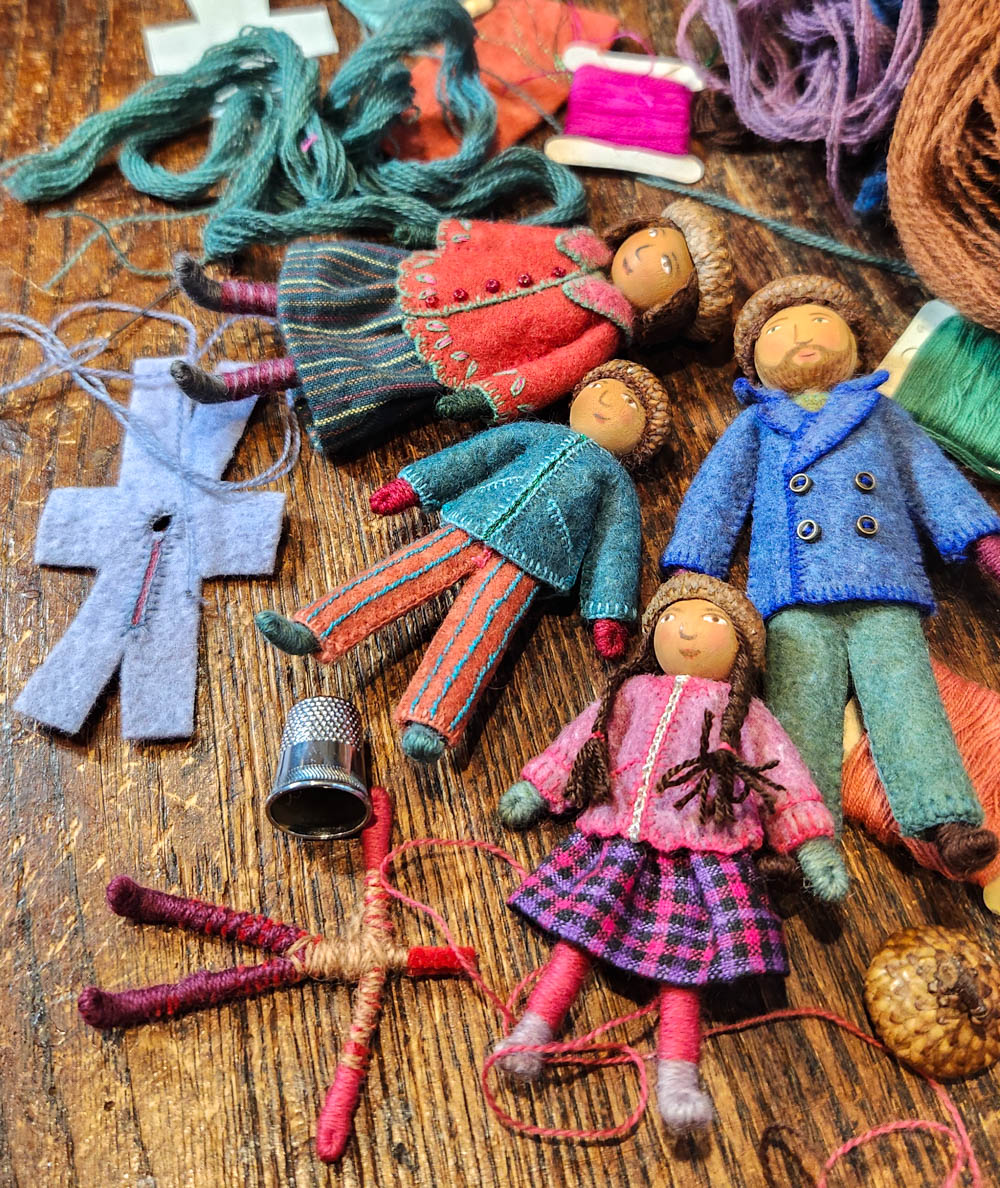
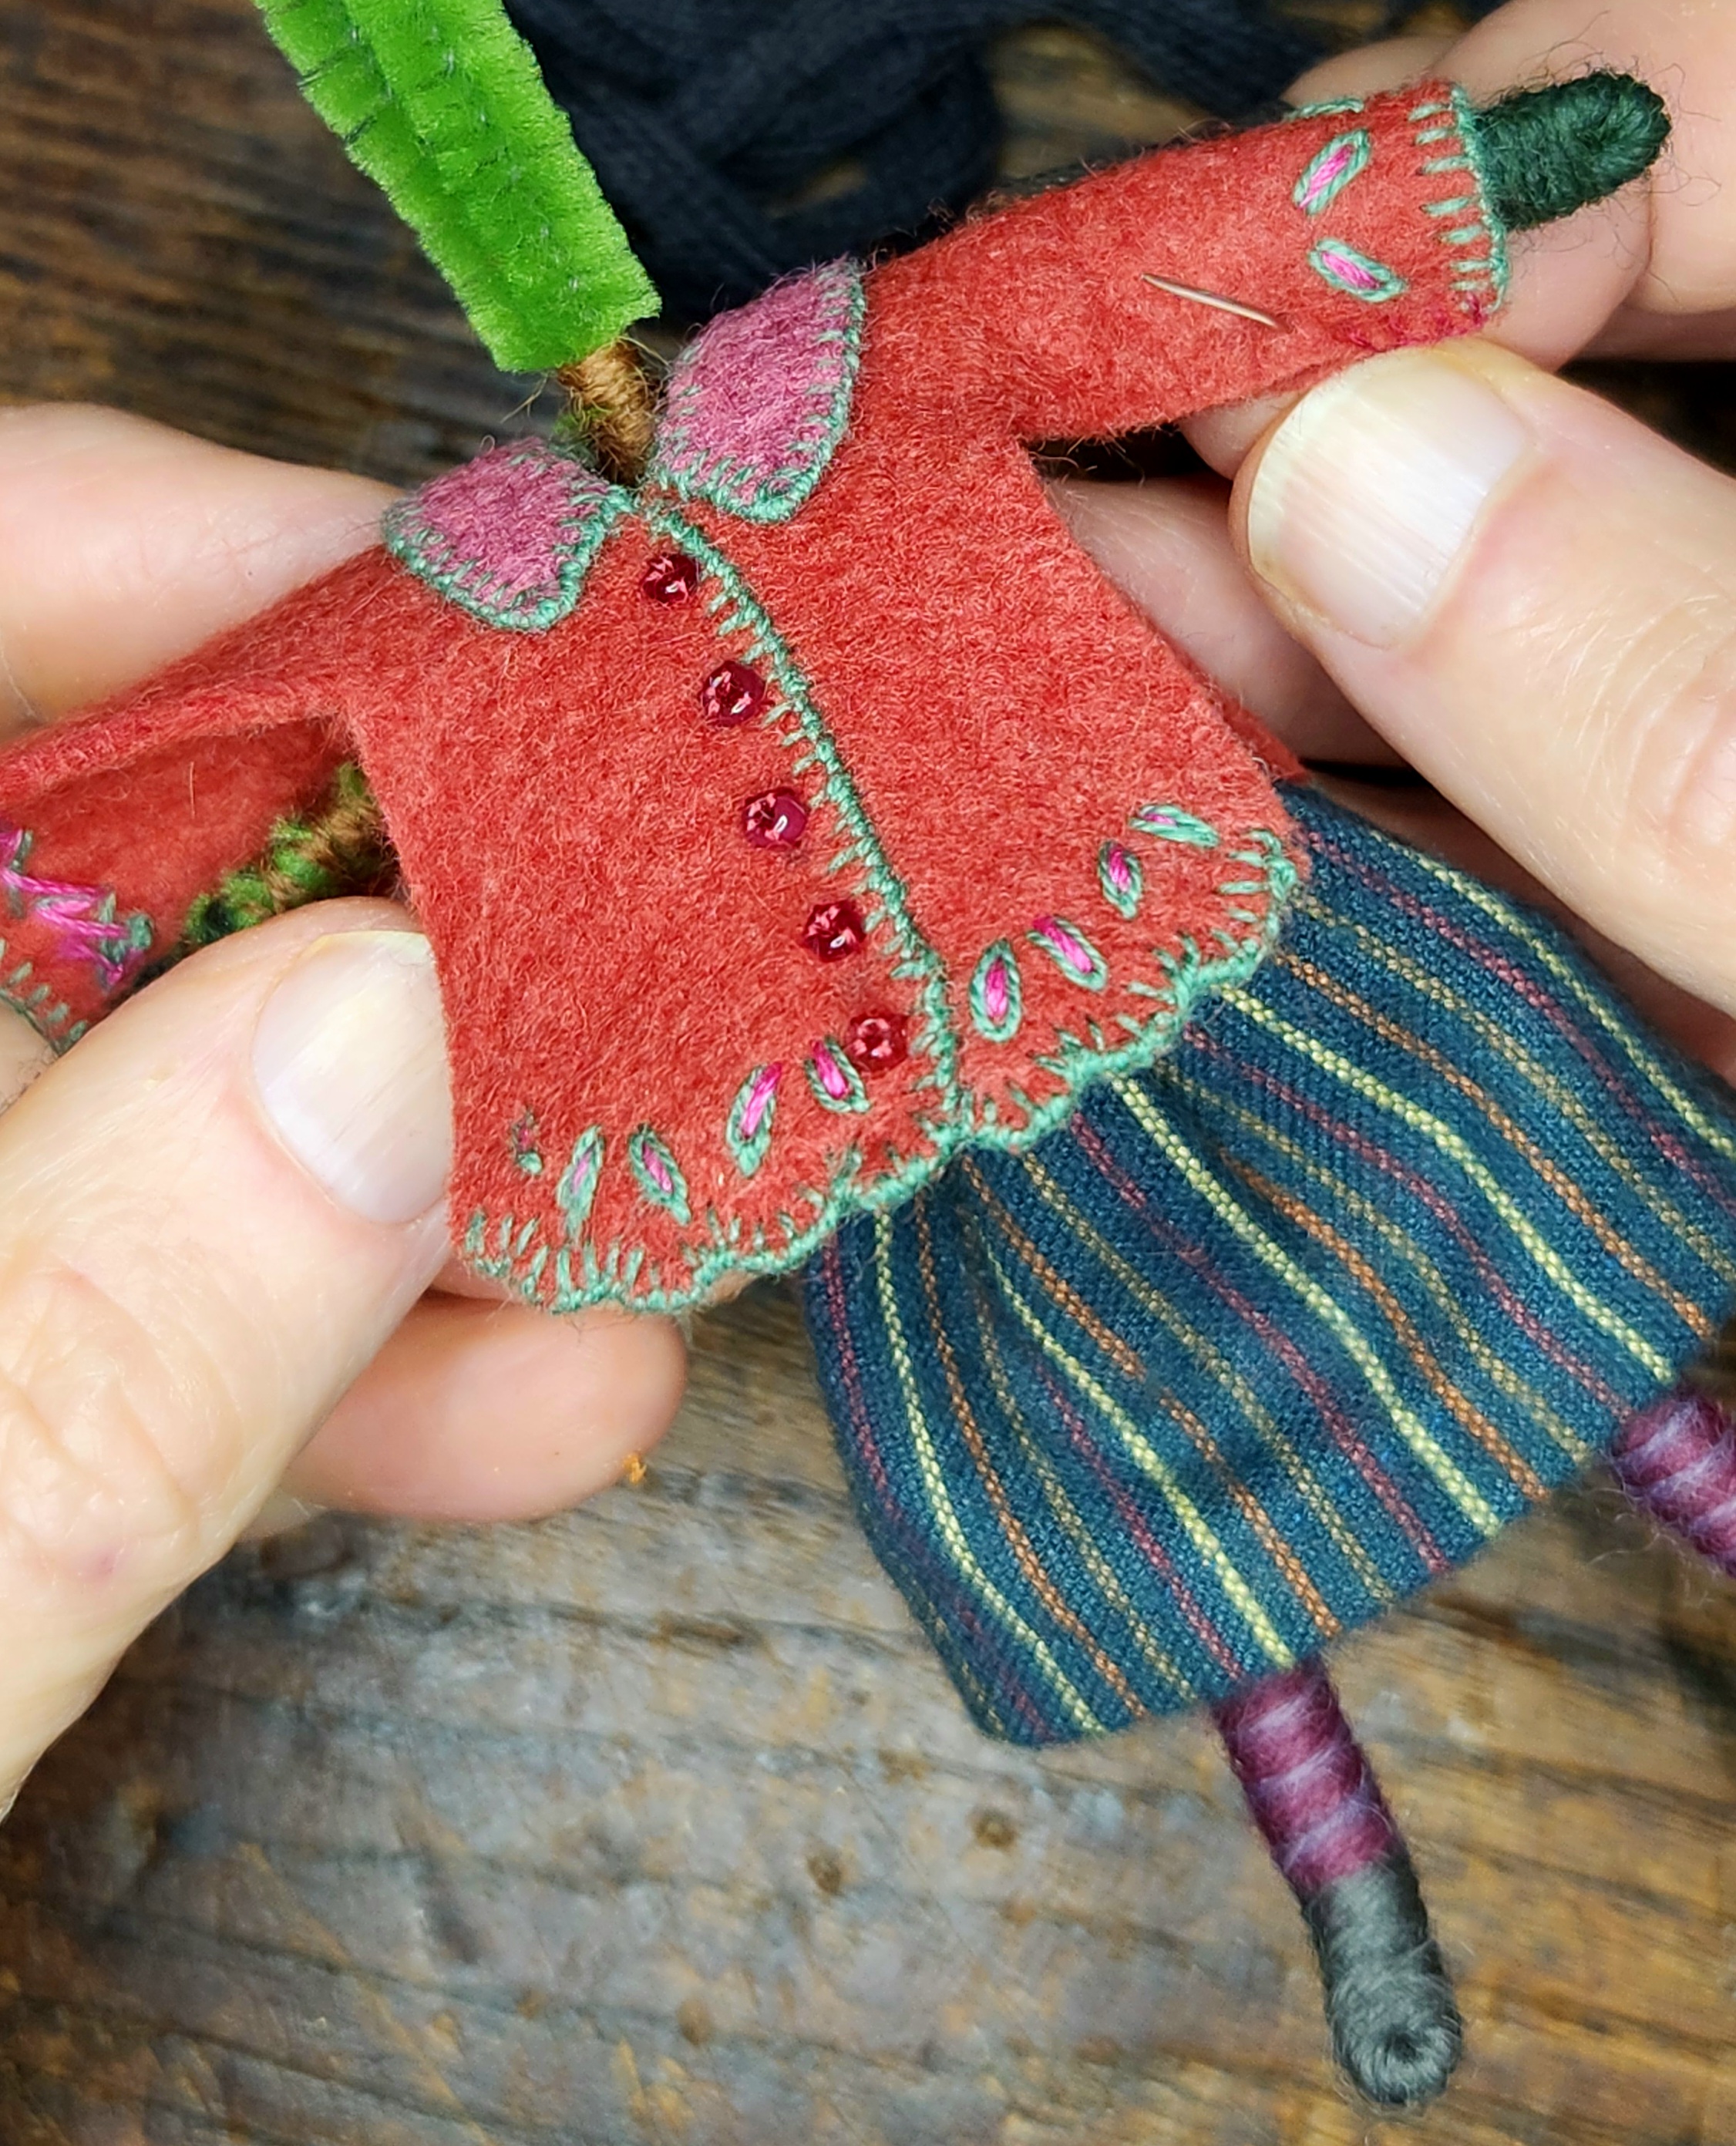
I really enjoyed all aspects of making this little family, from painting their faces, to embellishing their felt outfits, to sewing their wigs. After years of mass-producing fairies, it was so satisfying to put all my energy toward creating one special family. Different parts of the process were documented in videos, which you can watch near the end of this post.
Wee Folk Family Raffle tickets can be purchased from the Waldorf School of Cape Cod here. The winner will be announced on Dec. 10th.
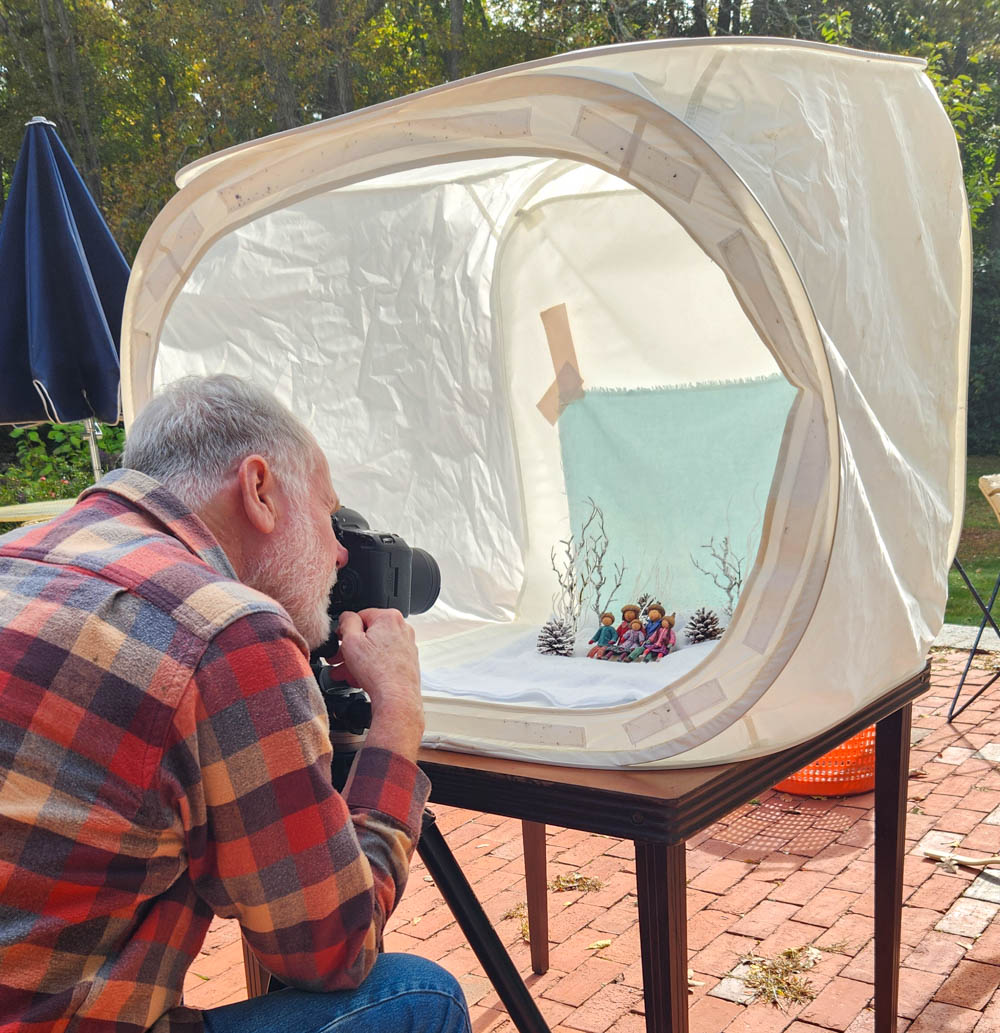
It was fun setting up the winter scene and posing the dols for their family portrait. Rob photographed them outside in a light box, which helps defuse harsh shadows.
The following videos give a glimpse at how I made the Wee Folk Papa, Mama and children. Instructions and patterns for making the dolls and their outfits are in my how-to book, Felt Wee Folk.
Wee Folk Papa
Wee Folk Mama
Wee Folk Family Raffle tickets can be purchased from the Waldorf School of Cape Cod here. The winner will be announced on Dec. 10th. Good Luck!
Wee Folk Children
To keep up with new posts, please subscribe to this blog. Your contact info will not be sold or shared. If you’d like to see more frequent photos tracking the projects in my studio, please follow me on Facebook, Instagram and BlueSky.
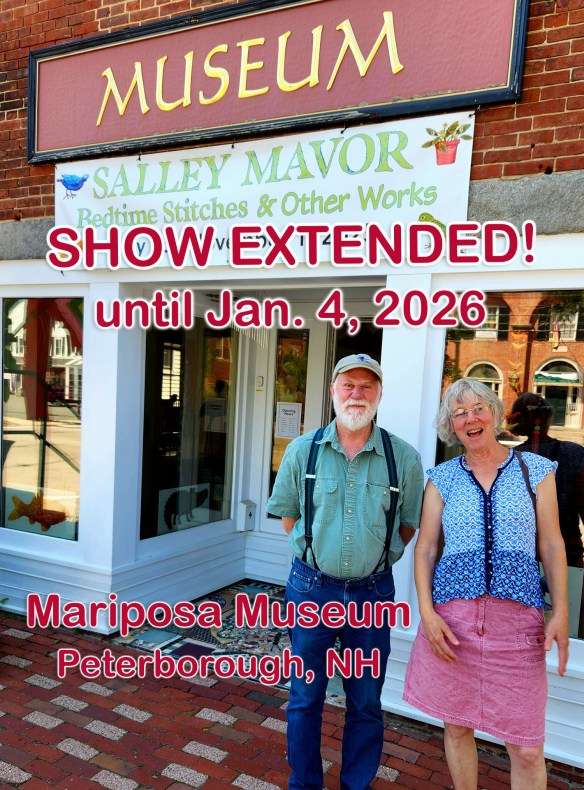
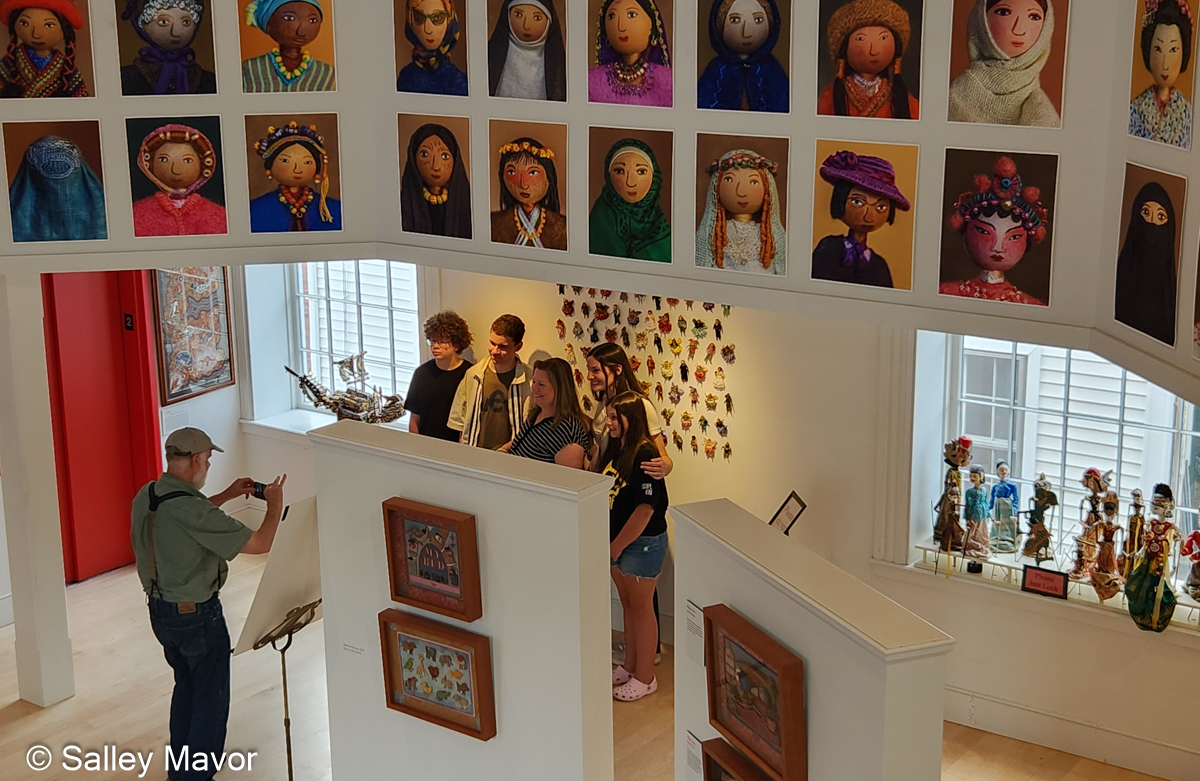
This fall has been particularly fruitful in my needle and thread universe and I’m pleased to share a growing list of good things that are happening. I’m astounded by the number of fans who are driving long distances with carloads of friends to see my art in person at both the Mariposa Museum in Peterborough, NH and the New England Quilt Museum in Lowell, MA.
New England Quilt MuseumMariposa Museum
A year from now, those of you in southern California will be able to do the same when my touring exhibition, Bedtime Stitches is shown at the Mingei International Museum in San Diego! Please read ahead to learn about multiple displays, a wee folk raffle, and other opportunities to experience my art and meet me in person.
Salley Mavor will give an Artist Talk at the Mariposa Museum on Nov. 22nd at 2PM.
SHOW EXTENDED My exhibition at the Mariposa Museum & World Culture Center in Peterborough, NH is being extended through Jan. 4, 2026! The show, Bedtime Stitches & Other Works, has been so popular that the museum decided to keep it open for another 2 months. I’m so happy that more people will have a chance to experience the 3-dimensional quality and detail of my art in person. ARTIST TALK I look forward to returning to the Mariposa Museum to talk about my work on Sat., Nov. 22 at 2:00 PM. This is an opportunity to learn about where my art comes from, how it’s evolved, and why I do it. Seating is limited. Please register here.
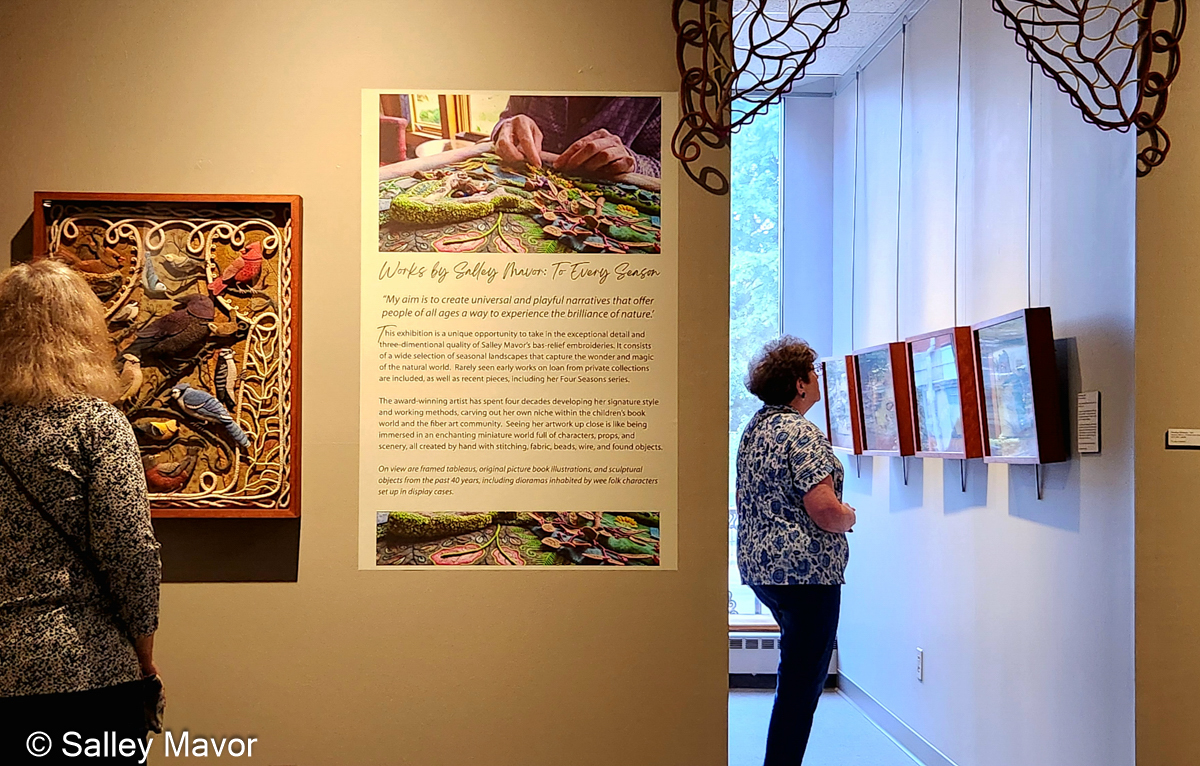
To Every Season: Works by Salley Mavor at the New England Quilt Museum in Lowell, MA
TO EVERY SEASON Since my show opened at the New England Quilt Museum in Lowell, MA an unusually high number of visitors have been spied walking around with smiles on their faces. One visitor named Susan summed up her experience this way – “Absolutely loved this show. I felt overwhelmed with joy!” How wonderful is that? My exhibition, To Every Season: Works by Salley Mavor is on view thru Dec. 31, 2025.
Salley Mavor signing books at the New England Quilt Museum
A big thank you to the lovely folks who came to hear my talk at the museum on Nov. 1st. I was surprised to learn that some people got up in the wee hours of the morning to drive from as far away as New York City, Vermont, and the mid-coast of Maine. It was was such a pleasure to meet everyone and hear about their creative lives!
Salley Mavor speaking about her work at the New England Quilt Museum
WEE FOLK RAFFLE If you’ve followed this blog for a while, you’ll know that I no longer sell my original work, including dolls. But occasionally, I can be persuaded to make something for a special fundraiser. So, I’m thrilled to announce this rare opportunity to win a Wee Folk Family of 5 that I made based on the projects in my how-to book, Felt Wee Folk. Tickets are $25 each and proceeds are supporting the newly renovated kindergarten classroom at the Waldorf School of Cape Cod (my children’s alma mater). Raffle tickets can be purchased here. The winner will be announced on Dec. 10th. Good Luck!
Wee Folk Family RAFFLE
Wee Folk MamaPocketful of Posies Tree
HOLIDAY TREE and STORYTIME at the Cahoon Museum I’m so happy that the Cahoon Museum in Cotuit, MA is displaying my Pocketful of Posies tree this Holiday Season. The tree is decorated with a collection of nursery rhyme ornaments based on my picture book, Pocketful of Posies. I made them in 2013 for the Concord Museum’s annual Family Tree event. Since then, the individual ornaments have been shown alongside my framed artwork in numerous exhibitions. Winter Open House – Sat., Dec 20th – 10 AM to 4 PM Please join me at the museum at 11:00 AM for a STORYTIME. All ages are welcome. Please register here.
EXHIBITION at the MINGEI MUSEUM I’m excited to share the news that next year, Bedtime Stitches, the touring exhibition of original 3-dimensional embroidered artwork for my picture book, My Bed: Enchanting Ways to Fall Asleep Around the World, will be shipped across the country to the Mingei International Museum in San Diego, California. The show will be on view for a nice long while, from Oct. 31, 2026 to April 18, 2027.
The Mingei /min-gey/ (art of the people) is an extraordinary museum dedicated to furthering the understanding of folk art, craft, and design from all eras and cultures of the world. Having my work shown in such a well-matched venue is truly a dream come true!
To keep up with new posts, please subscribe to this blog. Your contact info will not be sold or shared. If you’d like to see more frequent photos tracking the projects in my studio, please follow me on Facebook, Instagram and BlueSky.
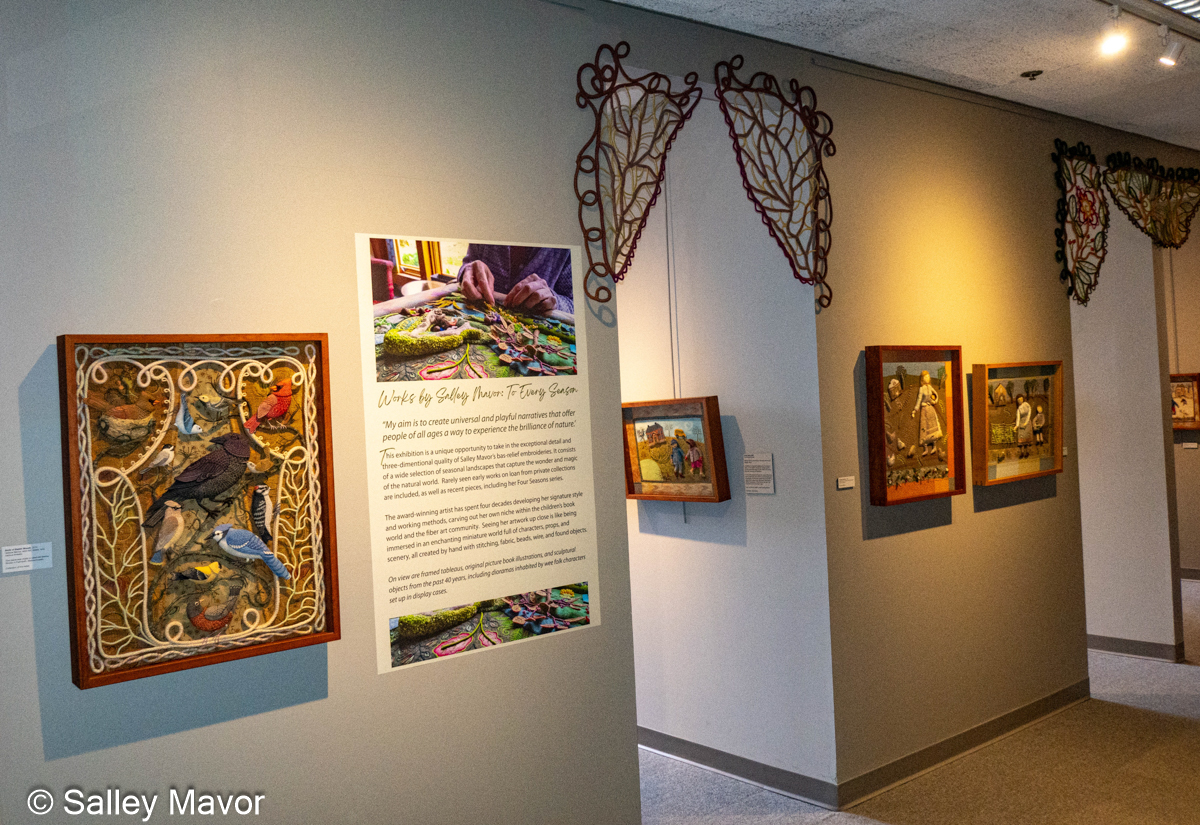
My current exhibition at the New England Quilt Museum in Lowell, MA features a collection of botanical sculptures hanging in the gallery entrances. In this post, I share photos, videos, and commentary about my new “Felt Filigree” work. The show, To Every Season: Works by Salley Mavor, will be on view through Dec. 31, 2025.
This is the first time I’ve created works that are entirely made with covered wire. For me, they are a way of drawing lines in space, without the interference of a background.
Where did the idea come from? When visiting the museum last year to choose which areas to display my work, a cluster of four small galleries drew me in. Having visitors experience my art in intimate spaces where they could spend time peering into my little worlds was a priority. But, the floor to ceiling doorways leading into the galleries seemed too imposing and hard-edged, especially for a nature themed show. My first inclination was to do something to soften the edges and create more welcoming entrances. In other words, embellish!
I ended up spending all winter and spring making a group of intersecting felt-covered wire forms to frame the upper portions of the doorways. When installed, they would look like valances and parting stage curtains that invite people inside. At this point, I didn’t know how to describe what I was making, let alone what to name this new concept.
During the process, I took a photo of my son Ian holding up one section, so I could see how they would look.
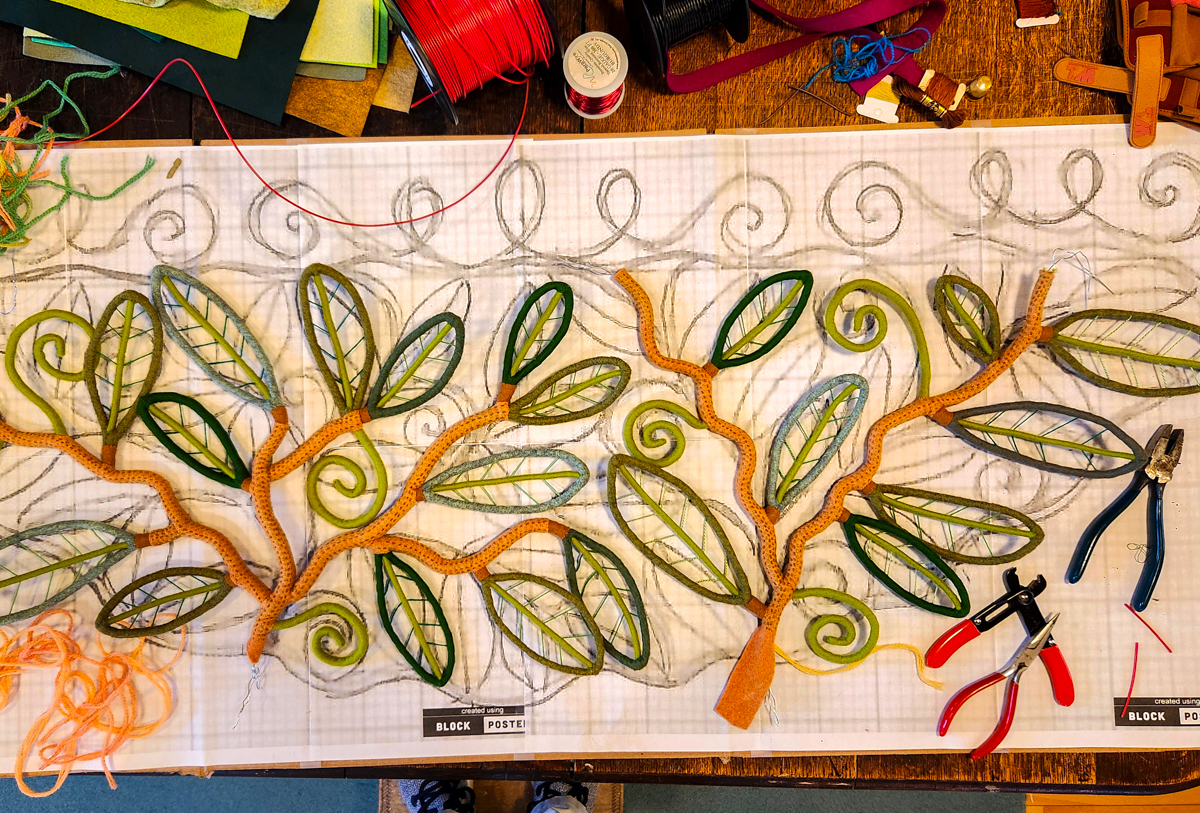
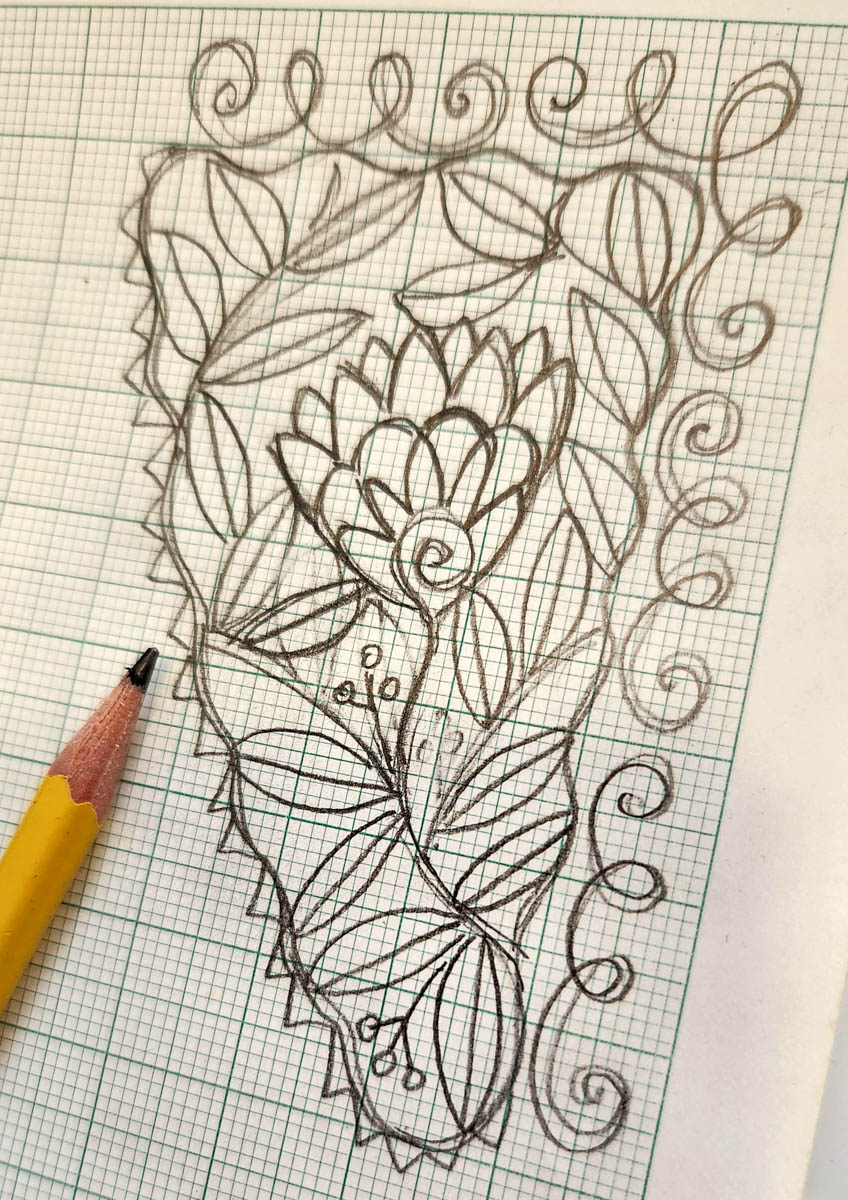
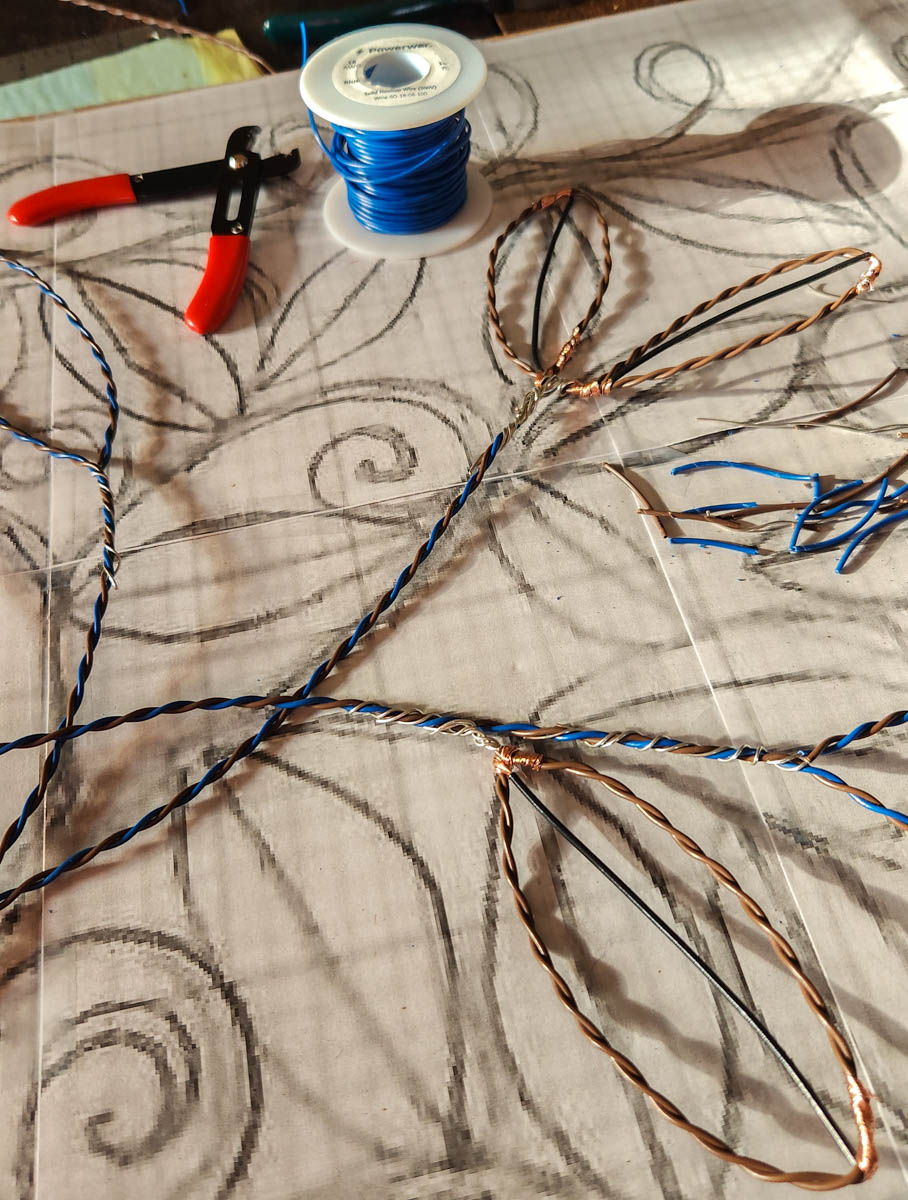
The process: To prepare, I measured the doorways and made sketches on some ancient graph paper passed down from my grandparents. I then scanned the drawings and enlarged them using Block Poster.
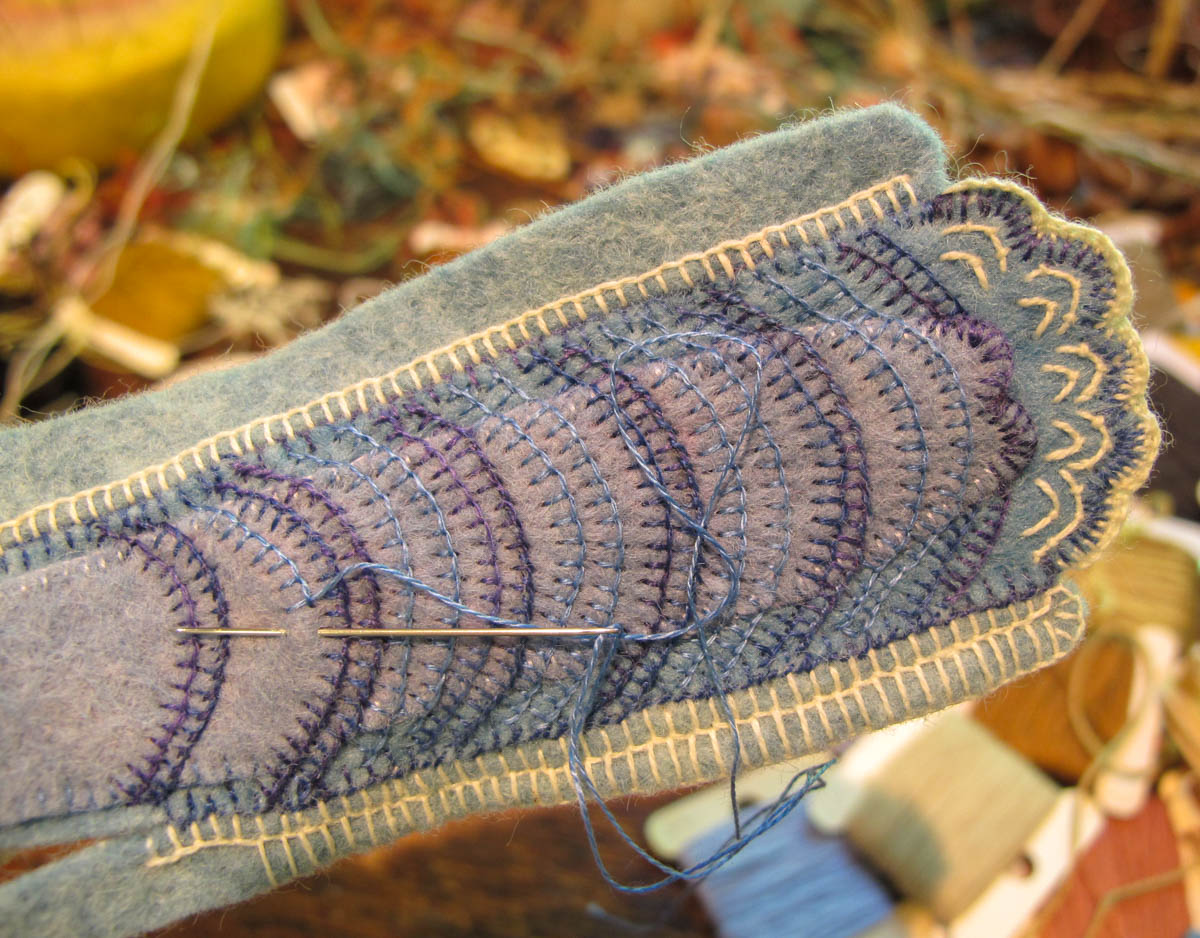
I printed out the sheets and taped them together to make full sized patterns to use as guides. I formed leaves, branches and other linear shapes with 18 gauge insulated electrical wire. Working with wire was tough on my hands, so I took to wearing gloves.
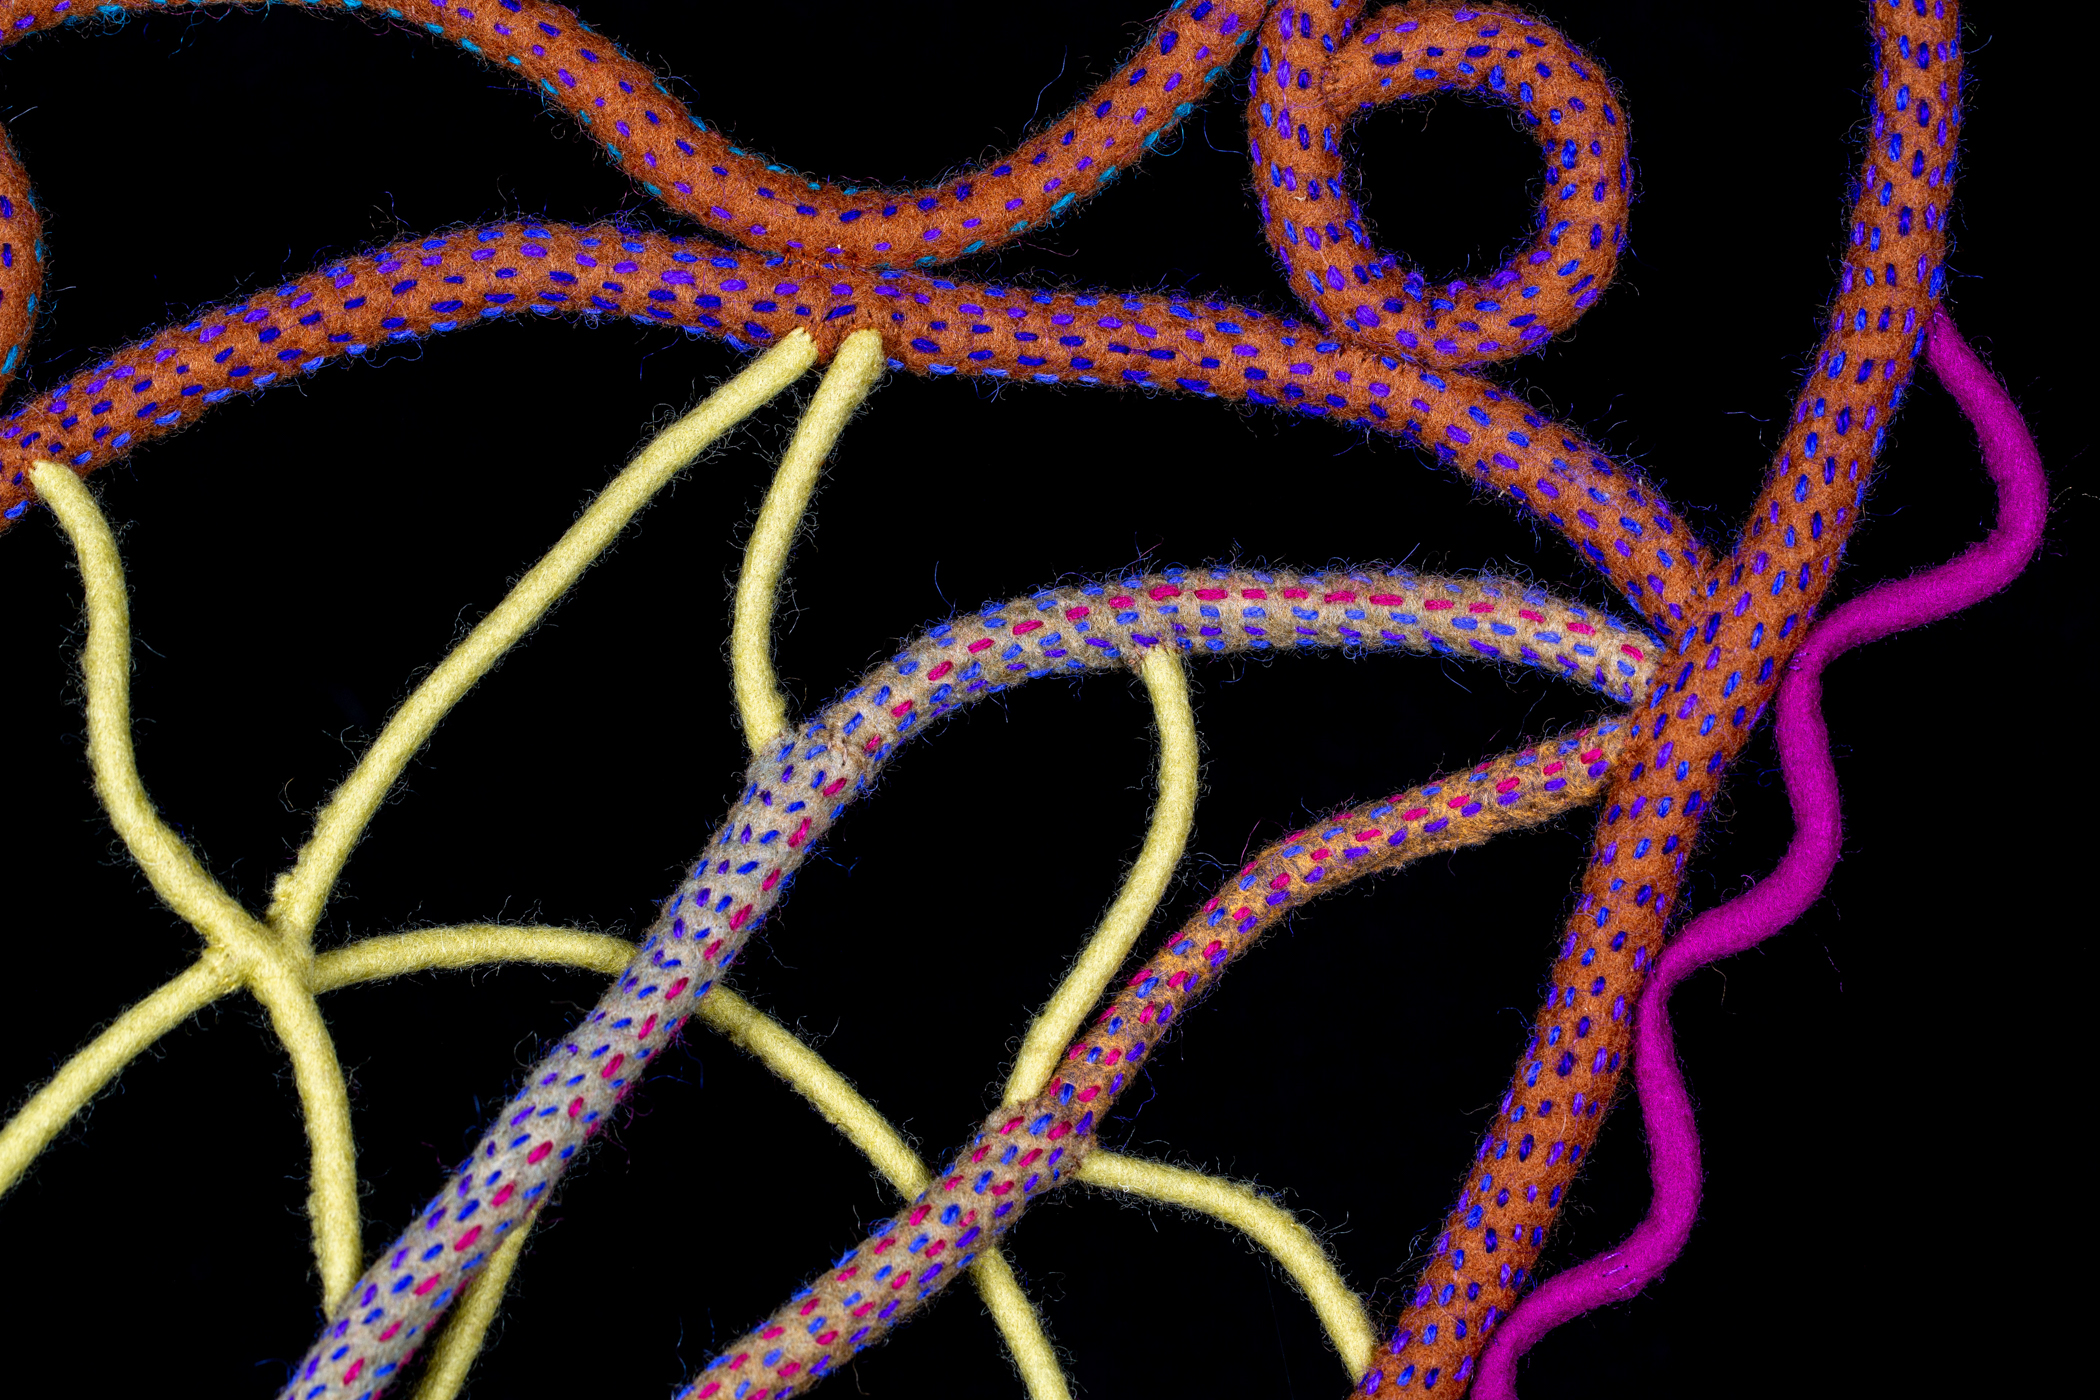
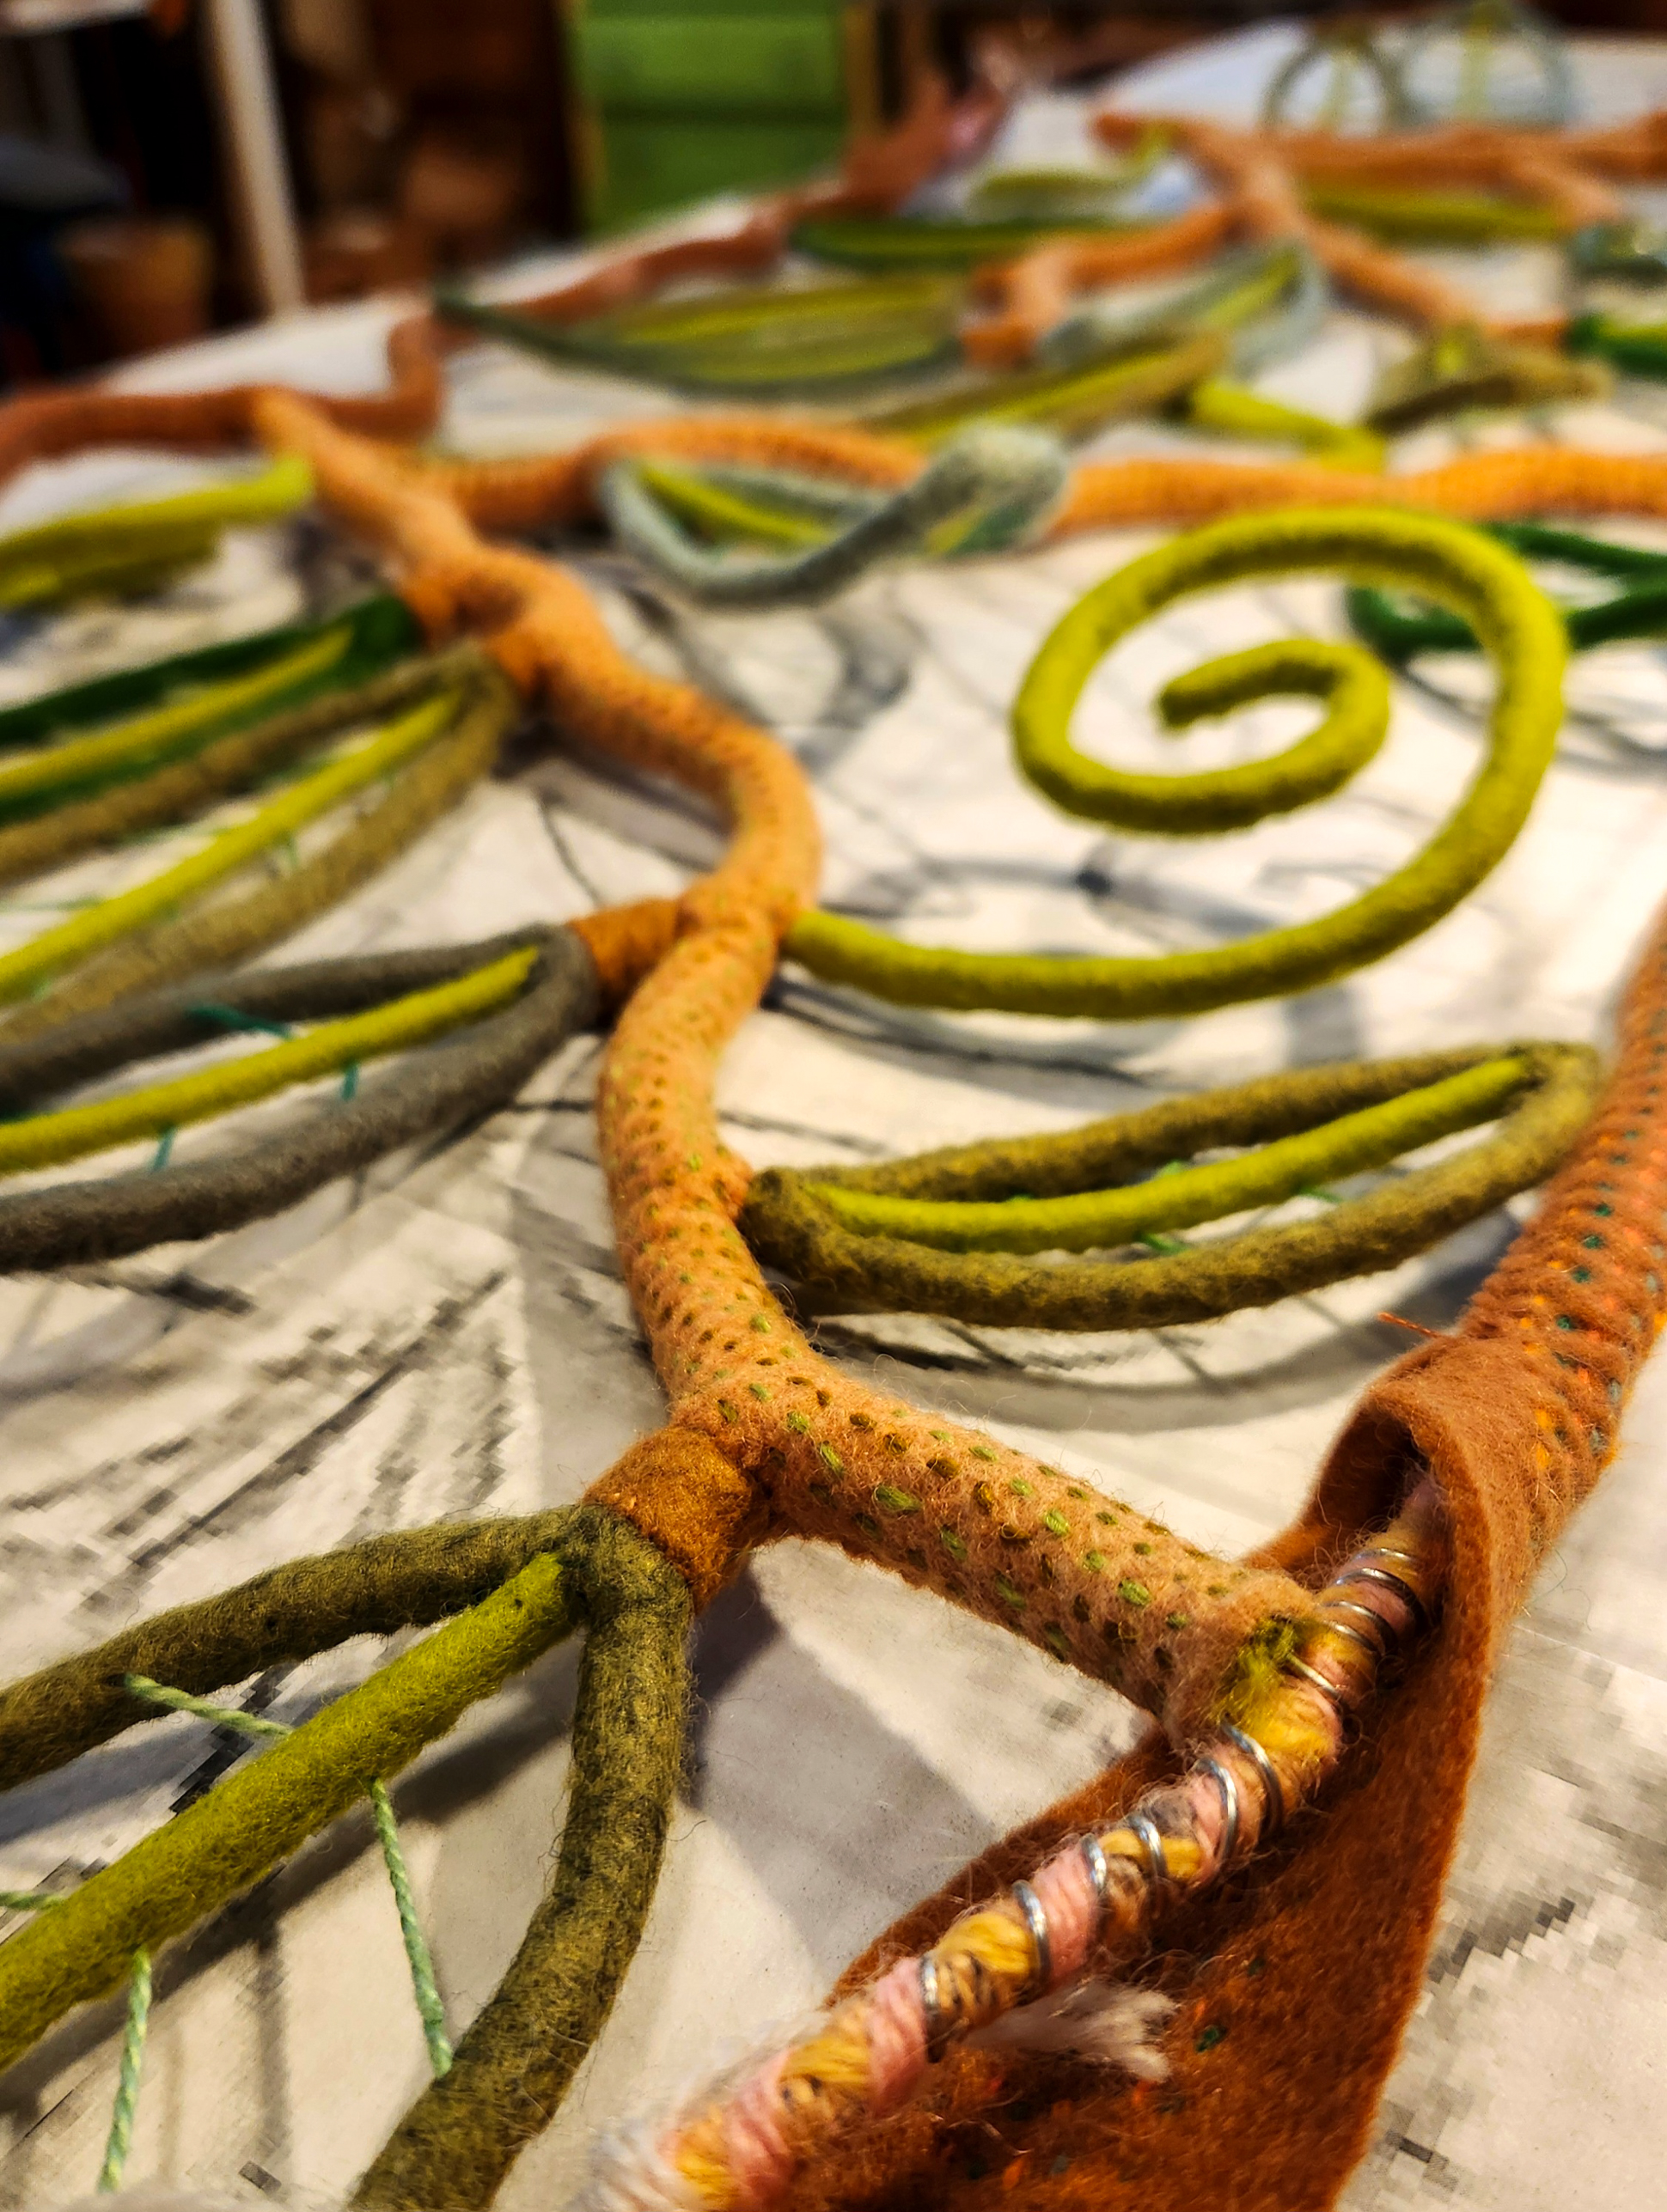
I wrapped layers of yarn around the wire shapes to smooth out the bumps and add a little thickness. Watch the following video to see how I stitched strips of felt around the wire.
Manipulating the wire and getting it to lay flat was tricky at times. Pliable materials like thread and yarn are much easier to handle, but what I envisioned required a strong structure that would hold its shape. No droopy, floppy, stringy fiber art for me!
I’d like to make more pieces like these and can imagine covering large expanses with felt filigree. My original thought was to create larger works that took less time, but I can’t seem to help myself from making little stitches. Still, the ratio of working hours to square footage is a big improvement.
Speaking of tiny stitches, the following video shows how I covered wire shapes with felt and embellished branches with seed stitches.
Even though these felt filigree sculptures are site specific, they can be reused in other ways in future exhibitions. For more versatility, I purposely made them in sections that can be arranged in different ways. Also, in addition to being suspended in open spaces, they could be mounted on light or dark colored walls.
The following video shows how I stitched strips of felt around the wire intersections.
I hope that you’ve enjoyed this peek at my process. The exhibition, To Every Season: Works by Salley Mavor will be on view at the New England Quilt Museumin Lowell, MA through Dec. 31, 2025. I will be giving an Artist Talk on Sat., Nov. 1 at 10:30 AM. Please register here.
To keep up with new posts, please subscribe to this blog. Your contact info will not be sold or shared. If you’d like to see more frequent photos tracking the projects in my studio, please follow me on Facebook, Instagram and BlueSky.
I am pleased to announce that a new exhibition of my work opened earlier this month at the New England Quilt Museum in Lowell, MA. To Every Season: Works by Salley Mavor is on view through Dec. 31st, 2025. I will give two Artist Talks at the museum on Nov. 1st., at 10: 30 AM and 1:00 PM. The afternoon program is filled, but there are still available seats for the morning talk. Please register here.
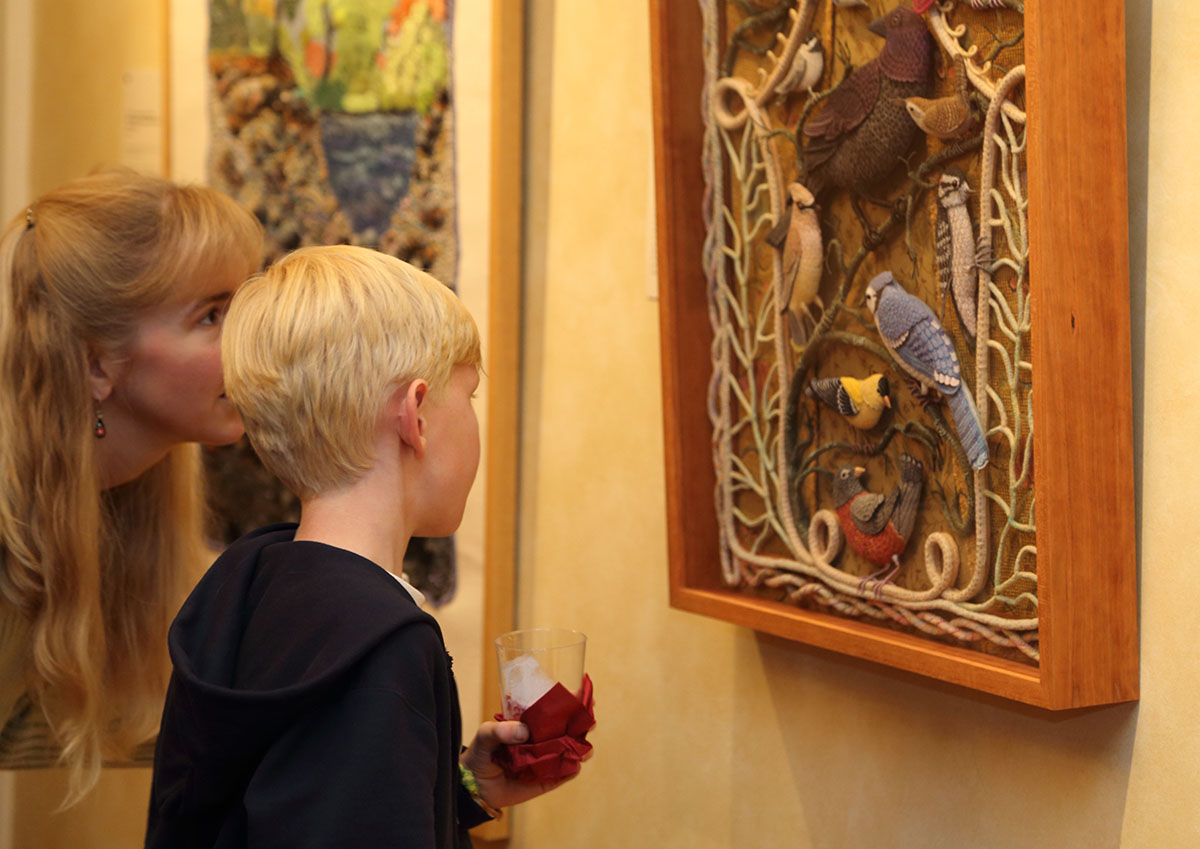
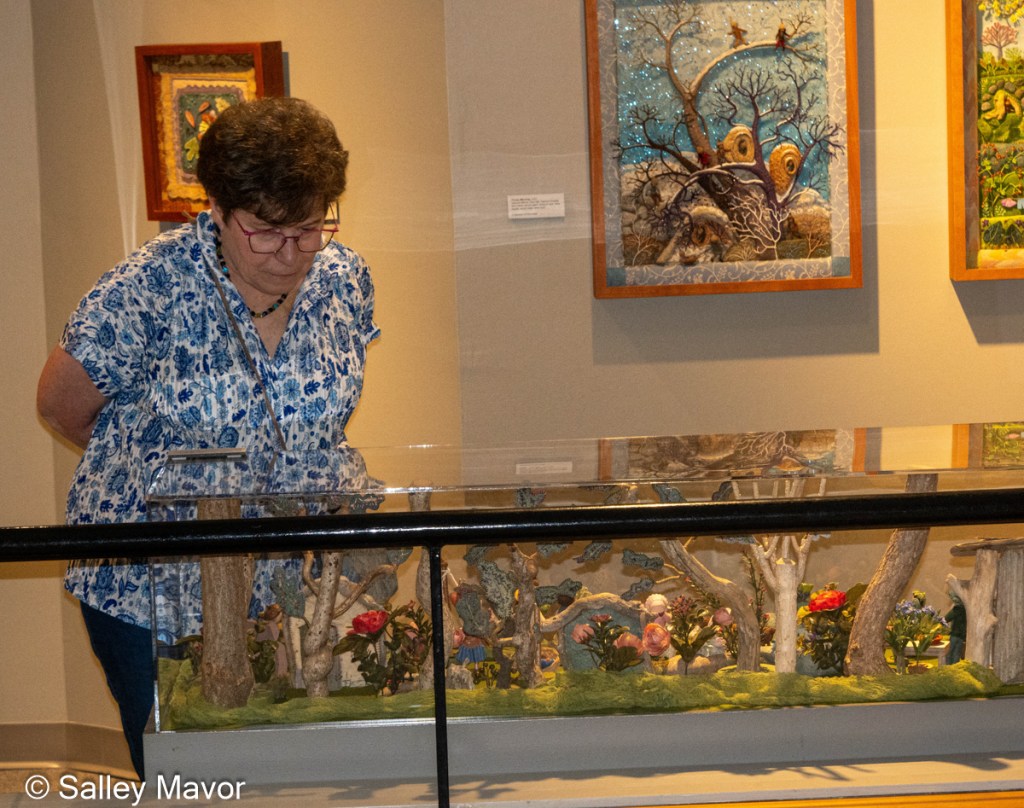
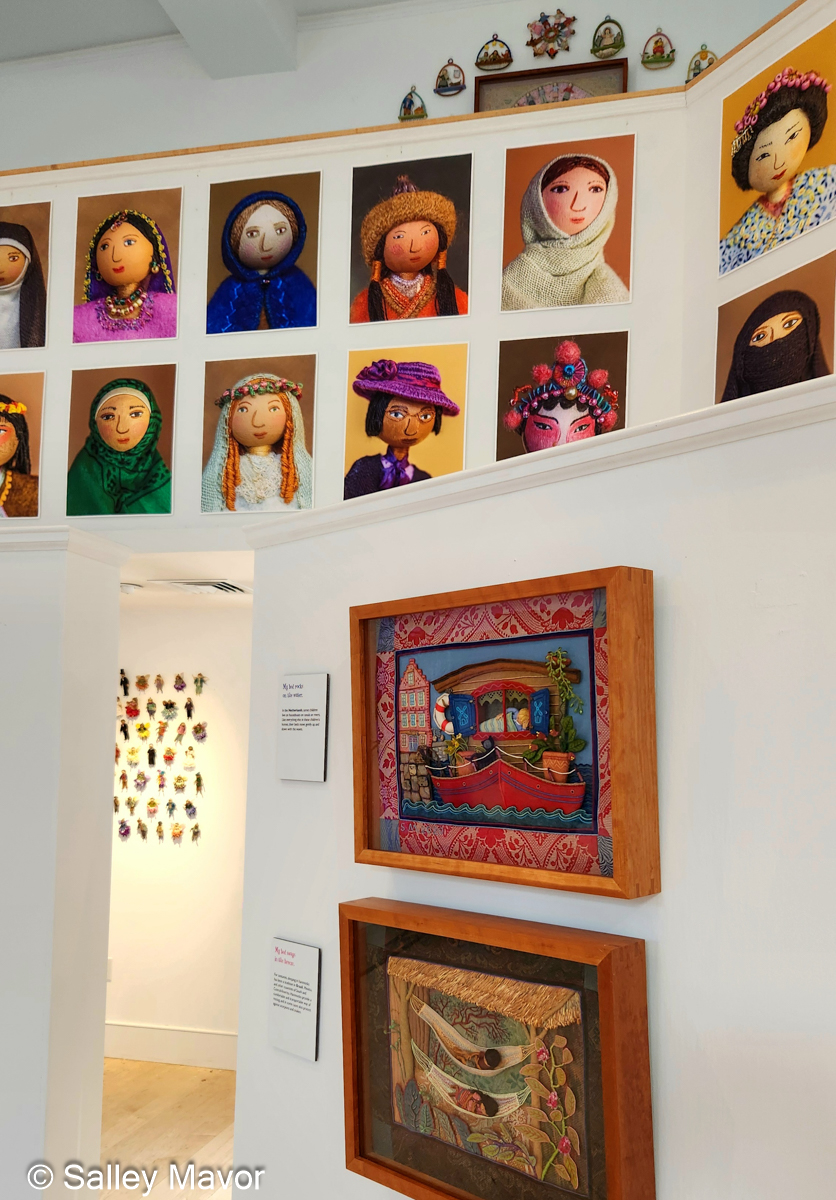
The exhibition includes a wide selection of three-dimensional embroidered scenes that celebrate the wonder and magic of the natural world, including Birds of Beebe Woods. On view are pieces spanning 40 years of my career, including rarely seen early works on loan from private collections, as well as recent creations.
The following video gives a brief tour of the exhibition. At the bottom of this post is a slide show of a representative sampling of individual works on display at the museum.
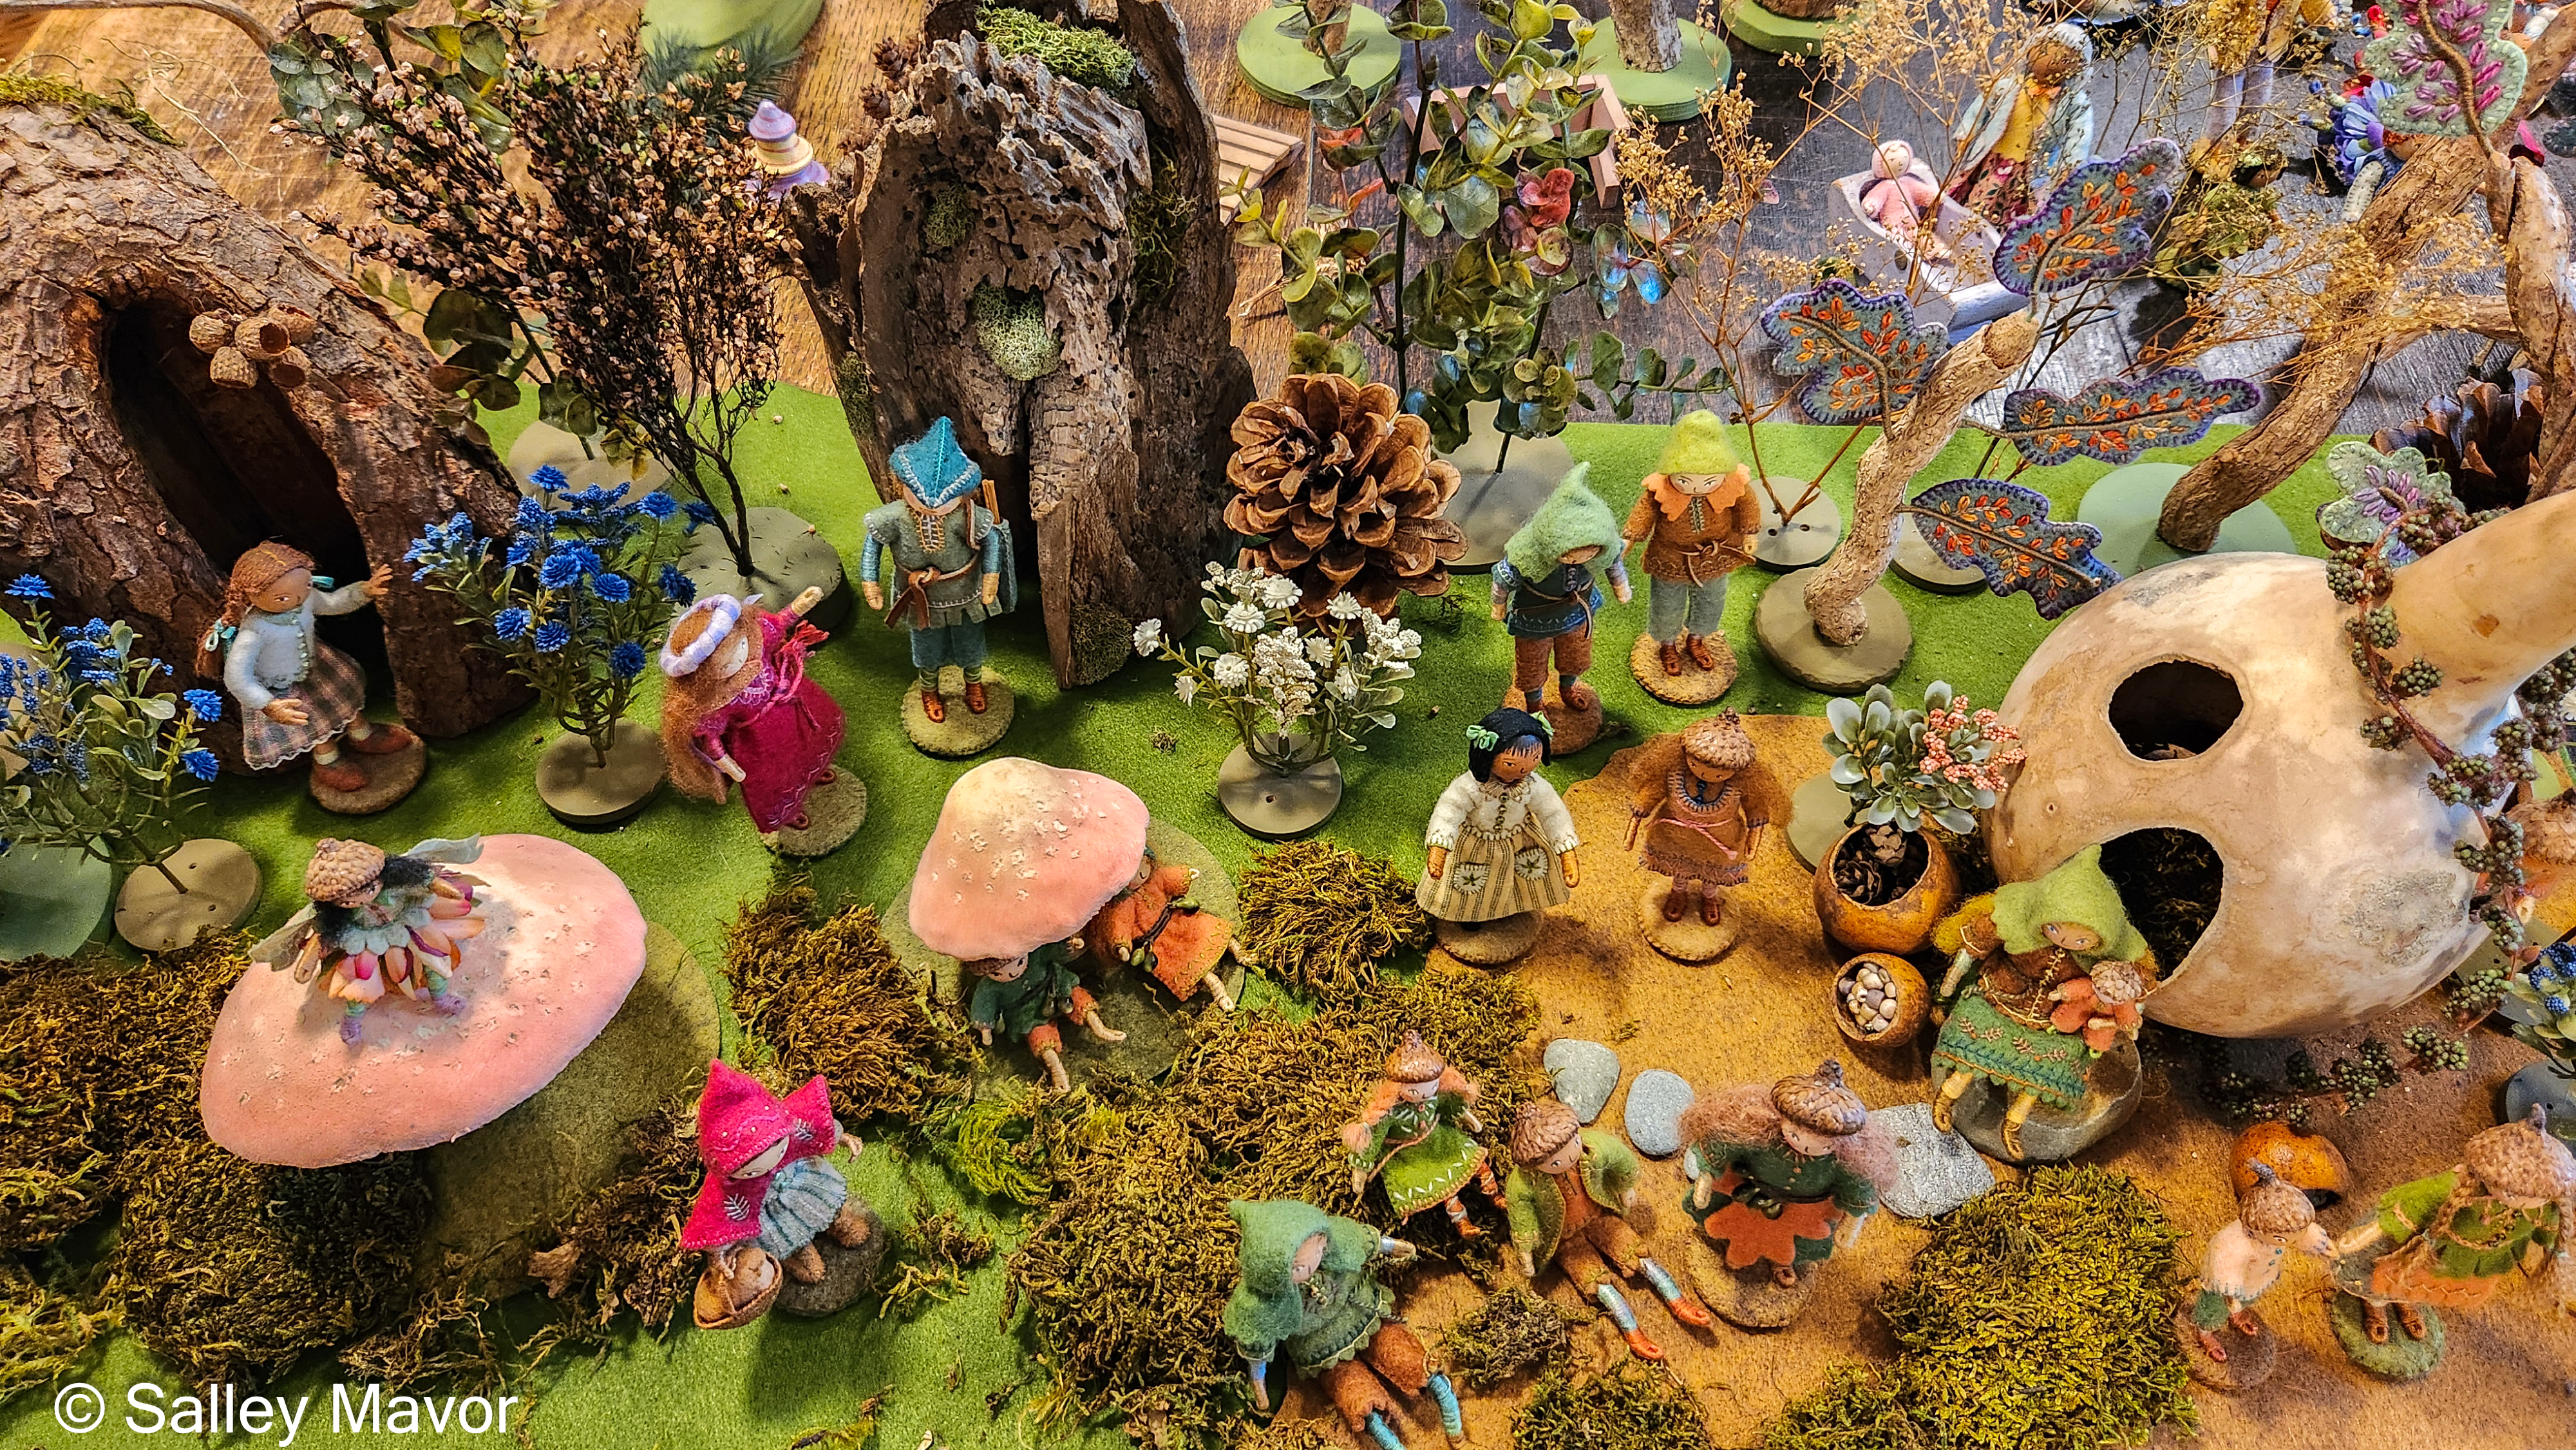
Visitors will see over 40 framed tableaus and original picture book illustrations, spread out in multiple galleries. Four glass cases are filled with dozens of wee folk characters, all set up in miniature environments made with houses, furniture, trees, and foliage saved from other projects. This is what my studio looked like during the summer, when I gathered the wee folk and props and figured out how to arrange the scenes. See more of my practice set-ups here.
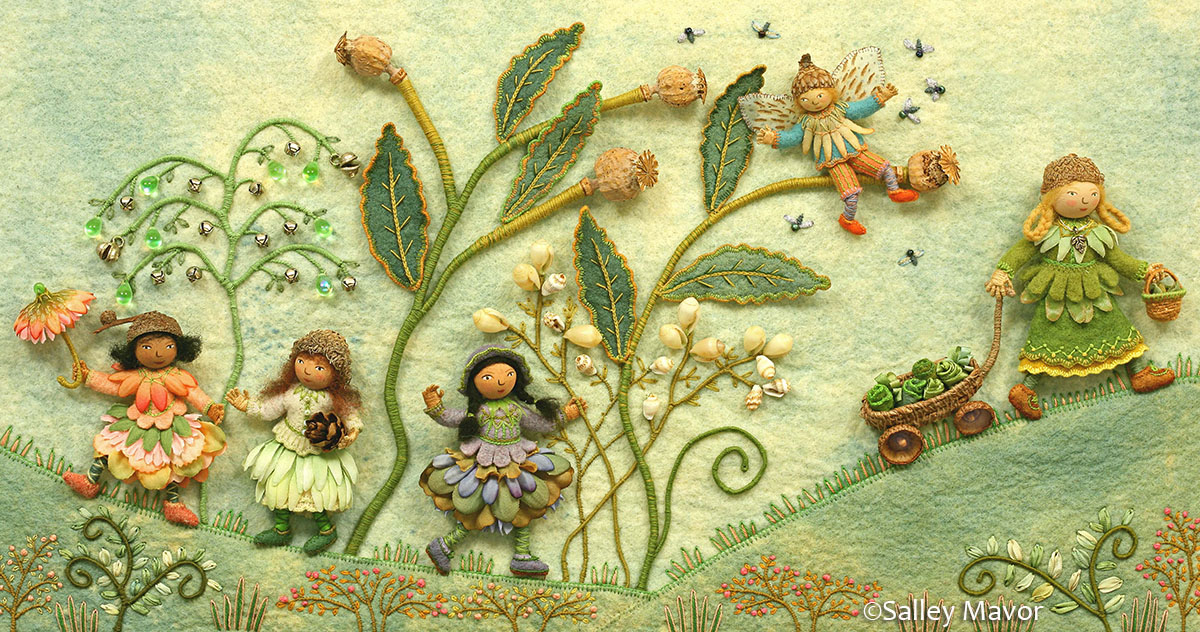
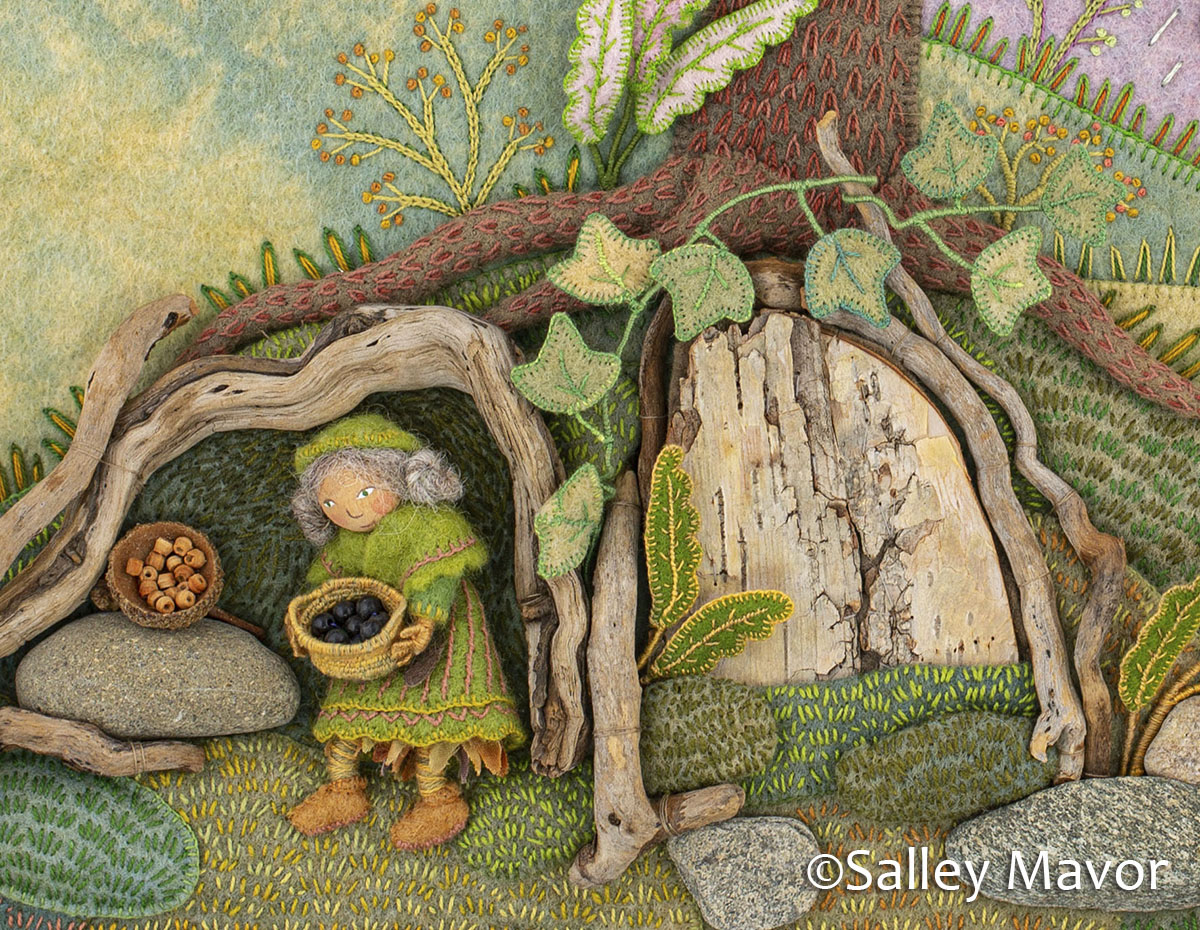
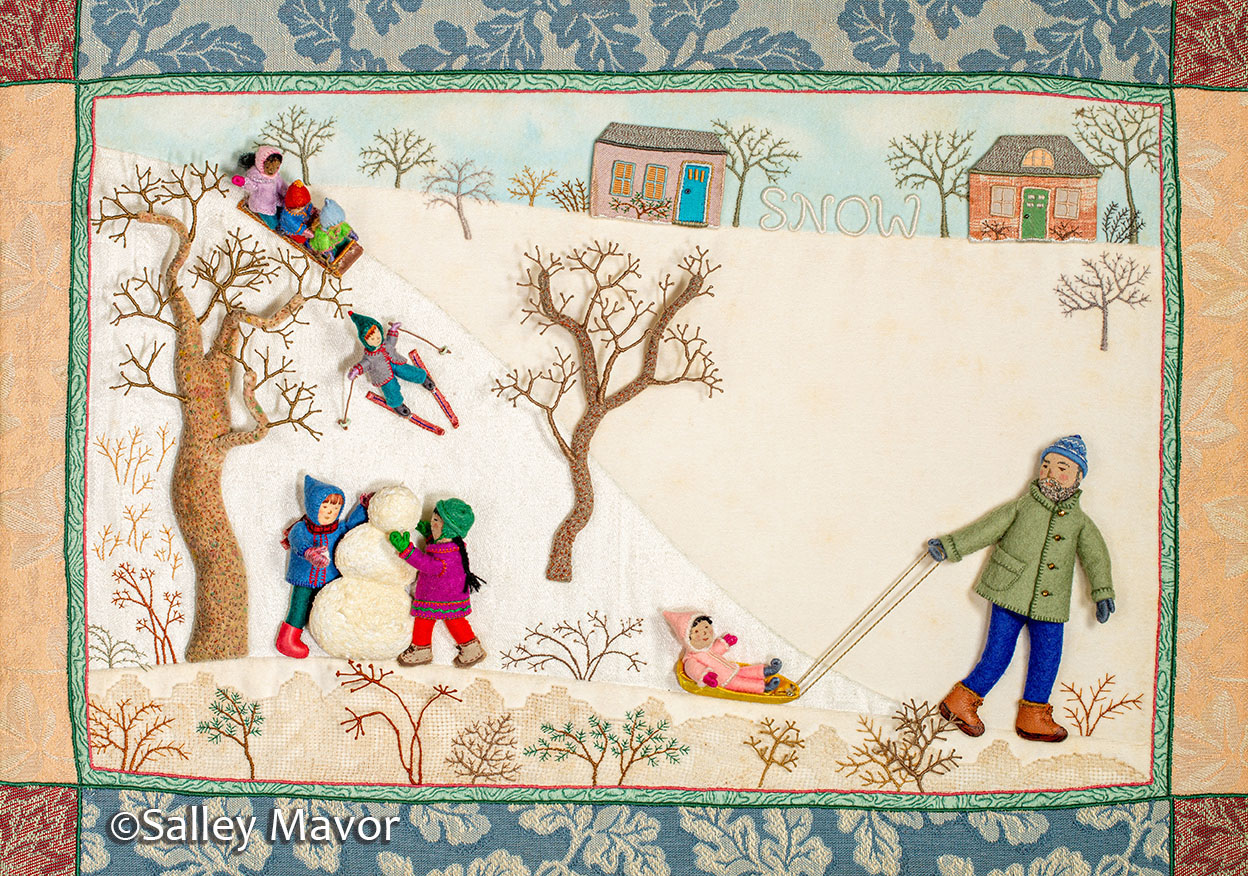
New artwork is also on display, including my series of seasonal landscapes. Frosty Morning, Mossy Glen, Summertime, and Harvest Time. To see how these pieces were made, please click on the titles.
There are currently two opportunities to see my original art in New England, in museums located 50 miles apart. So, if you’re coming to the area, it’s worth planning to visit both exhibitions. Between the two venues, you can see just about everything I have available to show!
All last winter, I made a group of felt-covered wire filigree forms to soften the edges of the museum’s gallery entrances. The idea was to create nature-inspired valences that help set the stage and invite visitors inside.
To make them, I covered wire forms with felt, creating linear designs that hold their shape when suspended. The sculptures were specifically made for this show, but they could be reused in different ways in future exhibits.
My intention was to work bigger and faster than normal, but my strong impulse to make tiny stitches slowed down the process. Still, I was able to increase the square footage/time ratio! I’ll share more photos, videos and commentary about these sculptures in a future post.
Here’s a slide show of a representative sampling of individual works on display at the museum. To Every Season will be on view at the New England Quilt Museum in Lowell, MA through Dec. 31st, 2025. If you can, please come see my work in person. It’s a totally different experience than looking at reproduced images!
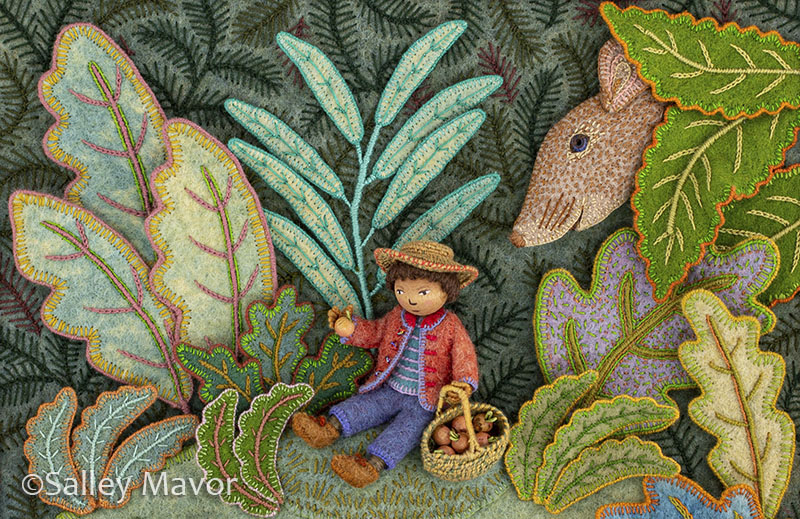
Birds of Beebe Woods 2012
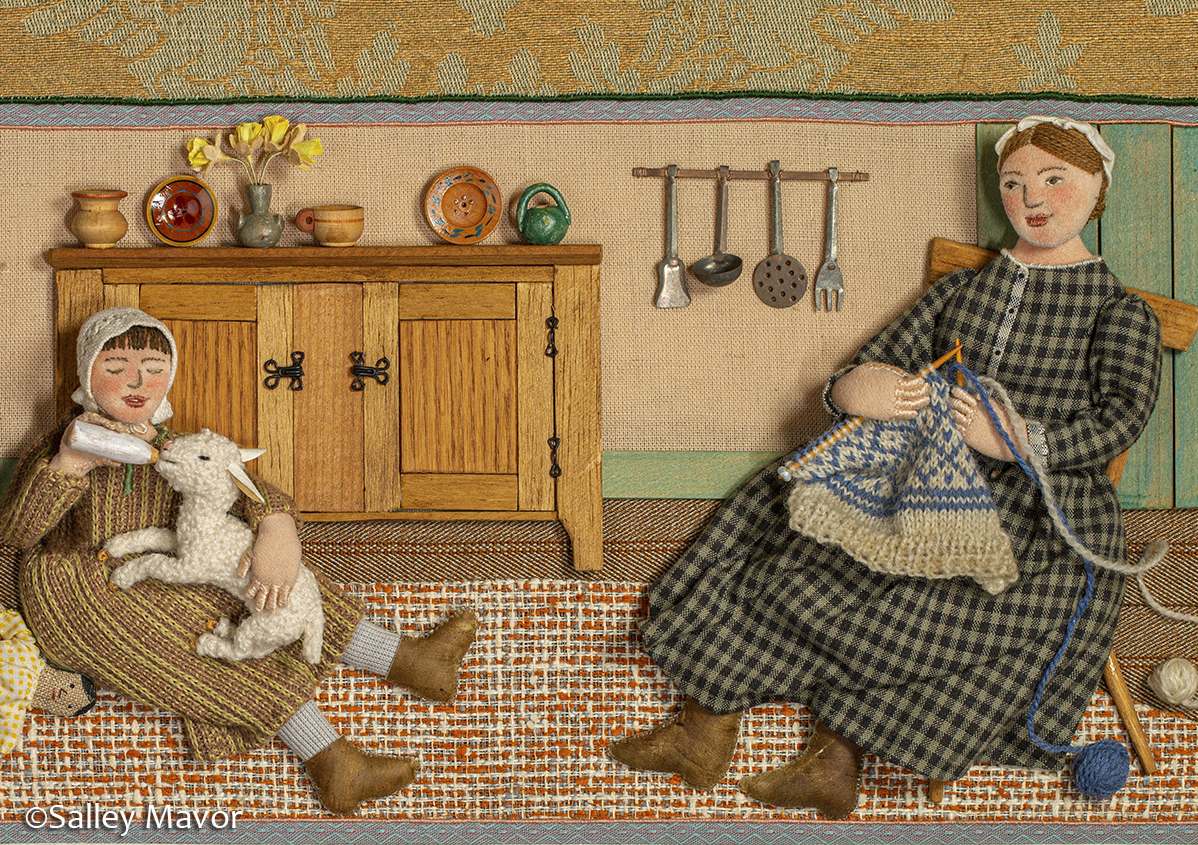
Mary Had a Little Lamb 1995
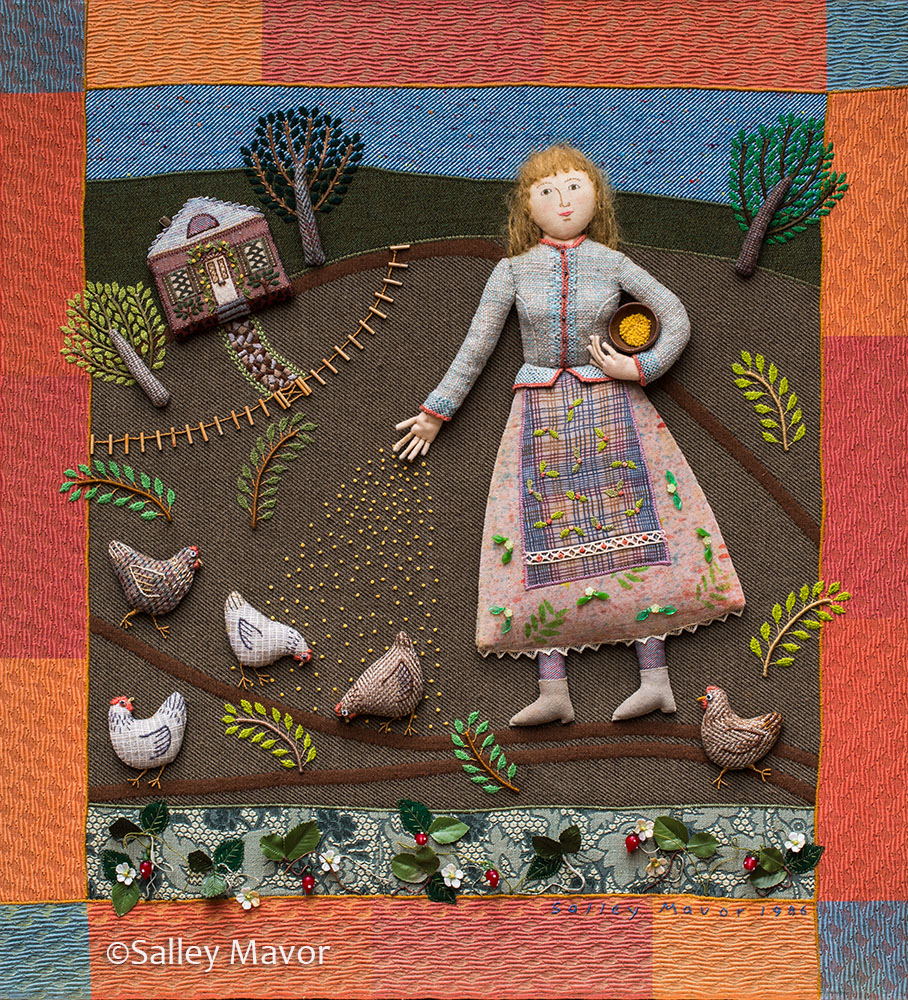
Feeding Chickens 1986
Fast Friends 1997
Frosty Morning 2021
In the Heart 2001
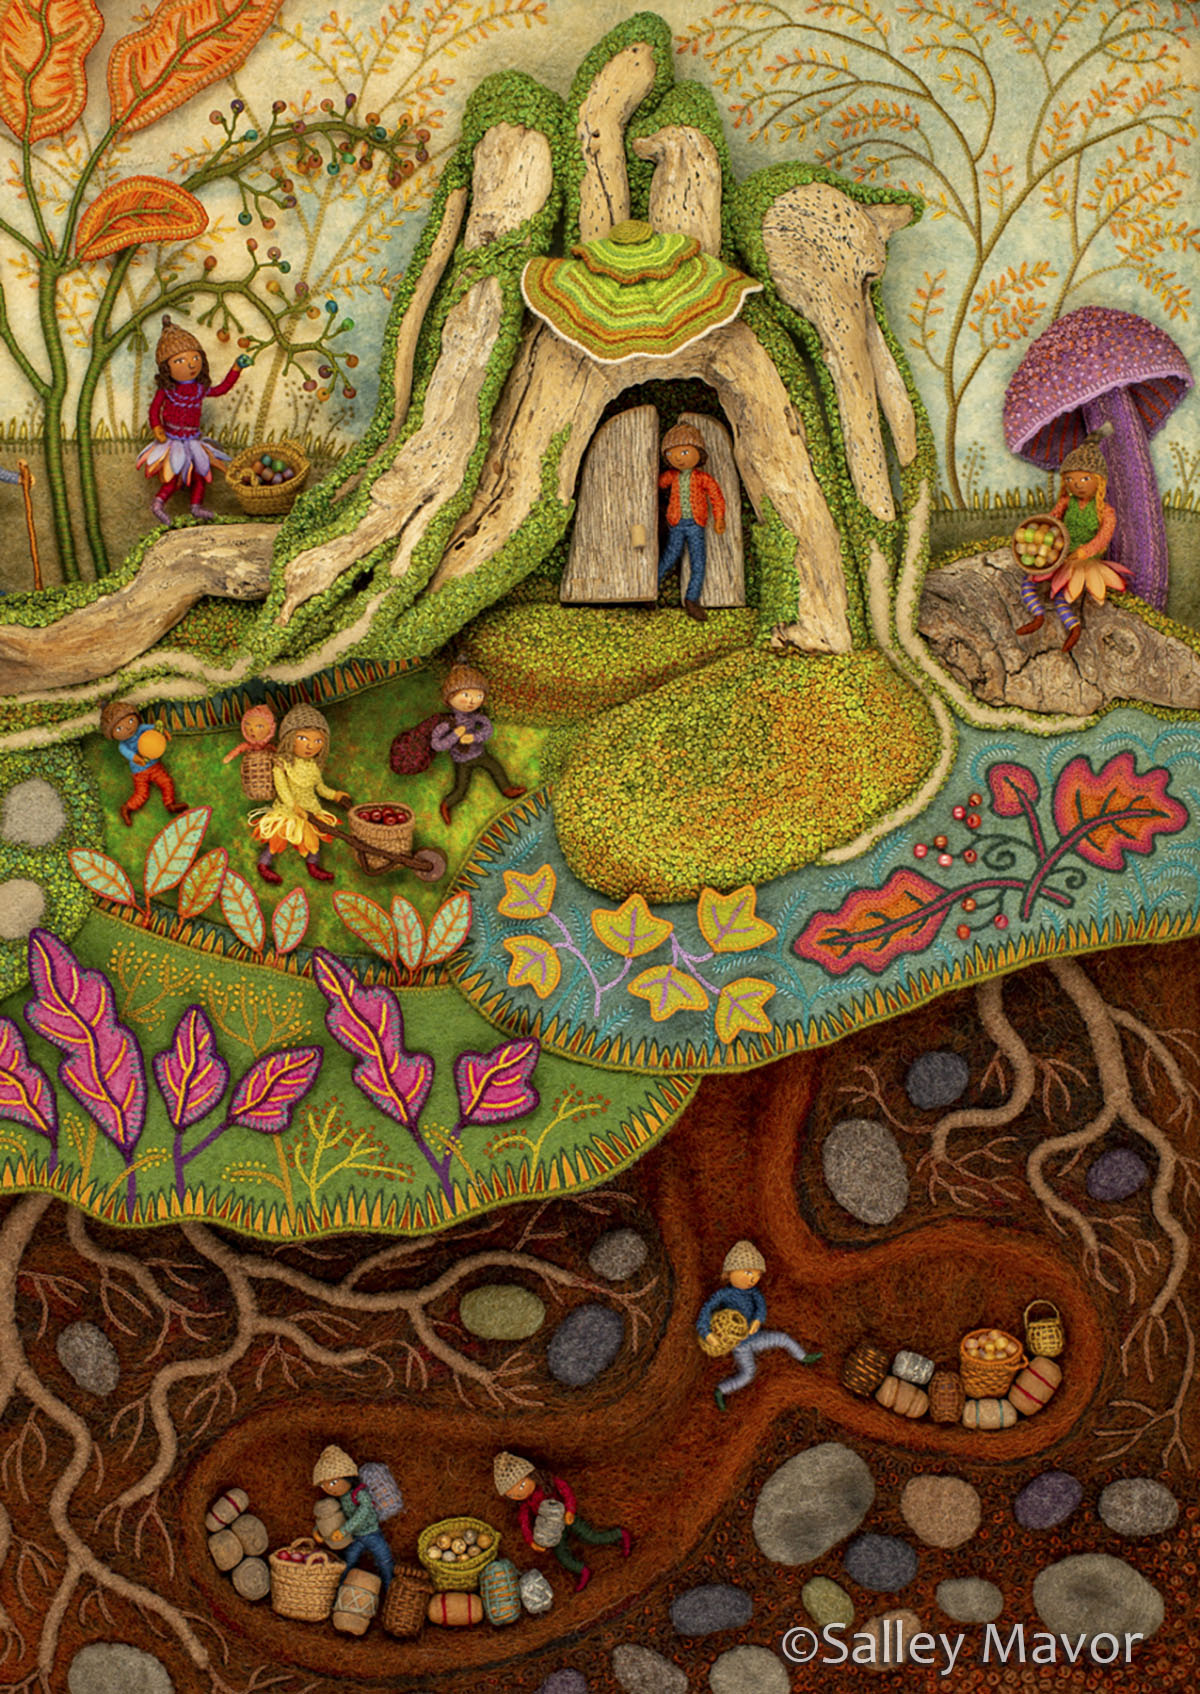
Harvest Time 2022
Jerry Hall 2010
Mary Had a Little Lamb 1995
Summertime 2023
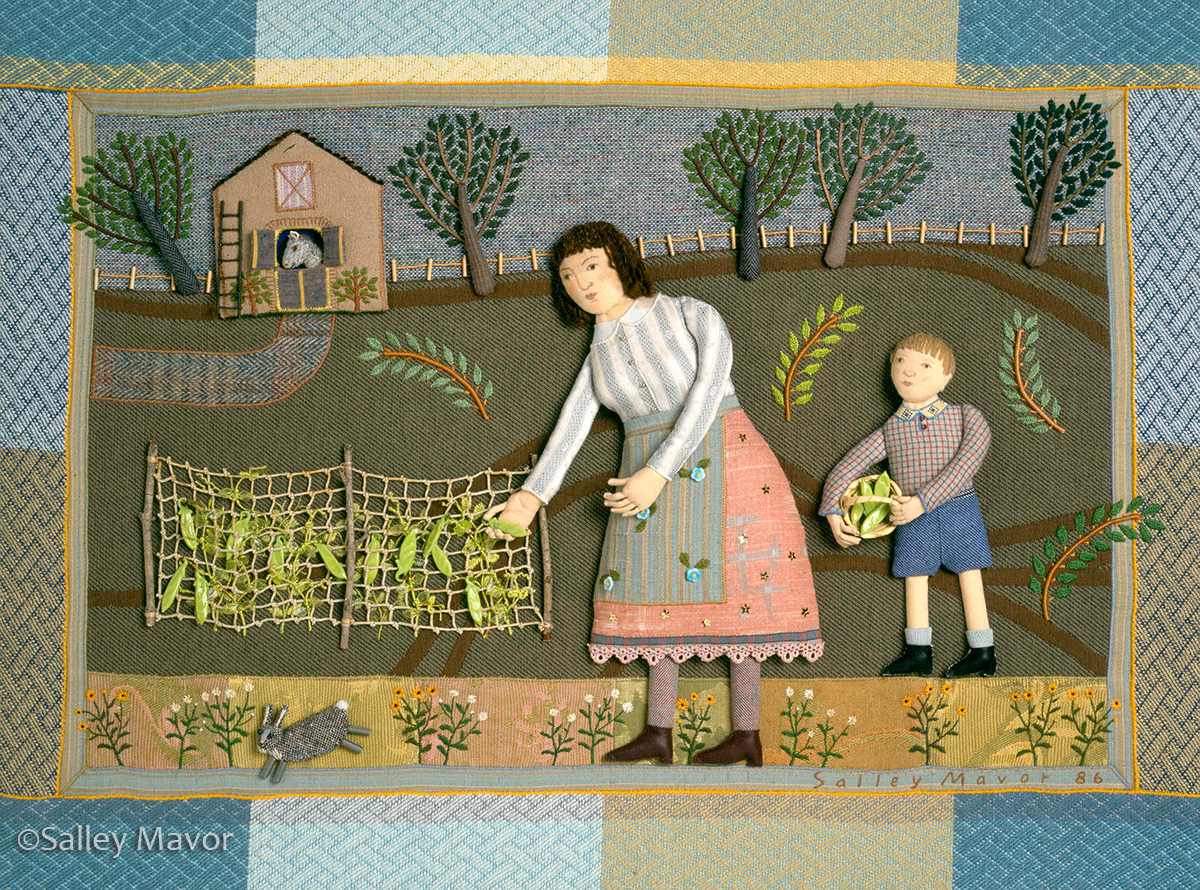
Picking Peas 1986
Beach 1982
Mary Had a Little Lamb 1995
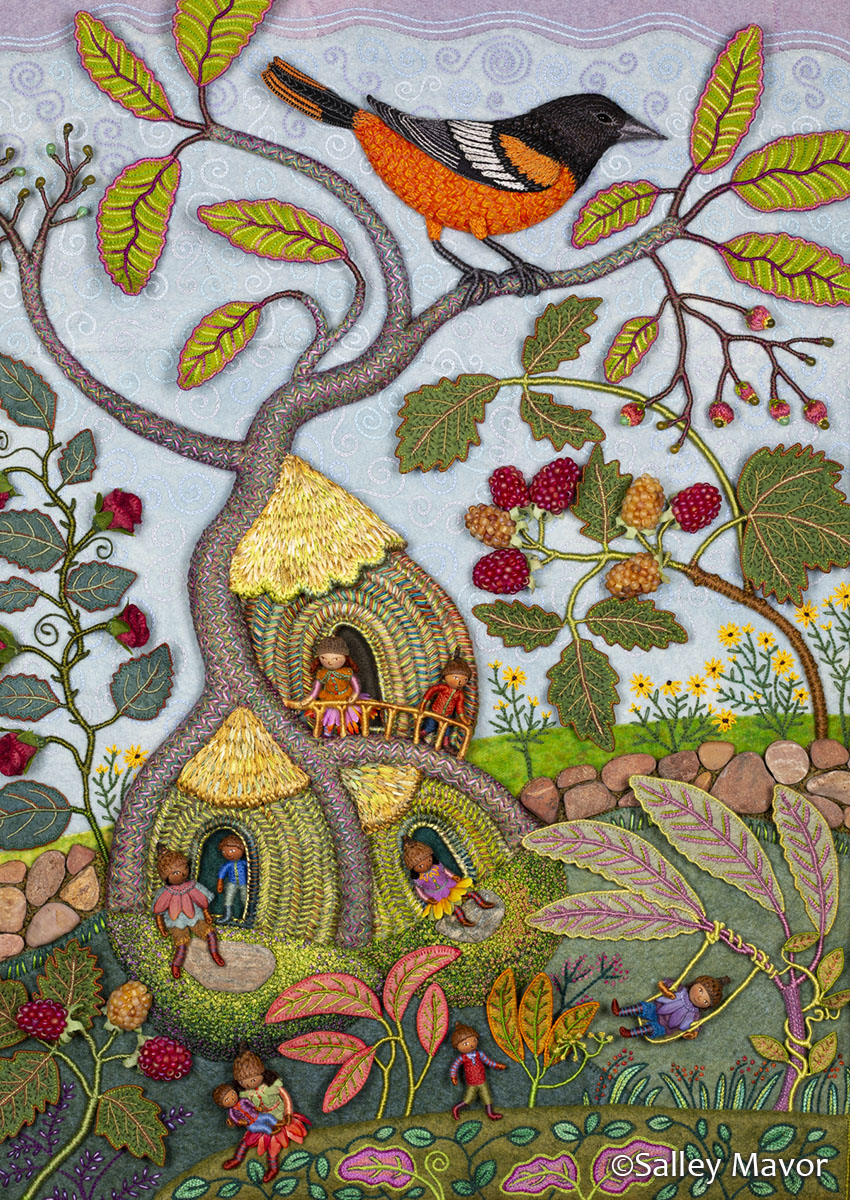
Pocketful of Posies 2010
Pocketful of Posies 2010
Pocketful of Posies 2010
Pocketful of Posies 2010
Rabbitat 2011
Snow 1997
Rana is Born 1991
To keep up with new posts, please subscribe to this blog. Your contact info will not be sold or shared. If you’d like to see more frequent photos tracking the projects in my studio, please follow me on Facebook, Instagram and BlueSky.
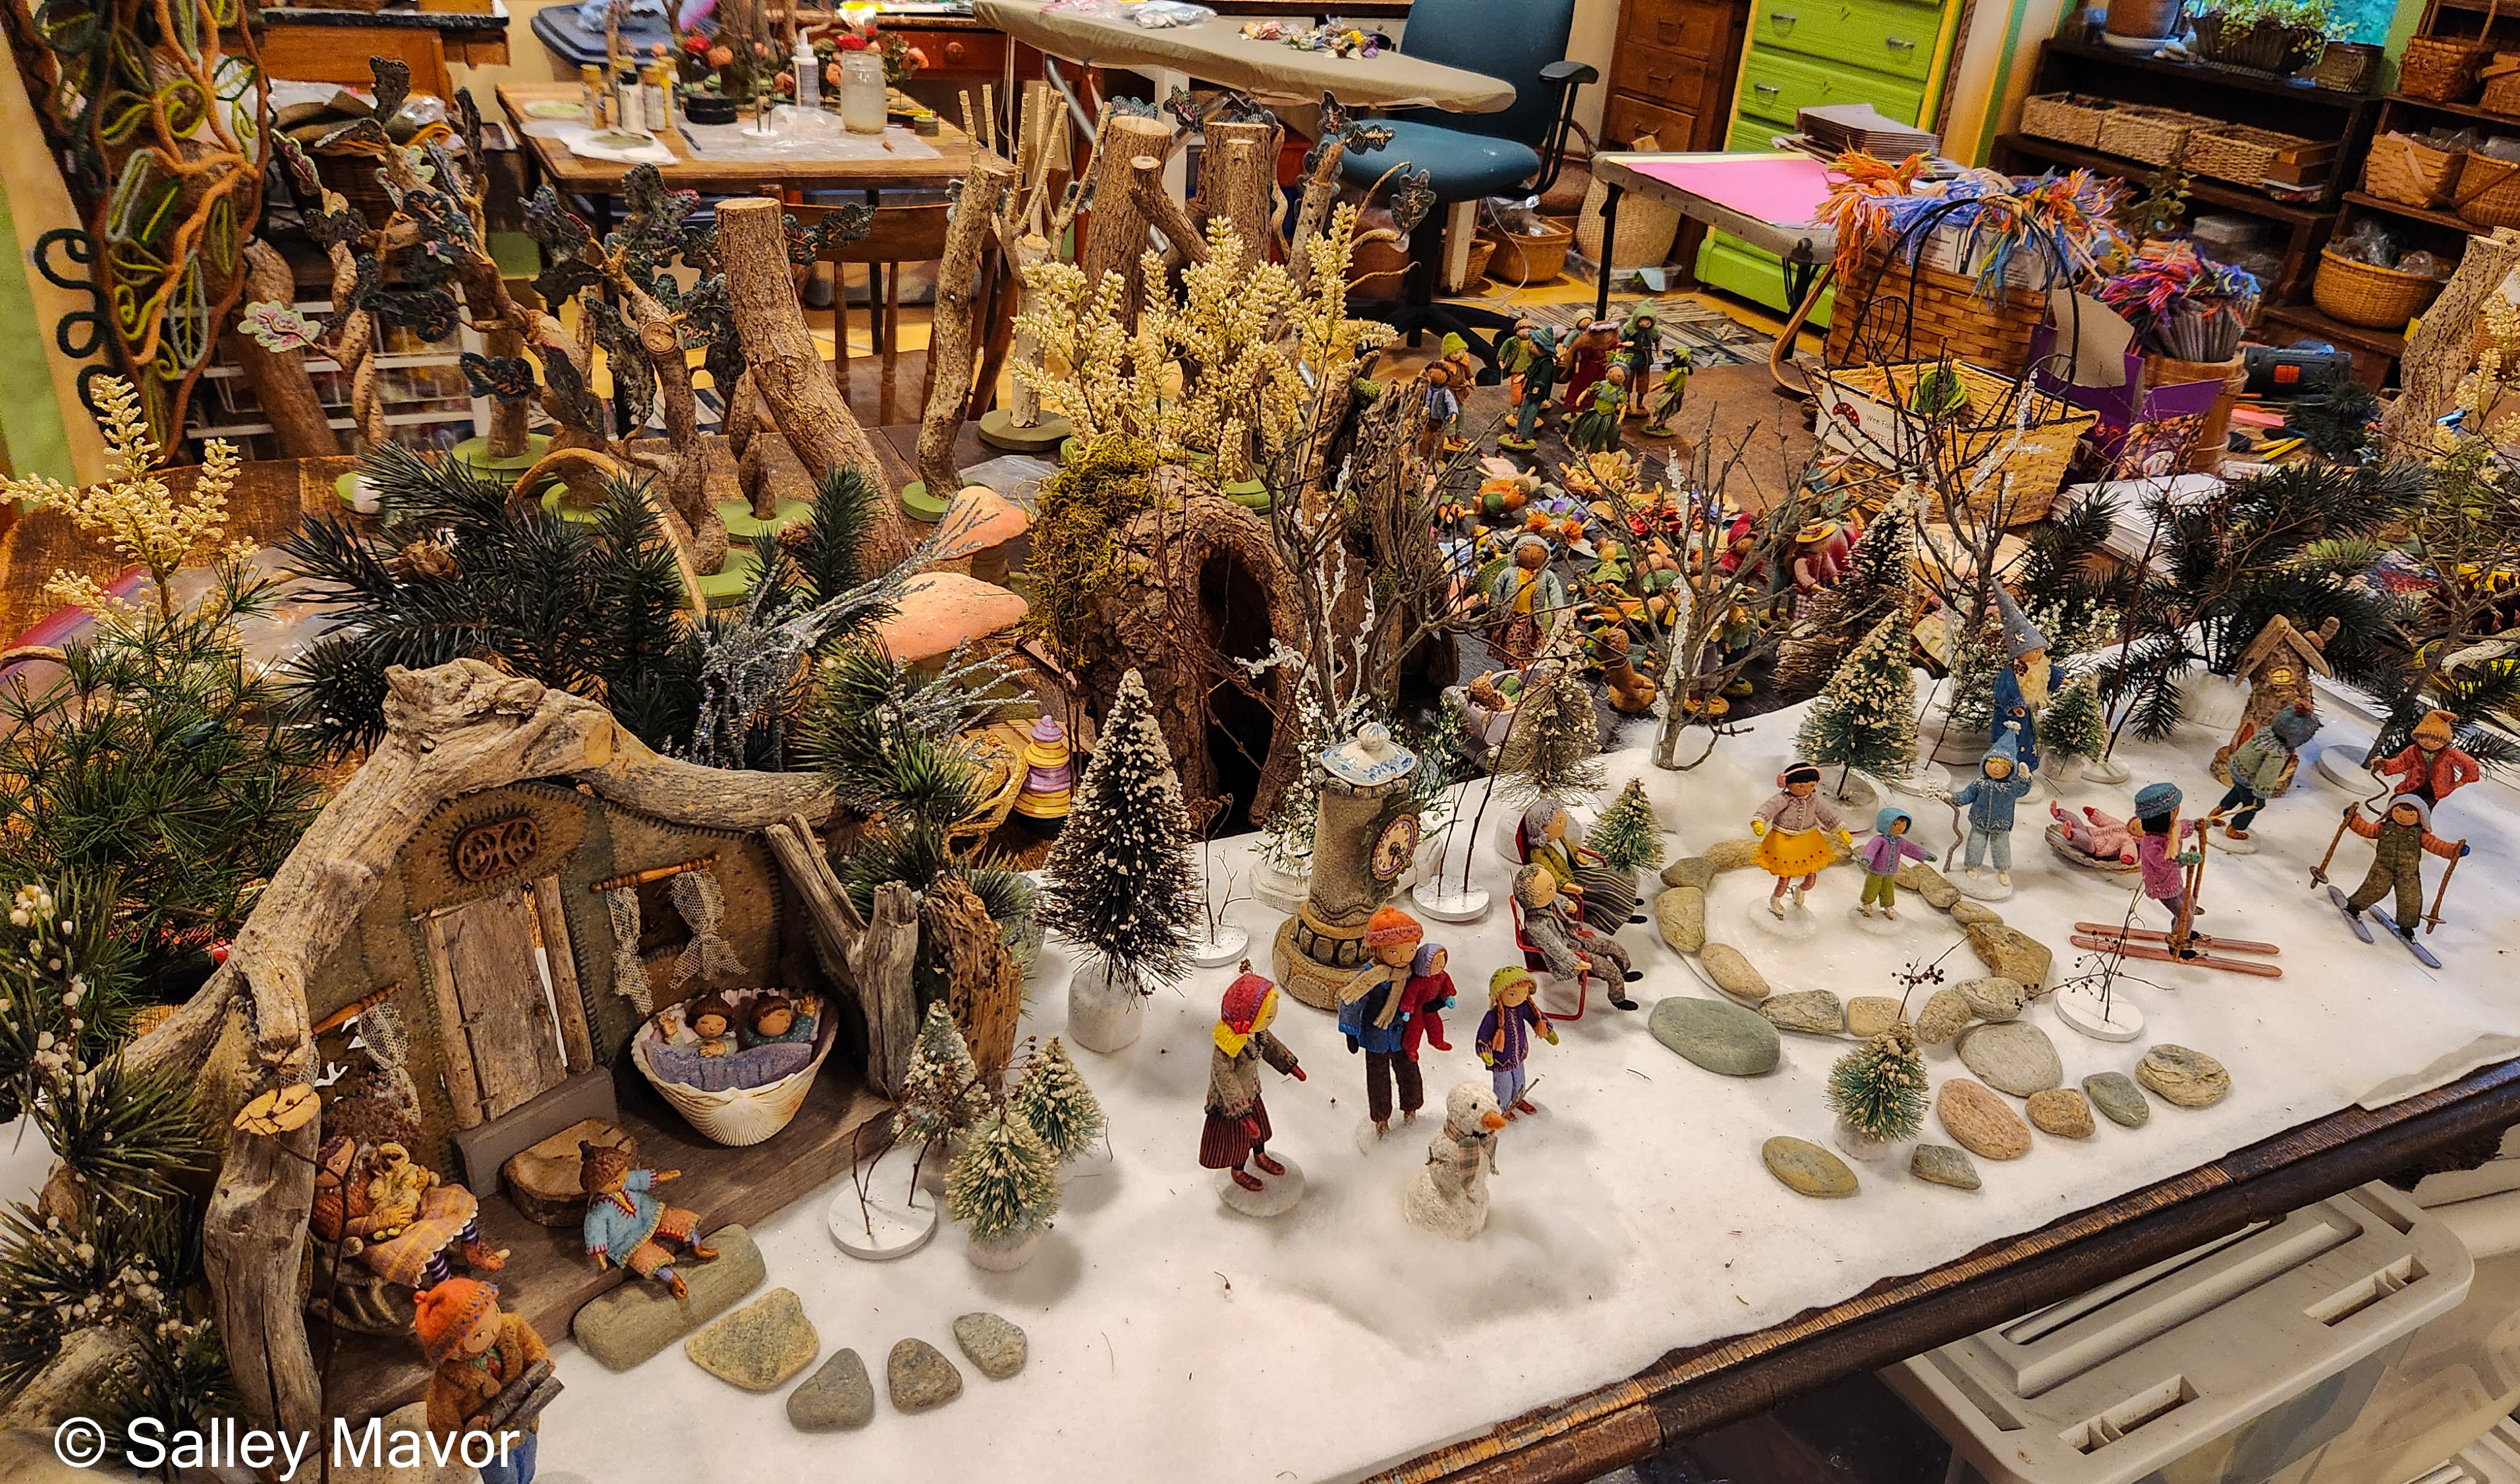
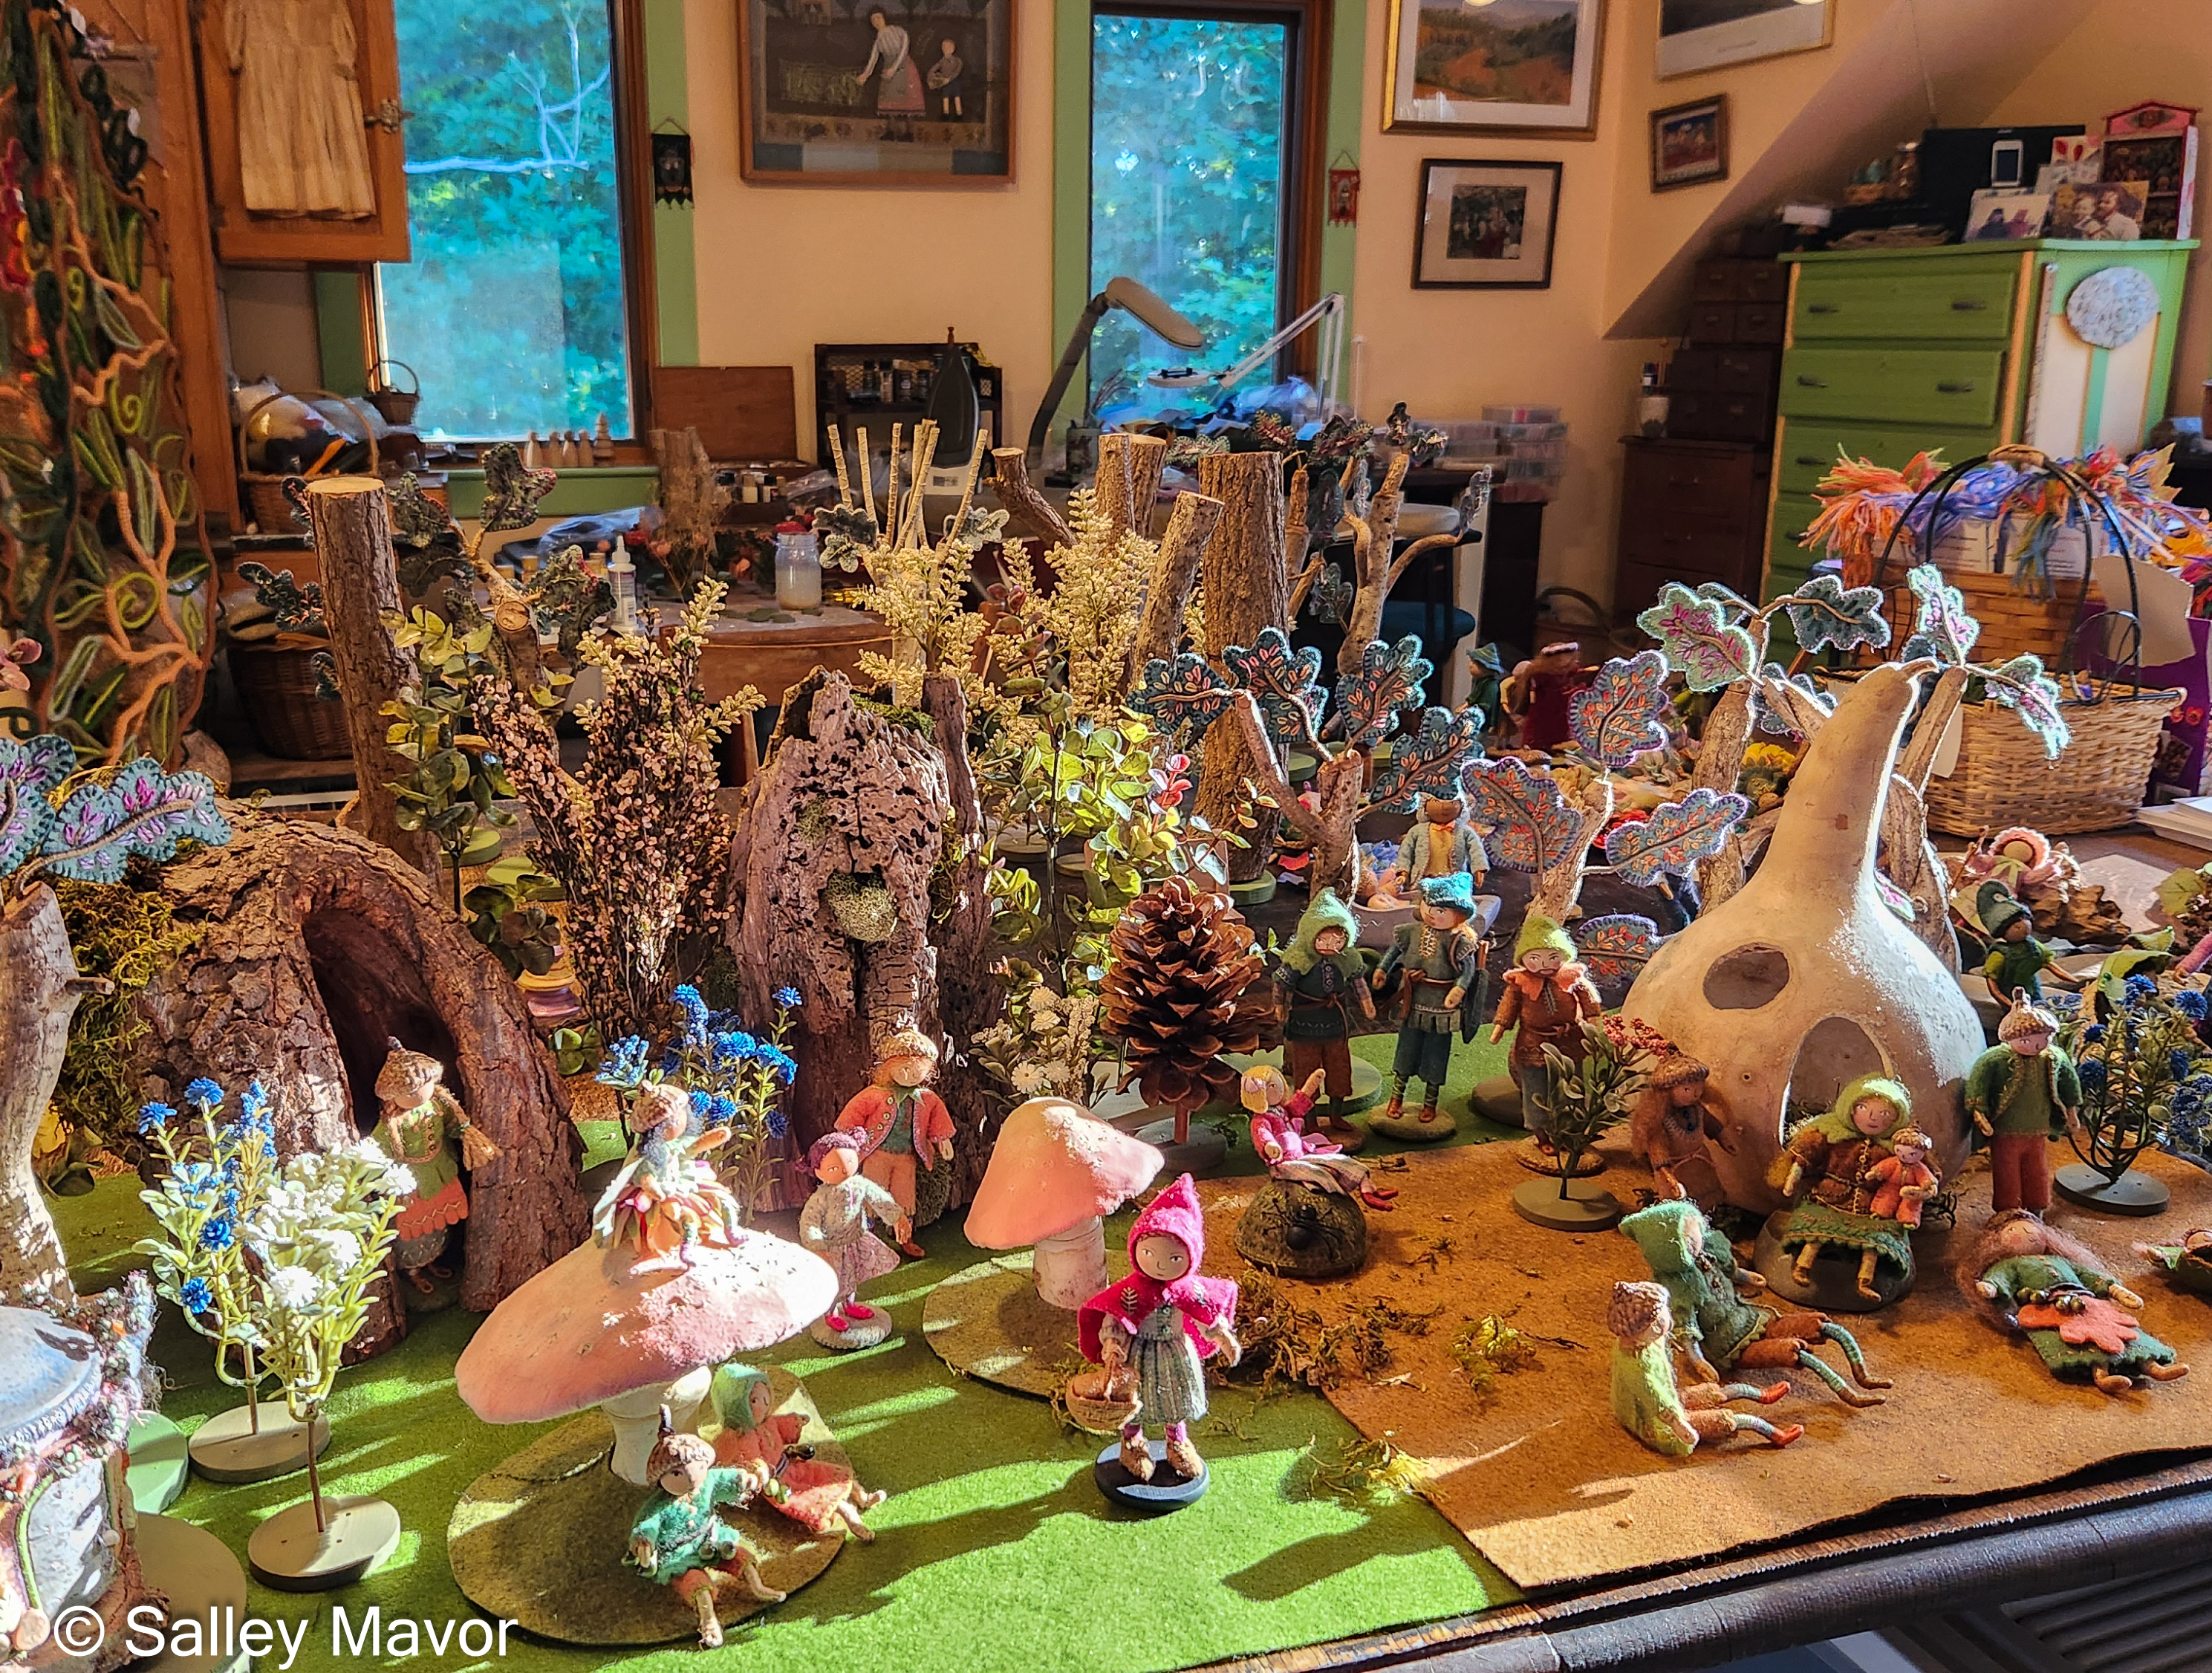
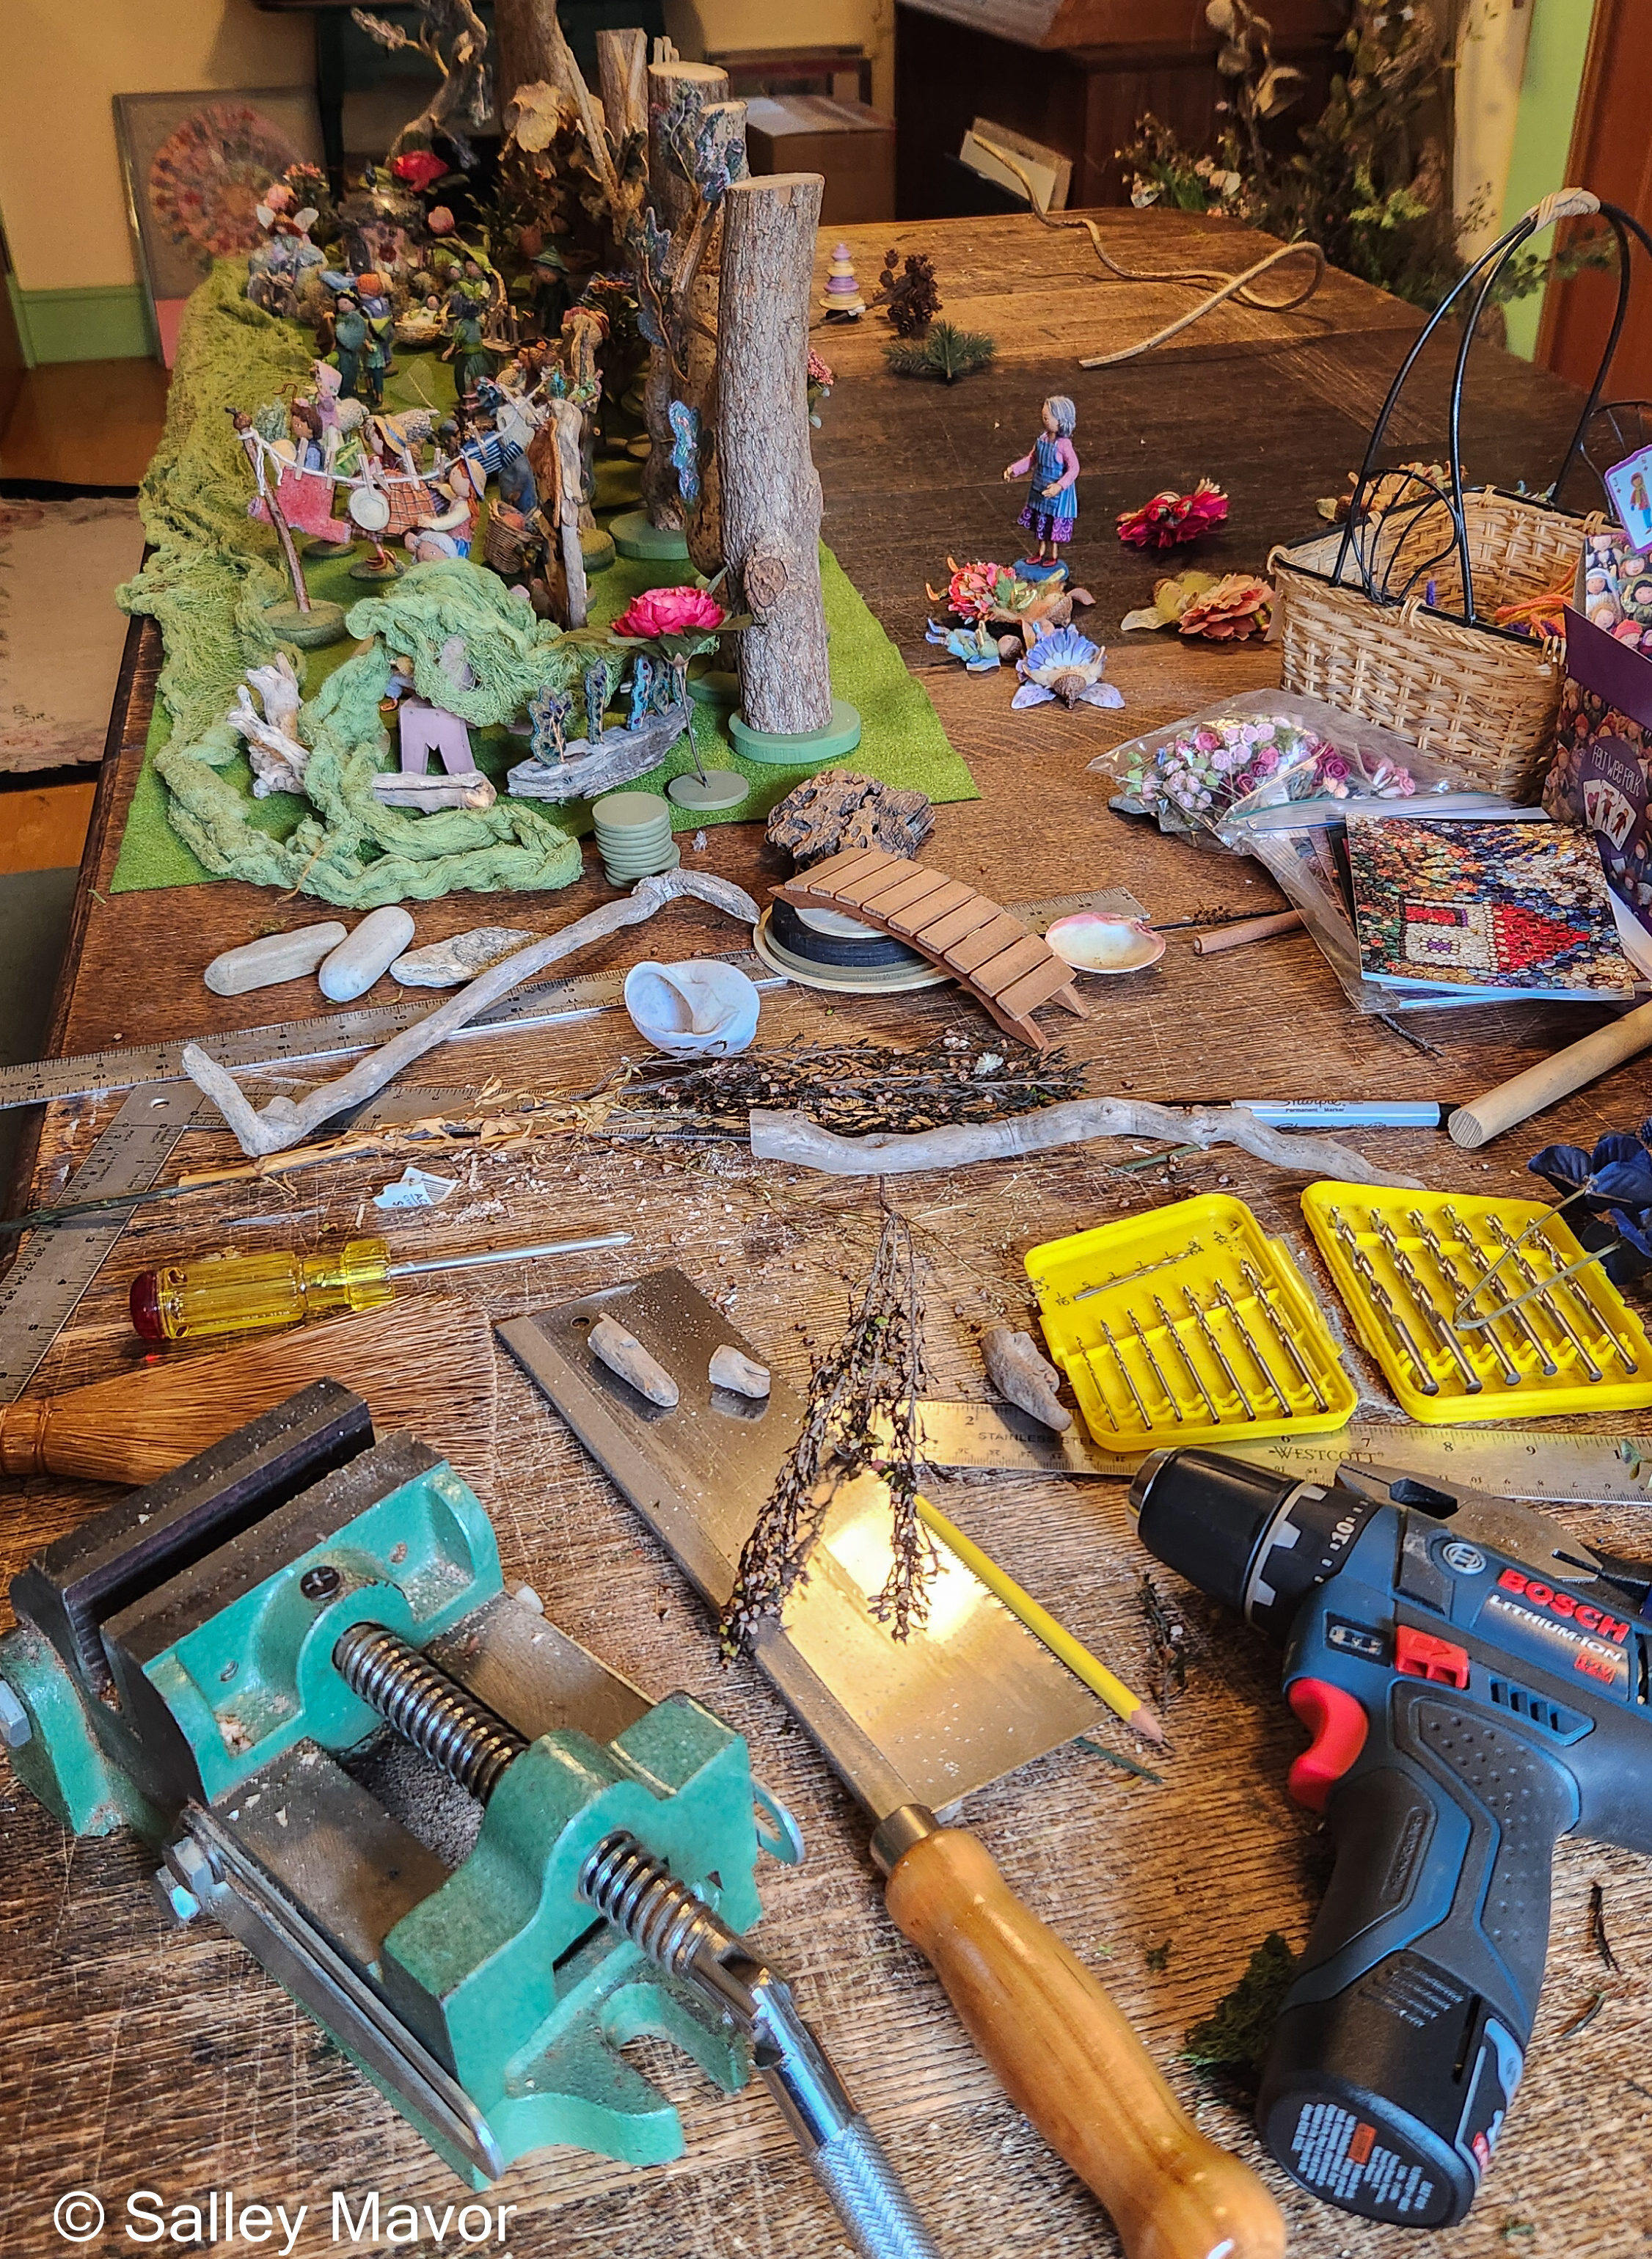
For the past few weeks, I’ve been playing with dolls and setting up miniature scenes in my studio. They’re for my exhibition at the New England Quilt Museum in Lowell, MA, which opens on Sept. 9, 2025. While working on these dioramas, I felt just as absorbed and transfixed as I did as a child. My imagination and abilities may have evolved since then, but the overwhelming desire to create other worlds is the same. I thought it would be fun to share photos and videos of these practice set-ups before everything was moved and installed at the museum.
Four scenes, depicting winter, spring, summer and fall, are reassembled and on view in display cases in my exhibition, To Every Season: Works by Salley Mavor. In addition to the dioramas, a wide selection of embroidered pieces that celebrate the wonder and magic of the natural world can be seen, including framed tableaus on loan from private collections and original picture book illustrations from the past 40 years. The show will be on view through Dec. 31, 2025 at the New England Quilt Museum in Lowell, MA. I will be giving an Artist Talk on Sat., Nov. 1, 2025 at 1:00 PM (pre-register here).
video of the practice Fall Scene
When I visited the museum last year to choose which galleries to hang my art, the curator, Pam Weeks, also pointed out 4 large display cases for 3-dimensional work. It seemed like the perfect opportunity to comb through all of my treasures and create miniature worlds! I ended up using a mishmash of figures, houses, furniture, trees, and other stage dressing materials that I’ve made and collected over the years.
Many of the 80 wee folk characters are sample projects from my how-to book, Felt Wee Folk: New Adventures. In addition to providing patterns and instructions for making the figures, the book explains how to make the weighted doll stands you see here.
Some of the trees and houses were used in Liberty and Justice, the stop-motion animation that Rob and I made.
The winter scene is modeled after the Winter Wonderland that I once created for a display case at Boston Children’s Hospital. The bottle brush evergreen trees included in the arrangement are vintage pieces from the 1950s, originally belonging to my mother-in-law.
video of the practice Winter Scene
One end of the old oak table served as a work bench where I sawed tree branches and drilled holes to screw them to wooden bases.
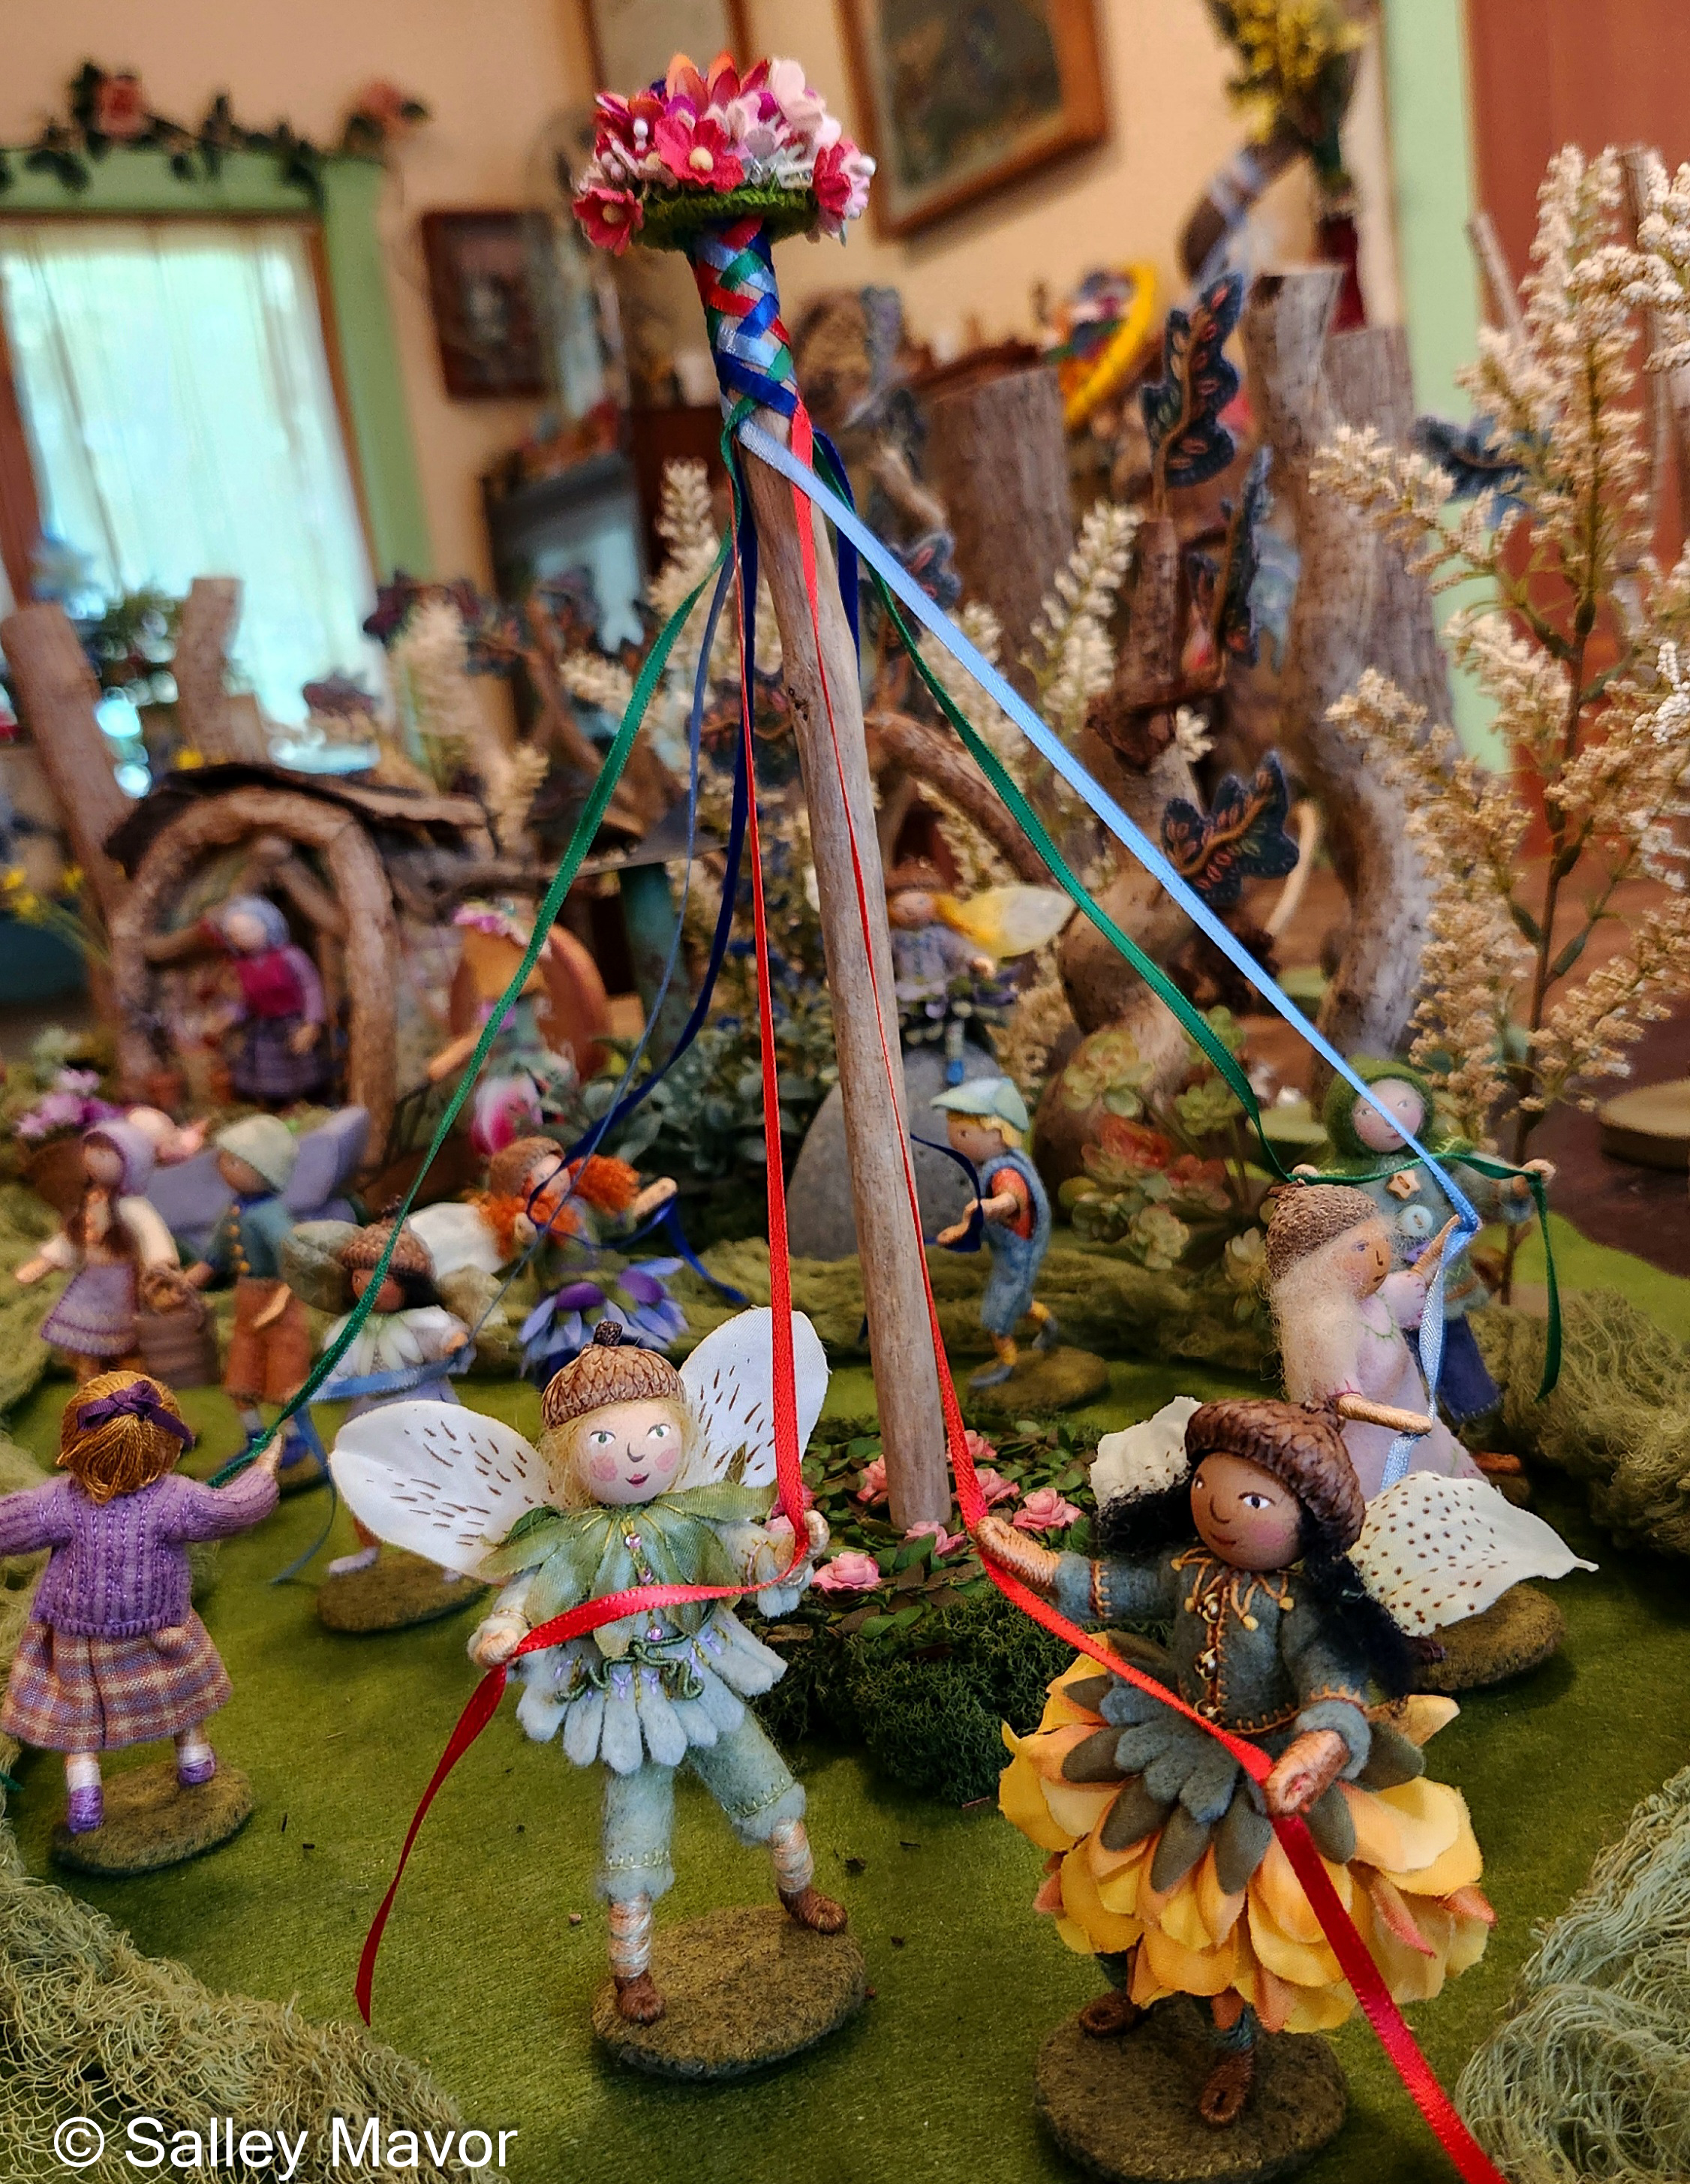
For the spring scene, I built a May Pole for the wee folk to dance around. The most complicated part was figuring out how to weave the ribbons around the pole.
video of the practice Spring Scene
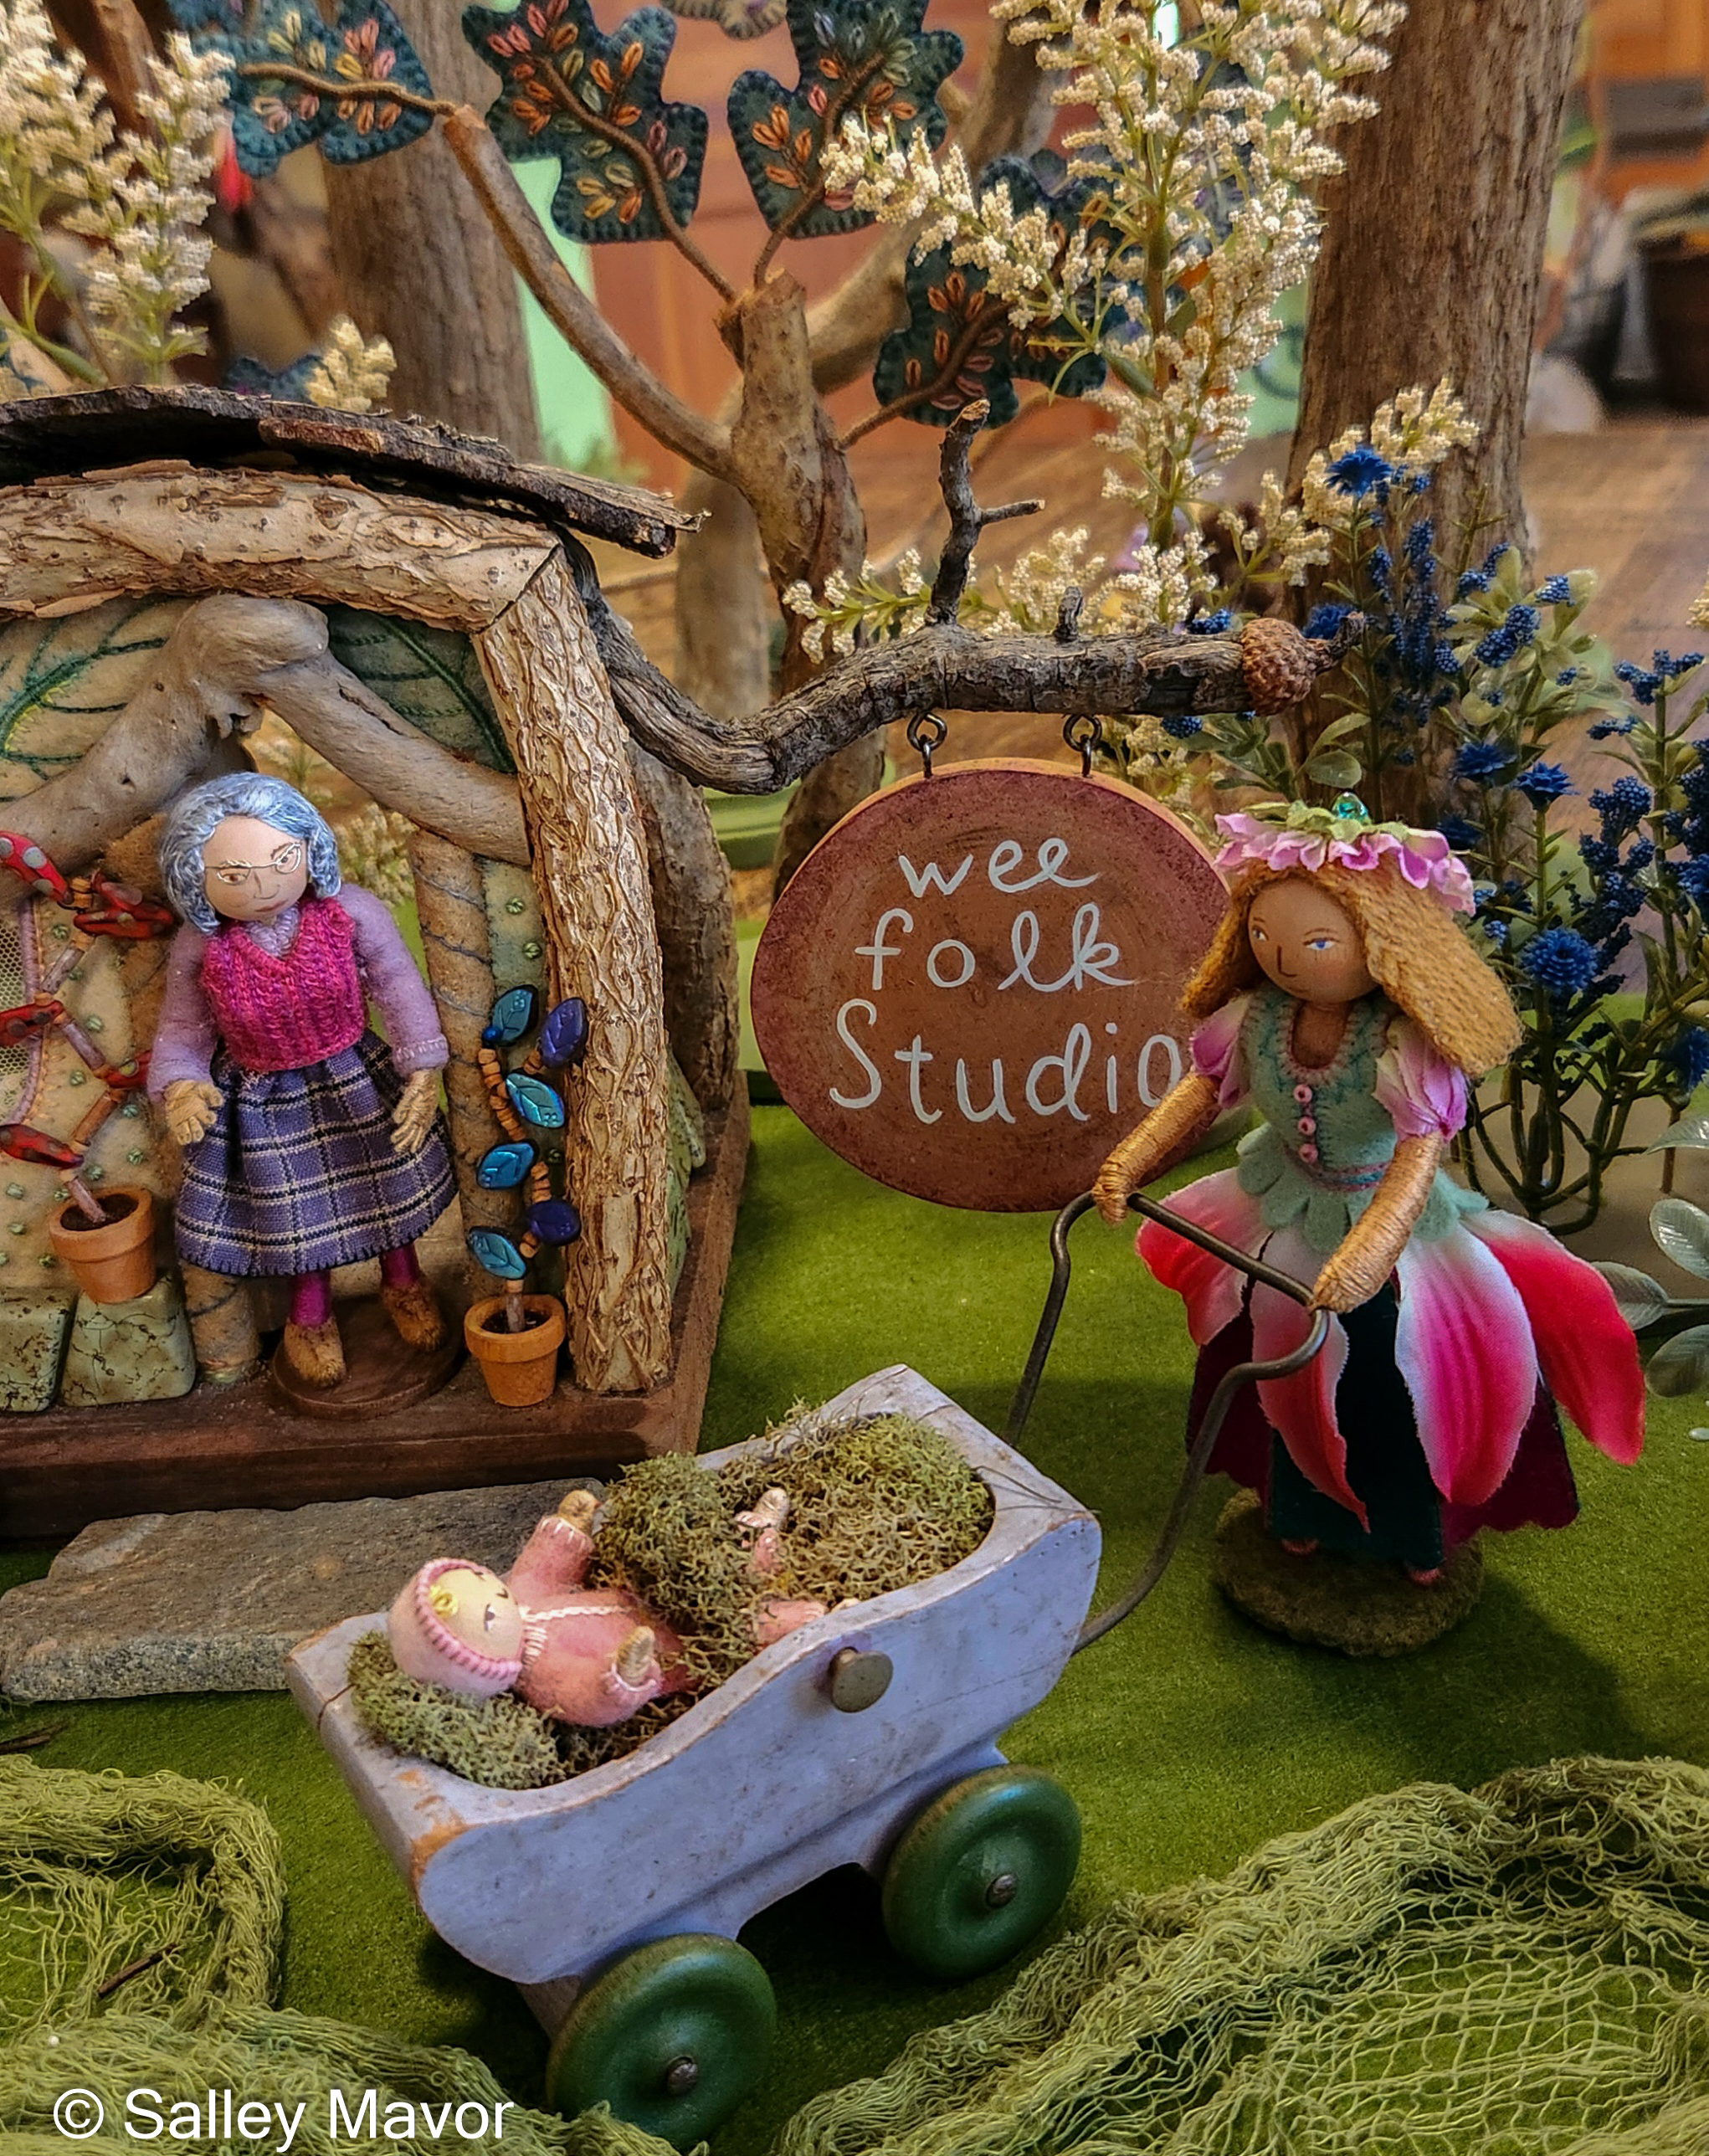
Most of the materials I used to build things are gathered from nature, but I like to include special items, such as this 1920’s vintage baby carriage that belonged to my mother.
The summer scene is jampacked with figures posing in different vignettes.
This pair of wee folk are proudly showing off some oversized vegetables that are left over from my stuffed pins period.
Even Polly Doll makes an appearance doing her laundry.
video of the practice Summer Scene
I hope that you’ve enjoyed this preview. Rob and I plan to visit the museum soon to see the exhibition and take photos, which I’ll share in future posts.
To keep up with new posts, please subscribe to this blog. Your contact info will not be sold or shared. If you’d like to see more frequent photos tracking the projects in my studio, please follow me on Facebook, Instagram and BlueSky.
I’m pleased to announce that the Mariposa Museum & World Culture Center in Peterborough, NH is hosting my exhibition, Bedtime Stitches & Other Works, through January 4, 2026. Rob and I visited the museum for the first time last week and were delighted by what we saw. The museum staff did a remarkable job hanging my work, which is spread throughout the building’s 3 levels.
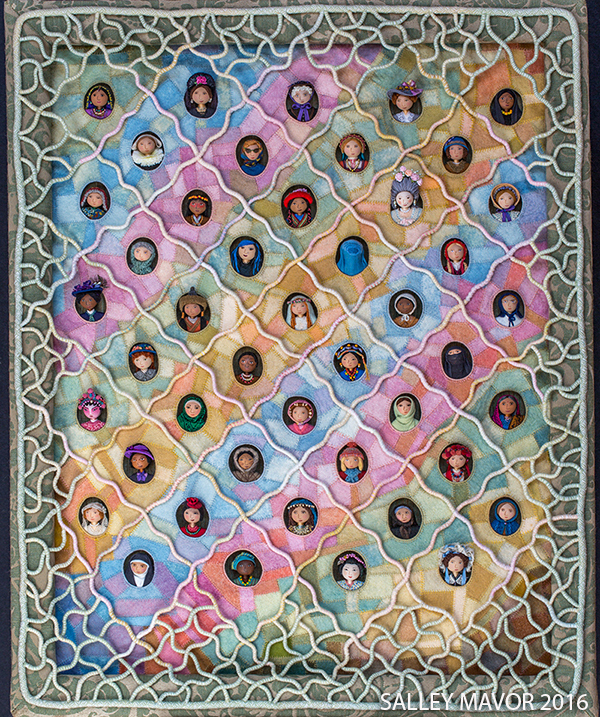
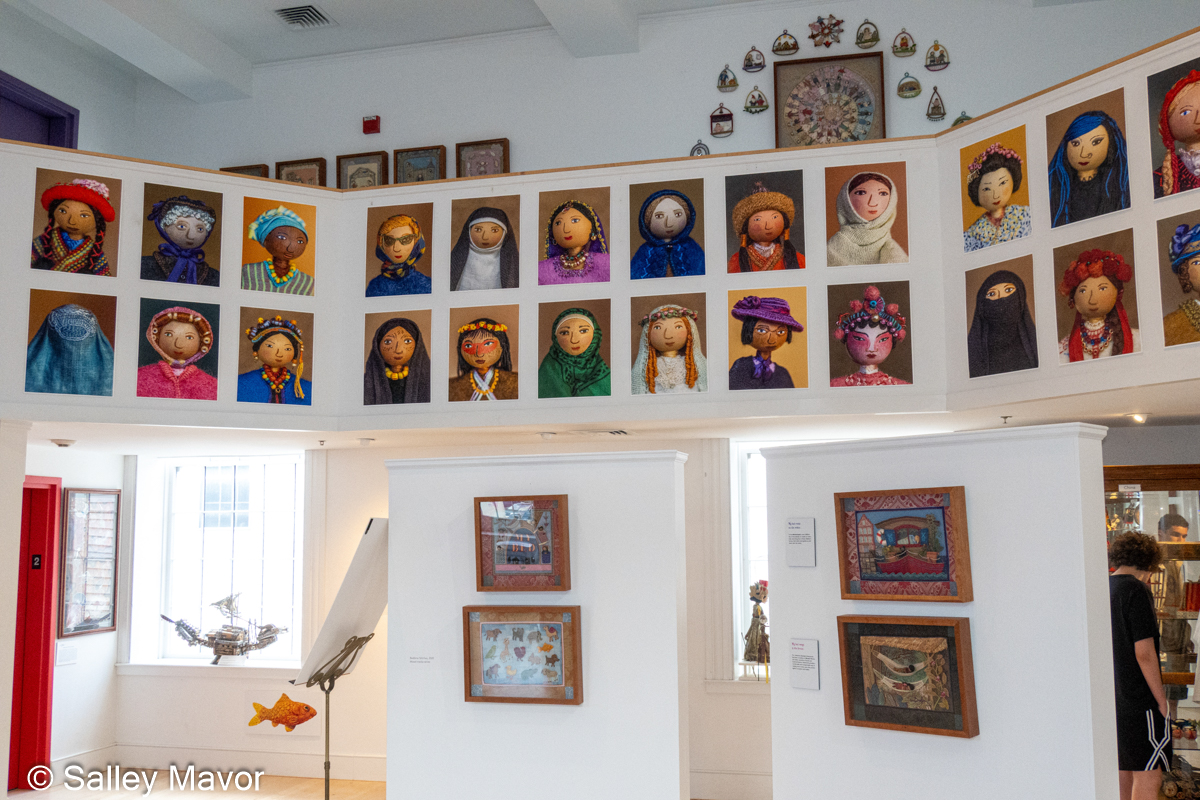
The exhibition includes a wide selection of framed tableaux and sculptures that span the past 30 years of my career, including the Wall of Women (printed enlargements of portraits from “Cover Up”) and the complete set of original art for my most recent picture book, MY BED.
While we were there, Rob took a photo for a family that posed in front of the display of wee folk. Many of the dolls are sample projects from my how-to book, Felt Wee Folk.
I enjoyed meeting some wonderful folks who told me about what they like to make.
I’m looking forward to returning to the museum to give an Artist Talk on Sat., Sept. 27 at 4:00 PM ~ Seating is limited, so if you plan on coming, please register here soon.
Another highlight of our trip was connecting with my artist friend, Beth Krommes, who lives in Peterborough. Beth and I first met 50 years ago, in a printmaking class at Syracuse University. She then took a junior year abroad in London and I transferred to the Rhode Island School of Design. We’ve kept in touch all these years, periodically talking about our current projects and commiserating about the challenges of working in the children’s book industry. It’s interesting that both of us have delved into a variety of mediums, including picture book illustration and textiles. Another aspect we have in common is our primary interest in design and visual communication, and our impulse to explore different ways of achieving that.
Beth is mostly known for her beautiful scratchboard illustrations, but she has always explored other ways of working, including fabric design, rug hooking and weaving. What is consistent is her incredible sense of design and attention to detail.
Beth Krommes will be participating in the Monadnock Art Open Studio Tour, which is being held Oct. 11, 12, 13, 2025. If you go to her studio, I guarantee that you will not be disappointed!
To keep up with new posts, please subscribe to this blog. Your contact info will not be sold or shared. If you’d like to see more frequent photos tracking the projects in my studio, please follow me on Facebook, Instagram and BlueSky.