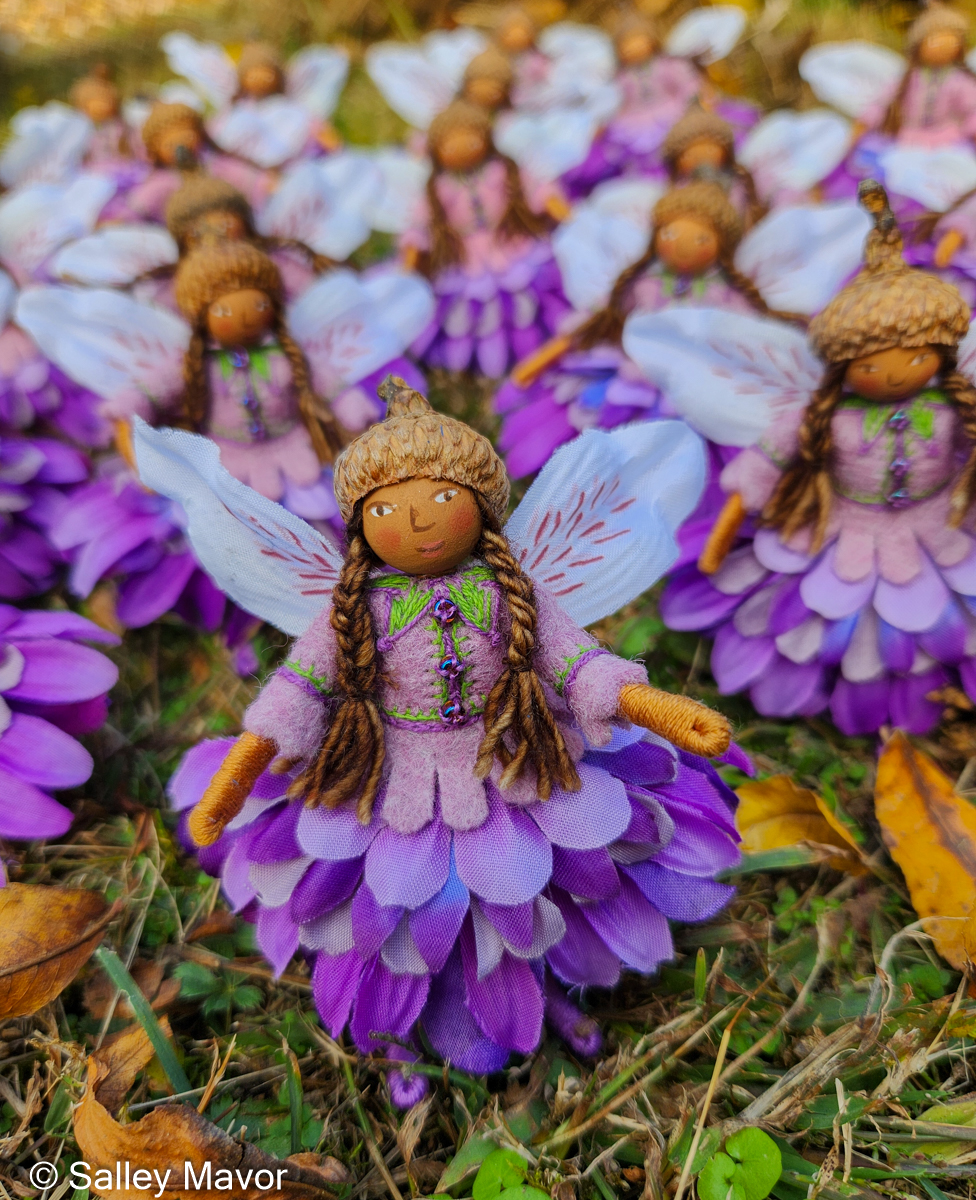
I’d like to introduce AMETHYST and CAMILLIA, two new Ltd. Edition Fairies. How can that be? I keep saying that I don’t sell dolls. But this is an exception because I needed something to do on our recent train trip across the country!
UPDATE: The fairies sold out in 7 minutes! Both sets of 24 dolls are dressed, coiffed and winged and will be ready to fly off to their new homes on Saturday, Nov. 23, 2024 at 10 AM (Eastern US time). They will be sold for $100 each through my Etsy Shop on a first come, first served basis, so please act quickly if you really want one! Sorry, no pre-orders ahead of time. I realize that 10 AM on Cape Cod is in the middle of the night for those of you on the other side of the world, but I can’t figure out how to make it perfectly fair for everyone.
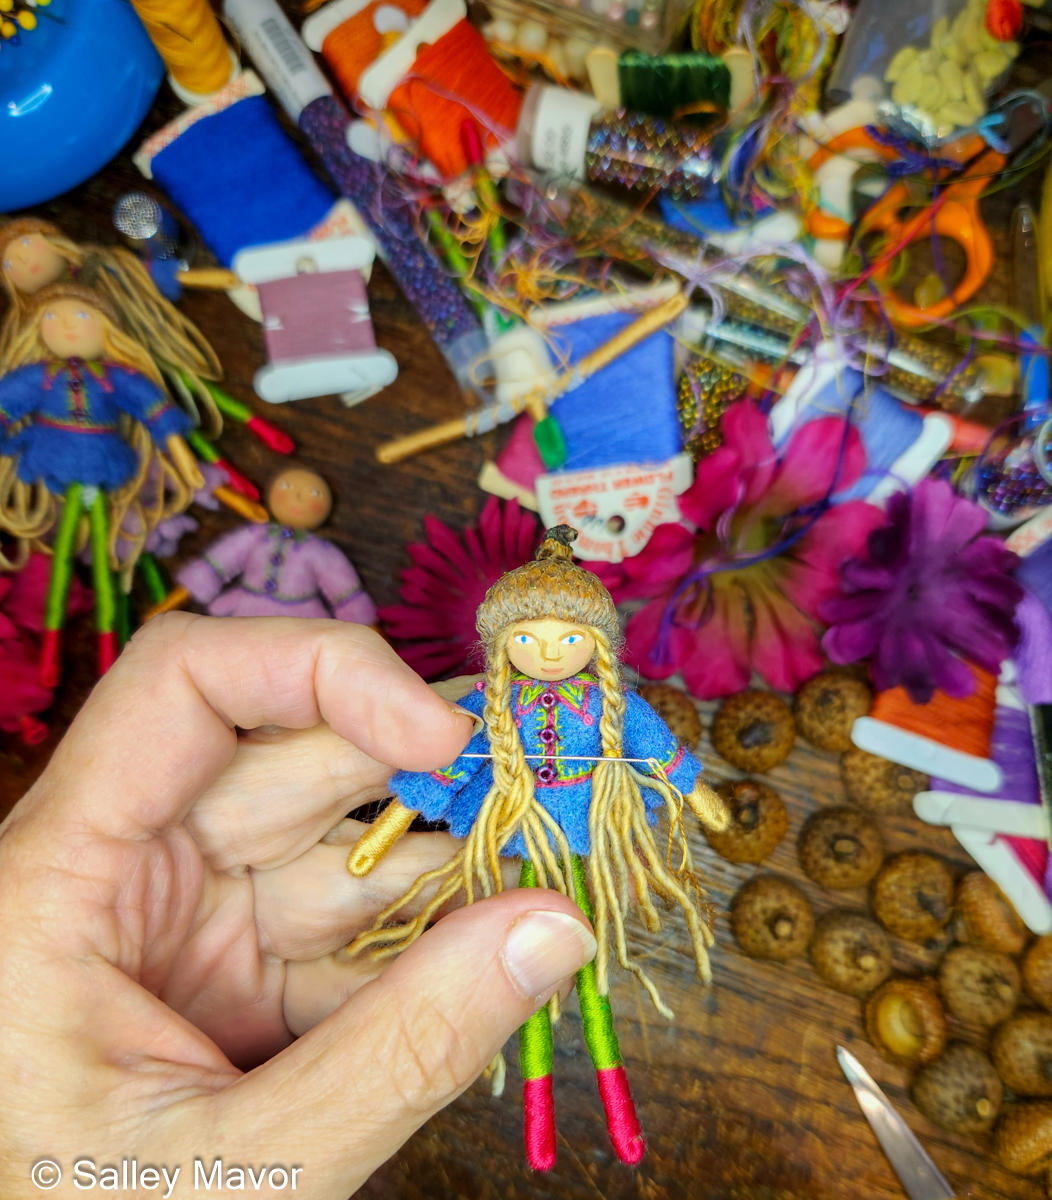
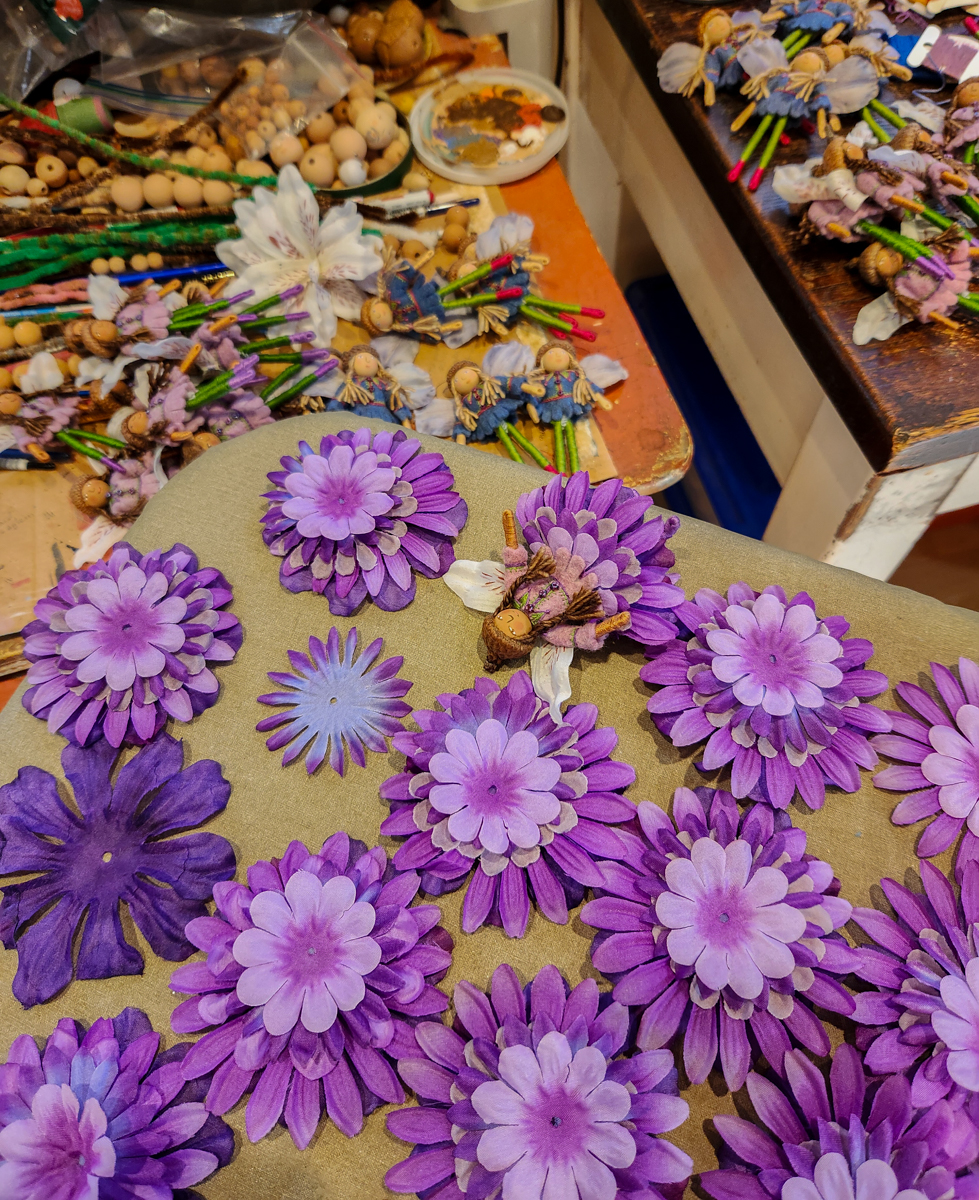
Despite my intention to move on, I haven’t weaned myself entirely from making fairies. It’s a nice relaxing, portable activity when traveling. I’ve had to put limits on myself at home or else I would make them all the time, instead of pushing myself to do new work.
They’re basically the same fairies from my how-to book of doll projects, Felt Wee Folk – New Adventures. During the train trip, I was able to complete the most time consuming steps, like embroidering felt peplum jackets and wrapping pipe-cleaner bodies.
The following video shows how I finished making CAMELLIA once I got home.
Salley Mavor Makes a Fairy
These fairies have a different hair material than I’ve used before. Instead of wool fleece, I used single ply, fingering weight Merino yarn, which is easy to braid. Unfortunately, Flying Finn Yarns, the small cottage industry I bought it from, is not currently in business.
It was fun revisiting the fairies, although it did remind me of why I don’t do mass-production any more. Now, I’ve got to change gears and work on some new pieces for my next exhibition, which will be in the fall of 2025 at the New England Quilt Museum. I can hardly wait for January, when hibernation sets in and you can be busy inside without the distractions of warm weather!
My Etsy Shop is well stocked for the holiday season, with a selection of books, cards, puzzles, notebooks, posters, and bookmarks that feature my particular doll-infested needle and thread universe!
To keep up with new posts, please subscribe to this blog. Your contact info will not be sold or shared. If you’d like to see more frequent photos tracking the projects in my studio, please follow me on Facebook, Instagram and BlueSky.
This post includes a mixed bag of activities and events that are coming up or have already happened – a train trip west, a podcast interview, a Tiffany window with a family connection, an artist talk, and new ltd. edition fairies.
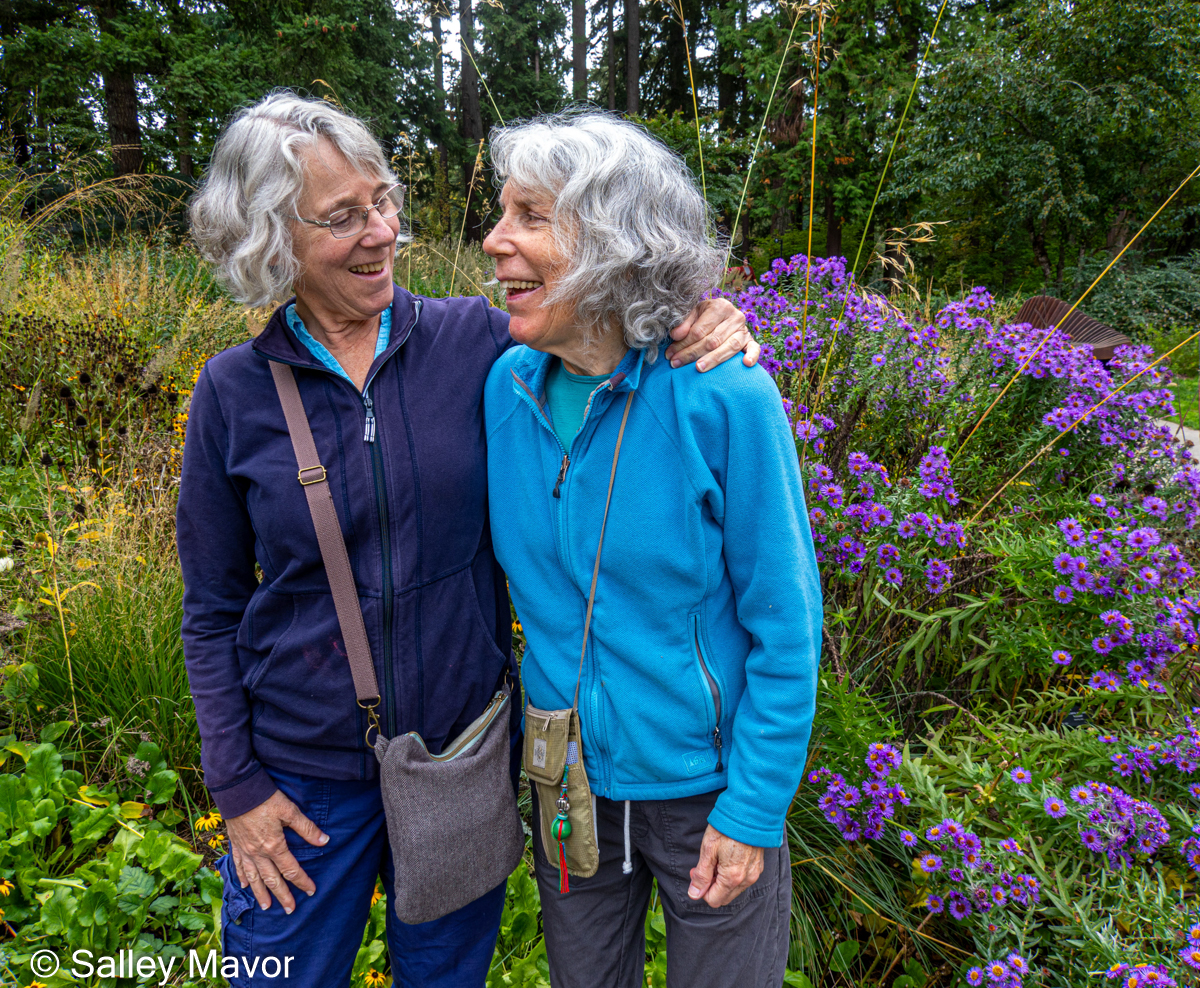
In October, Rob and I traveled by train to Portland, OR to see my sister, Anne Mavor, who is also an artist. Here we are at the Leach Botanical Garden. Every year, we look more and more alike. Not only do we have the same hair and face genes, we have a similar color and fashion sense, from our zippered jackets down to our totally practical over-the-shoulder purses.
Sisters Salley and Anne Mavor in Portland, OR
NEW PODCAST: I had the pleasure of chatting with Gail Cowley from the School of Stitched Textiles. We delved into where my art comes from, how it’s evolved and why I do it. You are invited to listen to the podcast on the YouTube link below.
ENCHANTING THREADS Exhibition: It’s wonderful to hear that my exhibition at the Albany Institute of History and Art in Albany, NY continues to attract a steady stream of visitors. I’m amazed that some fans are traveling far to see the show. They’re coming by plane, train and car from different parts of of the US and even driving across the border from Canada. And from what I hear, they say that it was worth the trip! One advantage of having the show up for a 7 month long stretch, is that there’s time for word to spread about the show. We’ve all had the experience of finding out about an exhibit after it’s closed. Enchanting Threads will be on view through March 2, 2025.
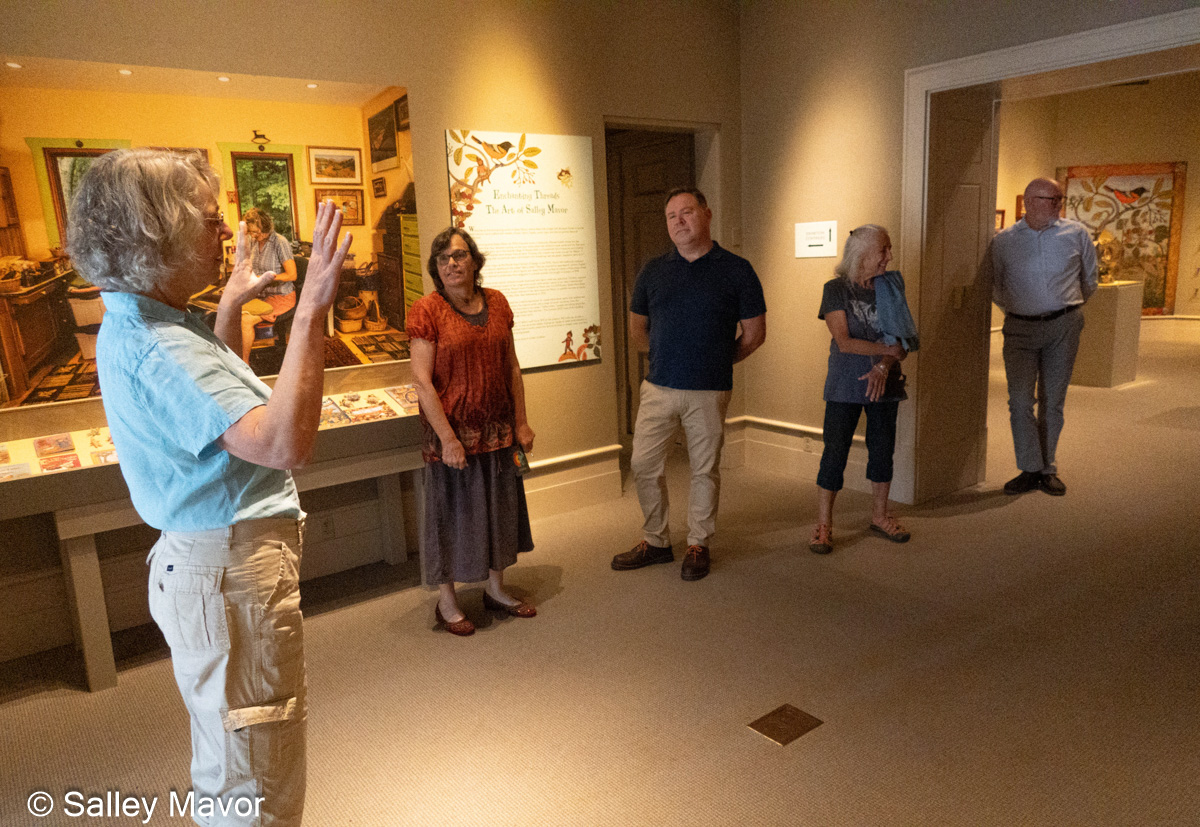
ARTIST TALK: I will return to Albany to give a talk about my work on Sunday, Dec. 8th. The talk is free with gallery admission. They anticipate the event will reach capacity and encourage those interested in attending to reserve early. To register, please click here.
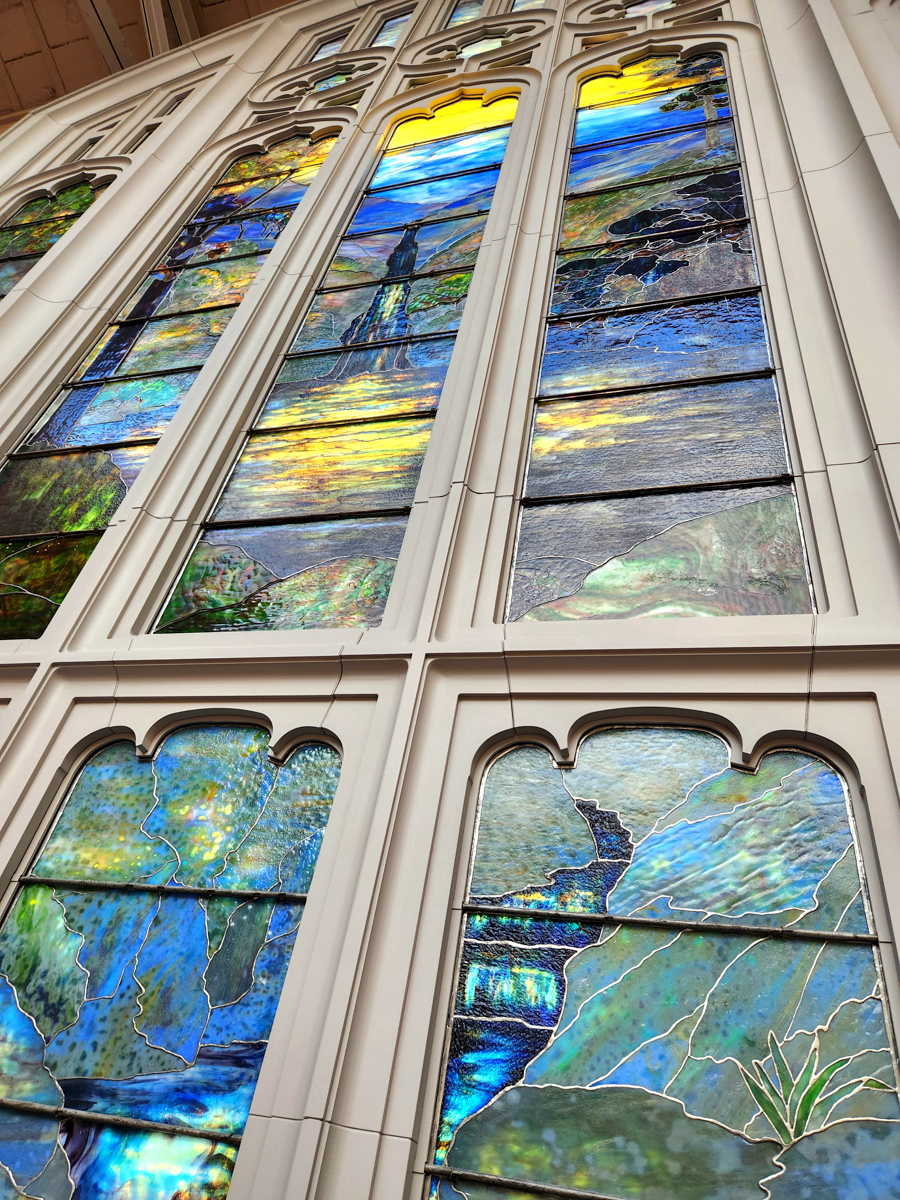
HARTWELL MEMORIAL WINDOW: On our way home, Rob and I got off the train when it stopped in Chicago, specifically to see the Tiffany window that my great grandmother, Mary Hartwell, commissioned in 1917. The window was a memorial to her husband, Fredrick, who grew up near the New Hampshire landscape it depicts. We were fortunate to spend some uninterrupted time gazing at the window and talking with a member of the curatorial team that worked on the project.
Seeing this stained glass masterpiece designed by Tiffany artist Agnes Northrop made me feel emotionally connected to my great grandparents in a way that I didn’t expect. After spending 100 years in their Baptist church in Providence, RI., the window was sold to the Art Institute of Chicago, where it was restored and installed in 2021. To learn about the window, please visit this page of the museum’s website.
NEW LTD. EDITION FAIRIES: If you’ve followed me for a while, you’ll know that I don’t sell one-of-a-kind dolls. But every once in a while I offer a ltd. edition of 25 dolls similar to the ones in my how-to book, Felt Wee Folk. I only work on them outside of my studio, while traveling, so there’s no predicting when a set will be finished. This is my way of controlling the urge to make them all the time. As some of you’ve discovered, making wee folk can be addictive! That isn’t such a bad thing, but if I succumbed to the impulse, I would be less inclined to work on new projects.
We traveled across the country by Amtrak, from Boston to Portland, OR and back home again. Besides gazing out of the train window at midwestern farms and plains for days, I wrapped pipe cleaners and stitched felt peplum jackets for 2 sets of ltd. edition fairies. I’ve made a lot of progress, but there’s still more work to do before the fairies are all dressed, coiffed and winged! They will be sold in my shop on a first come, first served basis. Sorry, no pre-orders. I’ll announce their listing date on this blog, Facebook, and Instagram when they’re closer to completion.
To keep up with new posts, please subscribe to this blog. Your contact info will not be sold or shared. If you’d like to see more frequent photos tracking the projects in my studio, please follow me on Facebook, Instagram and BlueSky.
Come along on a a quick walk through Enchanting Threads: The Art of Salley Mavor, my current exhibition at the Albany Institute of History & Art. The show will be there through March 2, 2025, so, there’s plenty of time to plan a trip to Albany, NY with your friends and family! Many of the pieces on display have been featured on this blog – see a list with links below.
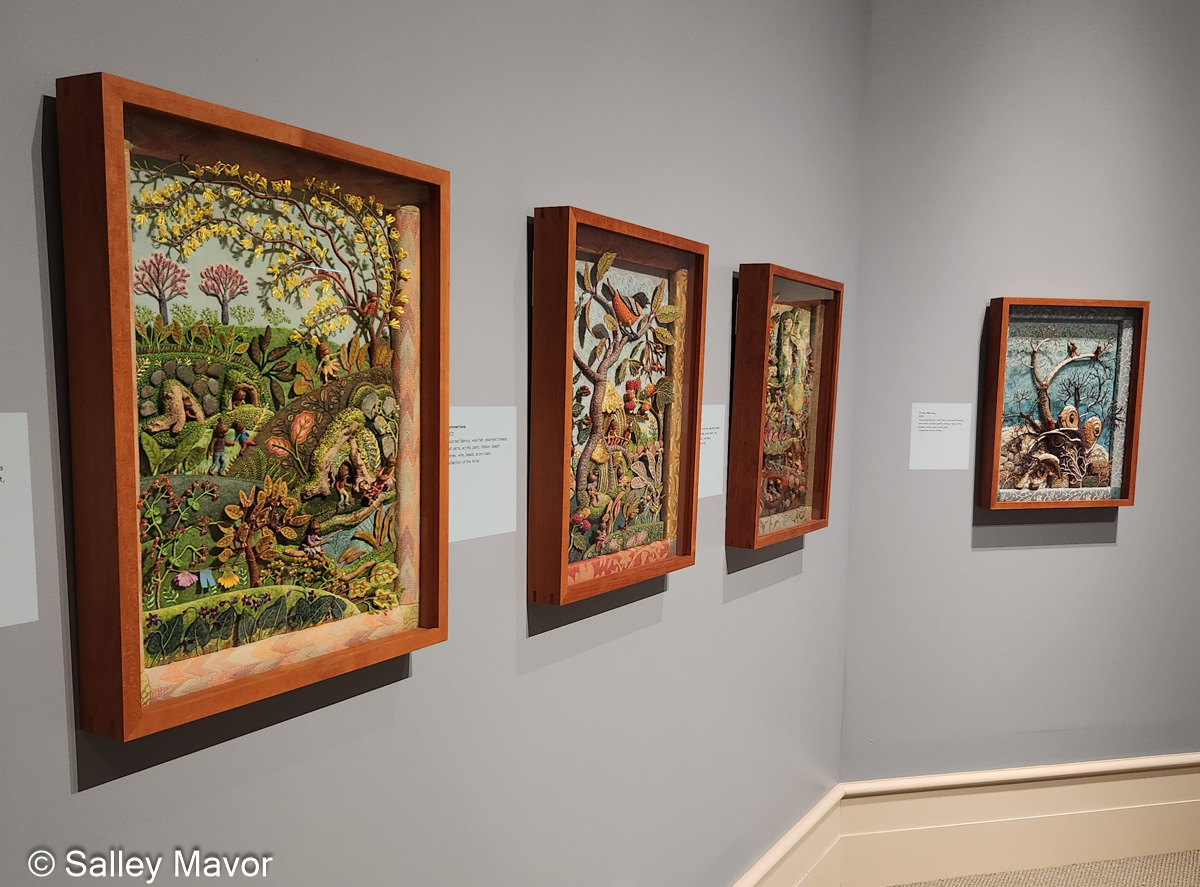
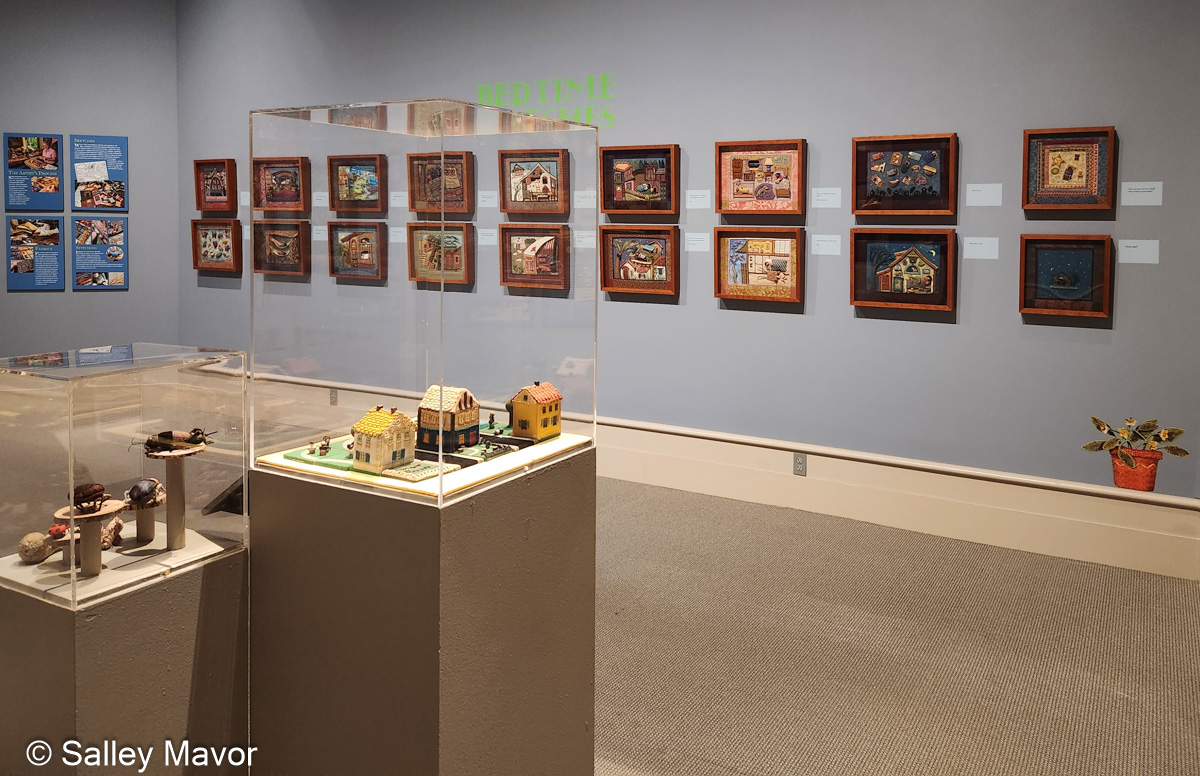
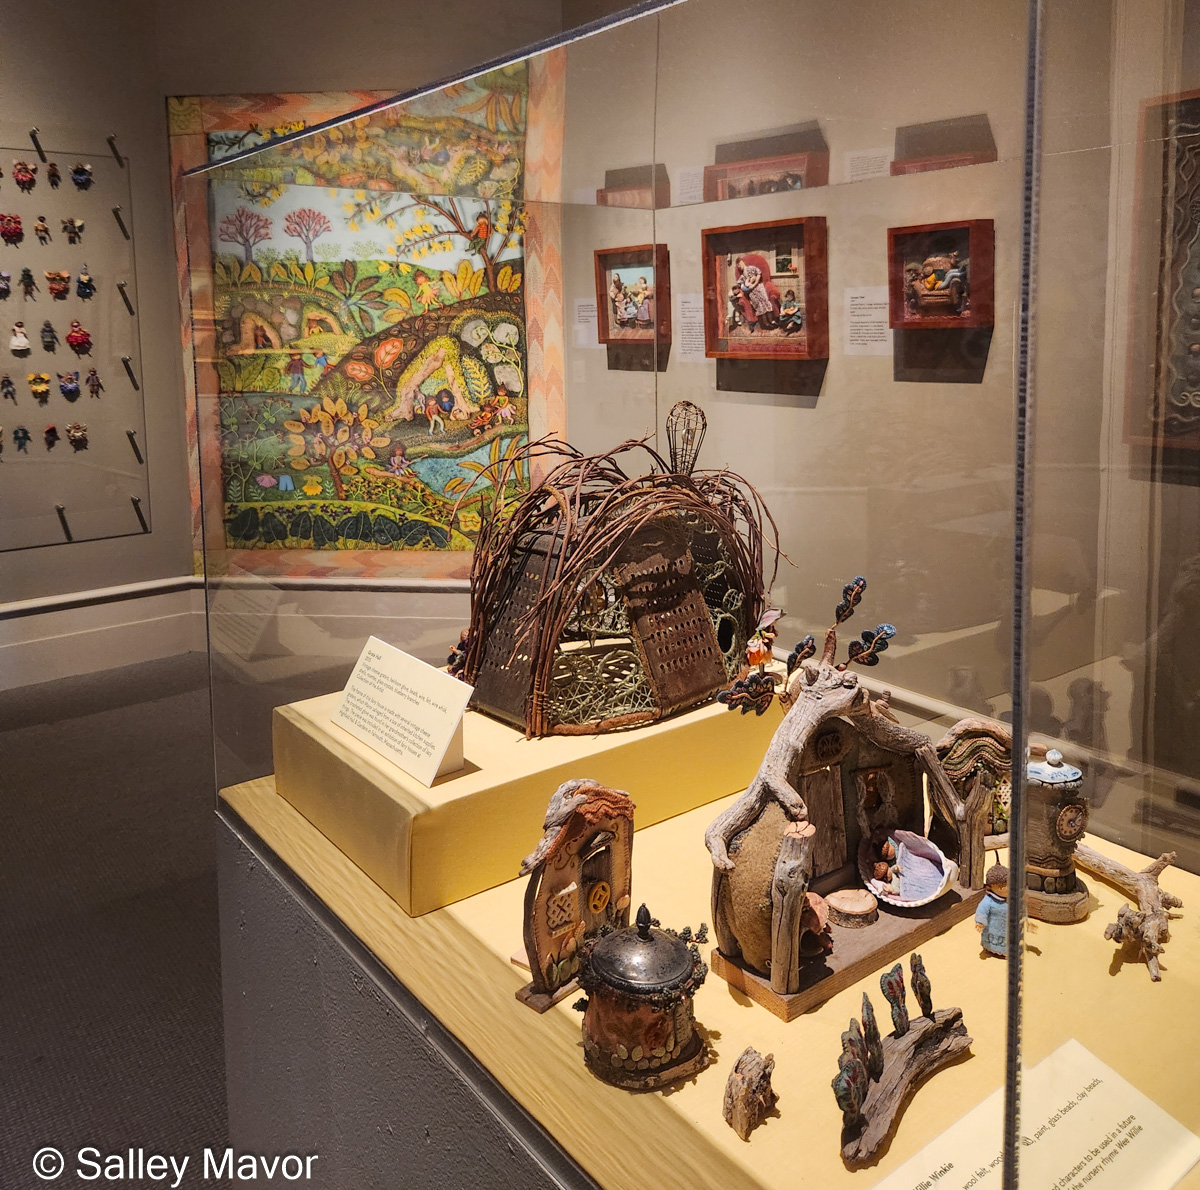
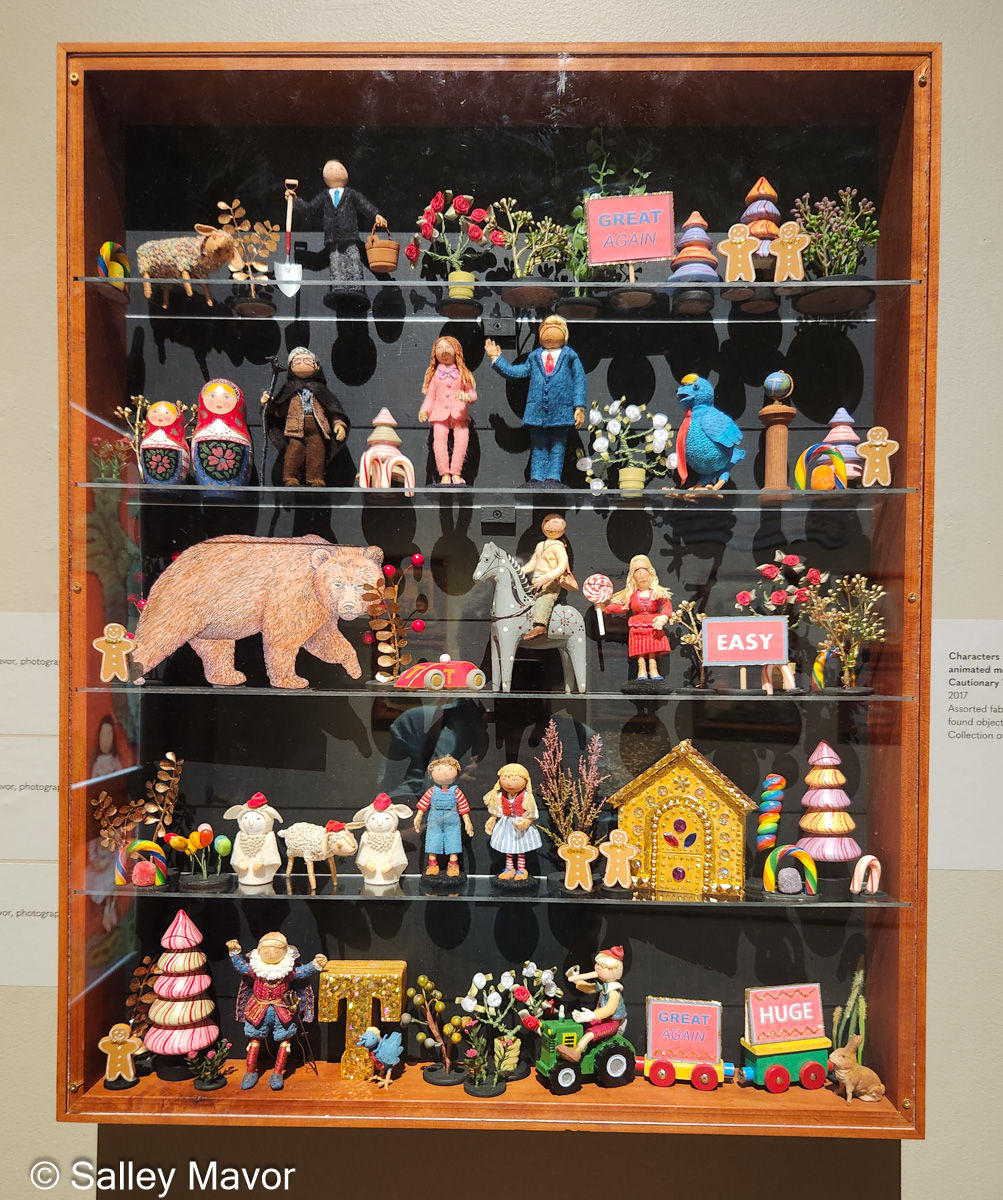
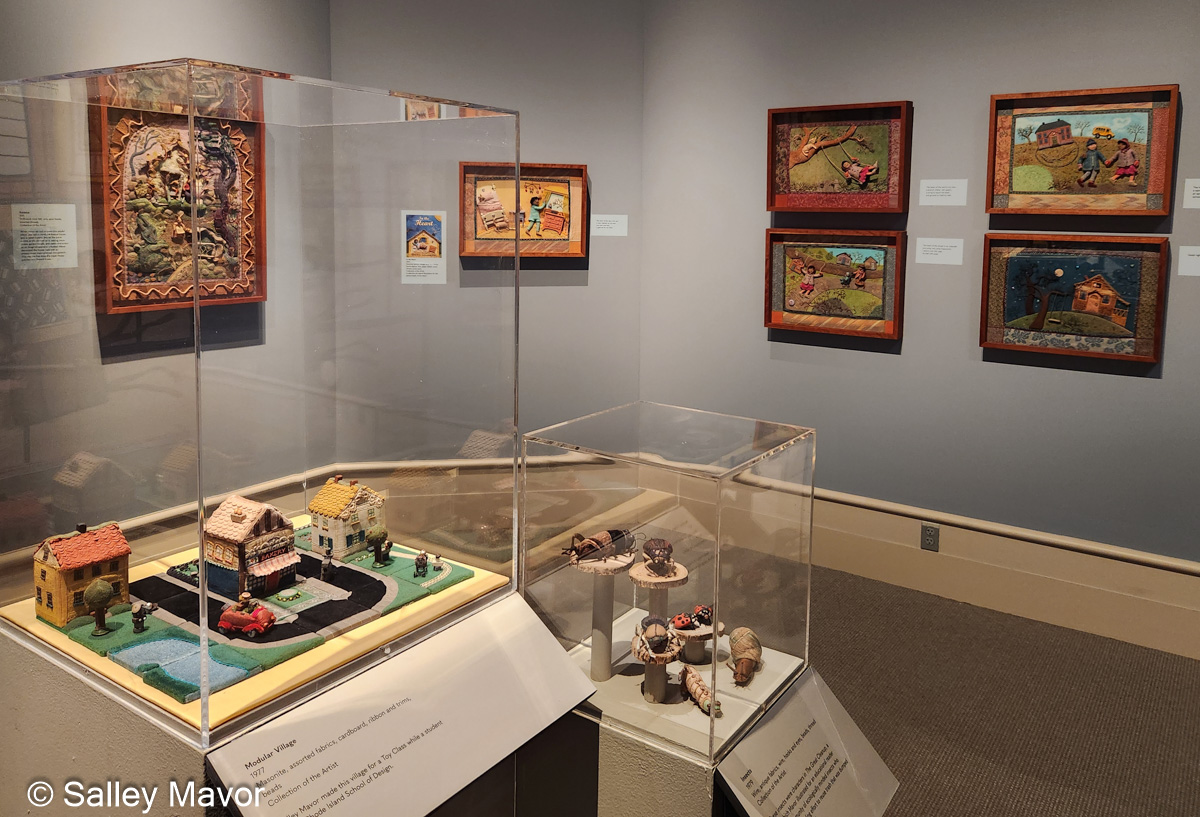
The exhibition has the feeling of a retrospective, with over 100 framed pieces and sculptural objects from the past 45 years, from a modular village I made in art school to the recent four seasons series. There are also over 100 wee folk figures that I made for my how-to book, Felt Wee Folk on display.
Four Seasons Series
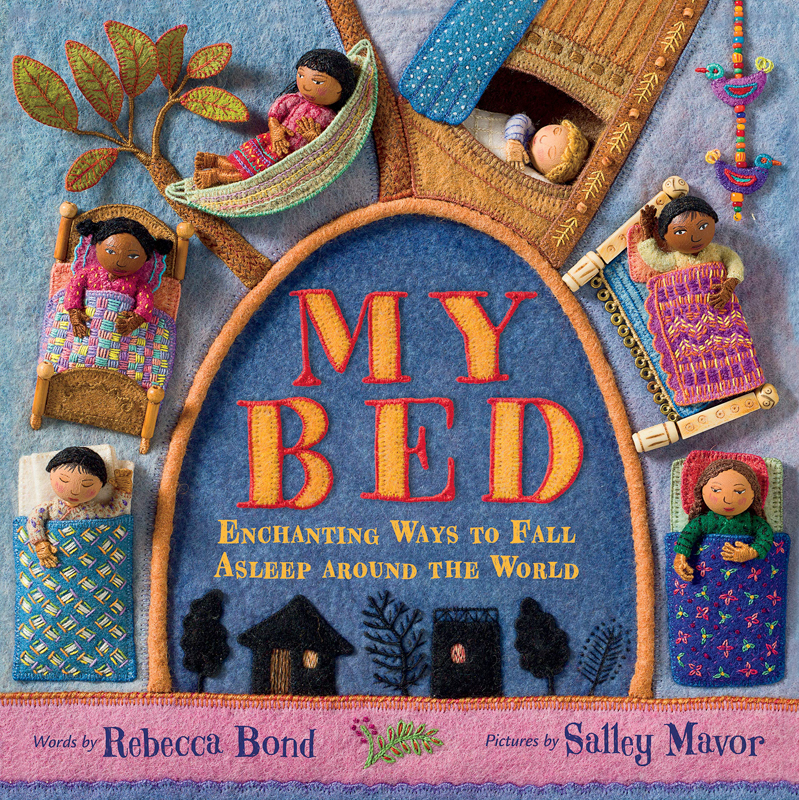
The complete series of original bas-relief illustrations from my picture book, MY BED is also included in the show.
“Enchanting Threads” includes all of the original illustrations from MY BED.
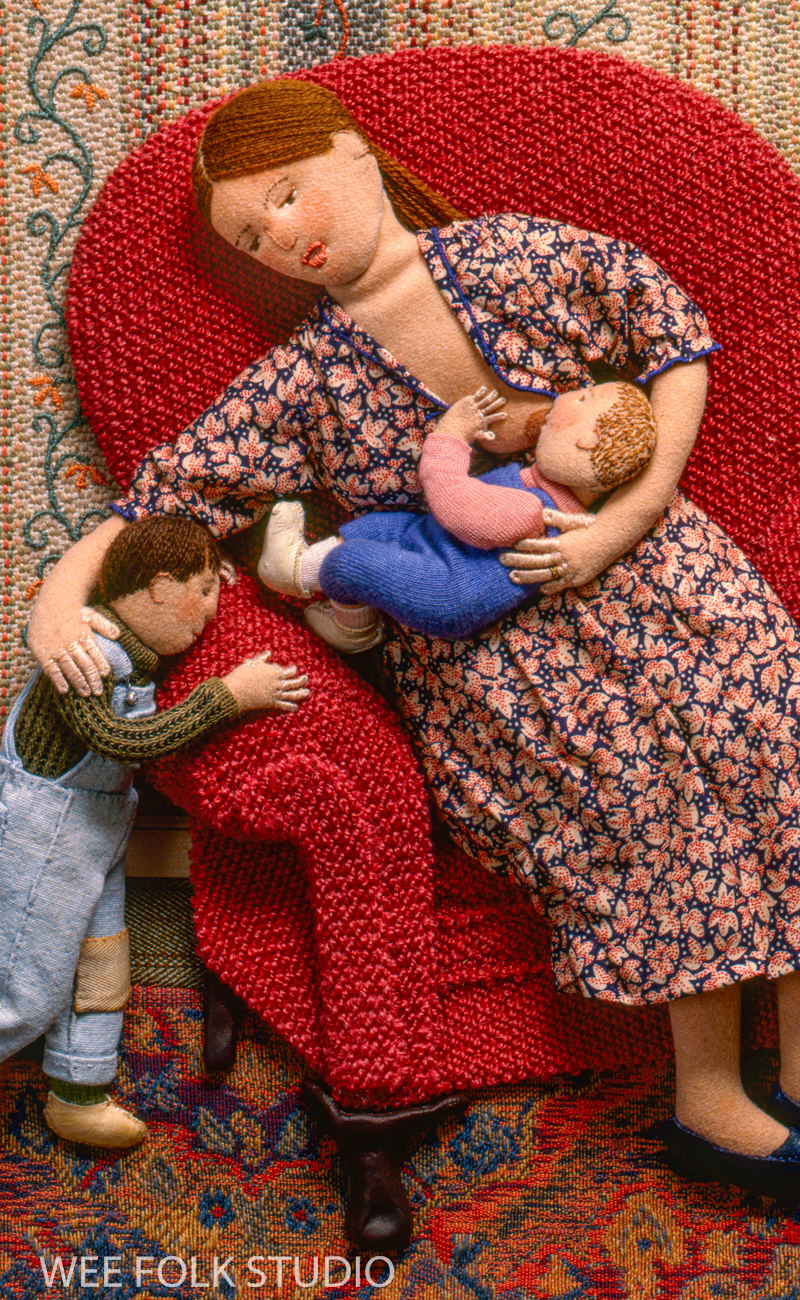
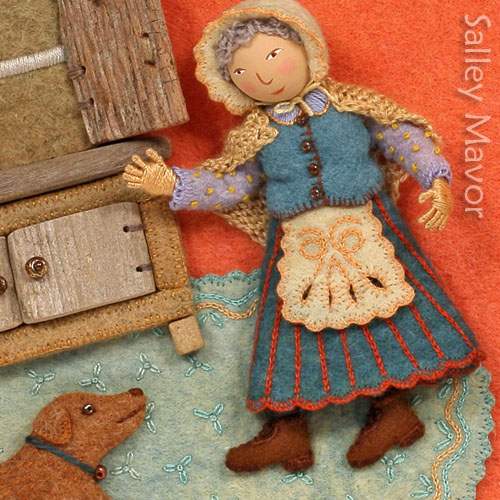
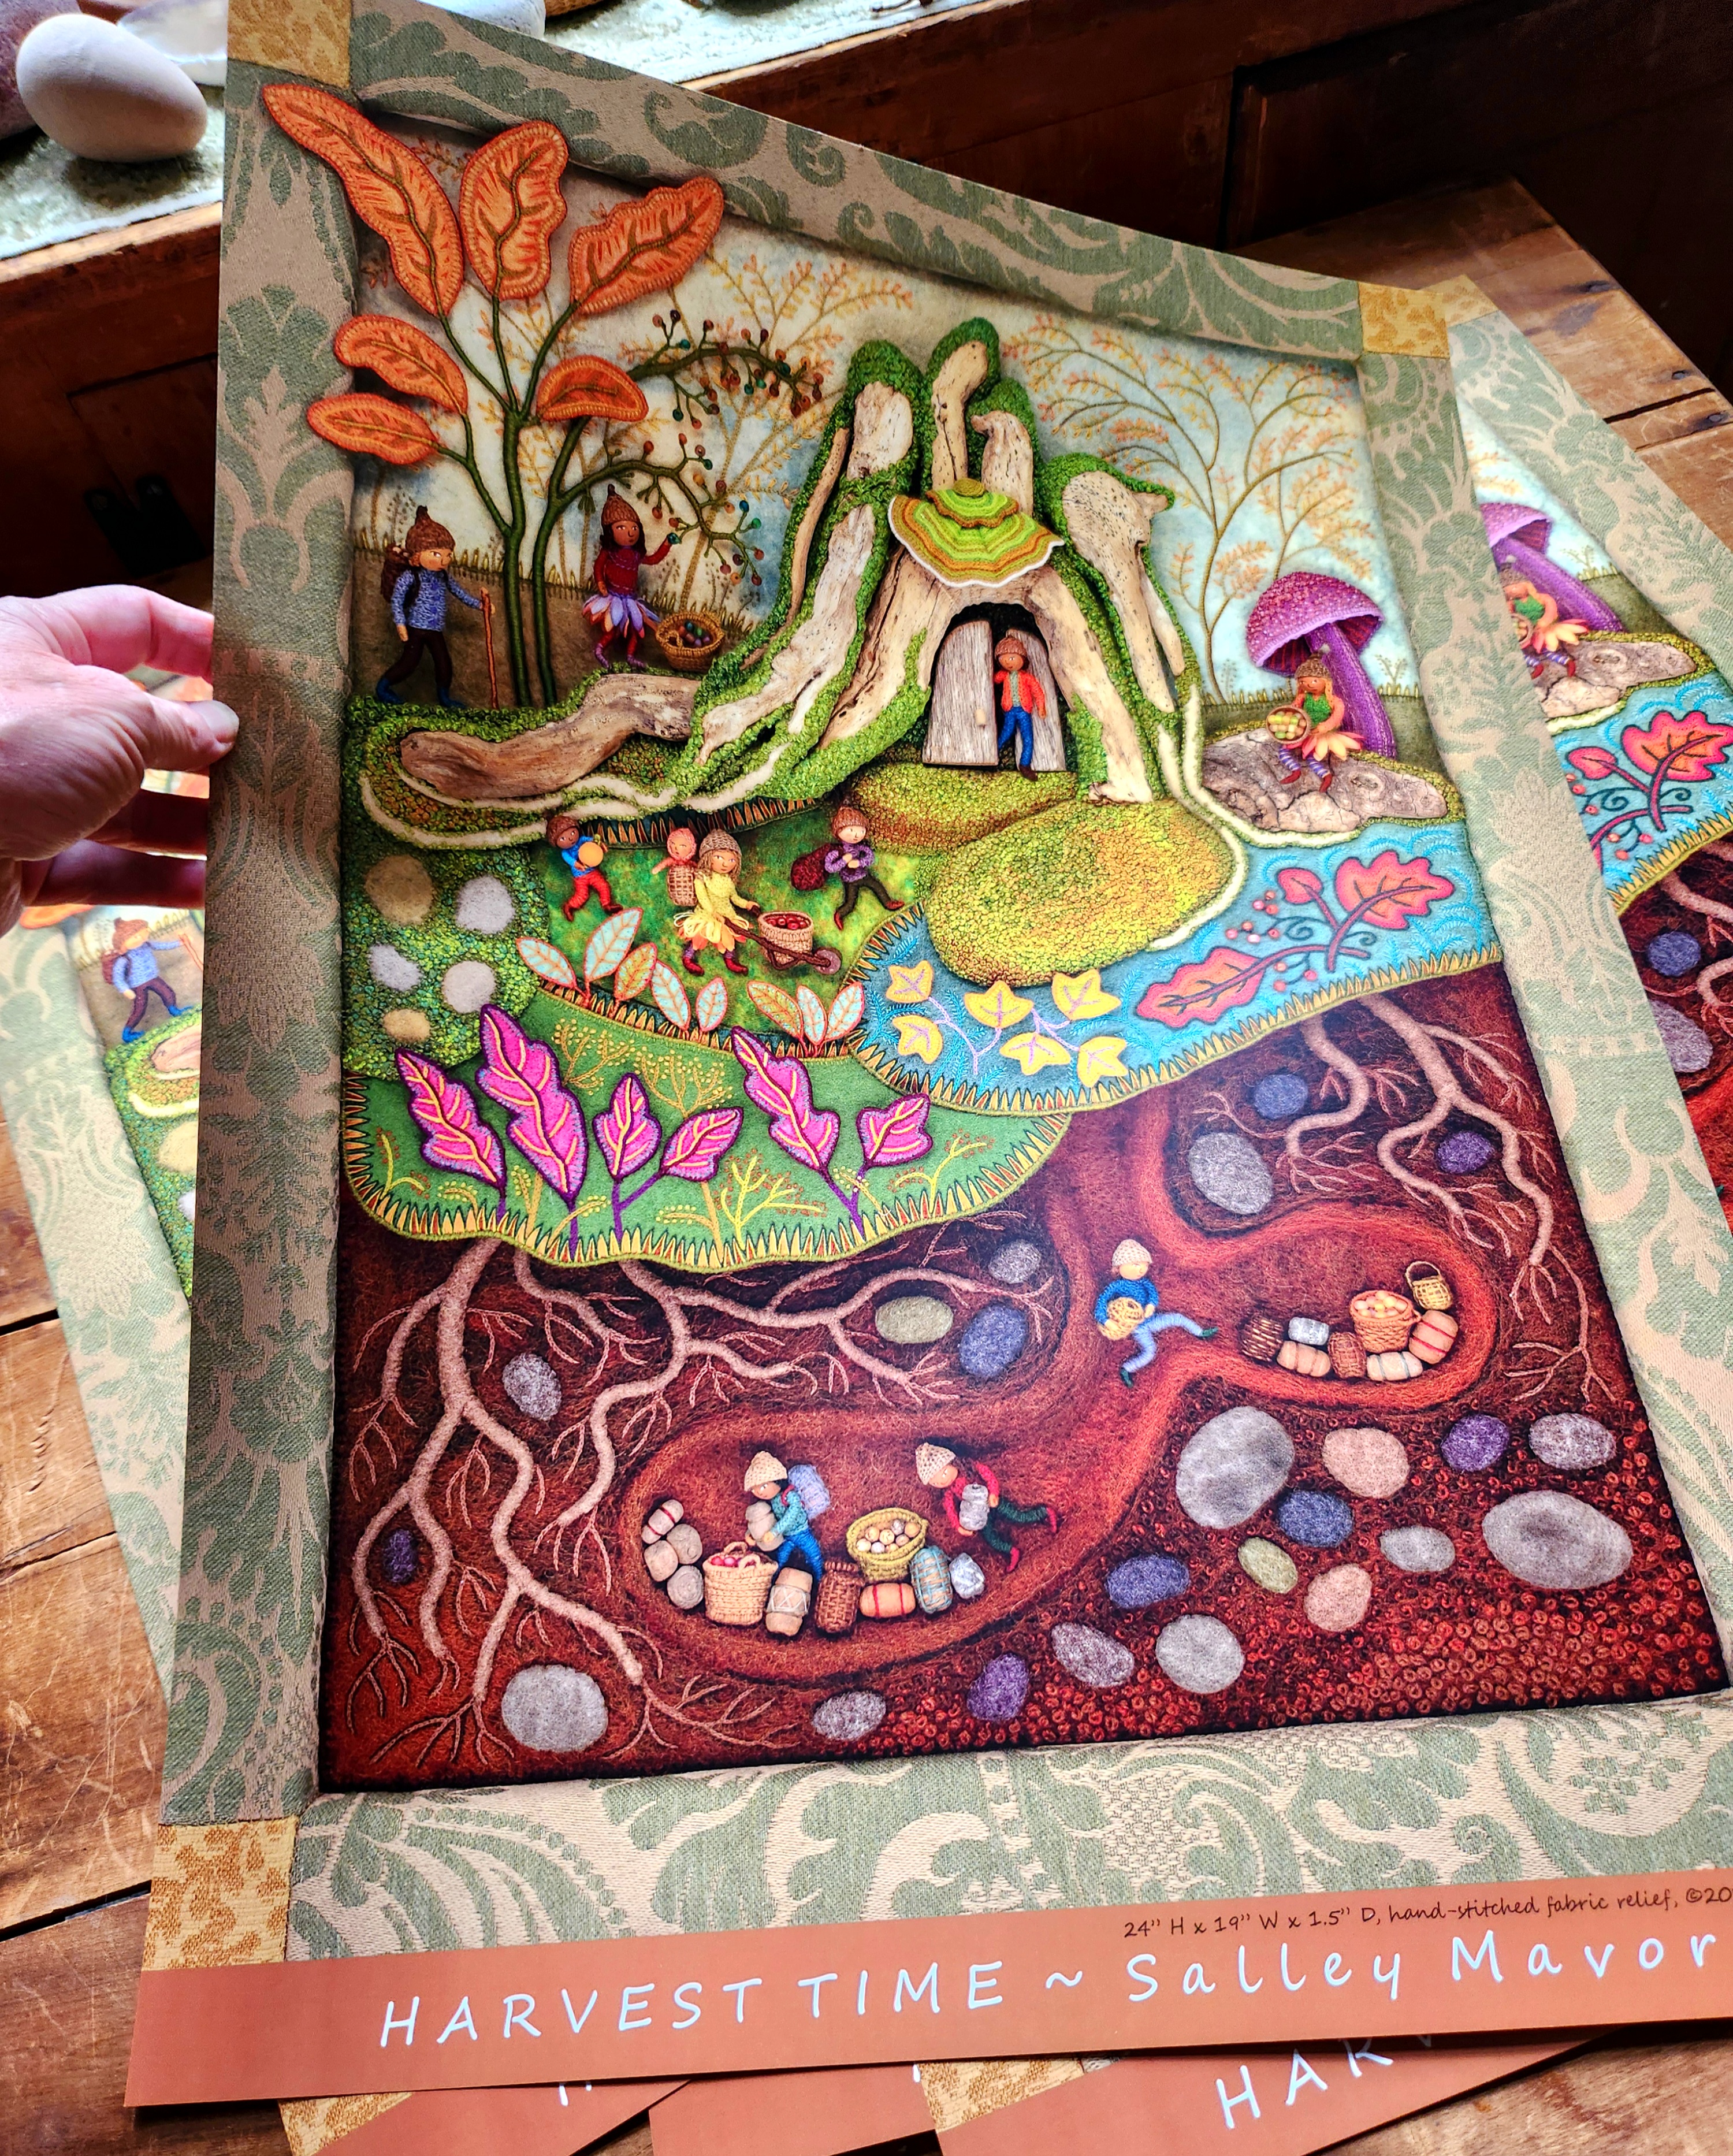
Self PortraitSummertimeWhiskersGeorge’s ChairDisplacedPocketful of PosiesRabbitatPocketful of PosiesPocketful of PosiesPocketful of PosiesFace TimeBirds of Beebe WoodsMossy GlenMY BEDMY BEDMY BEDGrate HallMY BEDFrosty MorningMY BEDHarvest TimeModular VillageThe Red ChairWee Gathering note cardIn the HeartLiberty and JusticePocketful of Posies
NEW IN MY SHOP! I’m pleased to offer 18″ x 24″ frameable posters of Summertime and Harvest Time. These printed reproductions just a little bit smaller than the bas-relief embroidered scenes, so the scale of the wee folk, bird, foliage, roots, fruit, and thousands of stitches is very similar to their actual size. They’re the closest thing to experiencing the original pieces in person!
To keep up with new posts, please subscribe to this blog. Your contact info will not be sold or shared. If you’d like to see more frequent photos tracking the projects in my studio, please follow me on Facebook, Instagram and BlueSky.
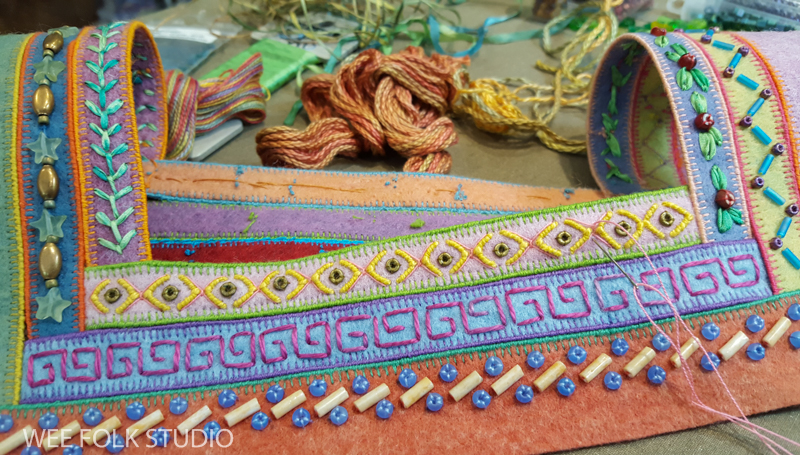
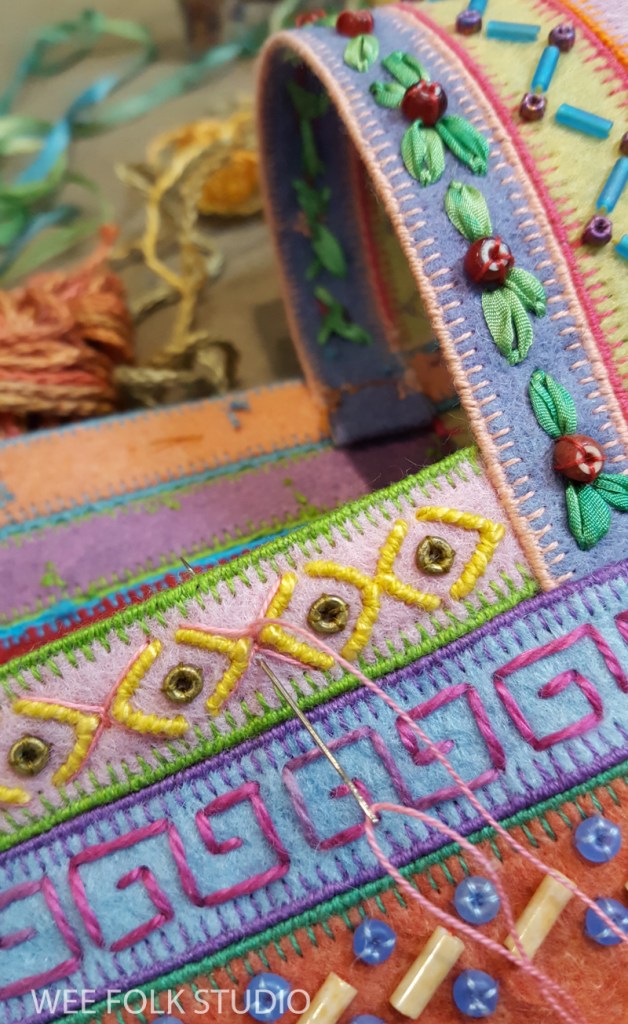
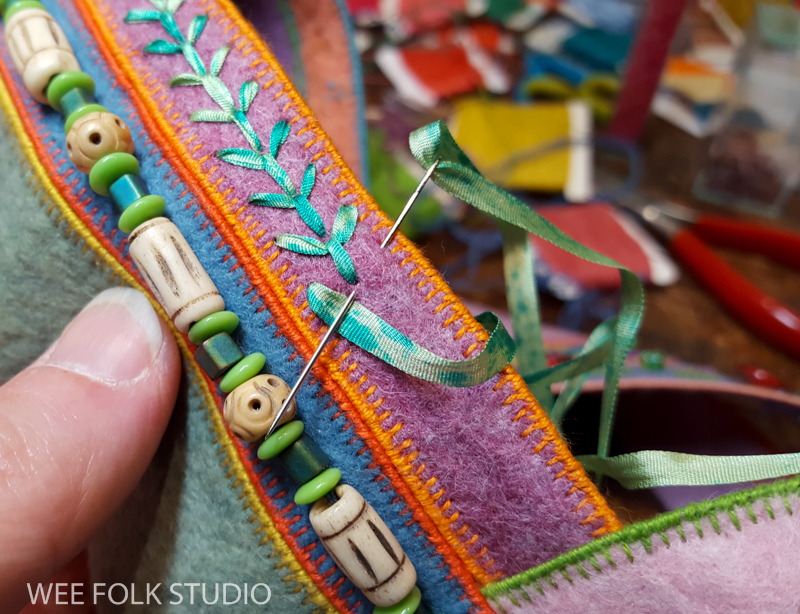
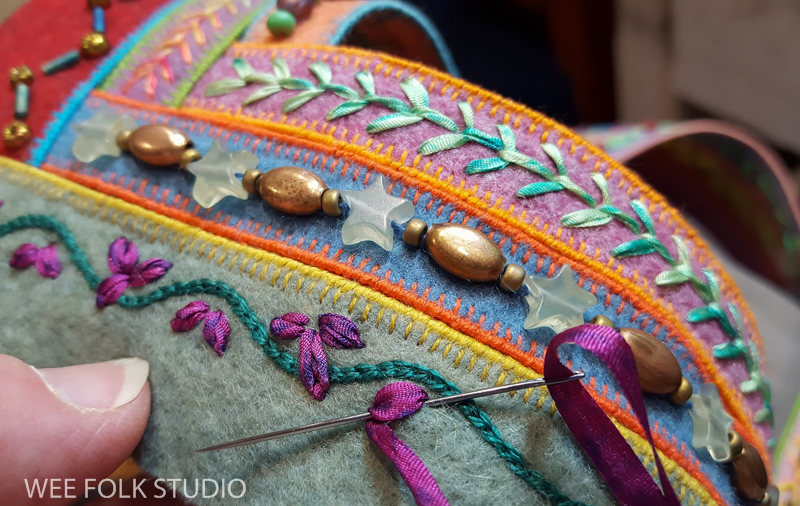
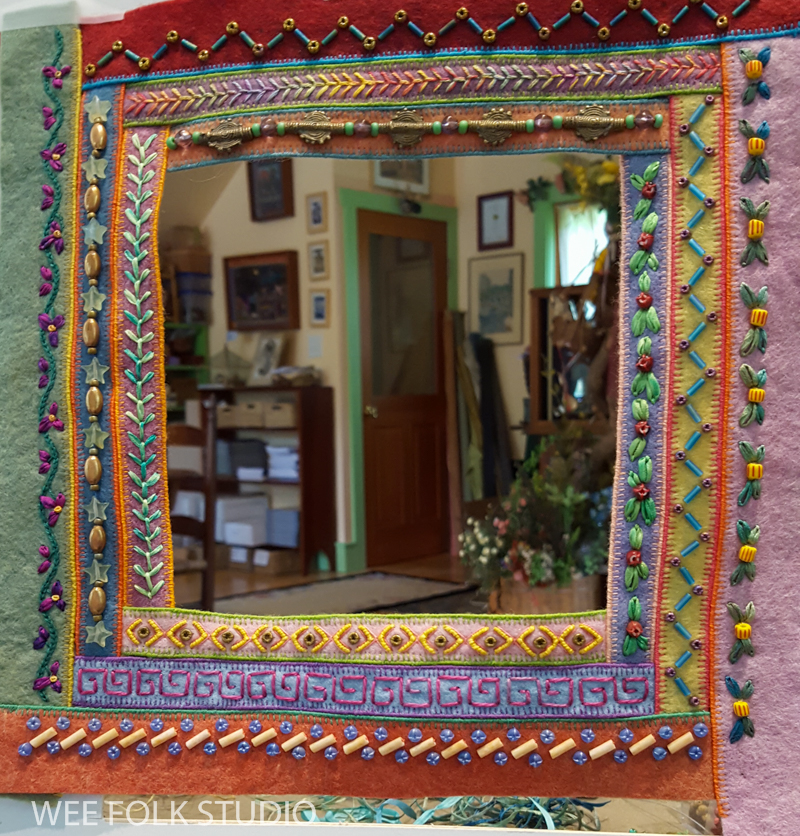
Today, I’d like to share how I made the embellished border strips that are on the back cover of MY BED. While the cover of the book introduces the children in their beds, the back is purely decorative. I wanted it to be a cross-cultural celebration of color, pattern and texture that hopefully will make the person looking at it to want to open the book. There were a couple of practical requirements, too, like a place for the bar code and an open area for the publisher to print promotional copy and add book reviews in future printings.
UPDATE: Personally signed copies of My Bed are available in my shop. Also, all of the original 3-dimensional embroidered illustrations for the book are included in my current exhibition at the Albany Institute of History and Art in Albany, NY. Enchanting Threads: The Art of Salley Mavor is on view now through Feb. 23, 2025.
The design on the back cover includes multiple narrow (about 1/2″ wide) lengths of felt that I embroidered and pieced together in the style of a log cabin quilt.
I edged each strip of felt with blanket stitch and then sewed on wire, to make the long sides firm and straight, like bones on a corset. Otherwise, the strips would be too limp and wobbly to work with. You can’t see the wire because it’s wrapped with thread.
After stitching the strips together, I embellished different motifs on each one with beads, silk ribbon and embroidery stitches.
I combed through my vast collection of beads, which all seemed to be waving their hands wildly, calling out “pick me!”. The hardest part was selecting which ones to use and coming up with a combination that was interesting, but not cluttered looking.
I love embroidering simple stitches with silk ribbon.
I wanted each strip to be distinctive, but also work in harmony with the others.
The border looked like a window when it was finished
The last part involved sewing the border in place on top of a solid felt center piece. Since the book is a perfect square, everything had to line up just right.
Please keep in mind that while this book is technically a children’s book, it’s really for all ages! Over the past few years, I’ve published posts about making several of the different scenes. Here’s a list of the posts I’ve written:
To keep up with new posts, please subscribe to this blog. Your contact info will not be sold or shared. If you’d like to see more frequent photos tracking the projects in my studio, please follow me on Facebook, Instagram and BlueSky.
I’m thrilled to announce that 18″ x 24″ posters of Summertime are now available in my shop! This frameable poster is the closest thing to seeing the piece in person, which I realize is out of reach for many of you (visit this page for current exhibitions). The original bas-relief embroidered scene is just an inch larger than the printed reproduction, so the scale of the wee folk, raspberries, and thousands of stitches is very similar to their actual size. If you’ve seen my other posters, like the one of Birds of Beebe Woods, you know that the photography and printing quality is very good, too.
Will the other scenes in the series, Frosty Morning, Harvest Time, and Mossy Glen be made into posters as well? It really depends on how much interest there is. I’d like to eventually offer all four seasons, but first I’m testing the market with Summertime posters to determine if it’s worth the financial investment. I’m excited to be adding Summertime posters to the list of books, notecards, puzzles, notebooks and bookmarks now available in my shop.
Summertime is one of four seasonal landscapes that will be icluded in my solo exhibition, Works by Salley Mavor: To Every Season at the New England Quilt Museum, Sept. 9 – Dec. 27, 2025.
The Four Seasons series is included in “Enchanted Threads: The Art of Salley Mavor” at the Albany Institute of History and Art in Albany, NY.
To keep up with new posts, please subscribe to this blog. Your contact info will not be sold or shared. If you’d like to see more frequent photos tracking the projects in my studio, please follow me on Facebook, Instagram and BlueSky.
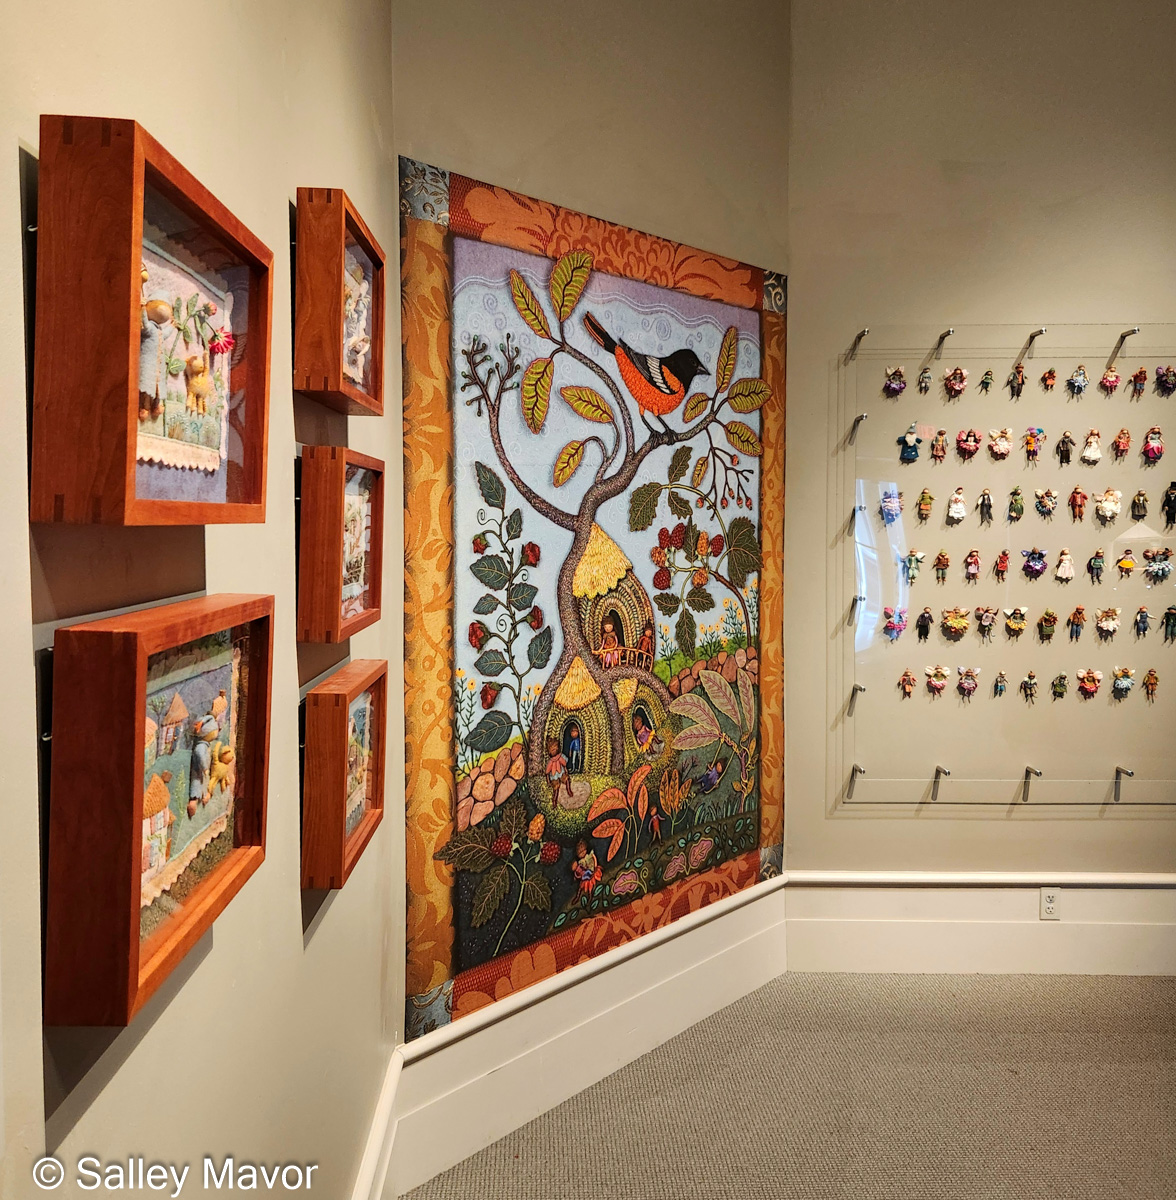
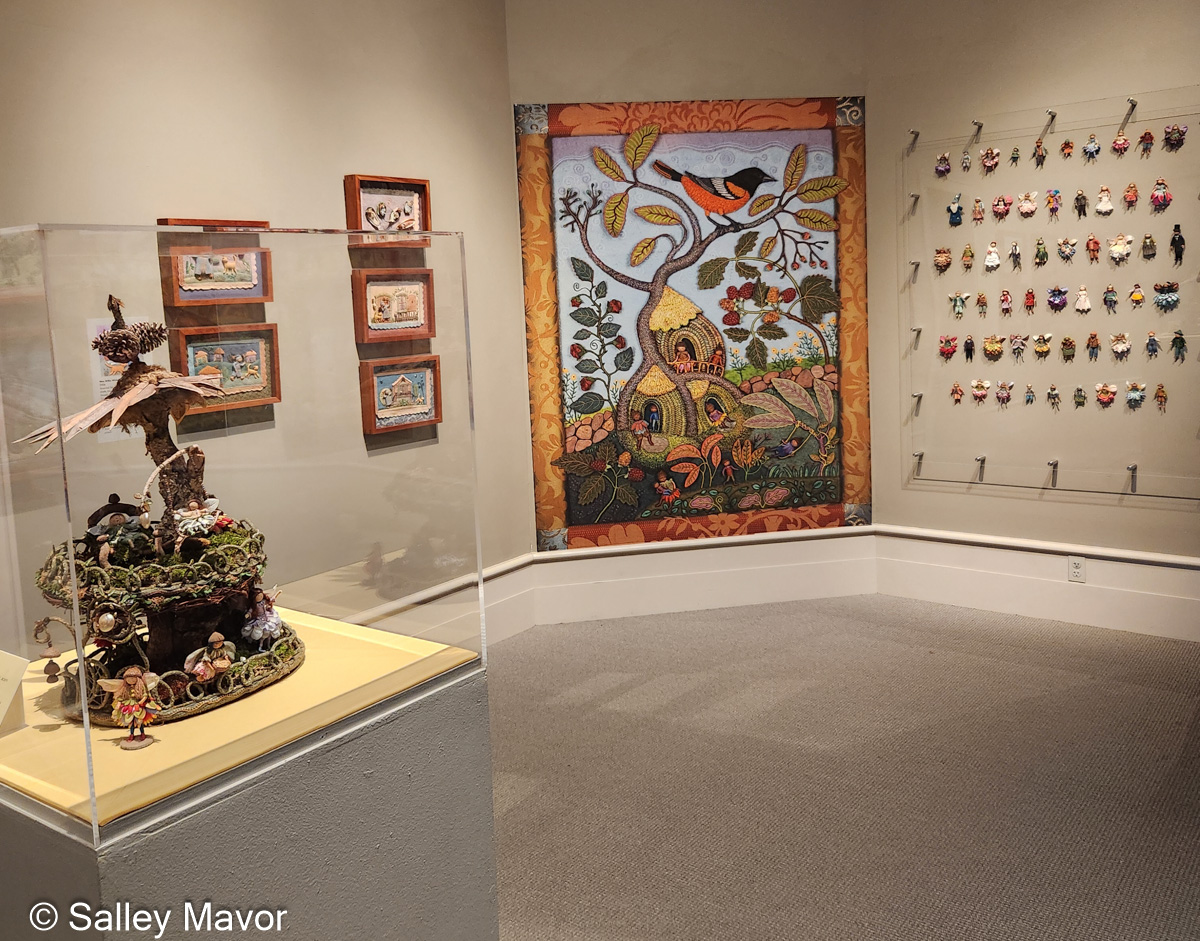
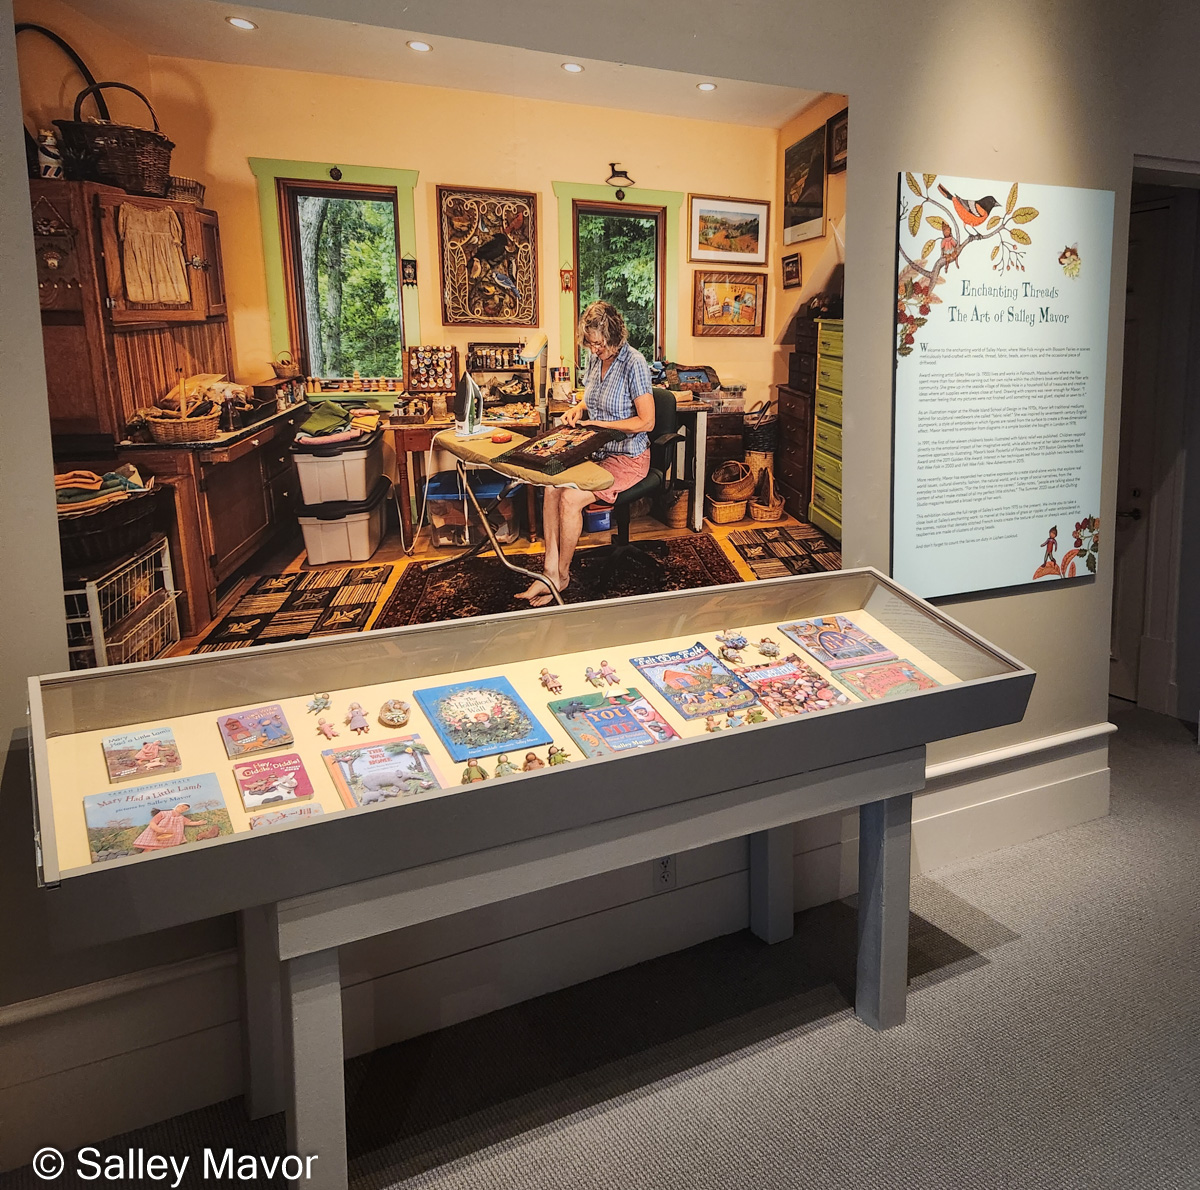
I’m excited to share photos of my new exhibition, which opened last weekend at the Albany Institute of History & Art. Enchanting Threads: The Art of Salley Mavor will be on view for 7 months, through March 2, 2025. So, there’s plenty of time to plan a trip to Albany, NY with your friends and family! For those who live too far away to visit, I’ll try to give you an idea of how the show looks.
The museum’s exhibition team did a fantastic job designing the layout and hanging my artwork, which is spread throughout 4 galleries. It’s one of the most artful and tasteful presentations of my life’s work that I’ve seen!
For the first time, visitors will see both original embroidered artwork and 8 ft. tall printed enlargements of some pieces, including Summertime, from my series of seasonal landscapes. I’m glad that Rob took hires photos, so that the blown-up reproductions are clear enough to see every stitch. It feels as if you could step inside the scene and pick raspberries!
The framed 24″ high originals in the four seasons series are displayed together. Over the past few years I’ve documented the process of making Mossy Glen, Summertime, Harvest Time, and Frosty Morning with photos, videos and commentary.
Seasonal Landscape Series
Enchanting Threads includes just about everything in my personal collection, from the doll house I made in 1975 to Birds of Beebe Woods. Past exhibitions have included several pieces on loan from private collectors, but I figured that borrowing artwork from their owners for 7 months was too much to ask.
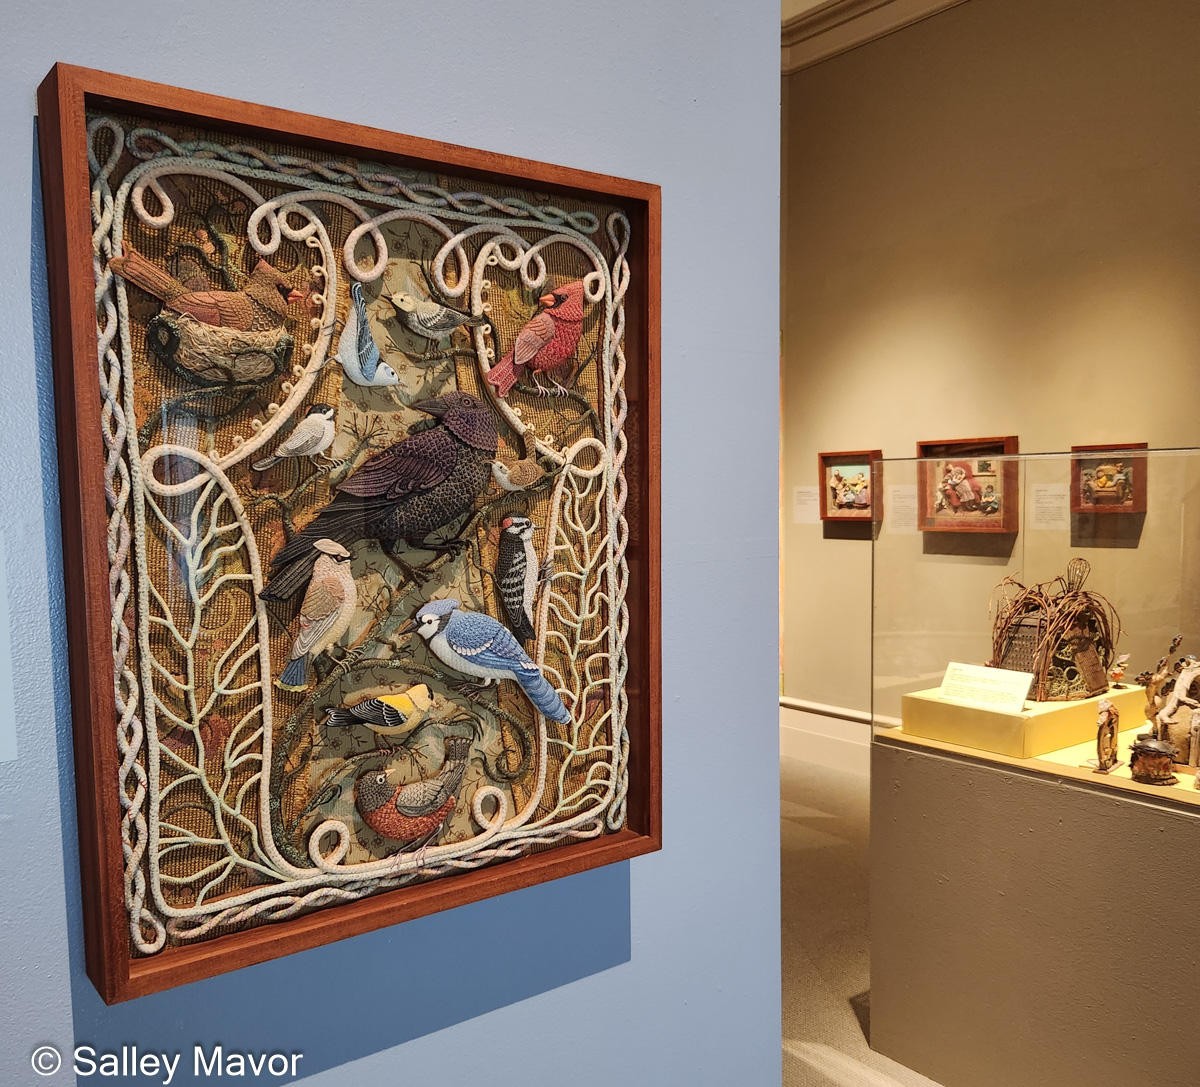
Birds of Beebe Woods
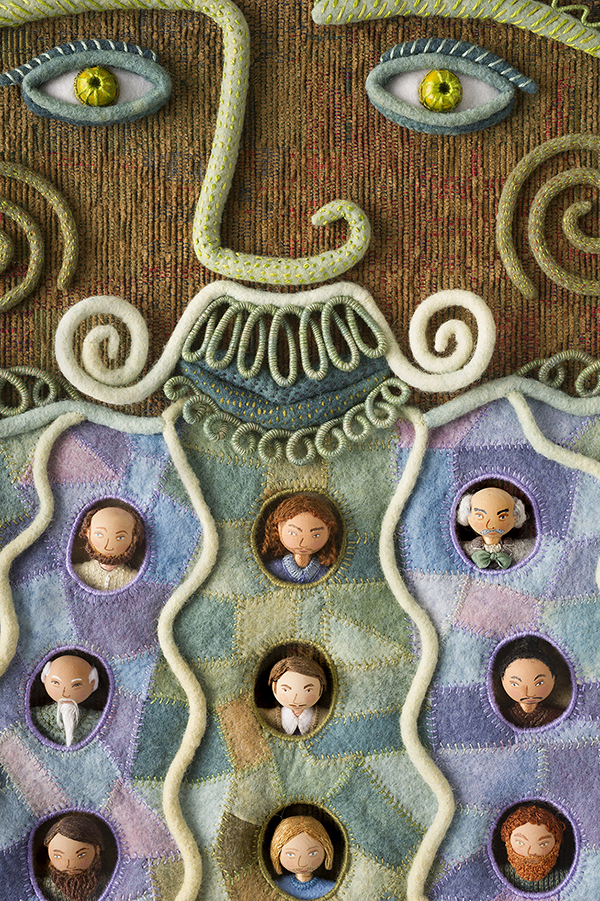
The show features over 100 framed tableaus, original picture book illustrations, and sculptural objects from the past 40 years, including fairy houses, walls crowded with wee folk dolls, and the cast of characters from my stop-motion film Liberty and Justice.
Characters, props and scenery from the stop-motion film, Liberty and Justice.
Bedtime Stitches, the touring exhibition of the entire collection of original illustrations for my most recent picture book, MY BED: Enchanting Ways to Fall Asleep around the World, is included, too. To find out where Bedtime Stitches is going next, please visit the Exhibitions Page.
I had an opportunity to walk around the galleries with museum staff and docents, and answer questions that they thought visitors would be curious about, such as how long it takes to make a piece (2 to 6 months) and if everything is really hand stitched (it is). I’m looking forward to returning to Albany to give a talk about my work to the general public in early December (date TBA).
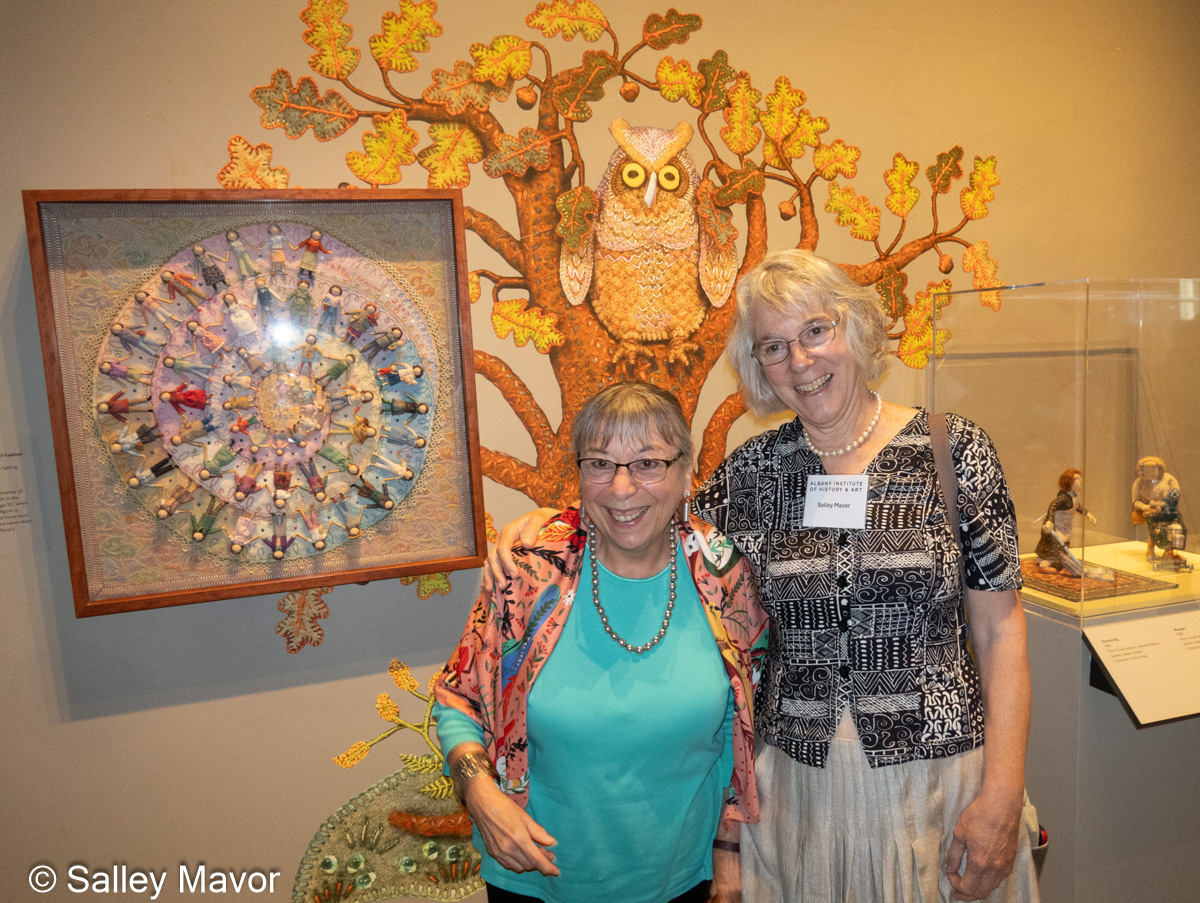
At the opening, I had the pleasure of meeting Janny Mironchuk, a long-time fan, who is responsible for bringing my work to the Albany Institute of History & Art. At my urging, she contacted the museum’s curator and suggested that they consider hosting an exhibition of my work. I’m grateful to Janny for approaching the museum and helping to set the stars in alinement for this exhibition to happen!
Over the years, I’ve come to realize that landing an art show is an art in itself, with no sure path to getting there. For me, attracting the attention of exhibition committees and curators hasn’t been easy. I’ve sent out countless proposals that go unanswered, but every once in a while, I hear from a venue that wants to work with me. These opportunities often involve fans who are passionate about my work and want to see it in person, close to where they live. A personal recommendation from someone who is part of a museum’s local community can sometimes convey enthusiasm better than an artist’s own entreaty can, especially if one’s art is not easily defined. Happily, plans are underway for two solo exhibitions in 2025 and 2027, which will be listed on the Exhibitions Page when their locations and dates are confirmed. That being said, I certainly welcome inquiries from museums and art centers who are interested in hosting future exhibitions.
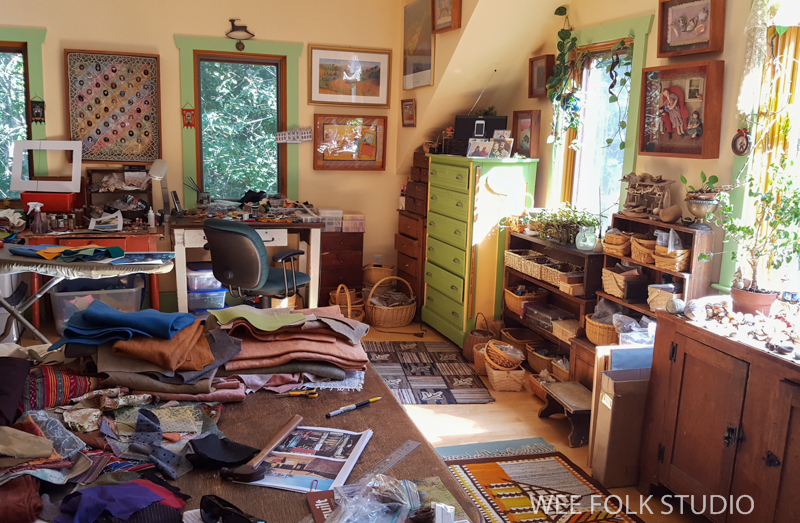
I believe that my embroidered pieces have the most value when they are put on public display, where people can become emersed in their detail and 3-demensional quality up close. That’s why I’ve decided not to deplete my supply of original artwork by selling it. (Books, prints, cards and puzzles are for sale in my shop.) Otherwise, it would take many years to create enough new pieces to fill an exhibition space. Now, I always have a body of work available to show. After 50 years of single-minded dedication to making art, I feel a shift taking place. Instead of stitching every spare minute, I’m happy to take time to play with my grandchildren and weed the garden. I don’t know what’s coming next, but my wish is to keep living an artistic life and to share my vision with the world.
To keep up with new posts, please subscribe to this blog. Your contact info will not be sold or shared. If you’d like to see more frequent photos tracking the projects in my studio, please follow me on Facebook, Instagram and BlueSky.
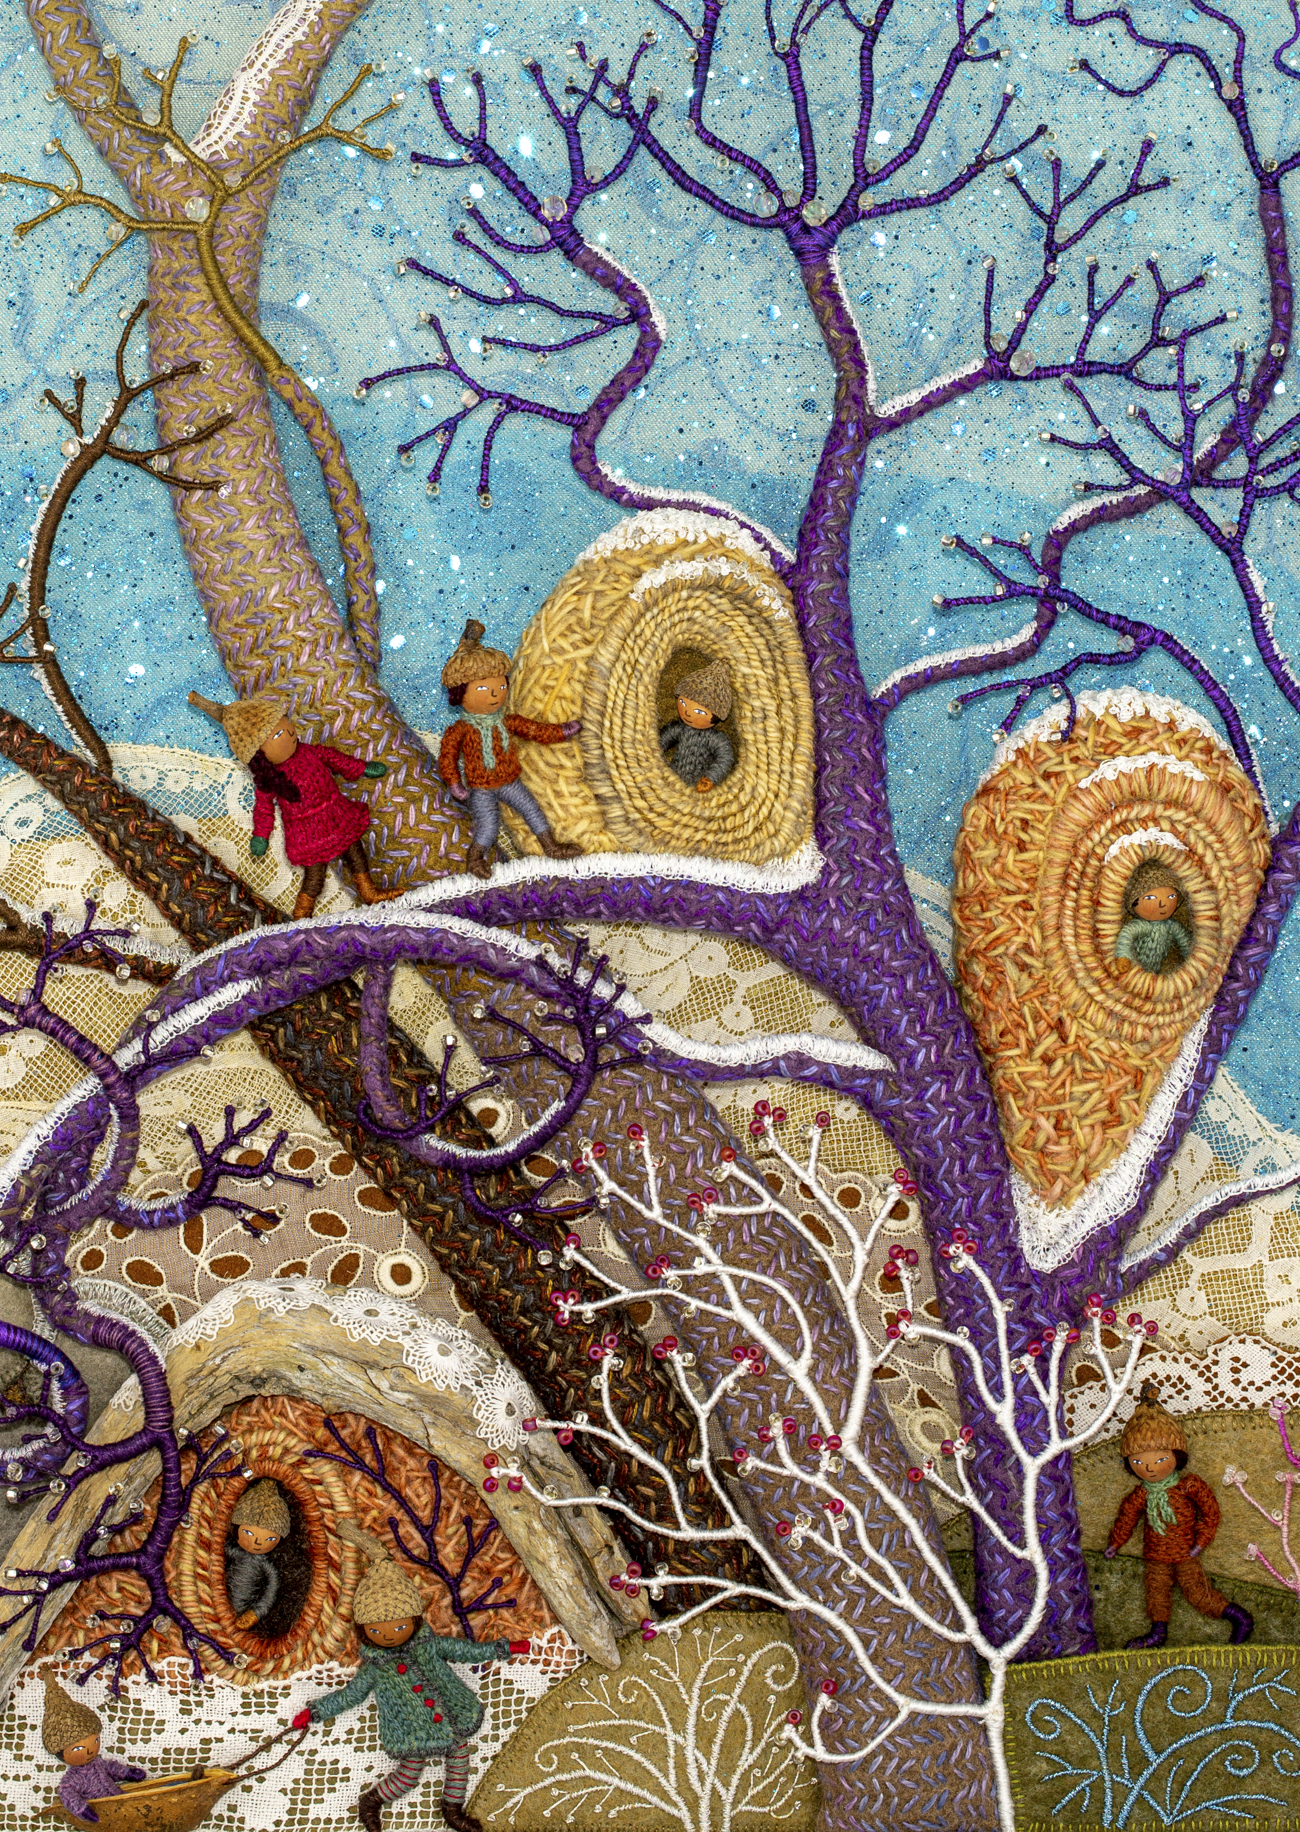
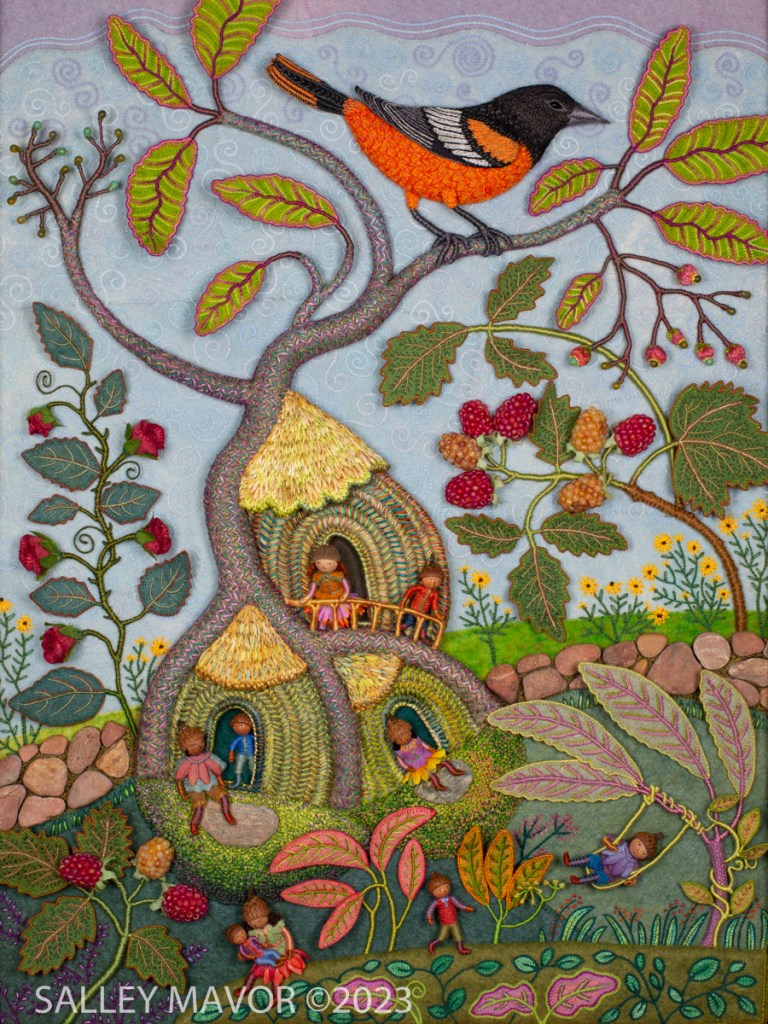
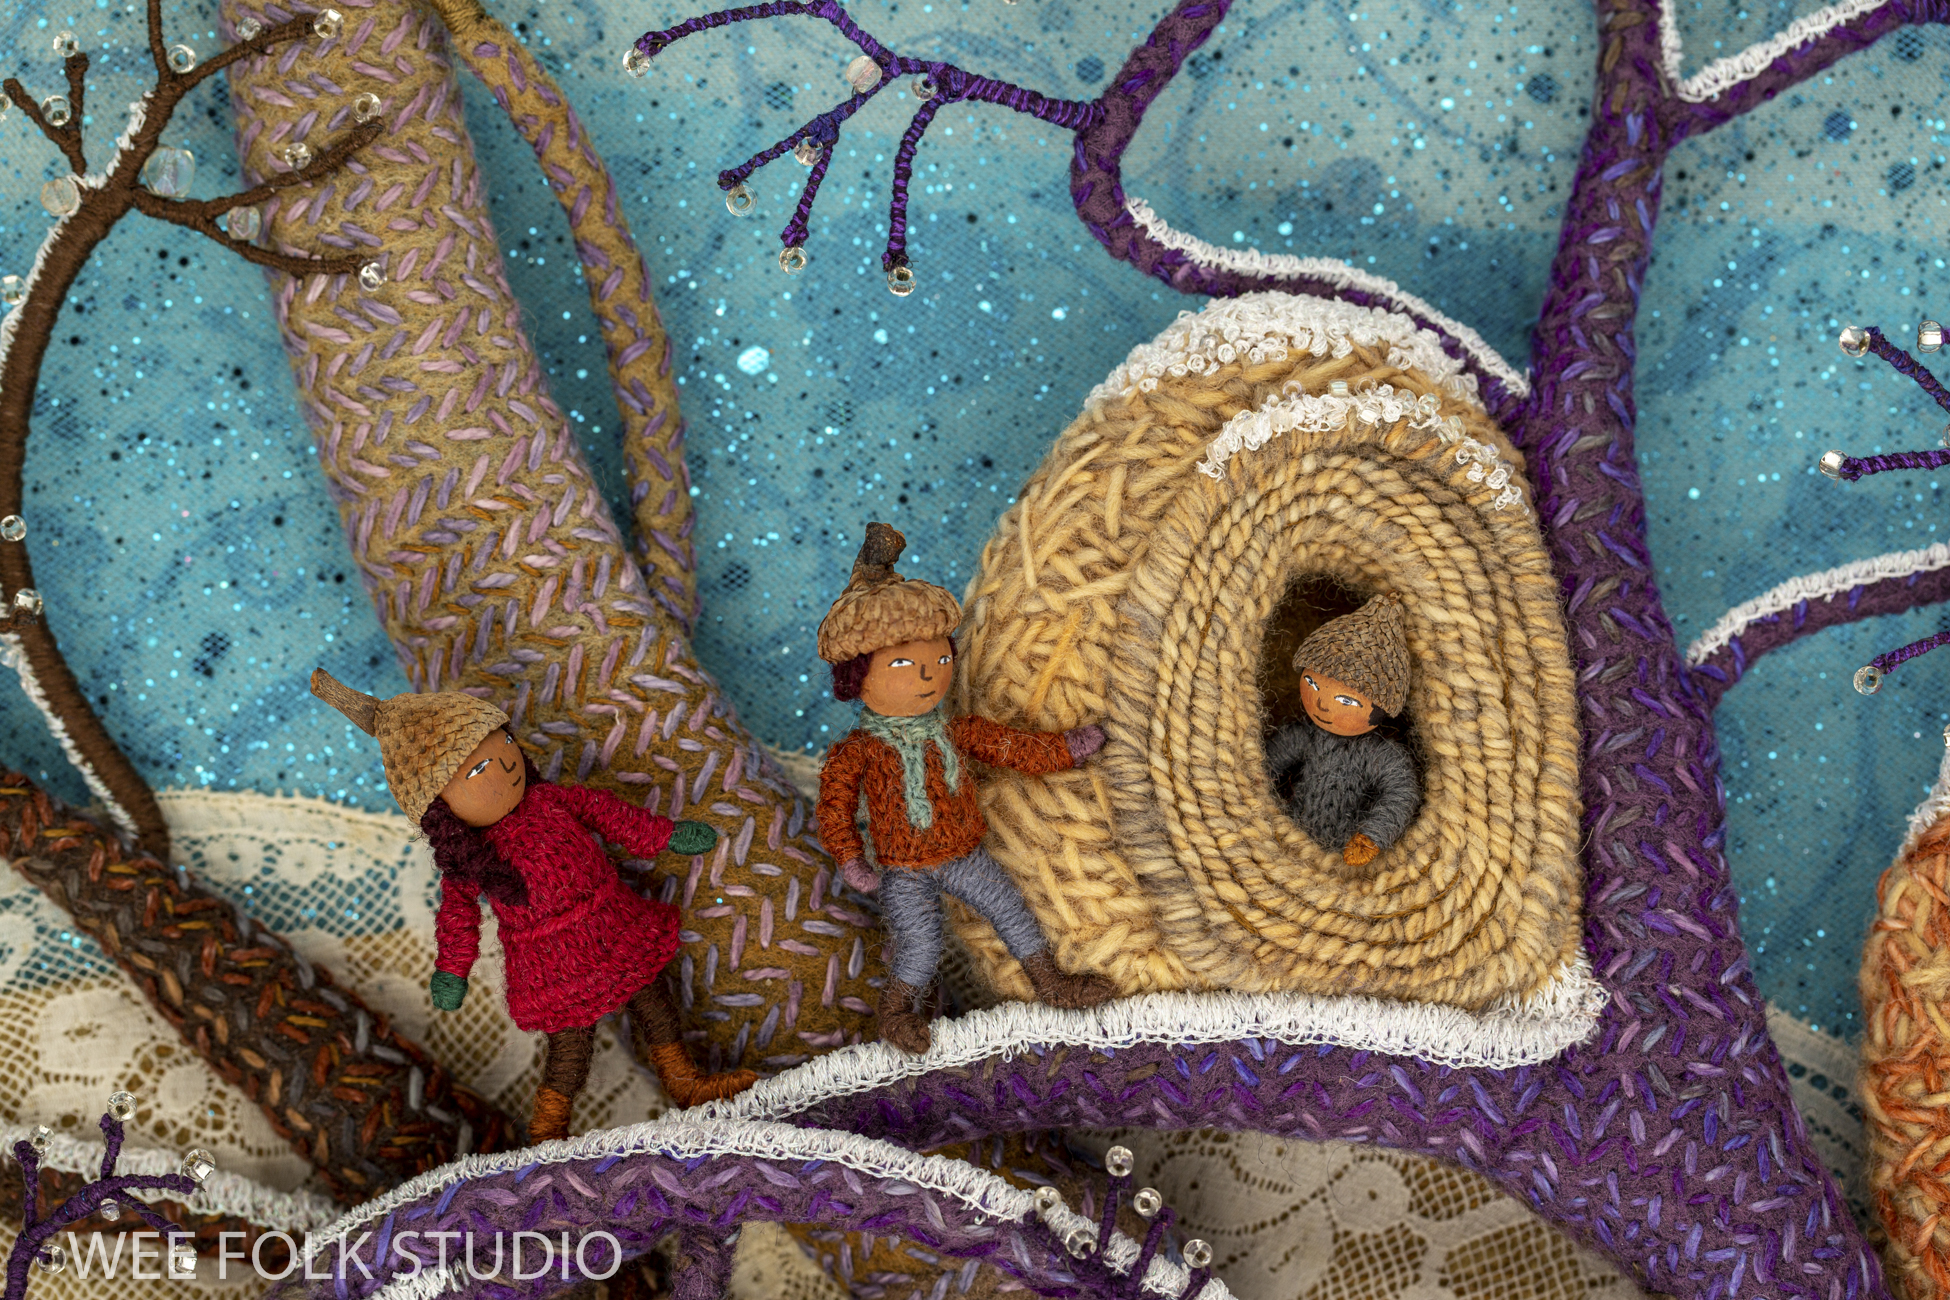
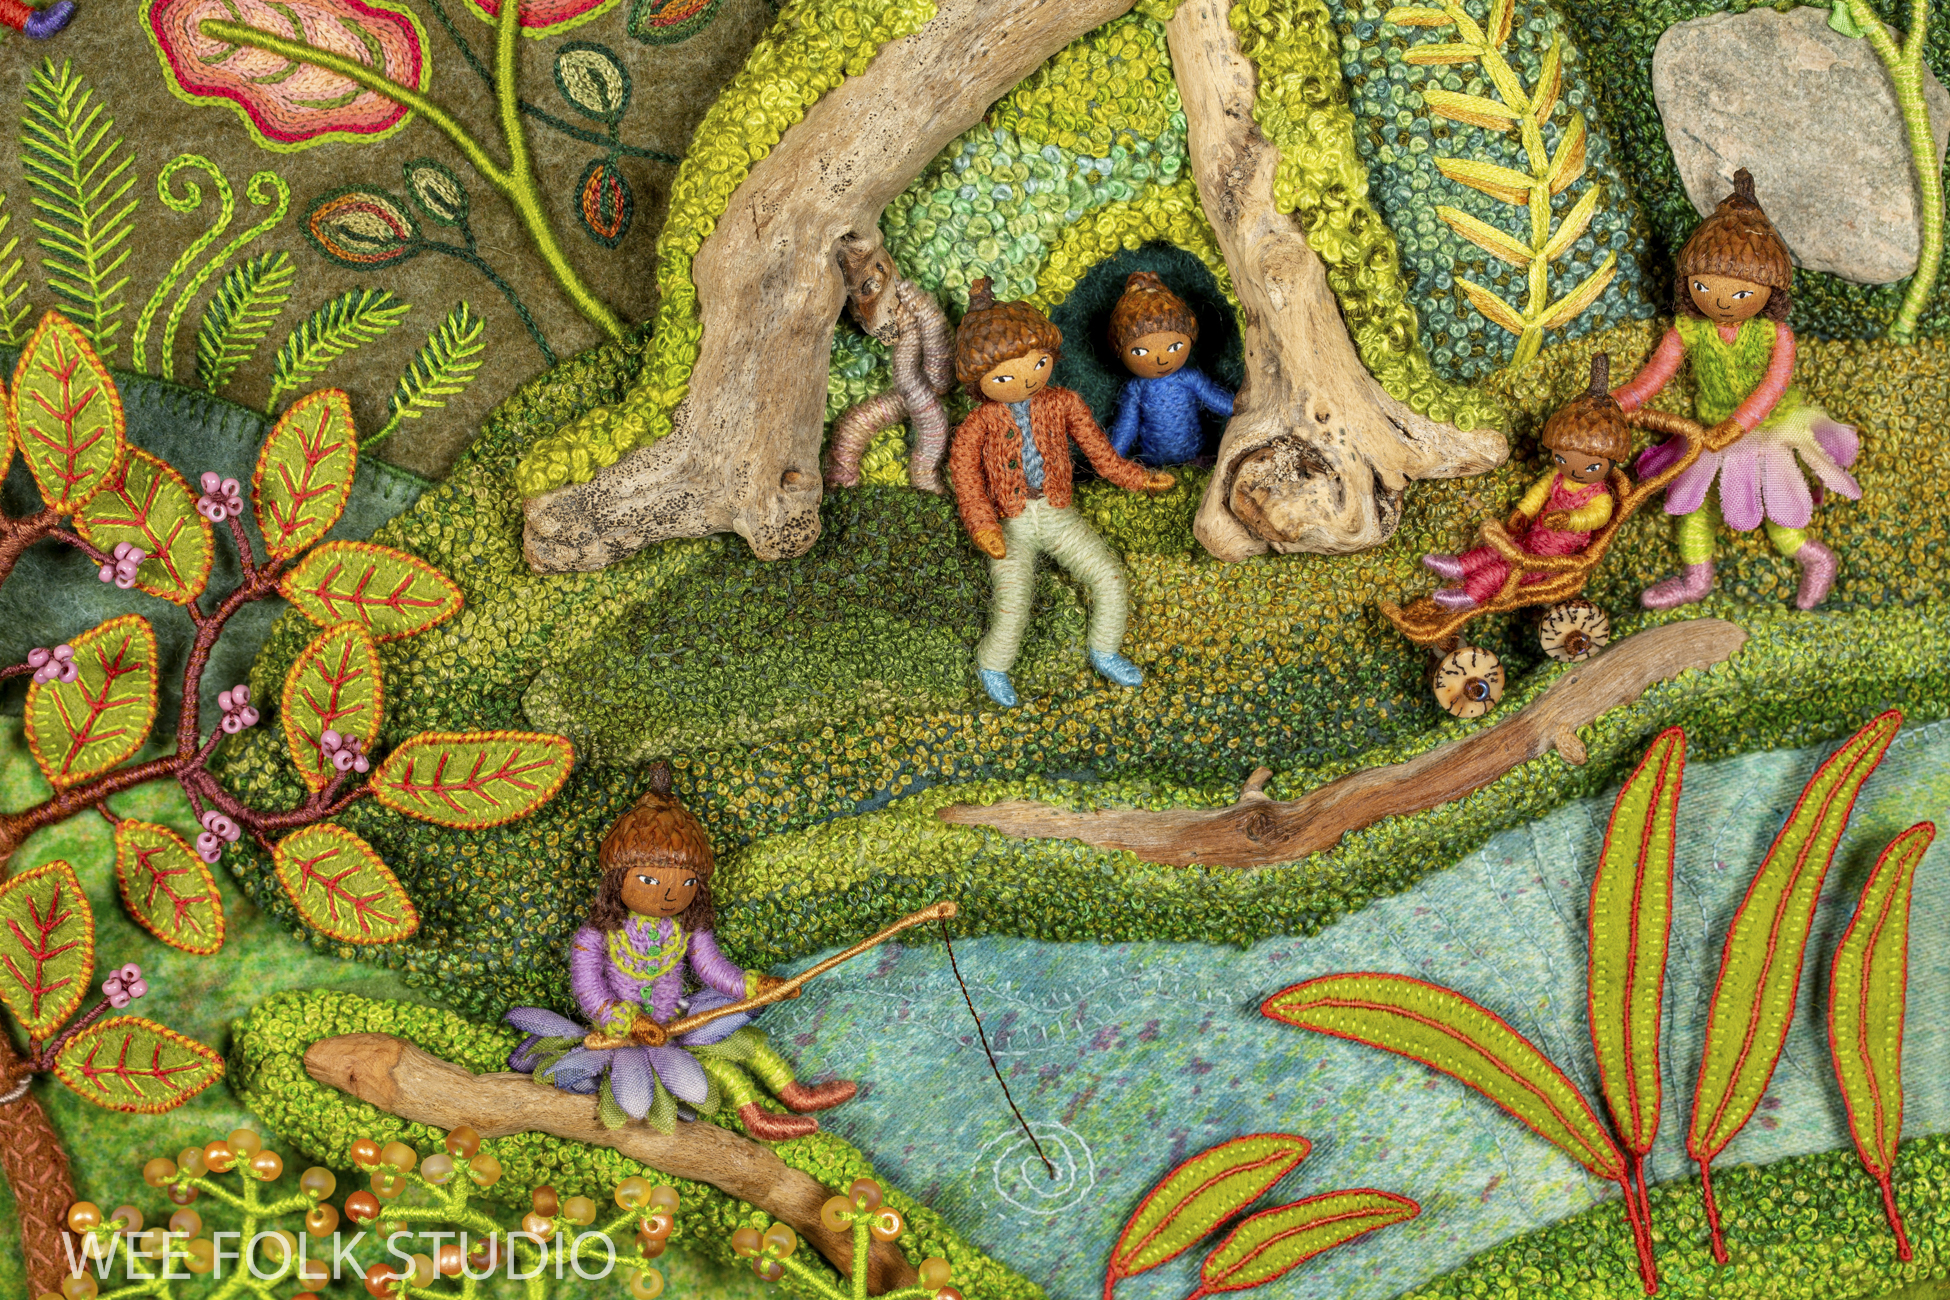
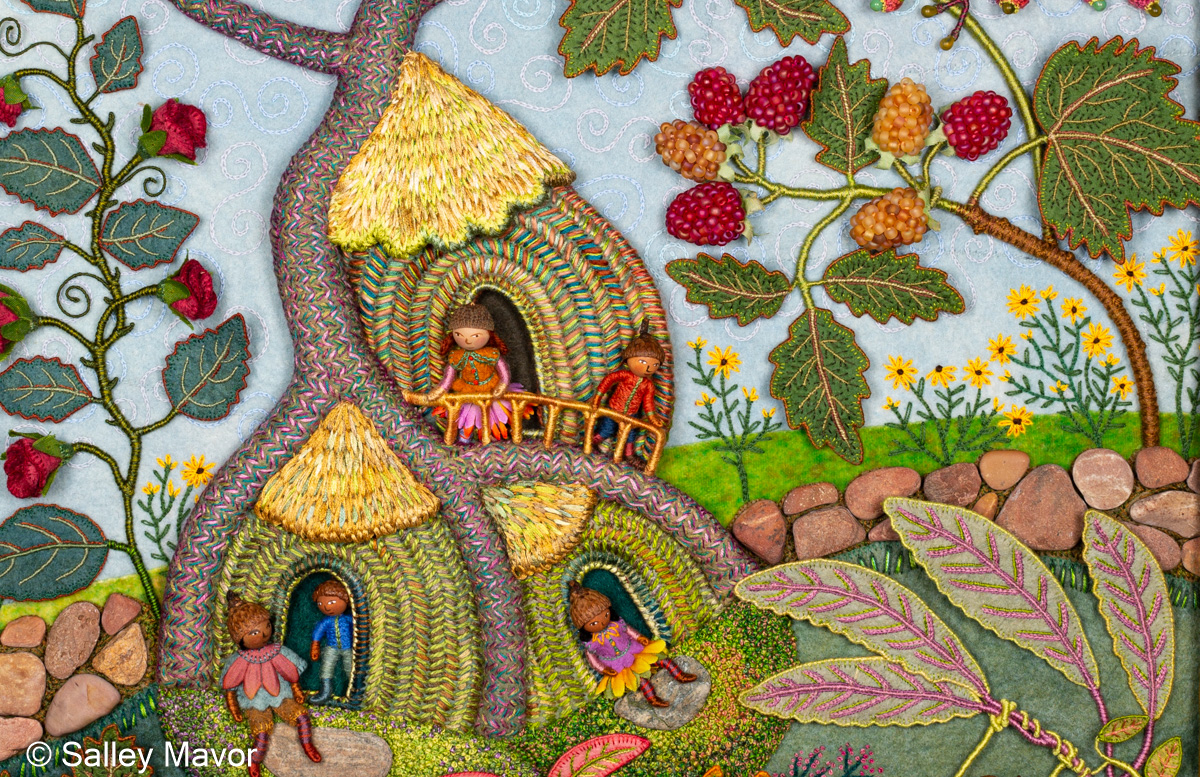
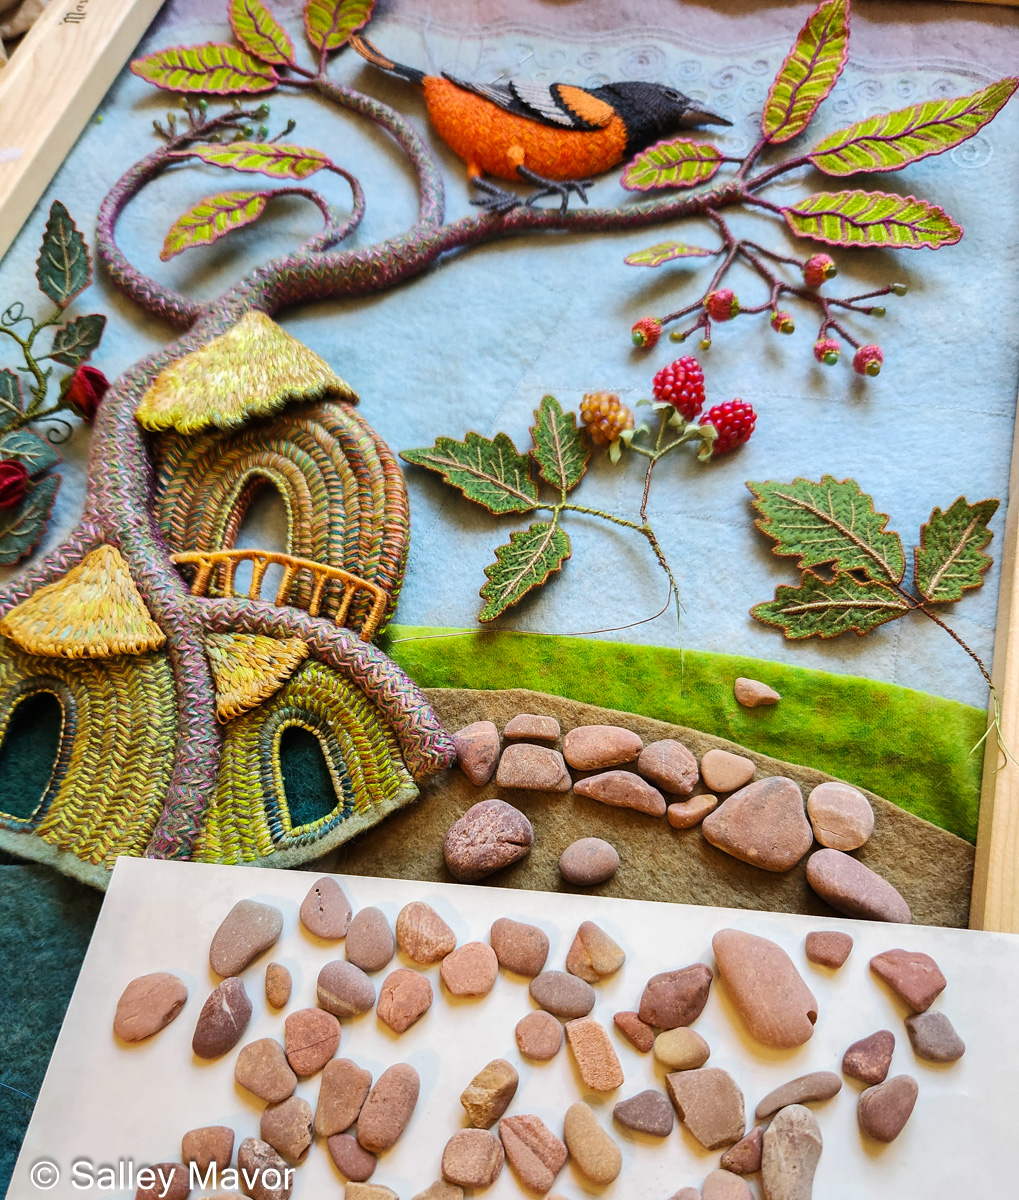
In the series about making Summertime (the fourth of my seasonal landscapes), I share photos of different stages of the project and explain what went through my head while I was working on it. In this post (Part 2), I show how I made the thatched roof treehouses nestled in the tree trunks.
For a more comprehensive understanding of my process, I encourage you to explore other posts in this series: Overview of the piece, Part 1 – Tree Trunks, Part 2– Tree Houses, Part 3 – leaves, stems and branches, Part 4– Baltimore Oriole (body), Part 5– Baltimore Oriole (head and feet), Part 6 – rose vine, Part 7– raspberry plants, Part 8– stitching flora, Part 9– moss, sky and stone wall, and Part 10 – wee folk.
Summertime is the summer scene in a series of four seasonal landscapes that capture the wonder and magic of the natural world. Note cards, prints, bookmarks, and jigsaw puzzles of Summertime and the other scenes in the series (Frosty Morning, Mossy Glen and Harvest Time) are available in my Etsy Shop.
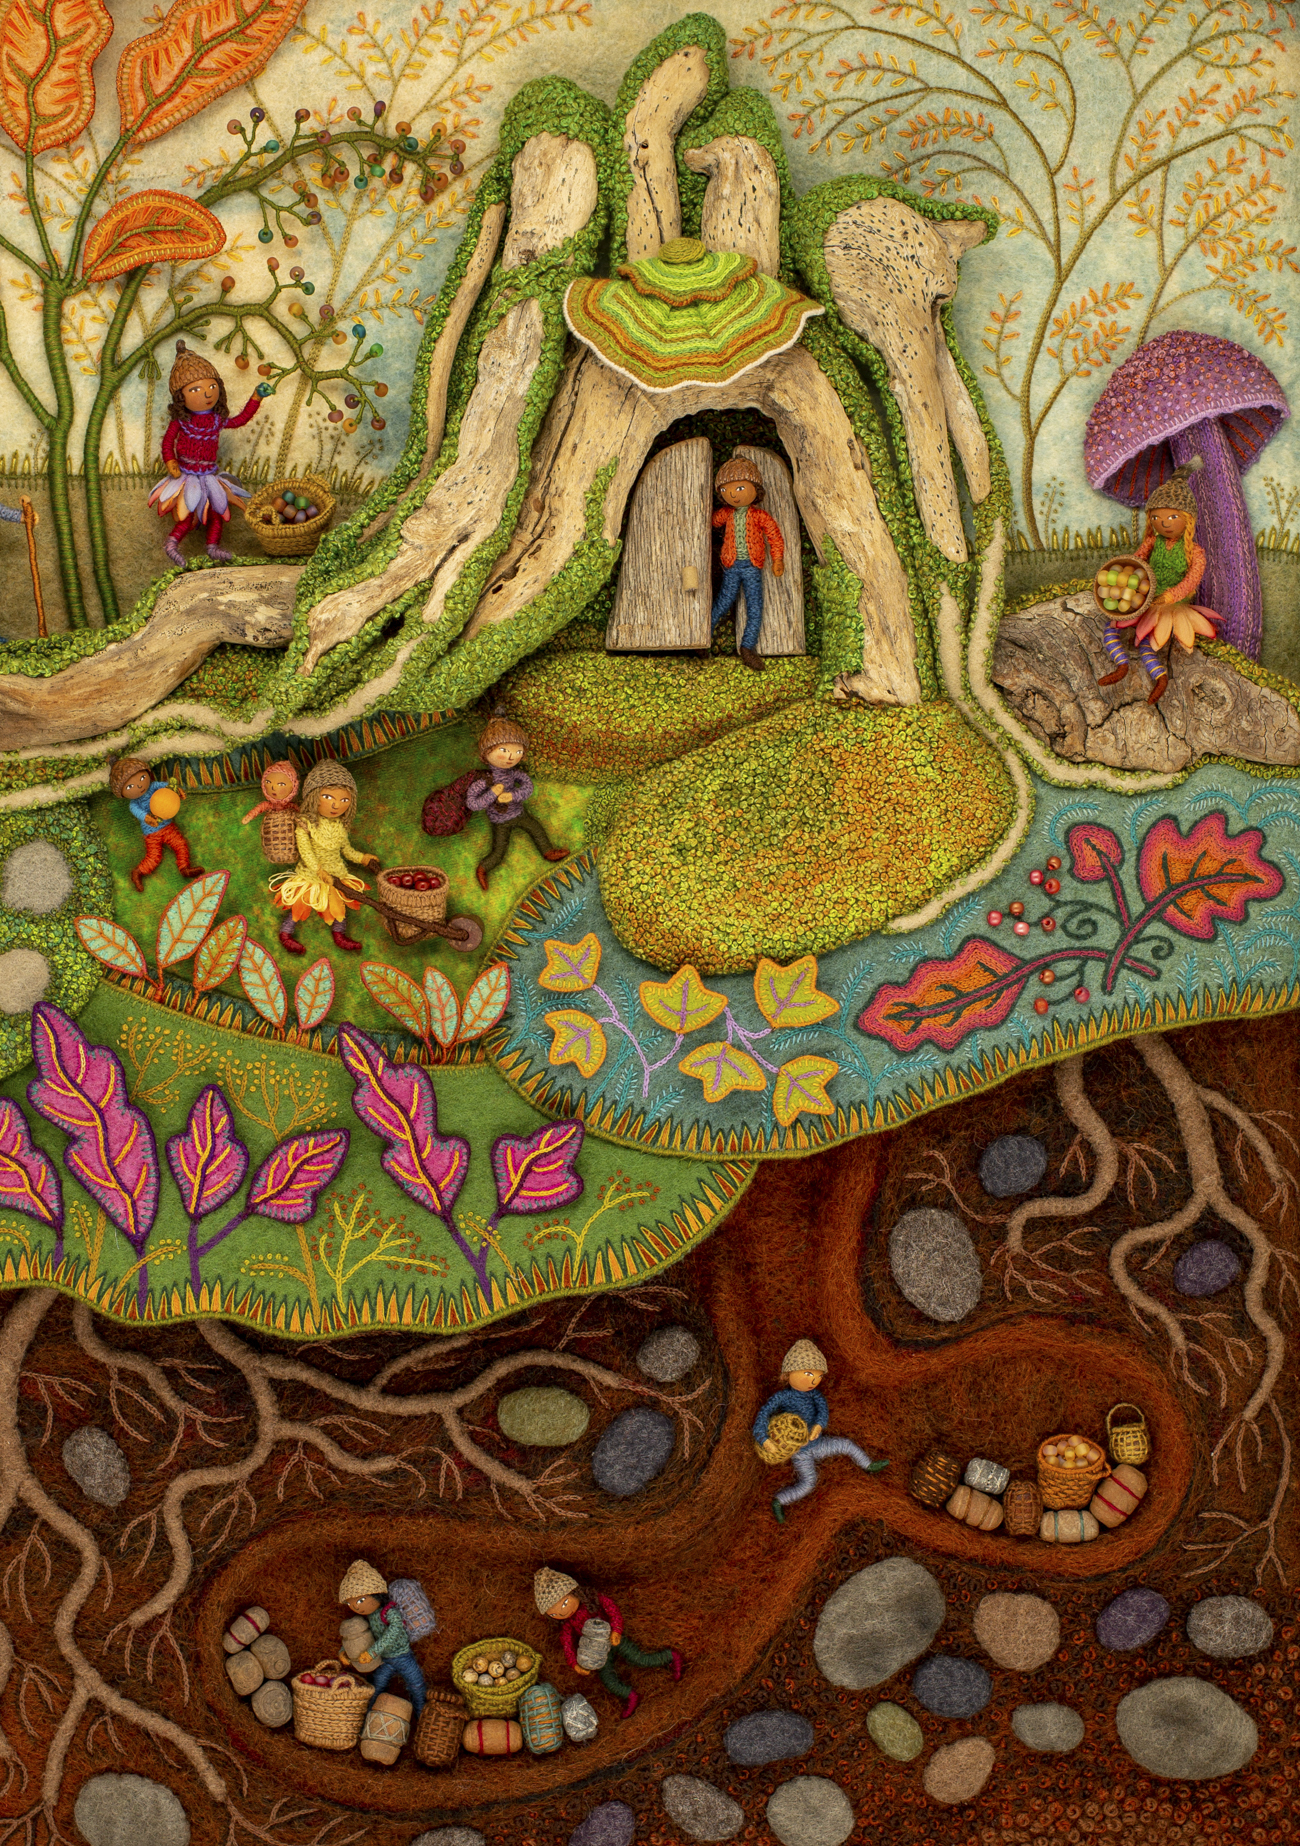
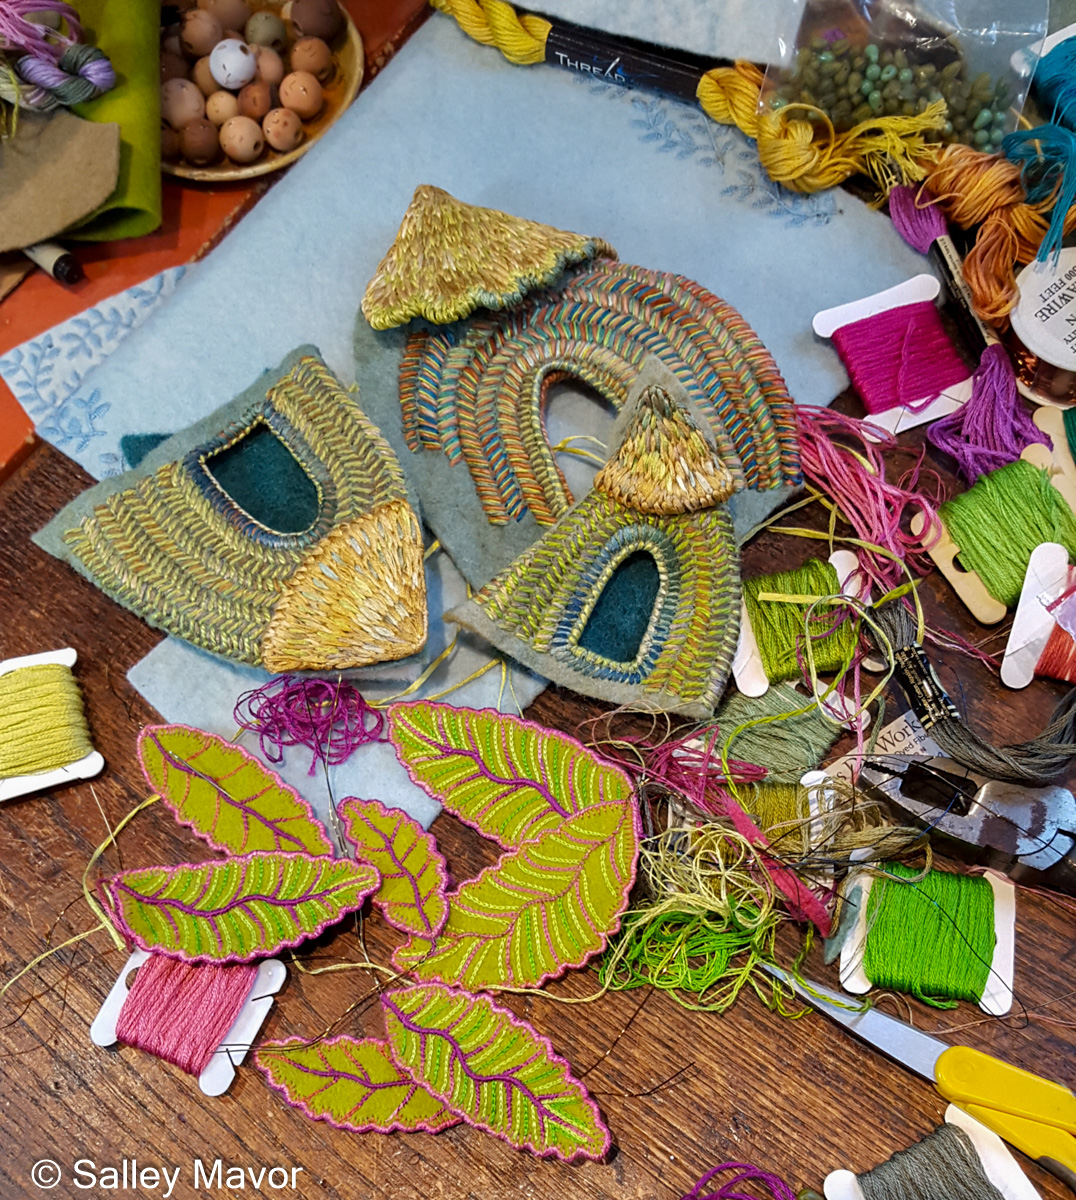
Thatched Roofs I hardly ever buy new materials because I have enough fabric, wire, beads, and thread to last a lifetime. However, sometimes I feel pushed to look beyond the containers full of miscellaneous supplies in my studio for something unique. That’s how I found straw silk made by Silk Road Fibers. I first came across it when searching for thatching materials for the roof in the South American scene in my picture book, MY BED: Enchanting Ways to Fall Asleep around the World.
MY BED: South America, bas-relief embroidery, 16 x 20 x 2
So, when it came time to make the tree house complex for Summertime, I knew exactly what to use to thatch the roofs.
Straw silk is different from other silk embroidery ribbon, which can be too slick for my taste. Straw silk’s rough texture and variegated colors give it the kind of natural appearance I’m looking for.
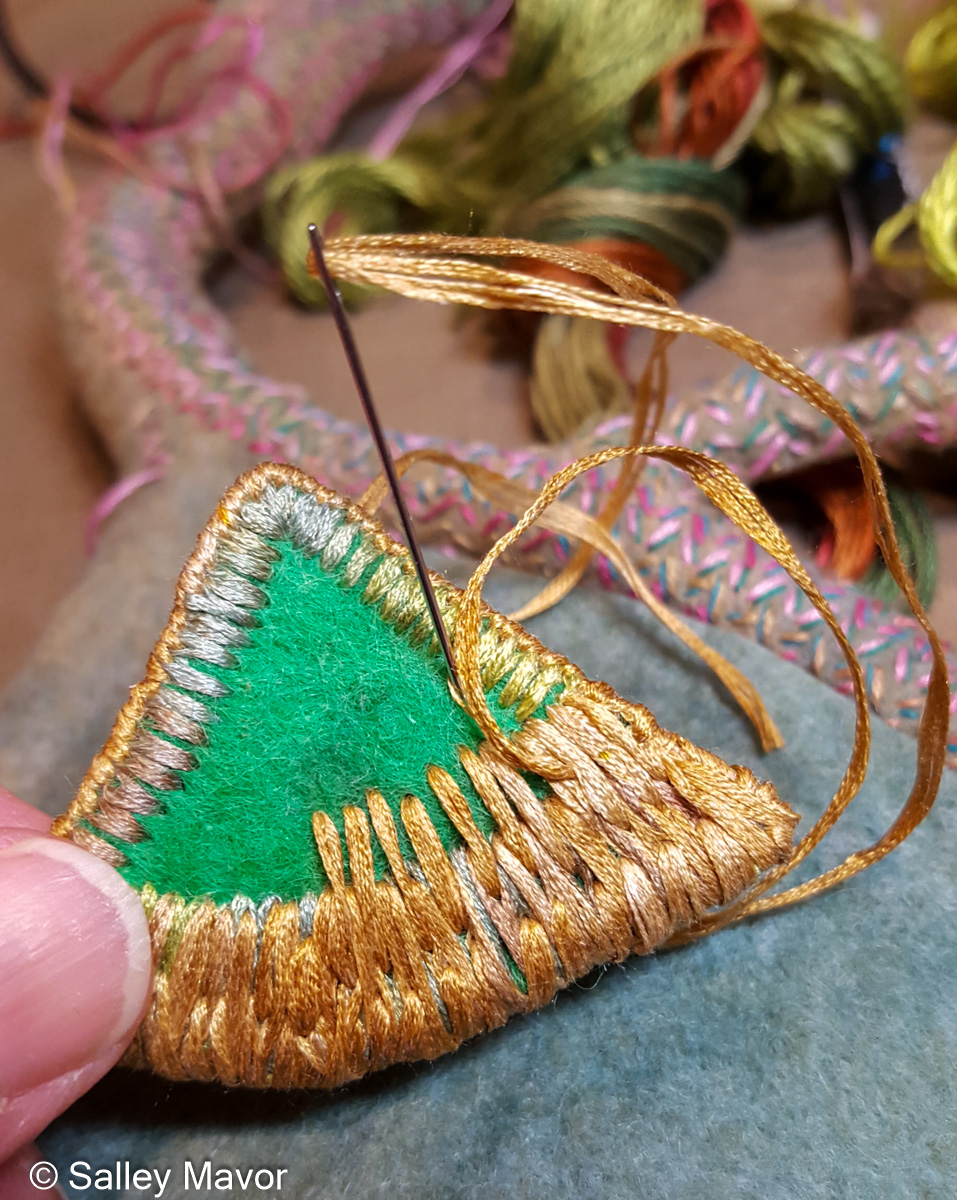
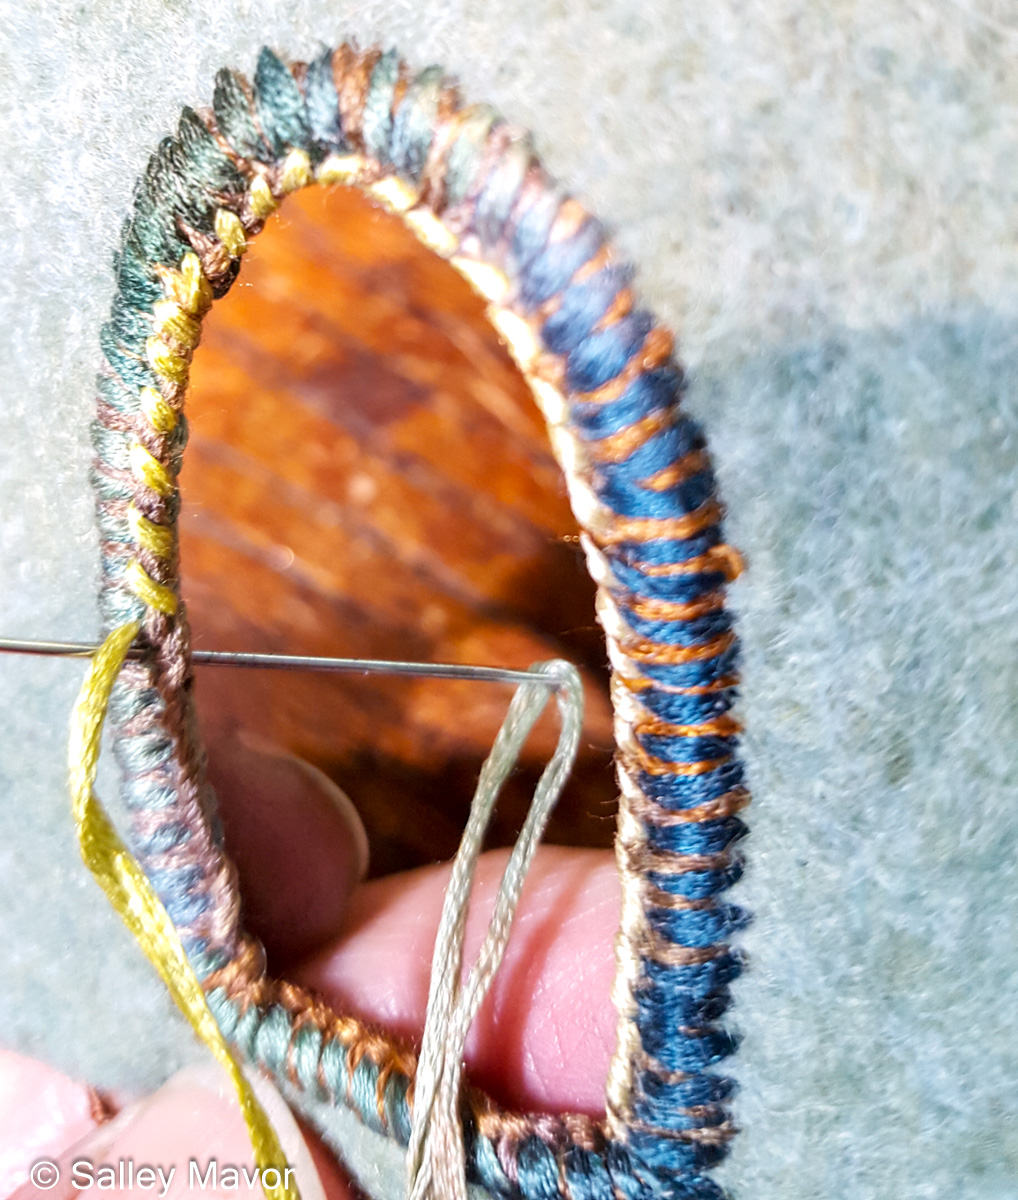
Doorways and Huts To make the doorways, I cut out holes in pieces of wool felt and edged the openings with a combination of straw silk and pima cotton.
I liked how the herring bone pattern around the doorway created a three dimensional effect, so I continued covering the entire hut that way.
At some point, I realized that the doorway openings were too flimsy and needed reinforcement, so I stitched wire (Memory Thread) around the open edges.
After stitching the roofs to the top of the huts, I decided to add loops around the bottom edge, like a pixie haircut with bangs.
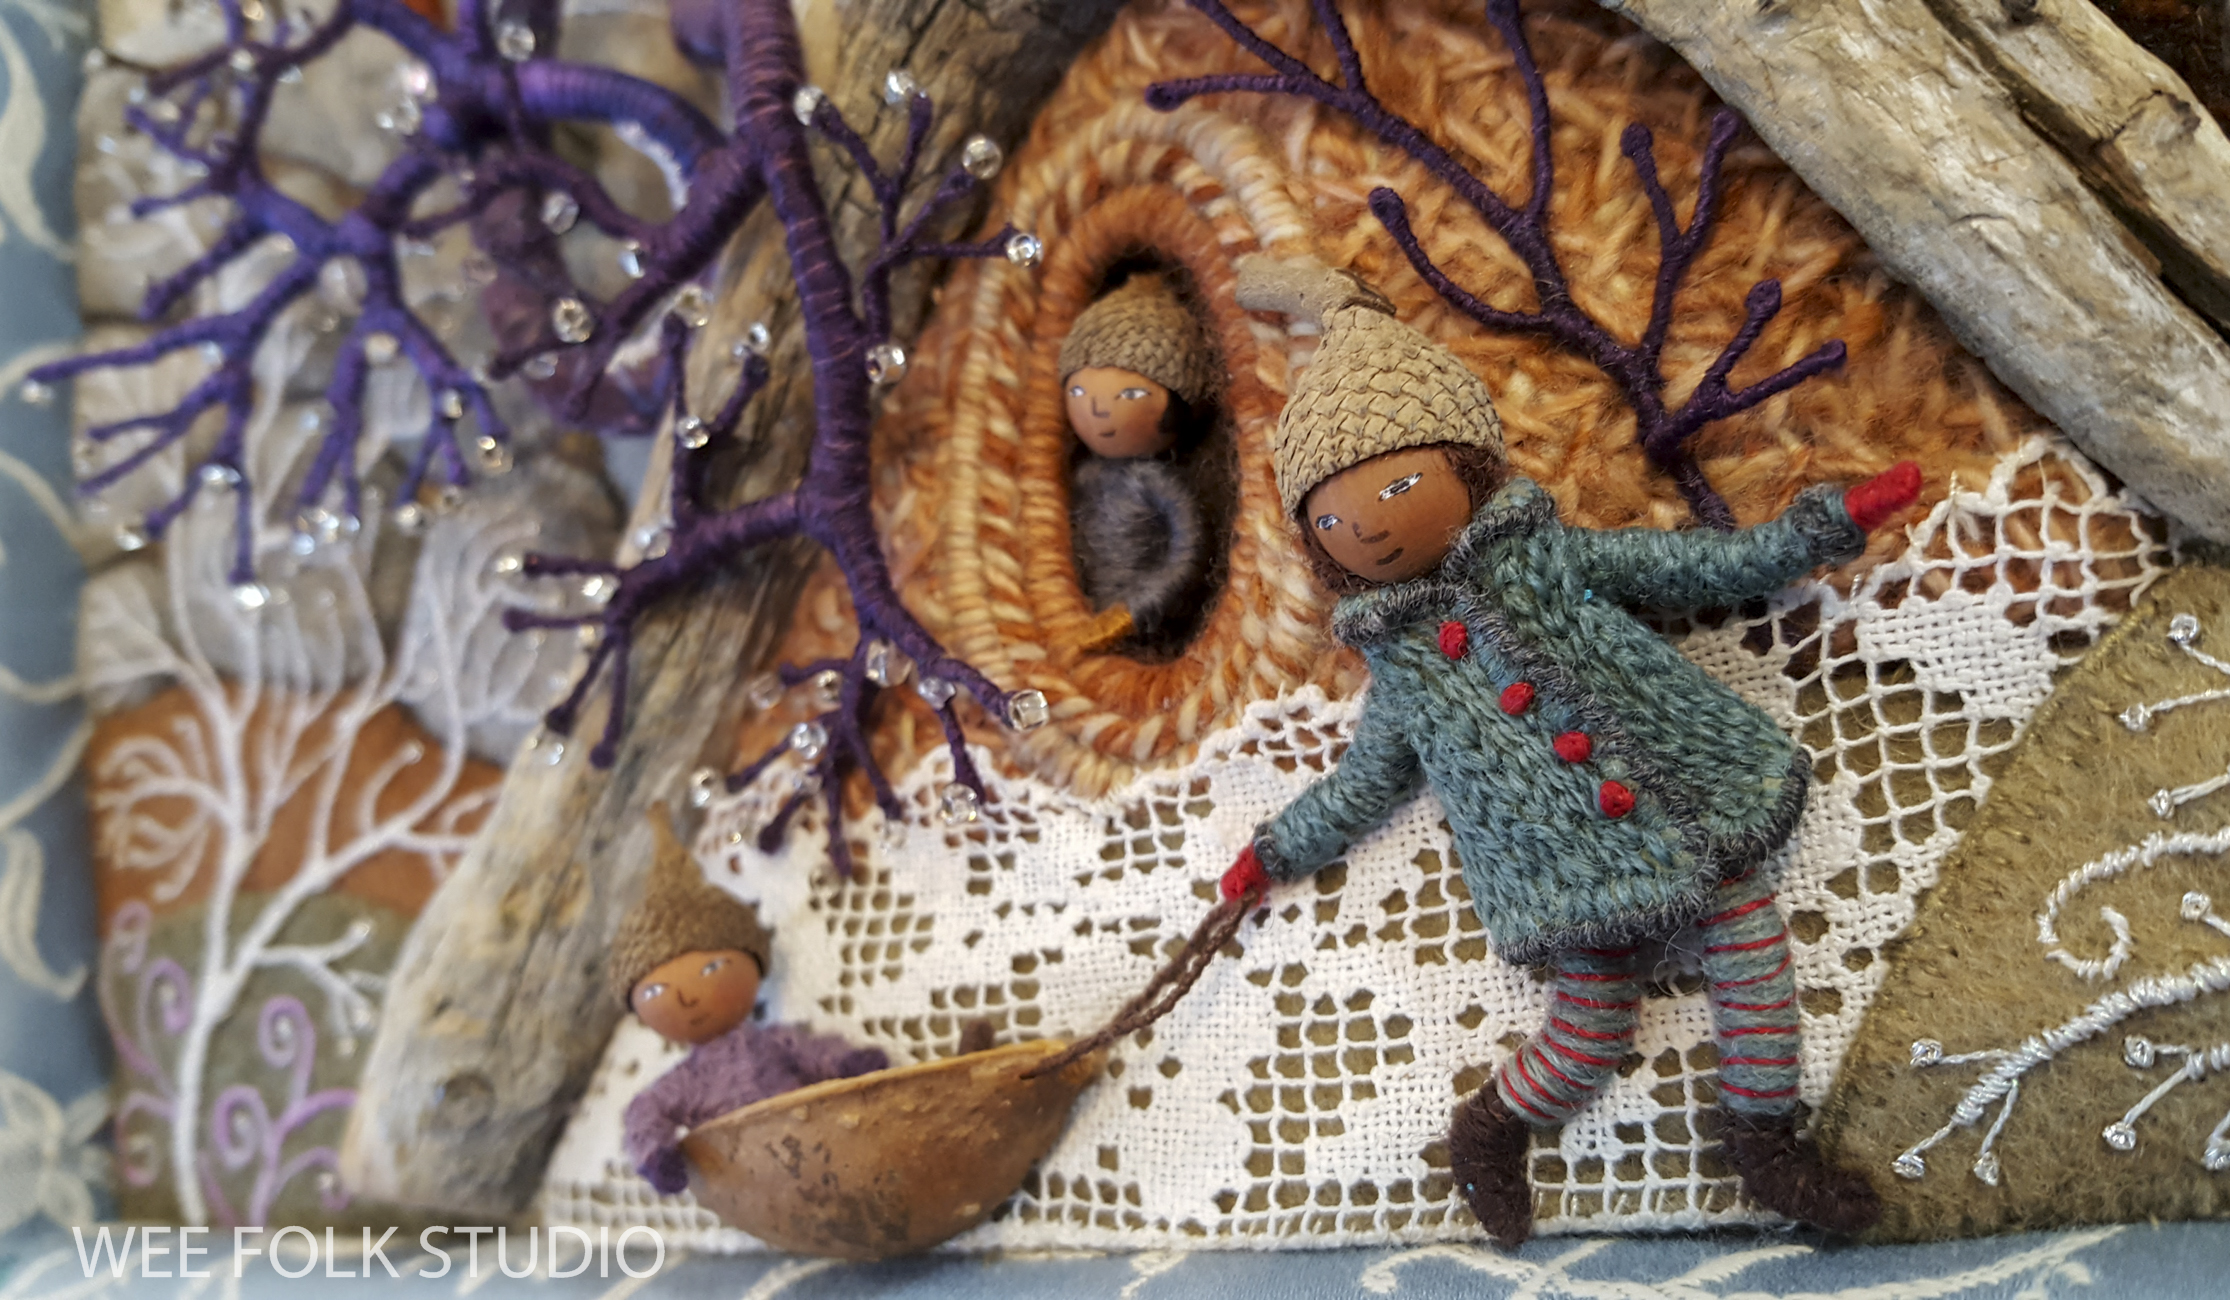
Each landscape in the Four Seasons Series includes housing for the wee folk, either perched in trees, dug into hillsides, or in underground tunnels. The slideshow below features examples of a variety of cozy shelters found in Frosty Morning, Mossy Glen, Harvest Time and Summertime.
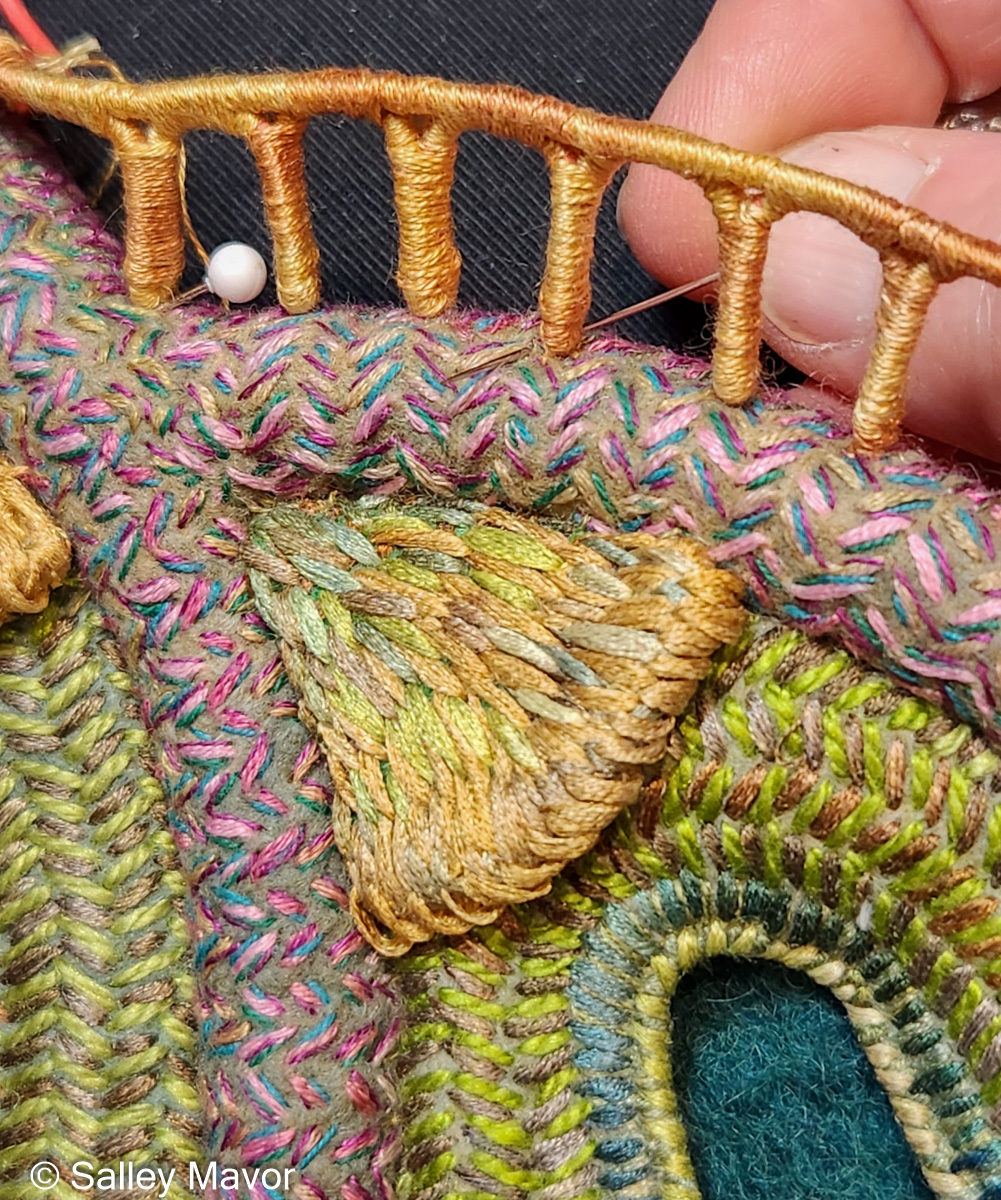
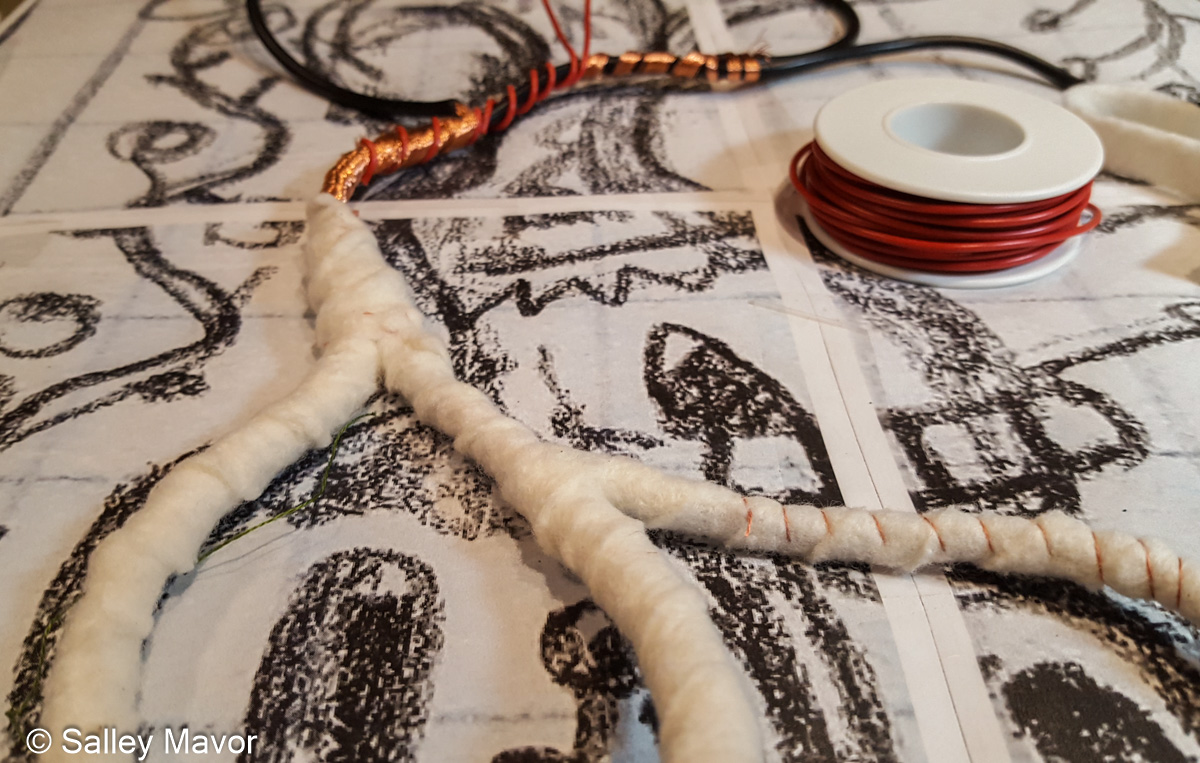
When I first imagined Summertime, I pictured thatch roofed huts clustered at the base of the center tree, with at least one elevated high enough to warrant a balcony.
I formed the balcony out of rubber coated electrical wire and wrapped it with embroidery floss.
Then, I sewed the balcony columns to the tree trunk.
It felt good to create homes for the wee folk and move on to others parts of the project!
Stay tuned for future posts in this series about Summertime. In Part 3, I will share photos, videos and commentary about how I made leaves and branches. If you want to receive email notices when I publish new posts, please subscribe to this blog using the form below.
To keep up with new posts, please subscribe to this blog. Your contact info will not be sold or shared. If you’d like to see more frequent photos tracking the projects in my studio, please follow me on Facebook, Instagram and BlueSky.
Part 1 in the series about making my piece Summertime features photos and videos documenting the process of creating the tree trunks, which provide the framework for the whole composition. In this post, I reveal what’s inside the trunks and show how I covered them with felt and embroidered embellishment.
UPDATED LIST of the complete series: Overview of the piece, Part 1 – Tree Trunks, Part 2– Tree Houses, Part 3 – leaves, stems and branches, Part 4– Baltimore Oriole (body), Part 5– Baltimore Oriole (head and feet), Part 6 – rose vine, Part 7– raspberry plants, Part 8– stitching flora, Part 9– moss, sky and stone wall, and Part 10 – wee folk.
Summertime is the summer scene in a series of four seasonal landscapes that capture the wonder and magic of the natural world. Posters, note cards, prints, bookmarks, and jigsaw puzzles of Summertime and the other scenes in the series (Frosty Morning, Mossy Glen and Harvest Time) are available in my Etsy Shop.
Before threading the first needle, I pictured the scene in my head for months, mostly while taking walks or riding on the bike path. During this early stage of the process, I made a lot of thumbnail sketches and worked out the basic design. Once I could clearly see a path forward, I enlarged a drawing to the full 19″ x 24″ size and used it as a simple guideline. All of the color choices, design changes, and stitching details would come later, as the piece evolved.
I formed the structure of the tree with insulated electrical wire of different thicknesses that I found at the hardware store. To make forked branches, I stripped the plastic coating at the ends and wound the exposed copper wire around the adjoining branches. The whole idea was to make an armature that was flexible and strong enough to bend and manipulate as needed.
To build up the thickness of the tree, I wrapped the wire with cut strips of cotton quilt batting, which I roughly stitched in place.
The next step was to cover the padded wire with wool felt. I started by stitching felt pieces to the back of the tree trunk and branches, making a flat surface that would eventually be sewn to the background sky.
Then I stitched pieces of felt over the curved front. The photo below gives a view from the back, as I overlapped the front strip of felt over the back piece. The messy seams will all be covered with embroidery and hidden in the back.
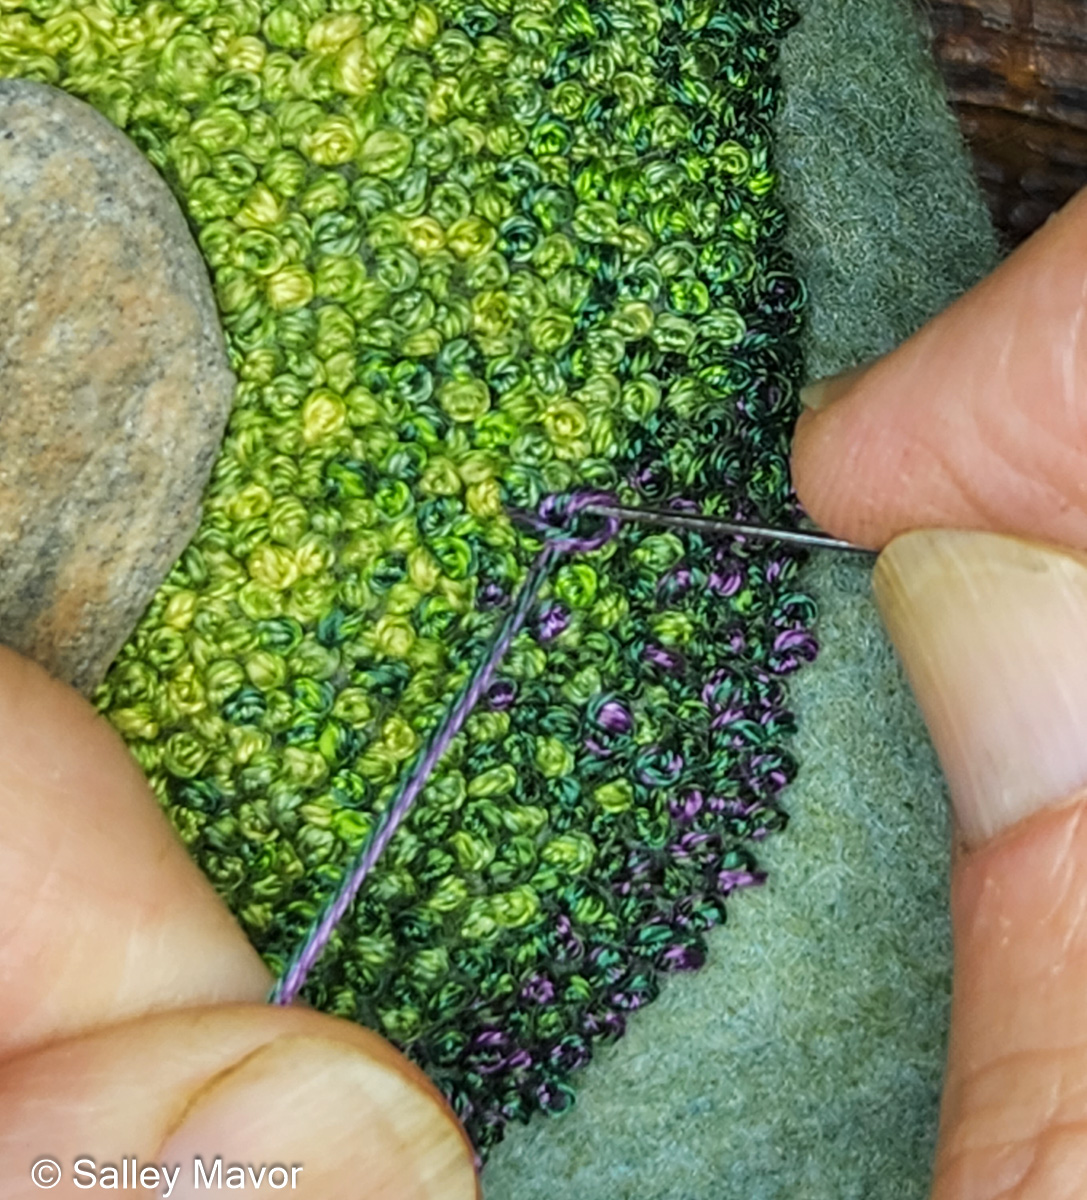
After covering the tree with felt, I stitched a zigzag “bark” texture up and down the branches with pima cotton.
At first, I liked how the pink and tan variegated thread looked, but soon realized that it alone was too subtle and needed more saturated accent colors to help it pop in contrast to the sky background.
I added bright turquoise and then decided to go even further with hot pink, which I also used to create a cross-hatched effect along the sides of the trunks.
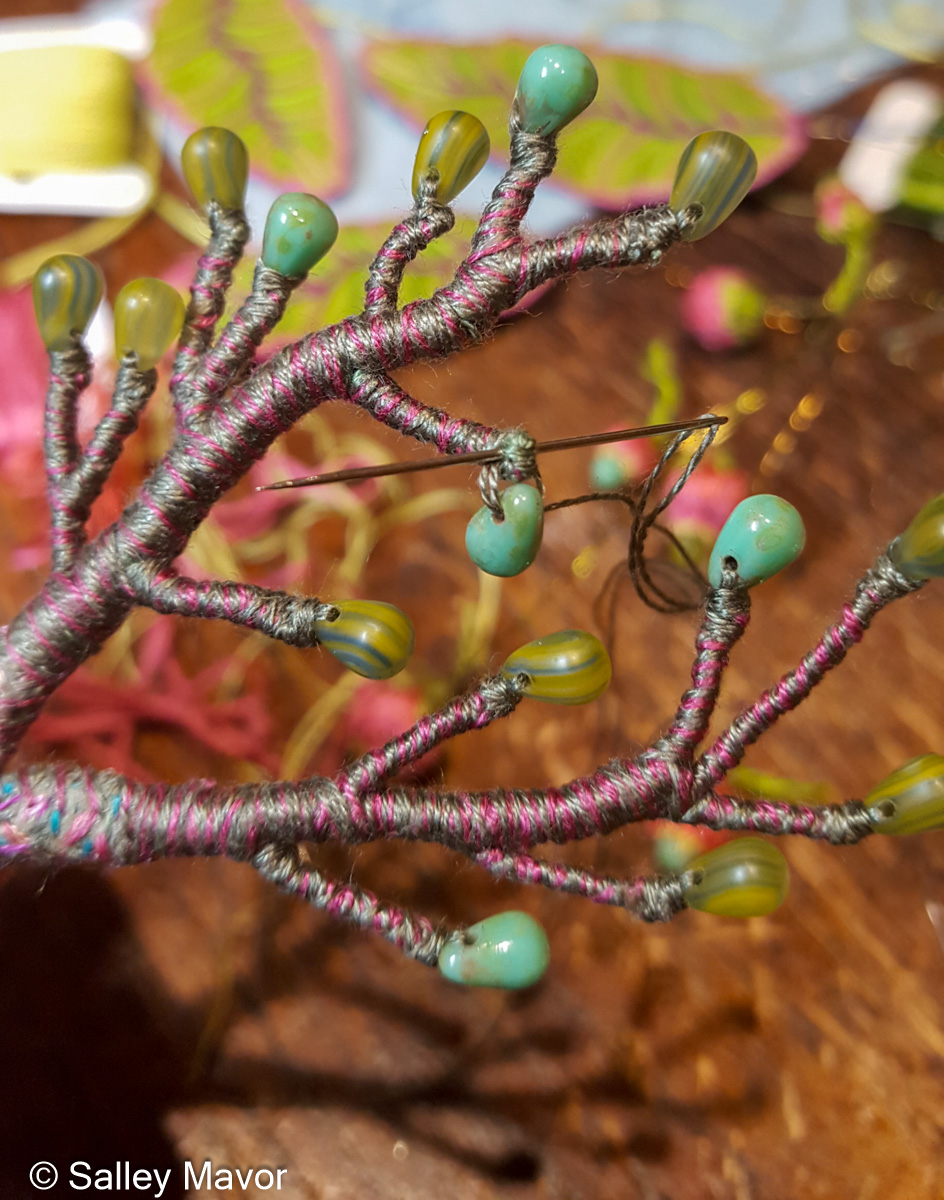
I used finer gauge wire to form the smaller branches and wrapped them with embroidery floss.
I sewed some glass beads that have been stored in my stash for 20 years to the tips of the branches. It felt so good to finally put them to use!
Stay tuned for future posts in this series about Summertime. In Part 2, I will show how I made the thatch-roofed treehouses nestled into the tree trunks. If you want to receive email notices when I publish new posts, please subscribe to this blog using the form below.
To keep up with new posts, please subscribe to this blog. Your contact info will not be sold or shared. If you’d like to see more frequent photos tracking the projects in my studio, please follow me on Facebook, Instagram and BlueSky.
With warmer weather approaching, it seems like a good time to begin a new multi-part series about making Summertime, the fourth of my seasonal landscapes. It feels so good to have completed all four seasons in this project! I started making them during the pandemic as a way to focus on something positive and healing.
UPDATE: For a more comprehensive understanding of my process, I encourage you to explore other posts in this series: Overview of the piece, Part 1 – Tree Trunks, Part 2– Tree Houses, Part 3 – leaves, stems and branches, Part 4– Baltimore Oriole (body), Part 5– Baltimore Oriole (head and feet), Part 6 – rose vine, Part 7– raspberry plants, Part 8– stitching flora, Part 9– moss, sky and stone wall, and Part 10 – wee folk.
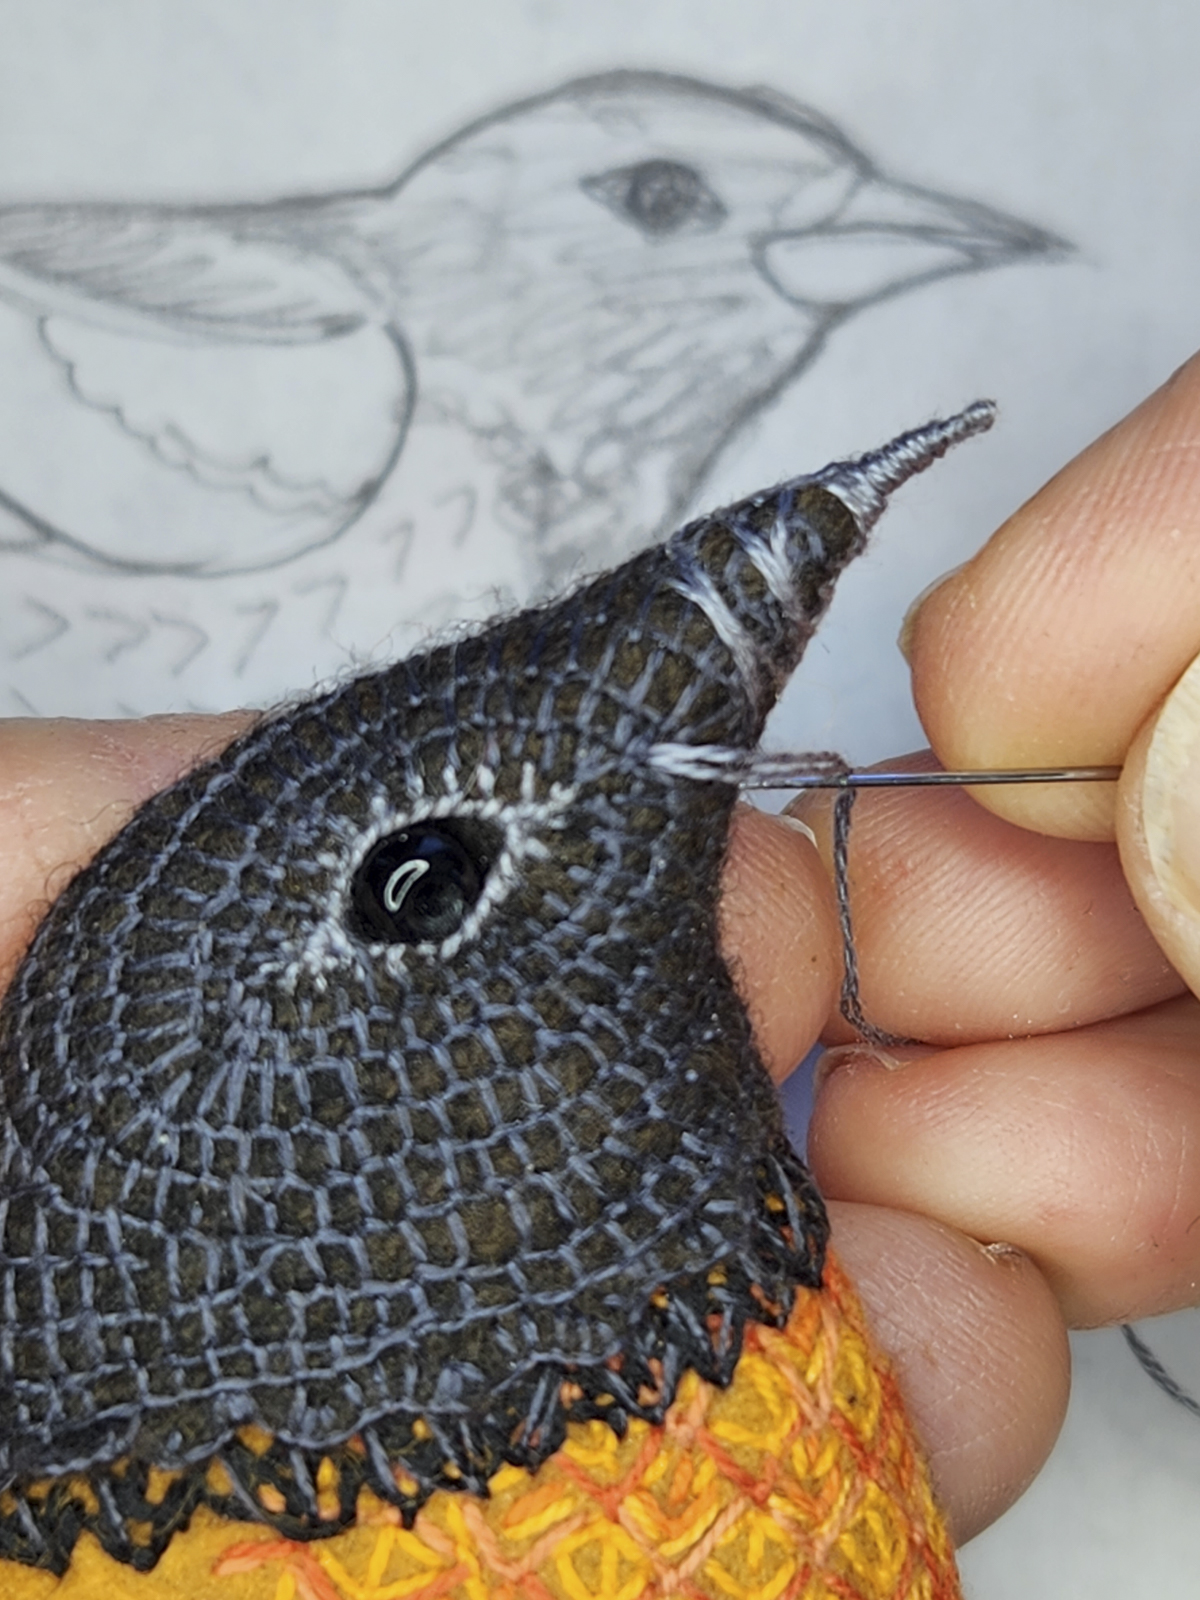
Over the coming weeks and months, I will share photos, videos and commentary about different aspects of the project, from raspberries to tree houses and their inhabitants to a life size Baltimore Oriole.
Summertime is the summer scene in a series of seasonal landscapes that capture the wonder and magic of the natural world.
The following video shows how I arranged different parts of the scene before sewing the pieces in place.
I know that you like to see my fingers in action, so I took videos of different parts of the process. Sometimes I weeded the garden and stitched on the same day, so I hope that my dirty fingernails aren’t too distracting! Here are 2 previews of making the bird’s beak and sewing raspberries. There’s lots more to show, so stay tuned! If you want to receive email notices when I publish new posts, please subscribe to this blog using the form below.
To keep up with new posts, please subscribe to this blog. Your contact info will not be sold or shared. If you’d like to see more frequent photos tracking the projects in my studio, please follow me on Facebook, Instagram and BlueSky.
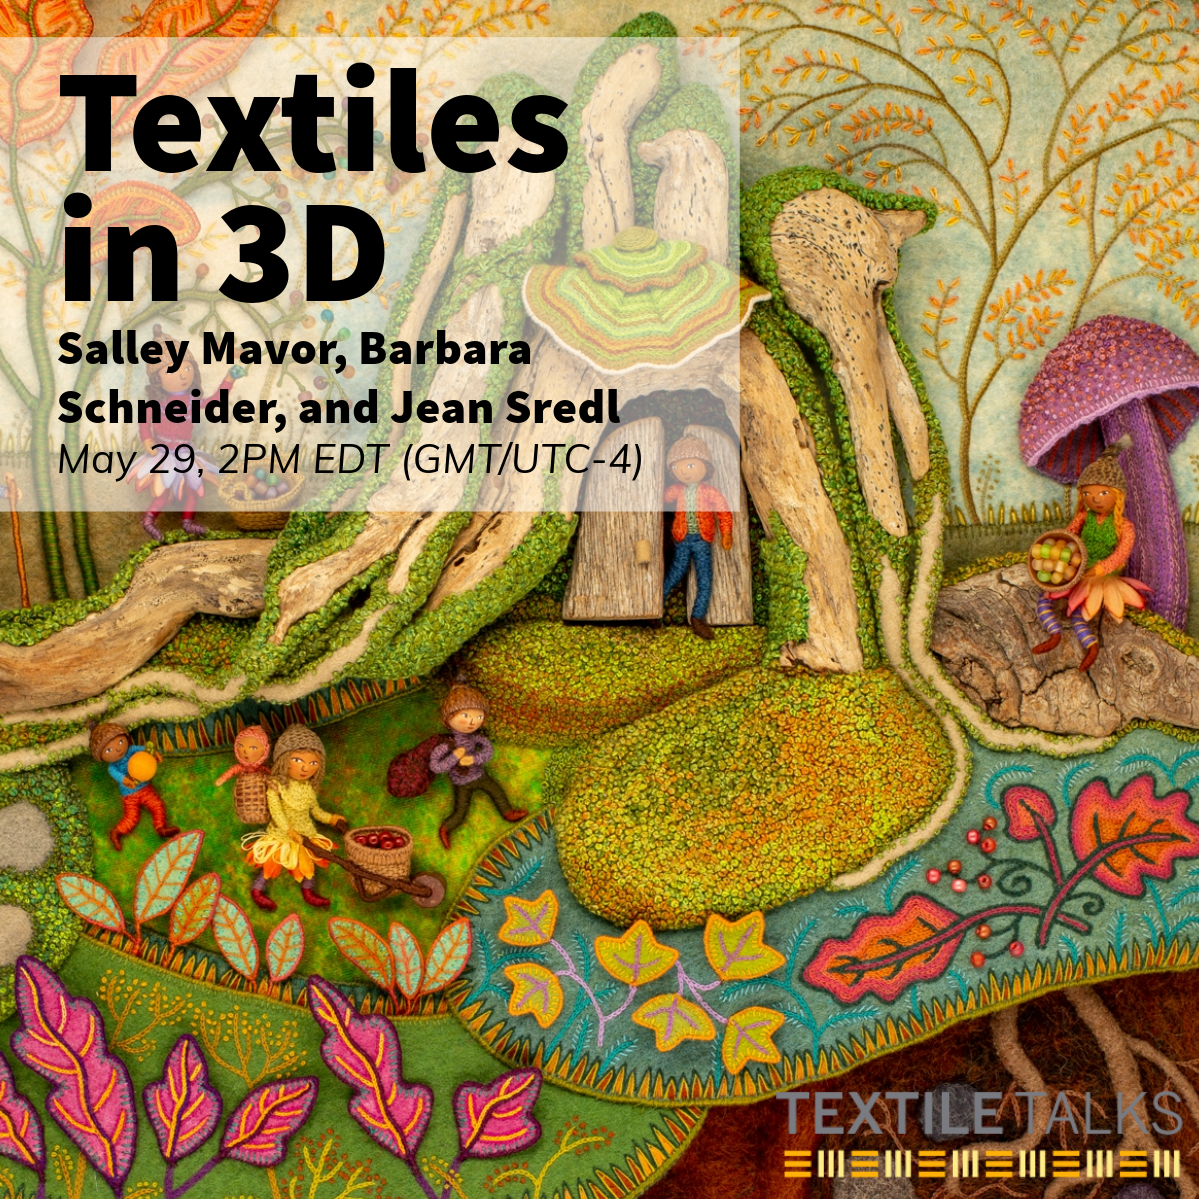
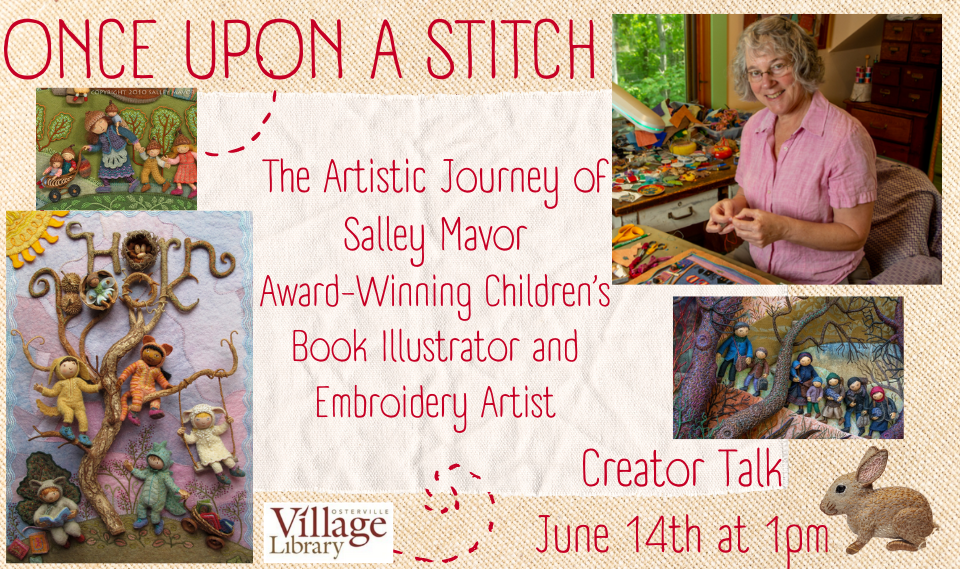
I’m excited to announce some upcoming virtual and in-person events that you may be interested in attending. Please read ahead for details.
May 29th at 2PM EDT – Textile Talk, Textiles in 3D (online only)
June 14th at 1PM – Slide Talk, Once Upon a Stitch: The Artistic Journey of Salley Mavor at the Osterville Village Library in Osterville, MA (in-person only)
July 27, 2025 – March 2, 2026 – Exhibition, Enchanting Threads: The Art of Salley Mavor at the Albany Institute of History and Art (in-person only)
Once Upon a Stitch: The Artistic Journey of Salley Mavor Osterville Village Library in Osterville, MA on June 14th at 1pm. I will give a slide talk about my life’s work and offer some insight as to where it came from, how it’s evolved and why I do it. A book signing will follow the presentation.
Birds of Beebe Woods
UPCOMING EXHIBITION Enchanting Threads: The Art of Salley Mavor Albany Institute of History and Art, Albany, NY. July 27, 2024 – March 2,2025 Opening Reception for the Artist – Fri., July 26, 5:30 – 7:30PM
Opening reception with the artist on July 27th. Artist talk TBA later in the fall.
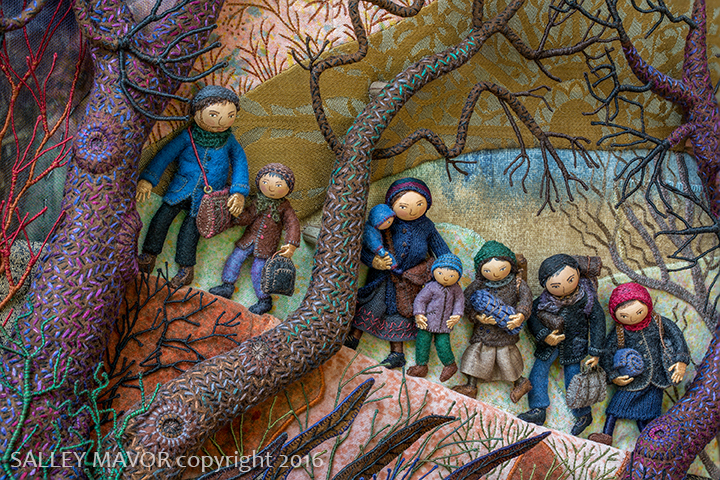
Starting this summer, The Albany Institute of History and Art will host a major exhibition of over 80 bas-relief pieces and sculptural objects from my collection. Enchanting Threads: The Art of Salley Mavor will be on view for 7 months, from July 27, 2024 – February 23, 2025. The show will include a large selection of my artwork from the past 30 years, including Bedtime Stitches, the touring exhibit of original illustrations for my most recent picture book, MY BED: Enchanting Ways to Fall Asleep around the World. Also on display will be recent works that explore cultural diversity, migration, fashion, the natural world, and a range of social narratives, from the everyday to topical subjects.
To keep up with new posts, please subscribe to this blog. Your contact info will not be sold or shared. If you’d like to see more frequent photos tracking the projects in my studio, please follow me on Facebook, Instagram and BlueSky.