This illustration from Pocketful of Posiesis for the rhyme, Hickety, pickety, my black hen, she lays eggs for gentlemen. My descriptions will be brief, as I’m working hard to finish all of the borders for the upcoming traveling show. The colors vary in this series of photos becuase I took them at different times of day, under different lighting conditions. The color green is famously difficult to reproduce anyways. Here’s the fabric relief piece sewn to foam core board, before a border was attached. Yes, I made the egg basket, by wrapping and coiling wire around and around. Pretty obsessive, but necessary!
The arched hen-house is made with bittersweet vine, with driftwood floor boards.
The border need a little punch, so I sewed some purple perle cotton around the outside edges.
The embroidered leaves could also be seen as feathers.
The hen’s nest is made from some curly excelsior packing material and her feathers are highlighted with purple metallic thread.
This coloring is more true to the original piece.
Note: See other posts from the Pocketful of Borders series here.
The 2nd summer wedding is coming up soon, so I’m making another felt banner for Leigh and Brendan (see Karen & Graham’s on an earlier post here). I get the impression that the bride and groom are kind of traditional, so I’m resisting the temptation to go wild with color and add too many funky embellishments.
I started by bending 32 gauge cloth-covered wire to form the names and wedding date. I’m really having fun bringing language into my artwork this way. I started figuring out this technique a few years ago when I was working on Pocketful of Posies, and have no idea if the same kind of thing has been done before. Once you get into the rhythm, the wrapping goes quite fast. After all those years wrapping fuzzy pipe cleaners with embroidery floss for fairy limbs, this seems easy.
I had to put in some color, though and wrapped the wire names in bright pink variegated embroidery floss. The couple’s invitation had a seaside motif, so I added a metal shell charm and got out a dried star fish from my collection of found objects. The dark blue and had too much weight compared to the names, so I lightened it by winding around a single strand of pink floss.
After bending and wrapping the characters for the date, I cut out a piece of yellow felt to mount them on. I don’t make patterns and plan everything out ahead of time, but construct as I go. I always start with the lettering and then figure out later how much room they’re going to need.
Then, I had to figure out how to place everything on the purple blue felt background. At this point, I realized that the star fish didn’t have anything to offer and would have to go. I go through this editing process often, latching onto some interesting found object and then seeing that it has served its purpose of moving the design along and is no longer needed. A writer friend describes the revision process the same way. She said, “You have to be willing to let go of favorite words and phrases.”
I decided to incorporate a more conventional floral decoration and added some of Mimi’s Kirchner’s felt roses and some glass leaf beads. If you haven’t learned how to make them yet, go to her tutorial on her blog here. I also got out the dreaded glue because that was the only way to attach some shells around the date. The yellow felt piece called out for some embellishment, so I added a chain-stitched loopy line around it.
Then, I cut out a banner of blue felt, with scallops on the bottom and blanket stitched all around with variegated pima cotton from the Caron Collection. I found an old shell necklace, the souvenir kind from Hawaii, and sewed some shells to the scalloped bottom edge. I was glad that they already had holes.
I sewed a casing for a drift wood stick at the top, then tied and braided a pima cotton strap.
Here’s the finished banner, ready to wrap up and bring to the wedding.
To keep up with new posts, subscribe to this blog (top right column on the home page). If you’d like to see more frequent photos tracking the projects in my studio, please follow me on Facebook and/or Instagram.
Update: See other banners with wrapped wire lettering here.
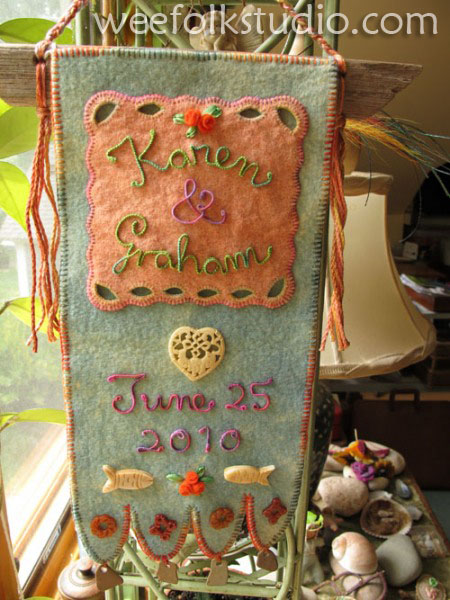
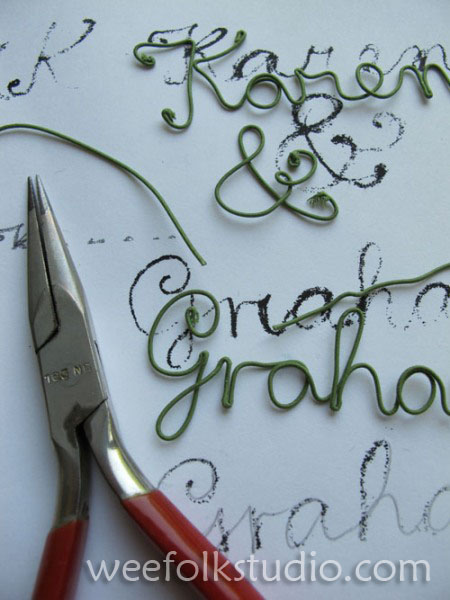
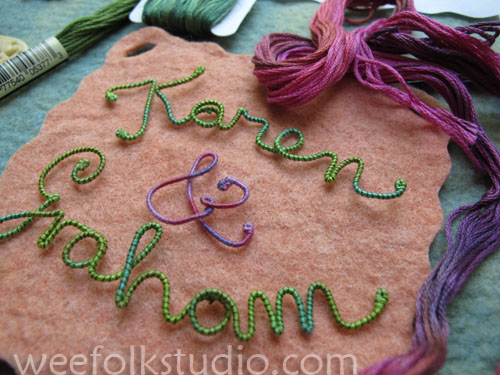
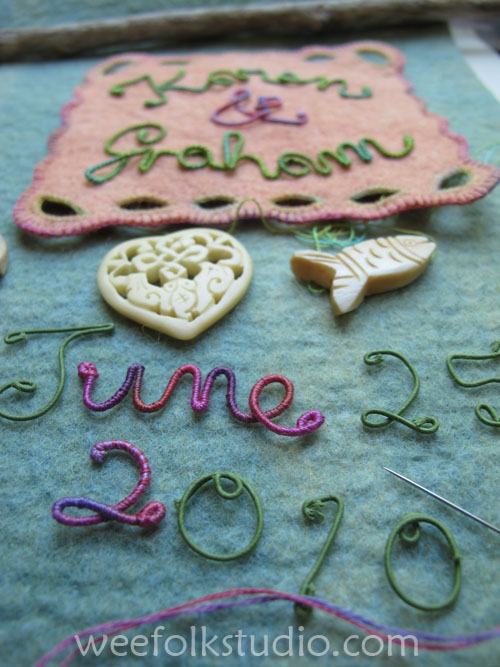
This summer I’ve been invited to two weddings, with the first being held on June 25th on Cape Cod. Both the bride and groom are designers and I thought they would like something artsy and personal for a wedding gift. I started by writing out Karen & Graham in a flowing script and then enlarging it to a lower case height of about 1/2″ . Then, using long-nosed pliers, I bent some 32 gauge cloth wrapped wire, using the hand written lettering as a guide. This is a technique that I figured out while sewing the book cover design for my children’s book, Pocketful of Posies, which you can see here. I wanted letters that were raised enough to create shadows. And because the wire was a separate flexible piece, it was easy to move the words around for proper positioning on the artwork. After determining the size of the names and their placement, I cut out a square of orange wool felt and added my customary wavy edge and some cut out holes. I then wrapped the wire with 2-ply variegated embroidery floss, hiding the knots in the back. This is where I do most of my work, on an old ironing board. The light green floss wrapped wire didn’t provide enough contrast with the background, so I wrapped a single strand of dark green floss around the wire, candy cane style. The banner was cut out of a light teal colored wool felt that matched Karen & Graham’s invitation. Then I blanket stitched around the orange felt edges with pink variegated embroidery floss. I chose some fish beads and a heart made of bone to decorate around the wedding date. Then I made some tiny 1/4″ roses following Mimi Kirchner’s great instructions from her easy felt rose tutorial. Some silk ribbon leaves were added, too. After I figured out how much space to leave for the date and beads, I cut out the scalloped bottom edge of the banner. The outside edge was blanket stitched with some variegated pima cotton (Caron Collection). From my collection of stuff, I picked out some more beads and some beach stone pendants with holes drilled in them to hang from the scallops. I then stitched the floss wrapped wire words and numbers in place and sewed the beads and stone pendants to the banner. It needed some color on the bottom to balance the orange square on top, so I added another clump of felt roses and silk ribbon leaves. I made a sleeve of felt at the top and slipped a piece of driftwood through. After drilling 2 holes in the driftwood, I threaded some pima cotton through and braided a strap for hanging the banner. Here is the finished banner, which I hope Karen & Graham will enjoy for many years!
To keep up with new posts, please subscribe to this blog (top right column on the home page). Your contact info will not be sold or shared. If you’d like to see more frequent photos tracking the projects in my studio, please follow me on Facebook and/or Instagram
These mushroom house have been packed away for over 30 years and earlier this spring I brought them outside and took some pictures. I made them for a story that was included in an elementary school text book. This was my first real illustration job after graduation from art school. I recently wrote about the project in a post about my first picture book, The Way Home, here.
The Great Cleanup was a story about some ecologically minded insects who organized a recycling effort to reuse the trash that was dumped on their neighborhood. I’ll show some pictures of the insects in a future post.
I was still using my Singer Featherweight back then, which was good for top stitching and maneuvering around tight corners. There was plenty of hand stitching, too, around the mushroom cap roofs and front landings.
The houses are 8 ” to 9″ tall and the stems are hollow, with walls of 1/2″ foam rubber. The caps are filled with fiber fill stuffing.
I can remember picking out textured and knobby fabric for the stems, caps and chimneys. It was good to dust them off and display them in the grass.
To keep up with new posts, please subscribe to this blog (top right column on the home page). Your contact info will not be sold or shared. If you’d like to see more frequent photos tracking the projects in my studio, please follow me on Facebook and/or Instagram.
This year, my home town of Falmouth, Mass. will be celebrating Katherine Lee Bates’ 150th birthday. She was born in Falmouth and was best known for writing the words to “America the Beautiful”. There’s a street named after her, our health food store is called Amber Waves and the bike path is named the Shining Sea Bikeway. On a beautiful spring morning, I stopped by and took some pictures of her statue in front of the library, along with some very blossomy cherry trees.
This wooden rabbit has been around since my childhood and may have been my father’s toy in the 1920’s. The front leg joints have been repaired with a knotted cord. At about 4″ long, it’s easily held and manipulated by a child. I love the simple and durable form.
This selection of hearts begins with a sleeping cat on a heart covered bed spread from my book In the Heart. Then there is a felt balsam pillow and a heart pin covered in french knots, both projects from my how-to book, Felt Wee Folk. The last two are a chain stitched heart that’s part of the endpapers and a heart tart from “The Queen of Hearts” nursery rhyme (see in this post) from my upcoming book, Pocketful of Posies (Sept. 2010). The original illustrations will be shown in a traveling exhibition which you can find out about here.
detail from “In the Heart” 2001
balsam pillow from “Felt Wee Folk” 2003
pin from “Felt Wee Folk”
detail from “Pocketful of Posies” 2010
detail from “Pocketful of Posies” 2010
Note: See other posts in the Close-ups series archive here.
I’ve recently (written in 2010) finished making a new crowd of boy and girl wee folk named Bud and Ivy. Here they are coming down the mountain through the snow. Directions for how to make these dolls are in my how-to book, Felt Wee Folk.
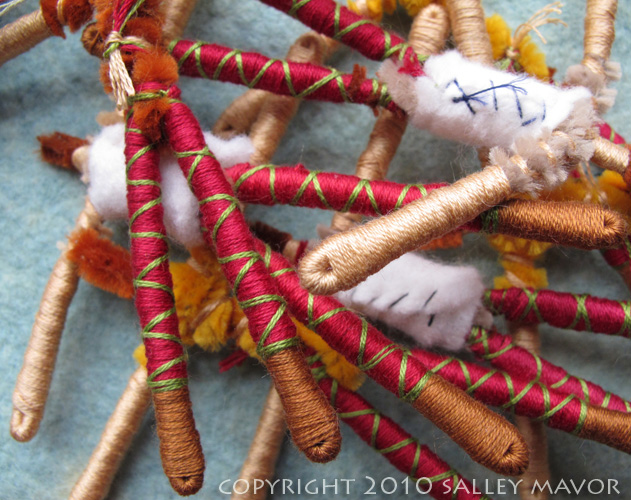
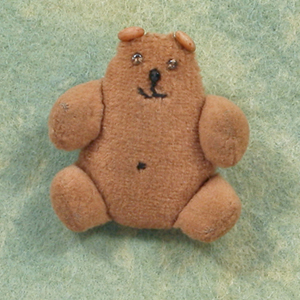
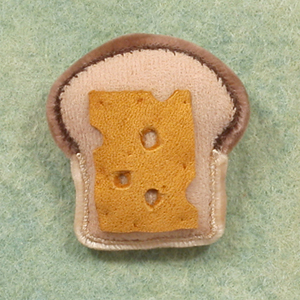
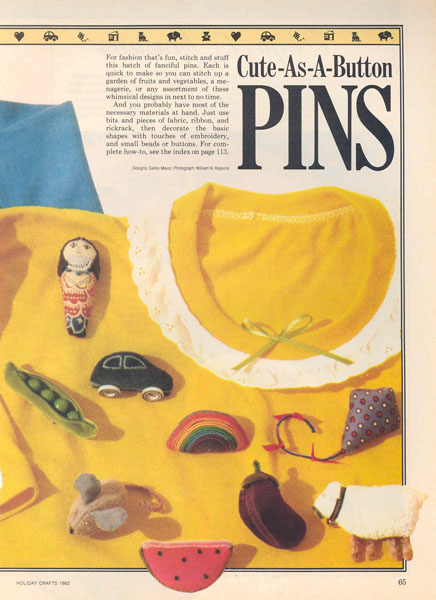
In an effort to meet people and to make more for my labor, I became a member of the Christmas Store, a seasonal cooperative in Cambridge and commuted from the Cape to do my work shifts. For a display, I built a fruit and vegetable stand with crates made out of popsicle sticks. Later, I made patterns and wrote directions on how to make the pins for the 1982 Holiday Crafts issue of Better Homes and Gardens magazine.
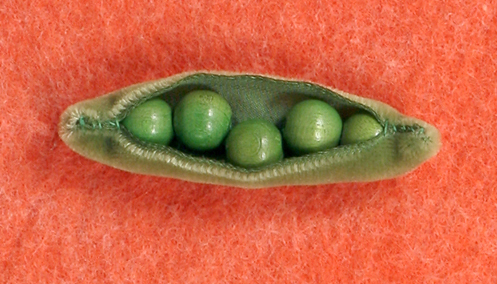
After about 5 years of mass producing the pins, I moved on to other things, including motherhood. Since then, I’ve had several business ventures, which inevitably reach a point when I’ve had to make a decision to grow or stop all together. I’ve always chosen freedom, never wanting to spend all of my time running a business, even though I see the promotional part as an important element of a creative project. And it’s not as if I walked away from a gold mine. At the wholesale price, I was making so little for my time. Being an artist means coming up with new ideas and making the same thing over and over has therapeutic, although limited appeal. Even the idea of hiring others to do the work made me nervous. I knew that I would be a miserable boss, having to hold others to a high standard of workmanship at low pay. And, I realized that I am happiest while making things myself! I have no exact record of how many pins I made, but it must have been well over a thousand. Throughout, the peapod was a best-seller, which was ironic because it was the simplest and fastest to make of all.
To keep up with new posts, please subscribe to this blog. Your contact info will not be sold or shared. If you’d like to see more frequent photos tracking the projects in my studio, please follow me on Facebook and/or Instagram.
I started adding new designs and soon had 20 different pins. It was time to be more serious about marketing and I decided that a catalog was needed to reach more people. A former classmate from RISD, Niki Bonnett, volunteered to develop some promotional materials for my business.
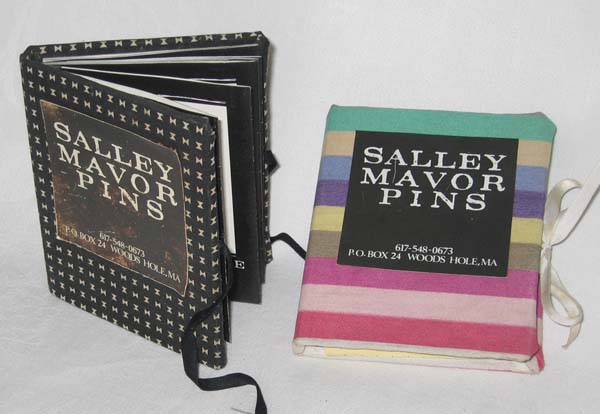
Pin catalog designed by Niki Bonnett, 1980
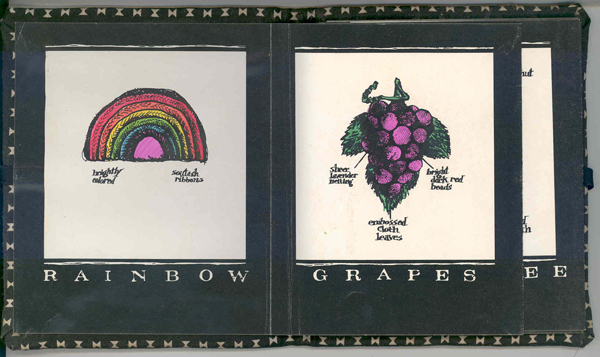
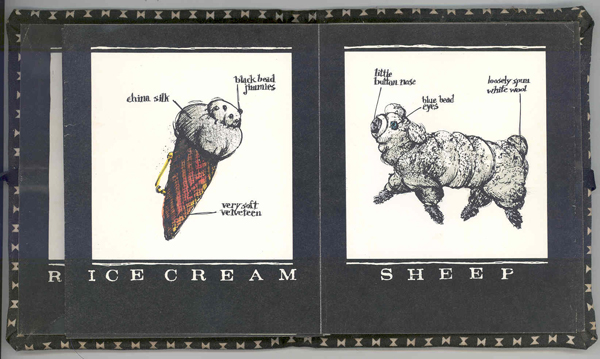
Niki devised a poster that could be cut up in strips and glued together in such a way as to make an accordion-fold catalog. She made drawings, with descriptive hand written notes identifying materials and features of each pin. For the sake of economy, the poster was printed in black and white, and I hand colored the pin illustrations with markers. I constructed a cover for each catalog out of cloth-covered cardboard. Then I glued the beginning and end of the accordion folded pages to the inside of the front and back covers, along with ribbon ties. The finished catalog size was 4″ x 3″.
pin poster designed by Niki Bonnett,1980
In a recent conversation from her home in Ashville, NC, Niki remembers this about the project: “When I did your job, I was working at Hill, Holliday, Connors, Cosmopulos (HHCC), a well-known ad agency in Boston. I was doing freelance work at night to build my portfolio and I loved your pins. For your project, I designed a poster with all the art and type as white on a black background. Once printed, it could be cut up into horizontal strips that were then hand colored, accordion folded, taped together and hand-bound into a fabric wrapped cover (also handmade) that tied shut with a bit of ribbon. Obviously, back then I didn’t think about my time as part of the cost of doing the project, and I had plenty of it back then too! All it cost was the printing of some black and white posters! Those posters looked great on their own, and it was lots of fun making those books; they were little gems.
In addition to the design and production of the piece, I also did all the illustrations of the pins, the calligraphy naming each pin style. I got one of the typesetter reps who visited HHCC every day to give me an entire alphabet of uppercase, metal letters (“slugs”? I forget the terminology for those bits of lead type). The letters were tiny, maybe 12 point. I used a brayer to roll black acrylic paint out on a piece of glass and then hand printed each tiny letter on rough newsprint until I got the “perfect” letter. Once I chose the letters for the entire alphabet, I blew them up to four times the original size on the Photostat machine (Good thing I had a key to that ad agency! Can you imagine being able to sneak back into a large office now to work on your own stuff from 8 to midnight?). That became my typeface from which I made all the “typeset” words. Needless to say, there was A WHOLE LOT of cutting and pasting goin’ on!
House Pin 1977
I was very proud of that project and I know I still have at least one of those books and some pins tucked away somewhere all these years later. I sure do miss the hands-on way design was done before computers; that’s what eventually caused me to quit my graphic design business in favor of making art quilts. I never made the kind of money I made in commercial art with my textile artwork, but it was so enjoyable… the creativity and the “making” of things!”
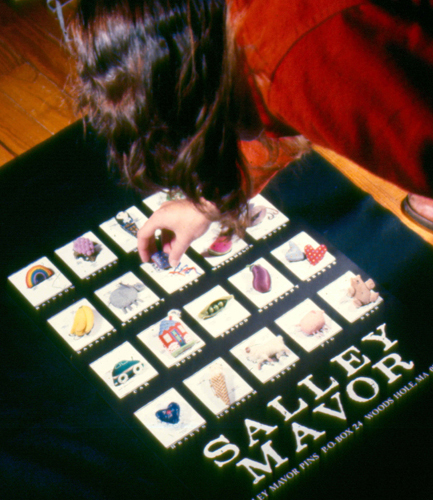
Salley arranging pins on top of poster, designed by Niki Bonnett, 1980
Mummy pin
Eggplant Pin 1977
My pins were included in Yankee’s Feb. 1981 issue, along with articles about a man who played music on a saw and someone who repaired oriental rugs. Laura Gross wrote, “Sparkling beads and soft velvet compliment her intricate hand-sewn and embroidered Egyptian mummies, palm trees, hearts, carrots, etc. Prices range from $4.00 to $12.00, and her custom work starts at $15.00. In the past, Salley has specially made banjos, cats, mermaids, New York town houses, corn-on-the-cob and a doctor’s bag, complete with gold initials.” I don’t recall making the doctor’s bag, but I do remember sewing on individual yellow seed beads for kernels of corn.
pin catalogs, 1980
People wrote in response to the article and I sent out free catalogs in manila envelopes. I can’t remember how many orders came in, but it was enough to keep me busy for a while.
To keep up with new posts, please subscribe to this blog. Your contact info will not be sold or shared. If you’d like to see more frequent photos tracking the projects in my studio, please follow me on Facebook and/or Instagram.