Frosty Morning: part 2 (branches)

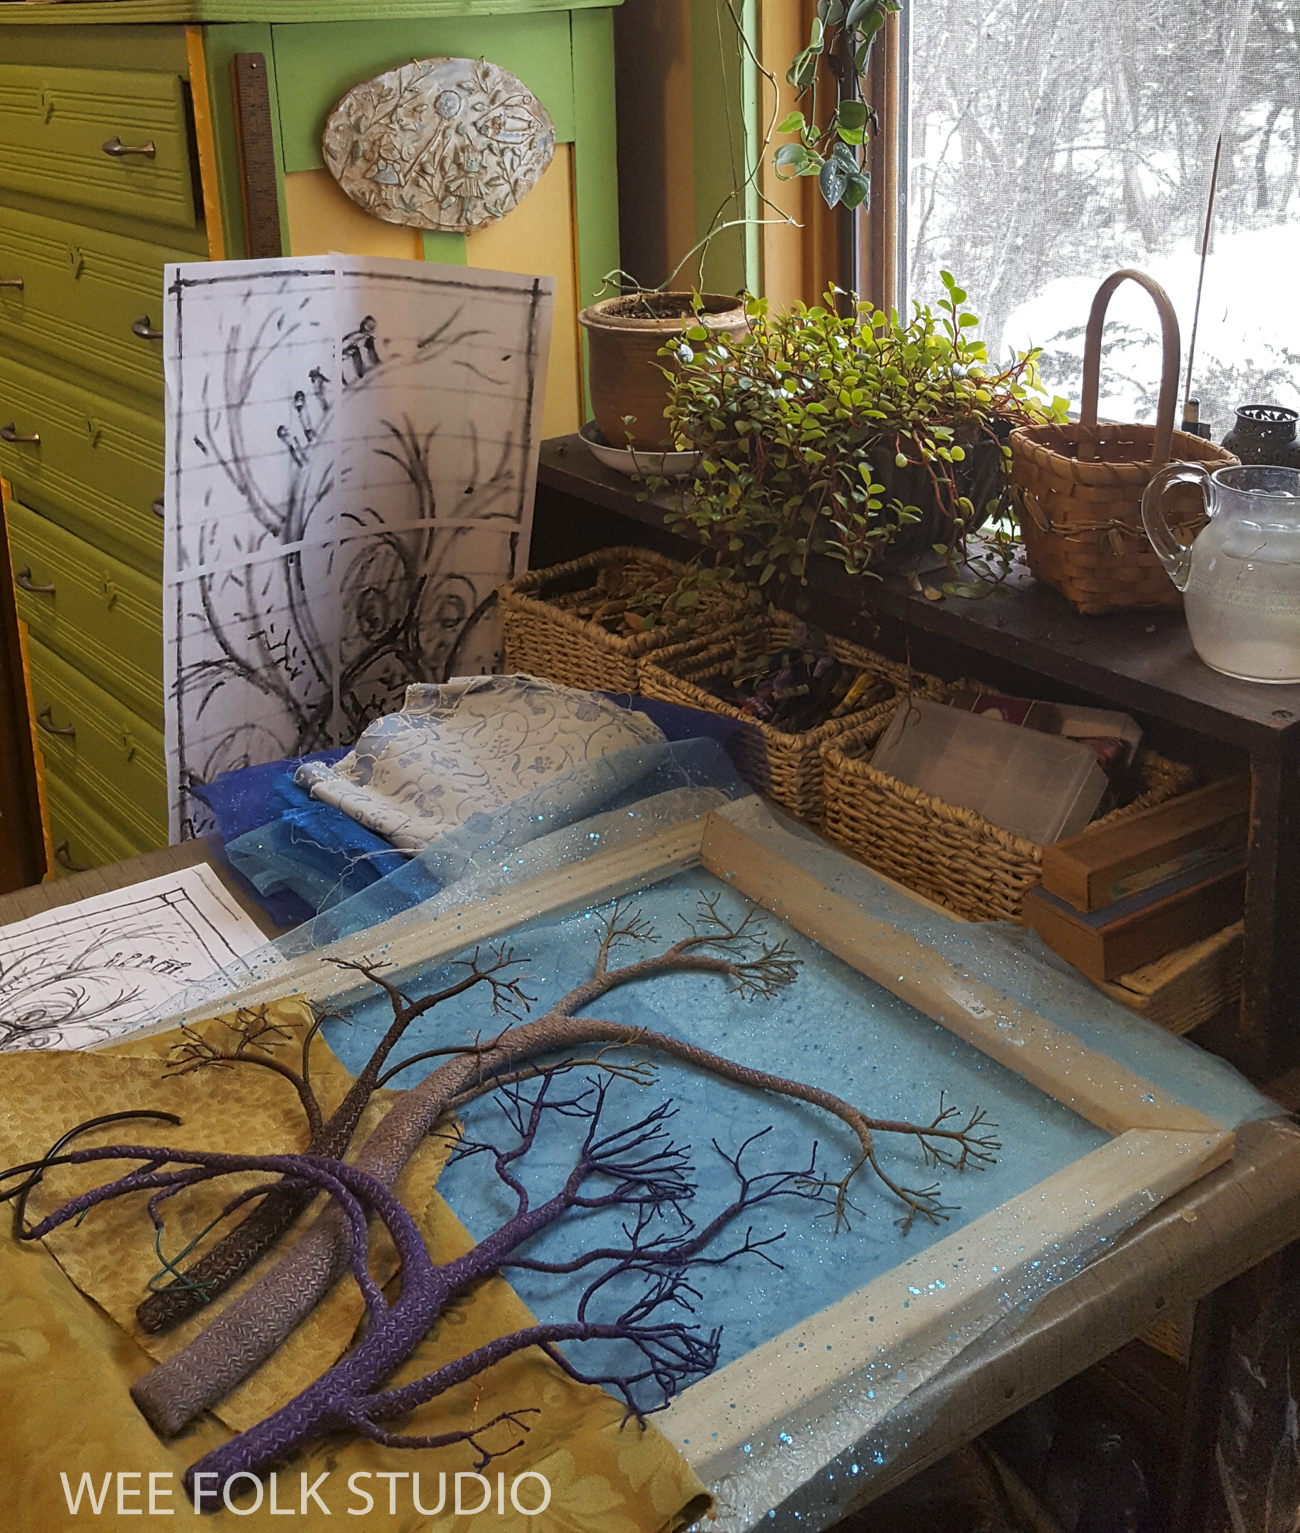
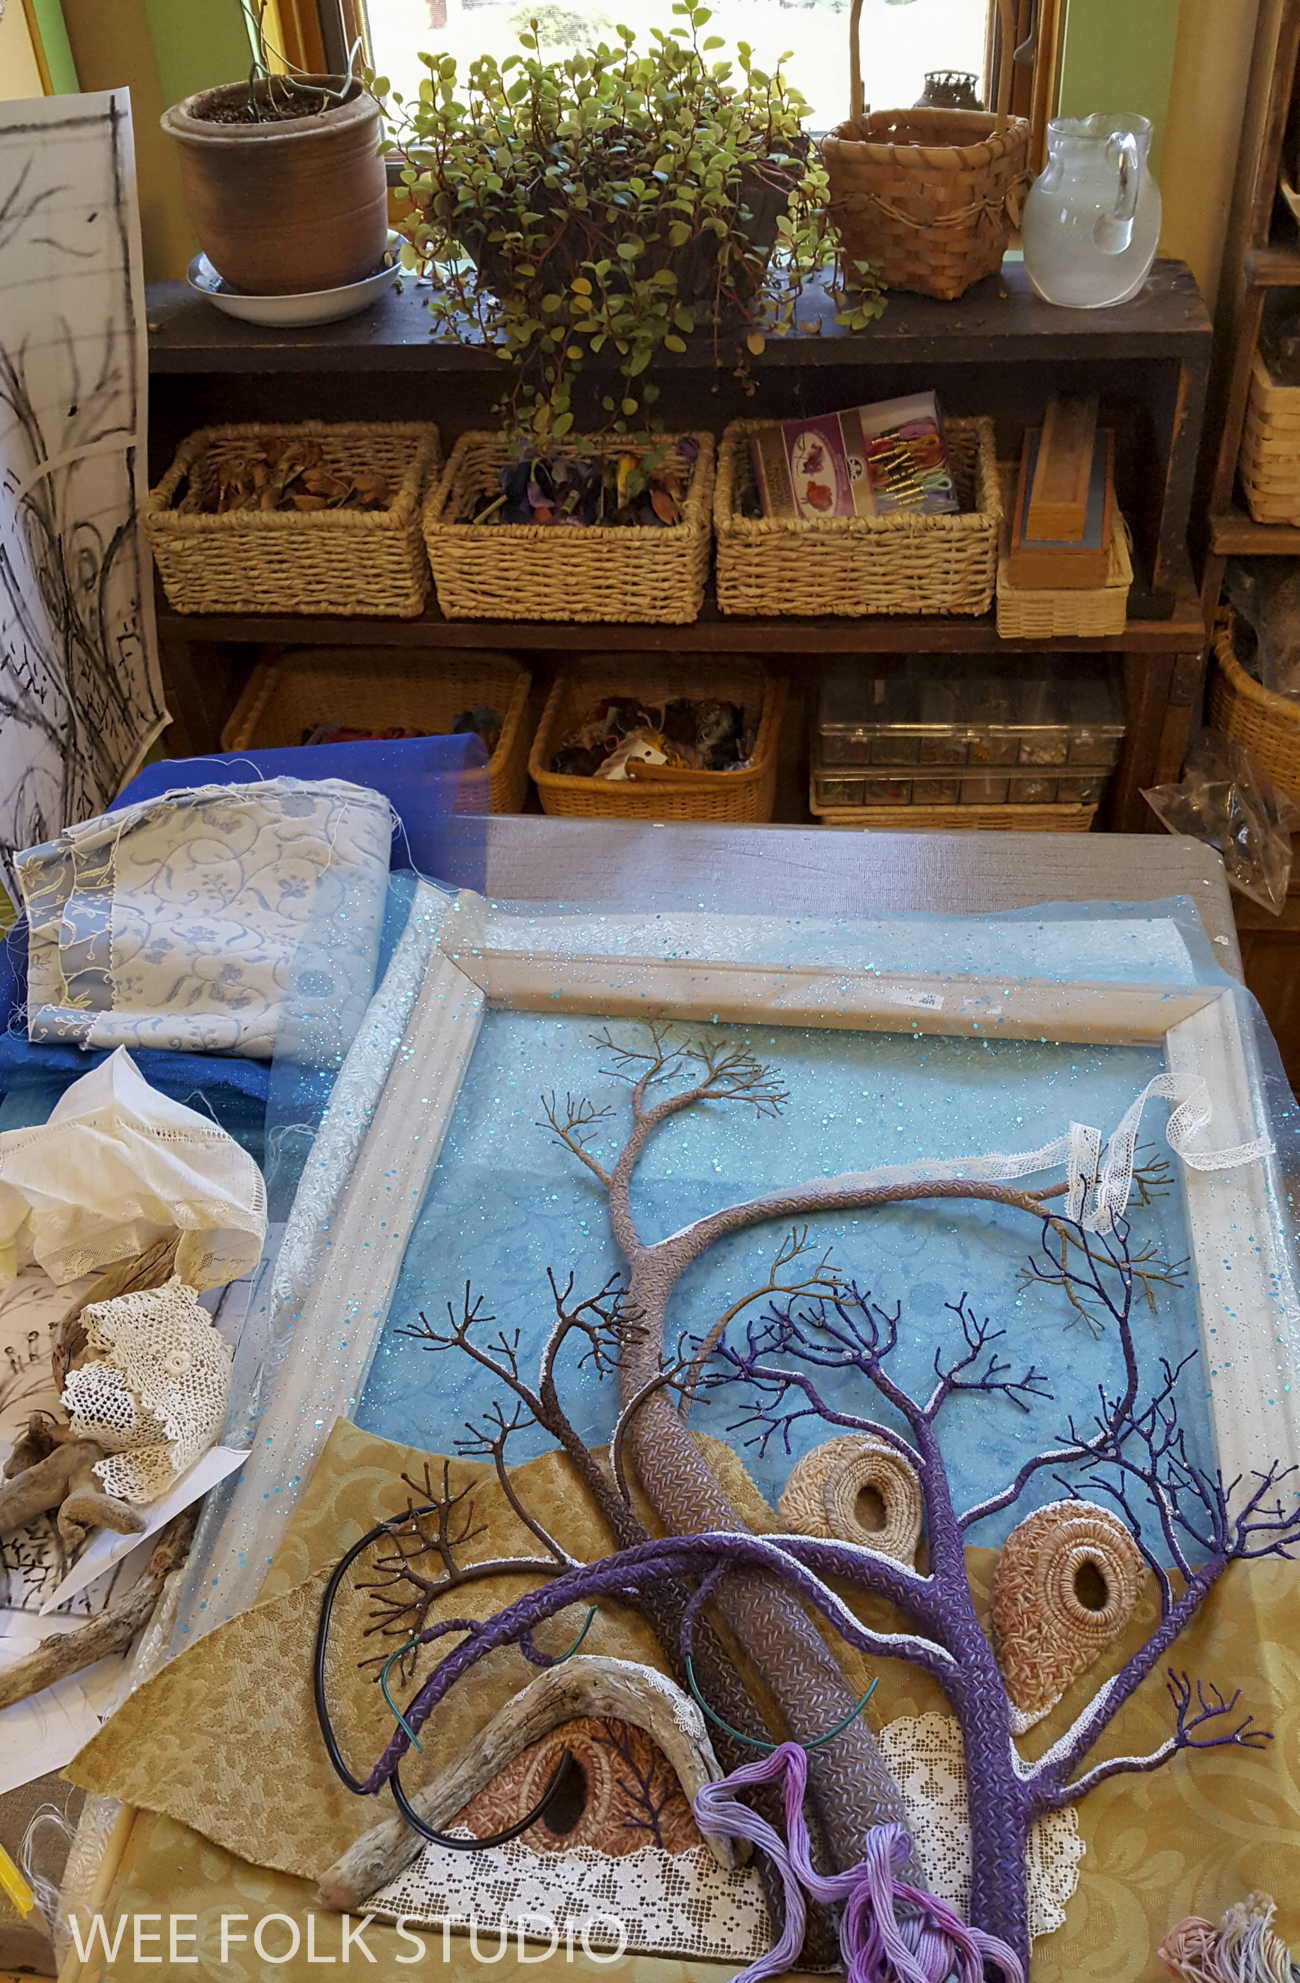
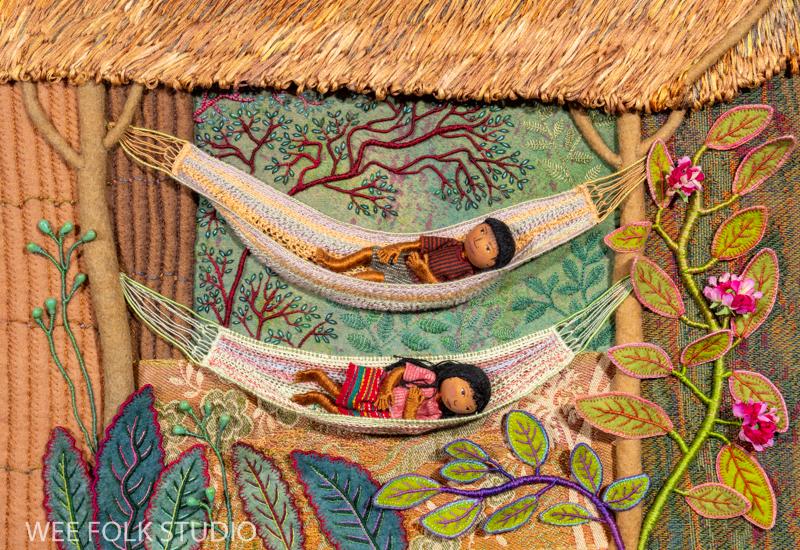
Part 2 in the Frosty Morning series gives a close look at how I formed and wrapped the wire tree branches, from the inside out. Part 1 was about making the tree trunks.

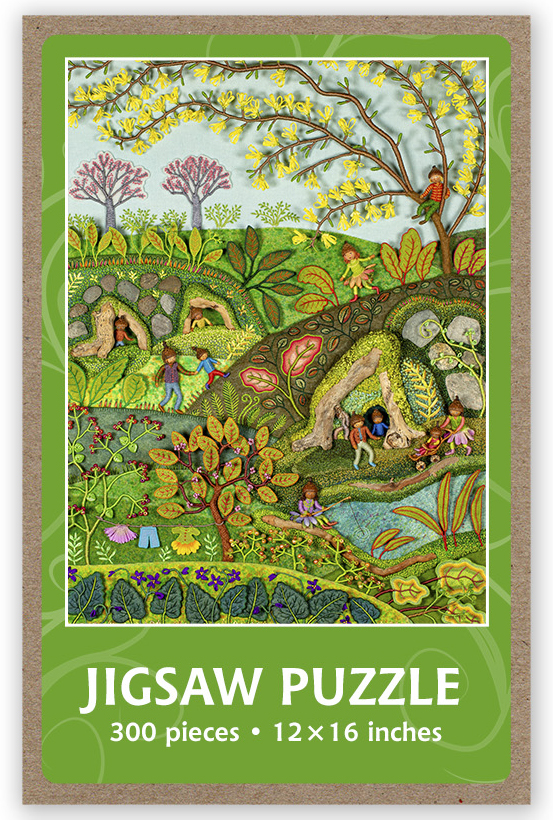
This year, I’m working on a group of seasonal landscapes that capture the wonder and magic of the natural world, both real and imagined. Frosty Morning, Mossy Glen, Summertime and Harvest Time are available as jigsaw puzzles and note cards in my shop here

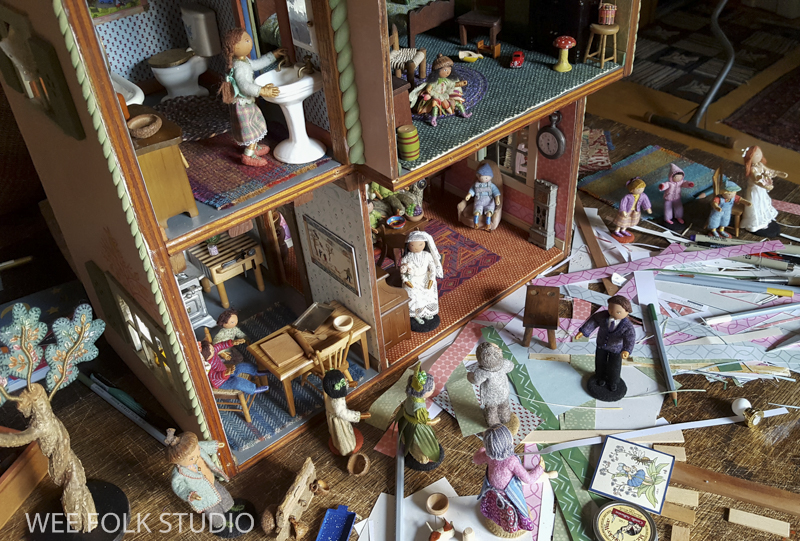
I started experimenting with wire branches in the mid-80’s, while exploring new ways of adding dimension to my work. The trees in the winter scene below are an early example of the same basic technique I use today.

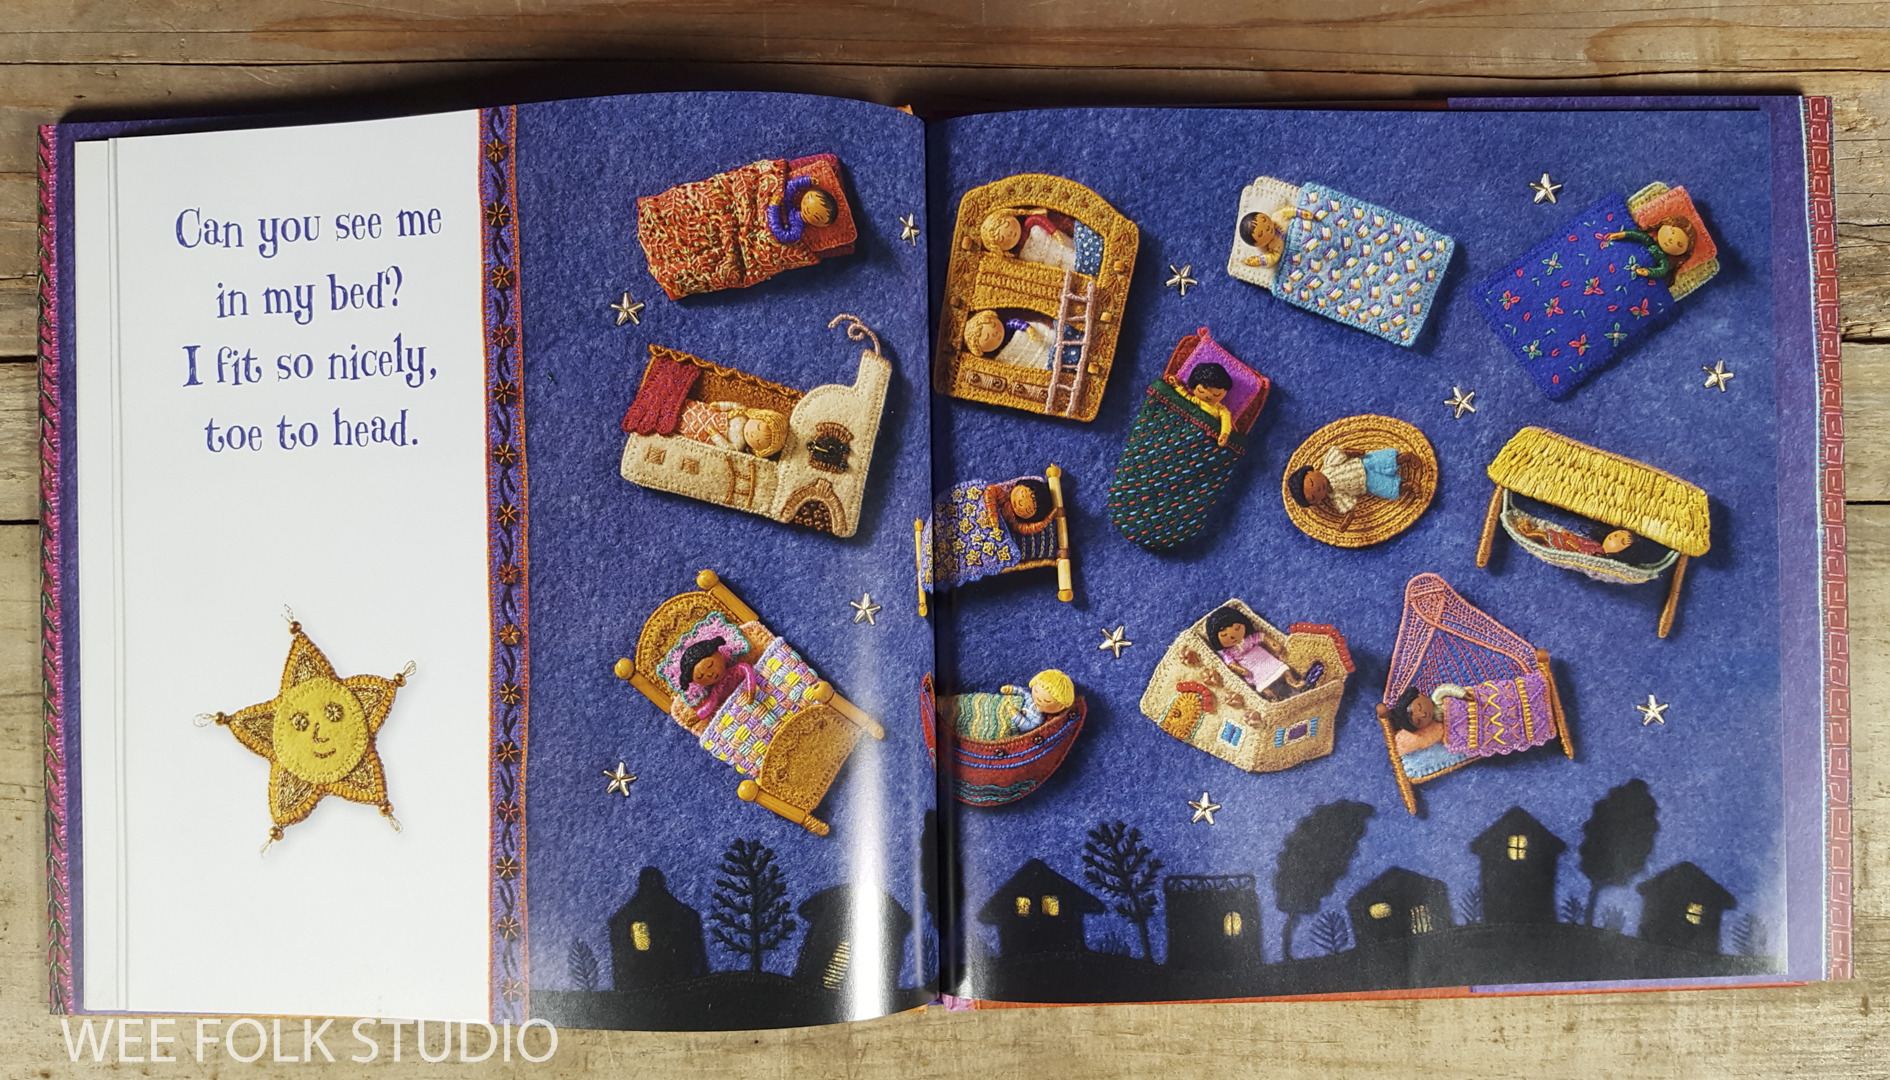
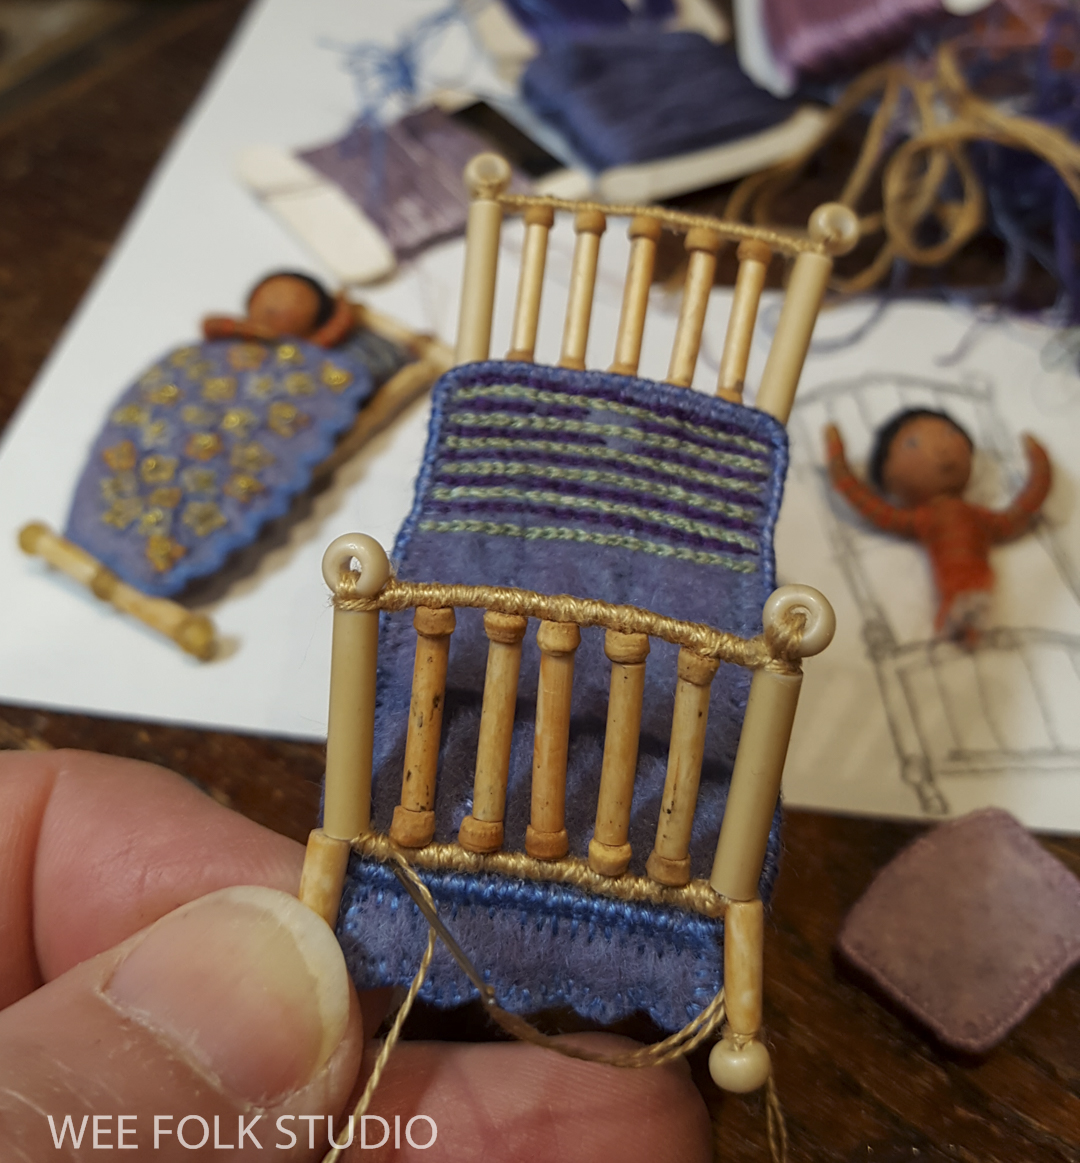
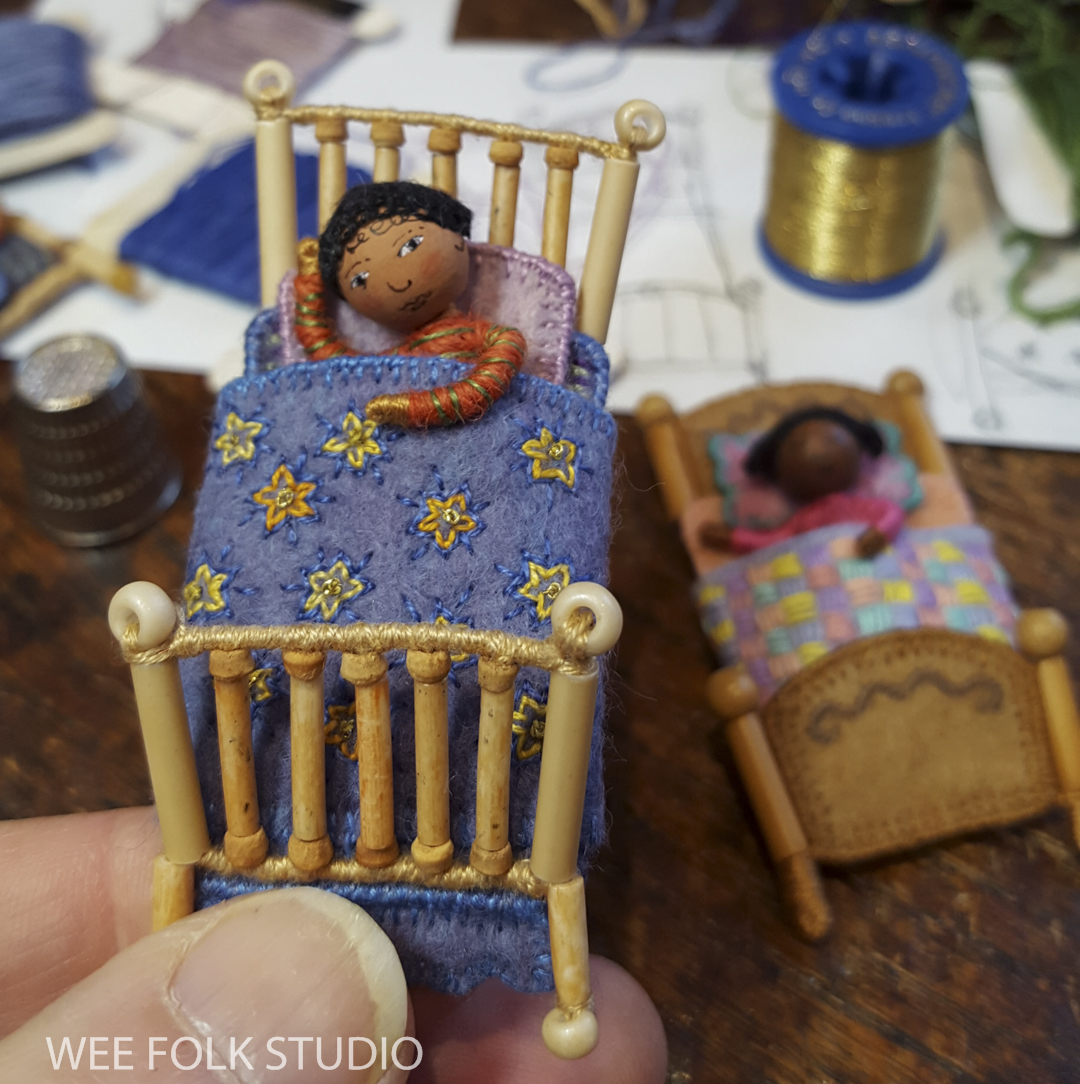
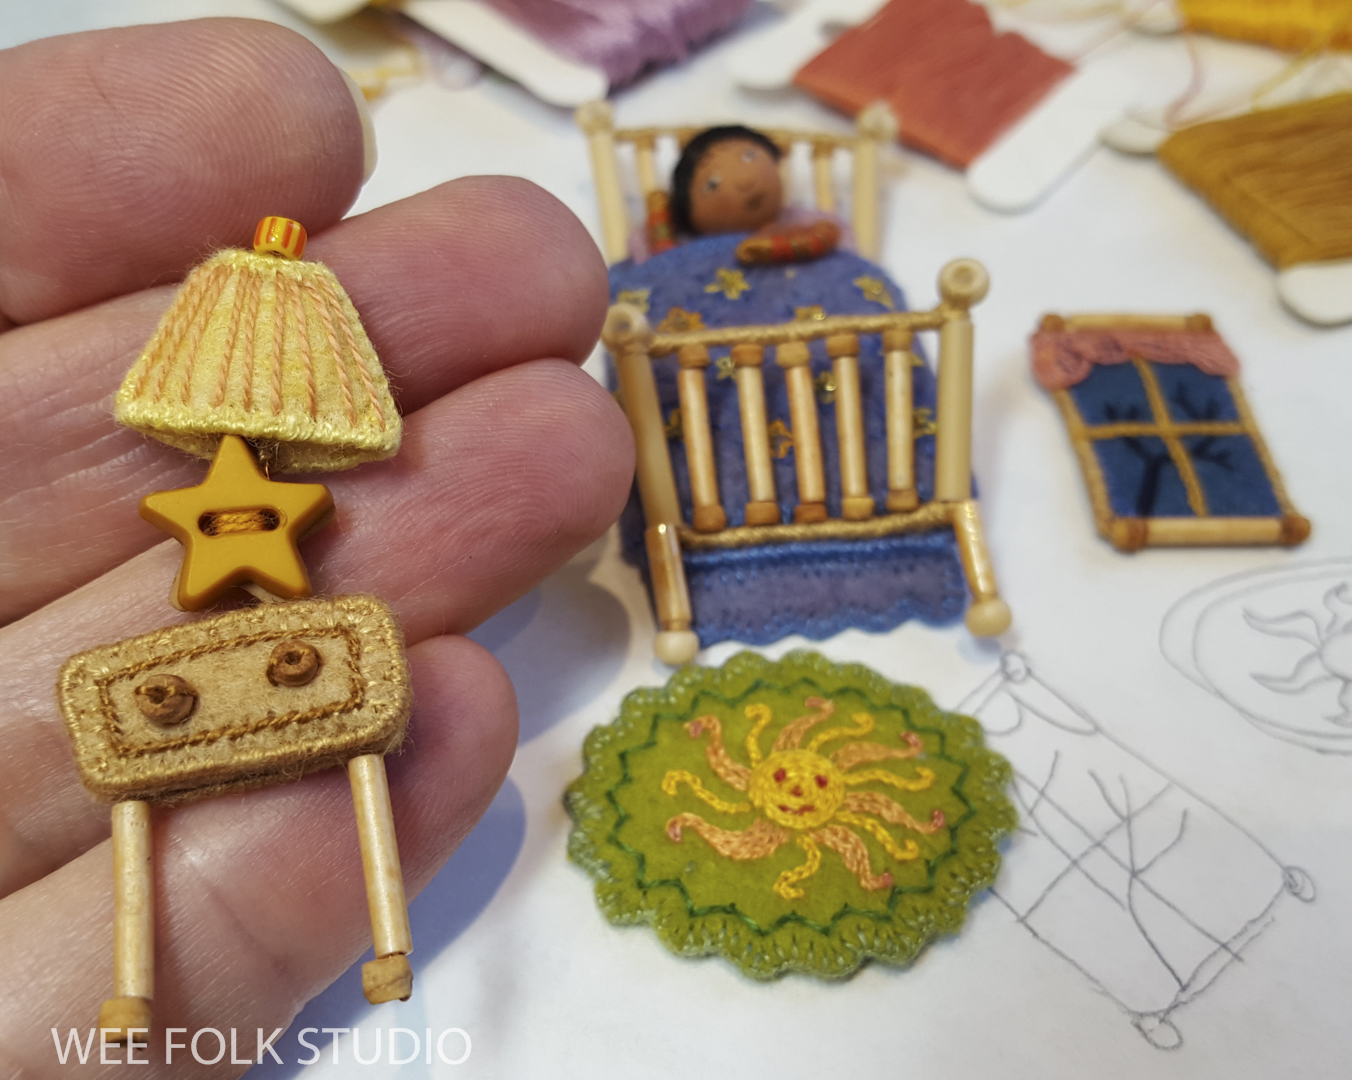
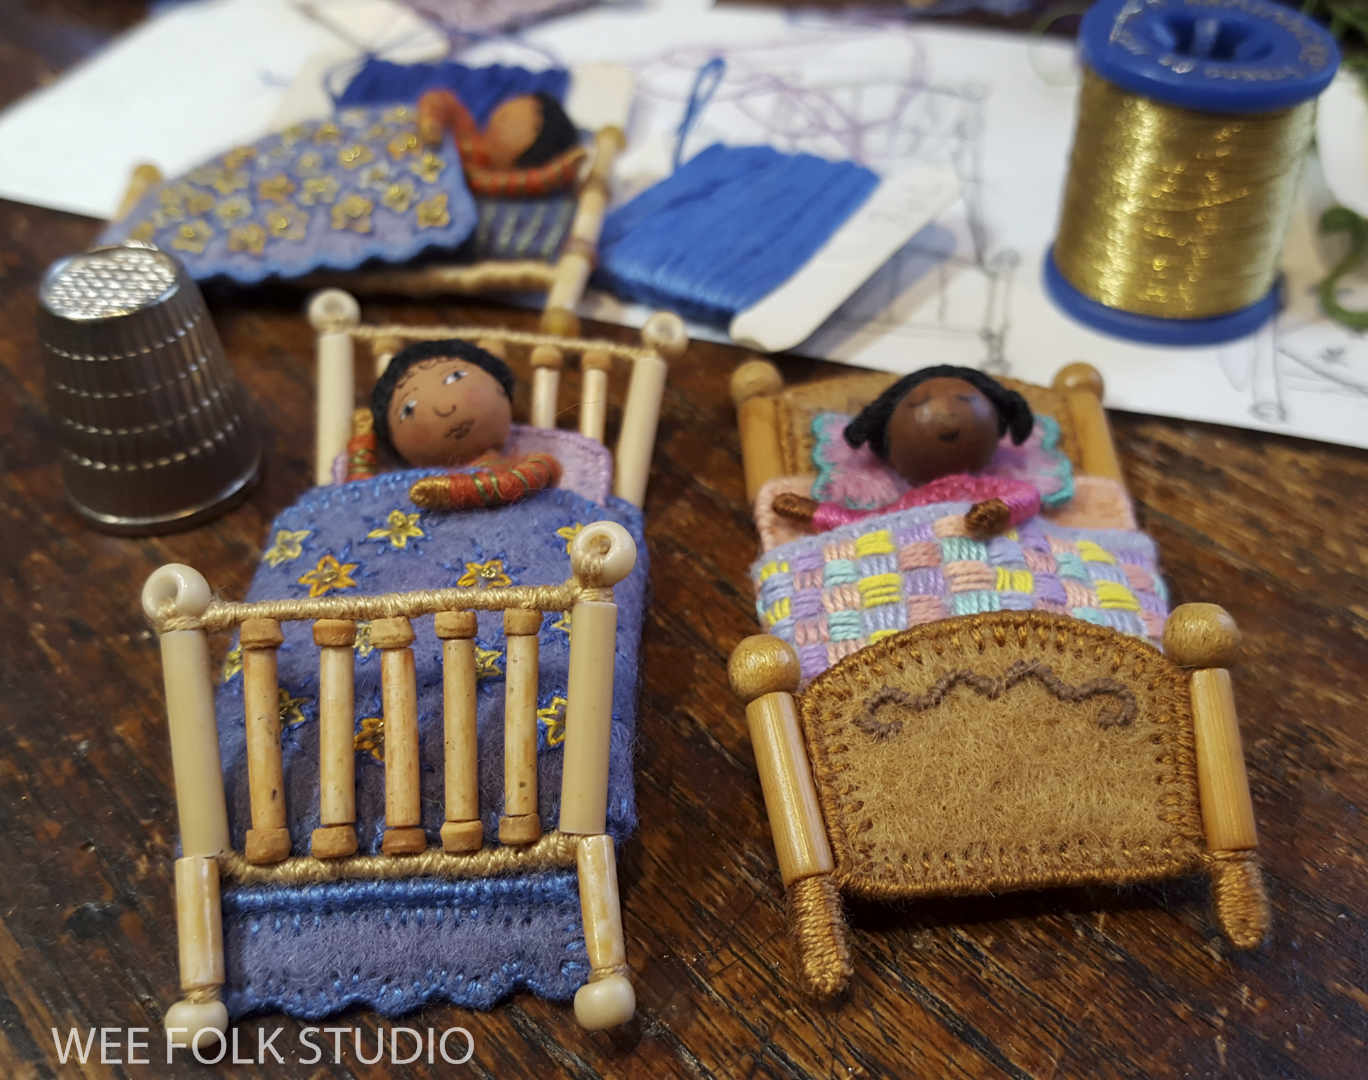
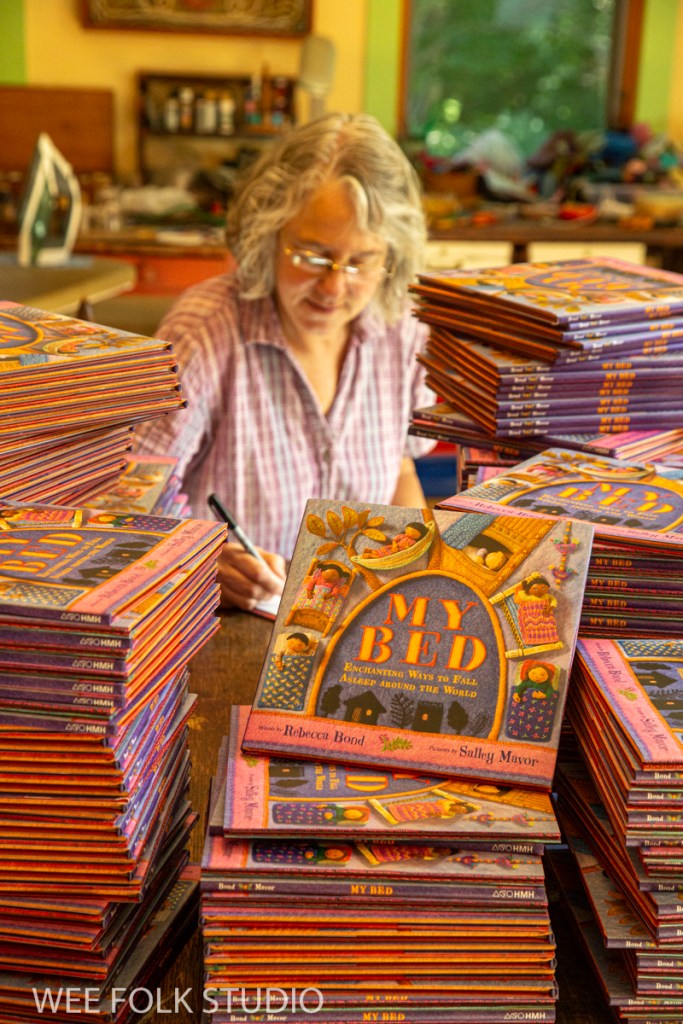
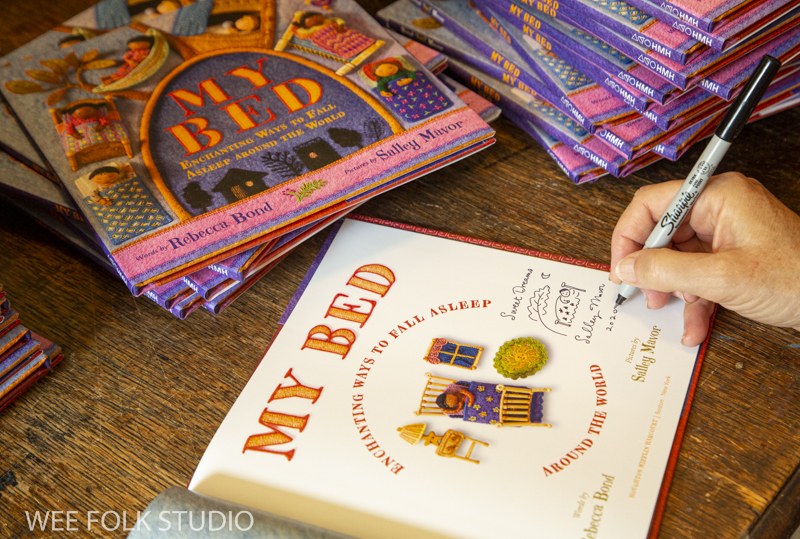
This piece from 1986, along with over 100 works spanning my 40 year career, will be included in next summer’s retrospective exhibition, WHAT A RELIEF: The Art of Salley Mavor, May 3 – Sept. 11, 2022 at the Brick Store Museum, Kennebunk, ME. Rarely seen works on loan from private collections will fill multiple galleries on the museum’s entire first floor. A large selection of sculptures, bas-relief pieces and original picture book illustrations, including the scenes from my newest book, MY BED, will also be shown.

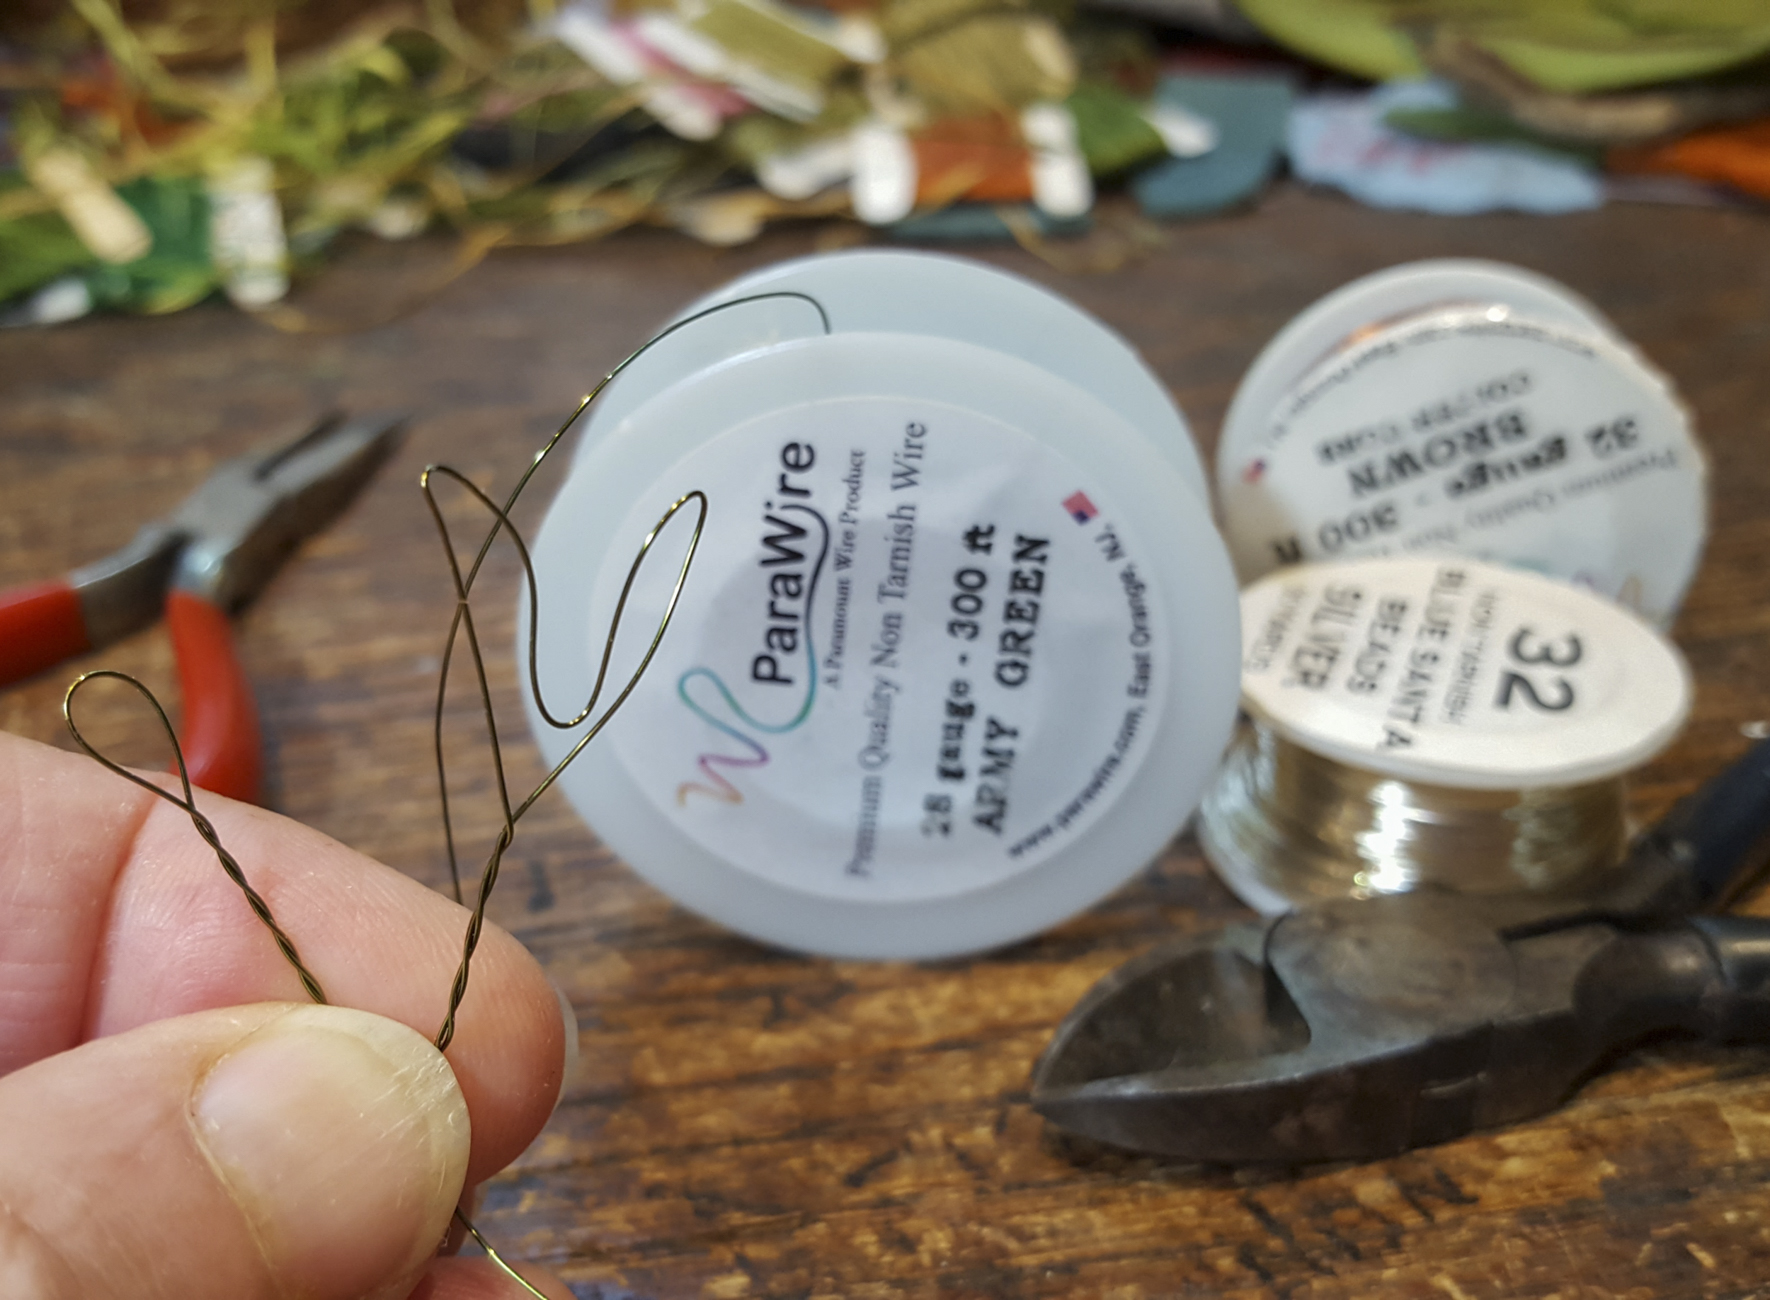
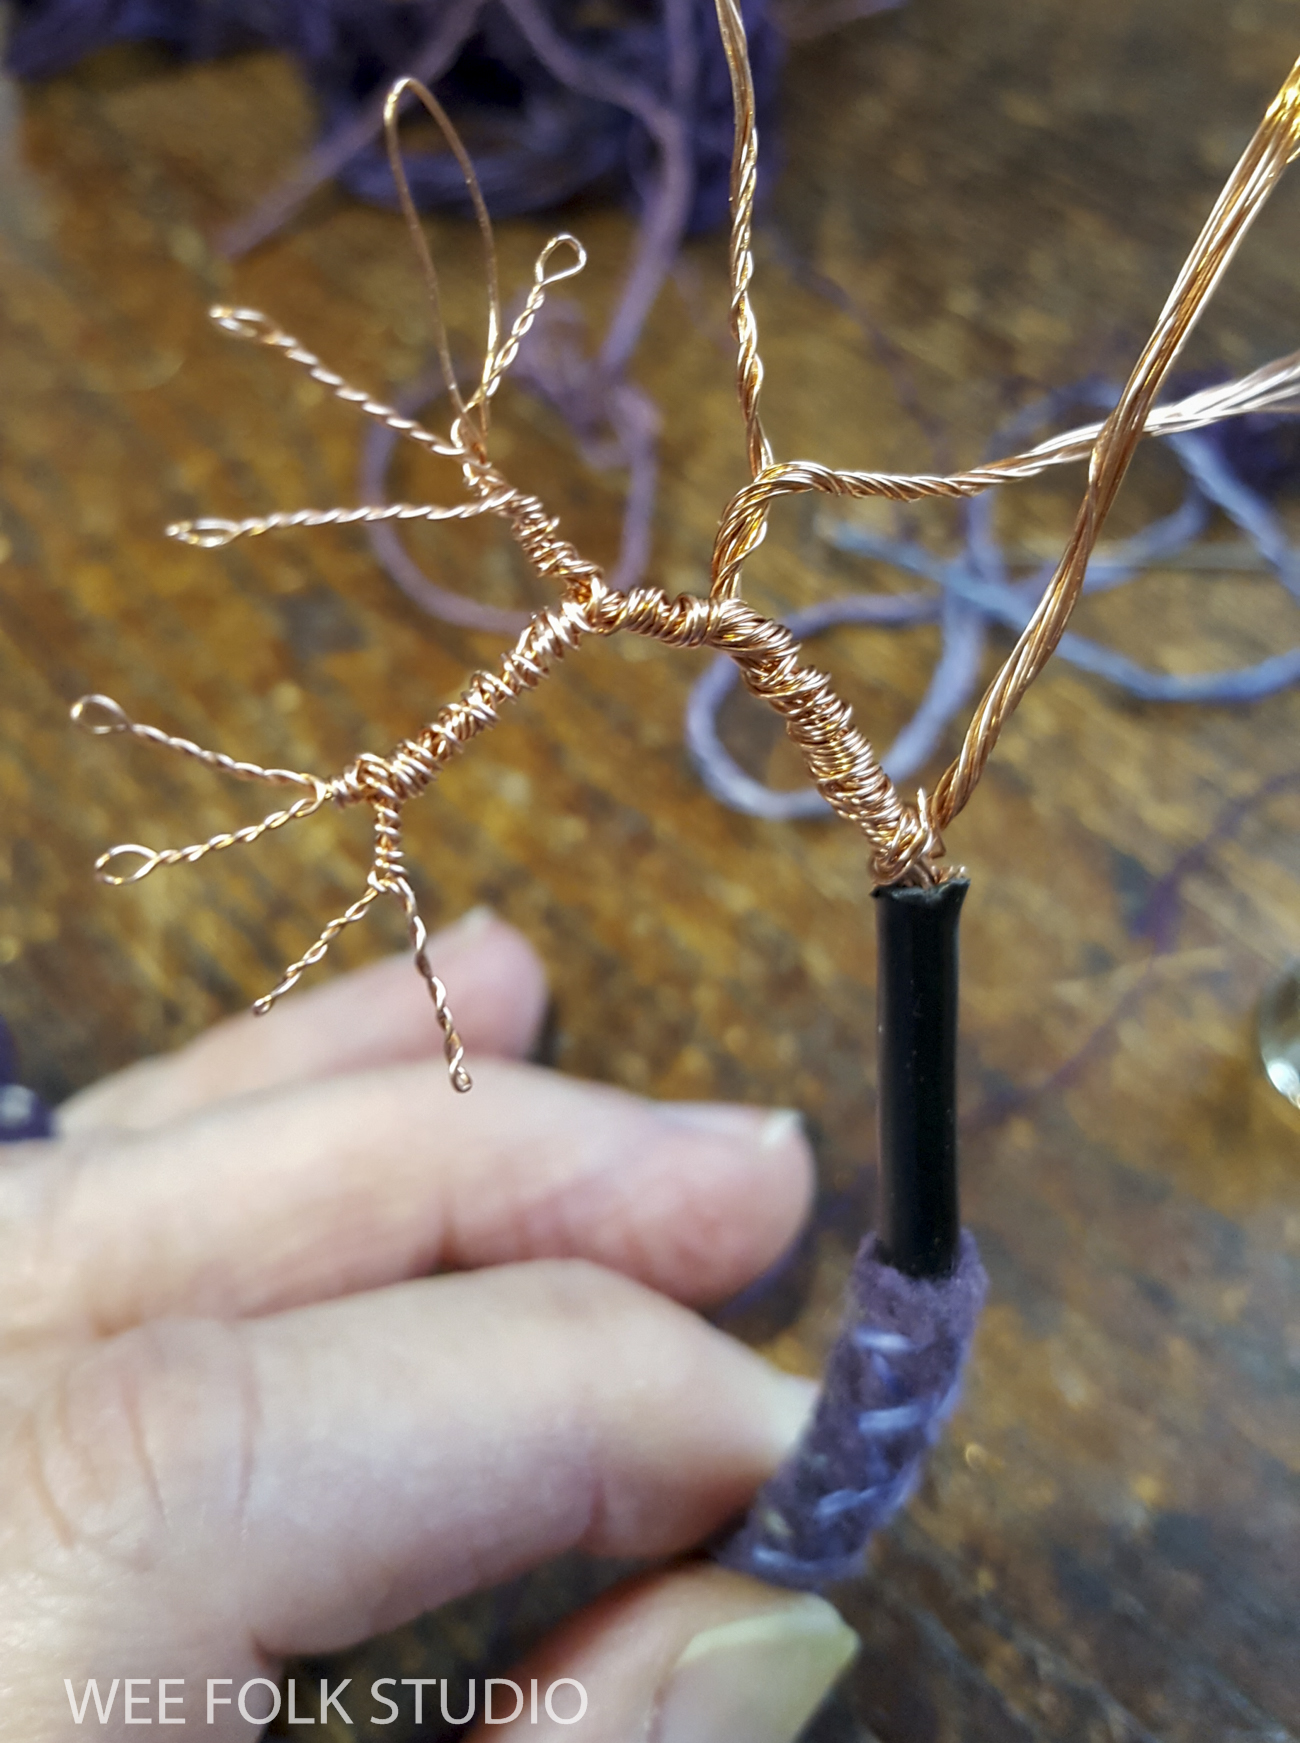
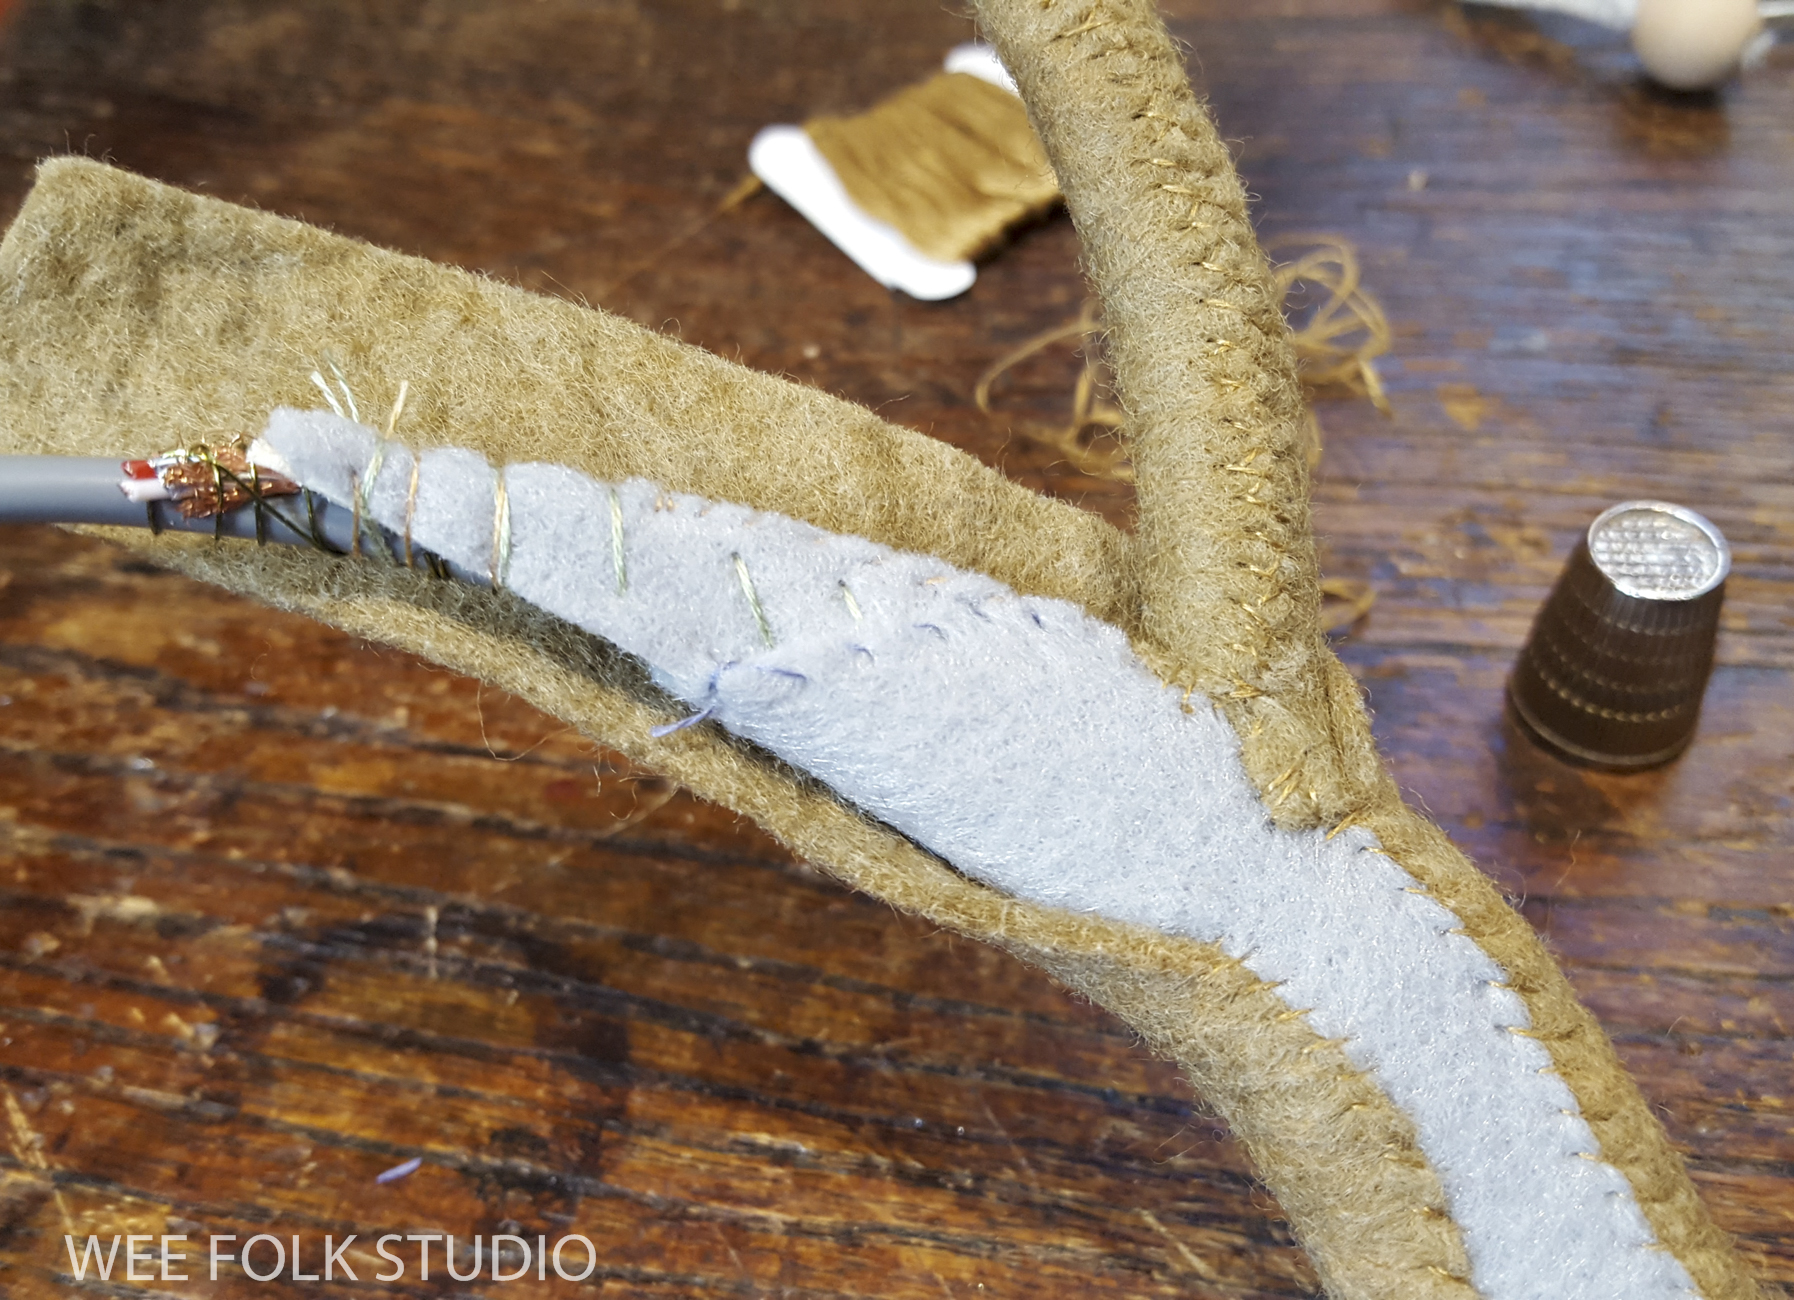
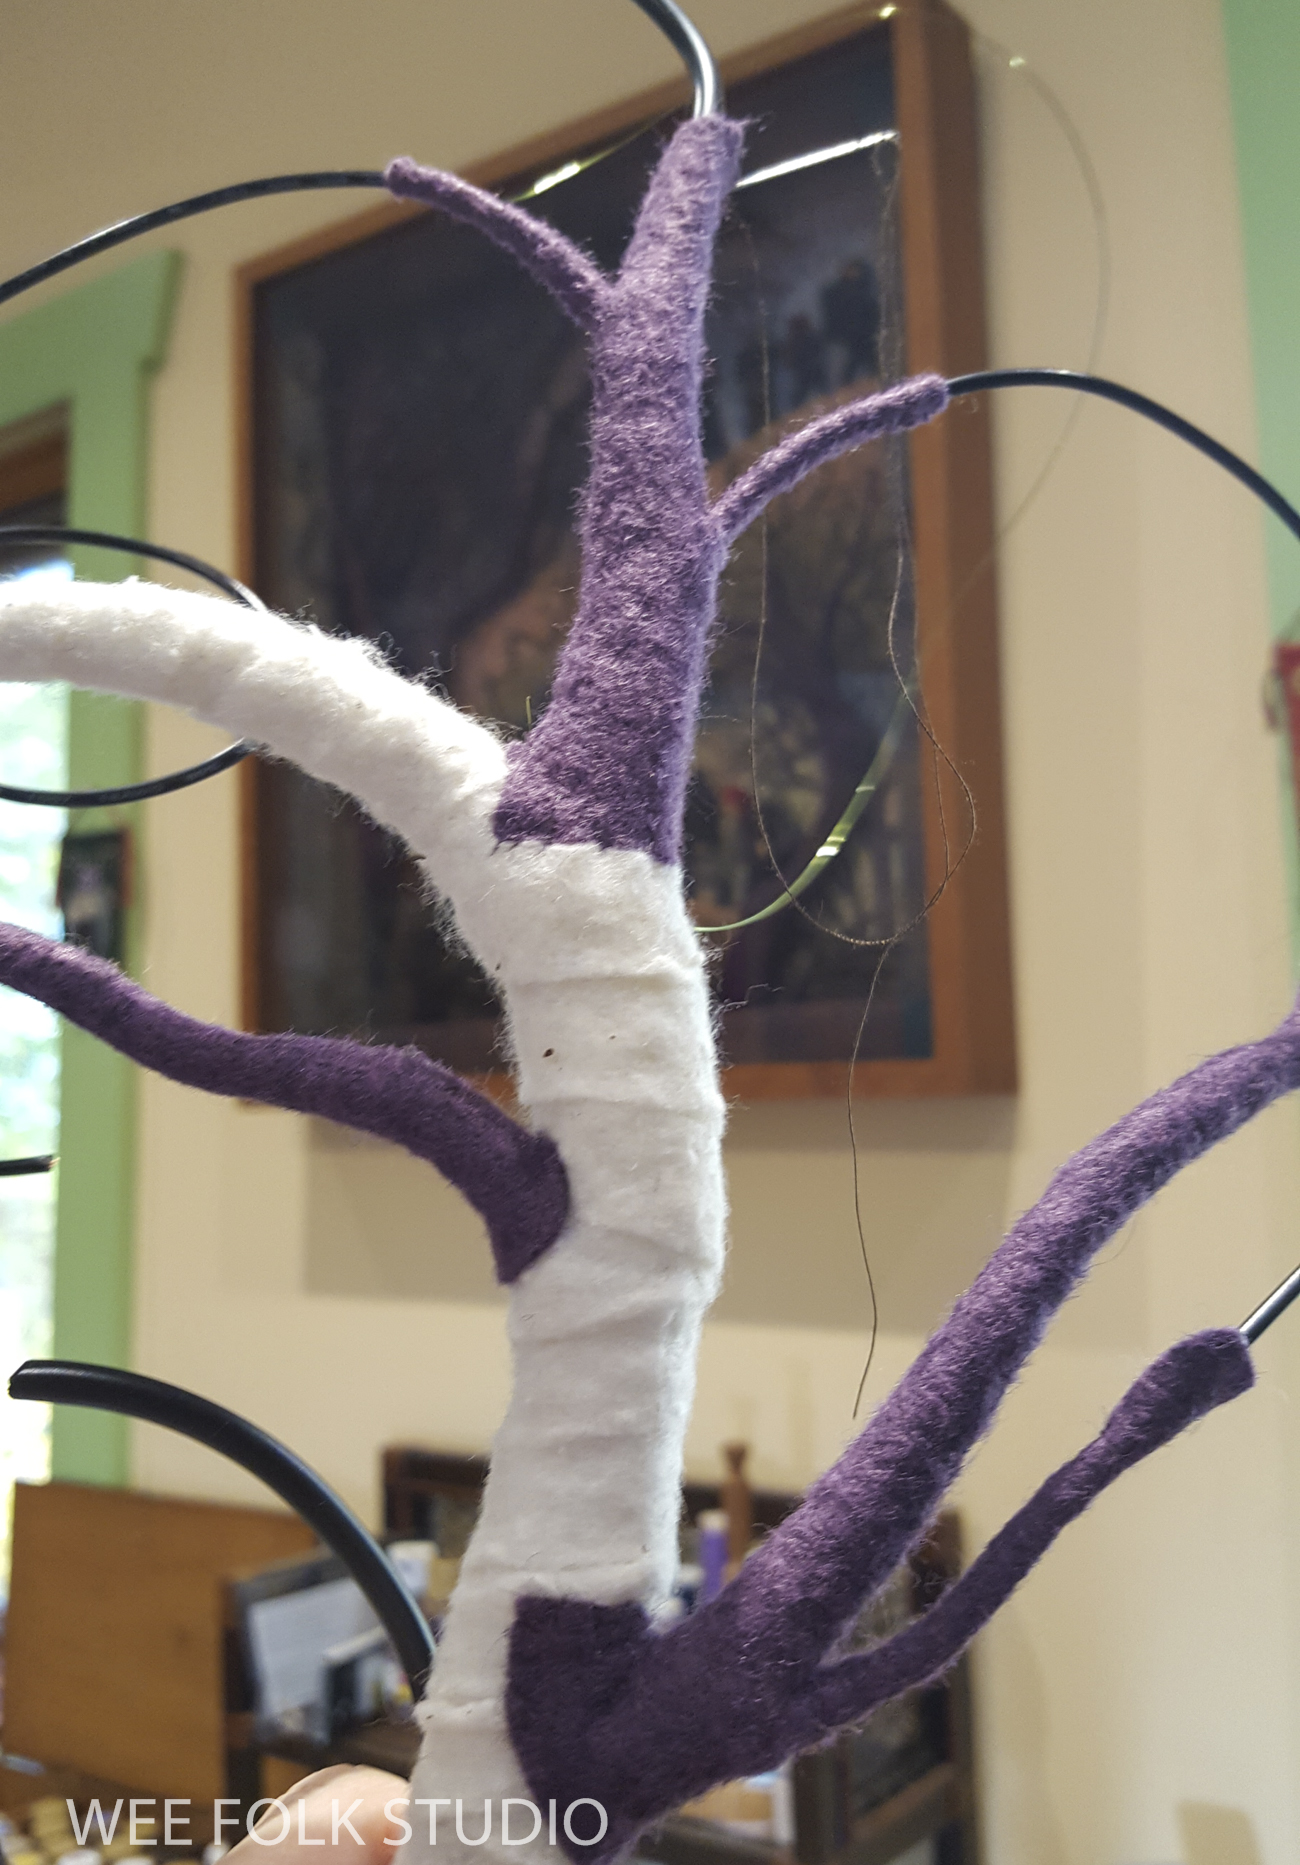
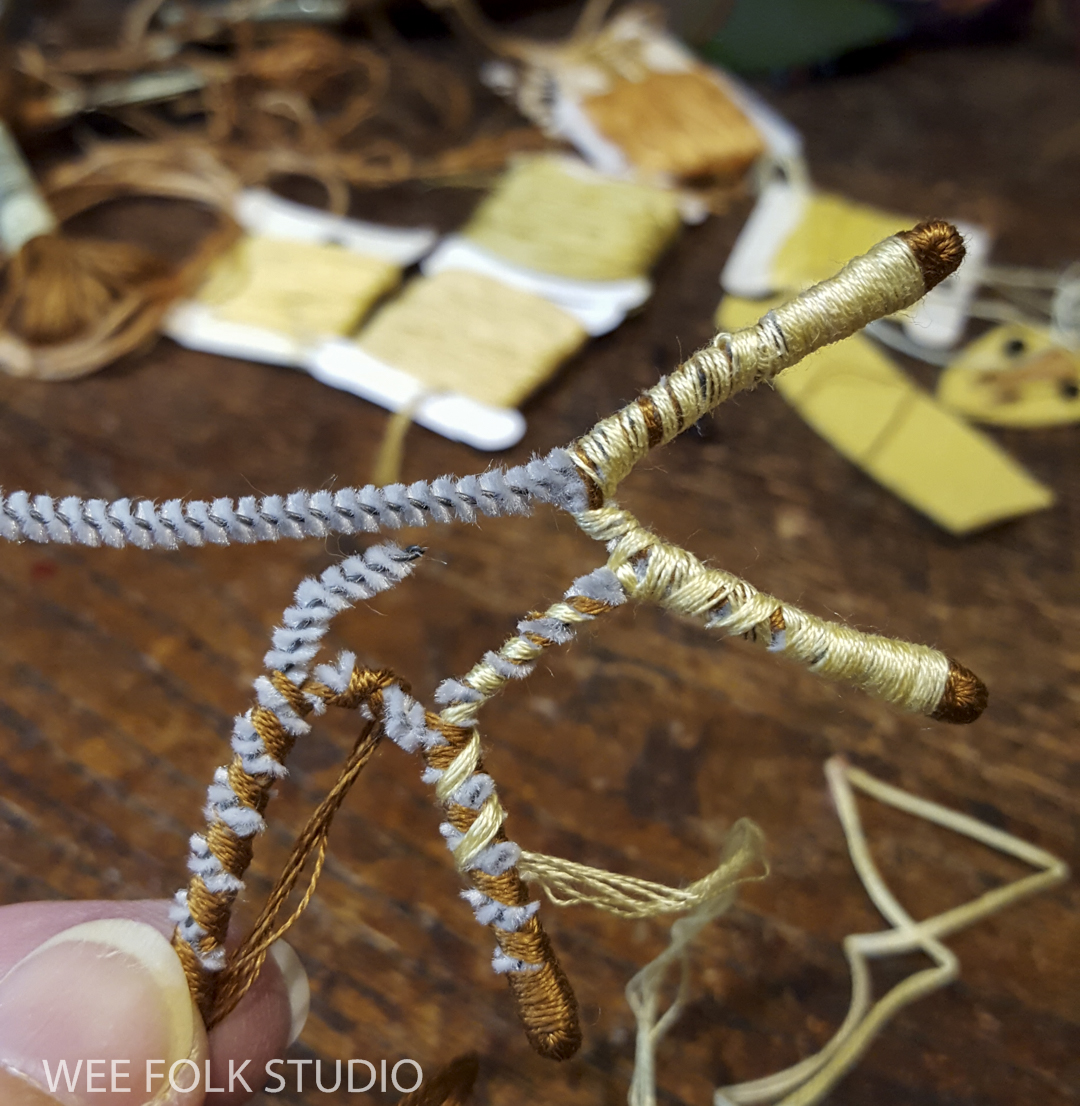
I use jewelry wire or copper filled insulated electrical wire to form tree branches.

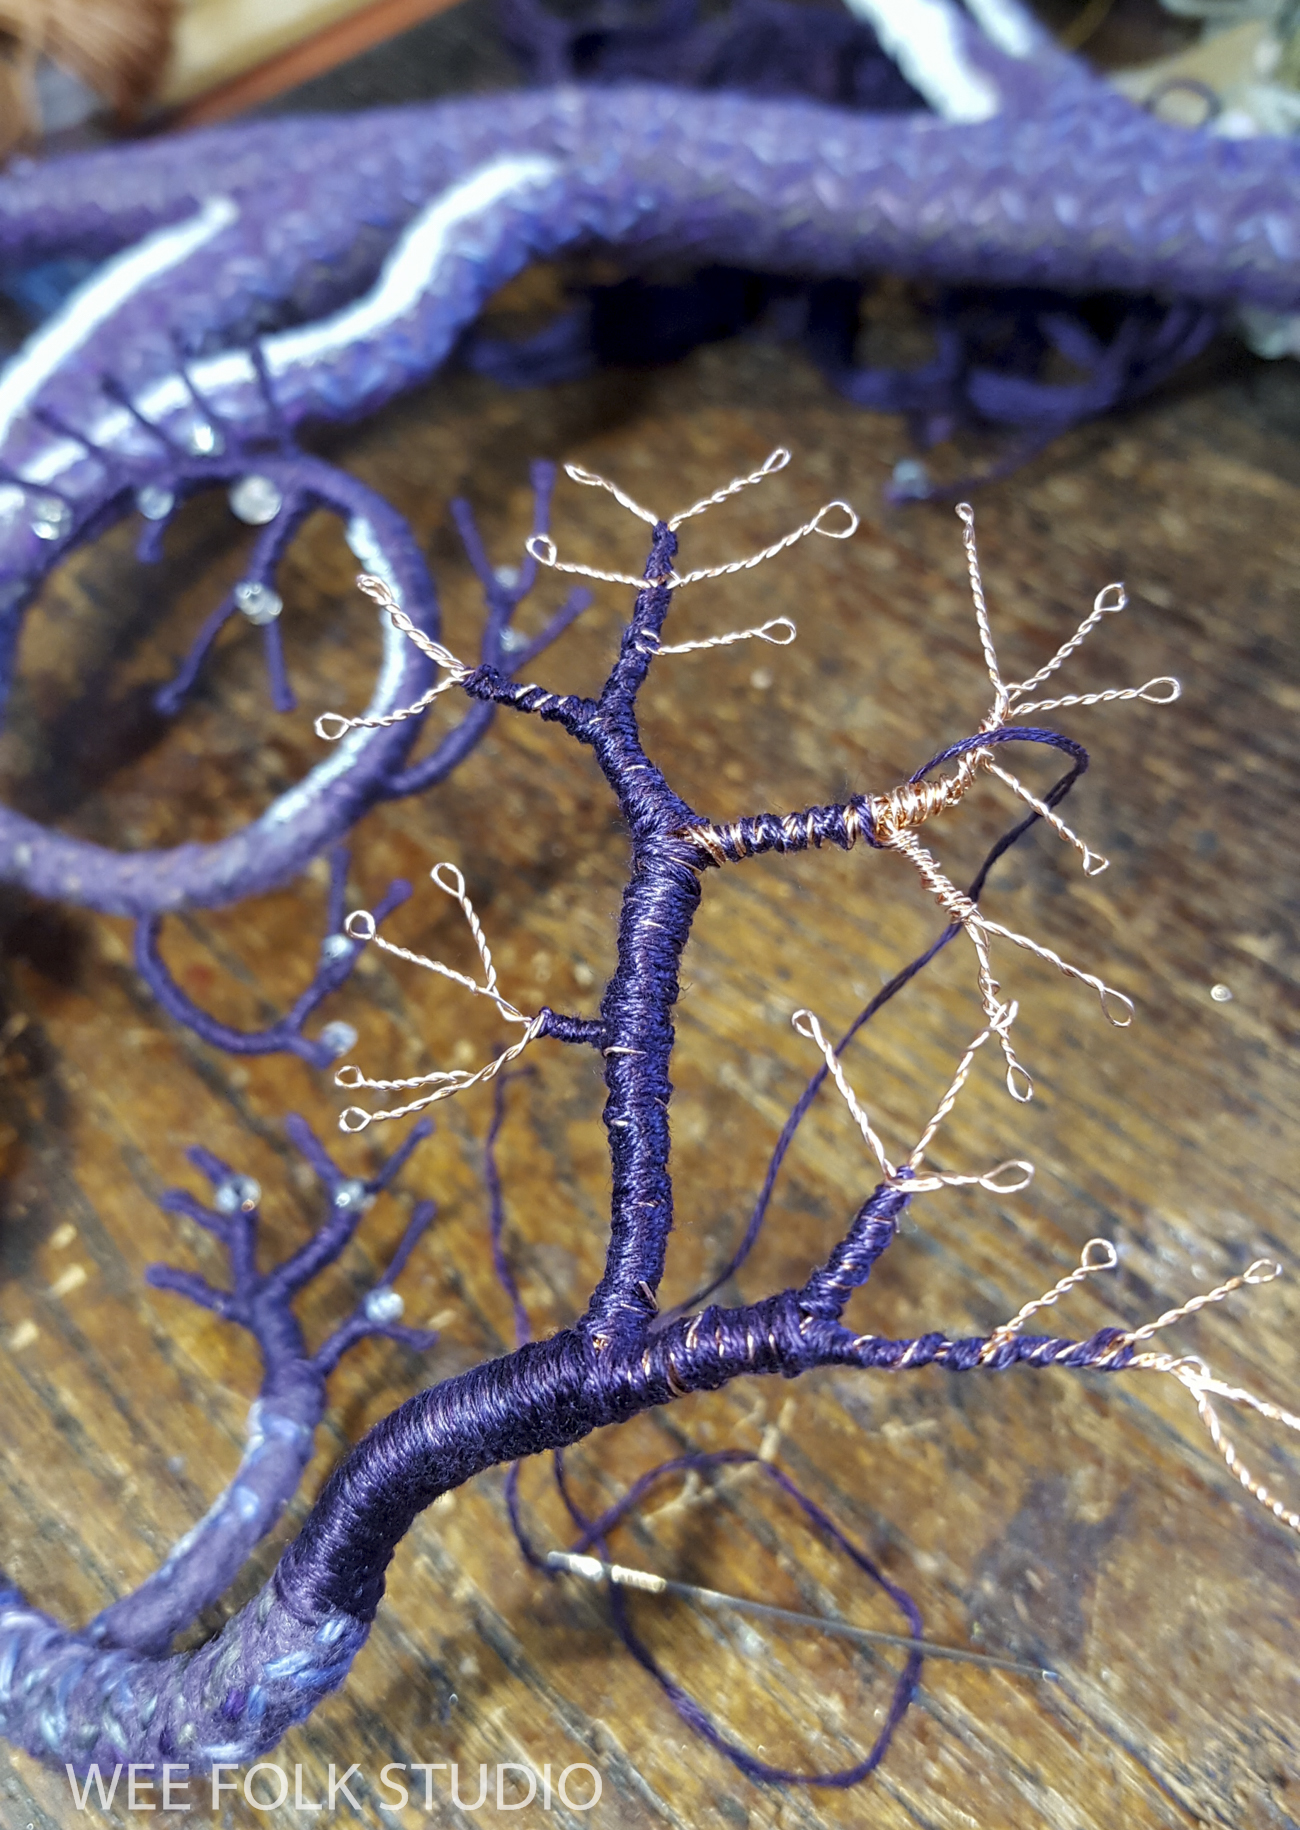
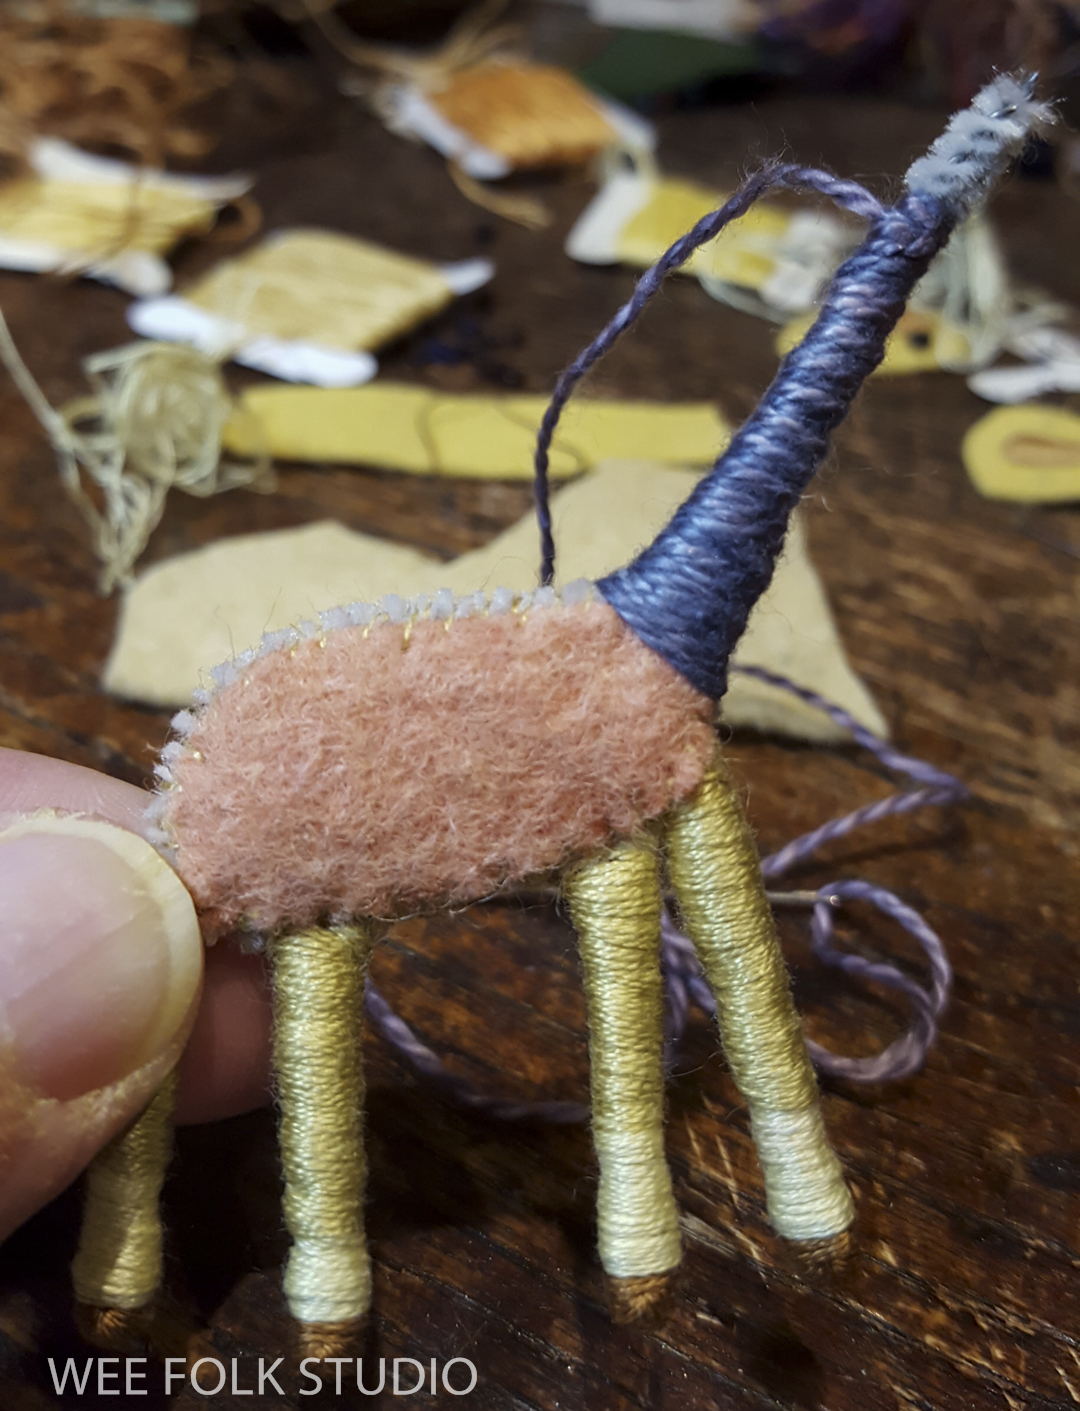
As I described in part 1, the trunk and thicker limbs were covered in felt.

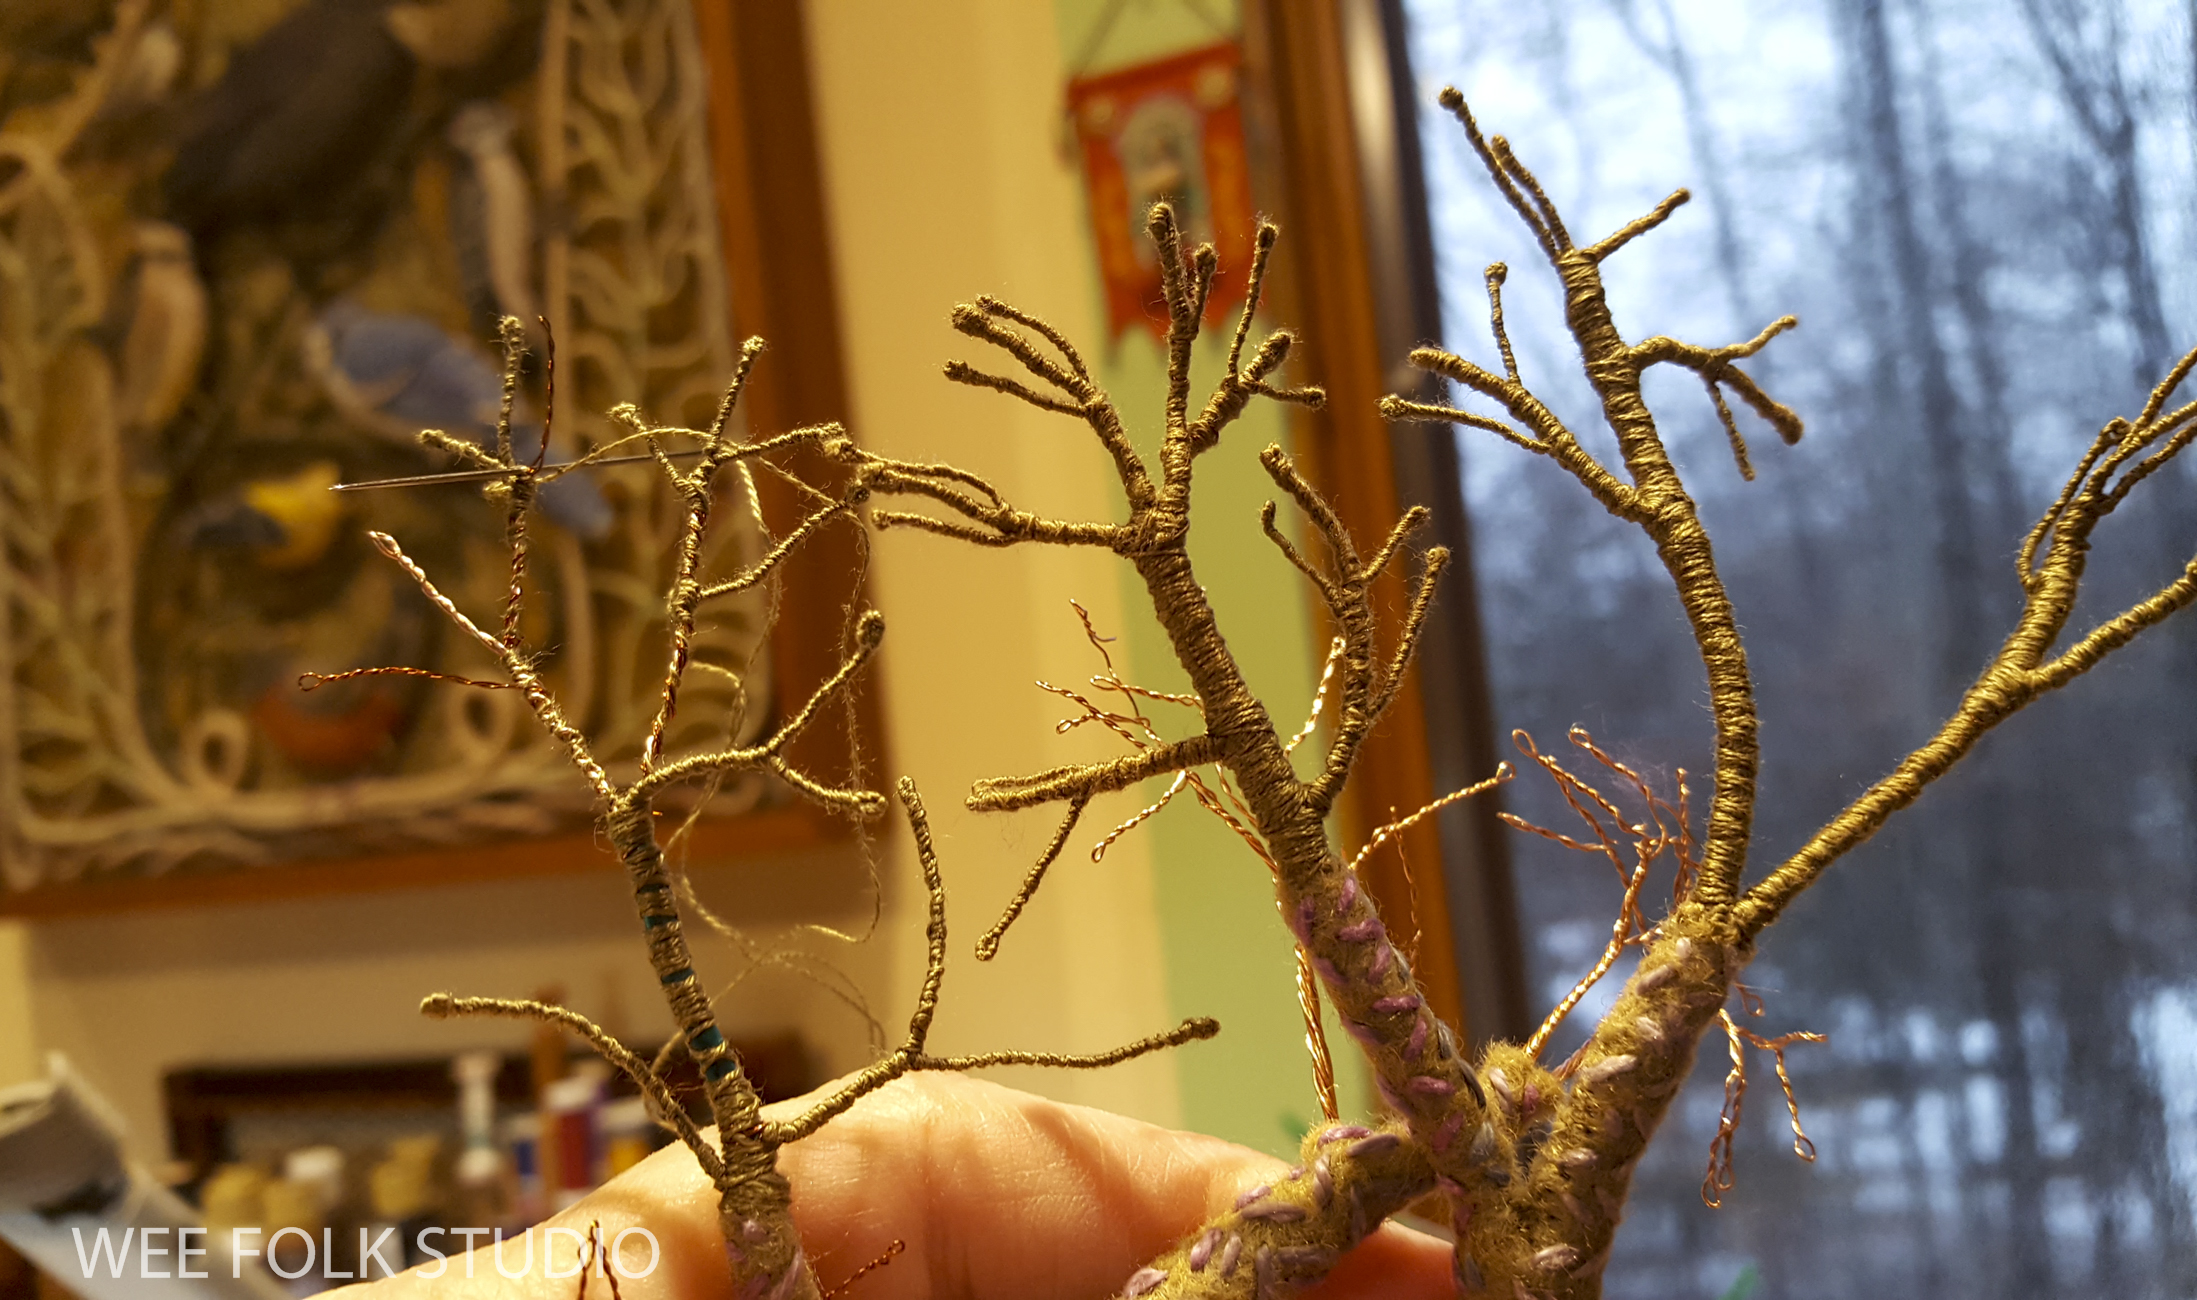
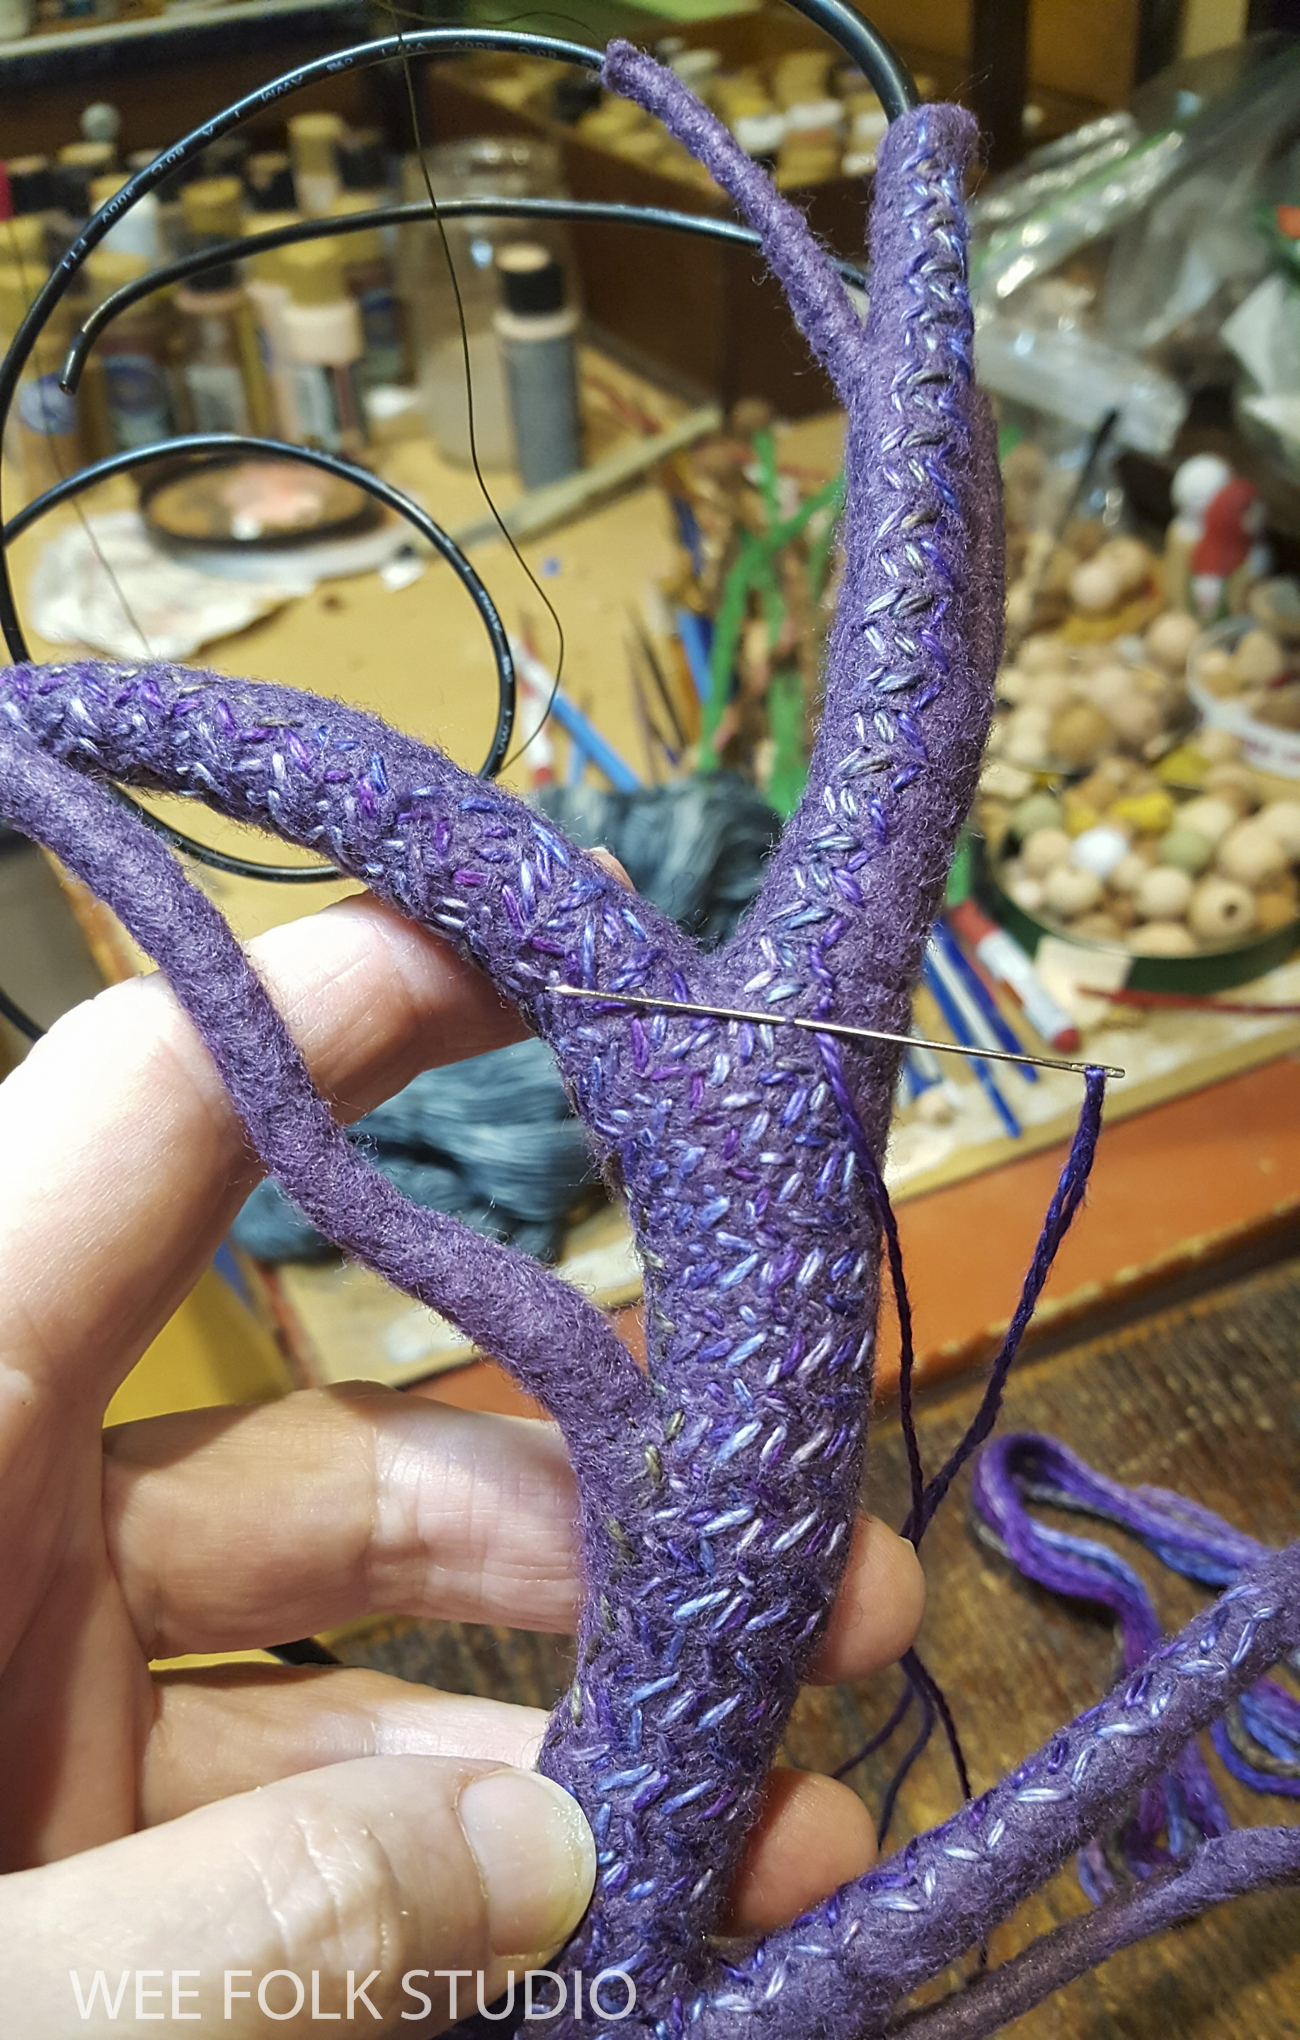
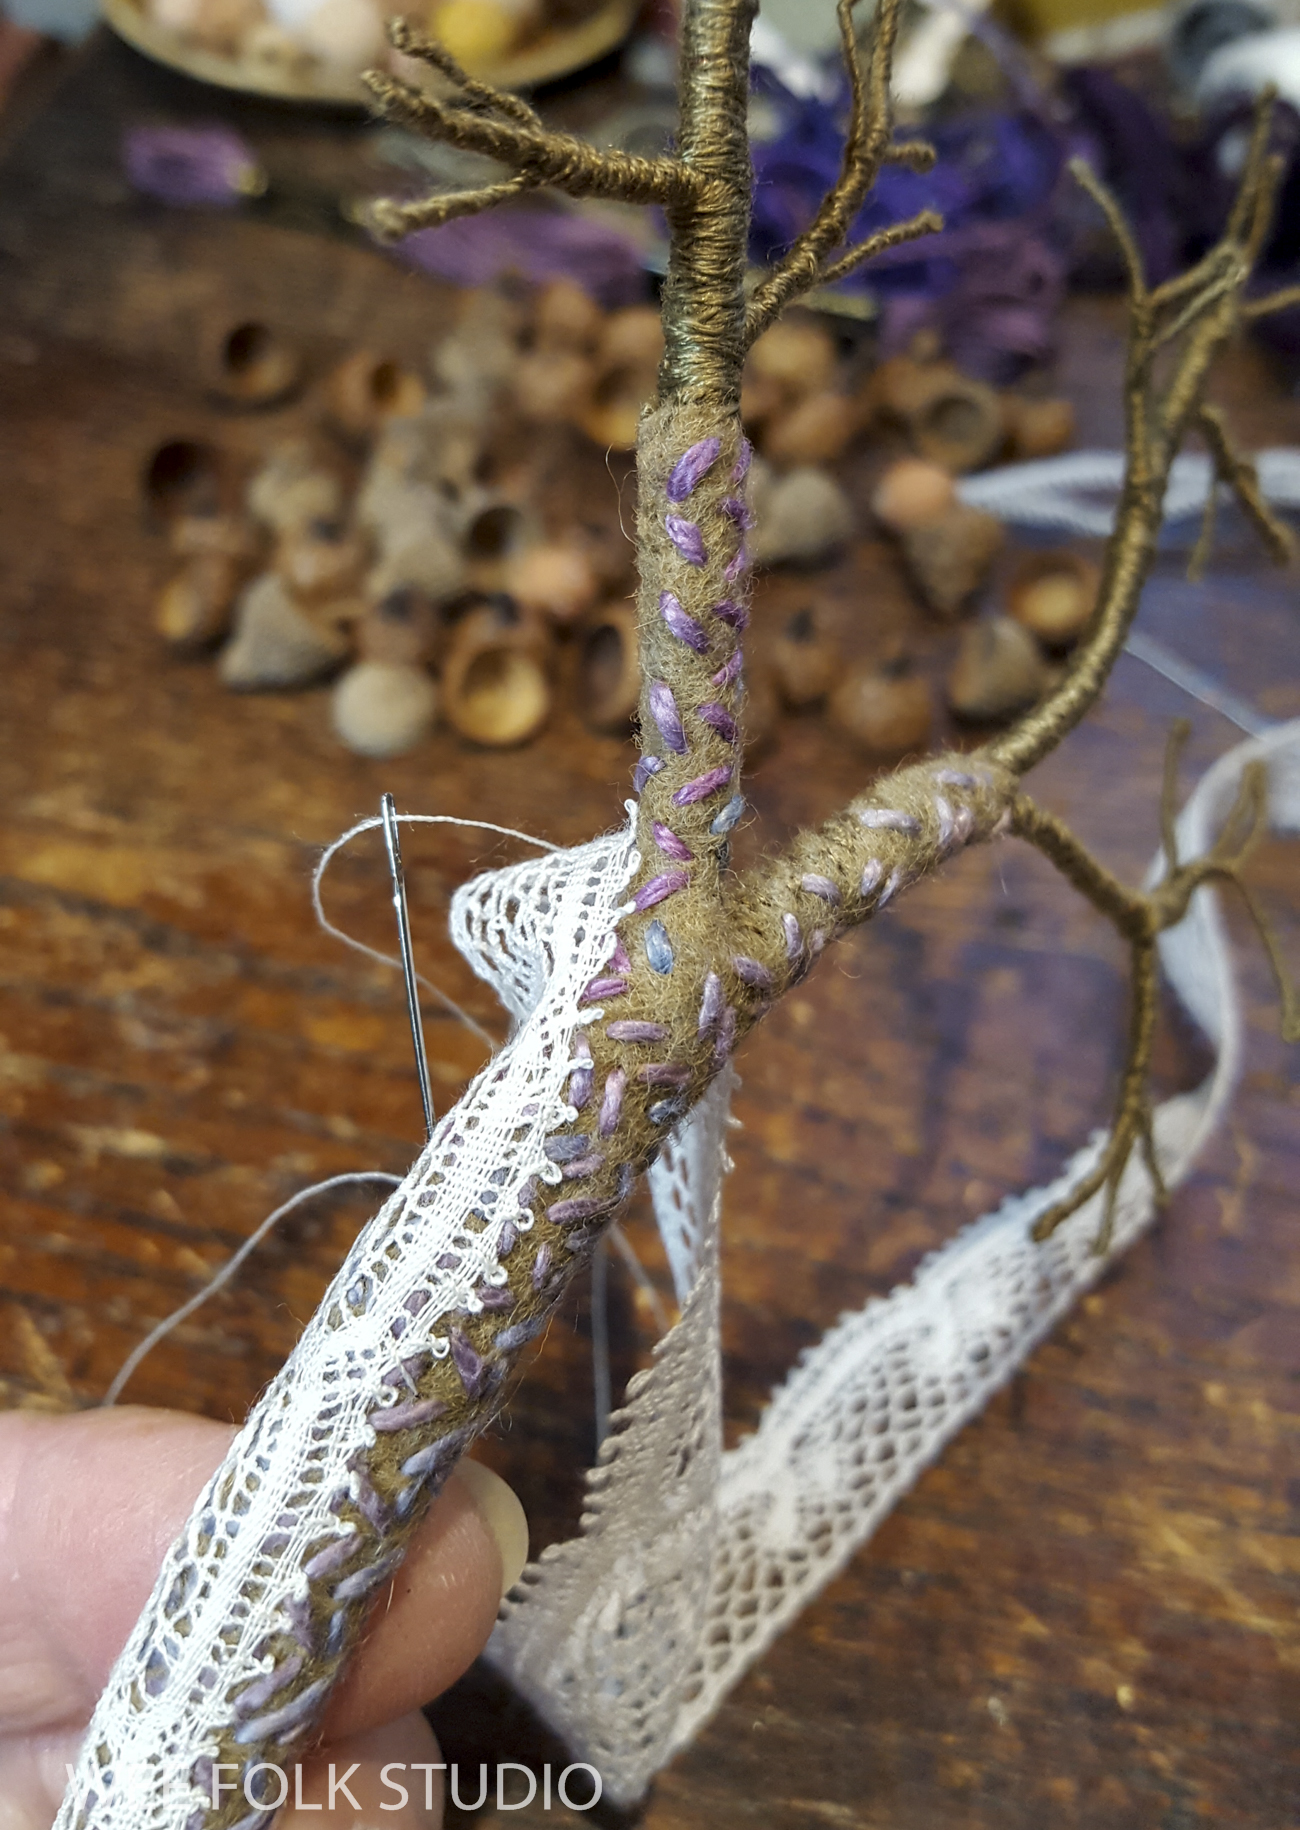
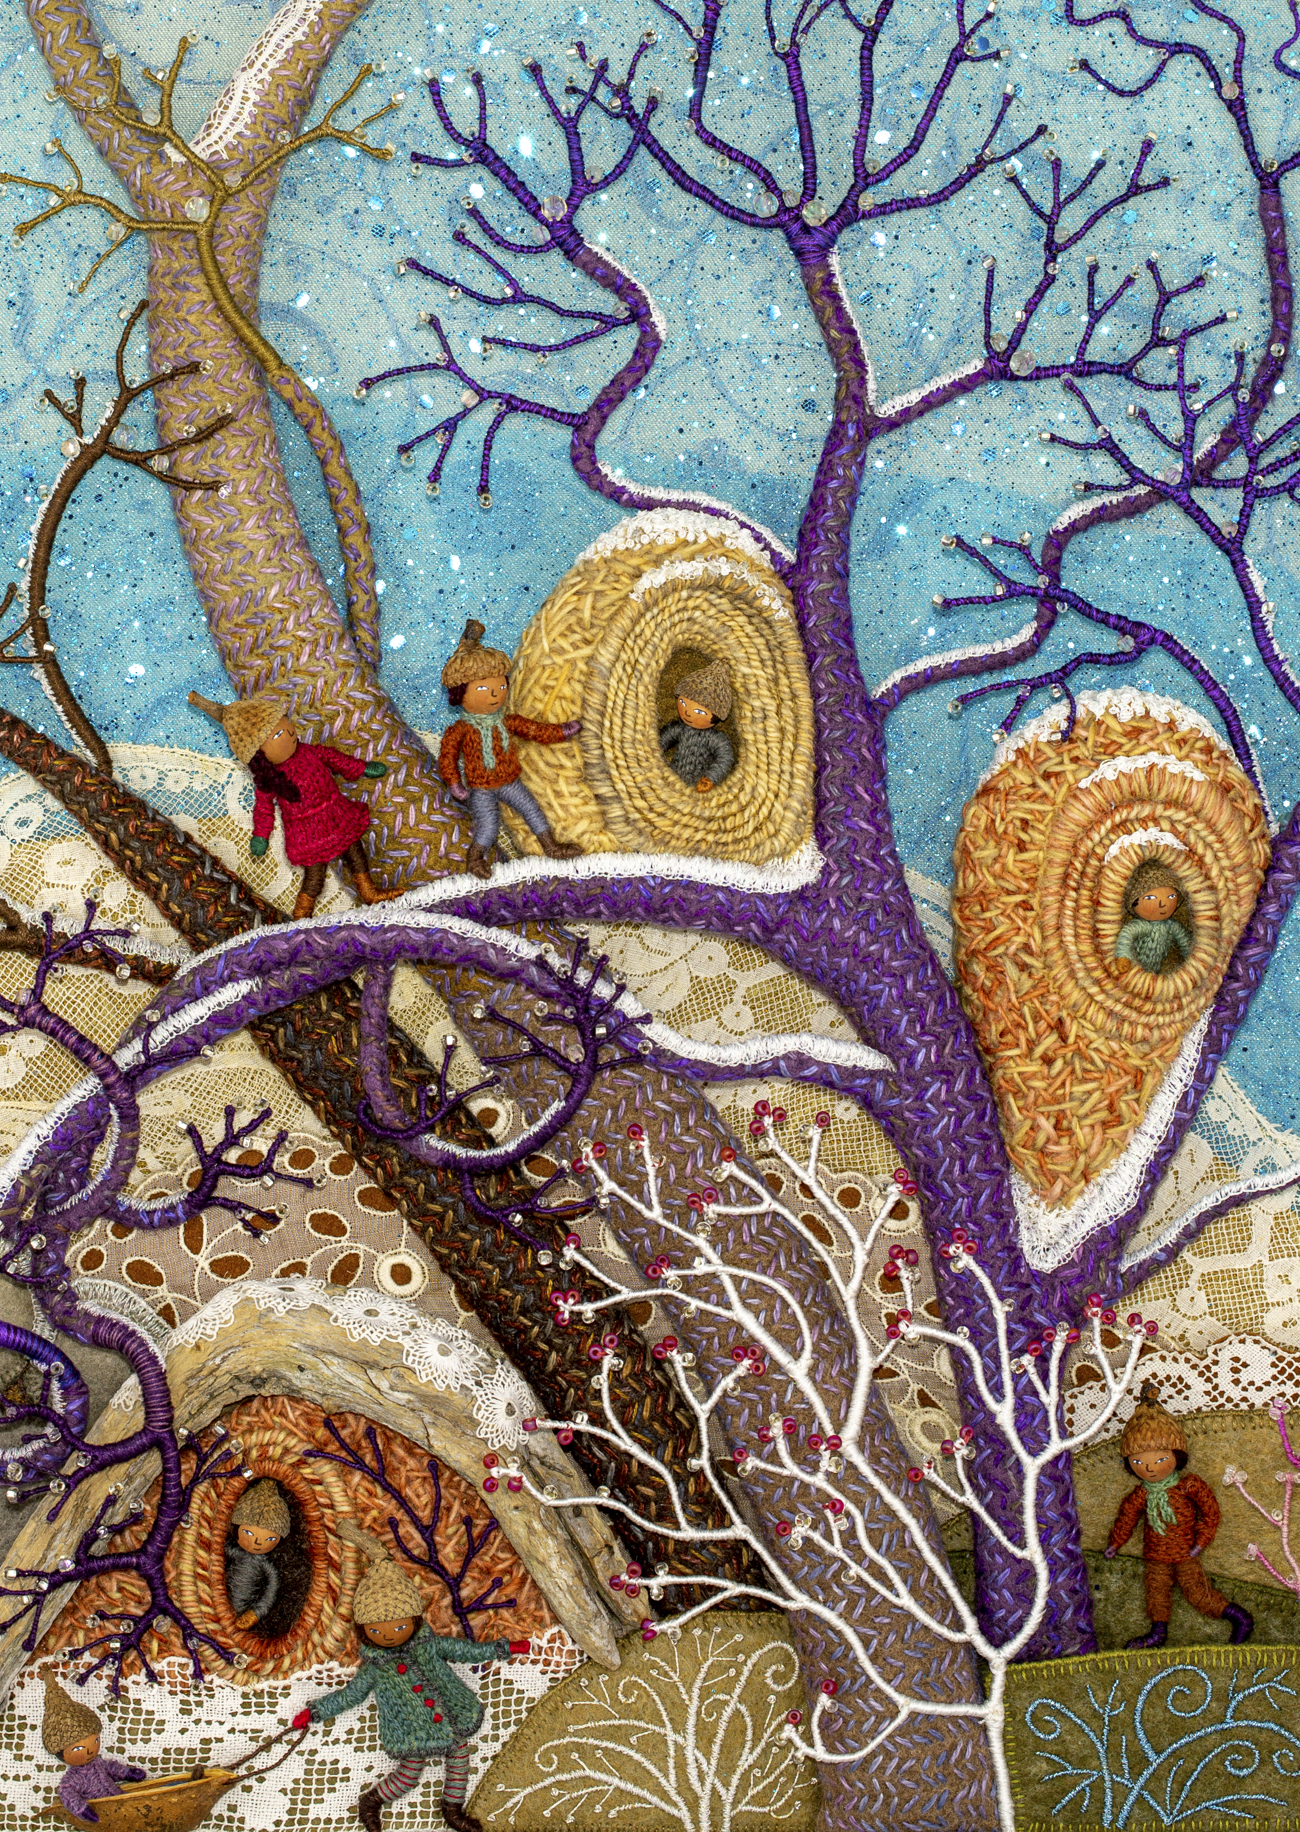
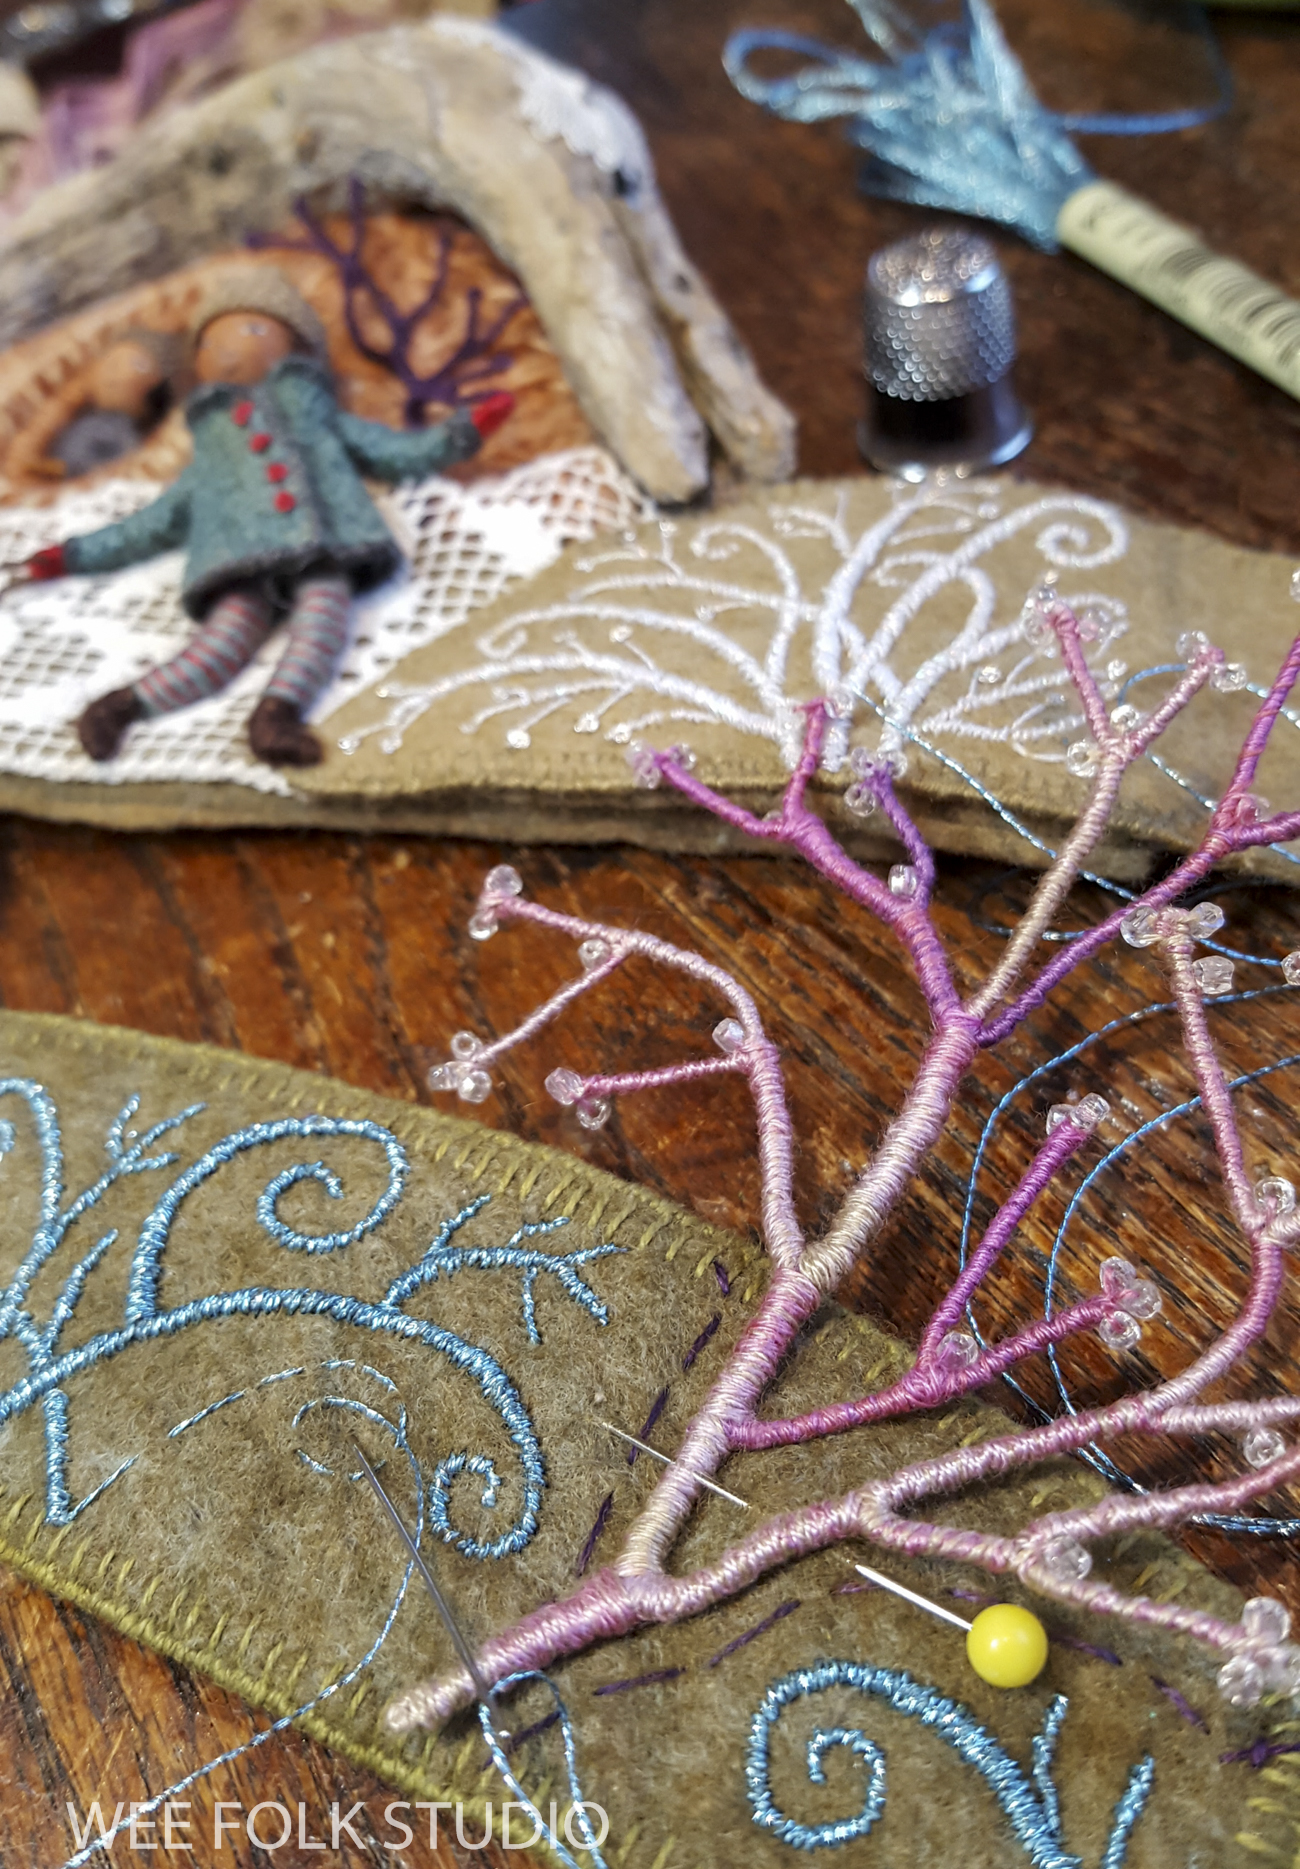
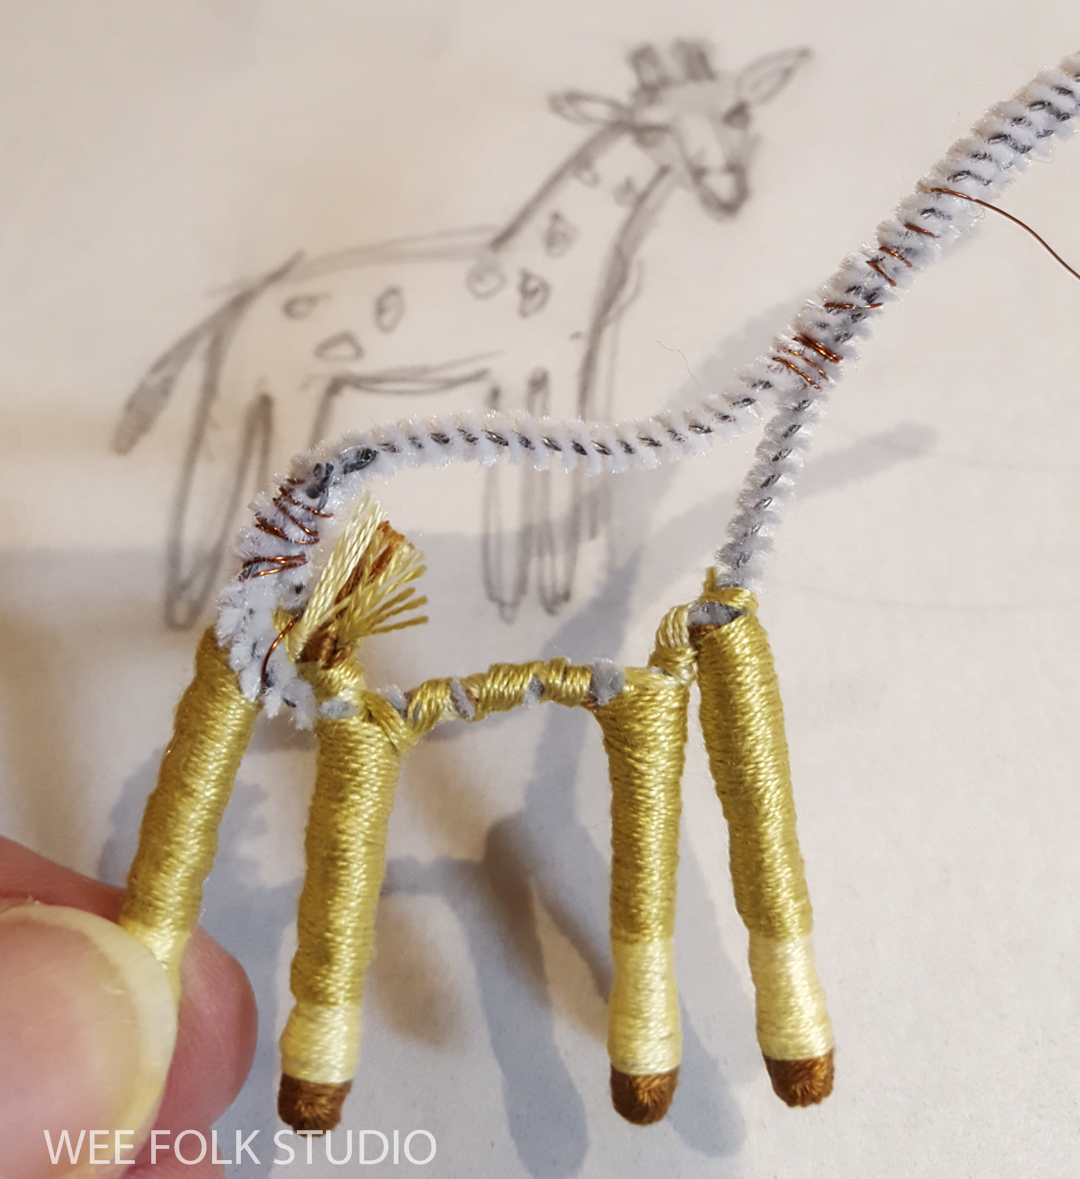
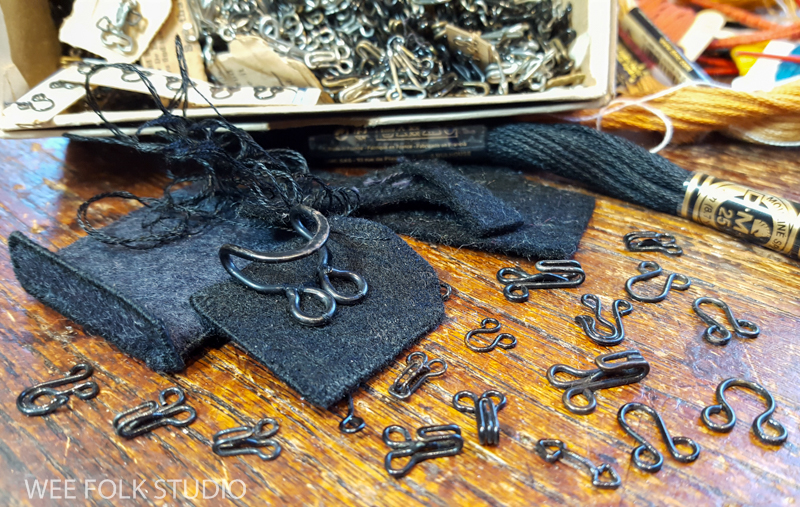
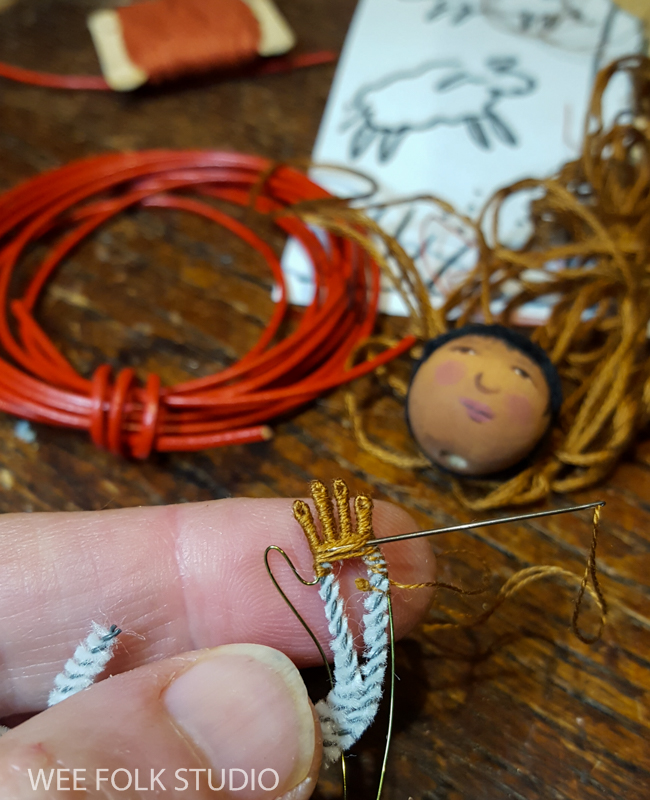
Then came the fiddly part, where I wrapped the wire branches in embroidery floss. I wound thread up and down several times, until the wire was no longer visible and the branches looked smooth and even. Using variegated thread gives the tree a more naturalistic look because nothing in real life is just one color.

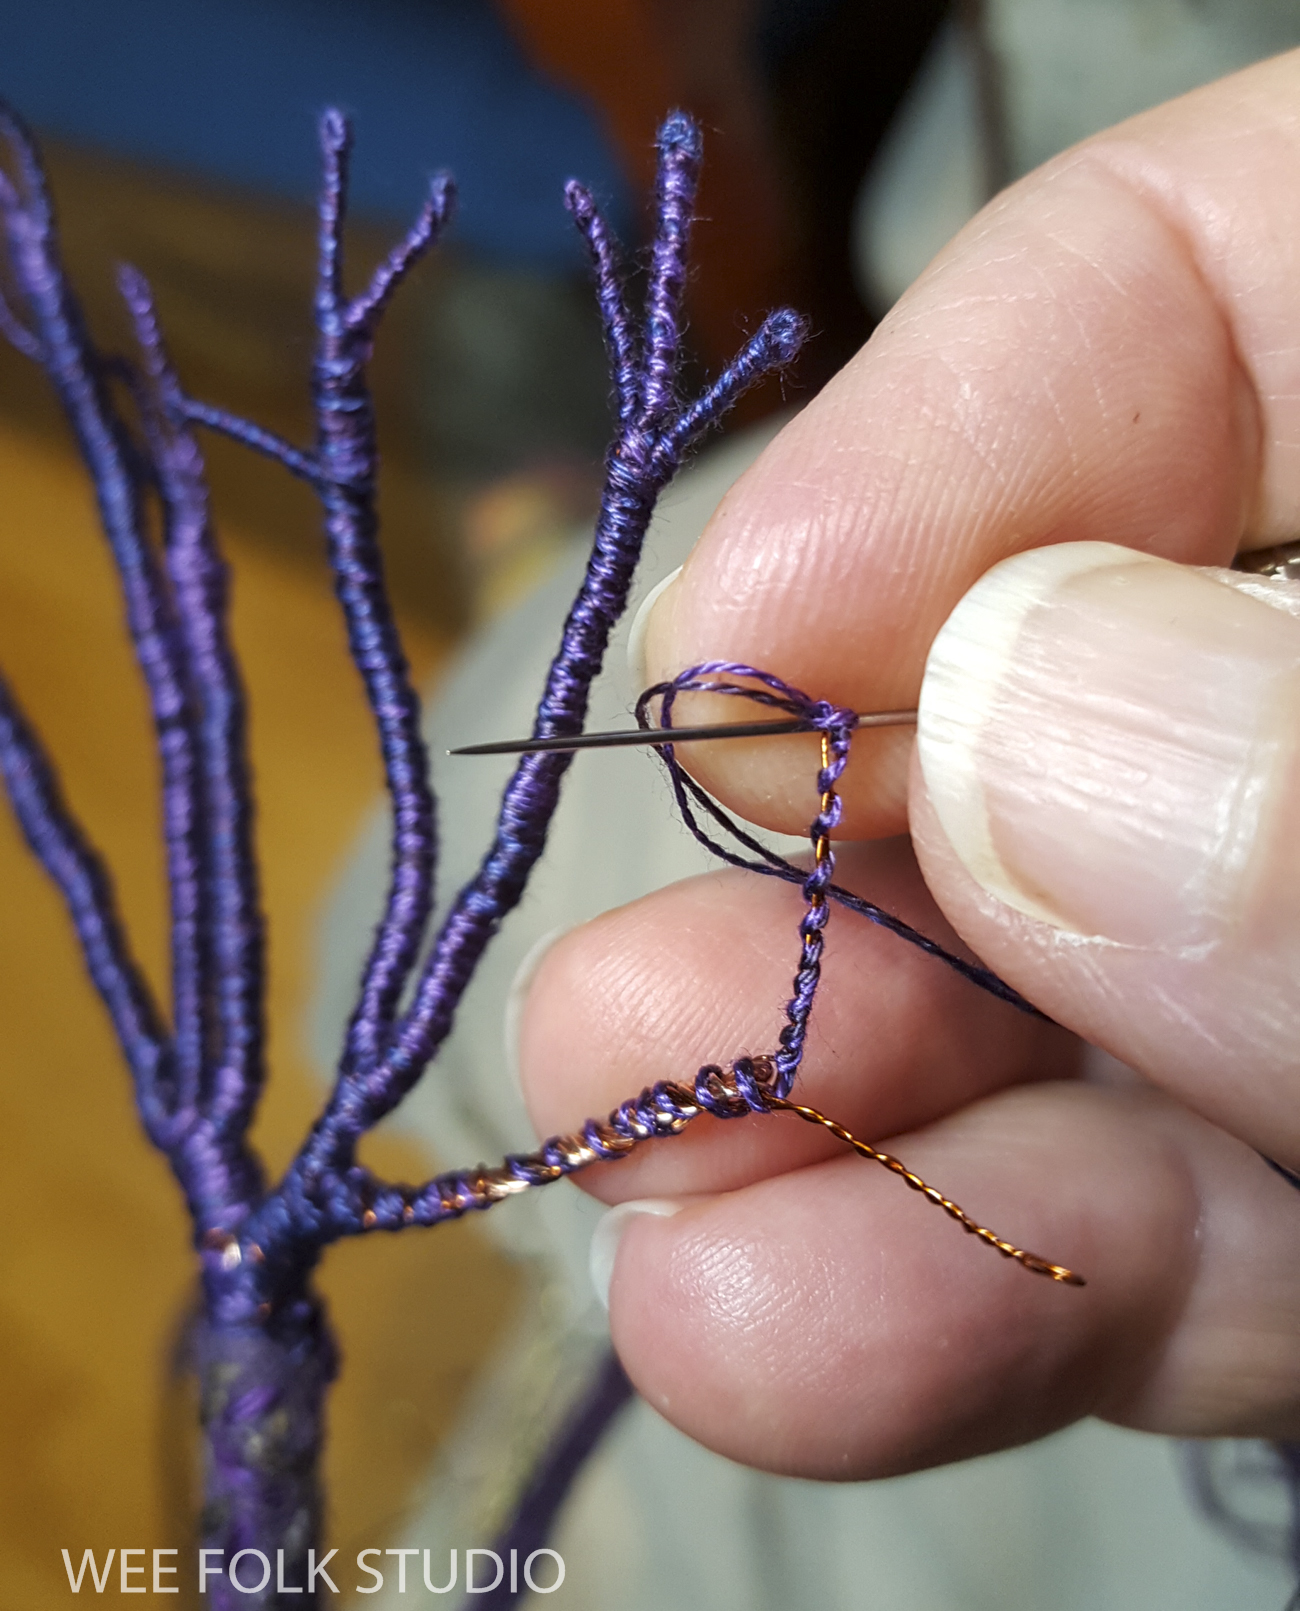
Despite its apparent fussiness, the process of wrapping the wire is strangely calming. People often remark at how patient I am, which ironically makes me feel annoyed and impatient. I know it’s meant as a compliment, but doing this kind of work has nothing to do with patience. For me, stitching is a grounding daily practice that verges on obsession. Somehow, that feels different than patience. Watch this video and see what you think.

Sometimes I used the copper wire filling inside insulated electrical cables I found at the hardware store.

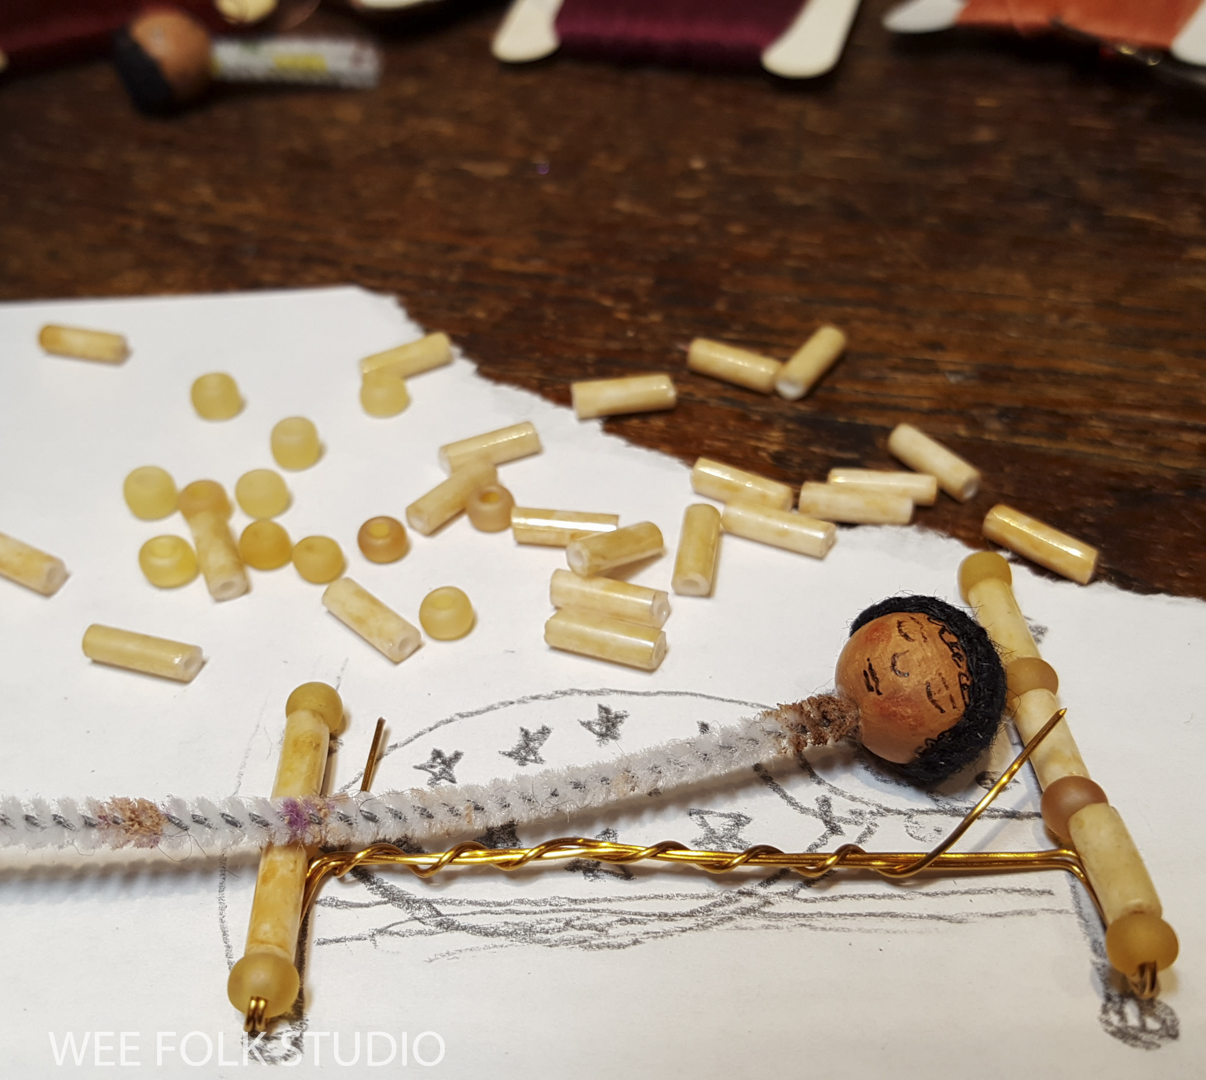
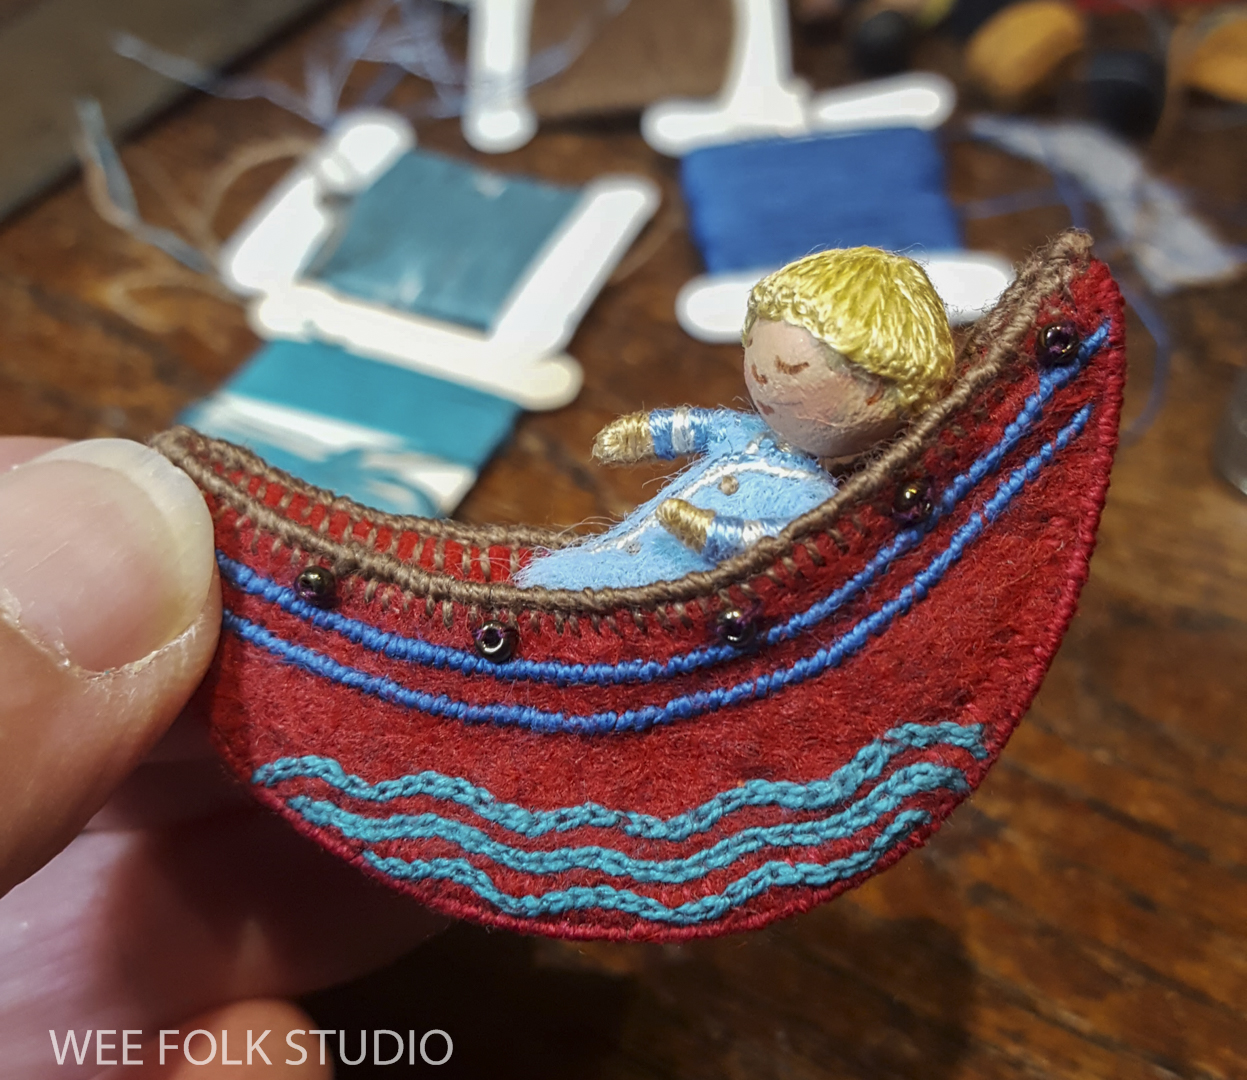
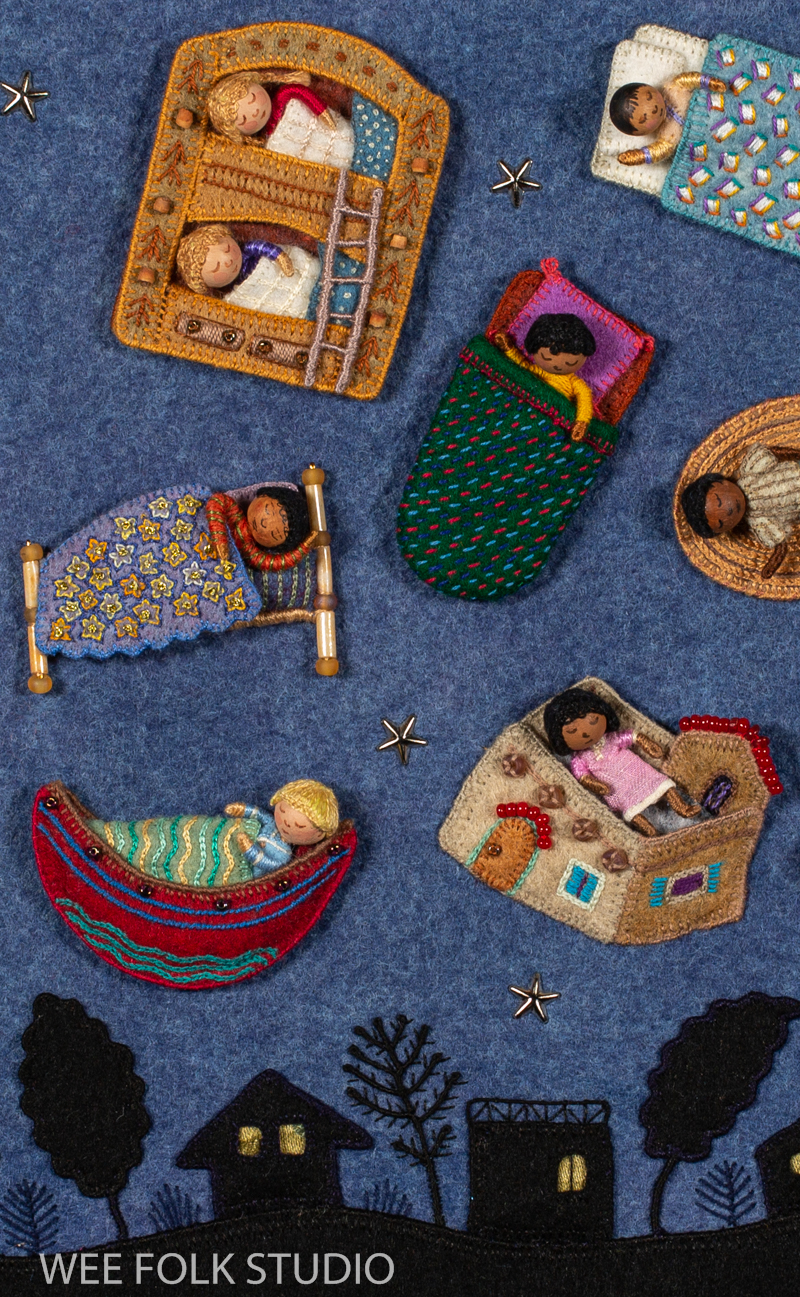
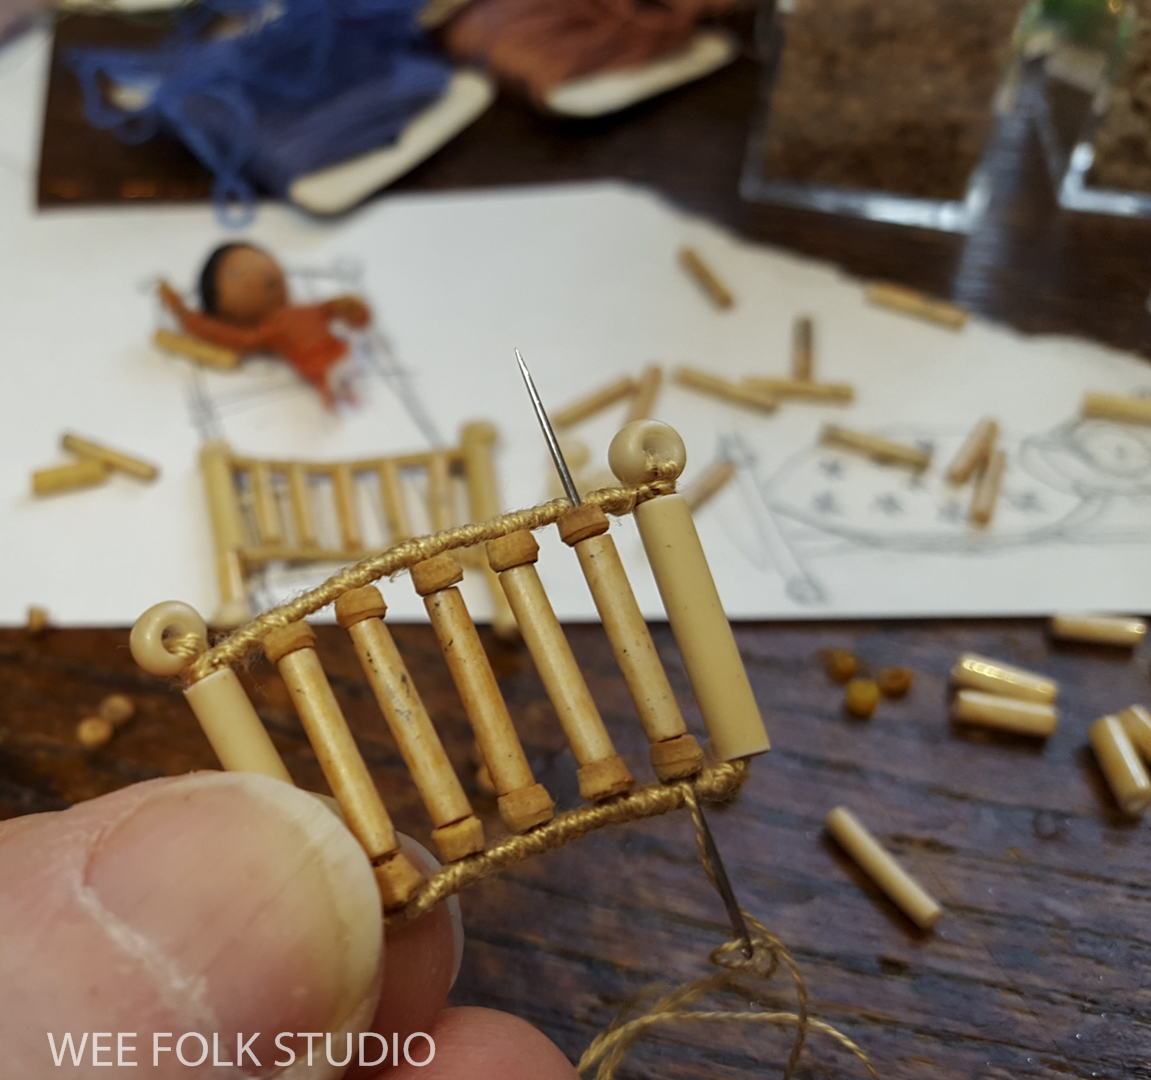
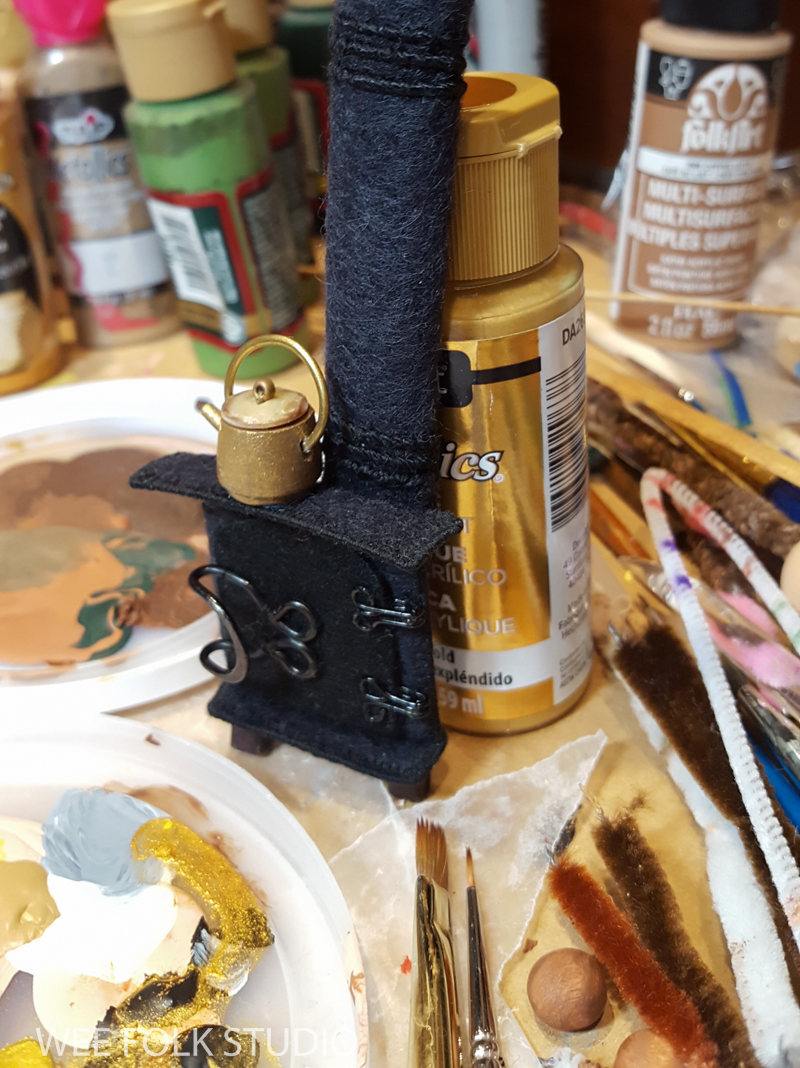
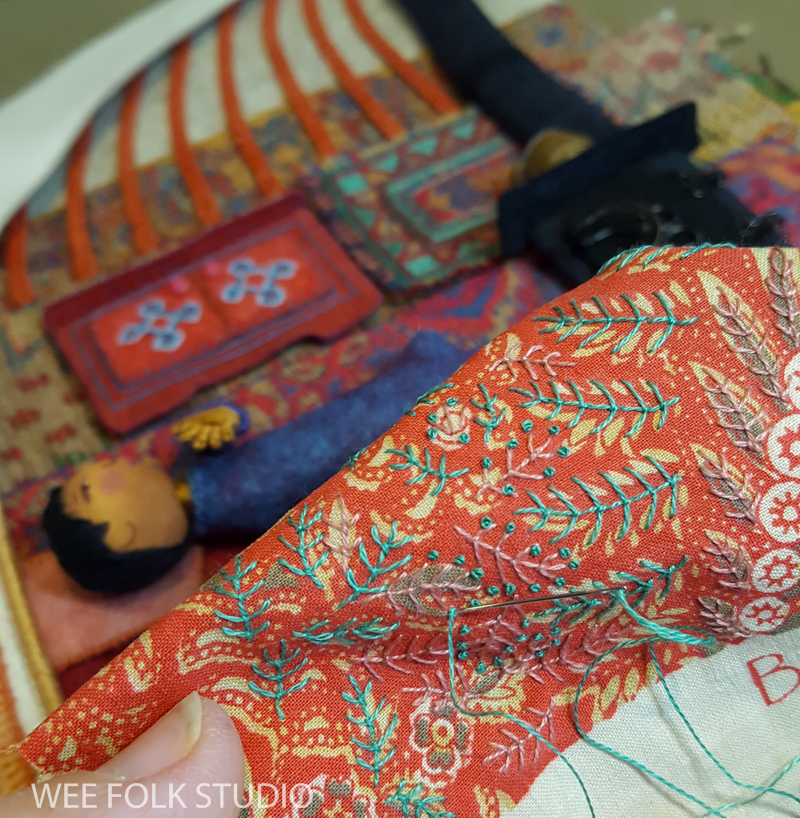
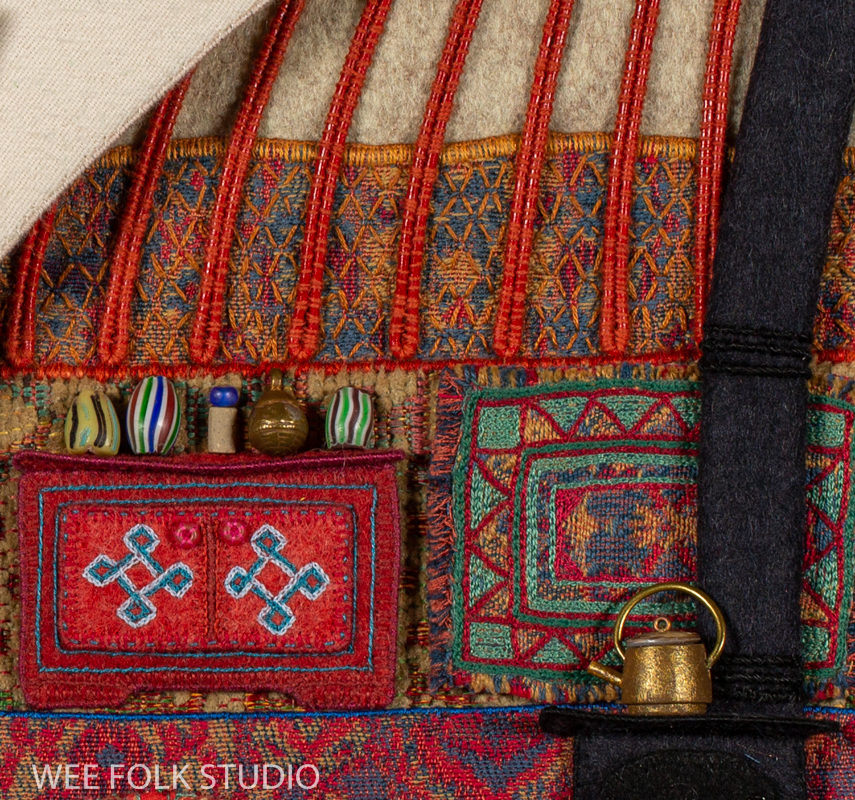
Part 3 in the series will be all about making these curious looking rounded shelters.

To keep up with new posts, subscribe to this blog. Your contact info will not be shared. If you’d like to see more frequent photos tracking the projects in my studio, please follow me on Facebook and/or Instagram.

Frosty Morning: part 1 (trees)

Are you ready for a blast of cold air in the heat of summer? I hope so, because today, I am giving a behind the scenes peek at how I made the tree trunks for Frosty Morning. Part 2 in the series will concentrate on how I formed and wrapped the wire branches. As the summer progresses, I will share other features of the winter scene, including snow and ice, cozy little shelters, a stone wall and the ubiquitous wee folk characters dressed in warm winter outfits.

This year, I’m working on a group of seasonal pieces that capture the wonder and magic of the natural world, both real and imagined. Frosty Morning, Summertime, Mossy Glen and Harvest Time are available as jigsaw puzzles and note cards in my shop here

I’m currently deep in making mode, working on a completely different piece – the spring scene, which you can follow on Instagram and Facebook . So, writing this post requires switching my brain into explaining mode. You see, when I’m engrossed in making something, I don’t think about the actual process. I’m focused on bringing my vision to life.

So how did this vision develop? I started by picturing a winter scene in my mind, with expressive branches and sparkling ice crystals. When I sketched out some ideas, rounded shelters showed up, all nestled in the thicket of trees. The original drawing also included a line of little figures climbing high along a branch. The details changed along the way, but the basic thrust and curve of the center tree remained. Over the 4 months that I worked on Frosty Morning, I used the drawing as a guide, but never a template.

Because the center tree is the main focal point of the piece, I constructed it first. The photo below shows how I used matte board and wire to form the structure of the tree trunk.

The concept of using matte board as a base actually began over 40 years ago, when I designed a line of stuffed pins. You can follow the story of my pins here.

i still have the patterns for the various shapes, including the cat. The board inside gave a nice flat backing to stitch the pin fastener onto.

For the tree, I glued a piece of felt (the cheap stuff) to the back of the matte board. That way there is something for the needle to catch onto. Then, I wrapped a piece of felt (the good stuff) around the trunk, covering the front side and stitching it in place on the back.

Then, I stitched a zigzag pattern on the font side with variegated pima cotton made by the Caron Collection.

I used insulated wire of different gauges, sometimes stripping off the rubber/plastic coating to reveal multiple wires inside. It’s the kind of supply that can be found at hardware stores The skinnier wire inside became the finer limbs as the tree branched out.

I searched through my old lace collection until I found something that would evoke snow cover on the center tree’s outstretched branch.

I made the purple tree a little differently.

Being smaller in diameter, the purple tree didn’t need a board backing, so i just wrapped the wire armature with strips of cotton batting until they were the right thickness. I have no logical explanation as to why this tree is purple. I just wanted to cheer up the scene with something besides drab browns and grays.

Part 2 in this series, will be devoted to forming and wrapping the branches.

Frosty Morning note cards are available in my Etsy shop here.

To keep up with new posts, subscribe to this blog. Your contact info will not be shared. If you’d like to see more frequent photos tracking the projects in my studio, please follow me on Facebook and/or Instagram.

Frosty Morning Overview

Since January of this year (2021), I’ve been in full making mode, creating art for no reason other than the pure joy of it. It’s something I regularly promise myself at the end of long involved projects like illustrating a book or animating a film. I’m taking this year to work solely on a group of seasonal pieces that capture the wonder and magic of the natural world, both real and imagined.

Frosty Morning, which is the first completed scene in the series, was inspired by what I saw early one January morning, when every bare branch sparkled with ice crystals. I’m one of those rare people who loves winter so much that it never seems to last long enough. I think it’s because I like long periods of time to work without the distraction of warm weather.

This year, I’m working on a group of seasonal pieces that capture the wonder and magic of the natural world, both real and imagined. Frosty Morning, Mossy Glen, Harvest Time and Summertime are available as prints, jigsaw puzzles and note cards in my Etsy shop. 

UPDATE: All 4 seasons are included in my exhibition at the Albany Institute of History and Art in Albany, NY. Enchanting Threads: The Art of Salley Mavor has been extended to Match 2, 2025.

Right now, I’m working on the spring scene, which you can see documented in photos and videos here. My followers are so excited about the mossy landscape that it’s all I can do to fend off their questions about how I did this or that. I tell them, “I know you’re curious, but I’m in pure making mode right now and don’t want to dispel the magic by turning on the explaining part of my brain yet. That will come later when the piece is finished and I write about it on my blog.”

If you’ve been reading this blog for a while, you know that I operate outside of the mainstream, in a different needle and thread universe. It’s been a struggle to find my place in the technique-driven model ingrained in the needle arts community. In the essay, To Teach or Not to Teach, I discuss in detail my approach to making art and my personal philosophy about sharing knowledge.

So, with all of that in mind, I’m preparing to turn on the explaining part of my brain, at least enough to say something to go along with the photos. Over the summer, I will be telling the story of making Frosty Morning in a series of posts that focus on different aspects of my working process. My aim is to inspire more than instruct, to give a peek behind the curtain that may spark your own kind of creativity.

I took lots of photos along the way, so there’s enough material to delve more deeply into several areas including making trees, snow and ice, cozy little shelters, a stone wall and the ubiquitous wee folk characters. The following photos are just a sampling of what’s to come.

Frosty Morning Part 1 – trees, Part 2 – branches, Part 3 – shelters, Part 4 – stone wall, Part 5 – sparkles, Part 6 – wee folk.

See the series of Frosty Morning Posts: Part 1 (trees), Part 2 (branches), Part 3 (shelters), Part 4 (stone wall), Part 5 (sparkles) and Part 6 (wee folk).

Frosty Morning, Mossy GlenHarvest Time and Summertime jigsaw puzzles, prints and note cards are available in my Etsy shop.

To keep up with new posts, subscribe to this blog. Your contact info will not be shared. If you’d like to see more frequent photos tracking the projects in my studio, please follow me on Facebook and/or Instagram.

Bed book peek: Pony

Today, I’m happy to give a behind the scenes peek at how I made this pony, which is used as a spot illustration on the Mongolian spread in my new picture book, MY BED. The story about children’s sleeping places in different cultures around the world was published in Sept. 2020.

The pony is also pictured with all the other animal icons on the book’s end-papers. If you’d like to see posts about making the other animals, please follow the links below: RoosterCamelParrotElephantGoldfishCatDuckSheepRabbitCow,
Crocodile, Giraffe, Dog.

A touring exhibition of my original embroidered artwork for the book is traveling around the United States. The schedule for Salley Mavor: Bedtime Stitches is listed here.

Signed copies of My Bed are available in my shop here. Watch this 8 minute documentary about how I created the illustrations for the book.

I’ll start off by showing this video, which brings you through the different steps of the pony making process, complete with Mongolian zither music in the background.

Making the Mongolian pony for the book, MY BED

in this series of still photographs, I’ll try to explain what I’m doing. As I’ve said before, I work intuitively, so it can be a challenge to describe the process in exact terms. For most of the animals in the book, I bent a pipe cleaner to form an outline shape. Then, I wrapped the legs, using the same technique that’s taught in my how-to book, Felt Wee Folk,

This part is all about building up the body with layers of felt. First, I sewed on a back piece and used scraps of felt to fill the cavity until it was a good thickness.

This is the point where I “upholster” the front of the animal with a piece of felt. There isn’t a supporting photograph because I consistently forget to take a picture of this part. It must be because I’m always consumed in the heat of battle. Just imagine the back as a maze of crisscrossing threads, all working to get rid of any bumps or folds.

Well, after the animal shape looked the way I wanted it to, I sewed on a seed bead eye and embroidered a mane.

I can’t remember how I made the top of the mane where it sticks up, but it could have been several rows of blanket stitching.

To make the tail, I covered the pipe cleaner with embroidery floss.

Research was an important and fun part of illustrating this book. To make an accurate representation, I looked at photographs of real Mongolian ponies, with their colorful, decorative saddles.

It took a while to make the right placement of the ear.

With its bridle in place, the pony was almost ready to go.

All it needed was a brass bead stirrup, which you can see in the last photo.

To keep up with new posts, please subscribe to this blog. Your contact info will not be sold or shared. If you’d like to see more frequent photos tracking the projects in my studio, please follow me on Facebook and/or Instagram.

My Bed: night sky- part 1

This is the first in a series of posts that will show how I made the night sky illustration for my new picture book, My Bed. The spread appears near the end of the story, with all of the children from around the world sleeping in their beds, floating in a starry sky above a silhouetted town. By the time I made this scene, I was about 2 years into the project and had gotten used to taking photos of almost every little step along the way. So, there’s a lot of material to share, which is divided into several parts that I’ll write about over the next few weeks. You can see a list of posts about making the other illustrations for the book on this page.

Update: Signed copies of My Bed can be ordered in my shop here. Watch this 8 minute documentary about how I created the illustrations for the book.

The Bedtime Stitches touring exhibition is an opportunity to see the original bas-relief embroidered artwork for MY BED. To see the tour schedule, please visit the Exhibitions Page.

Bedtime Stitches exhibit at Cedarhurst Center for the Arts, Mt. Vernon, IL

Thank you to those of you who’ve reached out to museums in your area to tell them about the exhibit. This strategy has resulted in several bookings! In fact, I’m in the process of working out the details with a curator who heard about my show from a fan who’s eager to see my artwork in person. As soon as the dates are confirmed, this museum will be added to the tour schedule.

Way back in the beginning, I sketched out the pages of the book. For the finished illustration, I rearranged the beds at bit, keeping in mind not to loose any children in the gutter. That’s where the pages are bound together in the center, which is marked with a vertical line on the drawing.

First, I made houses and trees out of black felt for the silhouetted landscape. I found some shiny golden fabric in my stash and sewed it behind the cutout openings for the windows and doorways. To help define the buildings and trees, I stitched wire around the outside edges.

Then, I started making miniature versions of the characters and beds pictured throughout the book. Since they are so tiny, I simplified the designs to include important and recognizable features. This one represents the child sleeping on the roof in the North African scene.

To make these reduced scale versions, I had to substitute smaller parts such as red seed beads for the roof tiles.

The girl’s pink nightie is made out of the same old handkerchief that I used to make the larger version in the North African scene. As you can see, the sleeves are not fabric, but embroidery floss wrapped around her wire arms.

I made the head and foot boards of another bed with wire and tube beads.

This is a different interpretation of the child who appears several times in the book – on the title page and in the scene that shows a house full of animal icons. The orange pajamas and star covered quilt are the giveaway.

For the boy in the scene set in Holland, I didn’t even try to duplicate the houseboat in such small scale, but instead made a boat bed for him to sleep in.

I hope that you enjoyed this peek behind the scenes at how I made some of the tiniest beds in MY BED. Please stay tuned for more posts about different beds in the night sky scene.

To keep up with new posts, subscribe to this blog. Your contact info will not be shared. If you’d like to see more frequent photos tracking the projects in my studio, please follow me on Facebook and/or Instagram.

Bed book peek: title page

For the past 3 years, I’ve shared the process of making the illustrations for my new picture book My Bed. Even though we all stayed home, it feels as if we’ve been on an international journey together, into the homes of children around the world. To date, I’ve written 45 posts about different aspects of how I made the book, including double page spreads and animal spot illustrations. Every time I write a post in this series, I think that we must being nearing the end. Then I discover more digital images in forgotten folders. So, it looks like there’s enough material to keep the Bed Book Peeks gong for for a bit longer. To see a complete list of posts in the series, please go to this page.

Update: Signed copies of My Bed can be ordered in my shop here. Watch this 8 minute documentary about how I created the illustrations for the book.

Today’s post is about the title page. Unlike the lush scenes inside the book, which totally fill up a page and a half, this artwork was made to float on a white background. I thought of it as a minimal stage set, with a few props and a window suspended in space. That way, the book designer had the flexibility to adjust the positioning of the pieces to accommodate the type layout. I also requested an open area on the page for drawing a picture and signing the book.

BED: I built the bed’s head and foot boards out of beads and wire. To hide the shiny wire and make it blend in with the bead color, I covered it with embroidery floss. After making the basic frame, I sewed the bead rungs inside the wire.

I made a mattress out of felt, sewed the boards to the head and foot of the bed and added bead legs. The bed is foreshortened to give the illusion that the foot board is standing upright.

The foreshortened bed is easier to see in this side view.

I made a tiny child, who I tucked in bed, with a pillow and a star covered quilt.

Window: First, I constructed a window out of felt and beads. Then, I fashioned a valance style curtain out of wire wrapped with pink embroidery floss. I filled in the the curtain loops with cross hatched embroidery floss, which was like weaving a lattice topped pie.

Rug: I chain-stitched a smiling sun on a green felt rug, to contrast with the night sky in the window and the star covered quilt .

Lamp: In keeping with the celestial theme, I made a lamp out of a star button to put atop a bedside table.

After the bed, table, window and rug were photographed for reproduction, I needed to find a way to display the them in Bedtime Stitches, the exhibition of original artwork for the book. I decided to mount the bedroom set along with a larger star, which I made for a different part of the book.

I arranged the items on the green felt in the center of the back cover illustration. You can see how I made the border in another post here. I couldn’t just leave the open areas plain, so I doodled a bunch of chain-stitched curly cues.

The touring exhibition of original artwork for MY BED, SALLEY MAVOR: Bedtime Stories, is an opportunity for the public to see up close the fine detail and 3-dimensional quality of my bas-relief sculptural embroideries. The show is currently booked at several museums through June 2023 with the possibility of being extended into 2024. The current tour schedule is listed on this page. Interested museums are welcome to contact me (salley at weefolkstudio.com) for information about hosting the exhibition.

To keep up with new posts, please subscribe to this blog. Your contact info will not be sold or shared. If you’d like to see more frequent photos tracking the projects in my studio, please follow me on Facebook and/or Instagram.

Bed book peek: giraffe

Shall we start the year with something cute to counteract the fact that everything in the world seems to be spiraling out of control? Good, now that we agree on a diversion, I will show how I made the giraffe for my new book, My Bed.


Update: Signed copies of My Bed can be ordered in my shop here. Watch this 8 minute documentary about how I created the illustrations for the book.


I’d originally picked a giraffe to go with the illustration set in Africa. But, then we narrowed it down to the country of Ghana, which doesn’t have giraffes. I started researching other possible animals to go along with the scene. Fortunately, I sat next to man from Ghana in a restaurant, who told me about wild life in his home country, including crocodiles. So, I switched to a crocodile instead. My ignorance about the African continent almost caused a gaffe similar to what Delta Airlines went through when they chose an image of a giraffe to represent Ghana in a tweet about the World Cup in 2014!

I was able to use the giraffe on another page, though. It appears with the other animal icons on the end-papers and as a spot illustration on the text panel in the second to last spread in the book, which isn’t set in any particular part of the world.

To start, I drew a simple sketch of a giraffe and bent a pipe cleaner to form the legs. Then I wrapped them with embroidery floss, using the same techniques I teach in my how-to book of doll projects, Felt Wee Folk.

From there, I built up the body and neck with felt and more thread wrapping.

While studying photos of giraffes. I noticed that their spots are made up of a complex combination of shapes and patterns, that fit together like paving stones on a garden path.

I used chain stitching to make the spots, which has become my favorite way of filling in areas. I sewed the spot covered piece of felt to the giraffe’s body and neck. I covered the back with a mishmash of stitches, which stretched across to hold the front piece tightly in place. There was no need to make the back look pretty. After all, art is an illusion.

To make the mane, I sewed a length of wire along the giraffe’s neck and wrapped it with thread.Then, I blanket stitched a few rows of “hair” along the wire mane.

It took several attempts to make the giraffe’s head, which had a combination of funny looking, yet endearing features. Not only do giraffes have horns and long ears, they have prominent eyes, an oddly shaped nose and a smiling mouth. That all had to be reduced to a few stitches, beads and wire.

For the tail, I sewed on a looped section of wire, which I wrapped with thread.

When I sewed on the head, it actually looked like a giraffe!

If you’d like to see posts about making the other animal icons for the book, please follow the links below:
Animals – Rooster, Camel, Parrot, Elephant, Goldfish, Cat, Duck, Sheep, Rabbit, Cow, Crocodile, Dog.

To keep up with new posts, please subscribe to this blog. Your contact info will not be sold or shared. If you’d like to see more frequent photos tracking the projects in my studio, please follow me on Facebook and/or Instagram.

MY BED is officially launched!

I’m happy to finally report that MY BED is officially released today, Sept. 8th! Thank you to all of you who pre-ordered signed copies of the book. Please be patient while I process 500+ orders and make a gazillion trips to the post office. I hope to get most of them out this week. Some of you may have received yours already, as I jumped the gun a bit and sent out some ahead of schedule. (Don’t tell my publisher!)
You can order signed copies in my shop here.

The book, MY BED: Enchanting Ways to Fall Asleep around the World takes the viewer on an international journey, showing where children sleep in varying cultures and living environments around the world. I like to think that it will help both children and adults view the world as a good place.

In creating the illustrations for My Bed, I feel as if I’ve gotten to visit all the children in the places they live around the globe, even though I stayed home. Author Rebecca Bond wrote a poem that celebrates our differences, while also bringing us together through the universal theme of children sleeping in their safe little beds. When making the artwork for each of the featured locations, I thought about what makes each child’s bed and home unique, as well as warm and welcoming. My aim was to portray a distinct sense of place for each culture, using architecture, furnishings, and landscapes as guides. I researched the different regions, looking at photos of children and their living situations, both inside and out, now and in the past.

I started working on the illustrations over 4 years ago, but after the 2016 election I put it aside for a year and a half and delved into political satire with the Wee Folk Players and the stop-motion animated film, Liberty and Justice. Looking back, this period has been the most trans-formative, both personally and professionally. Through the twists and turns of the past few years, I’ve learned that sharing my vision, whether it be in a precious, poignant or provocative way, is important.

Liberty and Justice – stop-motion animated film

Many of you have followed along through the process of making the scenes for the book. And there’s more to come! Throughout the fall, I will be posting stories and pictures about different aspects of the illustrations. Up until now, I haven’t posted images of the whole scenes, just details and process photos. But now that the book is out, I’ll show a few. For a full list of posts about making each scene, click here.

Click here to find out how I made the scene from Afghanistan.

Click here to see posts about how I made the Dutch scene.

Click here for a peek at making the South American scene.

Click here to see how I made the Indian scene.

BEDTIME STITCHES Exhibition
And there’s more exciting news! Salley Mavor: Bedtime Stitches, the touring exhibition of original embroidered artwork for the book debuts at the Cahoon Museum of American Art in Cotuit, MA. The exhibition will be there from Sept. 11 – Dec. 19, 2020. To ensure a safe and welcoming experience when you visit, please pre-register for timed entry. Masks will also be required. For those of you who live too far away to come see the show in person, the museum will be sharing the exhibition on their website as much as possible. To see other locations for Bedtime Stitches, go here.

To keep up with new posts, please subscribe to this blog (top right column on the home page). Your contact info will not be sold or shared. If you’d like to see more frequent photos tracking the projects in my studio, please follow me on Facebook and/or Instagram

bed book peek – Mongolia (part 3)

This is Part 3 in a series about how I made the Mongolian scene for my new picture book MY BED: Enchanting Ways to Fall Asleep around the World. I’m thrilled to say that the book will be published very soon – in 10 days! Thank you for following along during the past few years, while I shared bits and pieces of the process. For a full list of posts, go to this page.

Update: Signed copies of My Bed can ordered in my shop here. 40 pages, 9″ x 9″, words by Rebecca Bond, pictures by Salley Mavor, published by Houghton Mifflin Harcourt.

BEDTIME STITCHES Exhibition
And there’s more exciting news! Salley Mavor: Bedtime Stitches, the touring exhibition of original embroidered artwork for the book debuts at the Cahoon Museum of American Art in Cotuit, MA. The exhibition will be there from Sept. 11 – Dec. 22, 2020. To ensure a safe and welcoming experience when you visit, please pre-register for timed entry. Masks will also be required. For those of you who live too far away to come see the show in person, the museum will be sharing the exhibition on their website as much as possible. To see other locations for Bedtime Stitches, go here.

Along with the illustrations, additional artworks will be on view, including two fairy houses, many of my wee folk dolls, Polly Doll, as well as composition books and objects from my home studio. Also included is a doll house I built in 1975 while in college and which I’ve spent the past few months renovating and redecorating (photo below). These additional artworks will only be on view at the Cahoon Museum show.

Doll house built in 1975, renovated in 2020

Now, back to the Mongolian scene. Part 1 and part 2 are about making the little yurt, sheep, plants, door and flag. This 3rd and last part is about the yurt’s cozy interior that appears in the cutaway.

In my research, I found photographs of families inside their yurts, sitting on beautiful carpets, always with a stove in the center. I noticed painted red furniture, so I made a little chest decorated with a chain-stitched locking key pattern.

To keep the felt straight and firm, I edged the pieces with wire, which is stitched over so you don’t see the shiny metal.

For the stove, I used black felt and various hooks and eyes that look like mini hardware.

As with the red chest, the different pieces are edged with wire to keep them firm. For the feet, I sewed on square clay beads. The stove pipe is made with acid free card board covered with felt.

I made a little tea kettle of wood and wire. The lid is a button with a seed bead knob sewn on top.

A little metallic acrylic paint makes it look authentic.

I made a little rug using brocade upholstery fabric as a base and chain stitched a bold pattern around the border.

The child has a painted wooden bead head and wire hands.

He only need one arm because most of his body will be hidden under the covers.

For the bed covering, I embellished a piece of printed cotton that must be at least 50 years old. In fact, every piece of fabric and felt used in all of the illustrations for this book came from my collection. That goes for all of the found objects as well.

I used red leather strapping to represent the painted red slats that hold up the walls. Lengths of leather are folded over and sewn together and then sewn in rows.

And lastly, I sewed glass and metal beads on top of the chest, just to make it look homey. I hope you enjoyed this behind the scenes peek at making the Mongolian scene. For a full list of posts about My Bed, please refer to this page.

To keep up with new posts, please subscribe to this blog (top right column on the home page). Your contact info will not be sold or shared. If you’d like to see more frequent photos tracking the projects in my studio, please follow me on Facebook and/or Instagram.

Bed book peek – Mongolia (part 2)

My_Bed_Mongolia (1 of 1)-15

This is Part 2 in a series about how I made the Mongolian spread for my new picture book. Photographs of my stitched bas-relief scenes will be printed in MY BED: Enchanting Ways to Fall Asleep around the World. Here are links to posts about making other illustrations for the book: South America, JapanNorth AfricaGhana, Russia, Scandinavia, North AmericaHollandIran, and Afghanistan. To see a list of all my books, click here.

Update: Signed copies of My Bed can ordered in my shop here. 40 pages, 9″ x 9″, words by Rebecca Bond, pictures by Salley Mavor, published by Houghton Mifflin Harcourt. ISBN 978-0-544-94906-5

Art Exhibition: An accompanying national tour of the original artwork reproduced in the book will debut at the Cahoon Museum of American Art in Cotuit, Massachusetts from Sept. 11 – Dec. 19, 2020. Information about the exhibition is on this page.

Part 1 looks at the process of making the yurt or ger, sheep, and plants in the Mongolian scene. This Part 2 will focus on the creating the door.

My_Bed_Mongolia (1 of 1)-39
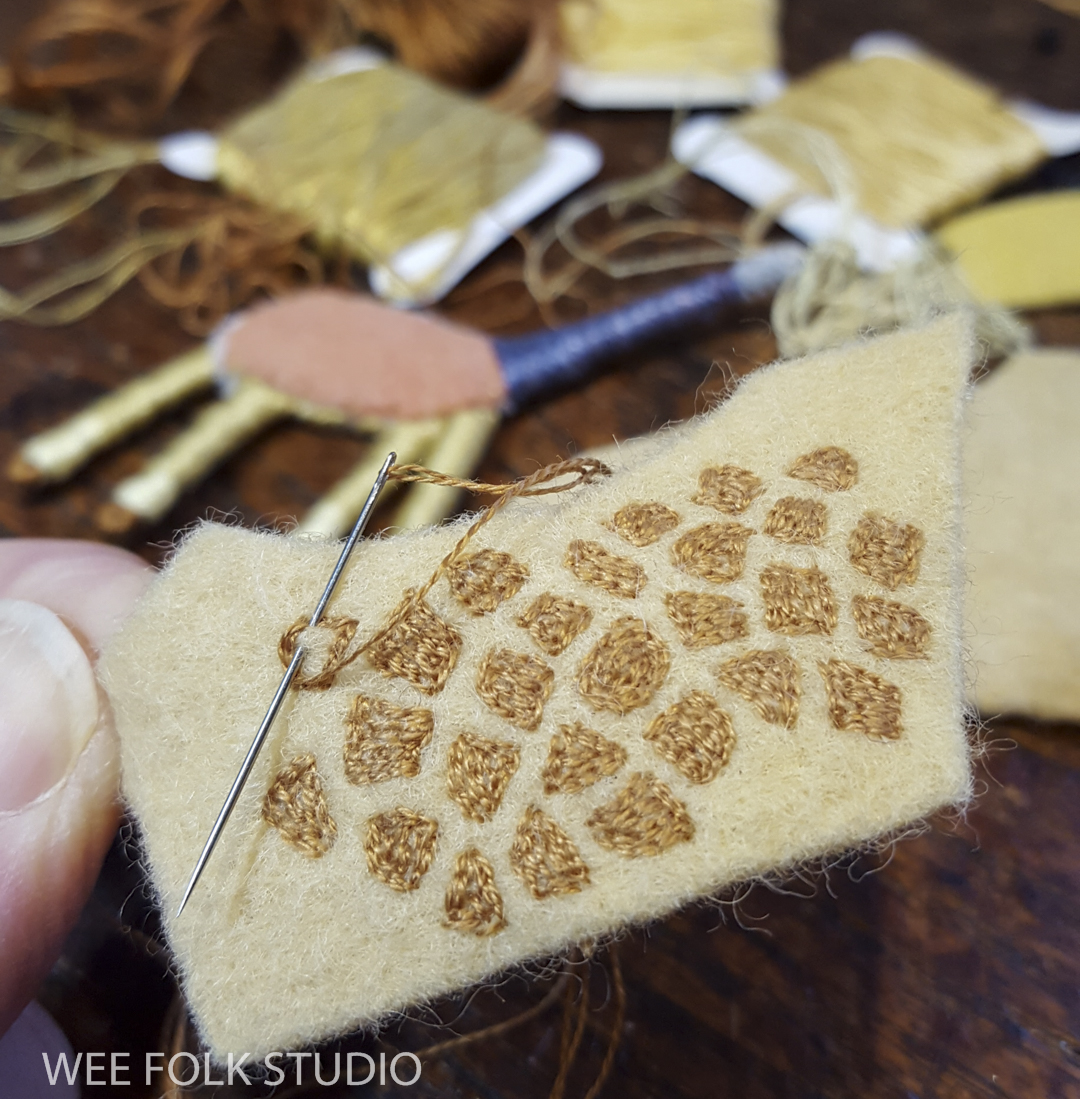
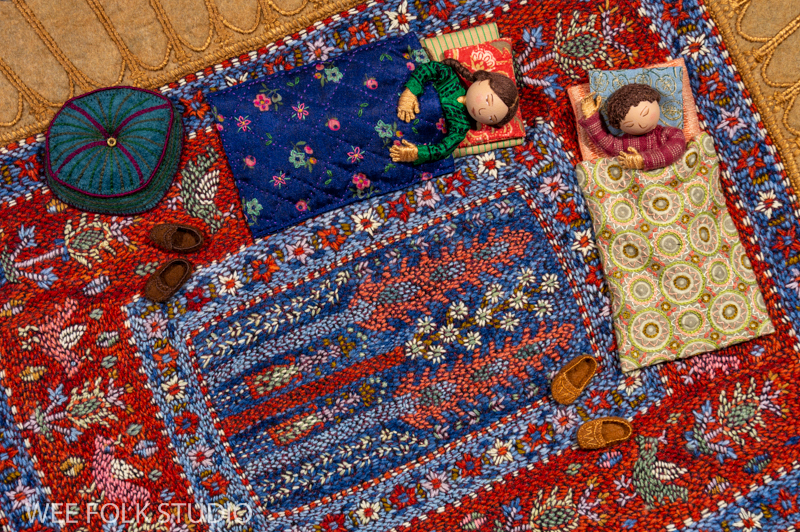
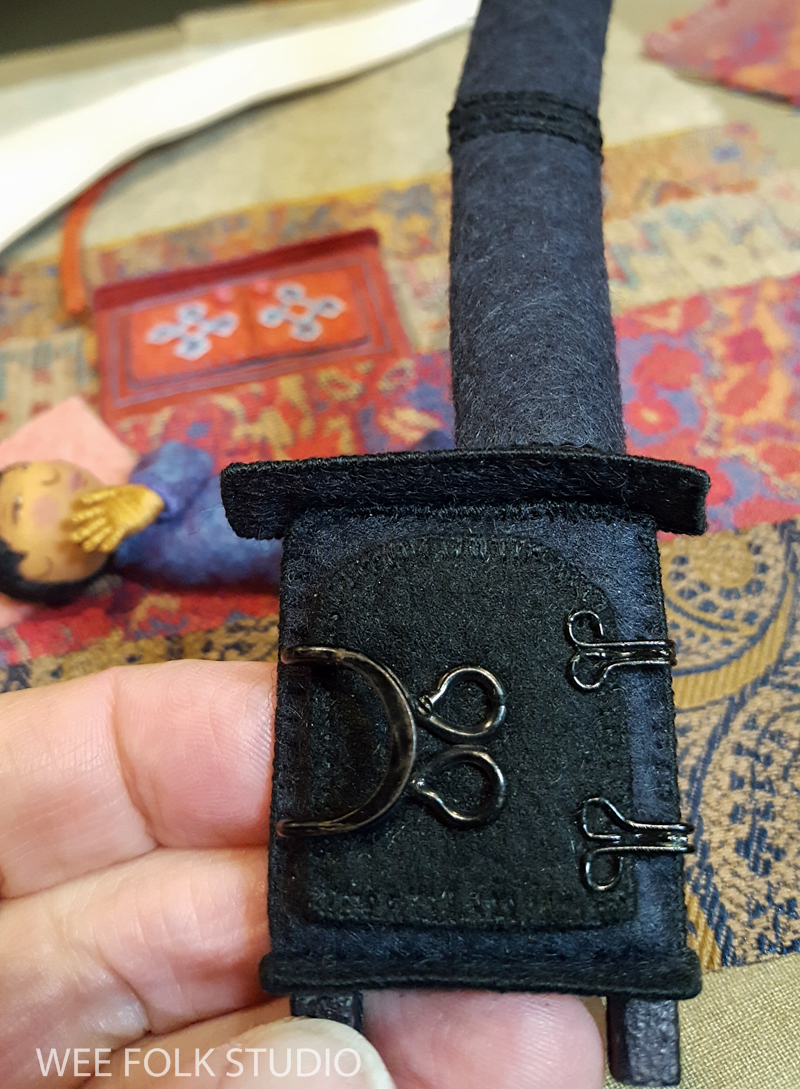
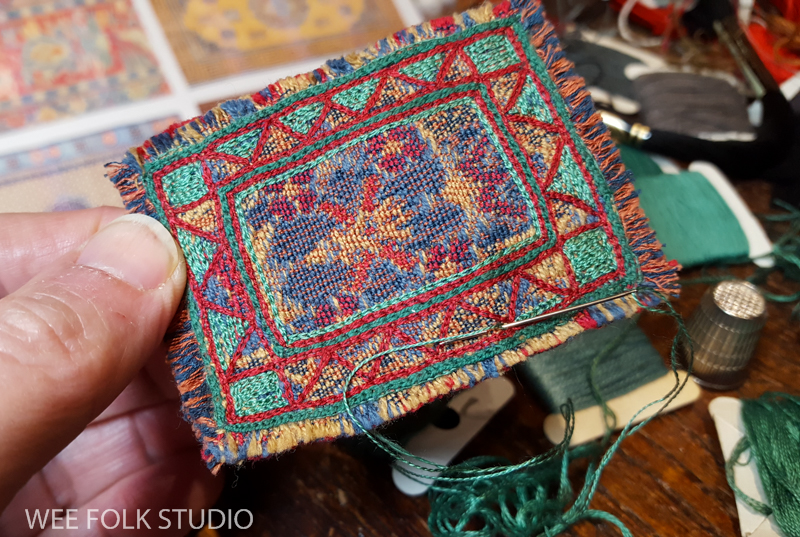
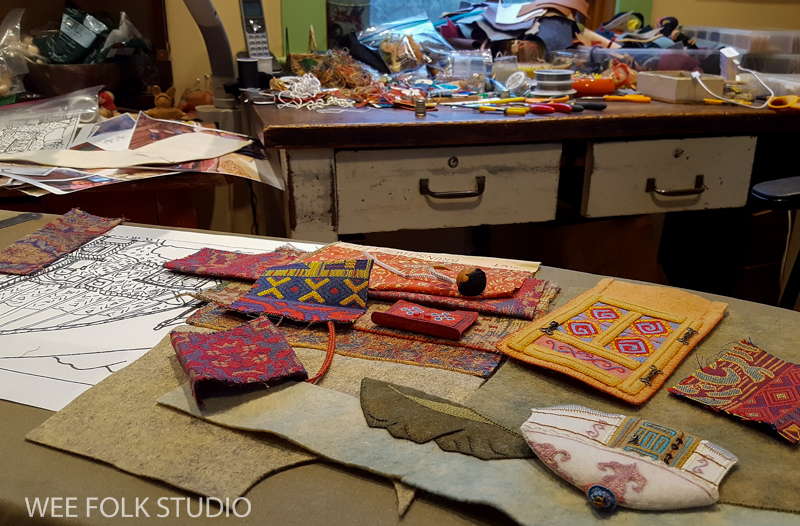
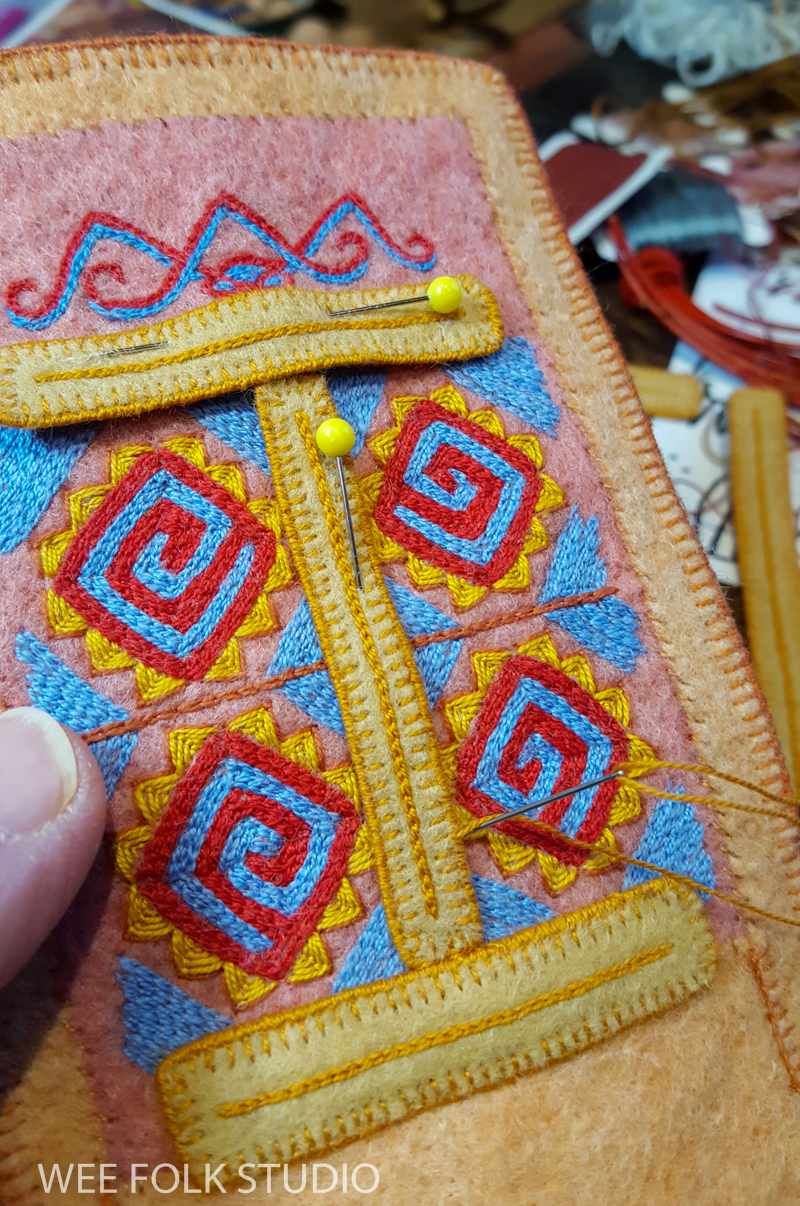
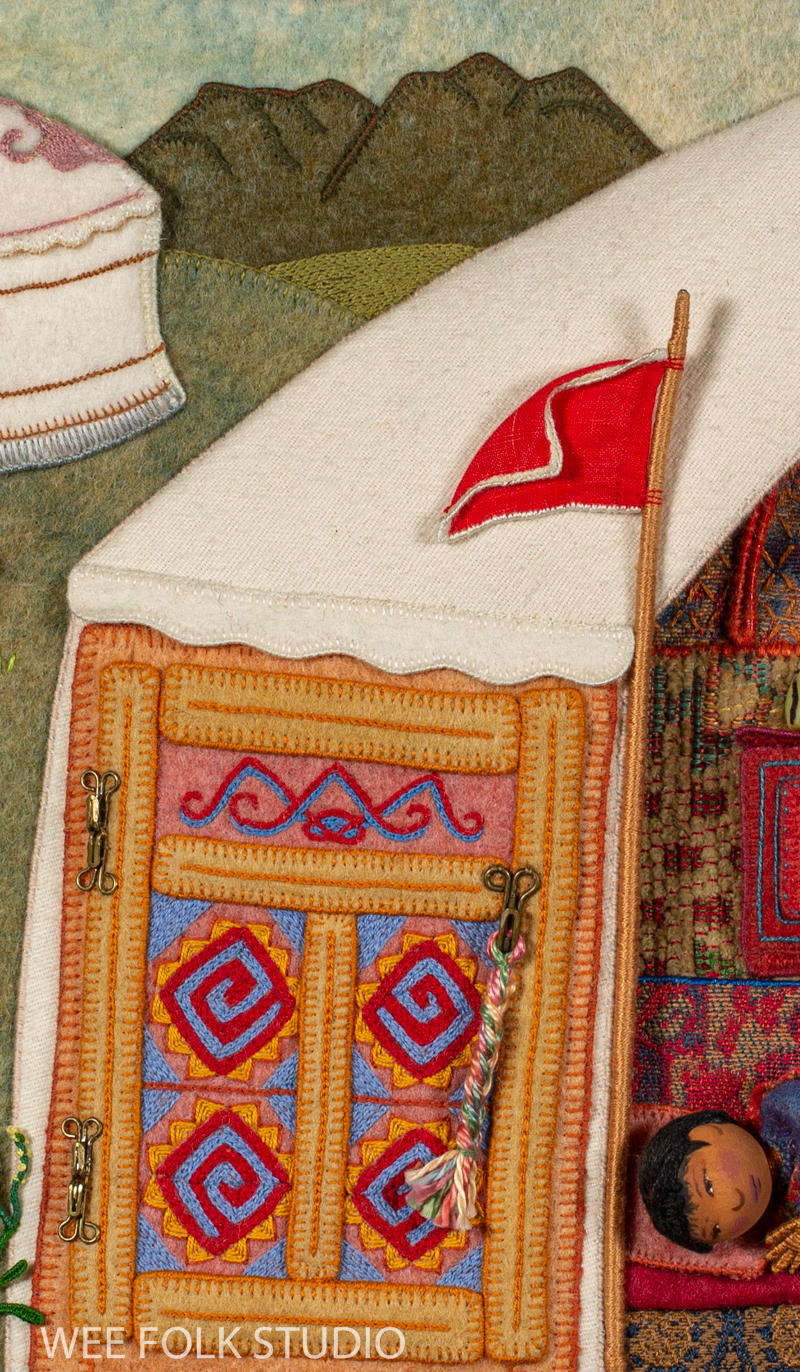
When researching the yurts or gers in Mongolia, I was impressed with the bold and beautiful doors. They are made of wood panels painted with traditional geometric motifs in predominately primary colors. For my design, I referenced several doors I saw in photos, combining the squares and triangles to make a pattern I liked.
I don’t remember exactly how I transferred the design from paper to the felt, but it probably involved a ruler and eyeballing it with a chalk fabric pencil. The red basting stitches mark where panels will later be placed on top. I colored in the patterns with chain stitched rows of cotton flower thread. The yellow triangles are made with fly stitches.

My_Bed_Mongolia (1 of 1)-4

Stitching patterns like this is the closest I get to doing old-style embroidery. It feels as calming as coloring in between the lines in a coloring book. 

My_Bed_Mongolia (1 of 1)-11

To replicate the wood panels, I cut strips of felt and outlined them with blanket stitches. To make them firm, I edged the panels with wire, which I covered over with stitches.

My_Bed_Mongolia (1 of 1)-12

For the door’s hardware, I poured through my collection of hooks and eyes until I found some of the right scale.

My_Bed_Mongolia (1 of 1)-13

I sewed them in place back to back, so they looked like door hinges.

My_Bed_Mongolia (1 of 1)-14

In the research photos, I often saw red flags flying on poles near the doorways. To make mine, I cut the corner off of an old red hankie that had delicate white edging. I then finished off the other two sides. I added wire around the outside edge so that it could be bent to look like a flag flapping in the wind.

If you’ve followed me for a while, you will have noticed that besides fabric, thread and beads, wire is an essential component of my artwork. I use it as a structural framework to keep limp materials upright and to form free-standing shapes.

My_Bed_Mongolia (1 of 1)-17

Another feature of the doors is a hanging rope-like pull. To make one, I braided strands of pima cotton.

My_Bed_Mongolia (1 of 1)-32

My_Bed_Mongolia (1 of 1)-33

Please stay tuned for Part 3 in this series, which will be about making the child and the interior of the Mongolian yurt or ger.

My_Bed_Mongolia (1 of 1)-44

To keep up with new posts, please subscribe to this blog (top right column on the home page). Your contact info will not be sold or shared. If you’d like to see more frequent photos tracking the projects in my studio, please follow me on Facebook and/or Instagram.