Wedding Banner: Katherine & Basil

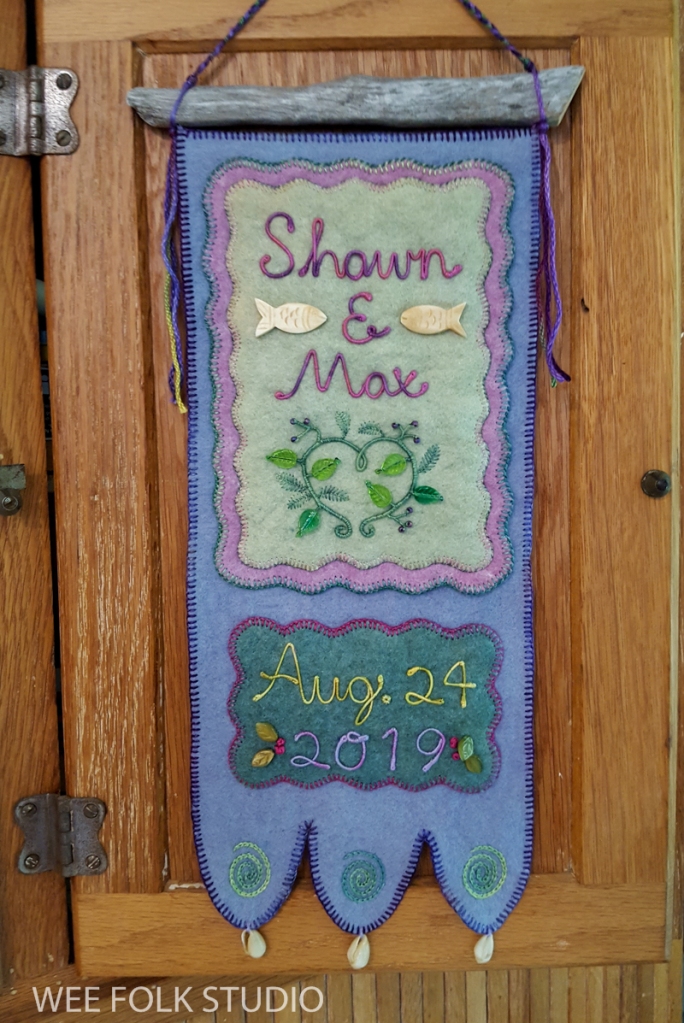
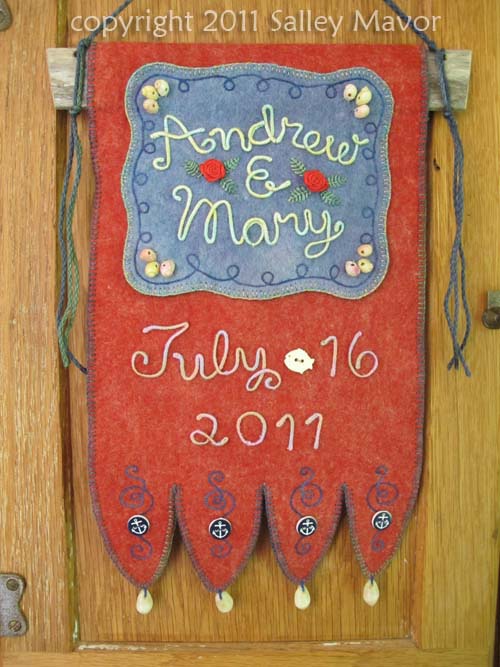
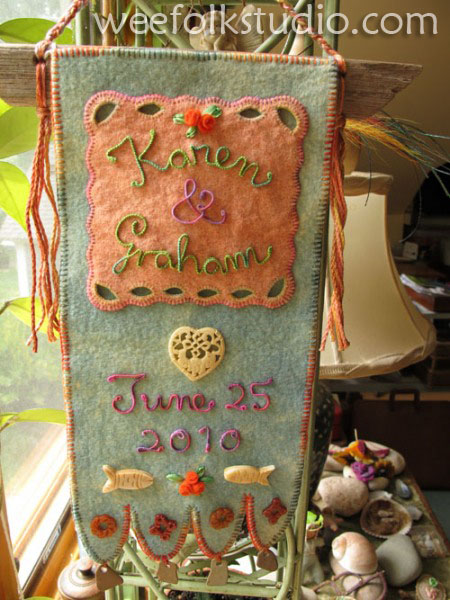
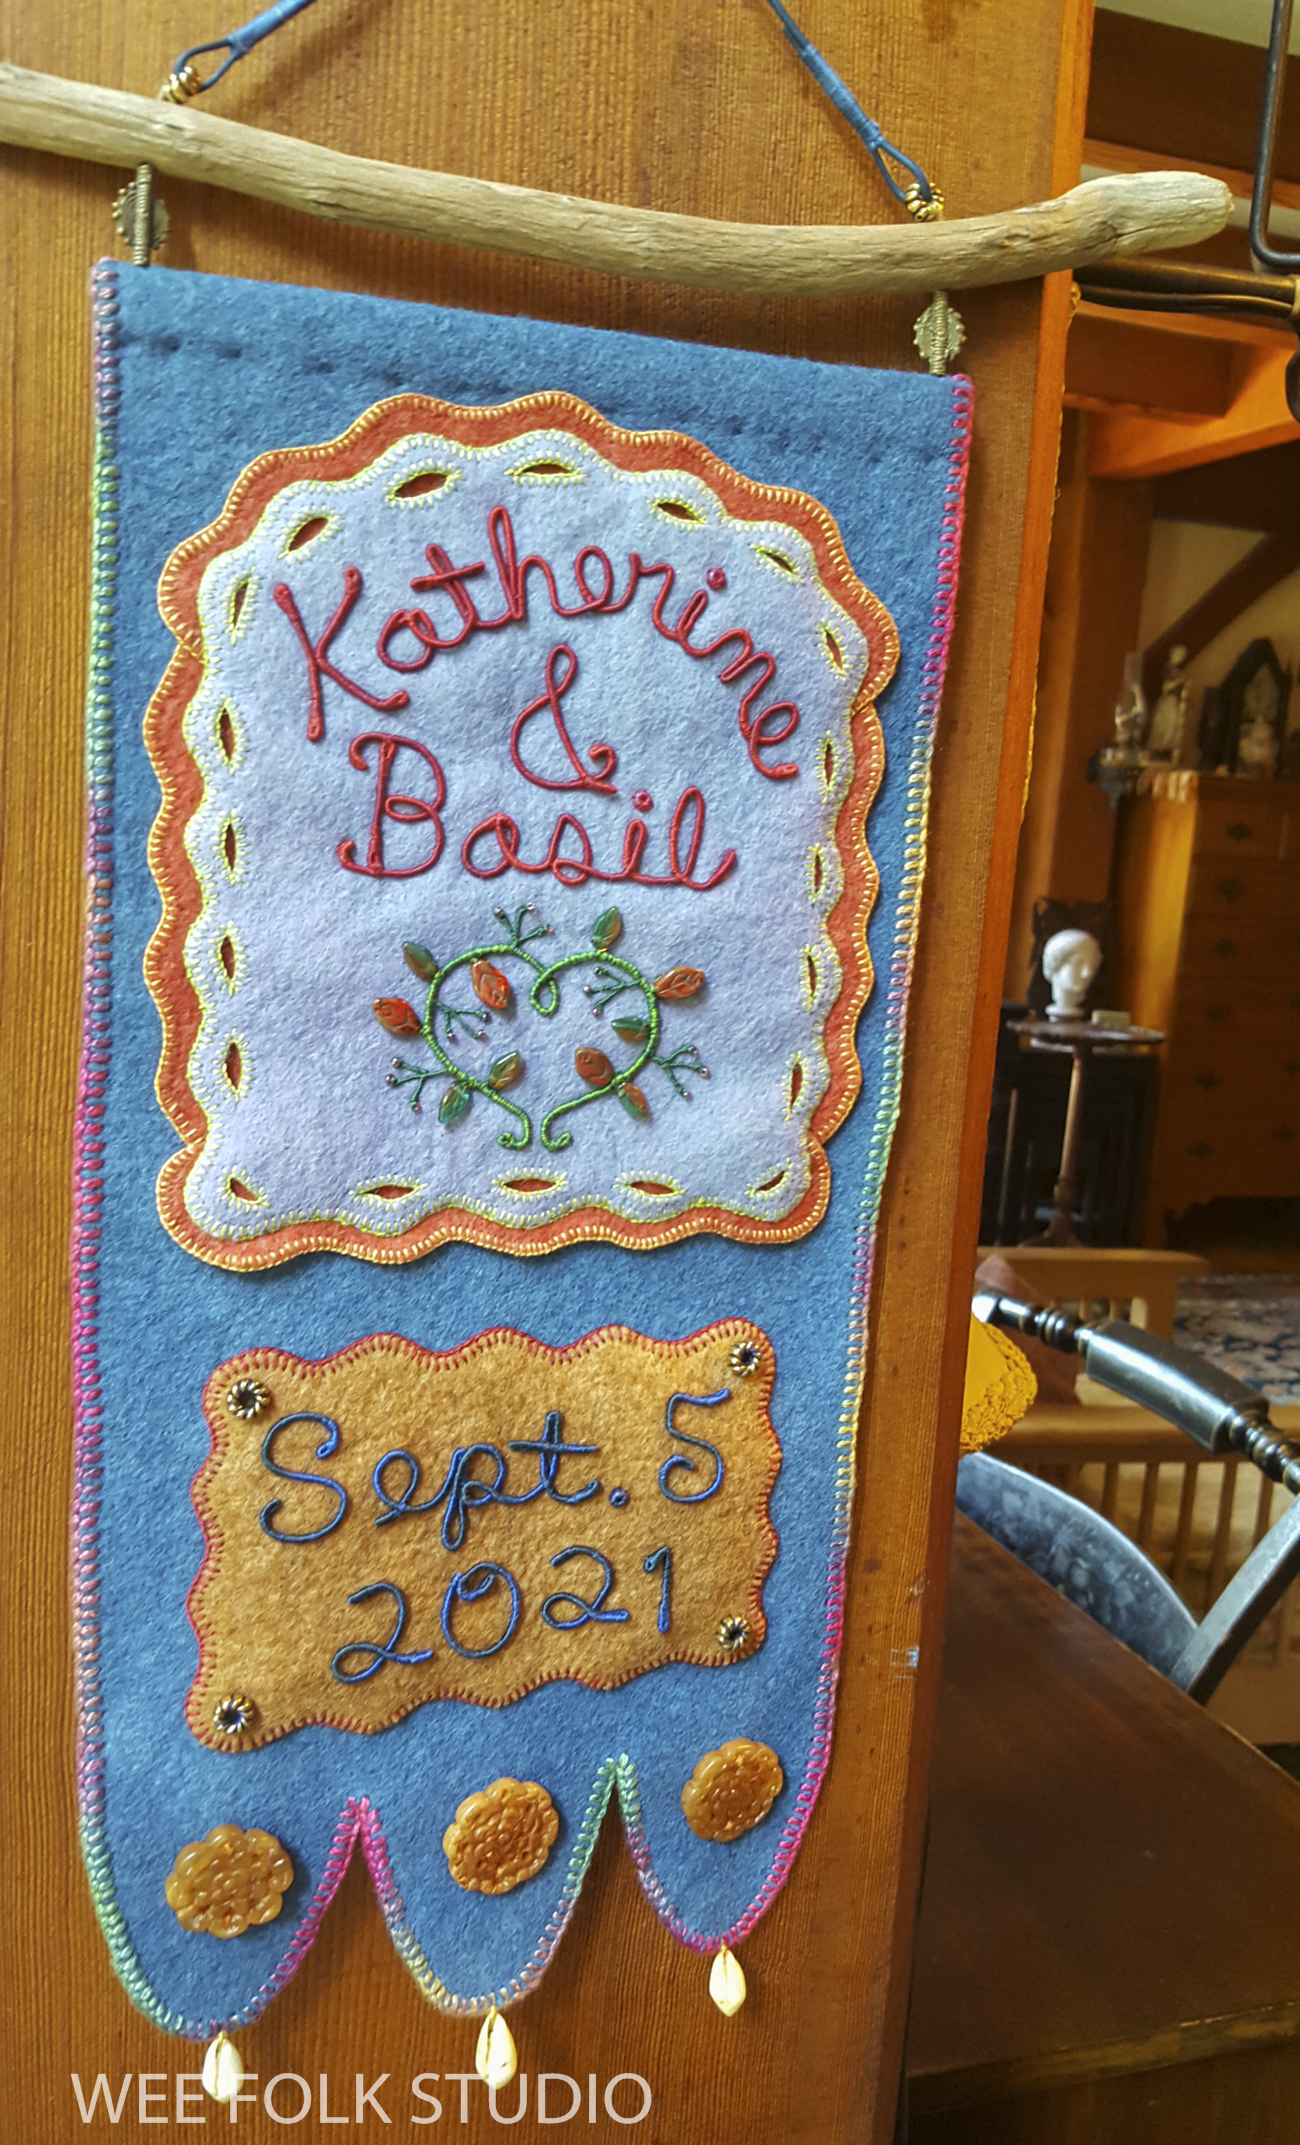
We had the pleasure of attending the wedding of a family friend earlier this month in Boston. As with many couples during these Covid times, Basil and Katherine had to postpone their wedding by a year. It was a lovely event and we felt happy to be a part of their special day and to see old friends. For the past decade or so, I’ve been making personalized wedding banners as gifts. They combine two of my favorite things, hand embroidery and handwriting. You can see this and other banners by scrolling through the archives here.

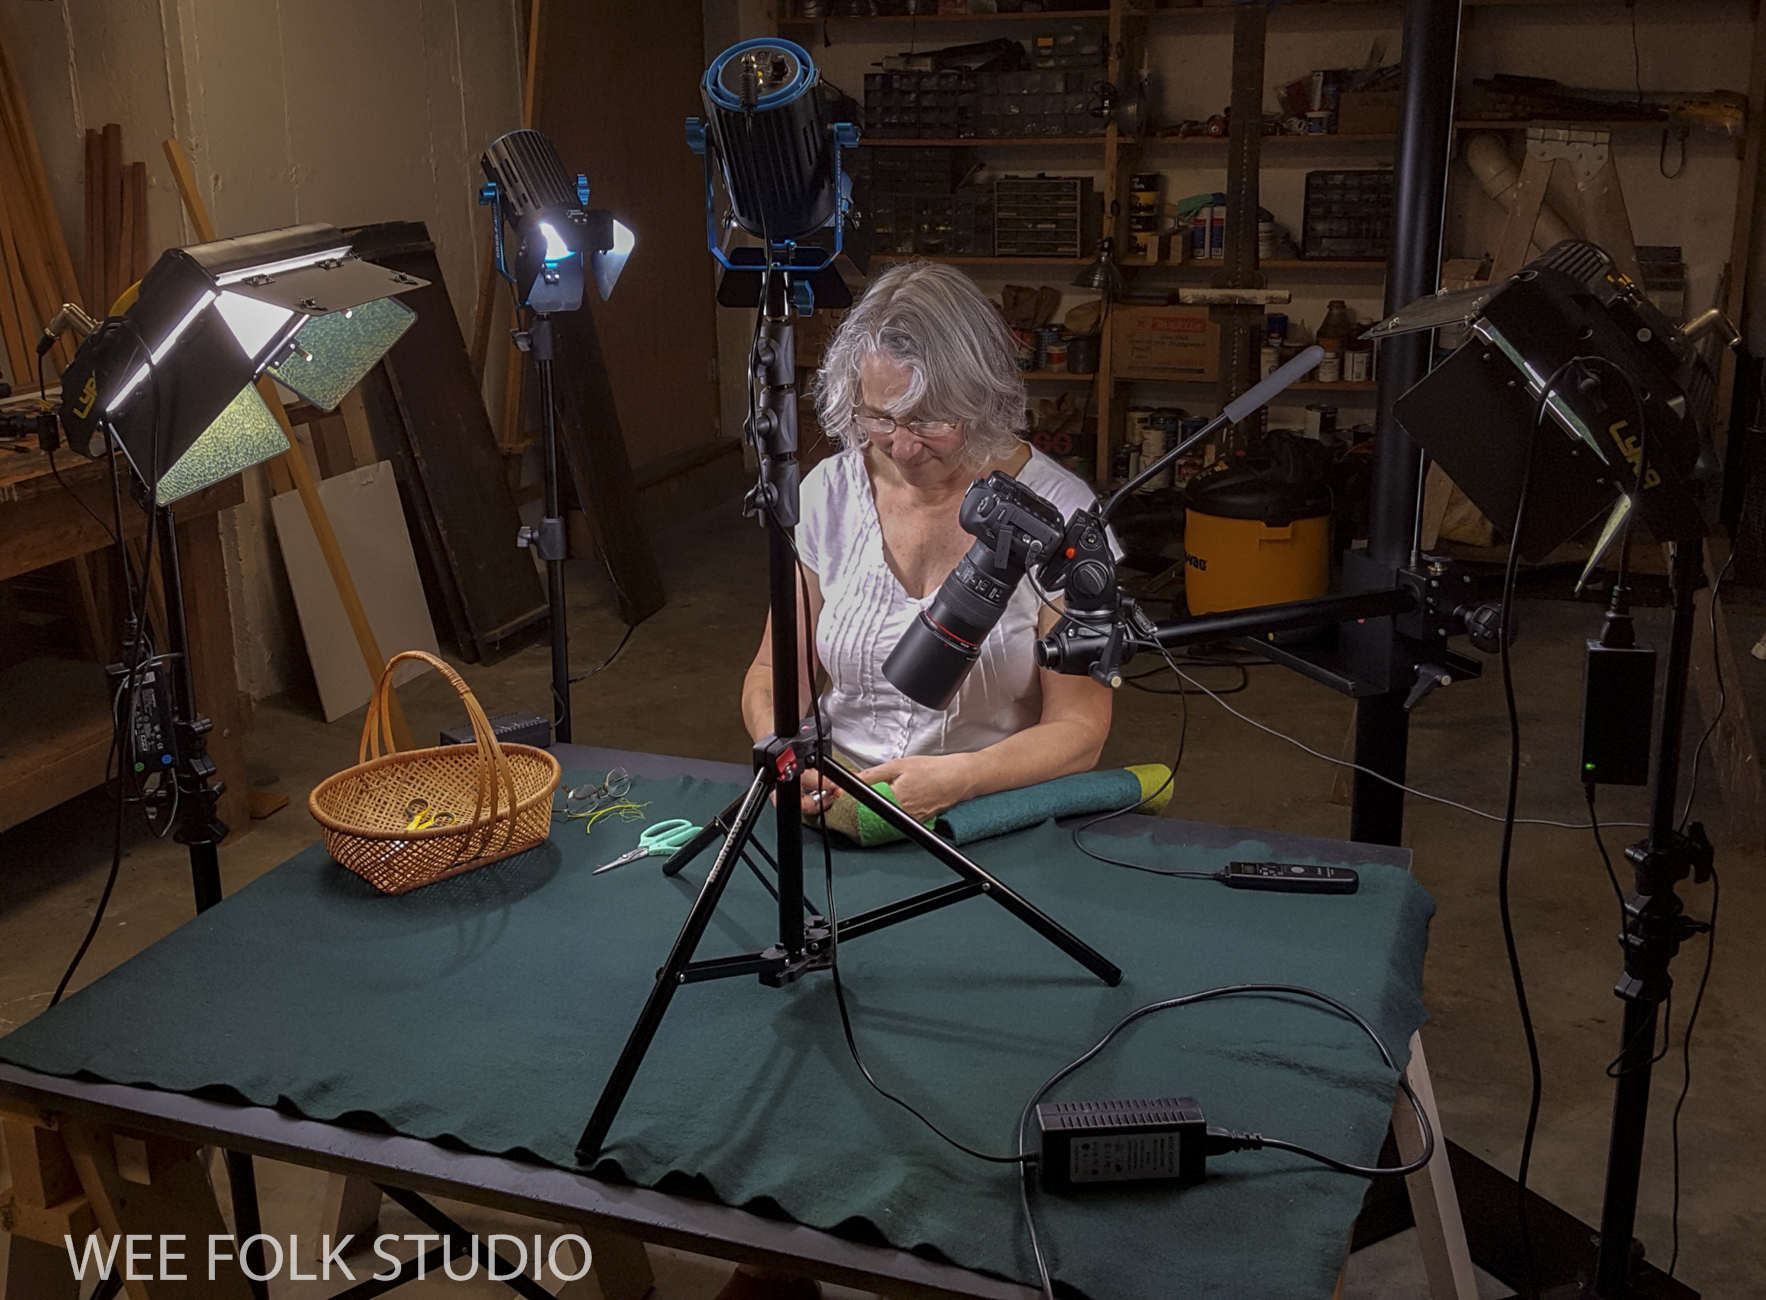
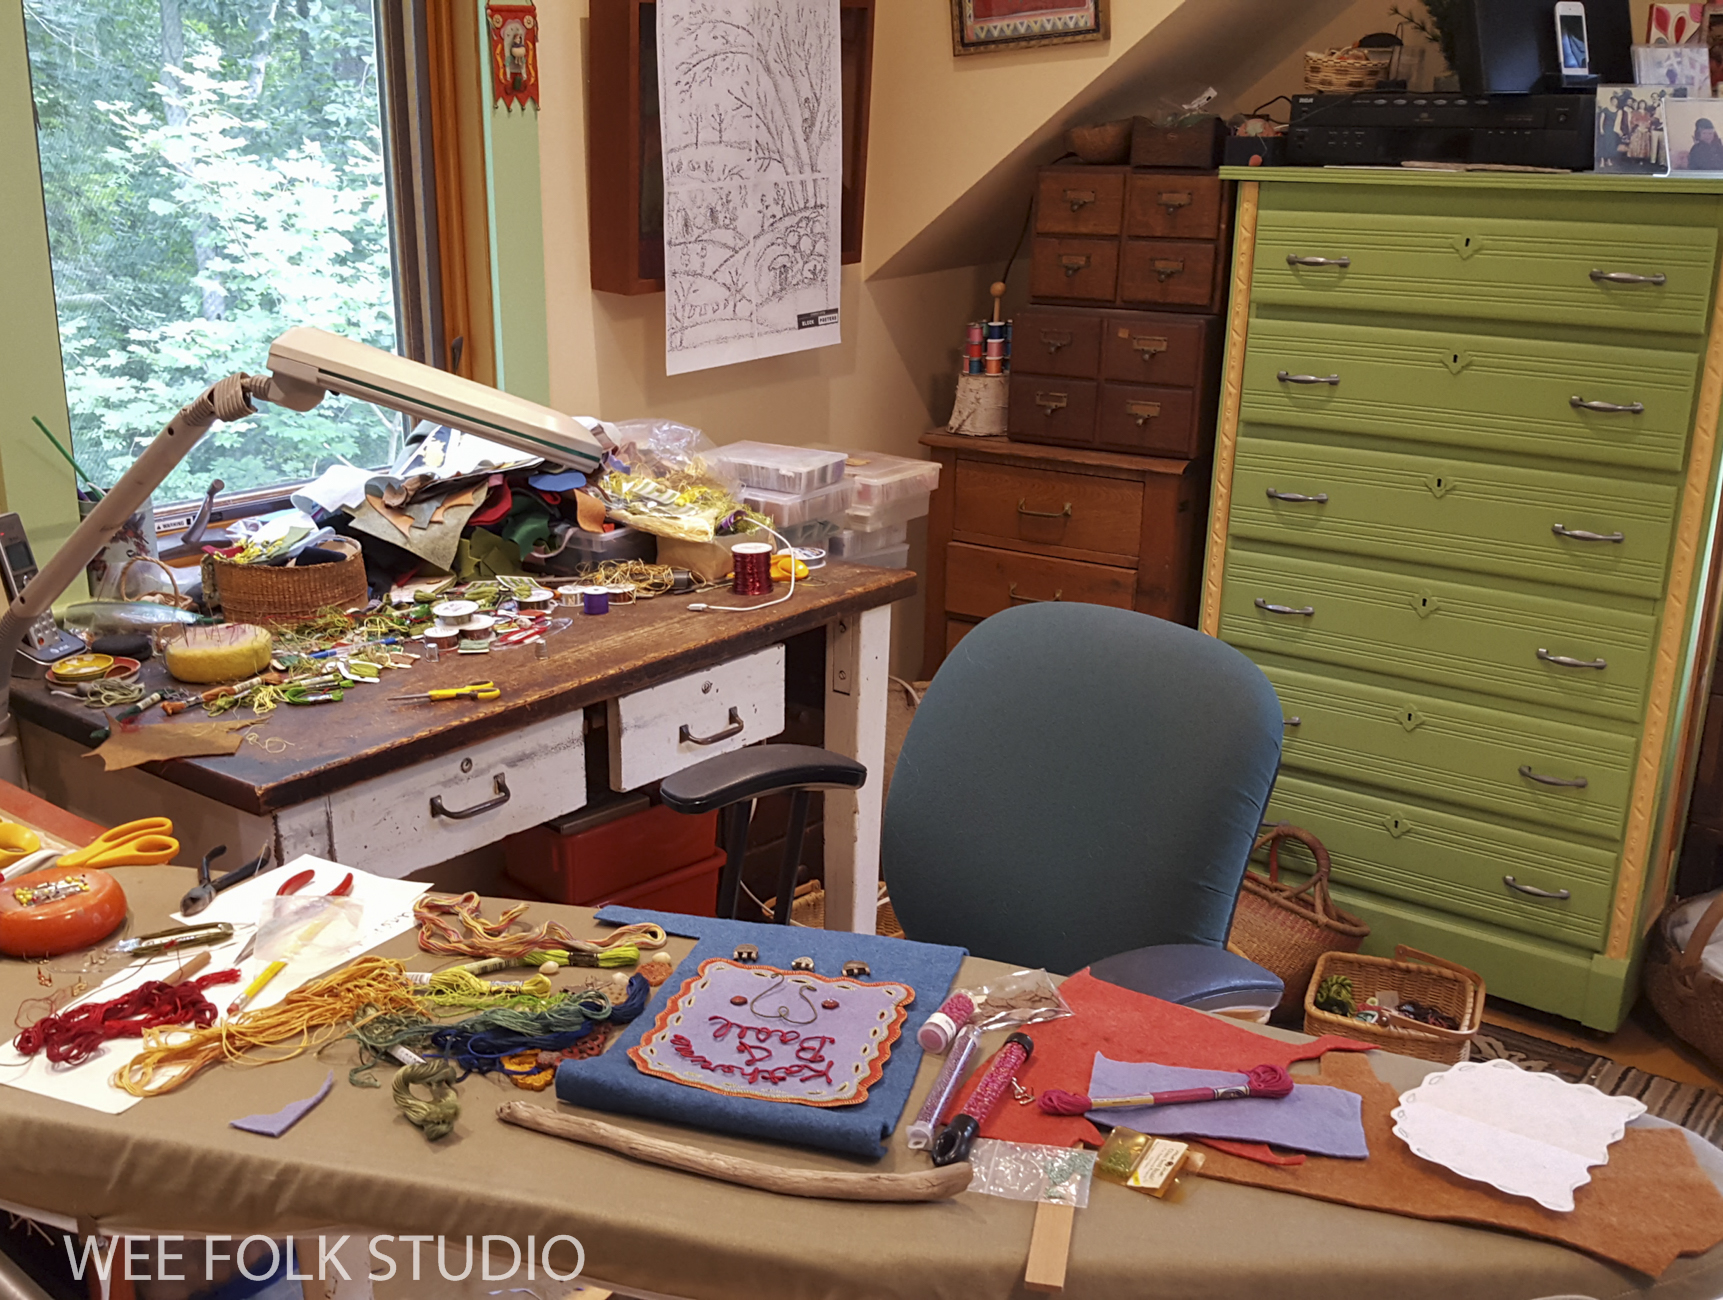
This post includes three Stitch Minute videos, which give closeup views of my process in action. The idea of making a series of short snippets of different aspects of my working methods came about when I saw the overwhelming response to a simple cell phone video of me stitching French knots that I posted on Facebook and Instagram. Since then, Rob and I have set up a filming studio in the basement, where we can control the lighting and camera positioning. Everything is ready to go, so it’s easy to bring whatever I’m working on in my studio into the basement and film a little bit. Of course, Rob has to be available, so I work around his schedule. In sharing these videos, my aim isn’t to instruct, but to inspire, by offering a glimpse over my shoulder. 

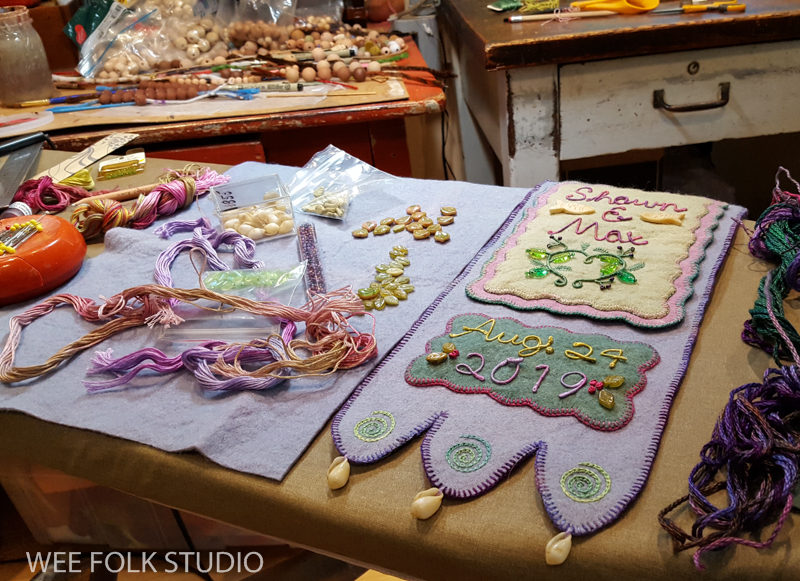
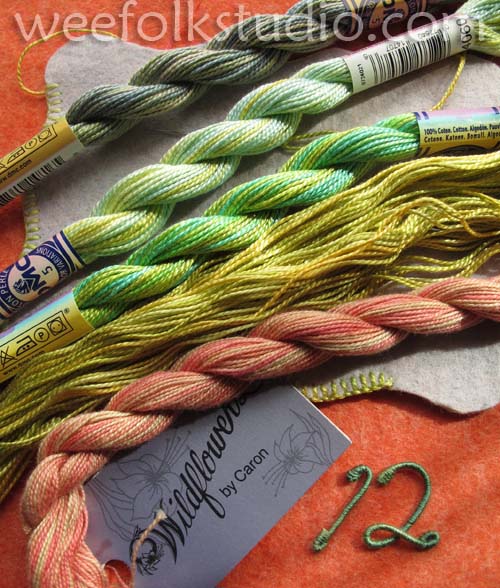
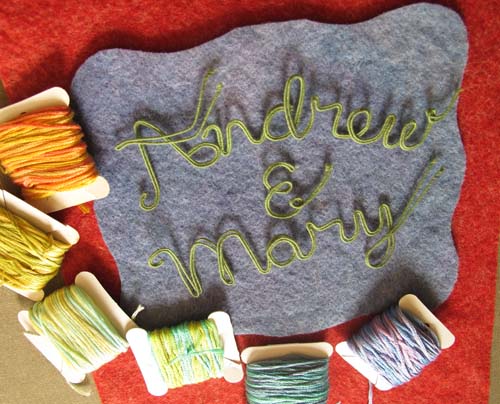
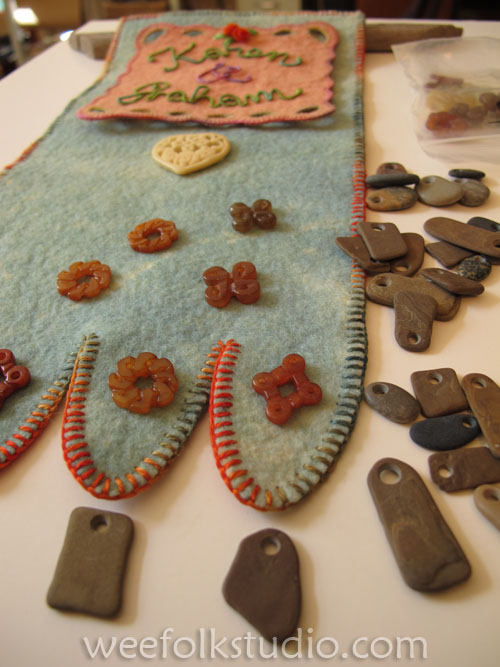
Whenever I begin a project like this, I choose a color scheme and pick out materials that I might use.

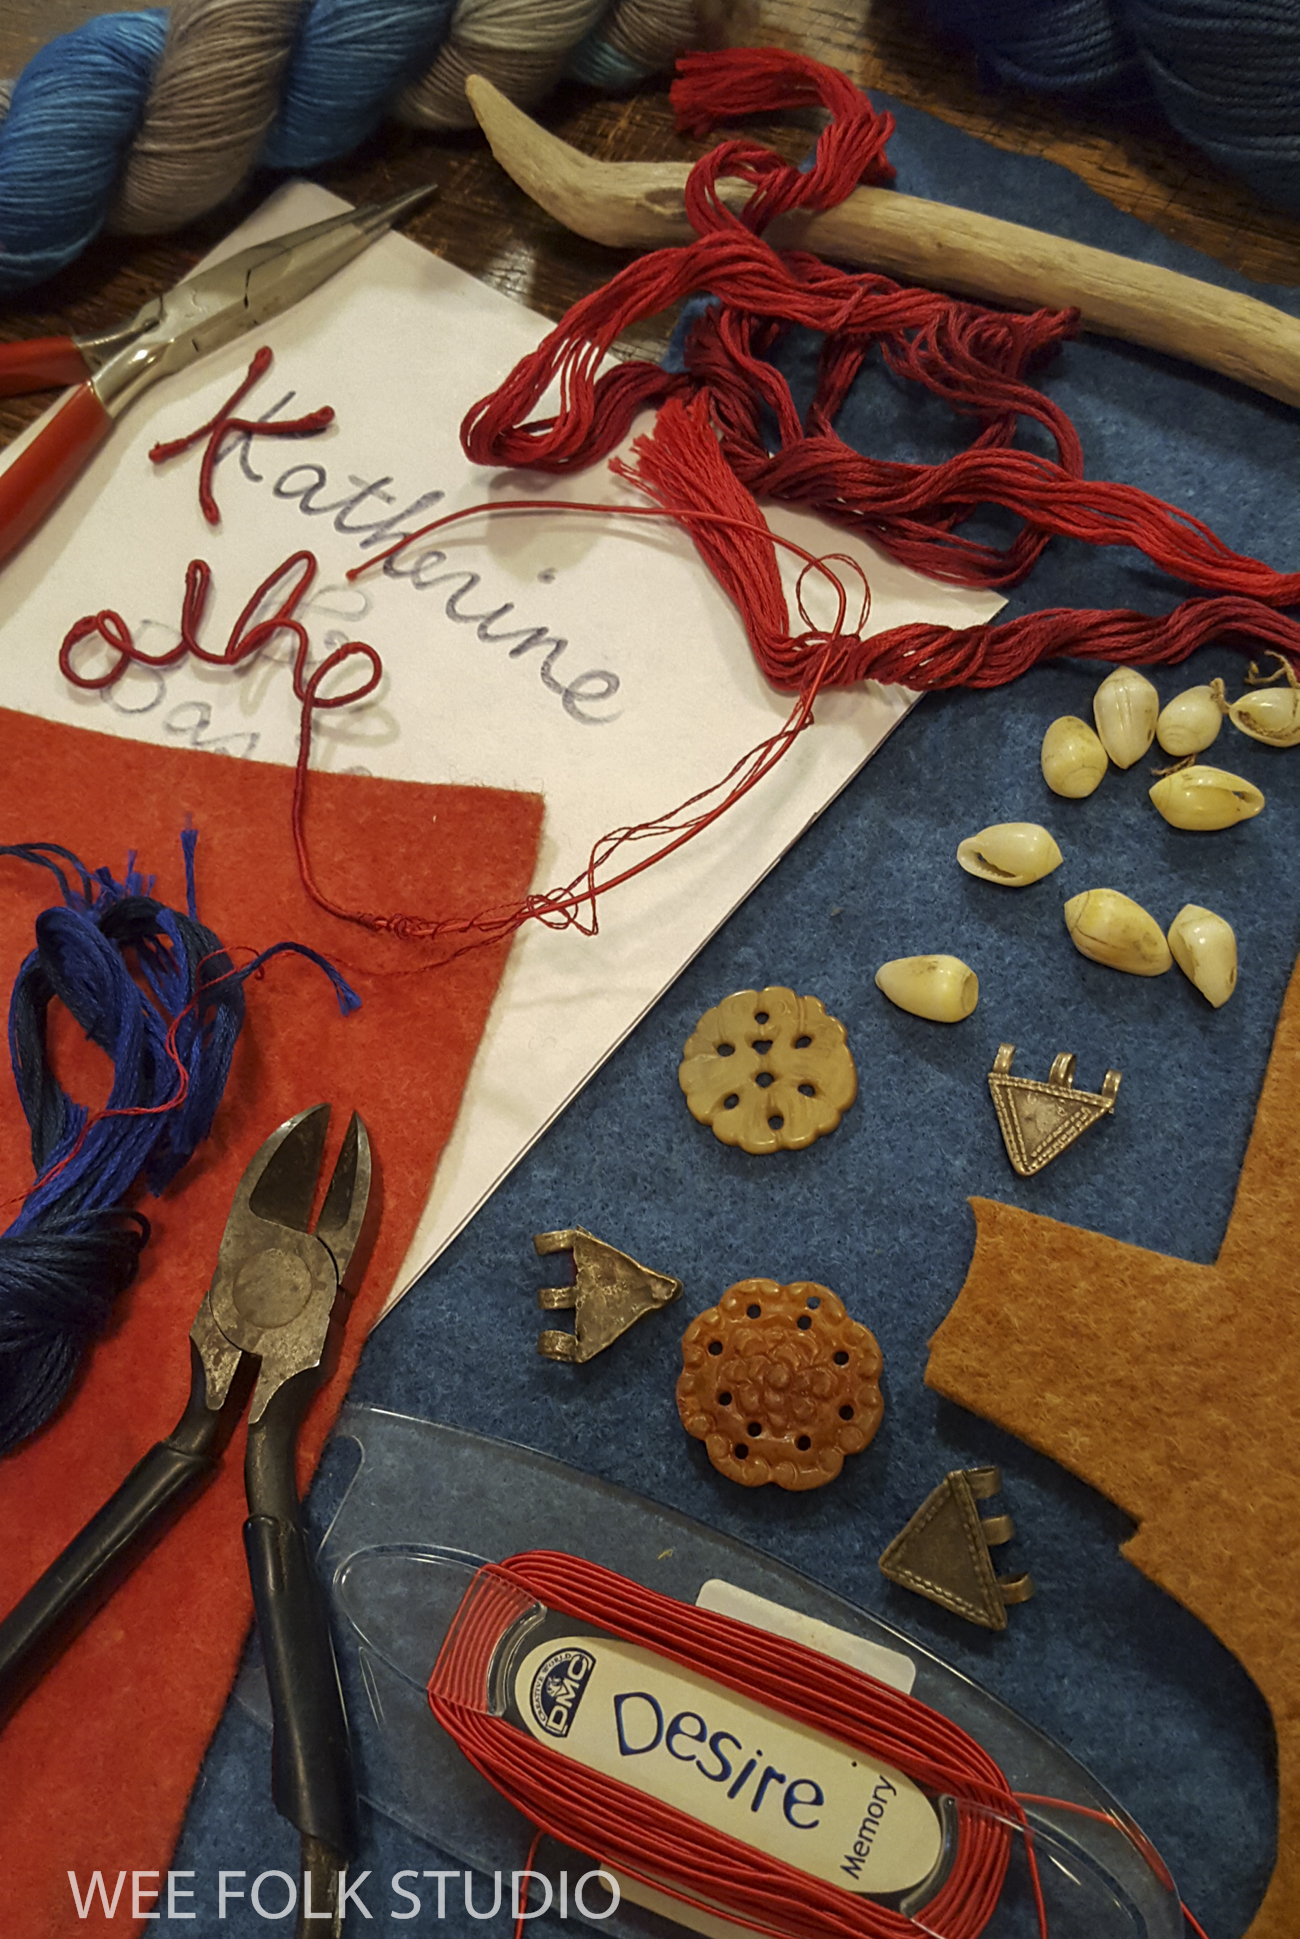
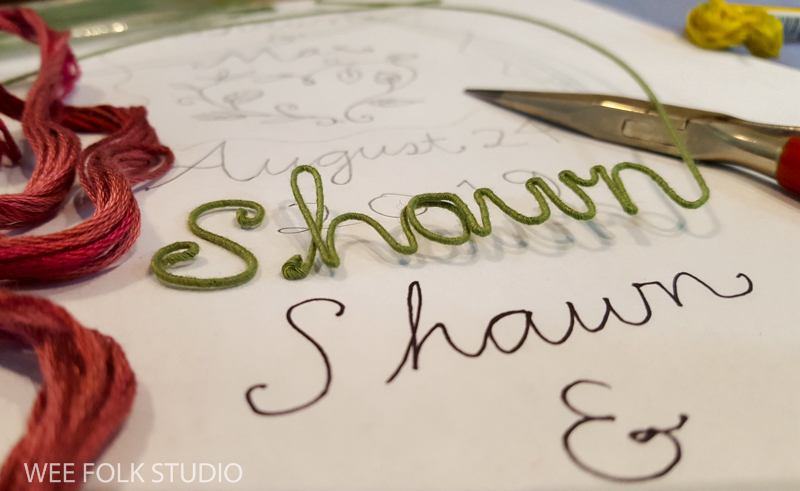
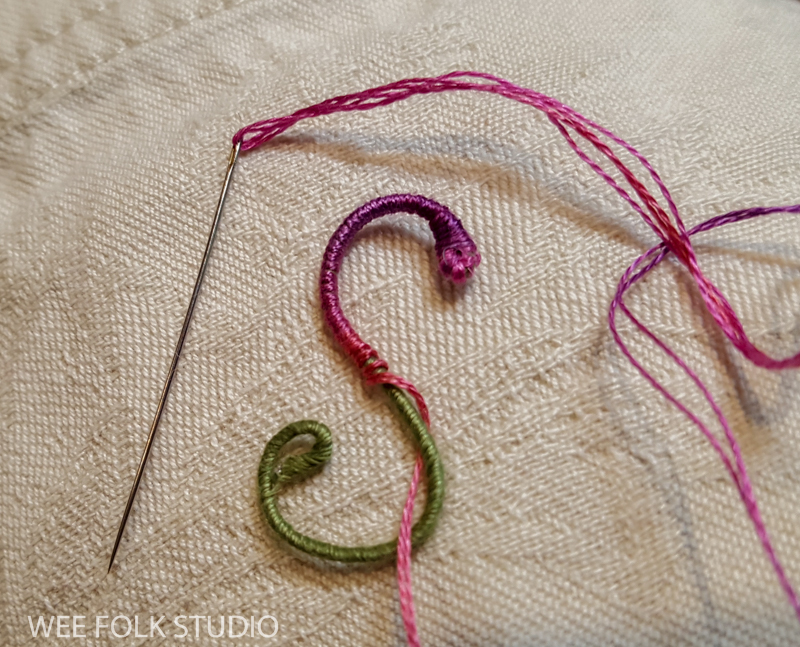
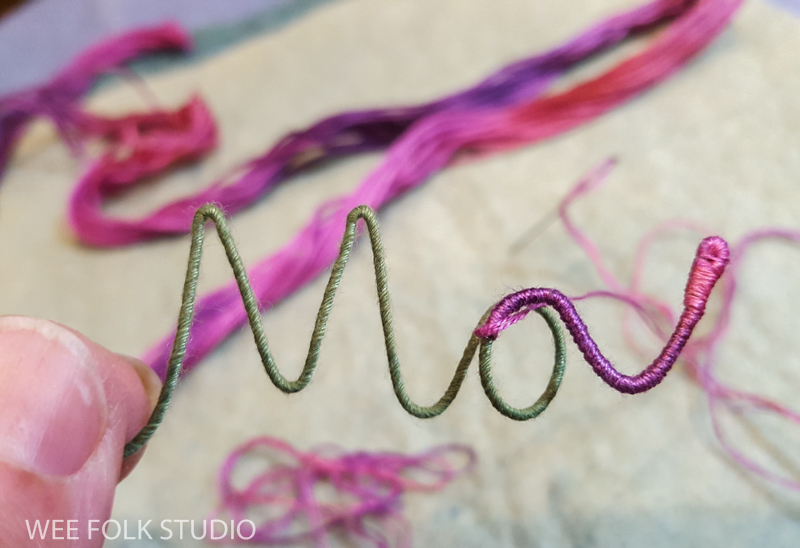
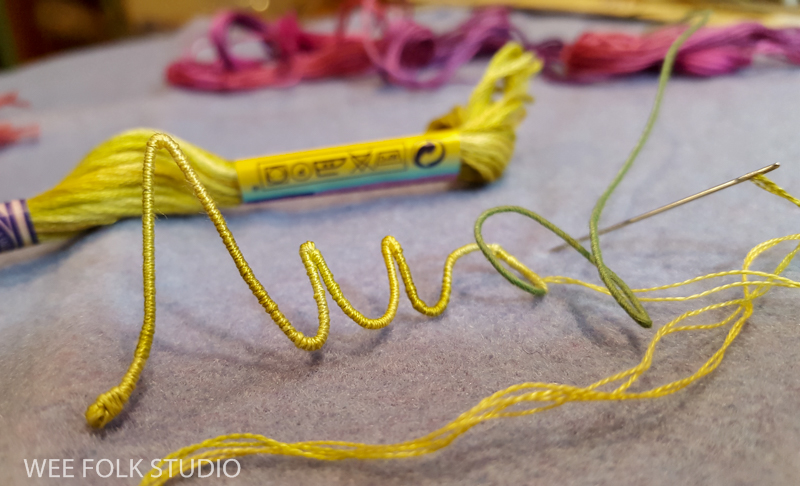
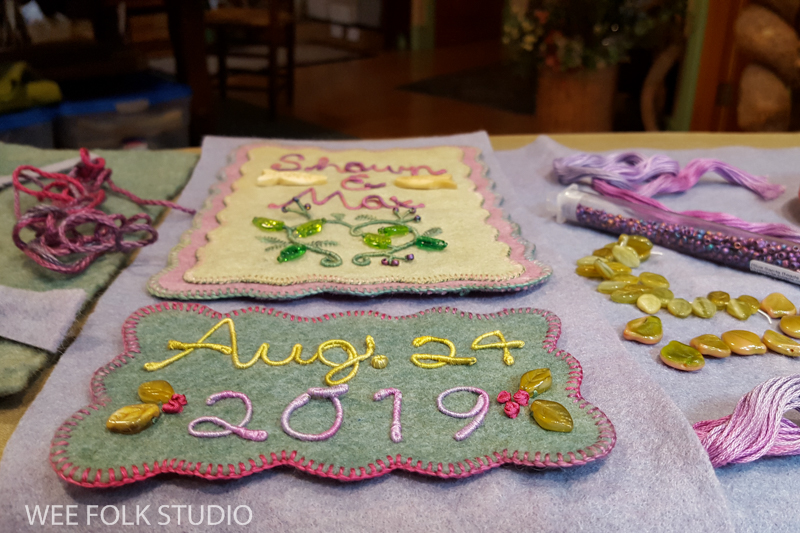
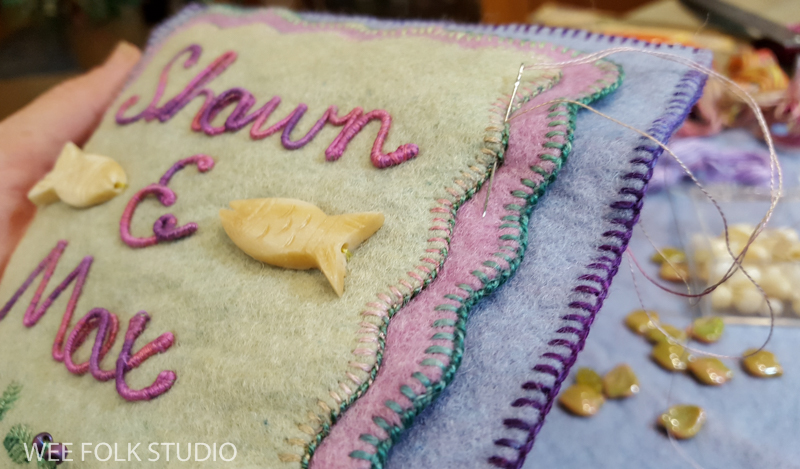
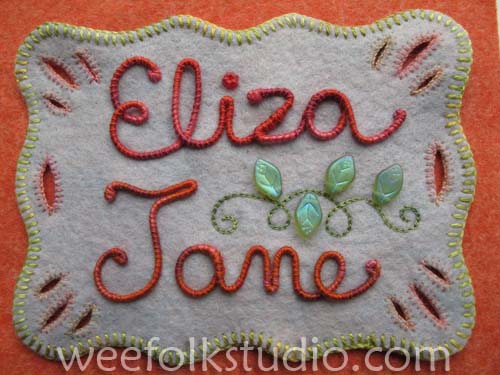
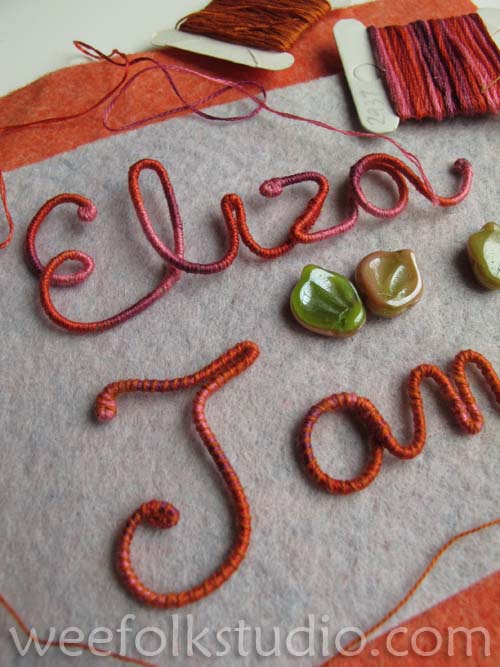
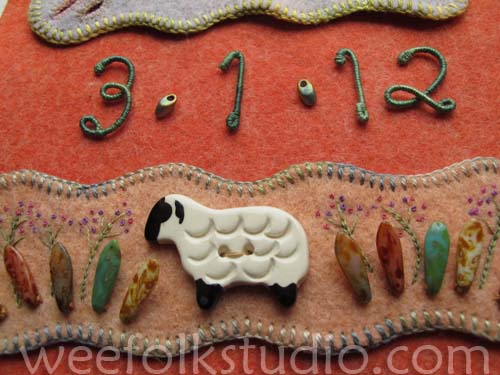
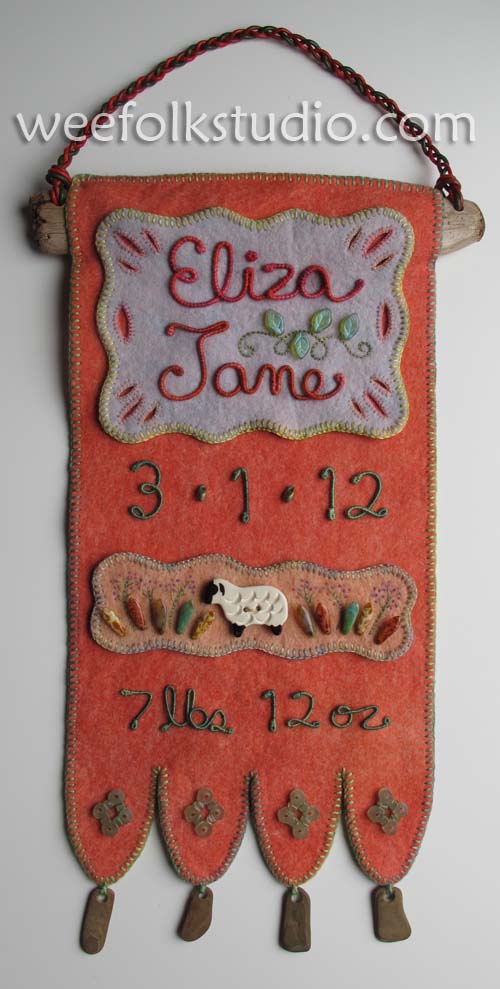
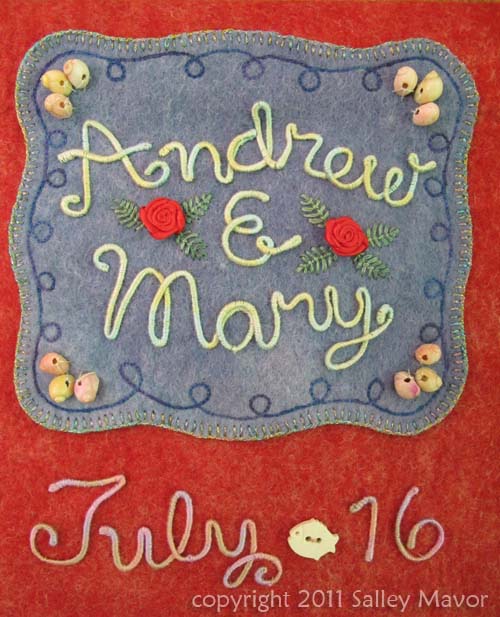
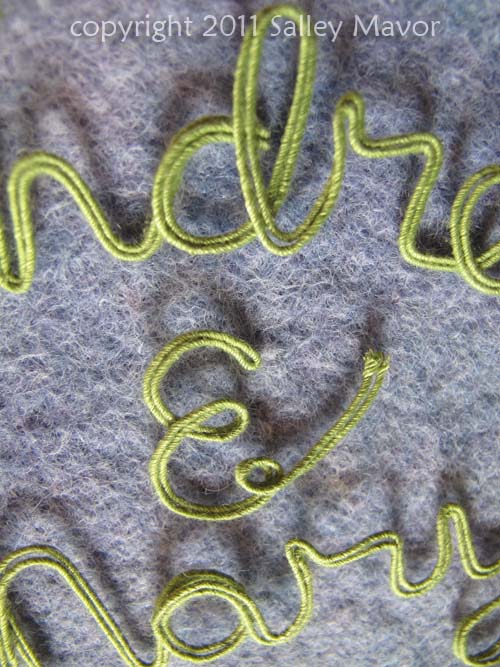
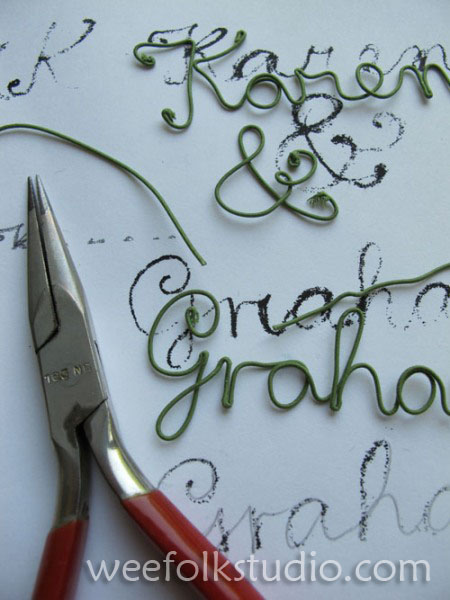
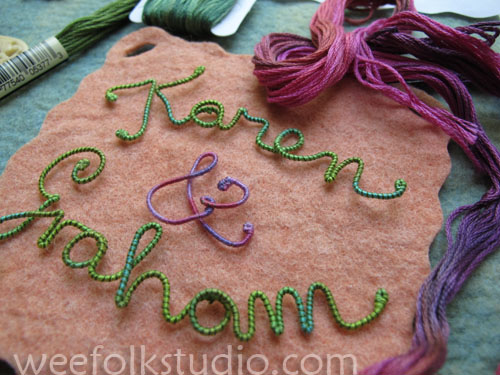
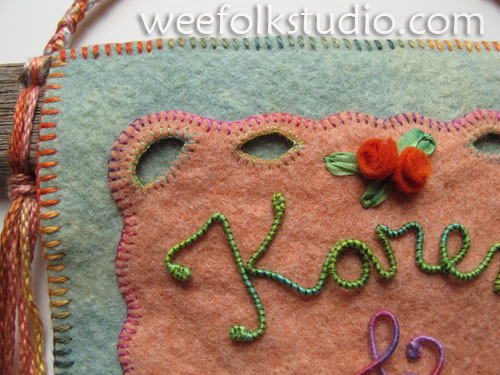
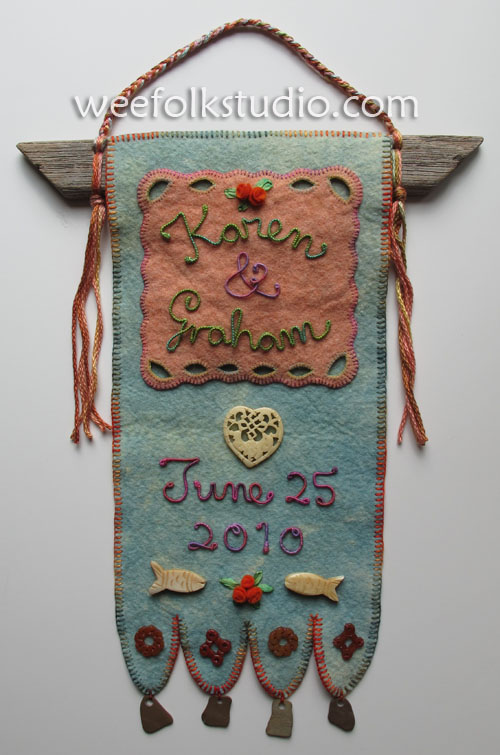
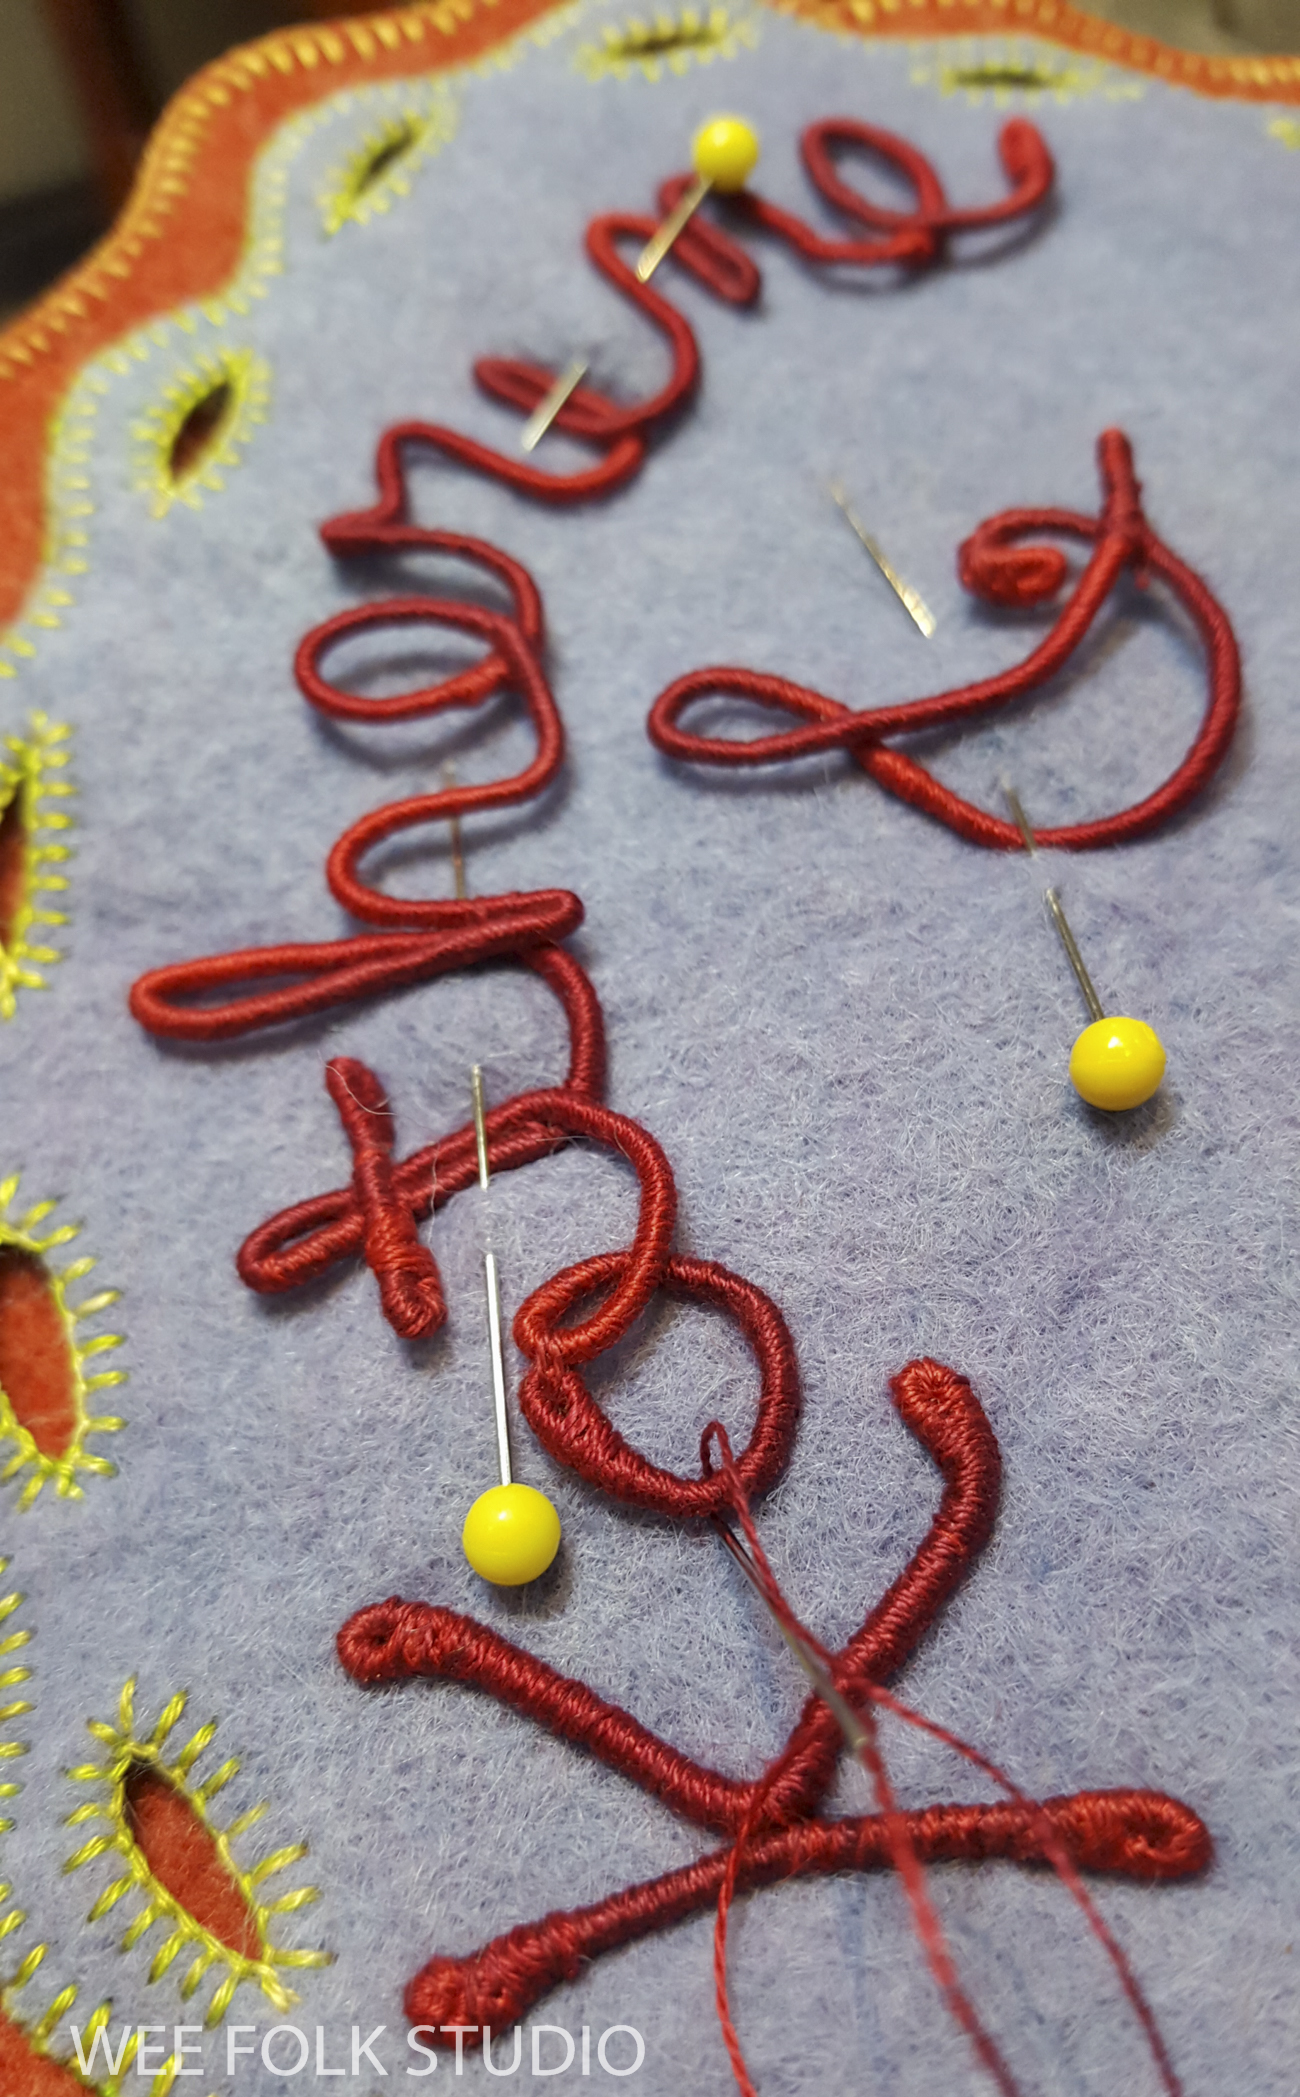
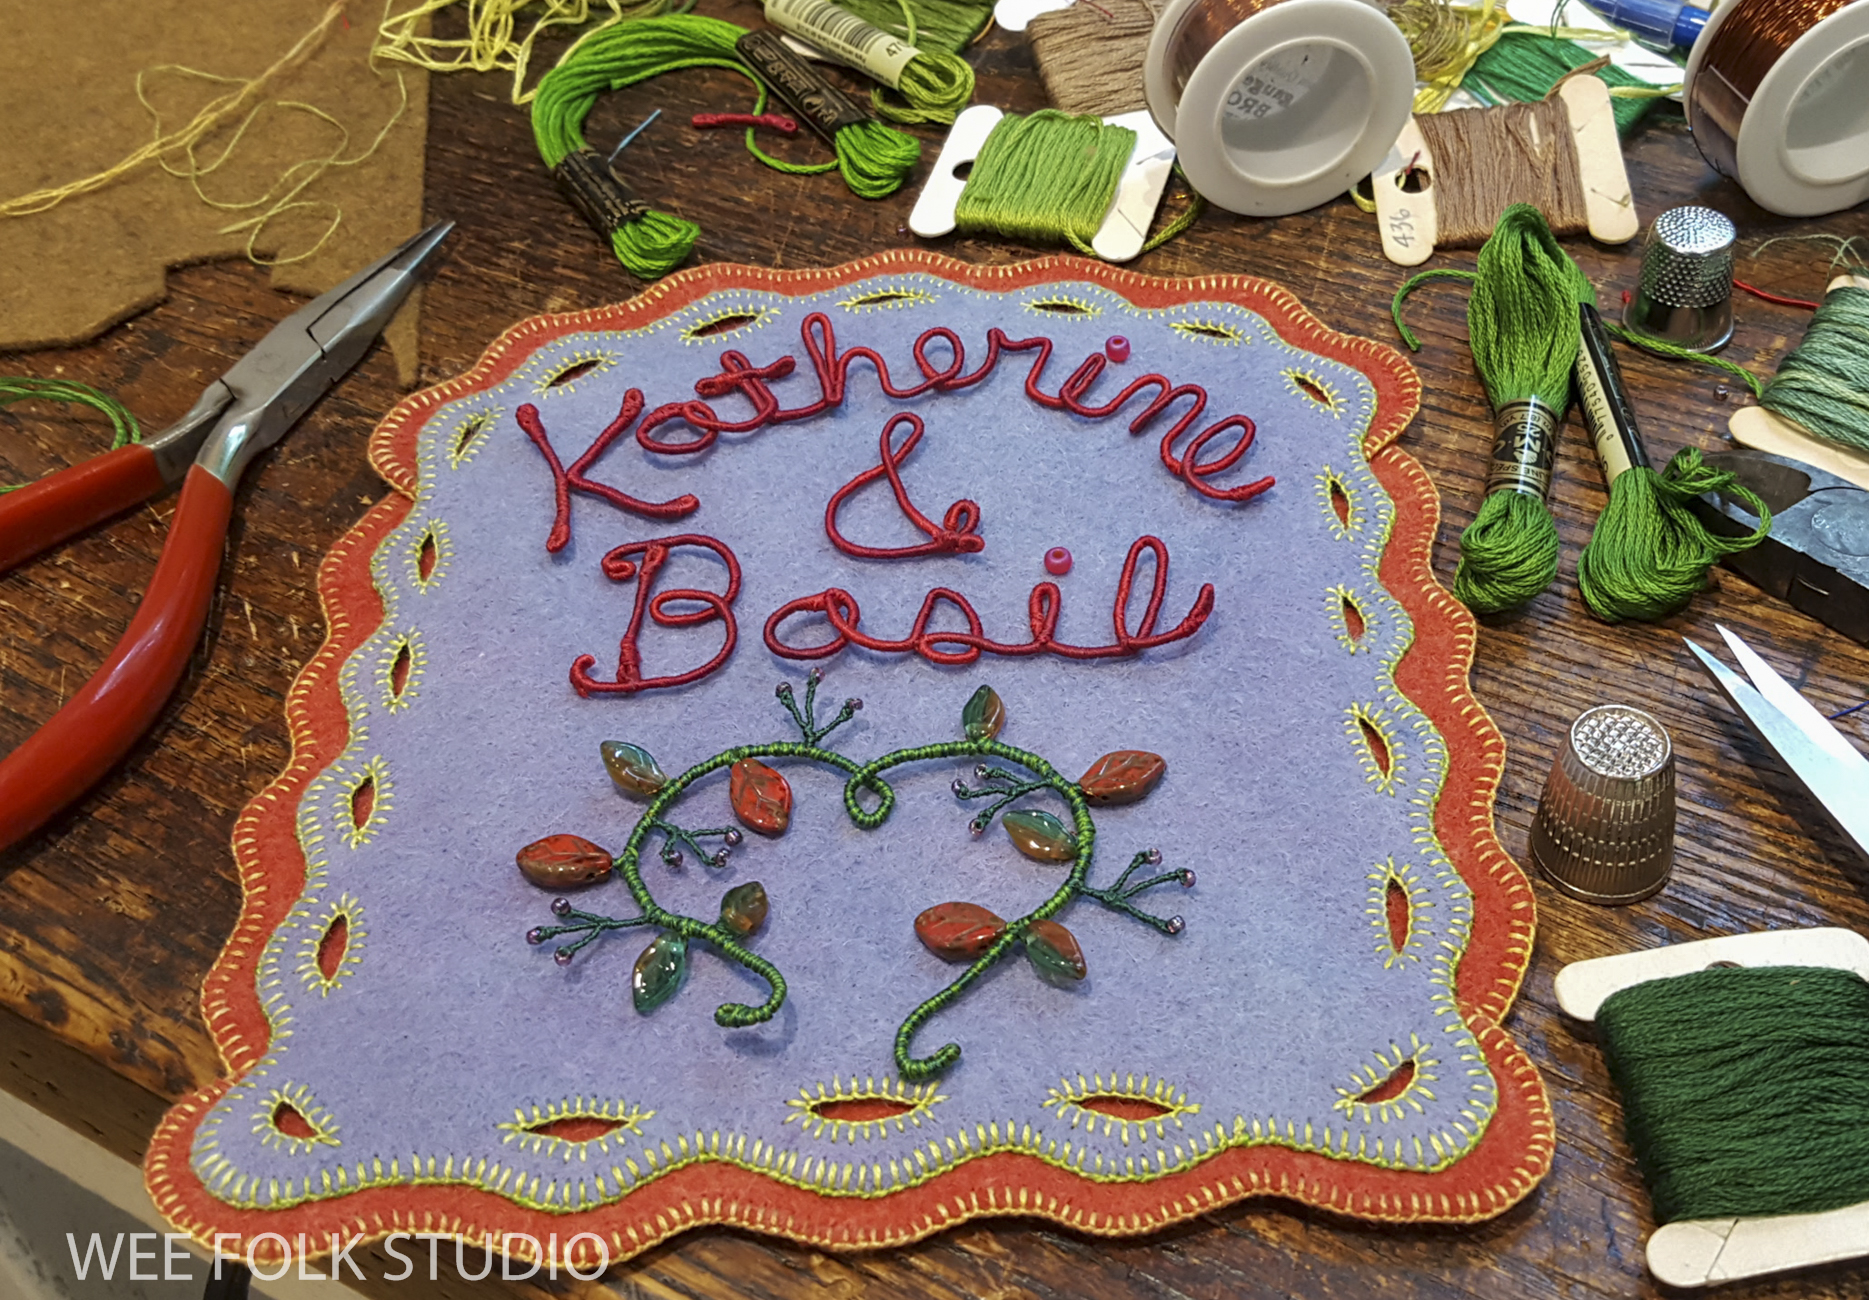
I wrote Katherine and Basil’s names in cursive handwriting on paper and using that as a template, I made a 3-dimensional copy with memory thread.

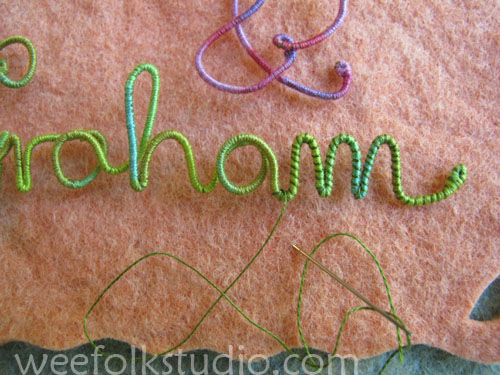
In this video, you can see how I wrapped embroidery floss around memory thread and formed cursive letters..

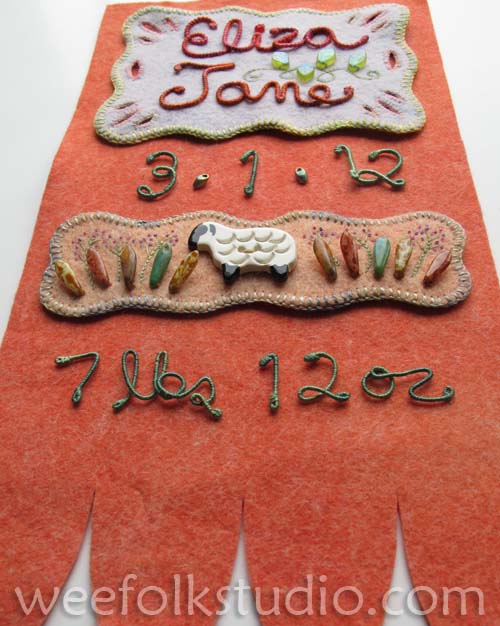
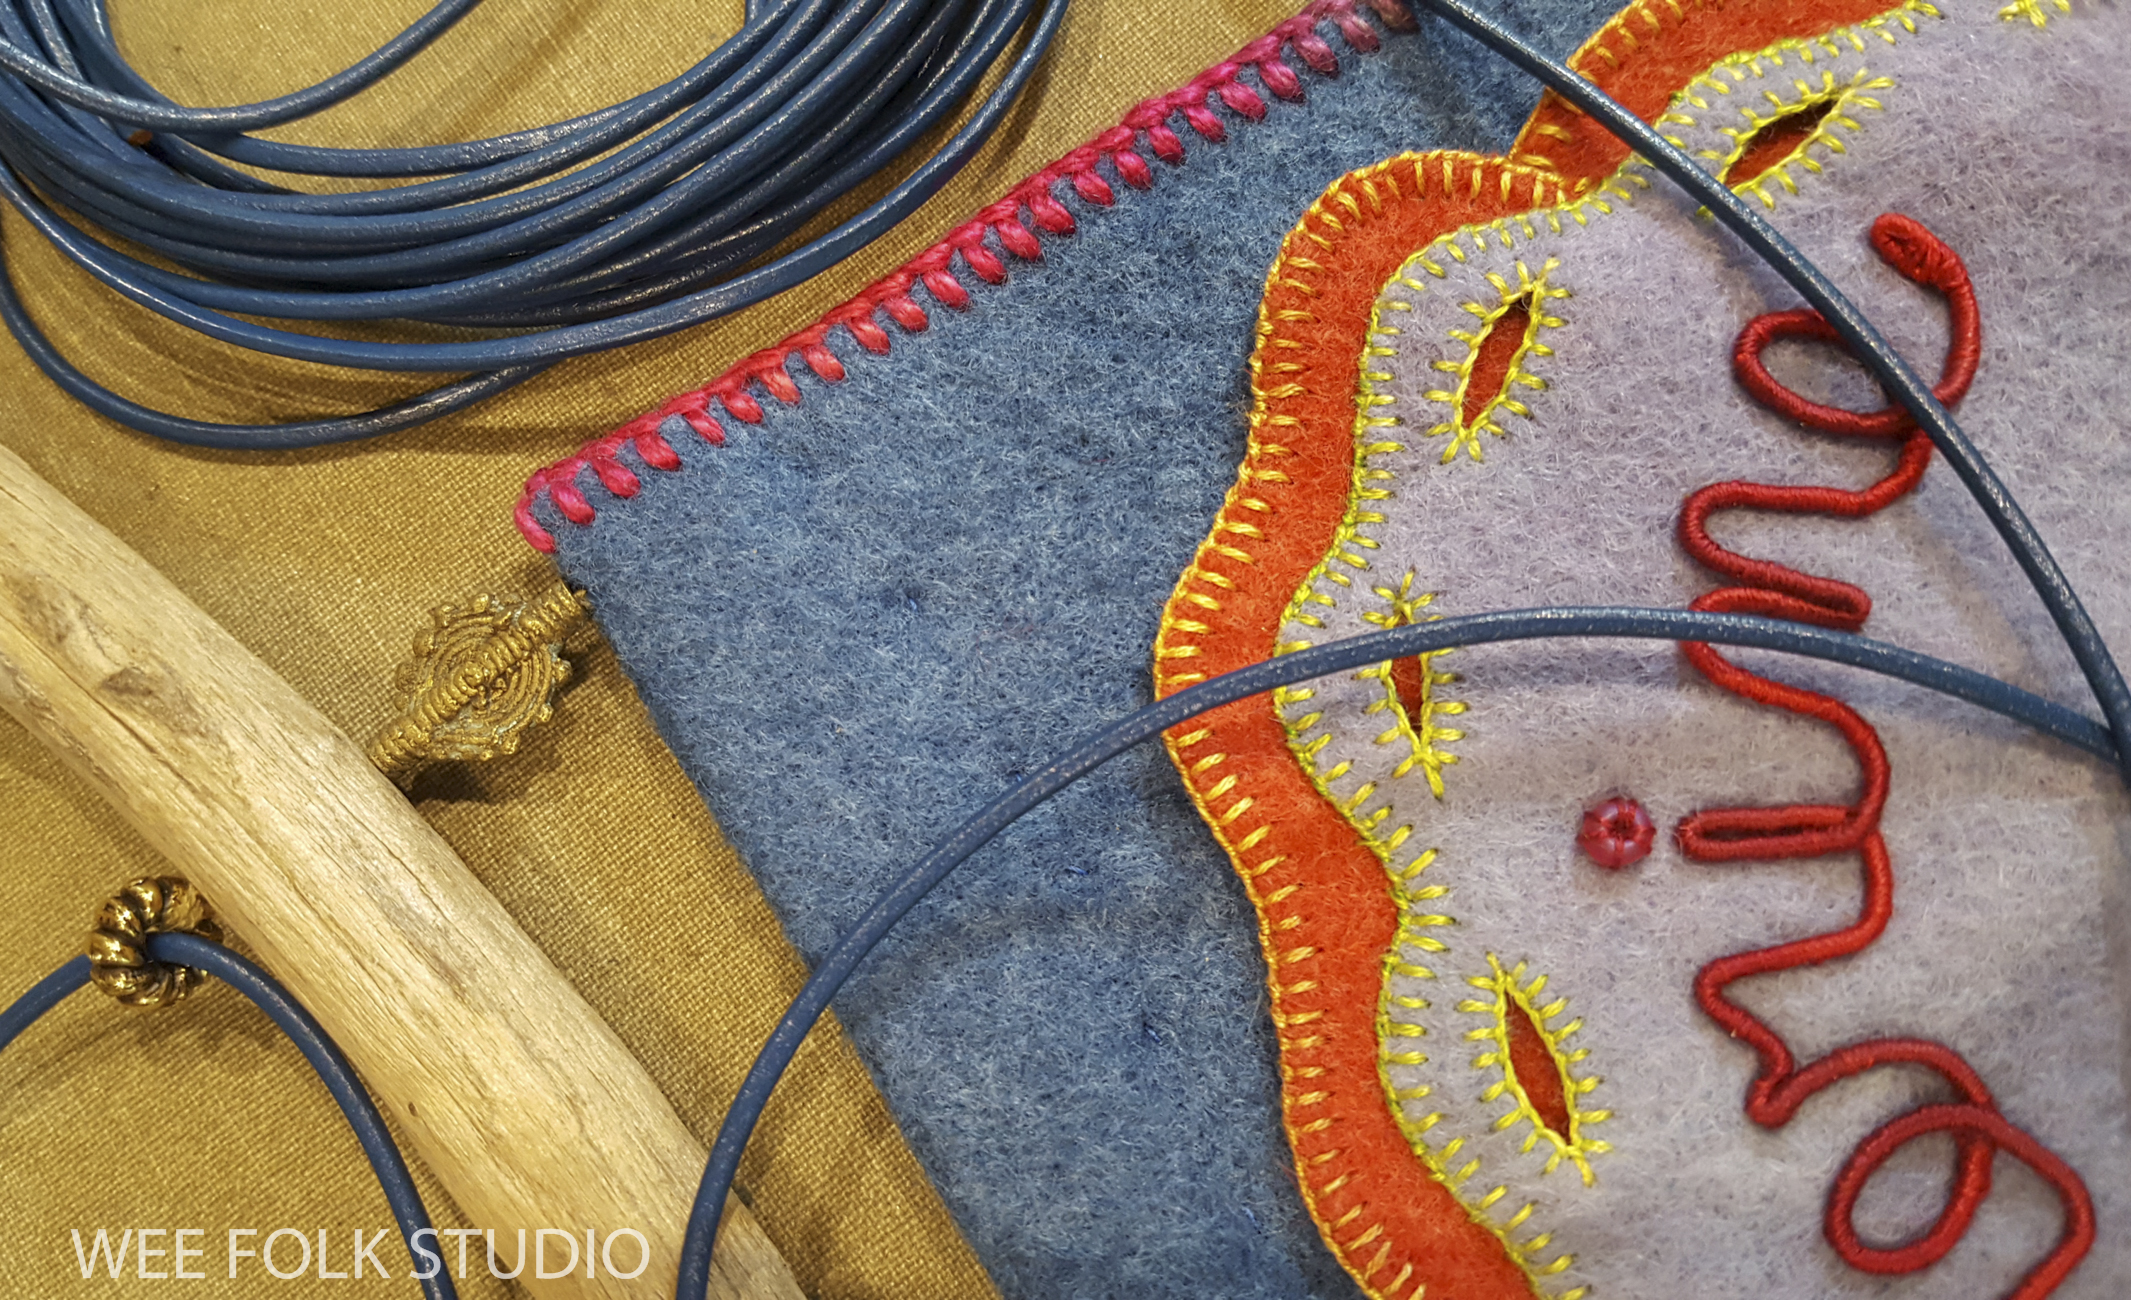
Then I cut out a felt background with my customary wavy edge; I tend to resist straight sides and sharp angles.

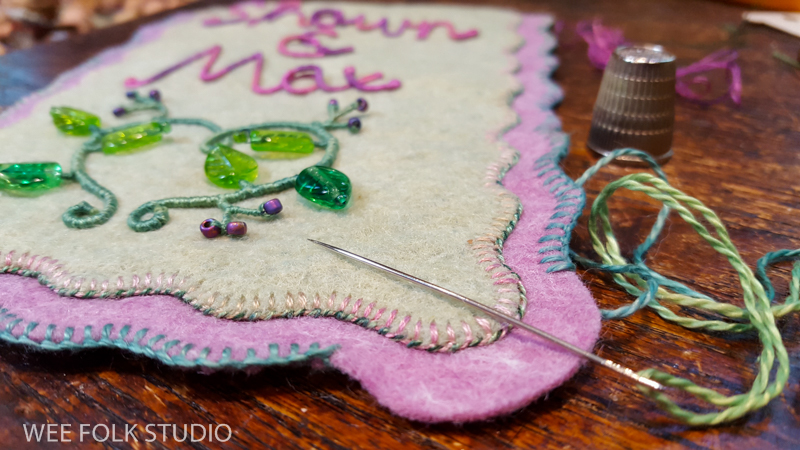
After choosing 2 shades of green embroidery floss to contrast with the red letters and lavender felt background, I blanket stitched around the outside edge and slits.

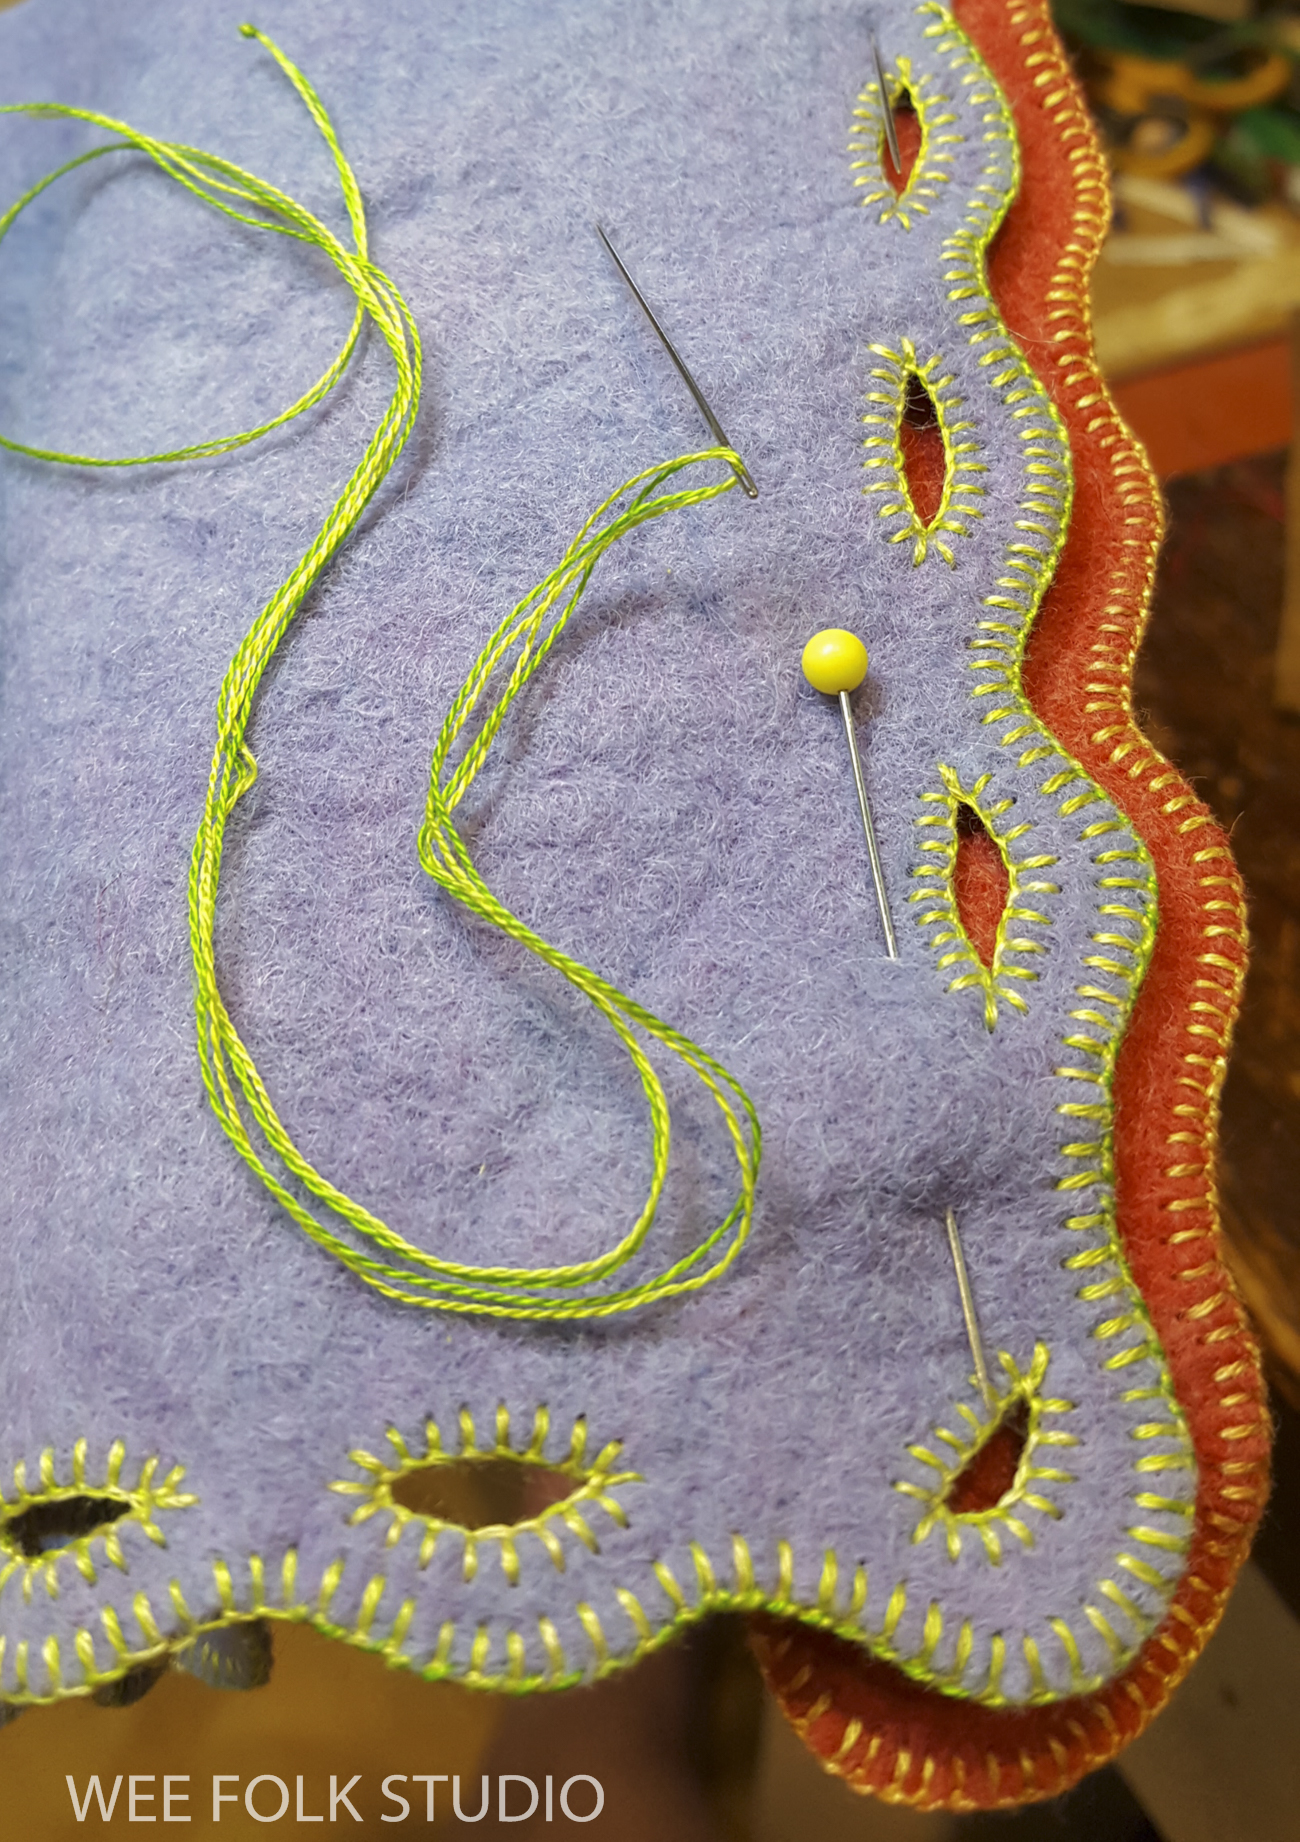
You can watch a minute’s worth of blanket stitching in this video.

Then I pinned and sewed the letters to the felt background.

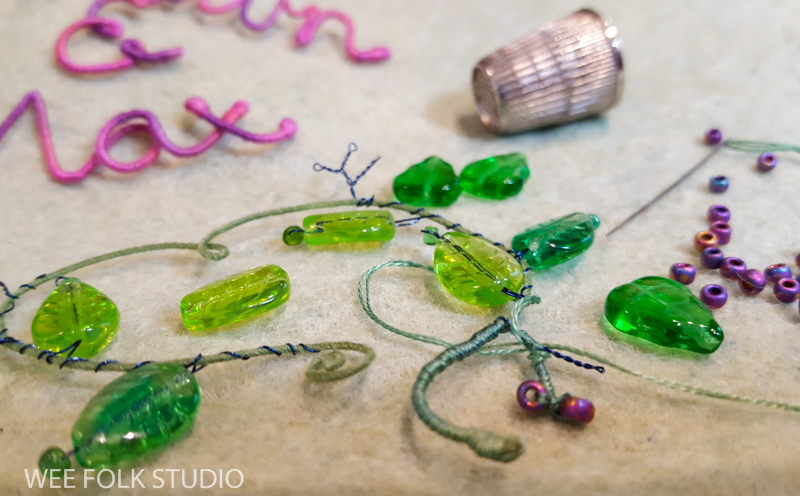
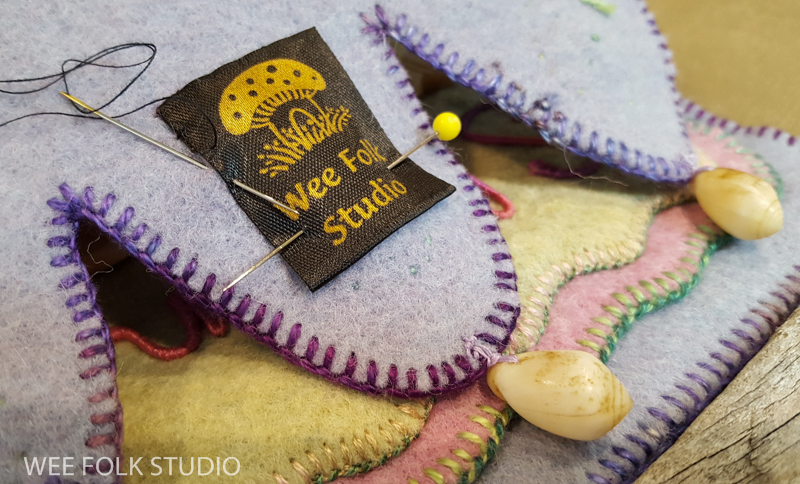
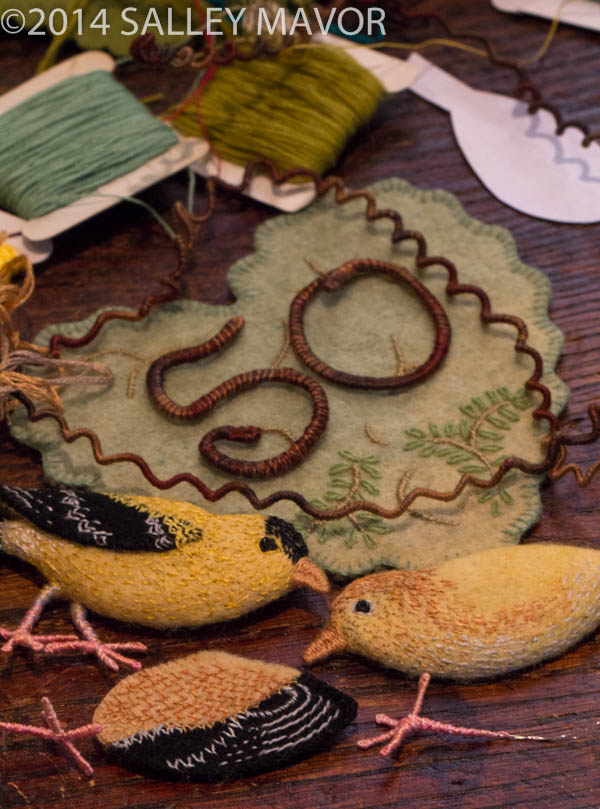
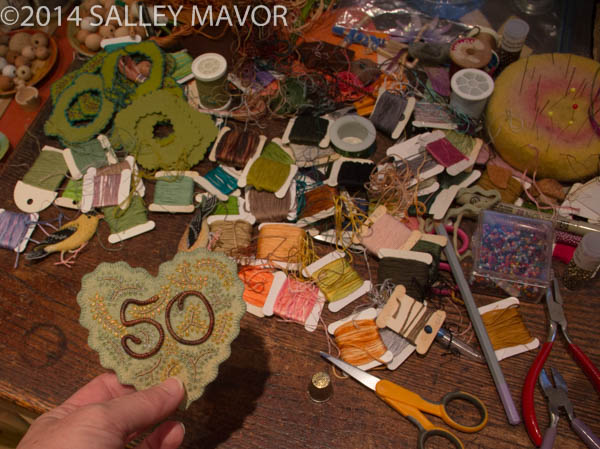
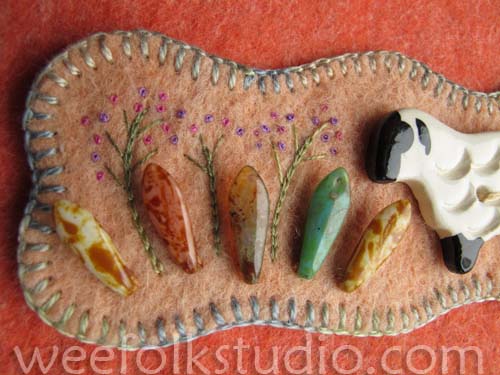
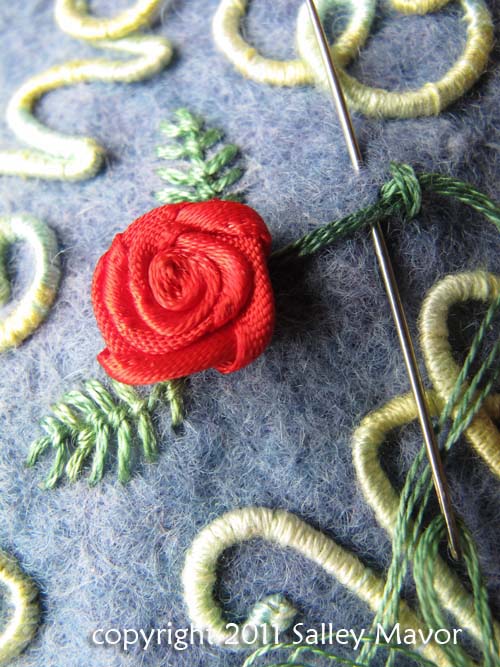
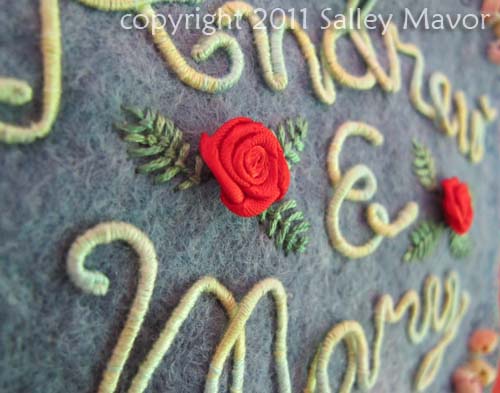
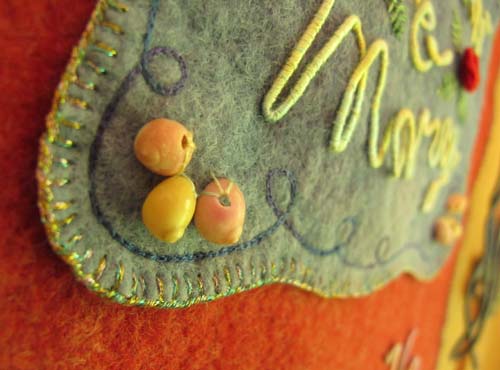
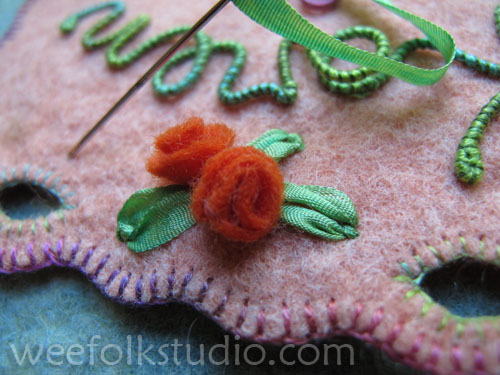
Throughout the process, I brought out various threads, beads and doodads, to see what to include in the design. Not everything ended up in the finished piece and through a process of elimination, many potentially interesting items were put aside.

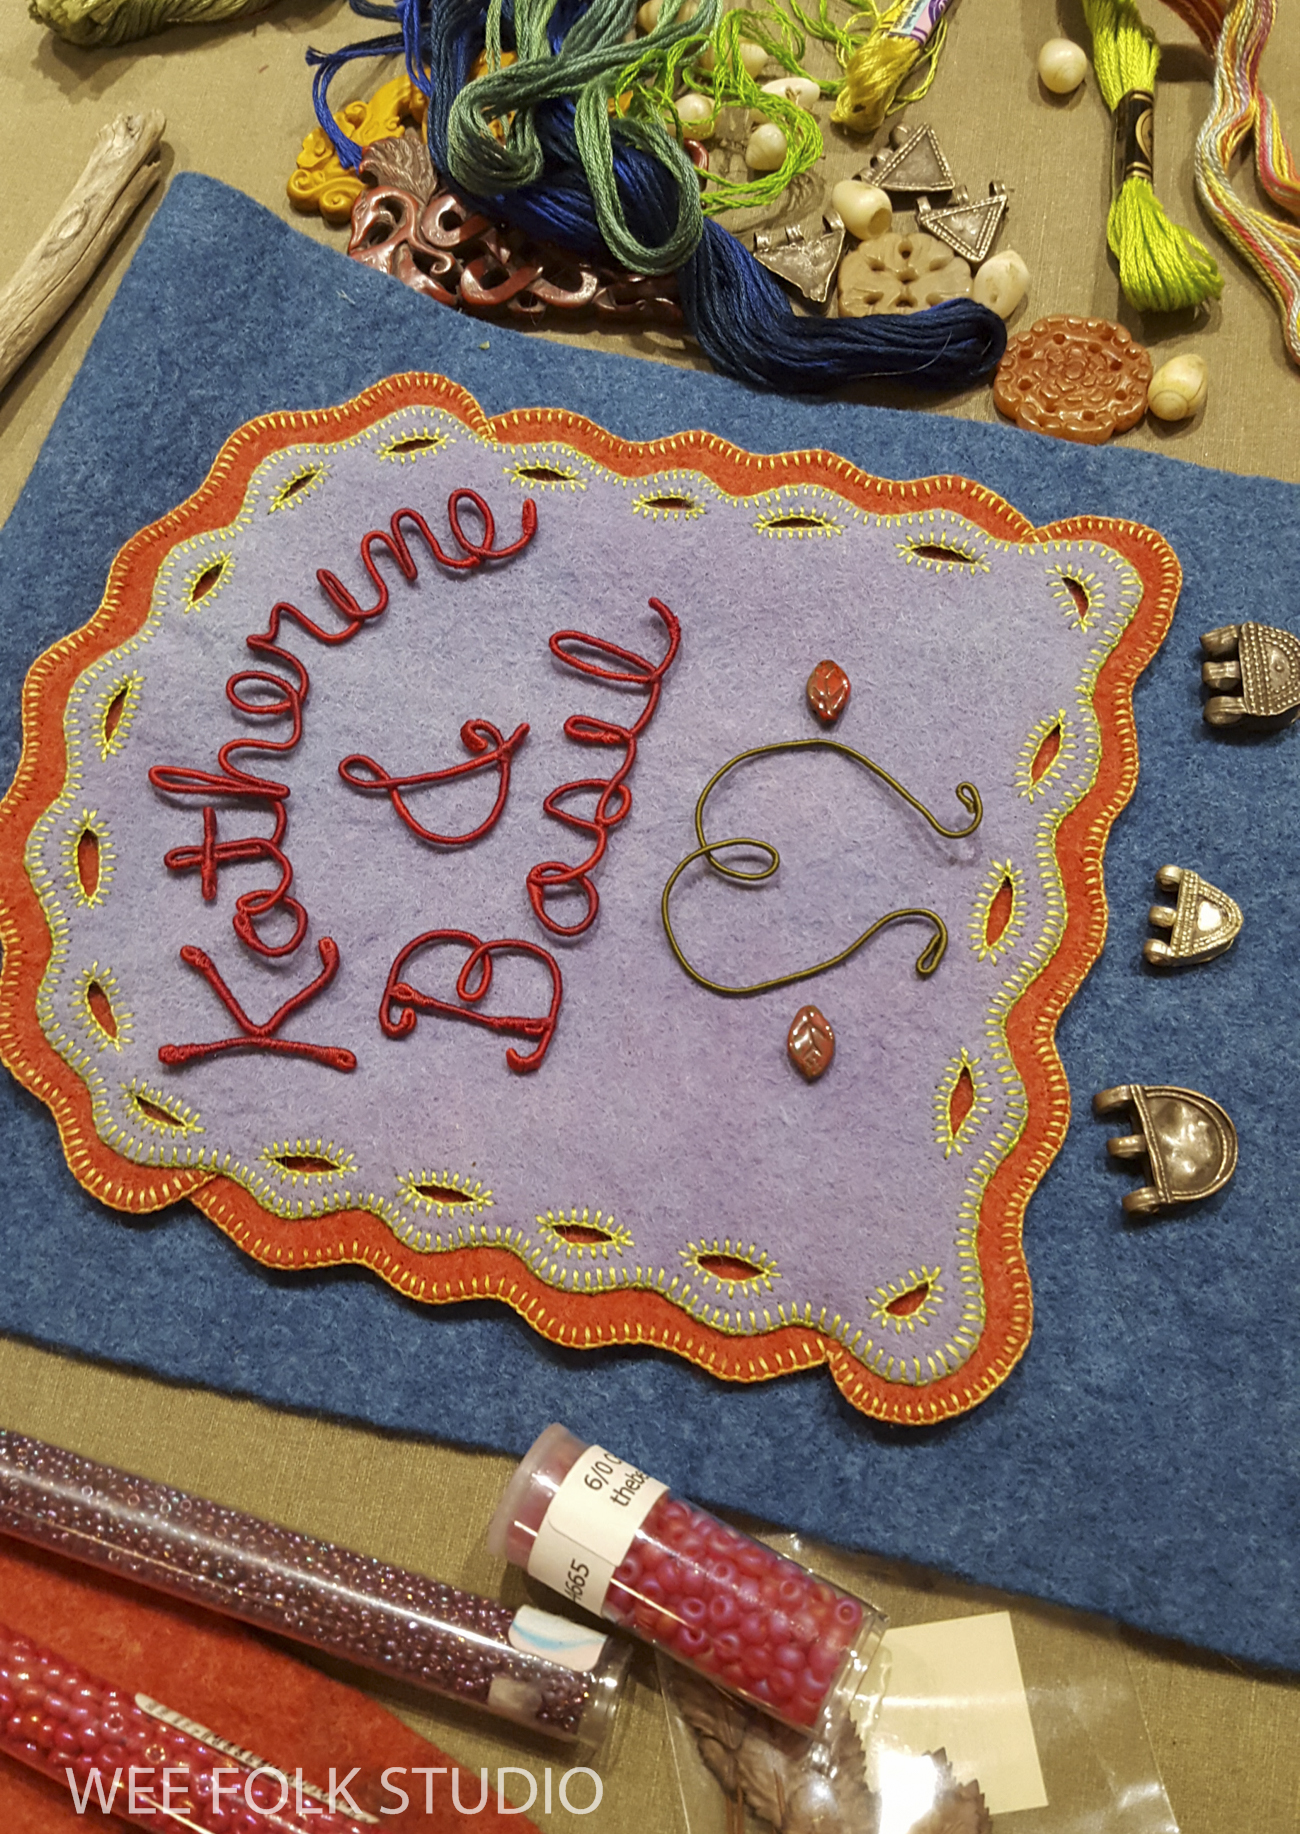
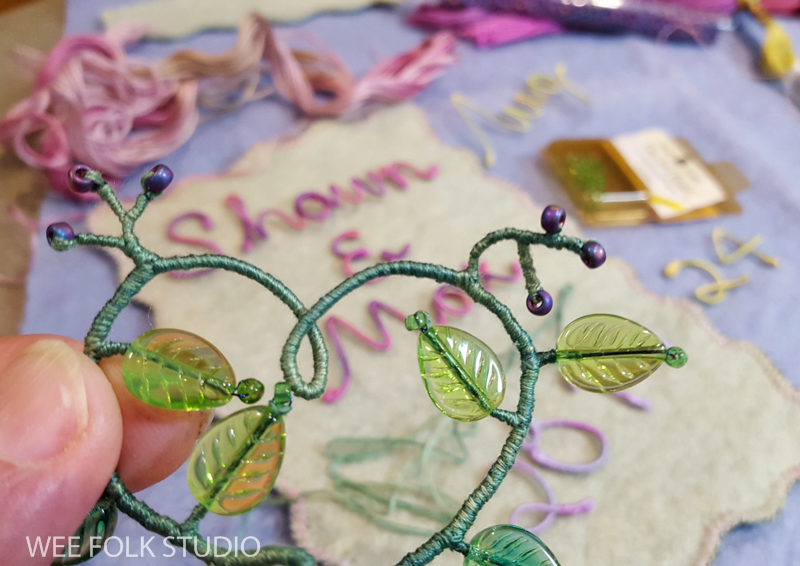
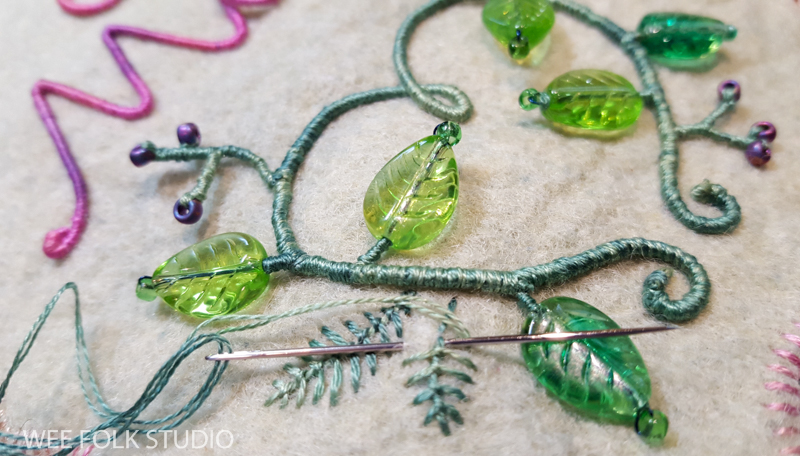
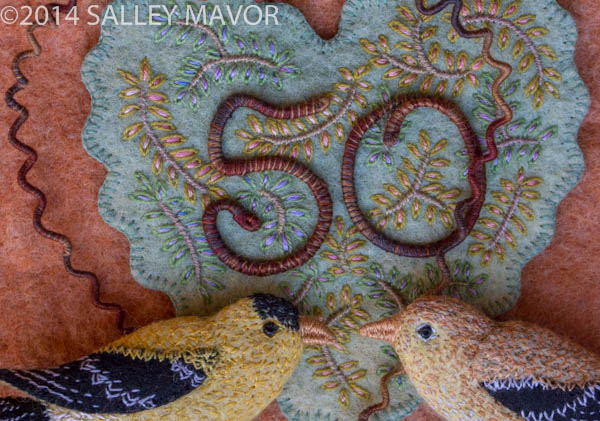
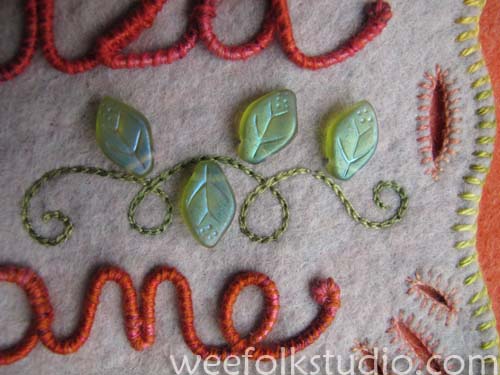
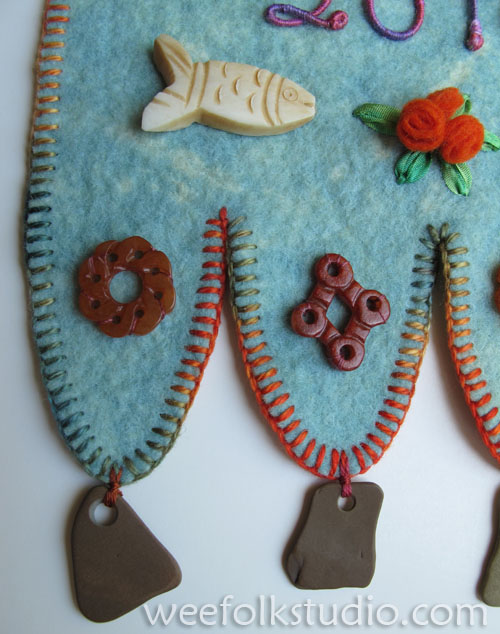
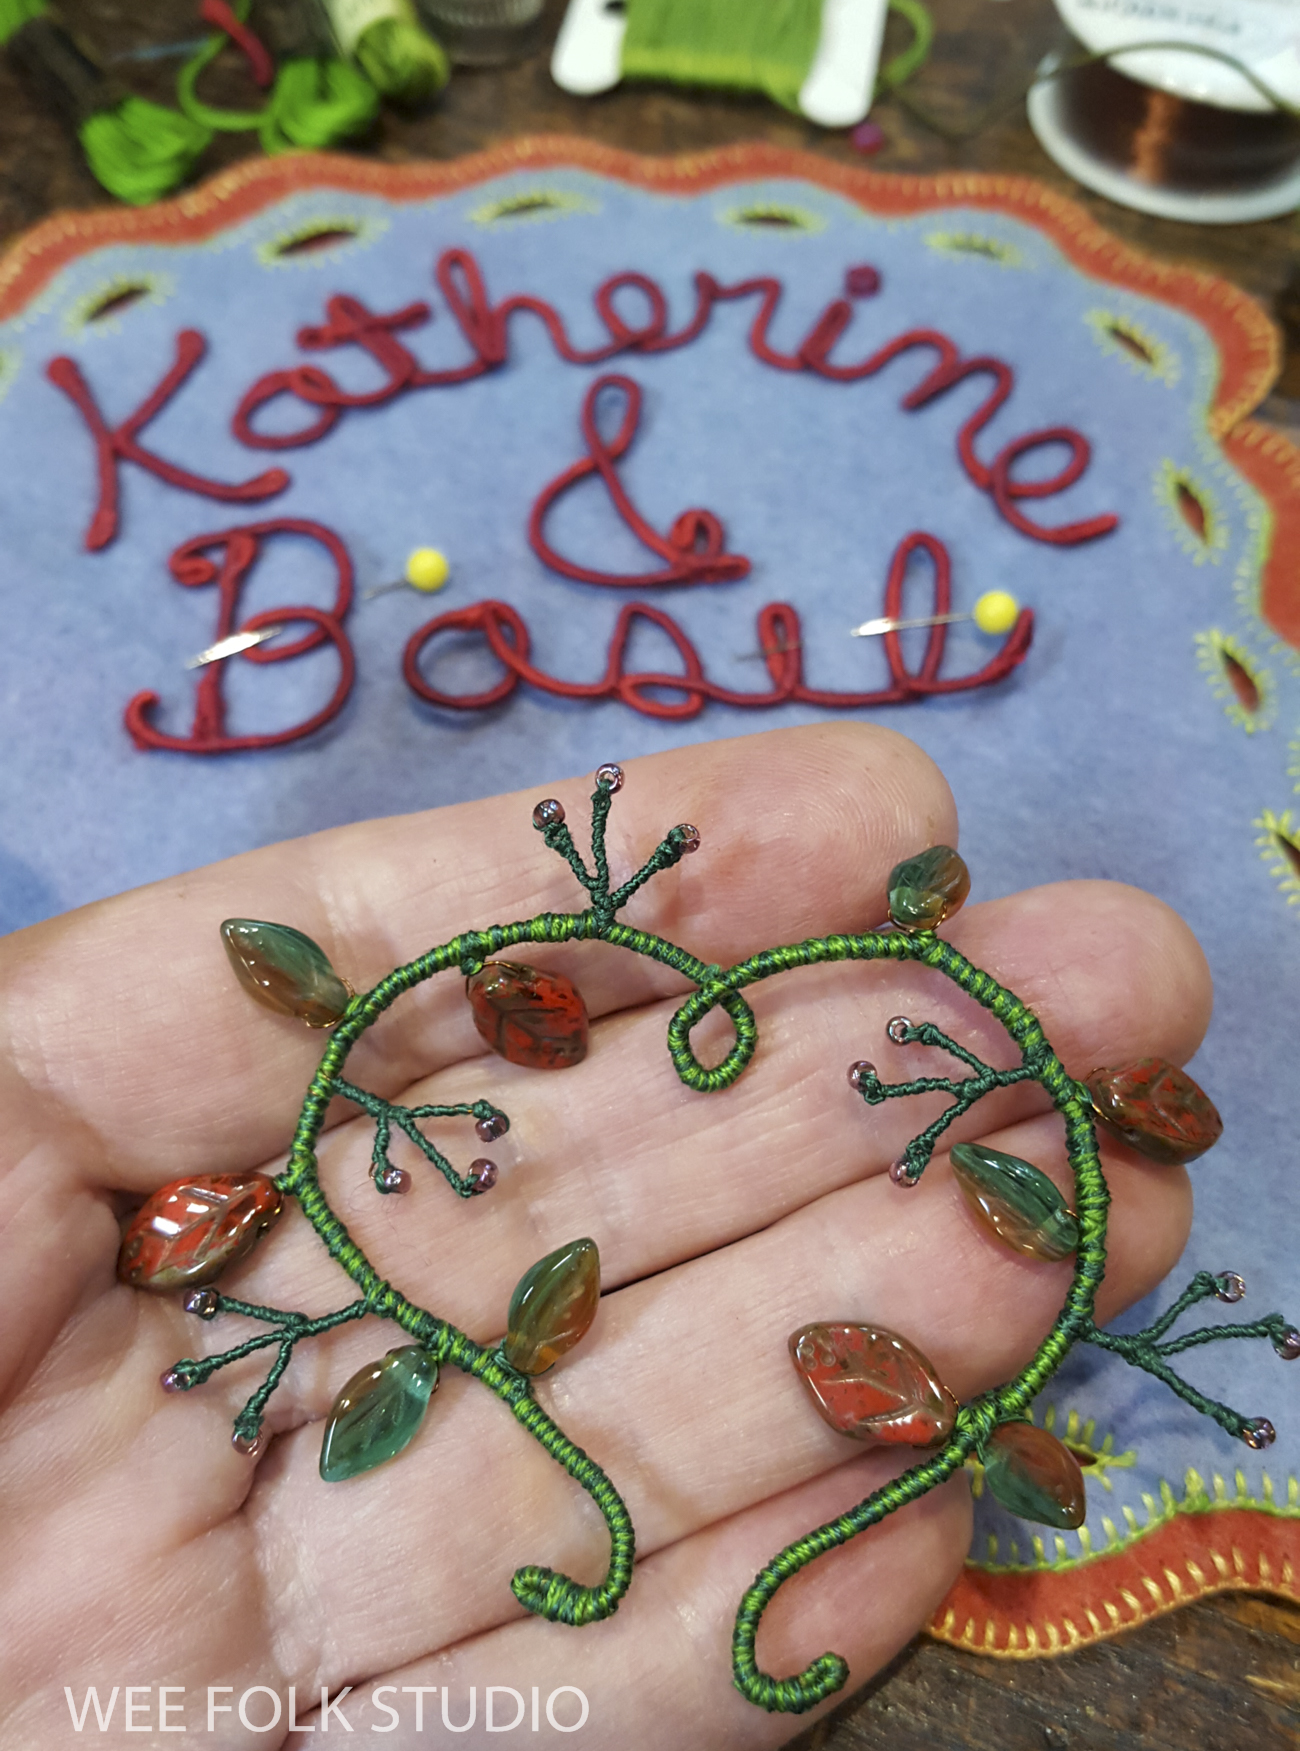
For this banner, I settled on a heart shaped vine for the featured decoration, which incorporated glass leaf beads and tiny seed beads.

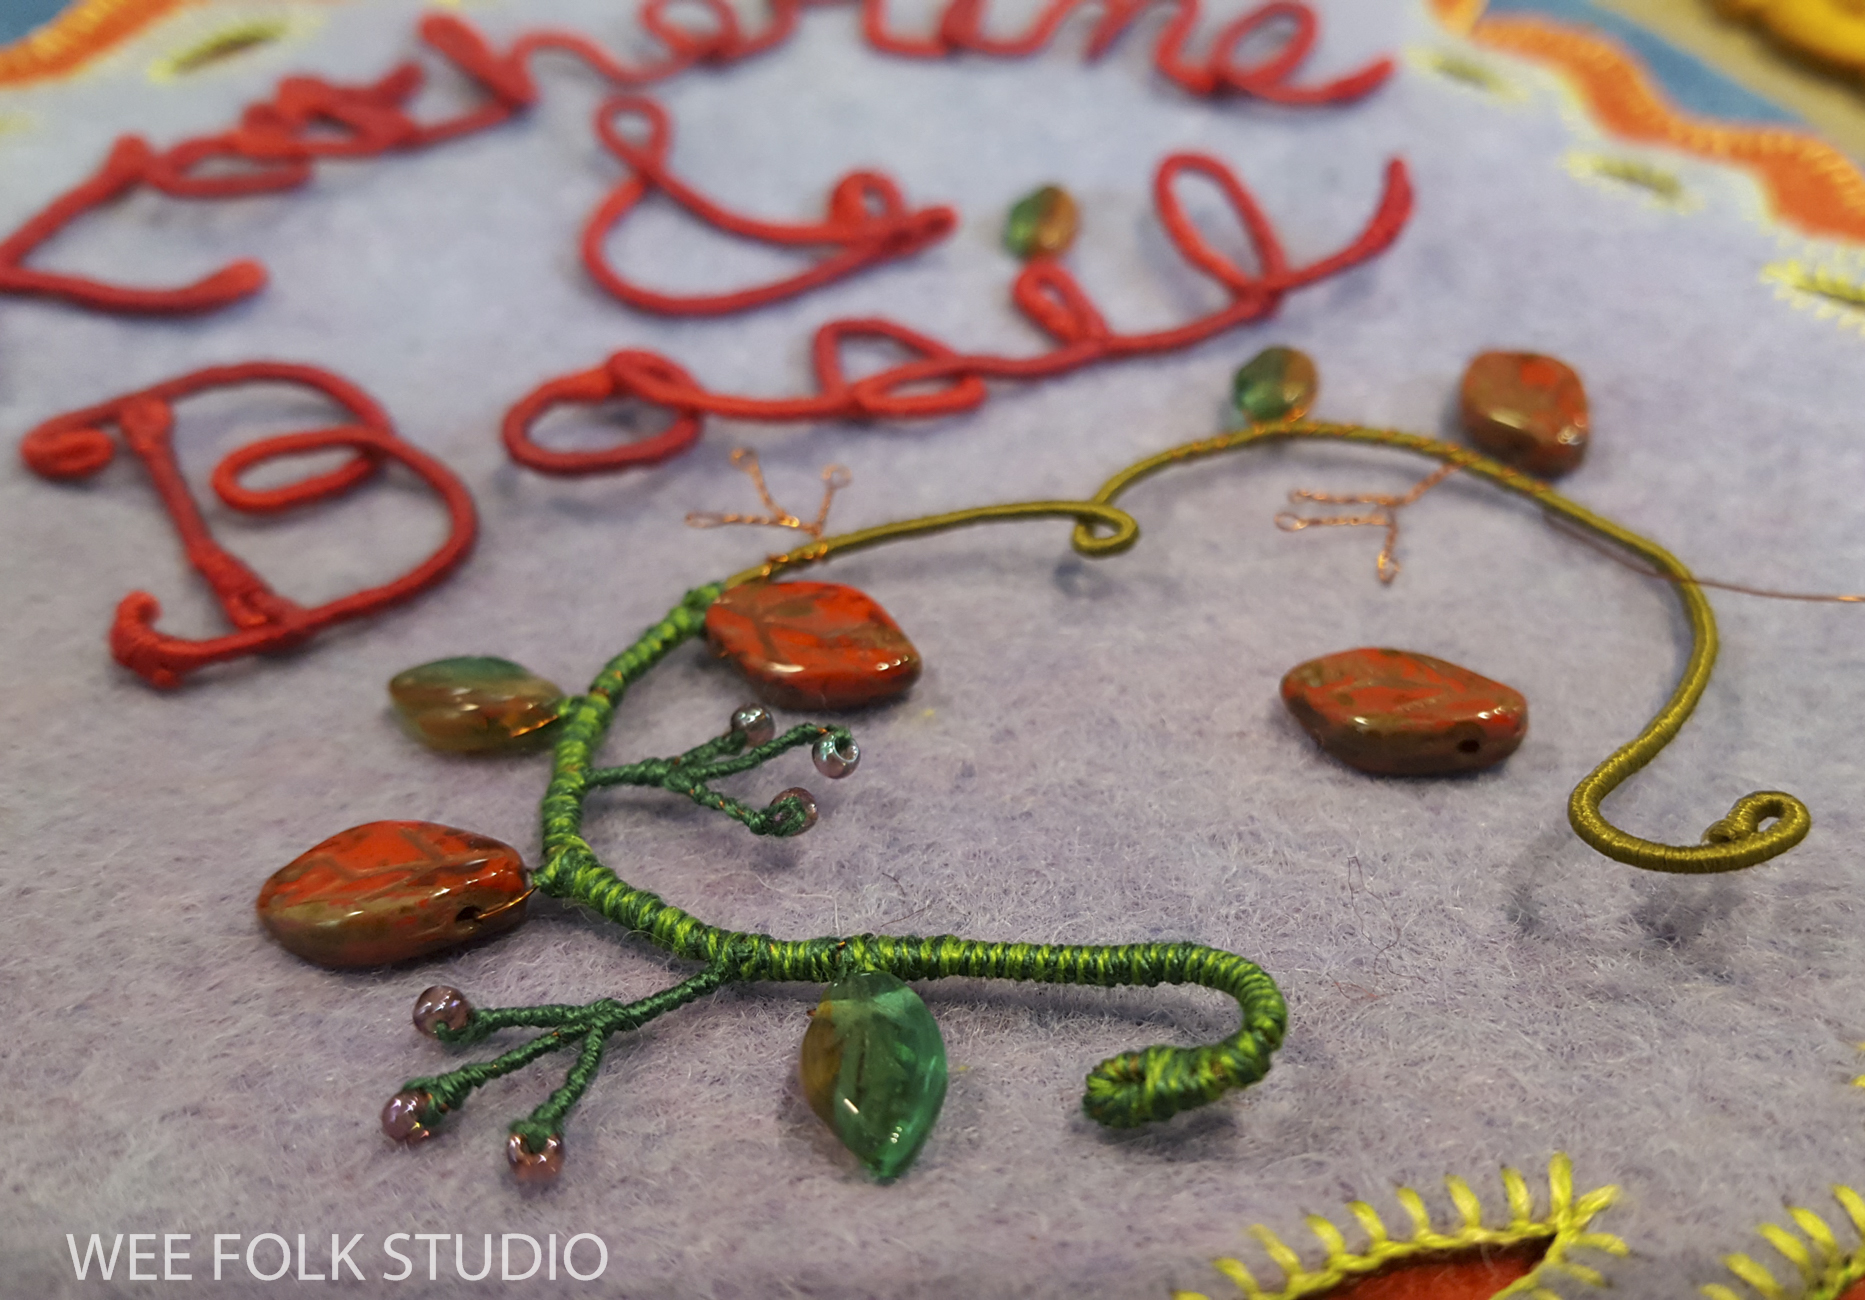
Watch this video to get a close up view of making the wire vine.

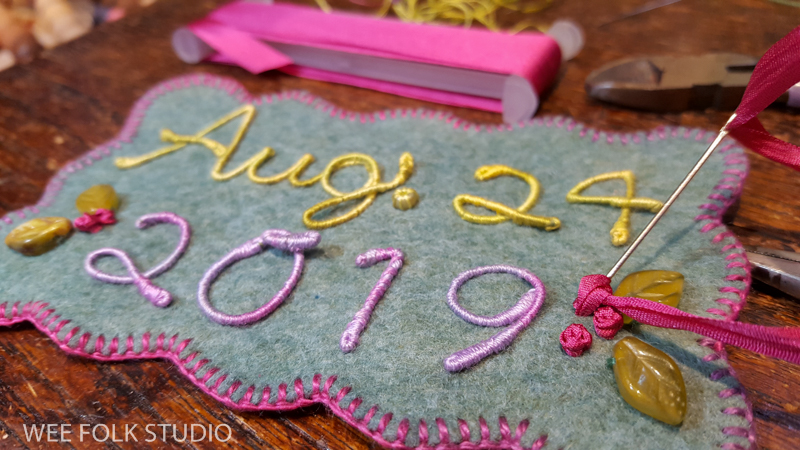
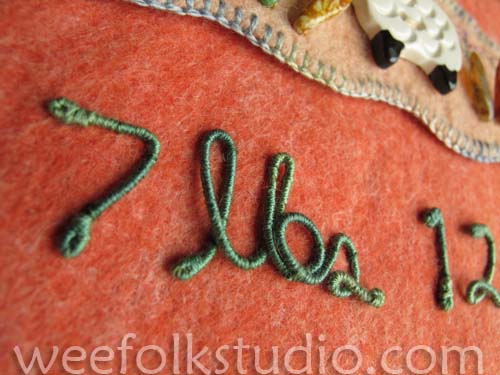
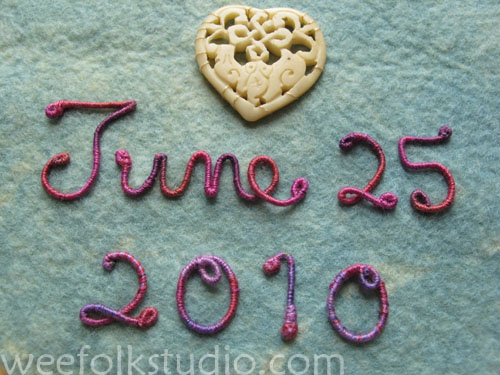
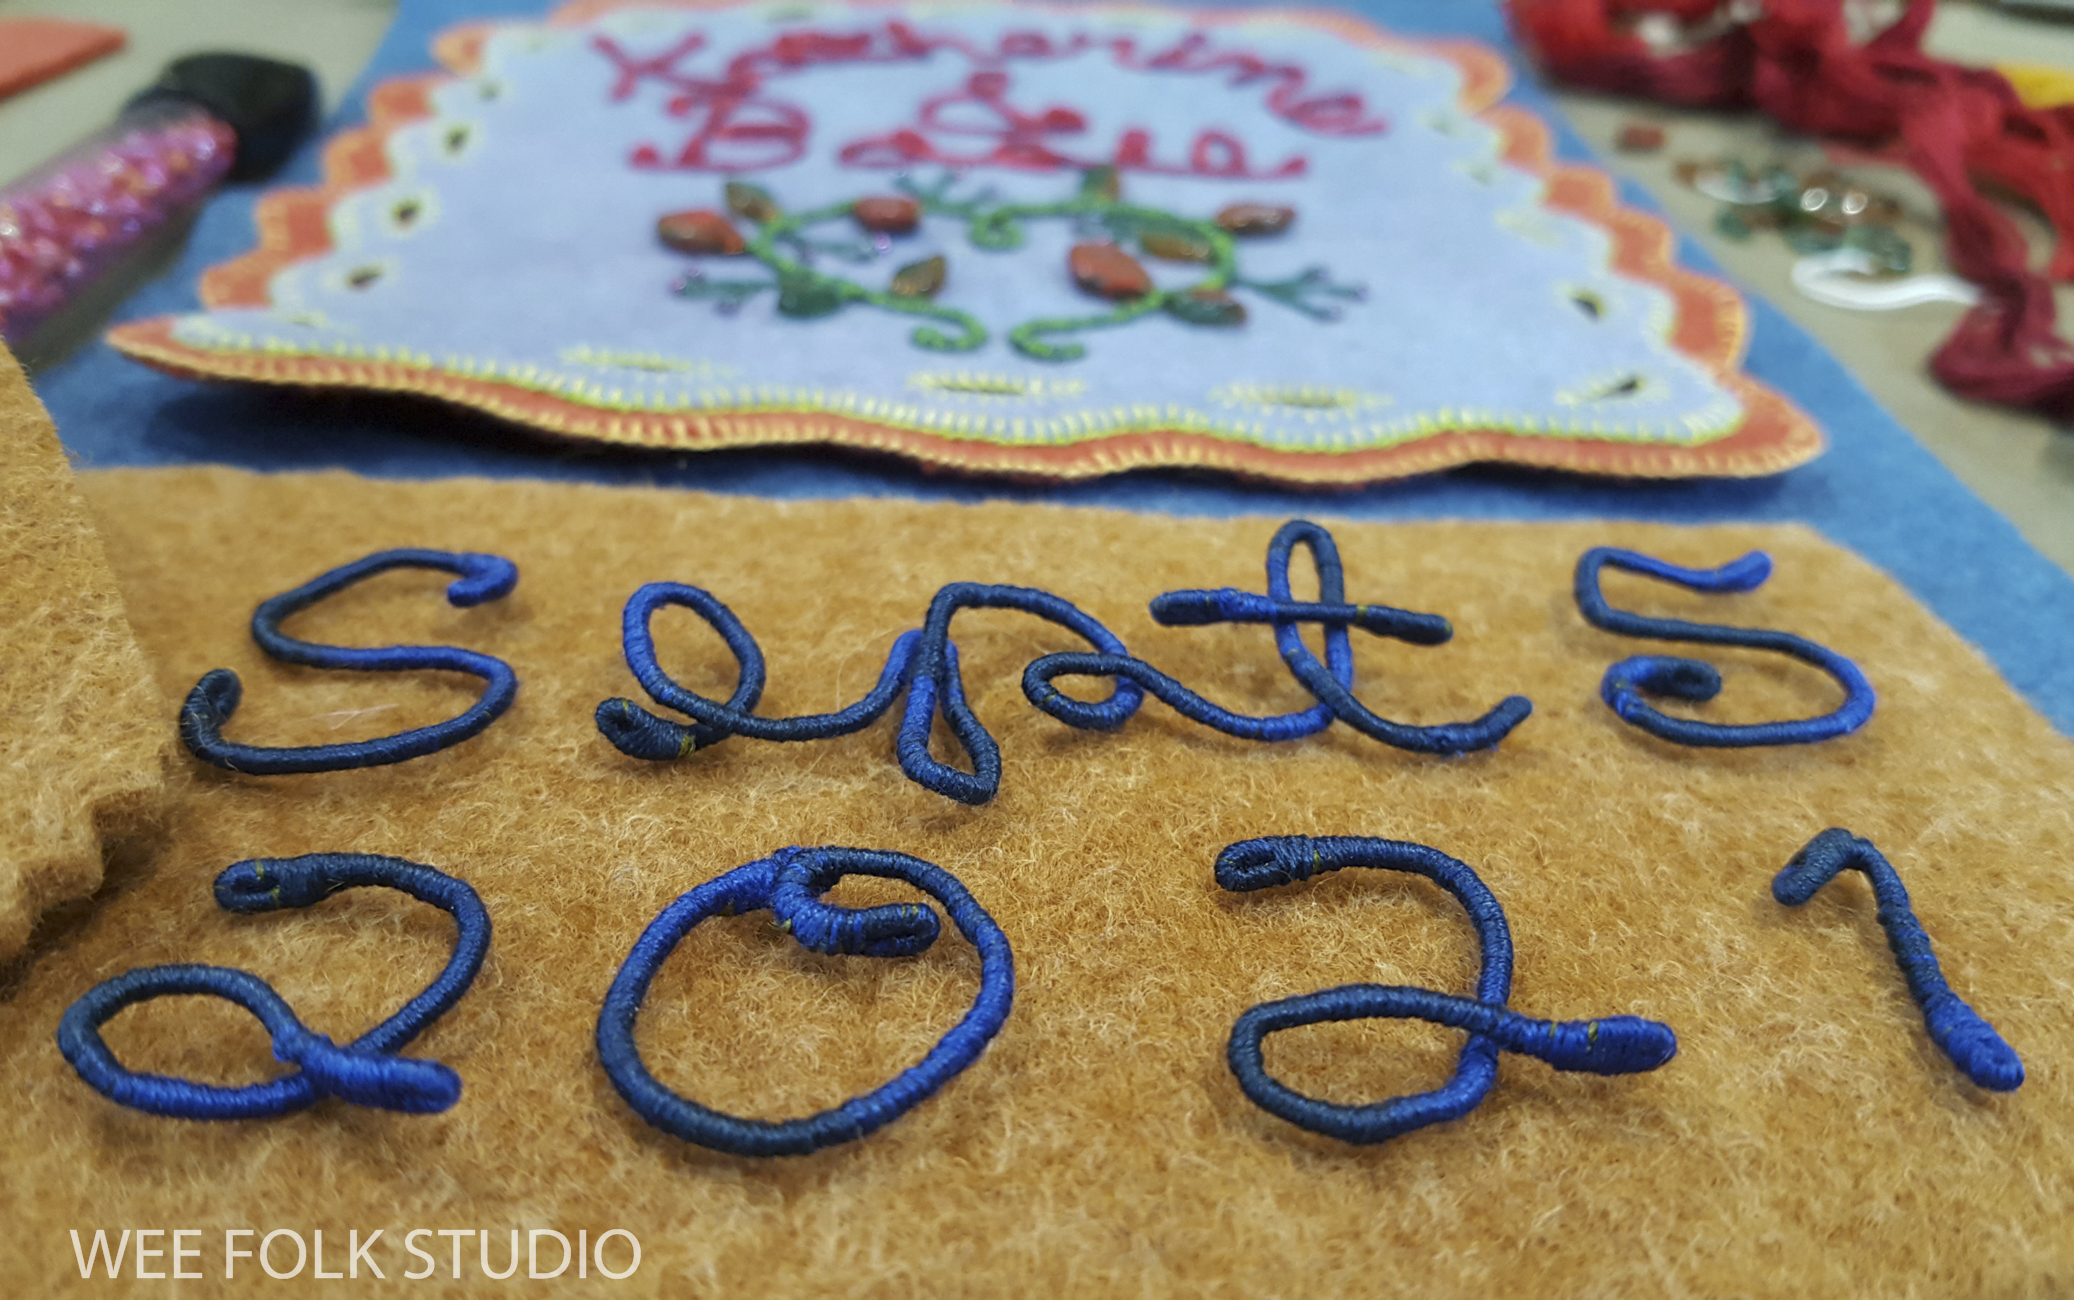
Next, I wrote out their wedding date in blue letters and numbers and made a separate contrasting background.

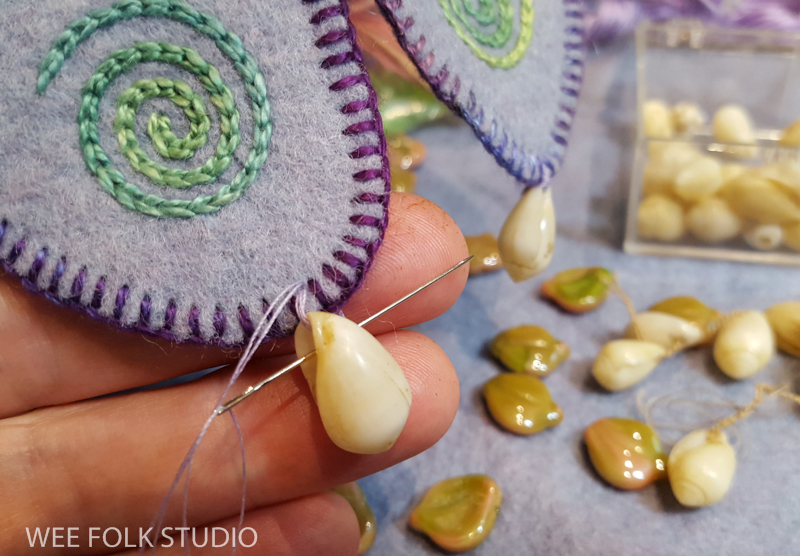
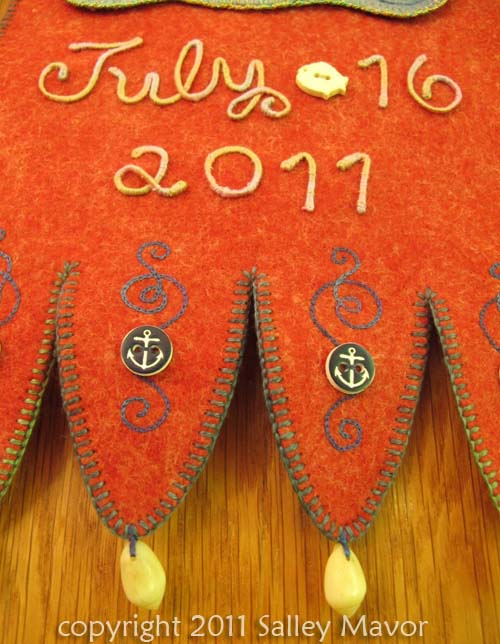
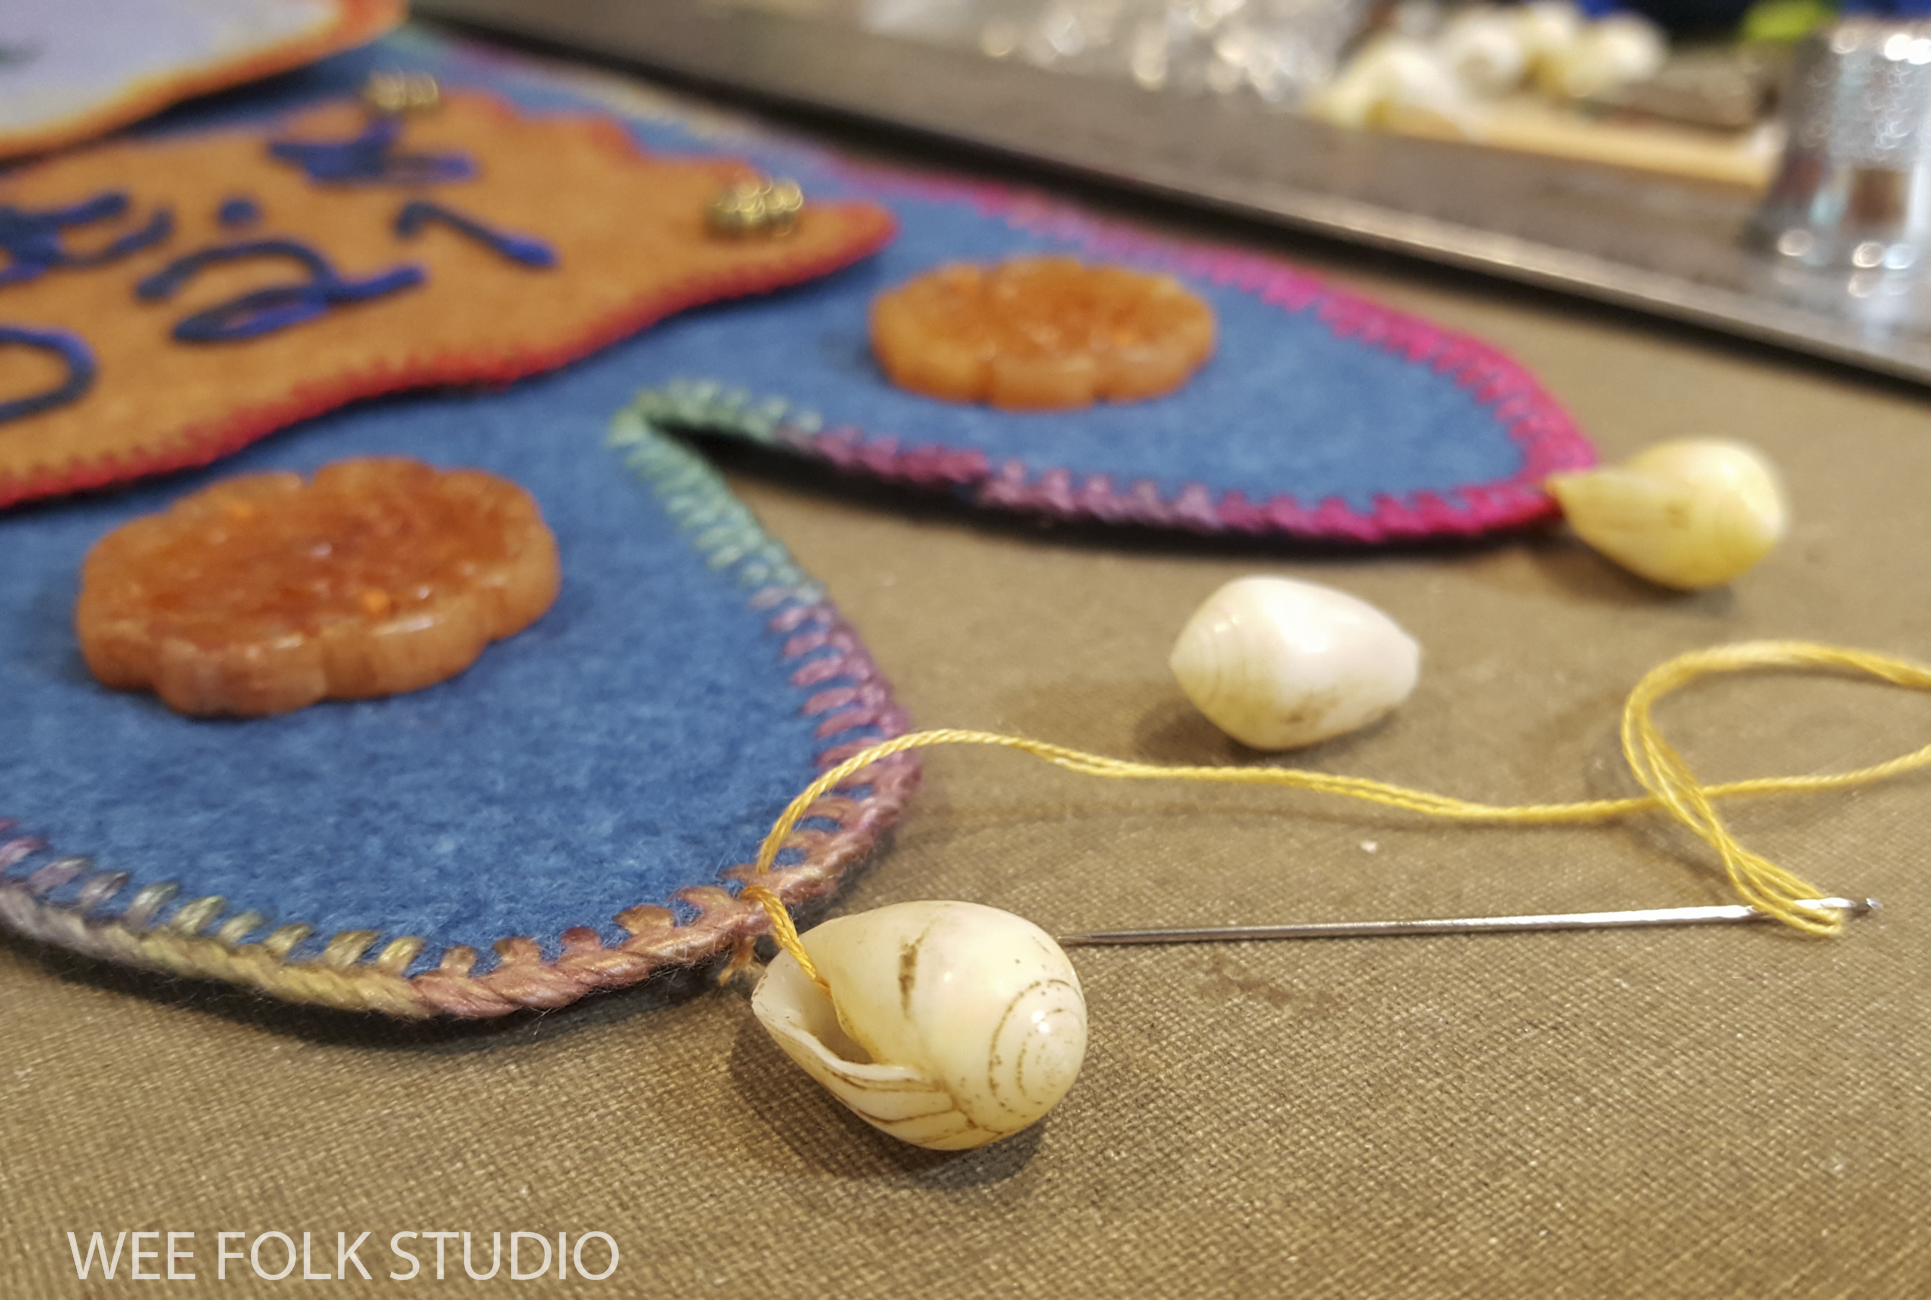
I blanket stitched all around the outside edge of the blue banner with variegated pima cotton (Watercolours by Caron). Then I sewed the different pieces onto the banner and added dangling shells to the 3 bottom flaps.

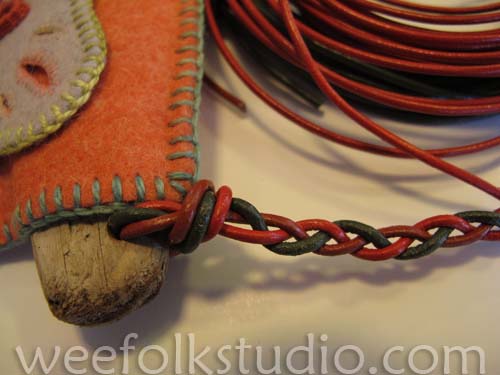
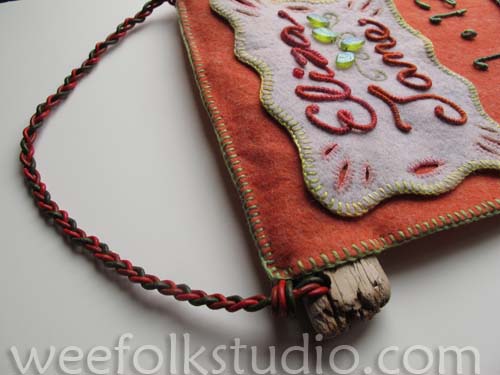
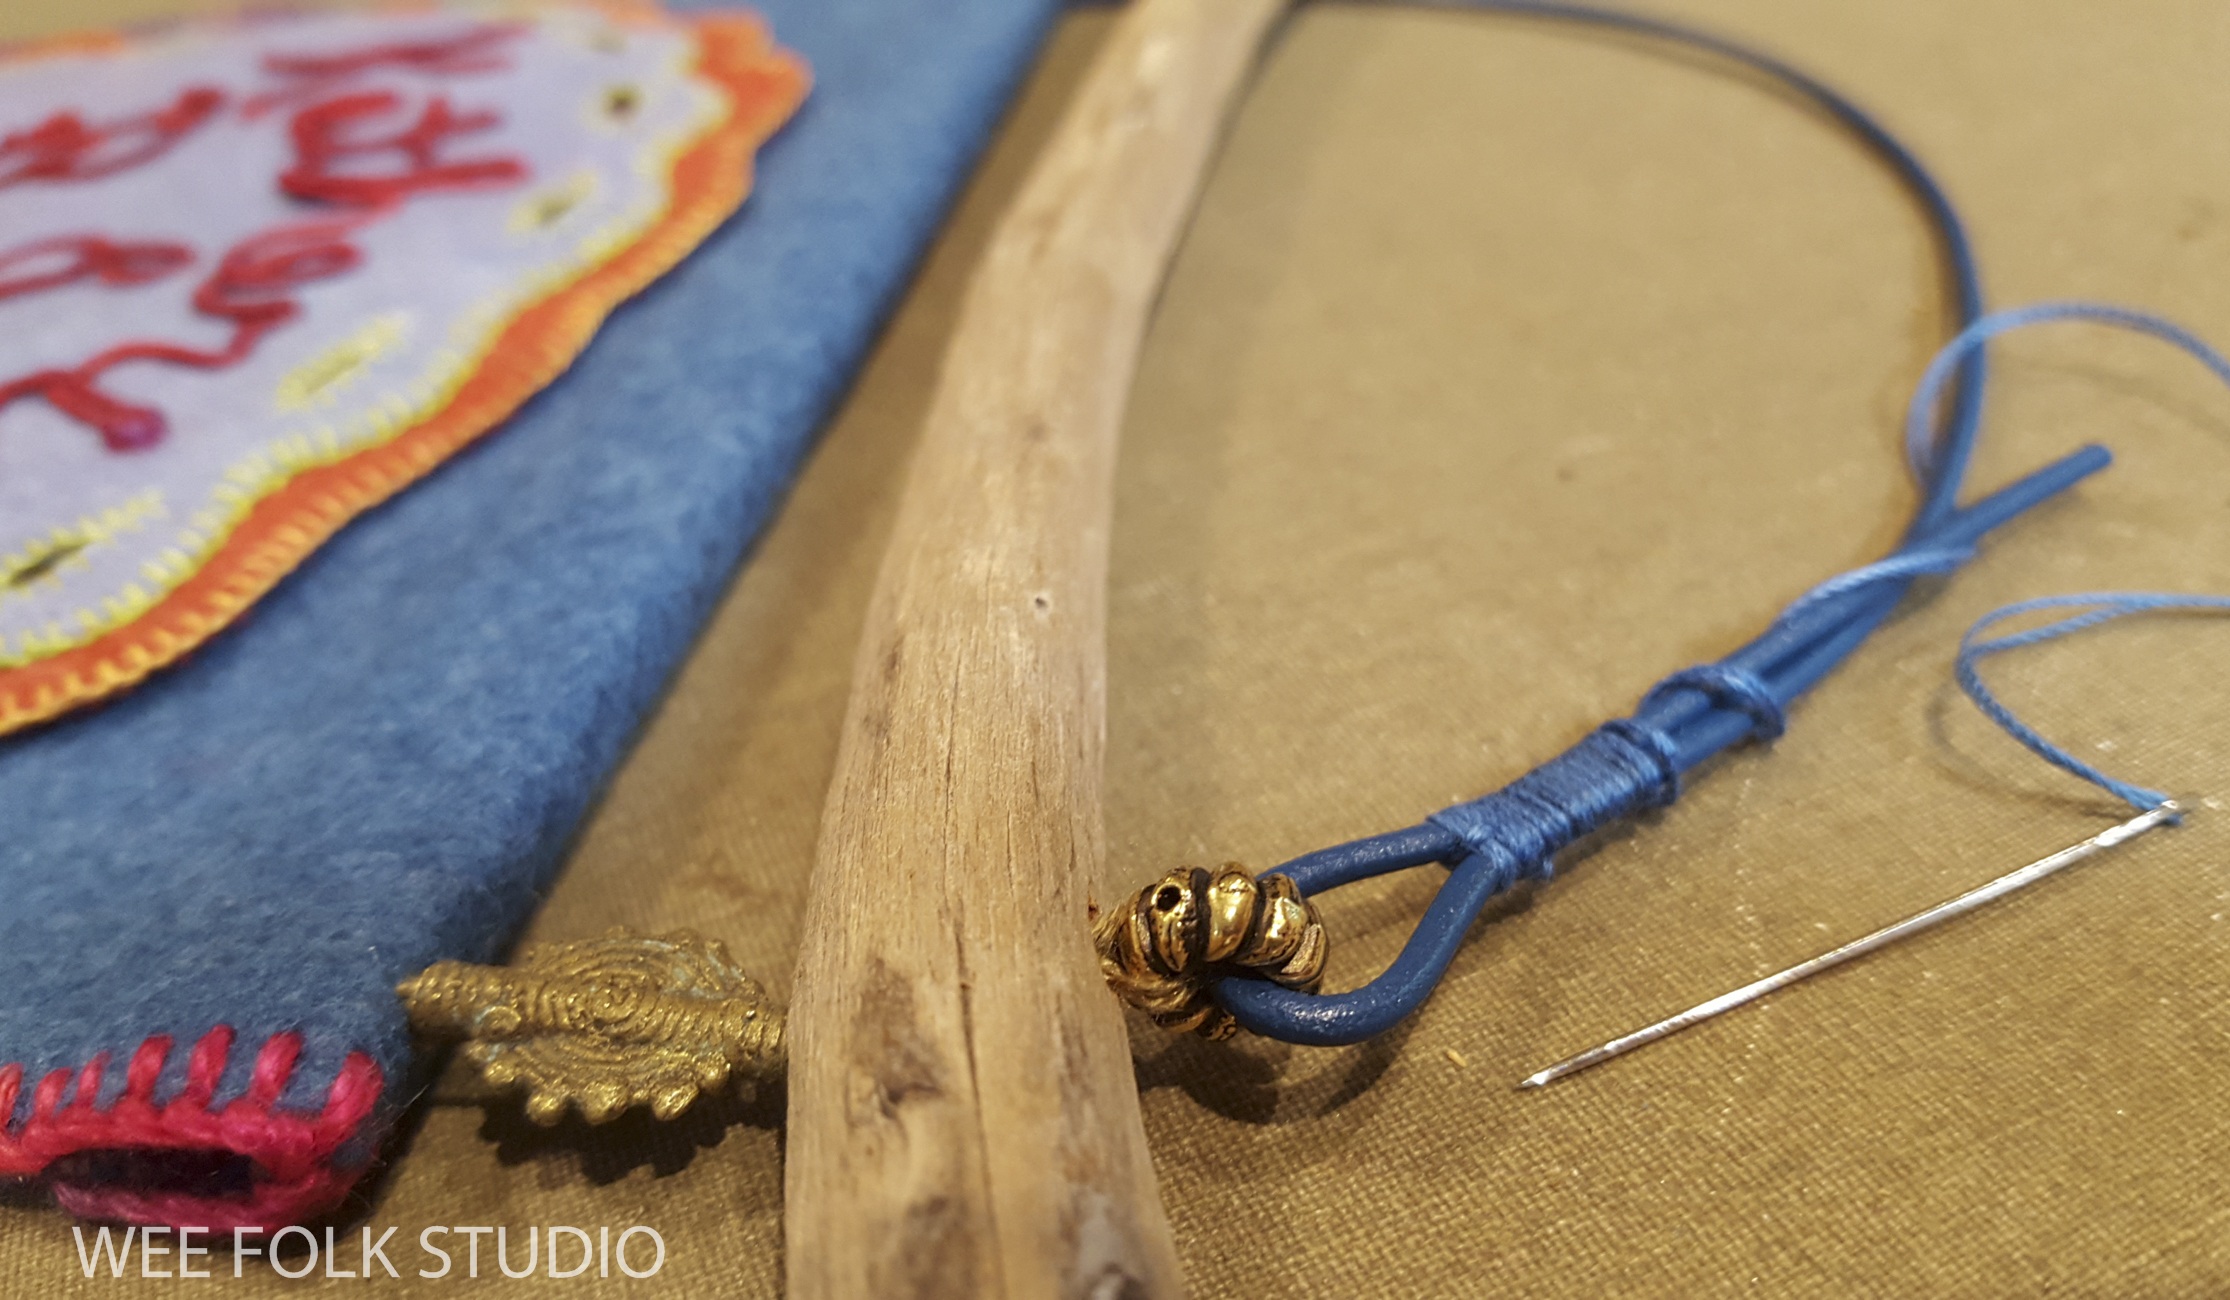
I looked through my driftwood collection and found the right sized stick that would work as a hanging bar.

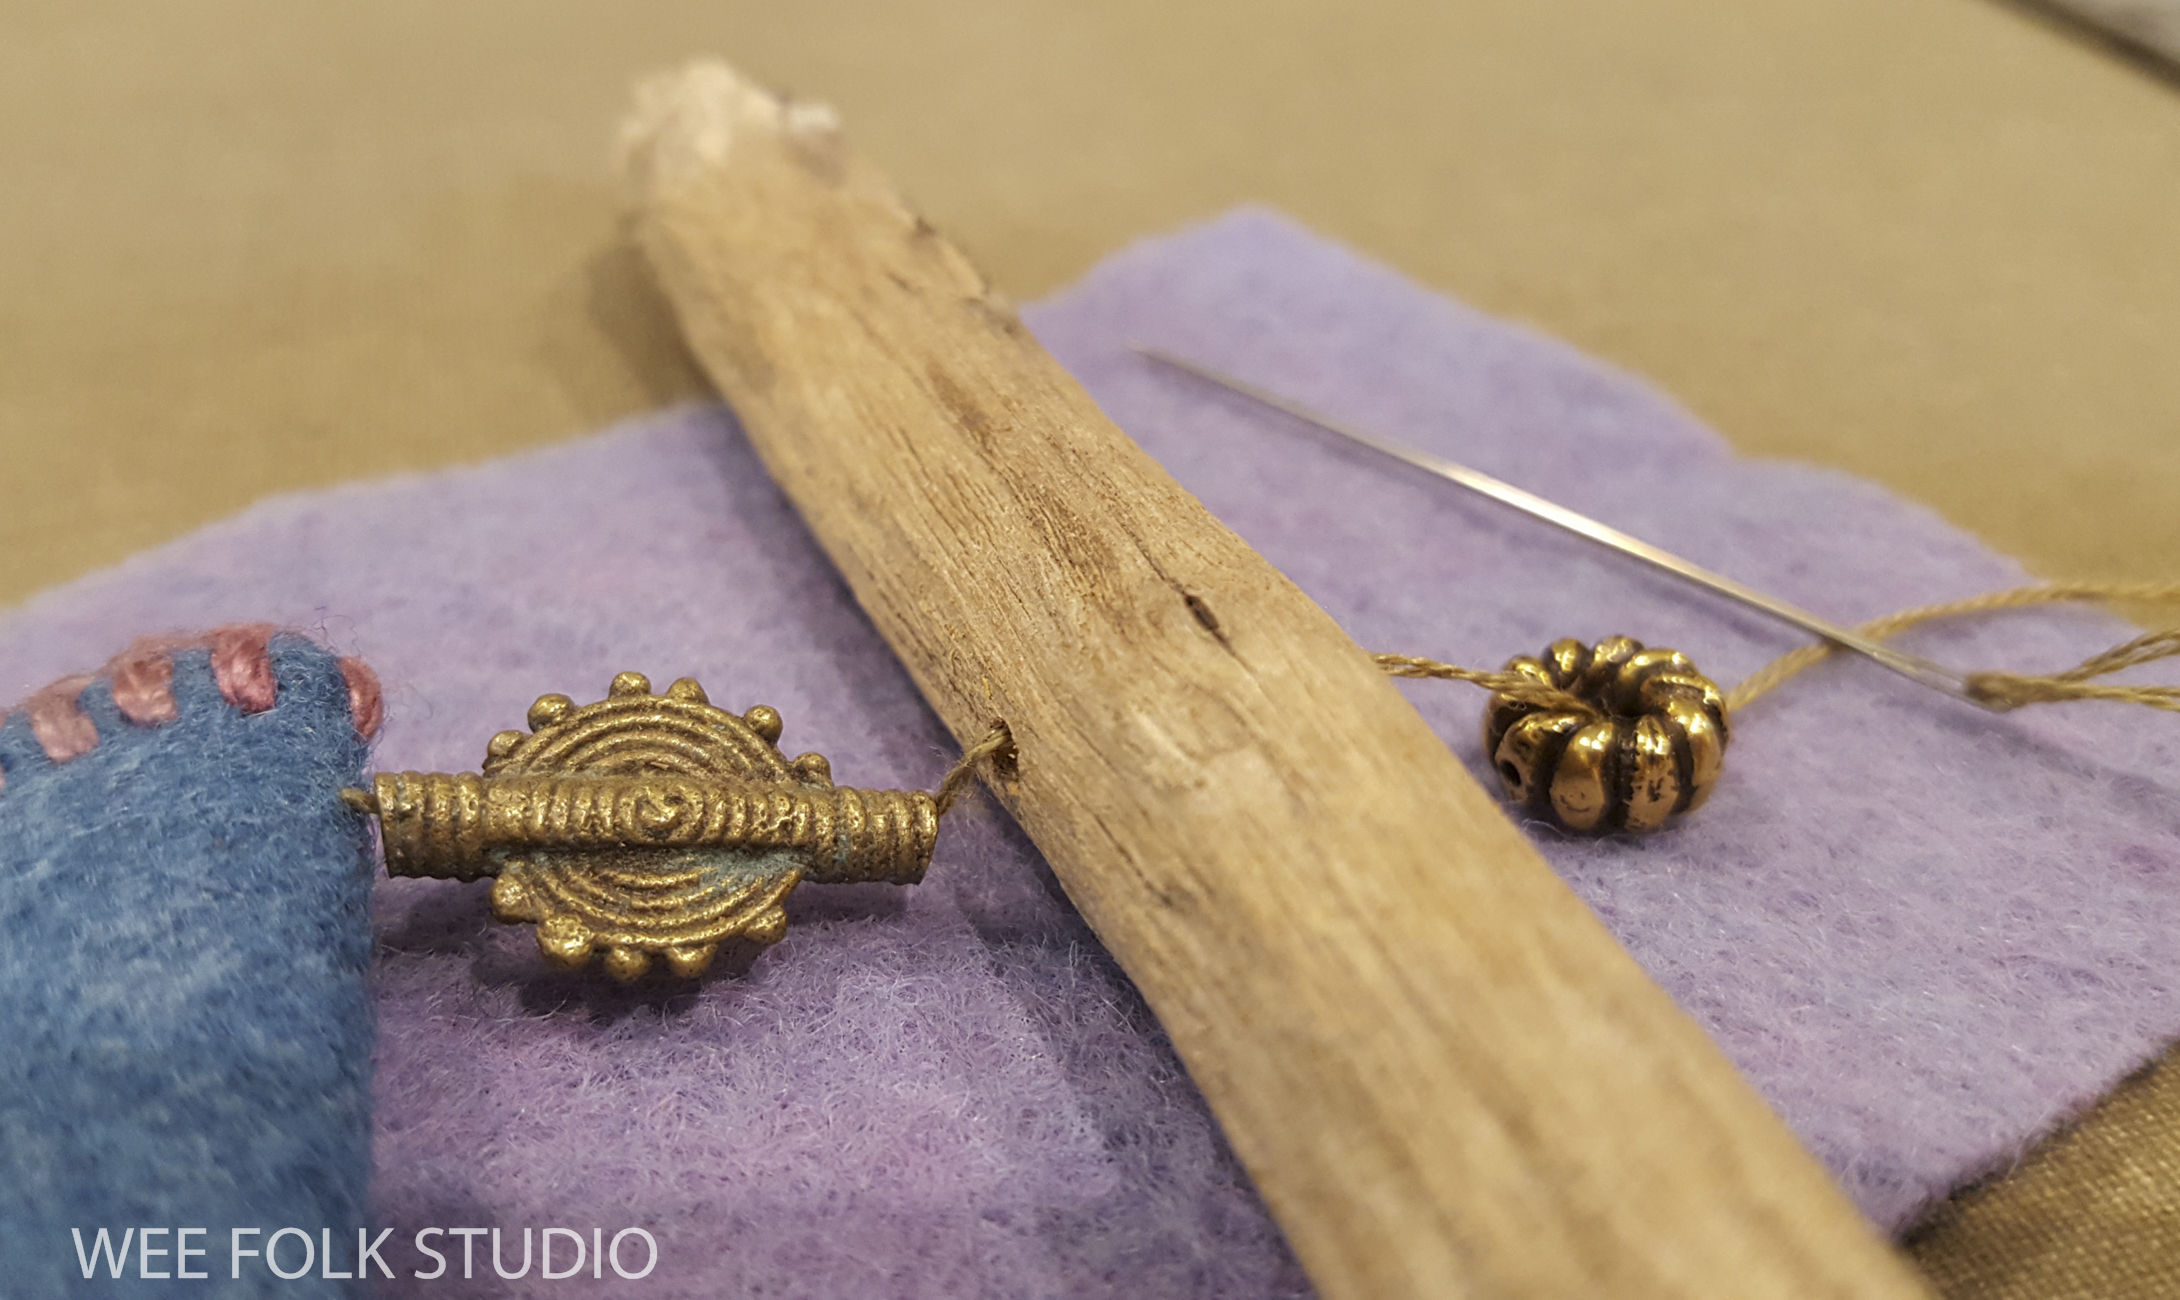
I drilled holes to thread beads through.

Then I attached a leather strap to hang the banner from.

Congratulations on your wedding Katherine and Basil. We are so happy for you!

To keep up with new posts, subscribe to this blog. Your contact info will not be shared. If you’d like to see more frequent photos tracking the projects in my studio, please follow me on Facebook and/or Instagram.

Wedding Banner: Shawn & Max

Today is Shawn and Max’s wedding day. The bride is a family friend and I wanted to make a banner to commemorate the occasion. This kind of project is quick (about a week) in comparison to the other work I do, which takes months or years. In the weeks since delivering the artwork for my upcoming book, My Bed to the publisher, I feel like a free woman! Besides gardening and paying attention to my husband Rob, I have indulged in making fun gifts like this.

It’s been a long time since I made a banner – you can see others in the archives here. I’ve also made personalized wedding dolls, which match the look and style of real-life couples. They inspired the new chapter in the 2nd edition of my how-to book, Felt Wee Folk: New Adventures.

Personalized wedding dolls from the archives

The banner features 2 of my favorite things, cursive handwriting and embroidery. I start by forming the letters with paper covered florist wire.

Then, I wrap the wire with a double strand of variegated embroidery floss.

The letters flow from one to the next, with occasional breaks, like in Max’s name below. I made a separate piece to complete the “x”.

In a nod to the theme of love, I made a heart shaped vine of wire and glass beads.

After I sewed the wire heart to the background felt, I stitched more leaves with embroidery floss.

For much of my art, borders are an important element. I like to define the edges using blanket stitching with a thick variegated thread – Watercolours by Caron.

The wedding date is written in light letters and numbers on a separate dark piece of felt.

I added glass leaf beads and silk ribbon French knot roses.

I put 2 carved bone fish beads in the open areas around their names and sewed the felt sections to the long banner piece.

After chain stitching spirals to the scalloped bottom edged, I sewed shells to the points. These shells are from old souvenir necklaces from Hawaii.

I even remembered to sew a Wee Folk Studio label to the back.

I cut a piece of driftwood to hang the banner from, drilled holes in it and attached the banner with thread. I then made a braided cord with variegated thread – Watercolours by Caron.
Congratulations Shawn and Max. May you have a long and happy marriage!

To keep up with new posts, please subscribe to this blog (top right column on the home page). Your contact info will not be sold or shared. If you’d like to see more frequent photos tracking the projects in my studio, please follow me on Facebook and/or Instagram

Stuart & Nancy ~ 50th gift

stuartnancyWM-1284I had the pleasure of making a 50th anniversary gift for my friend Judy Sue to give to her dear friends Stuart and Nancy. She asked me to include pertinent info like names and dates and suggested that I put in a pair of birds and a heart. As always, I began by drawing thumbnail sketches of the basic design.

50thsketches

About halfway through the process, when I’d already made the birds, I realized that this would be a good project to show how I work. You’d think that this would be automatic by now, but it’s always a challenge to stop and document while you’re engrossed in the middle of something. I took a few photos and also asked Rob to do some filming. You can see high action close-ups of my hand stitching, winding and arranging parts in the video below.

stuartnancyWM2-1263

In this piece I tried a new way of handling thread wrapped wire. In the video, you can see me winding wire around another straight wire rod and pulling it out, creating a curled spring.

stuartnancyWM-3

Stuart and Nancy should be receiving their gift this weekend at a surprise party. It is highly unlikely they will see this post, so I think it’s safe to publish it now. I enjoyed making the piece and it was a real honor to help Judy Sue express her love and friendship to this couple!

See what it looks like finished on the end of this post.

stuartnancyWM-1281

stuartnancyWM-1279

stuartnancy2WM-6

stuartnancyWM-5

RG_19461WM72

To keep up with new posts, subscribe to this blog (top right column on the home page). If you’d like to see more frequent photos tracking the projects in my studio, please follow me on Facebook and/or Instagram.

Felt Banner Workshop

I’m happy to announce that I’ll be teaching a workshop in my home town of Falmouth, Massachusetts later this fall. We’ll make wool felt banners with wrapped wire lettering, the same as I’ve shown several times on this blog (see archives here). Students can make their own personalized keepsake to celebrate a wedding or baby’s birth. It doesn’t have to be a wedding or baby banner. You can also make a welcome sign or write out a short phrase or proverb such as Home Sweet Home or Be Here Now. Update: the workshop is full, but there is a waiting list.

Birds of Beebe Woods

I’m usually too busy to teach classes, but couldn’t resist the opportunity to add a hands-on element to the Intimate Woods exhibit (Sept. 18 – Nov. 15, 2012), which will include my piece, Birds of Beebe Woods. (see posts about the piece here)

An 18″ x 24″ poster of Birds of Beebe Woods is available from my Etsy Shop.

Of course it doesn’t hurt that Highfield Hall is less than a mile from my house and we’ll have a large well-lit space to spread out and work. What could be more fun than spending all day stitching and wrapping thread in the company of other like-minded folk? More info about the workshop is on the bottom of this post.

(Workshop is full) FELT BANNER WORKSHOP – Sat., Oct. 27th , 2012 – 9:30am to 4:30pm Highfield Hall , Falmouth, MA. To find out more and to register, go to this link and scroll down to Felt Banner Workshop. The skill level is intermediate. I’ll provide materials including wool felt, wire, thread, beads and buttons, but students should bring a sewing kit and any special beads, charms and other embellishments from their personal stash.  The class size is limited to 10, so sign up soon if you’re interested. For those of you will travel a distance, there are plenty of Inns and Bed and Breakfasts nearby (even within walking distance). Buses from New York or Boston drop off within a short walking distance, too.

Wedding Banner: Kat & Devin

Last Sunday, we had the pleasure of attending Kat and Devin’s wedding.The bride’s family and my family have been closely connected through several generations. Kat’s grandparents and my grandparents were next door neighbors in Woods Hole in the 1940’s and our families have shared our love of folk dancing, folk music, sailing, and art ever since. Kat is an artist and her husband seems to be a free spirit. Here’s a picture of the dancing wedding couple.

As usual,  I made them a wedding banner for a gift. I really lucked out with the felt  colors I chose, since the wedding’s predominant color was purple/lavender.  I bent wire into the letters of their names and then picked out some decorative objects and beads. The pinkish square object in the center, between their names is a cool leather button I bought years ago.

I then wrapped the wire letters with embroidery floss and stitched the square wavy edged name panel with variegated pima cotton.

I sewed the wire letters and objects to the felt piece.

Then I stitched around the outside edge of the felt  banner piece and sewed the square panel in place. I added some fun “dalmatian” stone beads in a zig zag pattern.

I added some bead  and shell embellishments to the scalloped bottom edge and sewed the wrapped wire wedding date to the felt.

I picked some metal beads from India that I thought would bring an interesting texture to the hanging part of the banner.

A section of a strangled bittersweet vine serves as a hanger. I screwed in tiny metal eyes and hung the banner. I hope Kat and Devin like the banner. It was a lovely wedding and I wish the bride and groom many years of happiness!

To keep up with new posts, subscribe to this blog (top right column on the home page). If you’d like to see more frequent photos tracking the projects in my studio, please follow me on Facebook and/or Instagram.

Baby Banner (Eliza Jane)

eliza9WM

My cousin John and his wife Mariana had a baby girl on March 1st, so I had to drop everything and make a baby banner for Eliza Jane. I took photos along the way, which give an idea of my process. It’s like the wedding banners I’ve been making for a few years. You can see all of them here.

I first made a simple pattern, with her name, birth date and weight written out. Then I cut out a smaller felt square and bent wire to form the letters and numbers.

I wrapped the wire with 2 strands of variegated embroidery floss, hiding the knots behind the curled ends. In this case, wire had to overlap to make the Z. I tried making the fancier lower case script Z, but it was hard to read, so I went with the simpler zigzag style. Below you can see how I made an orange stripe with another thread on top of the embroidery floss in JANE.

eliza3WM

I like using variegated thread to edge the felt.

eliza4WM

I made a narrow panel for a sheep button and some leaf beads.

eliza5WM

Glass leaf beads and a chain stitched vine fill the space between the words.

eliza6WM

I’ve had this ceramic sheep button for about 30 years. It’s so satisfying to put it to use in just the right place.

eliza7WM

eliza8WM

I braided some Greek leather that I bought at a bead show and made a strap to hang the banner. Working with the leather reminded me of making gimp projects at camp. Remember gimp? What a weird material!

eliza11WM

eliza10WM

eliza12WM

Welcome to the world Eliza Jane!

To keep up with new posts, subscribe to this blog (top right column on the home page). If you’d like to see more frequent photos tracking the projects in my studio, please follow me on Facebook and/or Instagram.

eliza13WM

wedding banner: Andrew & Mary

july16aWM

I made this wedding banner for my son Peter to give to his good college friend Andrew, who was married last Saturday. The wedding was in Biddeford Pool, Maine and since the couple met sailing there, I gave the banner a nautical/seaside flavor.

july16bWM

I wrote out their names in doubled up 32 gauge florist wire, since I ran out of thicker stuff. Then I picked out some variegated embroidery floss to wrap the letters.

I added 2 purchased red ribbon roses and then stitched some leaves around them.

july16dWM
july16eWM

The had a whole bunch of shells with holes that came from a necklace my grandmother got in Hawaii about 50 years ago. The blue piece of felt is edged with metallic thread, which is nasty to sew with, but the sparkle looks good.

The felt banner is hung from a piece of driftwood, which was probably part of an old wooden lobster pot.

july16gWM

I found some anchor buttons and a fish in my stash to add and some more shells to hang from the scalloped edged bottom. Best wishes to Andrew and Mary!

july16hWM

See posts about making other wedding banners here.

To keep up with new posts, please subscribe to this blog (top right column on the home page). Your contact info will not be sold or shared. If you’d like to see more frequent photos tracking the projects in my studio, please follow me on Facebook and/or Instagram.

wedding banner: Sky & Daniel

It’s wedding season once again. For a gift, I like to give the bride and groom a felt banner with their names and the wedding date. Sky is an old family friend and we’re off to her wedding tomorrow. I’m sure that the day will be as unique and wonderful as she is!

There’s a lot of showing and no telling in this post. I’ve explained more about how I wrap the letters, etc. in earlier post about other wedding banners I’ve done. See the banners for Karen & Graham and Leigh & Brendan .

To keep up with new posts, subscribe to this blog (top right column on the home page). If you’d like to see more frequent photos tracking the projects in my studio, please follow me on Facebook and/or Instagram.

Wedding Banner (Leigh & Brendan)

The 2nd summer wedding is coming up soon, so I’m making another felt banner for Leigh and Brendan (see Karen & Graham’s on an earlier post here). I get the impression that the bride and groom are kind of traditional, so I’m resisting the temptation to go wild with color and add too many funky embellishments.


I started by bending 32 gauge cloth-covered wire to form the names and wedding date. I’m really having fun bringing language into my artwork this way. I started figuring out this technique a few years ago when I was working on Pocketful of Posies, and have no idea if the same kind of thing has been done before. Once you get into the rhythm, the wrapping goes quite fast. After all those years wrapping fuzzy pipe cleaners with embroidery floss for fairy limbs, this seems easy.

I had to put in some color, though and wrapped the wire names in bright pink variegated embroidery floss. The couple’s invitation had a seaside motif, so I added a metal shell charm and got out a dried star fish from my collection of found objects. The dark blue and had too much weight compared to the names, so I lightened it by winding around a single strand of pink floss.

After bending and wrapping the characters for the date, I cut out a piece of yellow felt to mount them on. I don’t make patterns and plan everything out ahead of time, but construct as I go. I always start with the lettering and then figure out later how much room they’re going to need.

Then, I had to figure out how to place everything on the purple blue felt background. At this point, I realized that the star fish didn’t have anything to offer and would have to go. I go through this editing process often, latching onto some interesting found object and then seeing that it has served its purpose of moving the design along and is no longer needed. A writer friend describes the revision process the same way. She said, “You have to be willing to let go of favorite words and phrases.”

I decided to incorporate a more conventional floral decoration and added some of Mimi’s Kirchner’s felt roses and some glass leaf beads. If you haven’t learned how to make them yet, go to her tutorial on her blog here. I also got out the dreaded glue because that was the only way to attach some shells around the date. The yellow felt piece called out for some embellishment, so I added a chain-stitched loopy line around it.

Then, I cut out  a banner of blue felt, with scallops on the bottom and blanket stitched all around with variegated pima cotton from the Caron Collection. I found an old shell necklace, the souvenir kind from Hawaii, and sewed some shells to the scalloped bottom edge. I was glad that they already had holes.

I sewed a casing for a drift wood stick at the top, then tied and braided a pima cotton strap.

Here’s the finished banner, ready to wrap up and bring to the wedding.

To keep up with new posts, subscribe to this blog (top right column on the home page). If you’d like to see more frequent photos tracking the projects in my studio, please follow me on Facebook and/or Instagram.

Wedding Banner (Karen & Graham)

wedbanner12WM Update: See other banners with wrapped wire lettering here. 

This summer I’ve been invited to two weddings, with the first being held on June 25th on Cape Cod. Both the bride and groom are  designers and I thought they would like something artsy and personal for a wedding gift. wedbannerWM I started by writing out Karen & Graham in a flowing script and then enlarging it to a lower case height of about 1/2″ . Then, using long-nosed pliers, I bent some 32 gauge cloth wrapped wire, using the hand written lettering as a guide. wedbanner2WM This is a technique that I figured out while sewing the book cover design for my children’s book, Pocketful of Posies, which you can see here. I wanted letters that were raised enough to create shadows. And because the wire was a separate flexible piece, it was easy to move the words around for proper positioning on the artwork. wedbanner3WM After determining the size of the names and their placement, I cut out a square of orange wool felt and added my customary wavy edge and some cut out holes. I then wrapped the wire with 2-ply variegated embroidery floss, hiding the knots in the back. wedbanner4WM This is where I do most of my work, on an old ironing board. The light green floss wrapped wire didn’t provide enough contrast with the background, so I wrapped a single strand of dark green floss around the wire, candy cane style. wedbanner4aWM The banner was cut out of a light teal colored wool felt that matched Karen & Graham’s invitation. Then I blanket stitched around the orange felt edges with pink variegated embroidery floss. I chose some fish beads and a heart made of bone to decorate around the wedding date. wedbanner6WM Then I made some tiny 1/4″ roses following Mimi Kirchner’s great instructions from her easy felt rose tutorial. Some silk ribbon leaves were added, too. wedbanner5WM After I figured out how much space to leave for the date and beads, I cut out the scalloped bottom edge of the banner. The outside edge was blanket stitched with some variegated pima cotton (Caron Collection). From my collection of stuff, I picked out some more beads and some beach stone pendants with holes drilled in them to hang from the scallops. wedbanner7WM I then stitched the floss wrapped wire words and numbers in place and sewed the beads and stone pendants to the banner. It needed some color on the bottom to balance the orange square on top, so I added another clump of felt roses and silk ribbon leaves. wedbanner8WM I made a sleeve of felt at the top and slipped a piece of driftwood through. After drilling 2 holes in the driftwood, I threaded some pima cotton through and braided a strap for hanging the banner. wedbanner9WM Here is the finished banner, which I hope Karen & Graham will enjoy for many years! wedbannerfinishWM

To keep up with new posts, please subscribe to this blog (top right column on the home page). Your contact info will not be sold or shared. If you’d like to see more frequent photos tracking the projects in my studio, please follow me on Facebook and/or Instagram