Pocketful of borders (back to work)

pages 40/41, "Pocketful of Posies" 2010

It’s great to get back to work again and my wrist is feeling much better. I’ve been bicycling a lot and leaning on the handle bars is good therapy. The borders for the originals from Pocketful of Posies are coming along nicely and I’ve finished a couple this week. It’s like matting 2-dimentional pieces of artwork before they’re framed, only I’m creating felt edging to go around the perimeter. Here’s a double-page spread of several rhymes grouped in the same scene.

I added a dark brown rick rack around the outside of the felt border to help separate it from the background upholstery fabric. This shows Mary at the cottage door and Peter the pumpkin eater’s wife in a pumpkin.

Here’s Little Tommy Tittlemouse with his fishing pole.

Molly My Sister and I, from "Pocketful of Posies" 2010

This rhyme, Molly My Sister and I, has a little wider border. The artwork already has a lot of detailed embroidered foliage, so a plainer border seemed appropriate. 

I added the green ruffled trim at the end, to echo the greenery of the topiary in the interior scene.

Note: See more posts in the Pocketful of Borders series here.

dolls’ new home in Australia

Lucinda Hooper sent me these photos of some Ltd. edition dolls which I sent to her in Australia. It’s fun to see Dahlia and Bud & Ivy settled in their new home on the other side of the world.

Dahlia, Bud & Ivy with Mimi Kirchner’s tiny world pin cushion

The dolls feel at home with Mimi Kirchner’s tiny world pin cushion, which also found its way from Massachusetts to Australia. See more of her pin cushions in an earlier post here. Thank you for sharing these pictures, Lucinda!

Dahlia sitting by a river in Australia

Bud & Ivy with a “river stone” cottage made by Lucinda’s Mum

Close-ups (boys)

I’ve spent a good part of my adulthood surrounded by boys; sons, friends and nephews. They have kept me grounded and brought a counter balance to all of this girly stuff I do, like sewing and fairy dolls.  Having sons has made me sensitive to the male point of view and I make an effort to include images of boys in my artwork, even though it’s easier to depict females. This first picture is from “Vineyard Family”, a piece I made as a naive young mother in 1985 and shows a rather idealized docile child.


vineyardfamily85WM

detail from “Vineyard Family” 1995

   This pair of boys are from “Fall Children” (see more here), which I made 10 years later in 1995. At this point, I’m trying to bring more motion to my figures, perhaps a more realistic reflection of children. Their sweaters are made from cotton socks and their shoes are leather.

detail from "Fall Children"

detail from “Fall Children” 1995

Here’s George reading a book in a chair made from old worn upholstery fabric. His clothing is also made from cotton socks. The full picture can be seen here.


detail from "George's Chair" 1996

detail from “George’s Chair”

This boy sitting in his real stick fort is from my book, You and Me: Poems of Friendship.


detail from "You and Me: Poems of Friendship" 1997

detail from “You and Me: Poems of Friendship” 1997

This is my favorite boy, “Dusty Bill from Vinegar Hill”, an unfamiliar rhyme I found and loved. His hair is made from a spiky acorn cap, which a friend sent from California. Even though I never learned how to crochet, I figured out how to construct his bag using a regular needle. Bill’s in an illustration from my upcoming book, Pocketful of Posies, which you can find out about here.


detail from "Pocketful of Posies" 2010

detail from “Pocketful of Posies” 2010

Note: See other posts in the Close-ups series archive here.

Pocketful of borders (end papers)

detail of end papers from "Pocketful of Posies"

I love the way end papers of a book can be purely decorative and bring a connection to the tradition of using marblized paper. There are no interfering words to accommodate and there’s freedom to work in a different way, but capture the essence of the book. For Pocketful of Posies‘ end papers, I used only flower thread and a background of wool felt,  which is plain and simple compared with the other illustrations.   


To make the border for this picture, I made patterns and cut out felt strips with a wavy edge. The four corners were cut out as separate pieces. The border sections were blanket stitched with my favorite variegated edging thread, Watercolours by Caron.   


Since the illustration was such a simple, flat chain stitched pattern, I thought the border could use some jazzy up. I embellished the border with glass beads and silk ribbon embroidery.   


I added some lavender rick rick to the inside edge of the border to help set it apart.   


All of the border sections were then sewn together into one continuous strip.   


Then, with pins, I positioned the border on the end paper illustration and stitched it in place on the upholstery background fabric.   


Note: See more posts in the Pocketful of Borders series here.

Pocketful of borders (title page)

Last week, I made a border for the title page from “Pocketful of Posies”. As I mentioned before, all 50 original illustrations need to be mounted and framed for the traveling exhibit this fall. Because the title page artwork was designed to bleed to the page’s edge and is without any kind of border, it requires a similar but different treatment than “Mary Had a Little Lamb” .

First, I picked  upholstery fabric from my stash to stretch for the background. Then I tried out different felt colors and chose ones that I thought complimented the artwork. This process can be tricky because I have to try many color combinations before I’m happy with the dynamics. For this one, I chose a contrasting pale violet for the corners to give the border a strong visual impact, without overpowering the artwork.

Each border section was blanket stitched with 3-ply pima cotton (Watercolours by Caron).

I then chain stitched the year and my initials on the bottom left and right corners. The corners needed something to set them apart, so I doodled a chain stitch with 2-ply variegated yellow/green embroidery floss.

Now, the sides, top and bottom pieces looked plain, so I decorated them with some chain stitched loops of flower thread. There wasn’t enough contrast, so I outlined the loops with stem stitches, using 1 ply variegated pink/purple embroidery floss.

I sewed the corners to the side pieces, measuring to make sure they were even lengths. Then, using a corner ruler, I squared up the border and pinned it on top of the artwork.

I then sewed the border in place and sewed it to the upholstery fabric background.

This title page shows a landscape filled with different characters and buildings from the rhymes in the book. The title and other information will be printed in the open areas in the sky.

Note: See other posts in the Pocketful of Borders series here.

Close-ups (peas)

My peas are starting to come up in the garden. Their vines are such a cheery sight in the spring and then the first food to pick in June. This series of closeups begins with a peapod pin made with velvet ribbon and green wooden beads. You can read the story about my pins here.

peapod pin 1977

peapod pin 1977

Here’s a detail from “Picking Peas”, a fabric relief from 1985. The full scene is on another post here. The peapods are glass beads. I must have figured out how to knot the string to make the net or cut a piece out of an existing net.

detail from "Picking Peas" 1985

detail from “Picking Peas” 1985

The peapods in this illustration from Mary Had a Little Lamb are made from seed beads sewn inside thin satin ribbon.

detail from " Mary Had a Little lamb" 1995

detail from ” Mary Had a Little lamb” 1995

This is a felt pin from my how-to book, Felt Wee Folk. The peas in the ribbon pods are glass beads in both this photo and the one below.

pin from "Felt Wee Folk" 2003

pin from “Felt Wee Folk” 2003

 Here are some felt pea vines from an illustration in my upcoming book, Pocketful of Posies.
PFOPpeapodsWM

detail from Pocketful of Posies” 2010

Note: See other posts in the Close-ups series archive here.

Pocketful of borders (Mary Had a Little Lamb)

x-ray of my wrist

I’ve recently resumed working in my studio after months recuperating from my fall and broken wrist in January. It was  a bad break that required surgery to put in a plate and several screws.   Two orthopedic surgeons told me the break was too complicated for them to fix and that I needed a hand specialist. Now, I look at the x-ray of my wrist and appreciate the intricacies of the hand surgeon’s fine detailed work. I’m glad that I waited the ten days after the break to have her do the surgery in Boston. Today, after 2 months of hand therapy, I’ve regained most of my wrist’s rotation, but still have limited flexibility and strength. Even though the break was in my subdominant left hand, I need the full use of my wrist to hold materials that I stitch with my right. As I work, I can feel the tendons in my hand and wrist pulling and aching, but I’m determined to sew! My physical therapist told me that she will work with me another month, to see if we can get back as much use as possible.     

"Mary Had a Little Lamb", pages 26/27 from the book, "Pocketful of Posies"

detail from "Mary Had a Little Lamb"

 Before the accident, I was going to spend the winter making borders for all 50 of the original illustrations from my upcoming book Pocketful of Posies: A Treasury of Nursery Rhymes . So, I have a lot of work to catch up on.     


The pictures now need to be given borders and mounted on stretched backgrounds before being framed under glass for the traveling exhibit. The illustrations were photographed a year ago for reproduction in the book and now can be reworked for their 2nd life as framed pieces of original art. I just finished the border on the double-page spread for the rhyme, “Mary Had a Little Lamb”. There was already a felt border, but I needed to finish the outside edge. I made a scalloped pattern and cut around the outside so that the corners were rounded.     


Then, with some variegated cotton thread (Watercolours by Caron), I sewed a blanket stitch around the curved edge.  I added a decorative curly-cued chain stitch made with 2-ply variegated embroidery floss (DMC).     


The scalloped border looked too flat, so I sewed 26-gauge wire to the underside, near the outside edge.     


I embroidered the date and my initials to the bottom border. Then, I bent the wire to make a wavy edge, just like you’d do with pie crust around the outside edge of a pie pan. The felt artwork is then sewn to a stretched piece of upholstery fabric.    


Here’s the finished picture. In the book, the words from the rhyme will be printed in the large open spaces and the book’s gutter will be in the center.     

"Mary Had a Little Lamb" ready for framing

Note: See other posts in the Pocketful of Borders series here.

Dragons

Here are 2 fabric relief pictures that incorporate the story of St. George and the Dragon. These pieces were personal projects and not made for an illustration job or to be published in a book. Both “George’s Chair” and “The Storyteller” illustrate the power of the imagination, one through reading a book and the other with storytelling.

georgeWM   The chair was made with worn upholstery fabric and sticks out about 1″ from the surface. It has a lace doily on top and the chair’s legs are polymer clay.

georgeanddragonWM George’s chain mail hood is made from metallic fabric and his arms, legs and sword are wire wrapped with metallic thread. The princess has an acorn cap crown sprayed with gold paint.

Georgedragon2WM

georgereadingWM

storytellerWM

storytellerwomanWM

storytellerdragonWM

storytellerchairwm

Close-ups (windows)

Windows are opportunities to go from one world and into another. They are like mini stages, complete with curtains. I also like the way they provide a structure for bringing pattern and color into a scene. This series of window close-ups are all from children’s books I’ve illustrated. The first one is from You and Me: Poems of Friendship. There are clay “brick” beads framing the window and the ones on the wall are painted on gray felt.   

Illustration from "You and Me: Poems of Friendship" 1997

 The next two are from the board book, Wee Willie Winkie. The window box is made of wire wrapped in embroidery floss and the fence is a row of budding branches.  

Illustration from "Wee Willie Winkie" 2006

Illustration from "Wee Willie Winkie" 2006

 The last group are closeups of  illustrations from my upcoming book, Pocketful of Posies: A Treasury of Nursery Rhymes.  

Illustration from "Pocketful of Posies" 2010

Illustration from "Pocketful of Posies" 2010

Illustration from "Pocketful of Posies" 2010

Note: See other posts in the Close-ups series archive here.

Felt Cat Pin tutorial

This project is from the first edition of my how-to book, Felt Wee Folk: Enchanting Projects. I showed how to make the cat pin on HGTV’s The Carol Duvall Show soon after the book came out in 2003. Here are the same pieces we used in the step-by-step demonstration on the show.

Find out about books I’ve illustrated with fabric relief here. See more cats I made of felt in an earlier post here.

feltpinscatWM

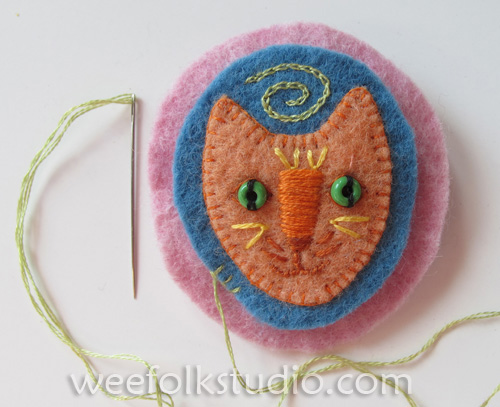
Felt Cat Pin from “Felt Wee Folk”, 2″ x 2.5″

Living without TV, I was unaware of the numerous cable craft shows and was unfamiliar with this new term “tutorial” on the internet. I’m slowly crawling out of my peaceful sewing room, but question how a person can both do their creative work and keep in touch with the vast sewing/fibers network! I suppose, like everything, it’s a question of balance. I hope that you enjoy this cat pin project and use it as a launching pad for other ideas of your own. You can read and see earlier posts about my pin business here.

FELT CAT PIN: To complete the project, you’ll need to understand how to do a blanket stitch, chain stitch, satin stitch and fly stitch.

Materials: 1″ pin back, pinking shears, embroidery needles, 2 green glass beads (about 1/4″), embroidery floss: black, brown, orange, gold, light green, wool felt: 2-1/4″ x 2″ pink, 1-1/2″ x 1-3/4″ blue, 1-1/4 x 1-1/2″ orange

CPTsuppliesWM Step 1. Cut out shapes from wool felt: orange for cat, blue for the middle layer and pink for the bottom layer.

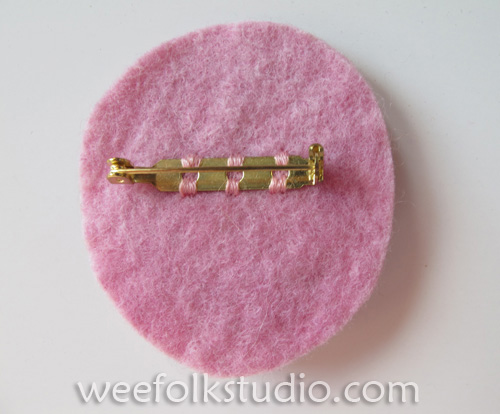
Step 2. Sew the pin back to the bottom layer with floss or sewing thread.

CPTpinbackWM

Step 2

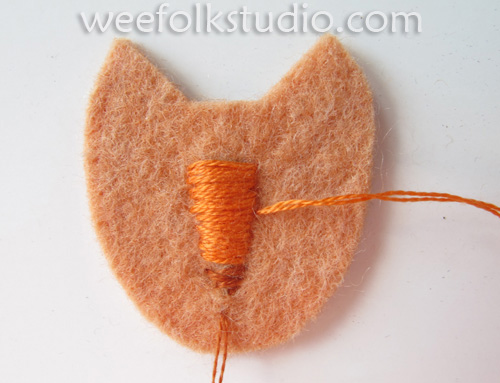
 Step 3. Satin stitch the cat’s nose with double strands of orange floss. With brown floss, stitch the bottom end the cat’s nose.

Step 3

Step 3

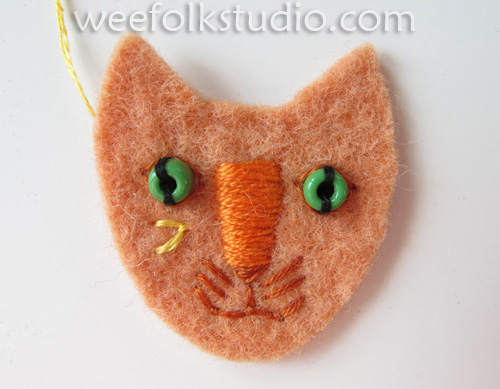
Step 4. Stitch the mouth and whiskers with double strands of brown floss. Sew the green bead eyes onto the cat face with black floss, stitching vertically to make the eye’s pupil. Stitch an outline around the bead eyes with a single strand of brown floss. With a double strand of gold floss, use a fly stitch to make cat’s stripes.

Step 4

Step 4

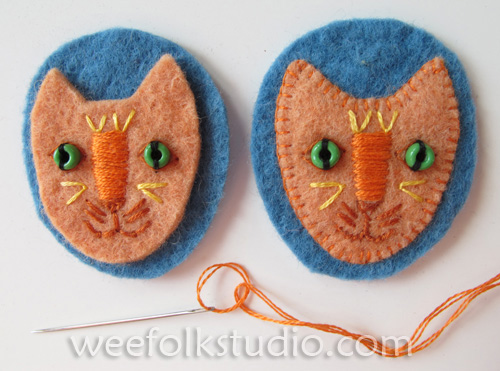
 Step 5: With double strands of orange floss, stitch the cat face to the blue middle piece, blanket stitching all around the outside edge of the cat face

Step 5

Step 5

Step 6. With a single strand of light green floss, chain stitch the curly queue on the blue felt, above the cat face. Then, with double strands of light green floss, blanket stitch the blue middle section onto the pink piece.

Step 7. With sharp picking shears, trim around the outside edge of the pink felt piece. You’re finished!

Step 6

Step 6