Pocketful of Borders: Ring around the Rosie

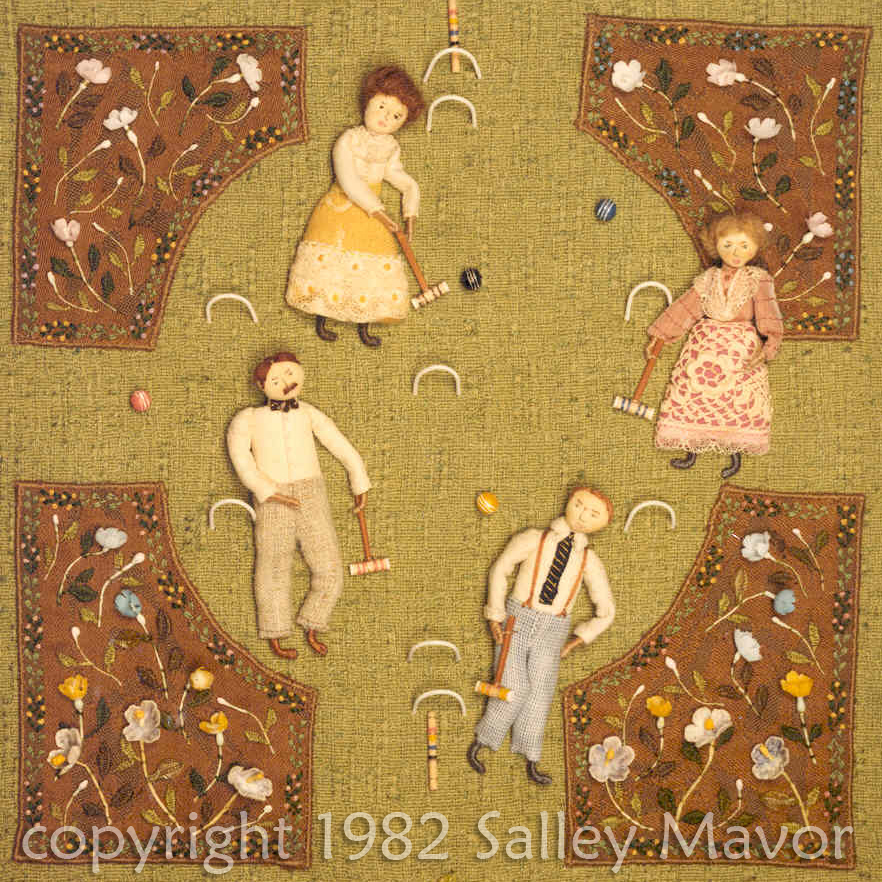
The one woman border stitching factory is running double shifts to get the illustrations finished and framed in time for my Pocketful of Posies traveling exhibit, which you can read about here.  This one is from the page for the rhyme “Ring around the rosie”. The border turned out to be much more involved than I planned and took several days to complete. From now on, I can’t afford to play around, trying out different approaches for each piece. It’s time to get serious. My goal is to complete one a day, so I’ll have all 51 ready by mid Sept., when we hang the show.

I picked out some upholstery fabric for the background and then chose the felt border colors.

I like to lay out different skeins of pima cotton from the Caron Collection next to the artwork and pick a color scheme that matches.

Then I edge the border pieces with a blanket stitch.

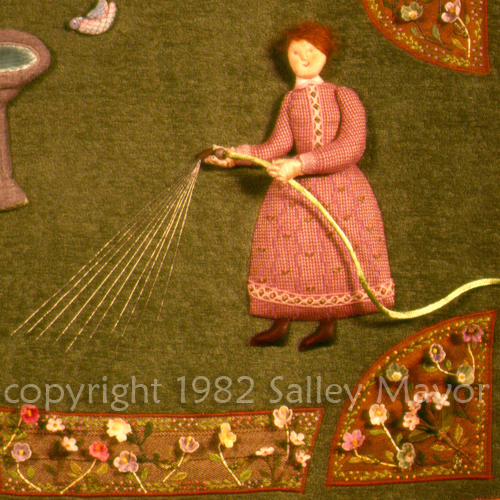
There’s a lot of open green space around the dancing figures in this illustration, so I thought that the border could take some embellishment. I did a little sketch of some leafy curled stems and embroidered them.

One thing led to the next and before I knew it, I was filling the leaves with orange floss and scattering french knots around like confetti.

When I put the finished border piece next to the artwork, it looked too busy and the many colors detracted from the circle of characters. It was clear to me that the first try didn’t look right and instead of wasting time trying to make it work, I quickly moved on. I put it aside and decided to make another design that was still embellished, but was limited to green chain stitching.

They were true doodles, done free hand, with every border section different. That way, I don’t have to plan it out and repeat exactly the same design for all 4 side pieces. Also, without a set pattern, the border more accurately reflects the lighthearted and uninhibited mood of the characters.

I then embroidered the date and my initials on the bottom corner pieces.

And continued doodling…

After sewing the side and corner pieces together to make a square border, I thought that it needed a little lift off the surface, so I added some wire around the outside edge.

Later, after I’d sewn the wire all around, I realized that I should cut and adjust the wire to conform to the curves of the corner pieces.

I then covered  the wire by wrapping it with variegated embroidery floss.

And to help define the form, I slipped some wire through the stitches on the backside of the inside edge, like a underwire bra.

Now, I sewed the whole wire supported border to the artwork and bent waves into the outside scalloped edge.

I’m half way through making the borders, with about 25 to go! I’ll try to remember to pause and take pictures as I go, but know some steps won’t be documented because I’m so intent on finishing this project.

Note: See other posts from the Pocketful of Borders series here.

Pocketful of Borders: Jack and Jill

detail from “Pocketful of Posies” 2010

I’ve just finished adding a border to the double page illustration for Jack and Jill, which is part of my upcoming book, Pocketful of Posies. For those of you who are new to this blog, I am preparing 51 illustrations for framing, so that they can be displayed in a traveling show.

The artwork was previously mounted on foam core board for photography purposes. Now, it will be dressed up and given a new border and background. I stretched upholstery fabric and picked out felt colors that complimented and contrasted with the blue and green scene.

I looked through my basket of Watercolour pima cotton threads from the Caron Collection.

And used bright blue and variegated light pastel thread for the blanket stitch edging along the felt border pieces.

I then chain stitched my initials and the date on the bottom corner pieces with variegated embroidery floss. I’m enjoying the mindless doodling of the chain stitching.

The outside blanket stitch and the embroidery floss curls pick up colors from the illustration.

Then the border pieces are sewn to the inside artwork and onto the stretched back ground.

Now, it is ready for framing!

Note: See other posts from the Pocketful of Borders series here.

Close-ups (shells)

This is a series of shell images, starting with a fabric scallop pin, which I made in the late 70’s. See the story about my pins in earlier posts here.

shellpinWM

The scale and natural delicacy of shells make them suitable props for my little dolls. Here’s a 2″ mermaid photographed on the beach.

mermaidWM

This is an appliqued felt purse from the 90’s, which is like the ones featured in my how-to book, Felt Wee Folk: Enchanting Projects.

shellpurseWM

Shells make good sleeping places, too. This is a detail from an illustration in Wee Willie Winkie, from the page which reads, “Are the children in their beds?”.

WWWshellbedwM

Here is a detail from “Mary, Mary, quite contrary, how does your garden grow?”, which is included in my picture book, Pocketful of Posies; A Treasury of Nursery Rhymes.  

marymaryWM

This is from “the old woman stands at the tub, tub, tub” verse, which is also in Pocketful of Posies. Her washing tub is made from a “boat” shell that is commonly found on our local beaches.

PFOPshelltubWM

Note: See other posts in the Close-ups series archive here.

Pocketful of Borders: In spring

detail from "In Spring" Pocketful of Posies 2010

The pressure is mounting to get these borders finished by September for the Pocketful of Posies show. I’ve completed four in the past week, including this one of a seasons rhyme, which begins “In spring I look gay decked in comely array”. 


It took several tries to get the background fabric and border colors right. I can’t explain why one shade or pattern works better, but it helps to compare and narrow it down until you’re satisfied. 


I chose a bright red floss for my initials and the date embroidery on the bottom corners. The photo doesn’t show the subtle variegation in the red thread. I have my eye out for variegated thread to purchase and find myself reaching for it first. It adds a complexity that mirrors nature better than solid colors. 


I had just finished writing the post about lettering and was inspired to add some words to this one. So, instead of doodling along the border, I wrote out the names of the seasons on the four side sections. 


Sometimes I write on the felt with a pencil and then embroider over it, but it can show through and look messy. For the seasons, I wrote out the words on a piece of paper to get the spacing and then eye balled the stitching. 


I made sure there were some doodles in the corners and sewed it all together. 


This piece is relatively shallow compared to the other illustrations from the book. To get an idea of scale, the birds are under 1 inch long. 


Note: See other posts from the Pocketful of Borders series here.

Pocketful of Borders: Hey, Diddle, Diddle!

board book version

The next border  to finish up for Pocketful of Posies: A Traveling Exhibit  is the illustration for the rhyme, “Hey, Diddle, Diddle!”. The new book includes all of the rhymes from my board book series, but they are represented by new illustrations. I really liked compressing the scene into one image, instead of stringing out the action over several pages. Most of  the main characters from “Hey, Diddle, Diddle!” are similar to the ones in my board book version, with the exception of the cat, which is made in a different style. The plate is made from polymer clay and the spoon is a doll house miniature.   

detail from " Pocketful of Posies" Houghton Mifflin 2010

cat from "Pocketful of Posies"

The new book, Pocketful of Posies: A Treasury of Nursery Rhymes includes many cats made in my new Halloween costume style. The head is a wooden bead, with face painting and a felt hood with ears attached. The cat’s paws and chest are whitened with acrylic paint. The fiddle is felt, with a thread-wrapped wire neck and bow. The illustration’s existing brown border was wide enough to cut in a wavy pattern, so I didn’t add another felt border. After several tries with different colors, I chose a blue pima cotton for the blanket stitched edging.   


I then embroidered my initials and the date with some variegated dark purple raw silk thread. It called out for embellishment, so I started doodling along the border with light blue raw silk thread.  


The light blue line lacked contrast, so I outlined it with a single strand of orange embroidery floss.   


For the corners, I added  spirals and unintentionally doodled a pattern in the Celtic style.  After outlining a few sections, I decided that the orange floss attracted too much attention, so I ripped it all out. That’s what is so great about stitching, you can change your mind mid stream. Borders, like any kind of framing, should compliment the artwork, not compete.  


I thought that a little height and firmness would perk up the border, so I added 32 gauge florist’s wire to the outside edge.  


I then covered the wire with 2-ply orange/red variegated embroidery floss.  


At this point, I was glad that I’d removed the orange outline around the doodles and saved the color for the outside edge, which defined the border against the upholstery fabric background.  


I bent the wavy wire so that it lifted up the outside edge.  


Here is the finished “Hey, Diddle, Diddle!” piece, ready to frame for the traveling exhibit of original art.  


My husband, Rob, has been making shadow box style frames in the basement. He’s doing a beautiful job and the 51 cherry wood frames are about half way done. We are both making progress toward the Sept. deadline for the first show in Falmouth.

Note: See other posts from the Pocketful of Borders series here.

Close-ups (gardens)

How fair is a garden amid the trials and passions of existence.  ~Benjamin Disraeli

gardenhose82WMjpg

Here are a couple of pieces that I made in 1982, when I was transitioning from 3d sculptural work to flatter, framed pieces. I started using the term “fabric relief” about then because people kept asking what they were called. It’s still hard to explain what I do at cocktail parties!

The water coming out of the hose is metallic thread. The figures playing croquet are very early “wee folk” with cloth heads instead of the painted wooden ones I use now.

croquet82WM

This is a detail from the strawberry garden scene in a illustration from Mary Had a Little Lamb. The stones were glued onto the velveteen background fabric.

MHALLlamb2WM

Here’s another Mary character in her garden, this one from The Hollyhock Wall. Her hair is wool fleece and the background is embroidery on dyed velveteen.

HHWyellowhouseWM

“Eleven, Twelve, dig and delve”. This illustration is part of a rhyme in Pocketful of Posies.  The straw hat is made with thread wrapped wire and the spade blade is a heart charm.

spadeWM

Note: See other posts in the Close-ups series archive here.

Pocketful of borders (Queen of hearts)

detail from "Queen of Hearts" from "Pocketful of Posies" 2010

I’ve been continuously working on the illustrations from Pocketful of Posies, getting them ready for framing. The traveling show of original fabric relief artwork will be launched in mid-Sept. and my husband just began making the wooden shadow box frames. Here’s a series of pictures of the “Queen of Hearts” rhyme, showing the process of adding an additional felt  and metallic braid border and mounting it on red upholstery fabric.  


Note: See other posts from the Pocketful of Borders series here.

Pocketful of Posies poster giveaway winners

Little Boy Blue, come blow your horn.   

The winners are chosen, on this very morn.   

detail of cover for "Pocketful of Posies"

This morning, 3 names were pulled at random from a pile of 86 entrants for a chance to win a poster. Congratulations to the winners:  Eva in Holland, Susan Dean in Massachusetts and Kathy Stuart in Canada!

Also, the date has been set for the Pocketful of Posies original art show opening and book release party at Highfield Hall in Falmouth, Massachusetts. If you live in the area, please come join the festivities on Sunday, Sept. 26th at 4:00 pm.   

To see the current schedule, visit the Pocketful of Posies Traveling Exhibit page. In addition to the scheduled show locations, plans are underway to have the show come to Wisconsin and Vermont. These venues will be added to the list when the details are confirmed.  

detail from "Pocketful of Posies"

Close-ups (butterfies)

I slipped in this moth (actual size 3″), even though it’s not a butterfly. He was a character in a story called “The Great Cleanup” (1979), which I wrote about in an earlier post here.

Moth from “The Great Cleanup” 1979

This close-up is from the endpapers for Pocketful of Posies, which is shown more in an earlier post here.

detail from endpapers in “Pocketful of Posies” 2010

Here is another butterfly project, a felt purse from  Felt Wee Folk: Enchanting Projects. The shiny dots are nail heads.

felt Purse from “Felt Wee Folk” 2003

This tiny butterfly (actual size is 1″) is a detail from my upcoming book, Pocketful of Posies: A Treasury of Nursery Rhymes. See the whole illustration for “Jumping Joan” here.

detail from “Pocketful of Posies” 2010

Note: See other posts in the Close-ups series archive here.

Pocketful of borders (Jumping Joan)

Here’s the latest picture that I’ve prepared for framing from Pocketful of Posies. It’s the illustration for the short rhyme, “Here am I, Little Jumping Joan/ When nobody’s with me, I’m all alone”. 

"Jumping Joan" illustration from "Pocketful of Posies" 2010

The original fabric relief is small (8 1/2″ square) and was enlarged to the printing size of 10″. Sometimes I want to have figures that are larger than wee folk size, so I have them blown up a bit. I made the original Jumping Joan as large as I could, using this technique (about 5″). The floss wrapped arms and legs don’t look right any bigger. 

detail of "Jumping Joan"

I tried out 2 different of shades of variegated pima cotton for the blanket stitched edging and chose the turquoise one. 


I then picked out some variegated embroidery floss to use in the chain stitching. 


Here are the top corner pieces, with a chain stitched curly cue line. 


I also chain stitched some loops along the scalloped side pieces. I wanted to give the whole border a lift, so I sewed on some 32 gauge cloth wrapped wire to the outside edge. 

I wanted the outside edge to have a crisp, defined quality, so I wrapped the wire with dark blue floss. 


I added my initials and the date to the bottom corners and sewed on wire, which was then wrapped with green floss. 


With the help of the wire, the finished border curves up like a plate. 


I thought it was finished and then my new order of upholstery fabric came in.  I’m excited about using these shades in future projects. 


I had run out of options from my stash, so I bought the minimum of 1 yard in a variety of patterns and colors. The people at the upholstery shop think I’m making pillows. It’s too hard to explain, so I didn’t correct them. 


I changed the background fabric from the brown to this pink and am much happier with the result. 

Note: See other posts from the Pocketful of Borders series here.