Wedding Cake figures

My friends, Shona and Amy are tying the knot this Saturday. Their wedding is looking to be more of a do-it-yourself type than the formulaic extravaganzas I’ve been to lately.  Their’s will be much looser, with lots of friends helping out, which reminds me of 30 years ago, when my husband and I got married.  My friend Terry and I volunteered to make their wedding cake. Terry has already baked the cake and she and I will be spending friday working on the decorations. We’ve been planning this cake for months and I’ll try to remember to take pictures as we add the personal touches. I just finished making Shona and Amy dolls to fit a toy boat, which will be on the cake.

To start, I found a wooden toy boat of the right size and type at Bella Luna Toys. I then made two 3 1/2 inch tall pipe cleaner doll forms, the same way as explained in my how-to book, Felt Wee Folk.

This is what the dolls look like undressed. I wrapped some cotton batting around their middle sections and sewed small beads for breasts, which show that these are women, not girls. Just adding stuffing doesn’t look natural and the beads appear more true to life when they are clothed. I started using beads for breasts a few years ago, when I made my self-portrait, because I wanted to show maturing over time. See my piece, Self-Portrait: A Personal History of Fashion here.

Then, I dressed them in clothing that I thought fit their style and personality.

Now that the dolls had heads, they needed a trip to the hairdresser. I put glue on the top and sides of the bead heads and then draped felt over, using pins to keep the felt in place while it dried. I started devising this wig making technique when I made all of those dolls for my Self-Portrait.

After the glue dried, I cut the felt in the back to conform to the round head and glued the felt to the back. Pins hold the felt in place while it dries. I felt like giving the dolls little fashion magazines to read like women in salons, who sit and wait with curlers or foil origami on their heads.

I sewed the seams together and blanket stitched around the felt edges, using flower thread, which is thicker than embroidery floss. DMC discontinued making flower thread, which is too bad, because it’s great stuff. I still have some of this golden wheat color that worked for both Amy and Shona’s hair.

Shona has curls, so I twisted the thread around the needle and pulled it through, like loose french knots. I really felt like a hairdresser then.

Amy’s doll had straight hair.

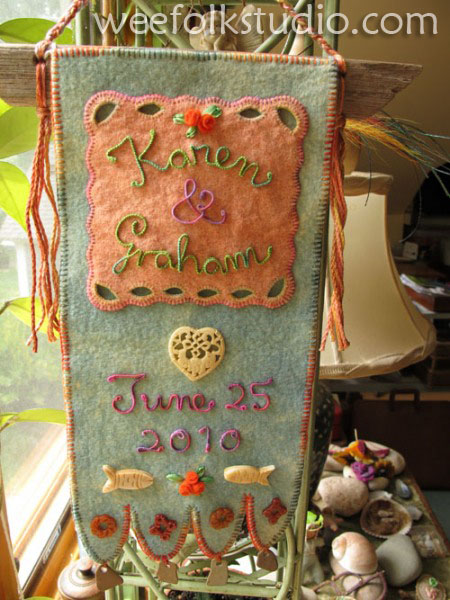
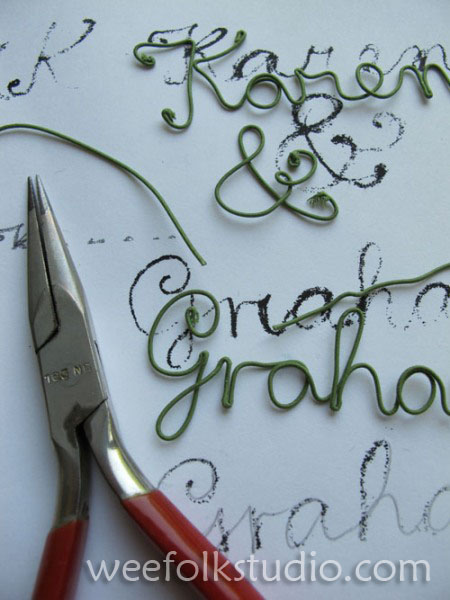
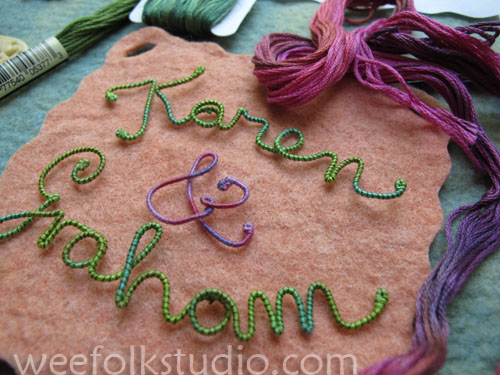
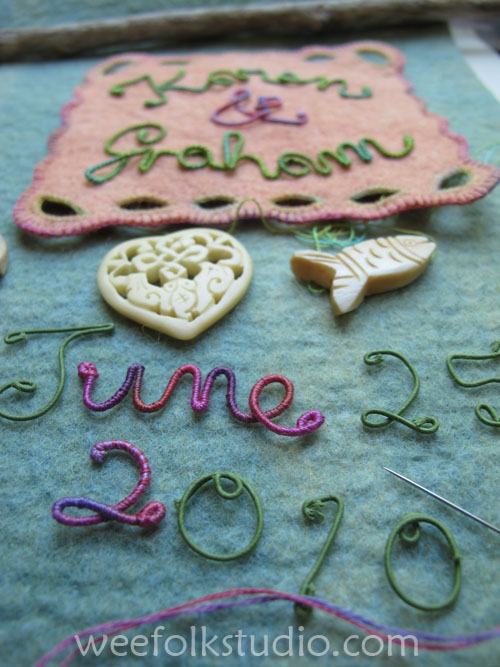
I made a flag with their names that would fly above the dolls on the boat. Wire along the flag’s edge helps keep its shape.

I painted the boat and sewed the finished dolls to tiny screw eyes on the cabin. Amy loves to fish, so I made her a fishing rod and attached a bead fish.

Shona, who is a bit of a show-off, is ready at the bow, holding on to the flag pole. I’ll let you know how the launching goes.

To keep up with new posts, please subscribe to this blog. Your contact info will not be sold or shared. If you’d like to see more frequent photos tracking the projects in my studio, please follow me on Facebook and/or Instagram.

Baby Jacket for Moss

When little Moss was born last fall, I knew I had to make something green for him to wear. His jacket is made from the same Simplicity pattern (6256) as Evan’s, which you can see here.  I am not waiting for  grandchildren of my own to make clothes for. Whether or not I will ever become a grandmother is uncertain and out of my control, so I take the opportunity to sew for those children who are here now. I made some children’s clothes earlier in the summer, before I realized that I was way behind in getting ready for my show in September. Sewing from a pattern is relaxing, like following a favorite cookie recipe. For Moss’s jacket, I used mottled green fabric with orange dots and lined it with cotton batting.

Then I chain stitched a name tag with Moss.

And shaped it into a leaf, which I appliqued to the jacket front.

Then a stem and pointed leaf edging were added with variegated embroidery floss.

The jacket was lined with a solid moss-green fabric and I made bias tape to sew around the raw edges.

Buttons and button holes came next.

This little guy is ready for cool days this fall.

Evan’s baby jacket

I took some time this summer to make some children’s clothes for my friends who are having babies. This little chinese style padded jacket is for Evan, who is 8 months old. I found some batik fabric that looked like a grassy meadow, cut out the pattern and lined the pieces with cotton batting. Then I embroidered his name on a scrap of contrasting batik fabric.

Then, I cut the scrap into a leaf shape, turned it under, and appliqued it to the jacket front piece. I added a stem and vein to the leaf and stitched a pointed tooth edging around the leaf.

I then sewed the pattern pieces together and made a lining out of a different cotton fabric.

I finished the outside edges with some bias tape I made from contrasting batik fabric.

I added buttons and button holes.

And sewed in a cloth label that I had left over from the days when I made felt purse kits.

It should fit the handsome little guy through the fall and winter. See another baby jacket here.

Wedding Banner (Leigh & Brendan)

The 2nd summer wedding is coming up soon, so I’m making another felt banner for Leigh and Brendan (see Karen & Graham’s on an earlier post here). I get the impression that the bride and groom are kind of traditional, so I’m resisting the temptation to go wild with color and add too many funky embellishments.


I started by bending 32 gauge cloth-covered wire to form the names and wedding date. I’m really having fun bringing language into my artwork this way. I started figuring out this technique a few years ago when I was working on Pocketful of Posies, and have no idea if the same kind of thing has been done before. Once you get into the rhythm, the wrapping goes quite fast. After all those years wrapping fuzzy pipe cleaners with embroidery floss for fairy limbs, this seems easy.

I had to put in some color, though and wrapped the wire names in bright pink variegated embroidery floss. The couple’s invitation had a seaside motif, so I added a metal shell charm and got out a dried star fish from my collection of found objects. The dark blue and had too much weight compared to the names, so I lightened it by winding around a single strand of pink floss.

After bending and wrapping the characters for the date, I cut out a piece of yellow felt to mount them on. I don’t make patterns and plan everything out ahead of time, but construct as I go. I always start with the lettering and then figure out later how much room they’re going to need.

Then, I had to figure out how to place everything on the purple blue felt background. At this point, I realized that the star fish didn’t have anything to offer and would have to go. I go through this editing process often, latching onto some interesting found object and then seeing that it has served its purpose of moving the design along and is no longer needed. A writer friend describes the revision process the same way. She said, “You have to be willing to let go of favorite words and phrases.”

I decided to incorporate a more conventional floral decoration and added some of Mimi’s Kirchner’s felt roses and some glass leaf beads. If you haven’t learned how to make them yet, go to her tutorial on her blog here. I also got out the dreaded glue because that was the only way to attach some shells around the date. The yellow felt piece called out for some embellishment, so I added a chain-stitched loopy line around it.

Then, I cut out  a banner of blue felt, with scallops on the bottom and blanket stitched all around with variegated pima cotton from the Caron Collection. I found an old shell necklace, the souvenir kind from Hawaii, and sewed some shells to the scalloped bottom edge. I was glad that they already had holes.

I sewed a casing for a drift wood stick at the top, then tied and braided a pima cotton strap.

Here’s the finished banner, ready to wrap up and bring to the wedding.

To keep up with new posts, subscribe to this blog (top right column on the home page). If you’d like to see more frequent photos tracking the projects in my studio, please follow me on Facebook and/or Instagram.

Wedding Banner (Karen & Graham)

wedbanner12WM Update: See other banners with wrapped wire lettering here

This summer I’ve been invited to two weddings, with the first being held on June 25th on Cape Cod. Both the bride and groom are  designers and I thought they would like something artsy and personal for a wedding gift. wedbannerWM I started by writing out Karen & Graham in a flowing script and then enlarging it to a lower case height of about 1/2″ . Then, using long-nosed pliers, I bent some 32 gauge cloth wrapped wire, using the hand written lettering as a guide. wedbanner2WM This is a technique that I figured out while sewing the book cover design for my children’s book, Pocketful of Posies, which you can see here. I wanted letters that were raised enough to create shadows. And because the wire was a separate flexible piece, it was easy to move the words around for proper positioning on the artwork. wedbanner3WM After determining the size of the names and their placement, I cut out a square of orange wool felt and added my customary wavy edge and some cut out holes. I then wrapped the wire with 2-ply variegated embroidery floss, hiding the knots in the back. wedbanner4WM This is where I do most of my work, on an old ironing board. The light green floss wrapped wire didn’t provide enough contrast with the background, so I wrapped a single strand of dark green floss around the wire, candy cane style. wedbanner4aWM The banner was cut out of a light teal colored wool felt that matched Karen & Graham’s invitation. Then I blanket stitched around the orange felt edges with pink variegated embroidery floss. I chose some fish beads and a heart made of bone to decorate around the wedding date. wedbanner6WM Then I made some tiny 1/4″ roses following Mimi Kirchner’s great instructions from her easy felt rose tutorial. Some silk ribbon leaves were added, too. wedbanner5WM After I figured out how much space to leave for the date and beads, I cut out the scalloped bottom edge of the banner. The outside edge was blanket stitched with some variegated pima cotton (Caron Collection). From my collection of stuff, I picked out some more beads and some beach stone pendants with holes drilled in them to hang from the scallops. wedbanner7WM I then stitched the floss wrapped wire words and numbers in place and sewed the beads and stone pendants to the banner. It needed some color on the bottom to balance the orange square on top, so I added another clump of felt roses and silk ribbon leaves. wedbanner8WM I made a sleeve of felt at the top and slipped a piece of driftwood through. After drilling 2 holes in the driftwood, I threaded some pima cotton through and braided a strap for hanging the banner. wedbanner9WM Here is the finished banner, which I hope Karen & Graham will enjoy for many years! wedbannerfinishWM

To keep up with new posts, please subscribe to this blog (top right column on the home page). Your contact info will not be sold or shared. If you’d like to see more frequent photos tracking the projects in my studio, please follow me on Facebook and/or Instagram

Felt Cat Pin tutorial

This project is from the first edition of my how-to book, Felt Wee Folk: Enchanting Projects. I showed how to make the cat pin on HGTV’s The Carol Duvall Show soon after the book came out in 2003. Here are the same pieces we used in the step-by-step demonstration on the show.

Find out about books I’ve illustrated with fabric relief here. See more cats I made of felt in an earlier post here.

feltpinscatWM

Felt Cat Pin from “Felt Wee Folk”, 2″ x 2.5″

Living without TV, I was unaware of the numerous cable craft shows and was unfamiliar with this new term “tutorial” on the internet. I’m slowly crawling out of my peaceful sewing room, but question how a person can both do their creative work and keep in touch with the vast sewing/fibers network! I suppose, like everything, it’s a question of balance. I hope that you enjoy this cat pin project and use it as a launching pad for other ideas of your own. You can read and see earlier posts about my pin business here.

FELT CAT PIN: To complete the project, you’ll need to understand how to do a blanket stitch, chain stitch, satin stitch and fly stitch.

Materials: 1″ pin back, pinking shears, embroidery needles, 2 green glass beads (about 1/4″), embroidery floss: black, brown, orange, gold, light green, wool felt: 2-1/4″ x 2″ pink, 1-1/2″ x 1-3/4″ blue, 1-1/4 x 1-1/2″ orange

CPTsuppliesWM Step 1. Cut out shapes from wool felt: orange for cat, blue for the middle layer and pink for the bottom layer.

Step 2. Sew the pin back to the bottom layer with floss or sewing thread.

CPTpinbackWM

Step 2

 Step 3. Satin stitch the cat’s nose with double strands of orange floss. With brown floss, stitch the bottom end the cat’s nose.

Step 3

Step 3

Step 4. Stitch the mouth and whiskers with double strands of brown floss. Sew the green bead eyes onto the cat face with black floss, stitching vertically to make the eye’s pupil. Stitch an outline around the bead eyes with a single strand of brown floss. With a double strand of gold floss, use a fly stitch to make cat’s stripes.

Step 4

Step 4

 Step 5: With double strands of orange floss, stitch the cat face to the blue middle piece, blanket stitching all around the outside edge of the cat face

Step 5

Step 5

Step 6. With a single strand of light green floss, chain stitch the curly queue on the blue felt, above the cat face. Then, with double strands of light green floss, blanket stitch the blue middle section onto the pink piece.

Step 7. With sharp picking shears, trim around the outside edge of the pink felt piece. You’re finished!

Step 6

Step 6

Close-ups (Cats)

Today, I’m starting a regular series called Close-ups, which will feature detailed images taken from my artwork. I’m having fun grouping different subjects for future posts. There will be close-ups from my childhood drawings, student work, sculpture, illustrations and fabric relief pieces, all presented in somewhat chronological order. The following cats are from my books, The Hollyhock Wall, Felt Wee Folk, Wee Willie Winkie and the upcoming book Pocketful of Posies.

HHWcraftcatWM

feltpinscatWM For a tutorial on how to make this cat pin, see another post here.

from

from “Wee Willie Winkie”

detail from Pocketful of Posies

from

from “Pocketful of Posies”

Note: See other posts in the Close-ups series archive here.