
 Update: See other banners with wrapped wire lettering here.
This summer I’ve been invited to two weddings, with the first being held on June 25th on Cape Cod. Both the bride and groom are designers and I thought they would like something artsy and personal for a wedding gift. 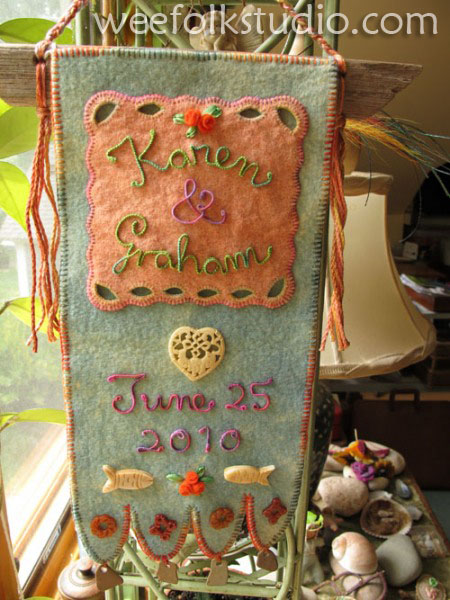 I started by writing out Karen & Graham in a flowing script and then enlarging it to a lower case height of about 1/2″ . Then, using long-nosed pliers, I bent some 32 gauge cloth wrapped wire, using the hand written lettering as a guide.
 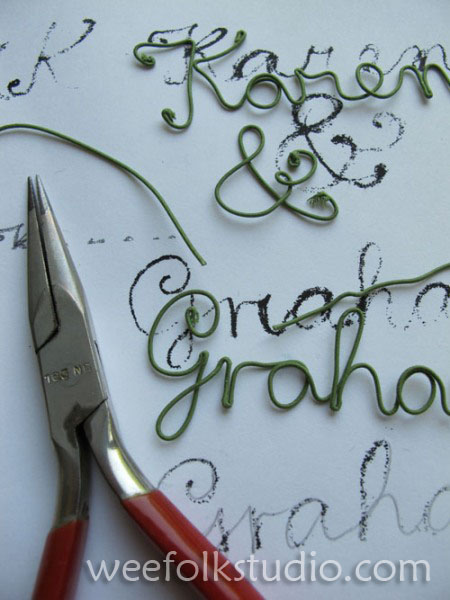 This is a technique that I figured out while sewing the book cover design for my children’s book, Pocketful of Posies, which you can see here. I wanted letters that were raised enough to create shadows. And because the wire was a separate flexible piece, it was easy to move the words around for proper positioning on the artwork.
  After determining the size of the names and their placement, I cut out a square of orange wool felt and added my customary wavy edge and some cut out holes. I then wrapped the wire with 2-ply variegated embroidery floss, hiding the knots in the back.
  This is where I do most of my work, on an old ironing board.
  The light green floss wrapped wire didn’t provide enough contrast with the background, so I wrapped a single strand of dark green floss around the wire, candy cane style.
 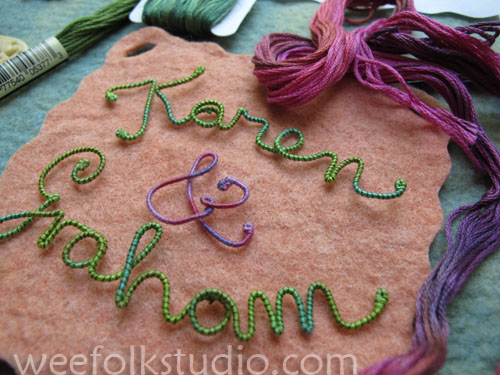 The banner was cut out of a light teal colored wool felt that matched Karen & Graham’s invitation. Then I blanket stitched around the orange felt edges with pink variegated embroidery floss. I chose some fish beads and a heart made of bone to decorate around the wedding date.
 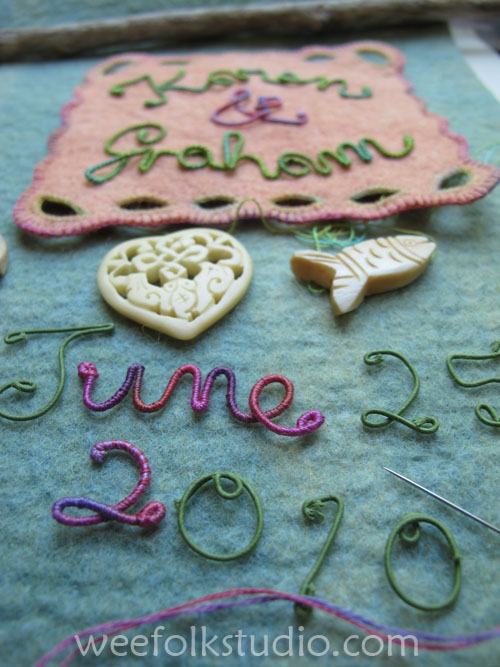 Then I made some tiny 1/4″ roses following Mimi Kirchner’s great instructions from her easy felt rose tutorial. Some silk ribbon leaves were added, too.
  After I figured out how much space to leave for the date and beads, I cut out the scalloped bottom edge of the banner. The outside edge was blanket stitched with some variegated pima cotton (Caron Collection). From my collection of stuff, I picked out some more beads and some beach stone pendants with holes drilled in them to hang from the scallops.
  I then stitched the floss wrapped wire words and numbers in place and sewed the beads and stone pendants to the banner. It needed some color on the bottom to balance the orange square on top, so I added another clump of felt roses and silk ribbon leaves.
  I made a sleeve of felt at the top and slipped a piece of driftwood through. After drilling 2 holes in the driftwood, I threaded some pima cotton through and braided a strap for hanging the banner.
  Here is the finished banner, which I hope Karen & Graham will enjoy for many years!
To keep up with new posts, please subscribe to this blog (top right column on the home page). Your contact info will not be sold or shared. If you’d like to see more frequent photos tracking the projects in my studio, please follow me on Facebook and/or Instagram

Hi Salley,
Wow, this is such a beautiful treasure! I’m sure your friends will cherish it always.
I’m so glad I *finally* found your website & blog! Many years ago, I saw one of your books in passing, but I never caught your name, or even the name of the book, but your work is very distinctive and I’ve kept my eye out ever since. When I happened across your site yesterday I was so happy! Now I can catch up on all your wonderful artwork (I think you’re amazing!!), see your books again and keep up with all your beautiful, new creations as they happen! It’s terrific, I love the internet sometimes!!
So happy that I can be a fan, now that I’ve found your blog and website! I’ve posted a link on my own little blog, I hope you don’t mind.
I look forward to many happy returns!
Lisa
Welcome, Lisa. Yes, I agree that a positive side to the internet is the ability to make connections with other like-minded people. And, of course it’s fine to put a link on your blog!
Salley,
What a fabulous and original gift, I love to receive something someone has made just for me. You are so creative and your imagination is amazing.
I do hope that your wrist has healed completely.
Jenny
The couple is going to be delighted with this gift. It is so personal and charming. It is so interesting to hear how you go about making your design decisions when you are creating. Thank you!
Thank you to share with us this nice “pas à pas” creation.
A very great present !!
I love the sound of “pas à pas”–so much more artistic sounding than step-by-step.
What a fabulous and highly personal gift! I’m sure that Karen and Graham will treasure it always.
Wow–that is spectacular! What a wonderful gift. You really put a lot of work.. and imagination into it. The Cape Cod references are perfect! So many personal touches! They will treasure this gift for sure.
I love the way you did the lettering- it is such a beautiful gift.
Superb and the wire idea for lettering…
very clever.How could they not treasure
such a splendid heartfelt gift.
What a loving and personal gift this was! Thanks for sharing your wording technique. I think it turned out beautifully and so very wonderfully YOU!
Beautiful; a cherished keepsake for this fortunate couple. Thank-you for sharing the finished product, and the making of it 🙂
Beth
it was lovely reading about your process in creating this piece…as always, each detail is so well thought out and considered. i would absolutely cry to receive such a gift made with so much love.
What a treasure!
What a lovely way to commemorate such a special occasion !
Очень красиво, напишите пожалуйста чем вы набиваете игрушки – подушки.
Thank you so much for sharing how you made those fabulous letters. What a gorgeous piece. The colours are breathtaking!
a very original and lovely gift, I’d love to receive something handmade like this. =) Thank you for sharing!
saw this on pinterest..and came to see the whole post. love it!
How delightful to see all these special gifts, with so much heart and soul! They are beautiful! Nancy
Thank you for sharing that beautiful method of making text! It’s lovely and so inspiring.
Who wouldn’t love to receive that banner?! Just terrific!
This looks wonderful! They must have loved this gift!
Time consuming perhaps, but oh so worth it! Saw this pinned on my weekly pinterest email.
Thanks for the inspiration, just beautiful.
Debbie 🙂
You’re so talented. Never saw anything like this. Simply beautiful.
‘
AMEI SEU TRABALHO, PARABÉNS…
This is very nice. I had to post because this is way too funny!!!!! My name is Karen Graham….hahahaha
Wow that is beautiful!