
This is part 3 in a series of posts about my new embroidered bas-relief piece Cover Up. In part 1 and part 2, the collection of “covered” women are introduced and discussed. Now, I will show how the pieced felt background was made. There’s also a short video my husband Rob filmed, which shows me stitching various stages of the project.
UPDATED series of posts with photos and commentary about making Cover Up:
Cover Up (part 1), Cover Up (part 2), Cover Up (part 3 and video), Cover Up (part 4), Cover Up (part 5).
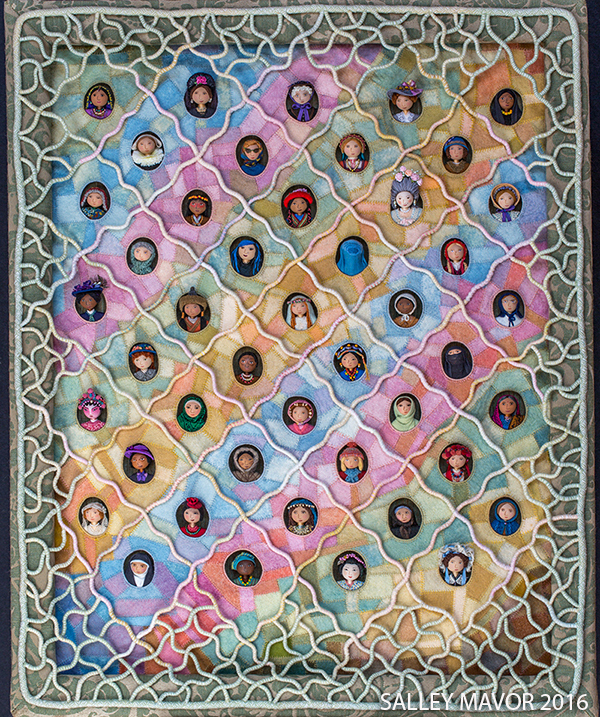
I knew that the piece would be populated with portraits of women, with each peering through an oval opening, but I didn’t know how many characters would be included. I did some simple drawings to get an idea of its composition and proportions and then calculated that 45 portraits would have enough breathing room within the 24″ x 30″ size. As you can see in this sketchbook page, there were lots of possibilities for border treatment.

The background needed to be done in a way that would compliment the portraits and not compete with the detail of the individual women. I also wanted the colors and design to work from a distance and also entice viewers to take a closer look.
I grouped my felt scraps in piles according to color and pieced them together crazy quilt style in diagonal strips according to their hue. It was done in a similar way to the beard in Whiskers. I find that large solid colors can be too overpowering and simplistic, whereas breaking up the field into small parts brings a softer, more natural appearance. I guess it’s more like impressionist art that way. I used plant dyed wool/rayon felt that I bought years ago from Textile Reproductions. Unfortunately it is no longer being produced, so every little piece is as good as gold.

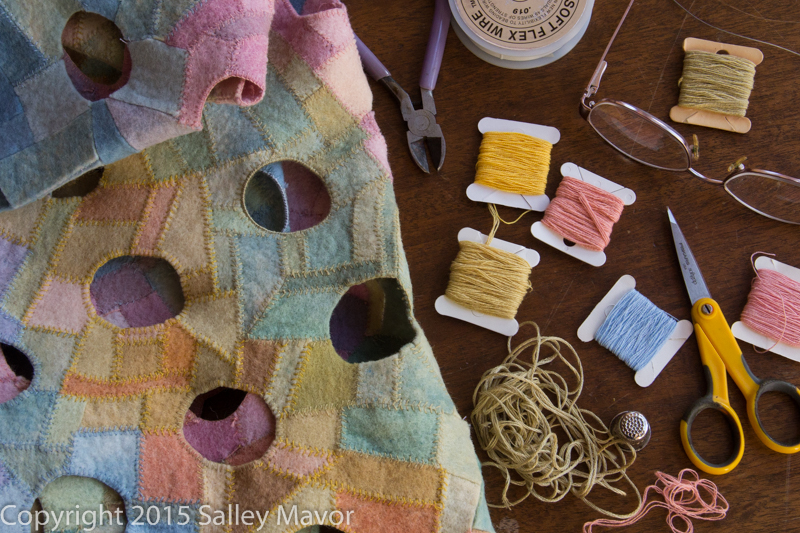
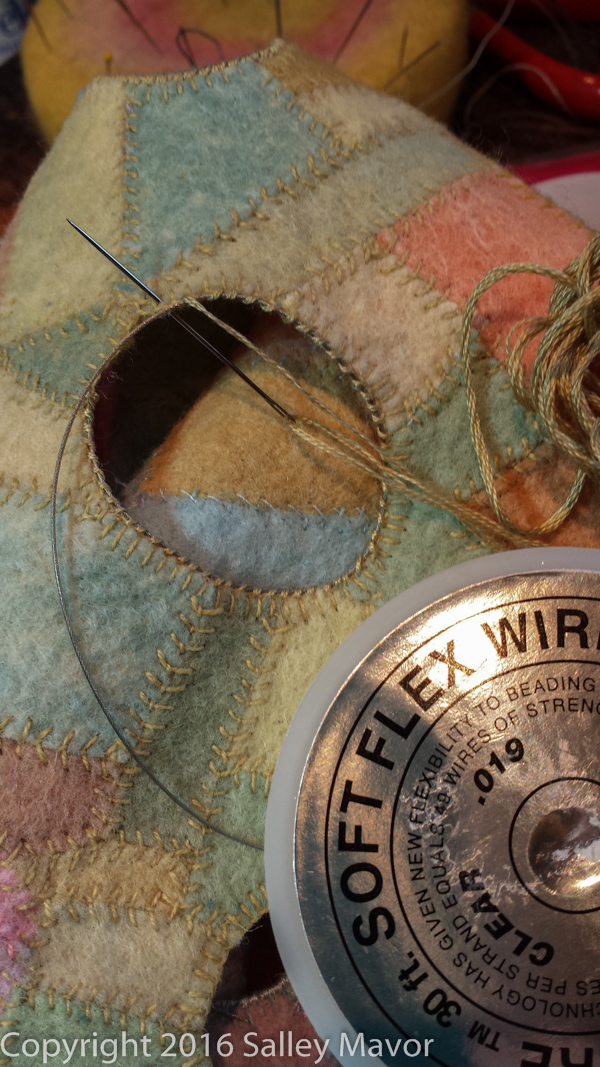
The odd-shaped pieces are held together on the back with a simple slip stitch. On the front, I used a fly stitch to join and outline the felt pieces. Here’s a video of some of the stitching:

It was great winter project, which I worked on through the holidays and into the new year.

I used Soft Flex beading wire to outline the holes and give them a clean edge and some structure.

I had fun playing around with the arrangement of the women.
Before sewing the portrait heads in their holes, I sewed the pieced felt background to a stretcher frame covered with upholstery fabric.
The next post (part 4) will show the process of making the border for Cover Up. Read Cover Up (part 1) here and (part 2) here.

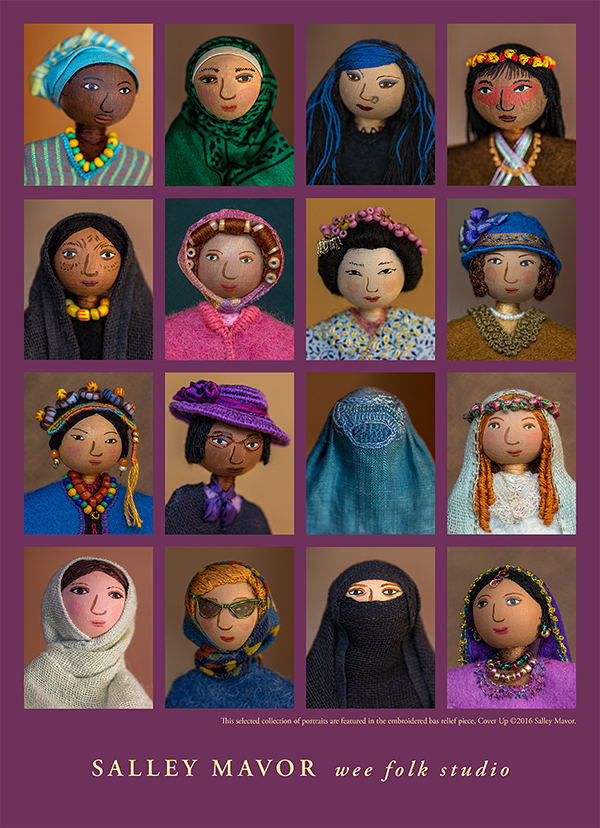
12 x 17 posters featuring of a selected group of portraits from Cover Up are available in my Etsy Shop here.
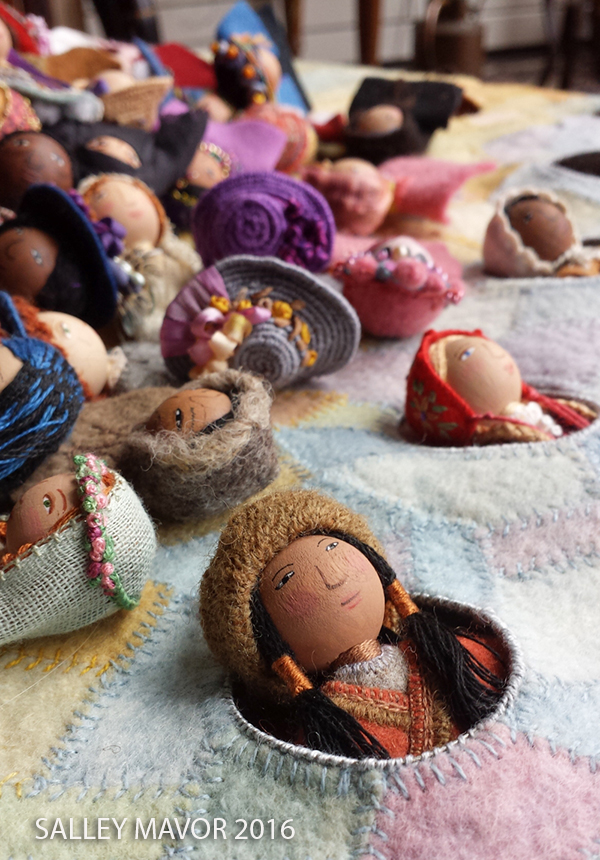
Cover Up is part of a series that includes Face Time and Whiskers, which focus on bringing to life different people from around the world, using themes of history, style and cultural identity. In each piece, head and shoulder busts peek out of “cameo” framed holes. Their faces are painted 20mm wooden beads, with wigs and adornments, similar to the doll heads in my how-to book Felt Wee Folk – New Adventures.
To keep up with new posts, please subscribe to this blog Your contact info will not be sold or shared. If you’d like to see more frequent photos tracking the projects in my studio, please follow me on Facebook and/or Instagram.

Hi Salley,
Your attention to every little detail is amazing! I love the fact that you shared with us the use of the beading wire around the openings (genius!!) so that your edges stay perfect when the little heads are placed behind them. All of your crazy quilting is glorious—your use of those tiny pieces is wonderful. I’m like you, when I know I have the last bits of a treasured fabric; I treat the remnants with the attitude that they are “gold” because I know once the last piece is sewn, that fabric is gone for good. Thanks, too, for allowing us to see your process on this latest beautiful art piece; as well as Whiskers. I can’t imagine the amount of research you did to bring these collective works together….awesome attention to detail can hardly describe the work that you put into your art. Who knew a little wood bead, some felt and floss could result into such incredible tiny masterpieces? Thank you.
Thanks for your kind and thoughtful words Jude!
It is so nice to see how you are working.
I really love your works.
Heidi
(Netherland))
I am so excited to see your work in RI! Thank you for explaining your process.
Salley,
I love this piece. All the different types of women in the world. All very ingenious and looks like a lot of hours of work. But worth it. Congratulations.
Ann B. >
Sally, what diameter is the cord or electrical cord please? Thanks susie
Sure, Susie. It’s 18, 20 and 22 gauge wire.
Sally, Thankyou for that. Have the best day sewing. Susie
I would like to see the faces of little children who are given one of your realistic and charming small dolls. Like the first Christmas my older sister and I received a doll house made by Great Uncle Si, and my grandmother’s small doll house dolls, we were so happy. thanks for your web page, well done